> ## Documentation Index
> Fetch the complete documentation index at: https://cloud-architect.ipoint-labs.com/llms.txt
> Use this file to discover all available pages before exploring further.
# Cross Region Image Viewer using VPC Peering
> Hands-on lab · 30m
Launch this lab in the IP Lab Portal, then follow the steps below in the AWS console.
Open IP Lab Portal
## Overview
### Project Details
1. This hands-on project guides you through building a secure, cost-optimized, **real-world cross-region image viewer application** using AWS services like **VPC Peering, S3 Gateway Endpoints, EC2 and IAM**.
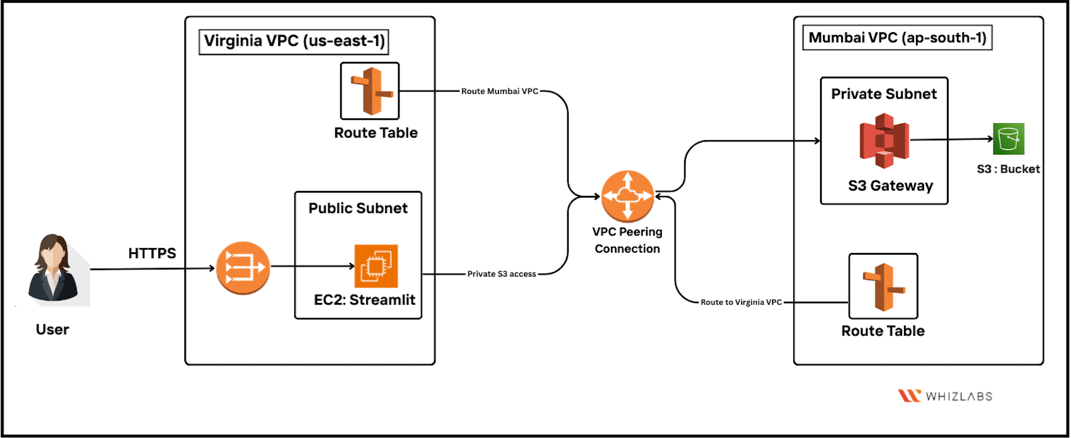
2. You will create two isolated VPCs in different AWS regions **(Mumbai & Virginia)**, peer them together using **Inter-Region VPC Peering**, and configure private access to an S3 bucket using VPC Gateway Endpoints. A **Streamlit web app** hosted on EC2 in Virginia will securely fetch and display images stored in a private S3 bucket in Mumbai, without using the public internet.
3. This intermediate-to-advanced level lab helps learners simulate a **SaaS-style multi-region cloud architecture**, apply real-world network security best practices, and understand how private AWS communication can prevent data breaches happened in some healthcare companies.
4. Duration: **1 Hour 30 Minutes**
5. AWS Region: **US East (N. Virginia) us-east-1, Asia Pacific (Mumbai) ap-south-1**
### Introduction
#### Amazon S3 :
* **Amazon S3** is a secure, durable, and highly scalable object storage service provided by AWS. It allows users to store and retrieve any amount of data from anywhere, making it ideal for storing images, videos, backups, and application data.
* In this project, S3 is used to store image files privately in the Mumbai region (ap-south-1). These images are **not publicly accessible** and are retrieved securely from a peered VPC using **S3 Gateway VPC Endpoints**, ensuring private communication over AWS’s internal backbone network.
#### Amazon VPC :
* **Amazon VPC** allows you to provision a logically isolated network in the AWS Cloud. You can define your own IP ranges, subnets, route tables, and gateways, and configure peering connections between VPCs across regions.
* In this lab, two VPCs are created - one in **Mumbai (BackendVPC)** and one in **Virginia (FrontendVPC)**. They are connected using **Inter-Region VPC Peering**, allowing **private, region-to-region communication** between services like EC2 and S3 without exposing traffic to the public internet.
#### Amazon EC2 :
* **Amazon EC2** provides scalable compute capacity in the AWS Cloud, enabling users to run virtual servers on-demand.
* In this project, an EC2 instance is launched in Virginia to host a **Streamlit web application**. The app securely fetches and displays images stored in the private S3 bucket in Mumbai, leveraging the **VPC peering connection** for secure, private data transfer.
#### Case Study
##### Cyberattack in a Foreign Healthcare Organization:
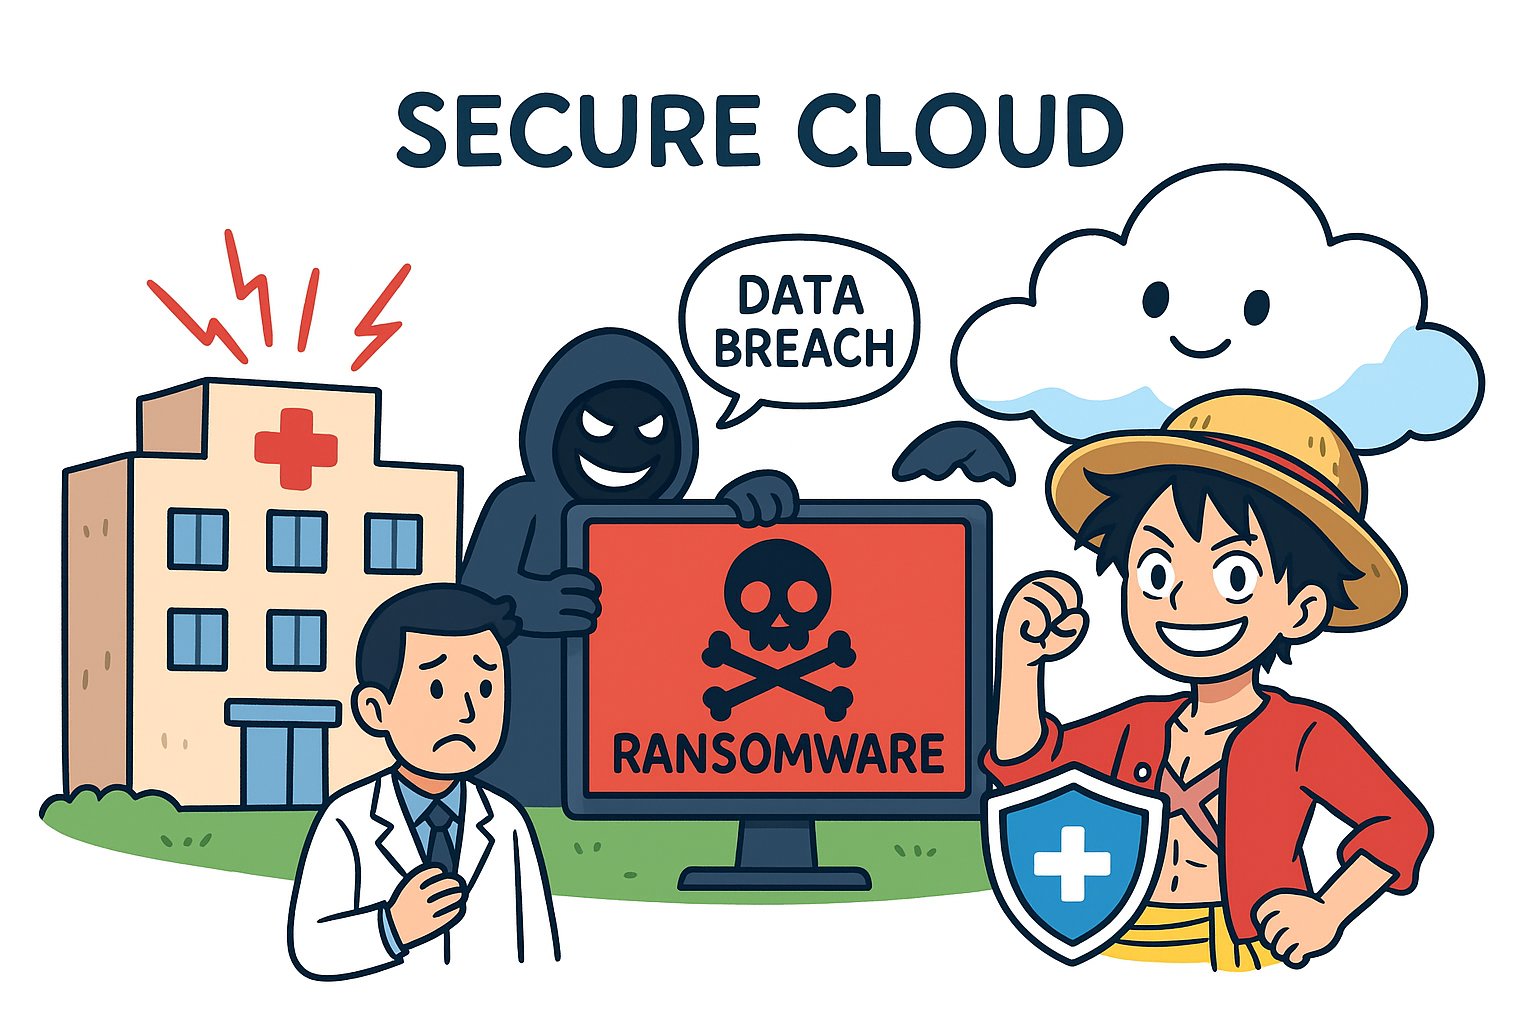
* In early 2024, a major healthcare organization in a foreign country faced one of the largest ransomware attacks in the sector’s history. Attackers exploited exposed servers, lack of network isolation, and public internet traffic to access sensitive patient data.
##### Impact of the Attack:
* Sensitive patient data was exposed, affecting millions of records.
* Healthcare operations were disrupted across multiple facilities, causing delays in treatments and prescriptions.
* The organization faced significant financial losses and additional emergency response costs.
* Critical services, such as surgeries and ongoing care, were temporarily delayed.
##### How This Project Helps
* This project demonstrates how to **build a secure, private, multi-region cloud architecture** that could prevent such attacks:
* **Private Networking:** All data transfers between regions happen via **VPC Peering and S3 Gateway Endpoints**, never using the public internet.
* **Regional Isolation:** Only peered VPCs can access the data, so compromise in one region does not affect the other.
* **Access Control:** S3 bucket policies and IAM roles enforce **least privilege access**, preventing unauthorized entry even if credentials are stolen.
* **Decentralized Architecture:** No single point of failure; each region functions independently.
##### What You Can Learn from This Project
* How to set up **VPCs and subnets in multiple regions** and configure **inter-region VPC peering**.
* How to **securely access private S3 buckets** using **VPC Gateway Endpoints**.
* How to deploy a **web application (Streamlit)** on EC2 that interacts with resources across regions securely.
* How to **apply real-world cloud networking security best practices** and cost optimization techniques.
##### Key Features of This Project
* **Secure Image Sharing Across Regions:** Fetch and display images without exposing data to the public internet.
* **Cost-Efficient Architecture:** Avoids expensive VPNs, NAT Gateways, or S3 replication.
* **Hands-On Multi-Region Setup:** Teaches core AWS networking skills including route tables, peering, and private endpoints.
* **Real-World SaaS Simulation:** Mimics how global organizations share sensitive content securely.
 #### Architecture Diagram
 ### Project Task
1. Sign in to AWS Management Console
2. Milestone 1: VPC Setup for Multi-Region VPC Peering
3. Milestone 2: S3 Setup in Mumbai (Backend)
4. Milestone 3: Inter-Region VPC Peering Setup
5. Milestone 4: EC2 Setup in Virginia (Frontend Viewer App)
### Project Launching Environment
1. To launch the Project environment, click on the **Start Project** button.
2. Please wait until the cloud environment is provisioned. It will take less than a minute to provision.
3. Once the lab is started, you will be provided with **IAM username, Password, Access Key and Secret Access Key**.
> **Note:** You can only start one lab at any given time.
## Lab guide
### Project Steps
##### Task 1: Sign in to AWS Management Console
1. Click on the **Open Console** button, and you will get redirected to AWS Console in a new browser tab.
2. On the AWS sign-in page,
* Leave the **Account ID** as default. Never edit/remove the 12-digit Account ID present in the AWS Console. Otherwise, you cannot proceed with the lab.
* Now copy your **Username** and **Password** in the lab Console to the **IAM Username and Password** in AWS Console and click on the **Sign in** button.
3. Once Signed in to the AWS Management Console, Make the default AWS Region as **US East (N. Virginia) us-east-1**.
#### Milestone 1: VPC Setup for Multi-Region VPC Peering
In this milestone, you will create two **Virtual Private Clouds (VPCs)** in different AWS regions. These VPCs will later be connected using VPC Peering for secure, cross-region communication.
* **Region: Virginia (us-east-1)** : FrontendVPC (hosts EC2 web app)
* **Region: Mumbai (ap-south-1)** : BackendVPC (hosts S3 bucket + S3 endpoint)
##### Task 2: Create a VPC in Virginia (us-east-1)
This VPC will be used to host the **frontend EC2 instance (web server)**.
1. Navigate to the **VPC Dashboard** in the AWS Console.
2. Make sure you are in region to **N. Virginia (us-east-1)**.
3. Click **Create VPC** and then Select **VPC Only**.
4. Enter the following details:
* **Name**: FrontendVPC
* **IPv4 CIDR block:** 10.0.0.0/16
* **IPv6 CIDR block:** None (default)
* **Tenancy:** Default
5. Click **Create VPC**.
### Project Task
1. Sign in to AWS Management Console
2. Milestone 1: VPC Setup for Multi-Region VPC Peering
3. Milestone 2: S3 Setup in Mumbai (Backend)
4. Milestone 3: Inter-Region VPC Peering Setup
5. Milestone 4: EC2 Setup in Virginia (Frontend Viewer App)
### Project Launching Environment
1. To launch the Project environment, click on the **Start Project** button.
2. Please wait until the cloud environment is provisioned. It will take less than a minute to provision.
3. Once the lab is started, you will be provided with **IAM username, Password, Access Key and Secret Access Key**.
> **Note:** You can only start one lab at any given time.
## Lab guide
### Project Steps
##### Task 1: Sign in to AWS Management Console
1. Click on the **Open Console** button, and you will get redirected to AWS Console in a new browser tab.
2. On the AWS sign-in page,
* Leave the **Account ID** as default. Never edit/remove the 12-digit Account ID present in the AWS Console. Otherwise, you cannot proceed with the lab.
* Now copy your **Username** and **Password** in the lab Console to the **IAM Username and Password** in AWS Console and click on the **Sign in** button.
3. Once Signed in to the AWS Management Console, Make the default AWS Region as **US East (N. Virginia) us-east-1**.
#### Milestone 1: VPC Setup for Multi-Region VPC Peering
In this milestone, you will create two **Virtual Private Clouds (VPCs)** in different AWS regions. These VPCs will later be connected using VPC Peering for secure, cross-region communication.
* **Region: Virginia (us-east-1)** : FrontendVPC (hosts EC2 web app)
* **Region: Mumbai (ap-south-1)** : BackendVPC (hosts S3 bucket + S3 endpoint)
##### Task 2: Create a VPC in Virginia (us-east-1)
This VPC will be used to host the **frontend EC2 instance (web server)**.
1. Navigate to the **VPC Dashboard** in the AWS Console.
2. Make sure you are in region to **N. Virginia (us-east-1)**.
3. Click **Create VPC** and then Select **VPC Only**.
4. Enter the following details:
* **Name**: FrontendVPC
* **IPv4 CIDR block:** 10.0.0.0/16
* **IPv6 CIDR block:** None (default)
* **Tenancy:** Default
5. Click **Create VPC**.
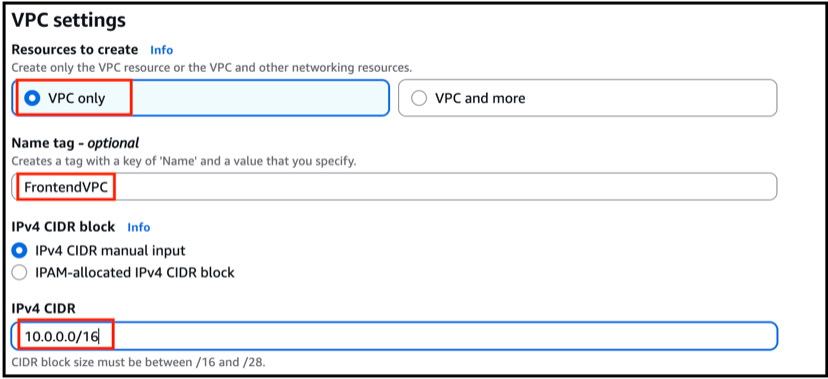 * You have now created the **Frontend VPC in Virginia**.
##### Task 3: Configure Public Subnet, Internet Gateway, and Route Table (Virginia)
* In this step, you will configure the **FrontendVPC** so that the EC2 instance can be accessed publicly over the Internet
###### Step 1: Create a Public Subnet
1. Navigate to **VPC Dashboard**, Click on **Subnets** in the left side of the Panel
2. Click **Create Subnet**.
3. Fill in the following details:
* **VPC**: Choose **FrontendVPC**
* **Subnet Name**: Frontend-Public-Subnet
* **Availability Zone**: us-east-1a
* **CIDR block**: 10.0.1.0/24
4. Click **Create Subnet**.
* You have now created the **Frontend VPC in Virginia**.
##### Task 3: Configure Public Subnet, Internet Gateway, and Route Table (Virginia)
* In this step, you will configure the **FrontendVPC** so that the EC2 instance can be accessed publicly over the Internet
###### Step 1: Create a Public Subnet
1. Navigate to **VPC Dashboard**, Click on **Subnets** in the left side of the Panel
2. Click **Create Subnet**.
3. Fill in the following details:
* **VPC**: Choose **FrontendVPC**
* **Subnet Name**: Frontend-Public-Subnet
* **Availability Zone**: us-east-1a
* **CIDR block**: 10.0.1.0/24
4. Click **Create Subnet**.
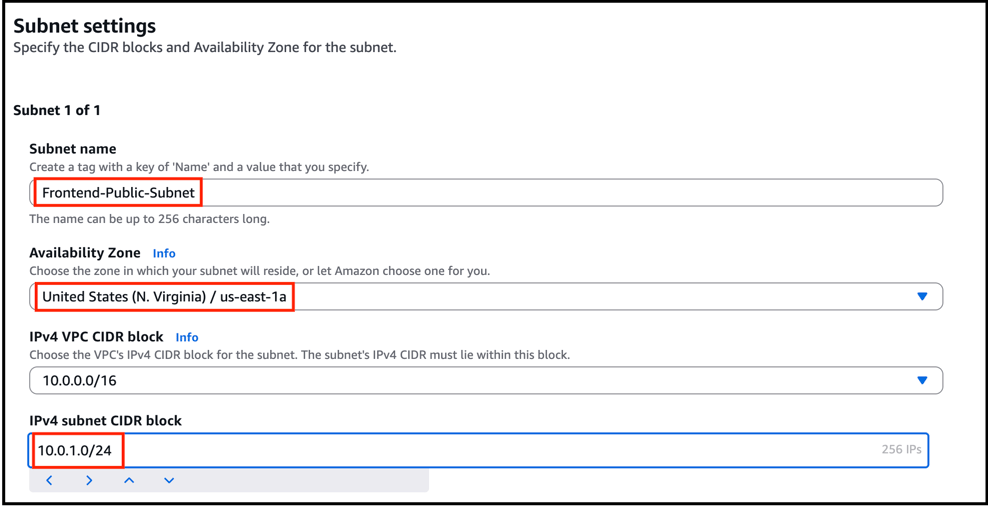 * You have created a public subnet inside **FrontendVPC**.
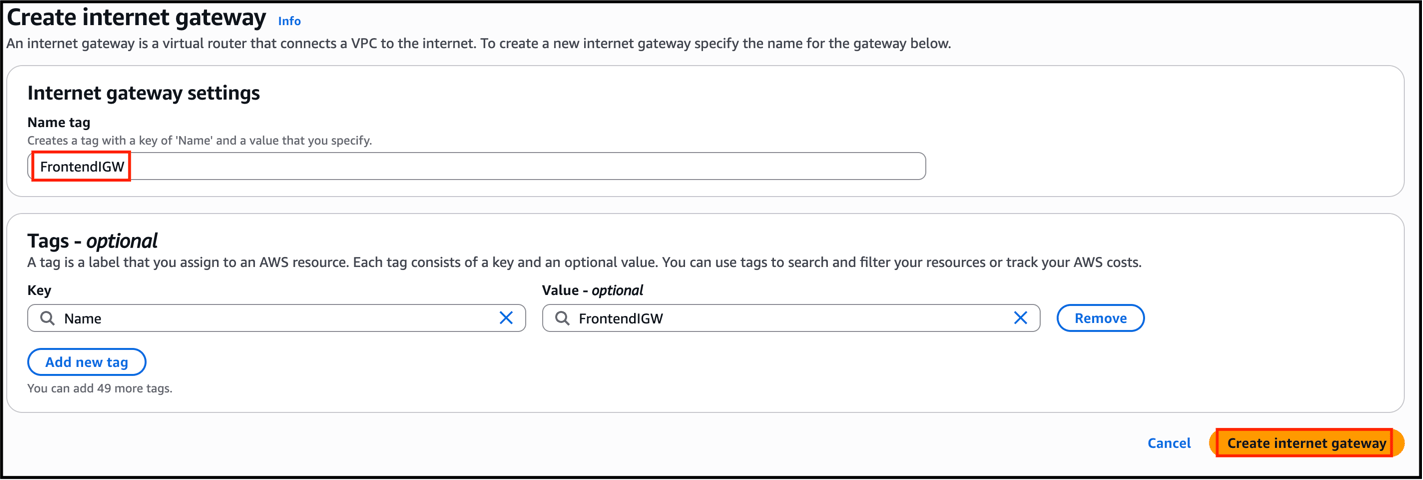
###### Step 2: Create and Attach an Internet Gateway
1. Go to **VPC Dashboard**, Select **Internet Gateways** in the left side of the panel
2. Click **Create Internet Gateway**.
3. Enter the name: **FrontendIGW**.
4. Click **Create**.
5. Select the newly created IGW, Select Attach to VPC, then choose **FrontendVPC**.
6. Internet Gateway is now **attached to FrontendVPC**.
* You have created a public subnet inside **FrontendVPC**.
###### Step 2: Create and Attach an Internet Gateway
1. Go to **VPC Dashboard**, Select **Internet Gateways** in the left side of the panel
2. Click **Create Internet Gateway**.
3. Enter the name: **FrontendIGW**.
4. Click **Create**.
5. Select the newly created IGW, Select Attach to VPC, then choose **FrontendVPC**.
6. Internet Gateway is now **attached to FrontendVPC**.
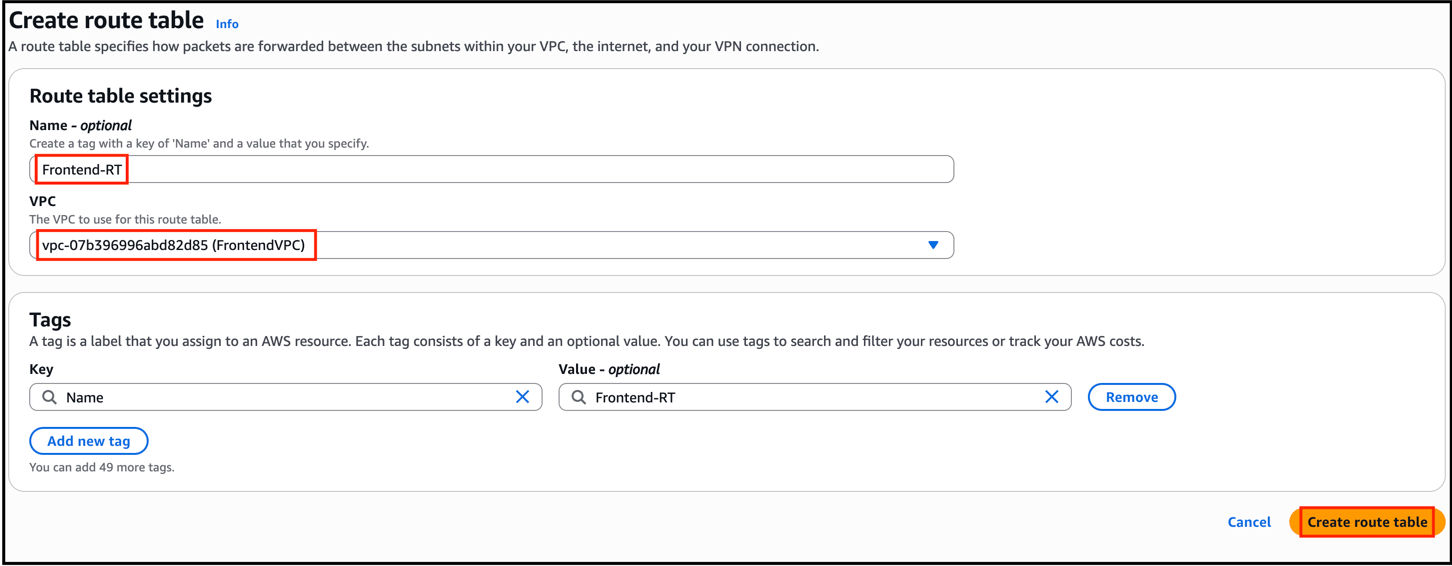
 ###### Step 3: Configure Route Table for Public Subnet
1. Go to **VPC Dashboard**, Select **Route Tables** in the left side of the panel
2. Click **Create Route Table**.
3. Enter details:
* Name: **Frontend-RT**
* VPC: Choose **FrontendVPC**
4. Click **Create Route Table**.
###### Step 3: Configure Route Table for Public Subnet
1. Go to **VPC Dashboard**, Select **Route Tables** in the left side of the panel
2. Click **Create Route Table**.
3. Enter details:
* Name: **Frontend-RT**
* VPC: Choose **FrontendVPC**
4. Click **Create Route Table**.
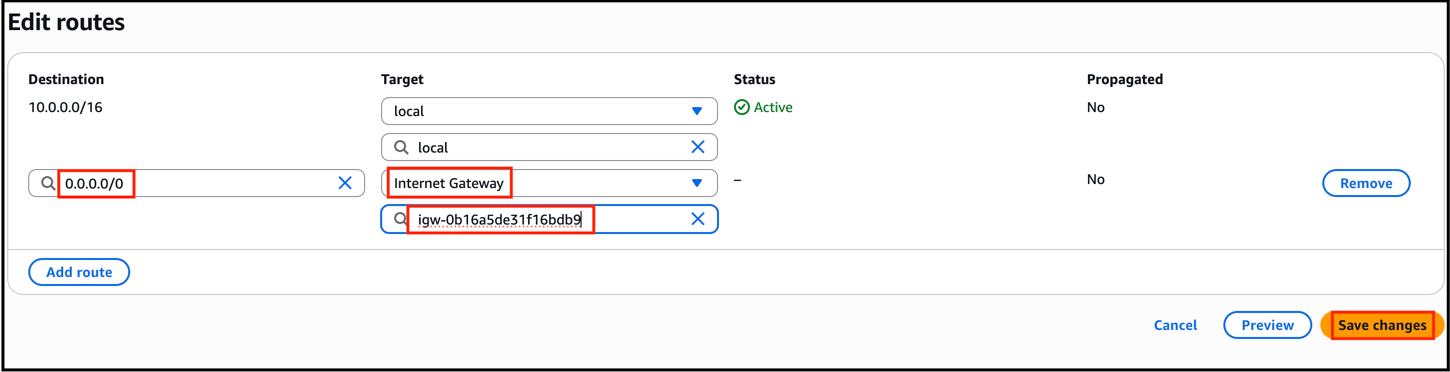
 5. Select the **route table,** go to **Routes**, Click on **Edit routes** , then Add route:
* Destination: **0.0.0.0/0**
* Target: **FrontendIGW**
* Click **Save**.
5. Select the **route table,** go to **Routes**, Click on **Edit routes** , then Add route:
* Destination: **0.0.0.0/0**
* Target: **FrontendIGW**
* Click **Save**.
 6. Go to **Subnet Associations**, Click on **Edit subnet associations**.
* Select **Frontend-Public-Subnet**.
* **Save** changes.
6. Go to **Subnet Associations**, Click on **Edit subnet associations**.
* Select **Frontend-Public-Subnet**.
* **Save** changes.
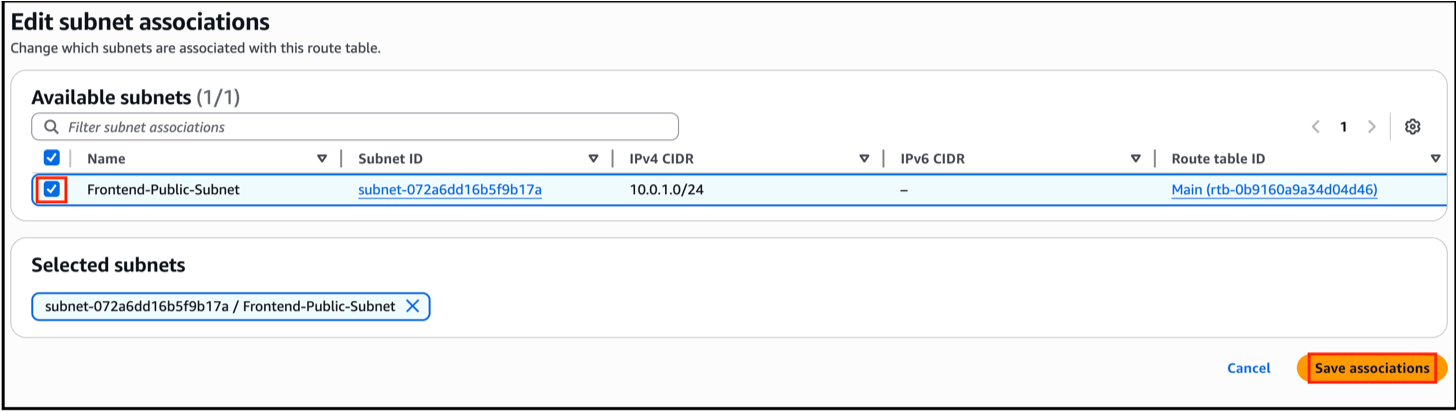 * The public subnet now routes Internet-bound traffic via **FrontendIGW**.
##### Task 4: Create Backend VPC in Mumbai
1. Open the **VPC Dashboard** in the AWS Console.
2. Switch the region to **Mumbai (ap-south-1)**.
3. Click **Create VPC**, Select **VPC Only**.
4. Enter the following details:
* Name: **BackendVPC**
* IPv4 CIDR block: **10.1.0.0/16**
* Enable **DNS Hostnames** and **DNS Resolution**
5. Click **Create VPC**.
* The public subnet now routes Internet-bound traffic via **FrontendIGW**.
##### Task 4: Create Backend VPC in Mumbai
1. Open the **VPC Dashboard** in the AWS Console.
2. Switch the region to **Mumbai (ap-south-1)**.
3. Click **Create VPC**, Select **VPC Only**.
4. Enter the following details:
* Name: **BackendVPC**
* IPv4 CIDR block: **10.1.0.0/16**
* Enable **DNS Hostnames** and **DNS Resolution**
5. Click **Create VPC**.
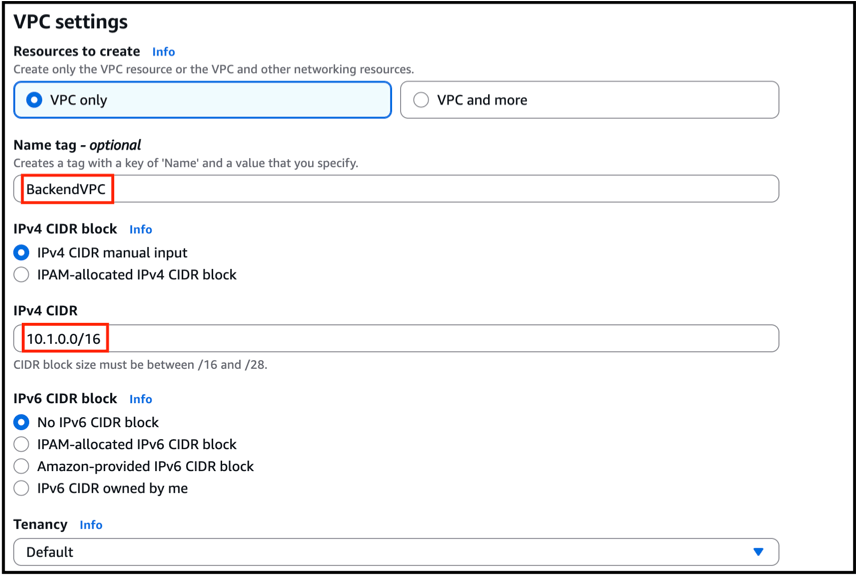 * You have created the **BackendVPC** in Mumbai.
##### Task 5: Create Private Subnet and Route Table (Mumbai)
###### Step 1: Create a Private Subnet
1. Go to **VPC Dashboard**, Click **Subnets**
2. Choose **Create Subnet**.
3. Enter details:
* VPC: **BackendVPC**
* Subnet Name: **Backend-Private-Subnet**
* Availability Zone: **ap-south-1a**
* CIDR block: **10.1.1.0/24**
4. Click **Create Subnet**.
* You have created the **BackendVPC** in Mumbai.
##### Task 5: Create Private Subnet and Route Table (Mumbai)
###### Step 1: Create a Private Subnet
1. Go to **VPC Dashboard**, Click **Subnets**
2. Choose **Create Subnet**.
3. Enter details:
* VPC: **BackendVPC**
* Subnet Name: **Backend-Private-Subnet**
* Availability Zone: **ap-south-1a**
* CIDR block: **10.1.1.0/24**
4. Click **Create Subnet**.
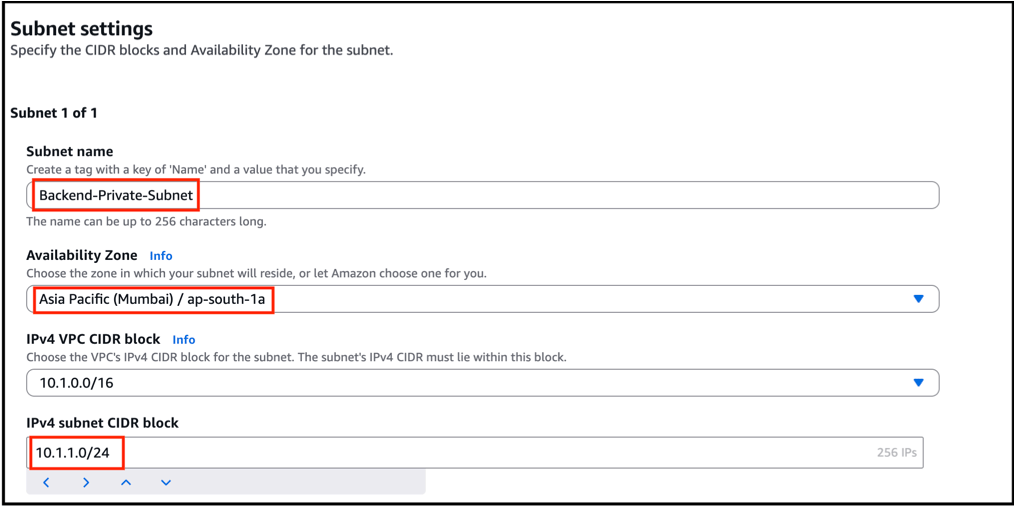 * Private subnet created inside **BackendVPC**.
###### Step 2: Create a Route Table
1. Navigate to **VPC Dashboard, Click Route Tables from the left side of the panel**
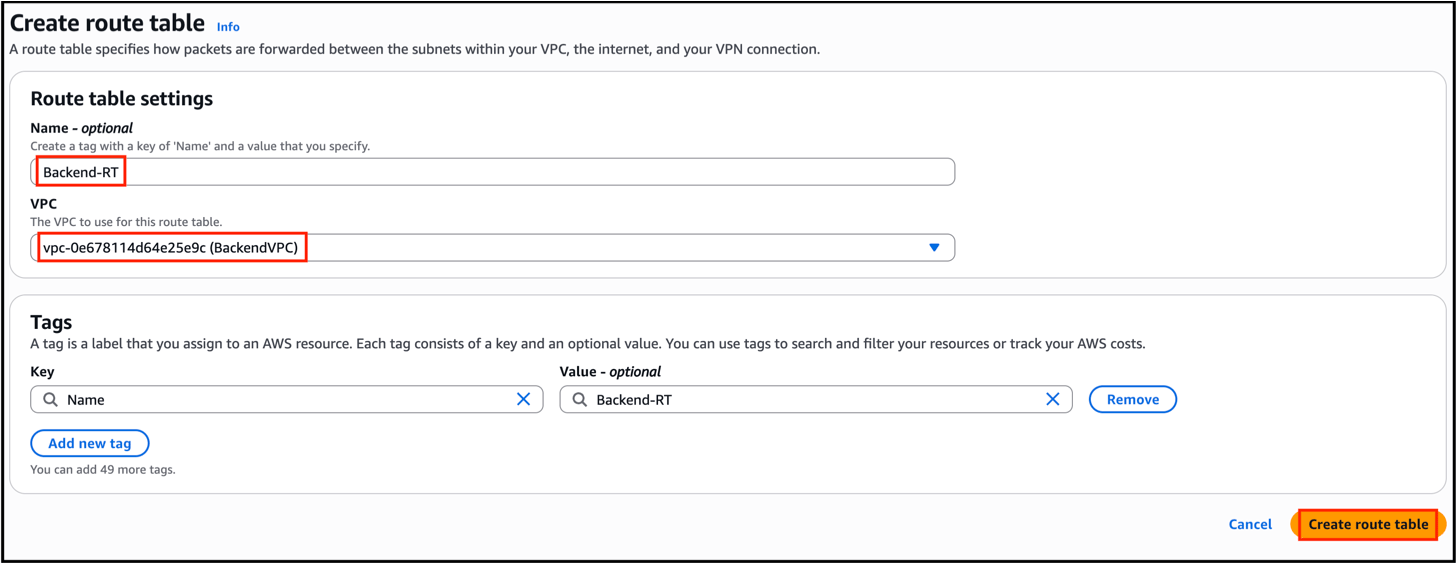
2. Choose **Create Route Table**.
3. Enter details:
* **Name:** Backend-RT
* **VPC:** BackendVPC
4. Click **Create Route Table**.
* Private subnet created inside **BackendVPC**.
###### Step 2: Create a Route Table
1. Navigate to **VPC Dashboard, Click Route Tables from the left side of the panel**
2. Choose **Create Route Table**.
3. Enter details:
* **Name:** Backend-RT
* **VPC:** BackendVPC
4. Click **Create Route Table**.
 5. Select the new route table, Click go to **Subnet Associations and choose Edit subnet associations**.
* Select **Backend-Private-Subnet**.
* **Save** changes.
5. Select the new route table, Click go to **Subnet Associations and choose Edit subnet associations**.
* Select **Backend-Private-Subnet**.
* **Save** changes.
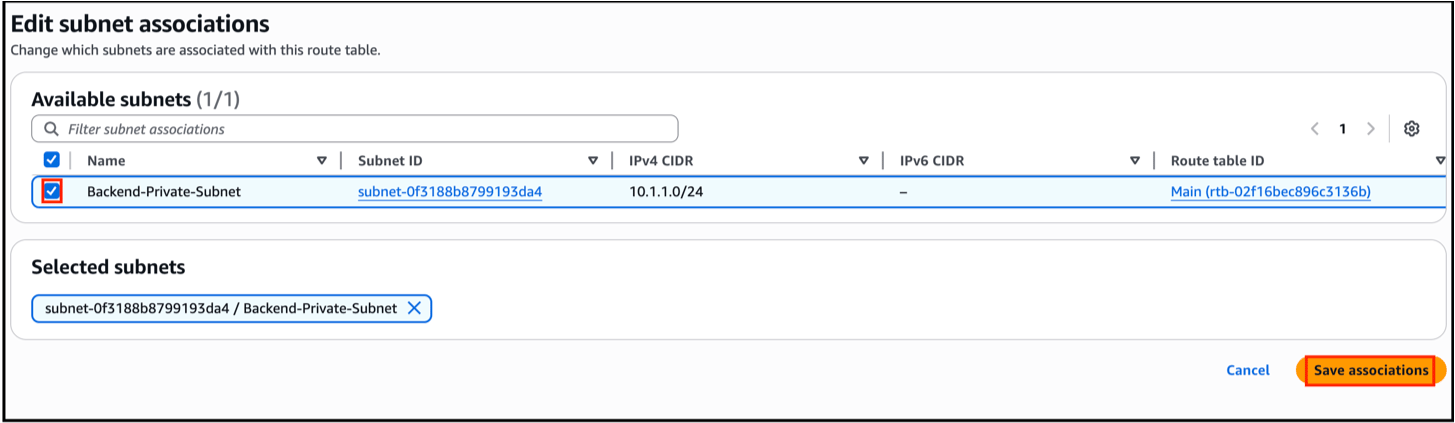 * **Backend private subnet** is now associated with its route table.
##### Task 6: Create S3 VPC Endpoint (Private Access)
To allow the EC2 in Virginia to fetch images from S3 in Mumbai **without Internet**, you will use a **Gateway VPC Endpoint**.
1. Go to **VPC Dashboard**, **Choose Endpoints and click Create Endpoint**.
2. Make sure you're in Mumbai Region.
3. Enter the following:
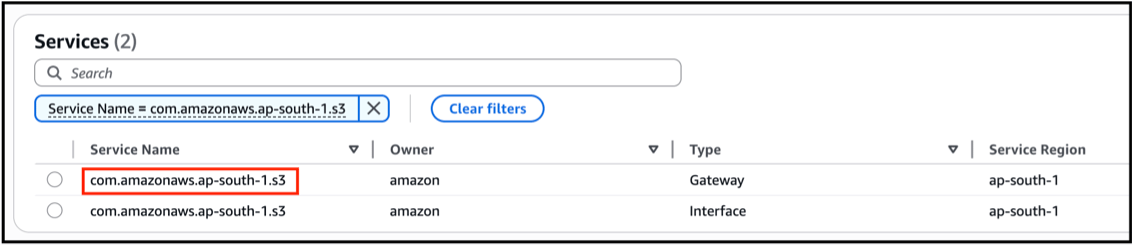
* **Service Category**: AWS Services
* **Service Name**: com.amazonaws.ap-south-1.s3 (S3 Gateway)
* **Backend private subnet** is now associated with its route table.
##### Task 6: Create S3 VPC Endpoint (Private Access)
To allow the EC2 in Virginia to fetch images from S3 in Mumbai **without Internet**, you will use a **Gateway VPC Endpoint**.
1. Go to **VPC Dashboard**, **Choose Endpoints and click Create Endpoint**.
2. Make sure you're in Mumbai Region.
3. Enter the following:
* **Service Category**: AWS Services
* **Service Name**: com.amazonaws.ap-south-1.s3 (S3 Gateway)
 * **Endpoint Name:** S3Endpoint
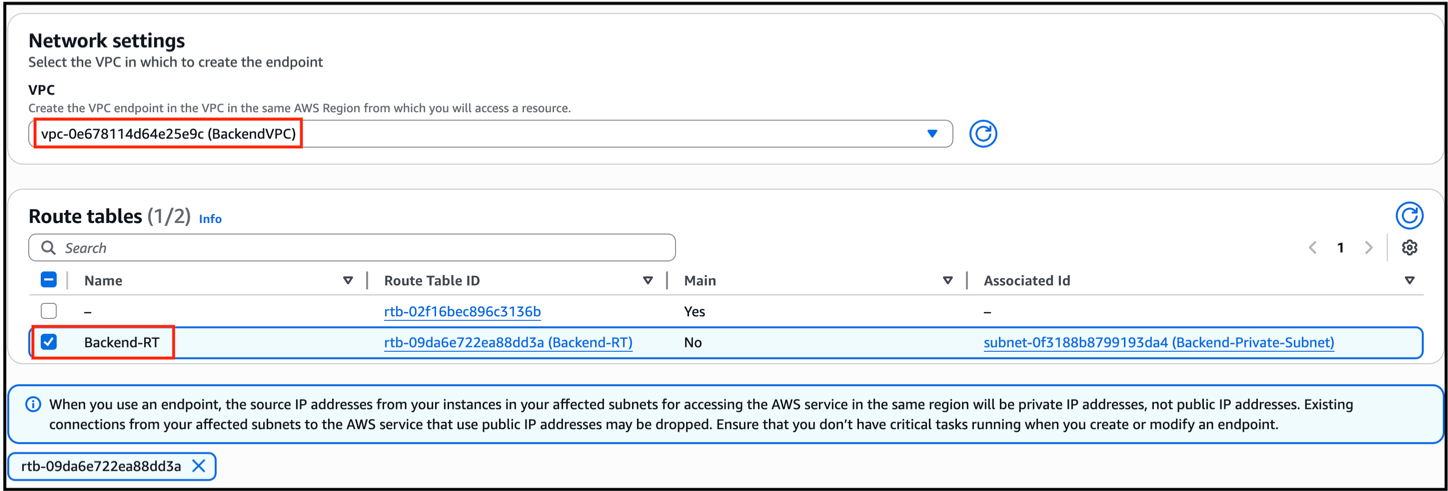
* **VPC:** BackendVPC
* **Route Table:** Backend-RT (enables private routing)
* **Endpoint Name:** S3Endpoint
* **VPC:** BackendVPC
* **Route Table:** Backend-RT (enables private routing)
 4. Click **Create Endpoint**.
* Your S3 bucket is now accessible **privately** within the VPC (no Internet required).
#### Milestone 2: S3 Setup in Mumbai (Backend)
* In this milestone, you will create a private S3 bucket in the **Mumbai region (ap-south-1)** and upload test images. This bucket will act as the **central storage** for images, which will later be accessed securely from the Virginia frontend via VPC Peering.
##### Task 7: Create an S3 Bucket (Mumbai)
1. Go to the **S3 Dashboard** in the AWS Console.
2. Click **Create bucket**.
3. Fill in the details:
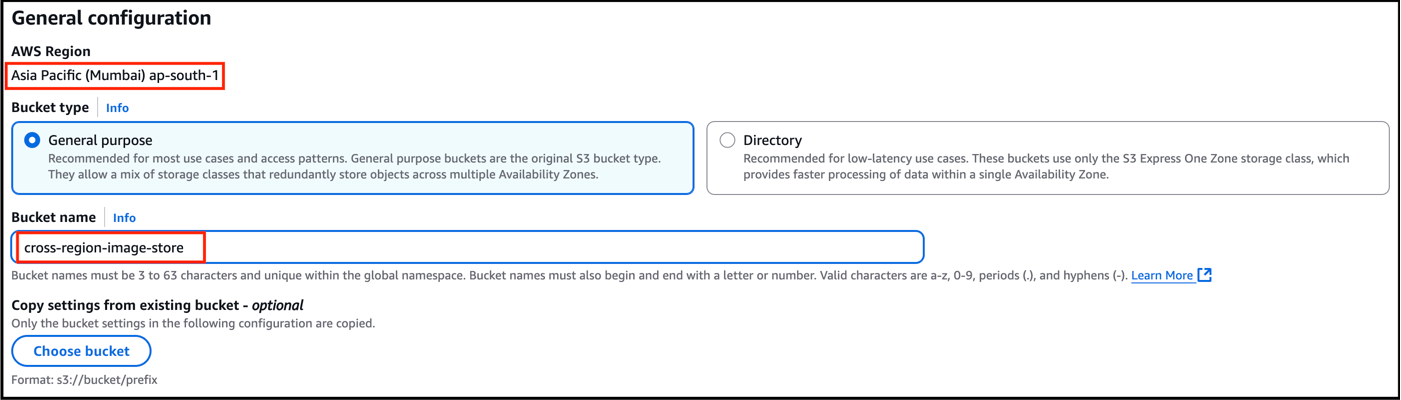
* **Bucket Name:** cross-region-image-store
> **Note :** Bucket name must be globally unique, replace the name accordingly.
* **Region**: ap-south-1 (Mumbai)
4. Click **Create Endpoint**.
* Your S3 bucket is now accessible **privately** within the VPC (no Internet required).
#### Milestone 2: S3 Setup in Mumbai (Backend)
* In this milestone, you will create a private S3 bucket in the **Mumbai region (ap-south-1)** and upload test images. This bucket will act as the **central storage** for images, which will later be accessed securely from the Virginia frontend via VPC Peering.
##### Task 7: Create an S3 Bucket (Mumbai)
1. Go to the **S3 Dashboard** in the AWS Console.
2. Click **Create bucket**.
3. Fill in the details:
* **Bucket Name:** cross-region-image-store
> **Note :** Bucket name must be globally unique, replace the name accordingly.
* **Region**: ap-south-1 (Mumbai)
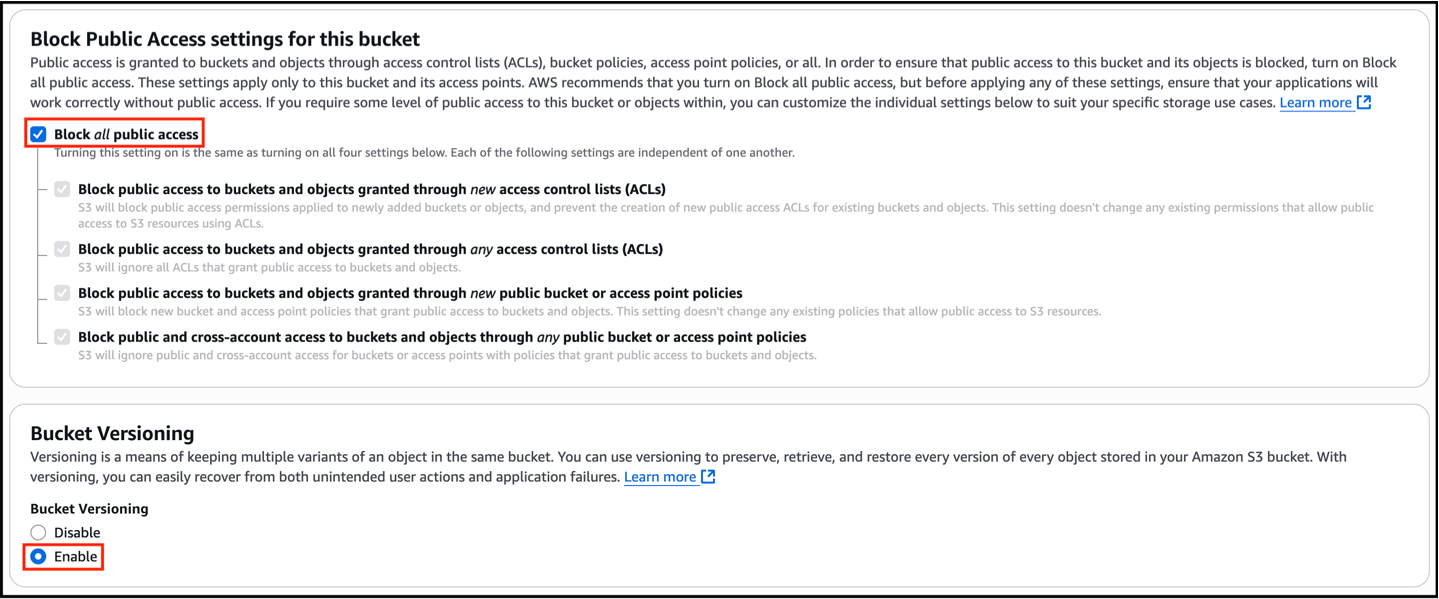
 4. In **Block Public Access settings**, keep all options **checked** (we will use private access only).
5. In the **Bucket Versioning,** Check **Enabled.**
4. In **Block Public Access settings**, keep all options **checked** (we will use private access only).
5. In the **Bucket Versioning,** Check **Enabled.**
 6. Click **Create bucket**.
* You have successfully created a **private S3 bucket** in Mumbai.
##### Task 8: Upload Test Images to S3 (Mumbai)
Before setting up cross-region access, upload some sample images to test the setup.
1. In the **S3 Console**, navigate to the bucket: **cross-region-image-store.**
2. Click **Upload**.
3. Select one or more image files (.jpg or .png)
4. You can upload these photos of these cars for example, [porsche.jpg](https://labresources.whizlabs.com/da141345b0987b5153479c05e2943b57/porsche_11_36.jpg), [ferrari.jpg](https://labresources.whizlabs.com/da141345b0987b5153479c05e2943b57/ferrari_12_19.jpg), [mclaren.jpg](https://labresources.whizlabs.com/da141345b0987b5153479c05e2943b57/mclaren_13_06.jpg)
5. Keep all **permissions private** (no need to modify).
6. Click **Upload**.
6. Click **Create bucket**.
* You have successfully created a **private S3 bucket** in Mumbai.
##### Task 8: Upload Test Images to S3 (Mumbai)
Before setting up cross-region access, upload some sample images to test the setup.
1. In the **S3 Console**, navigate to the bucket: **cross-region-image-store.**
2. Click **Upload**.
3. Select one or more image files (.jpg or .png)
4. You can upload these photos of these cars for example, [porsche.jpg](https://labresources.whizlabs.com/da141345b0987b5153479c05e2943b57/porsche_11_36.jpg), [ferrari.jpg](https://labresources.whizlabs.com/da141345b0987b5153479c05e2943b57/ferrari_12_19.jpg), [mclaren.jpg](https://labresources.whizlabs.com/da141345b0987b5153479c05e2943b57/mclaren_13_06.jpg)
5. Keep all **permissions private** (no need to modify).
6. Click **Upload**.
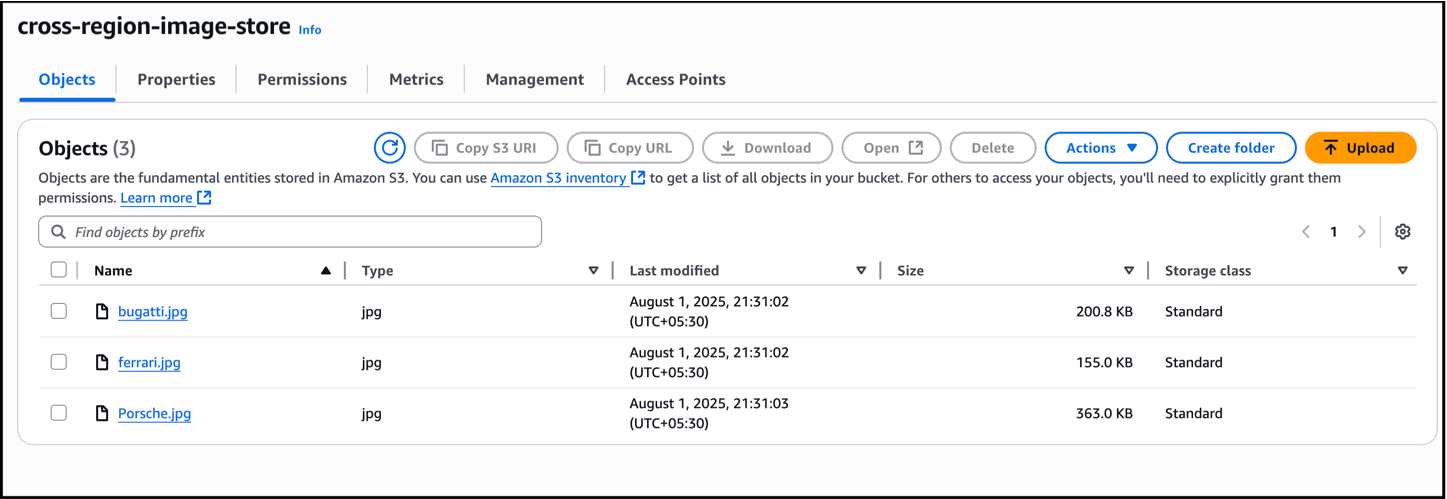 * Test images are now stored securely in S3. These will later be accessed by the **Virginia EC2 frontend app** through private networking.
#### Milestone 3: Inter-Region VPC Peering Setup
Now that you have:
* **Frontend VPC in Virginia**
* **Backend VPC in Mumbai**
* **S3 bucket + endpoint in Mumbai**
It’s time to connect these two VPCs using **VPC Peering**. This will enable secure, private communication between both regions without using the public internet.
##### Task 9: Create VPC Peering Connection (Initiate from Virginia)
1. Make sure you’re in **Virginia region (us-east-1)**, open the **VPC Dashboard**.
2. Go to **Peering Connections**, **Click Create Peering Connection**.
3. Fill in the following details:
* **Name:** Virginia-Mumbai-Peering
* **VPC ID (Requester):** FrontendVPC (Virginia)
* **Account:** Select My Account
* **Region:** Select **Another Region** (ap-south-1 (Mumbai))
* **VPC ID (Accepter):** Give BackendVPC VPC ID (Mumbai)
4. Click **Create Peering Connection**.
* Test images are now stored securely in S3. These will later be accessed by the **Virginia EC2 frontend app** through private networking.
#### Milestone 3: Inter-Region VPC Peering Setup
Now that you have:
* **Frontend VPC in Virginia**
* **Backend VPC in Mumbai**
* **S3 bucket + endpoint in Mumbai**
It’s time to connect these two VPCs using **VPC Peering**. This will enable secure, private communication between both regions without using the public internet.
##### Task 9: Create VPC Peering Connection (Initiate from Virginia)
1. Make sure you’re in **Virginia region (us-east-1)**, open the **VPC Dashboard**.
2. Go to **Peering Connections**, **Click Create Peering Connection**.
3. Fill in the following details:
* **Name:** Virginia-Mumbai-Peering
* **VPC ID (Requester):** FrontendVPC (Virginia)
* **Account:** Select My Account
* **Region:** Select **Another Region** (ap-south-1 (Mumbai))
* **VPC ID (Accepter):** Give BackendVPC VPC ID (Mumbai)
4. Click **Create Peering Connection**.
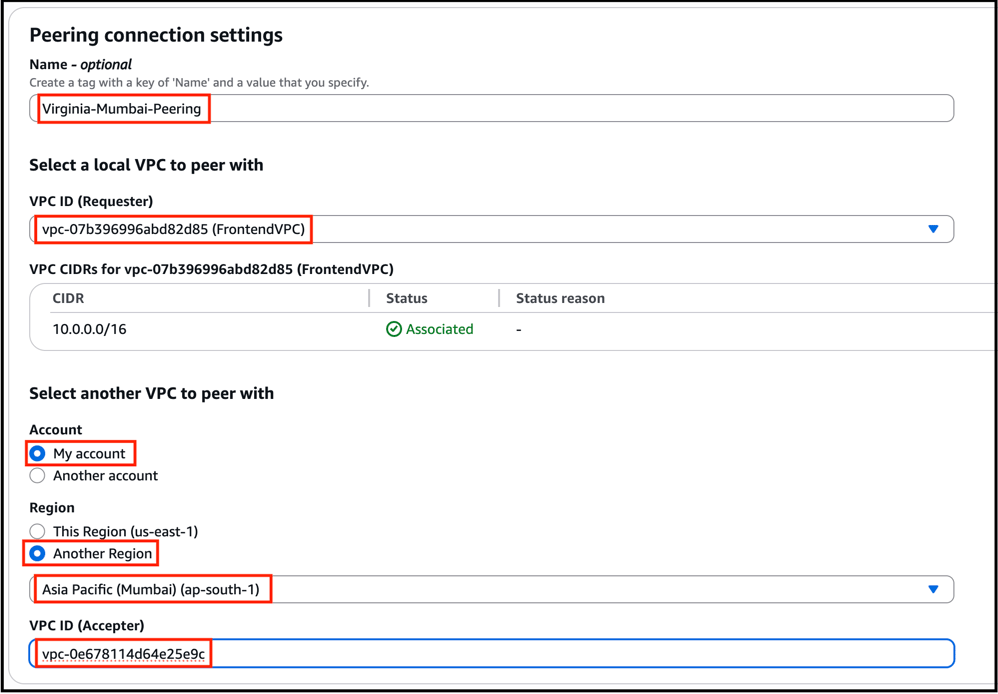 * A peering request has been sent from Virginia to Mumbai.
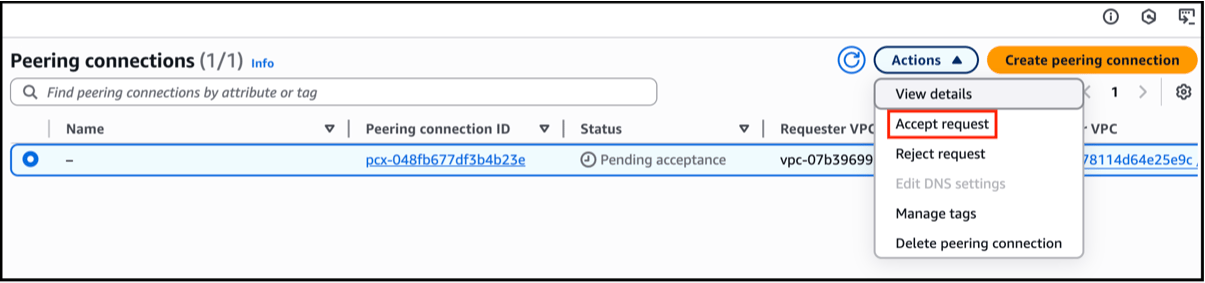
##### Task 10: Accept VPC Peering Connection (from Mumbai)
1. Switch to the **Mumbai region (ap-south-1)**.
2. Go to **VPC Dashboard, Choose Peering Connections**.
3. You will see the pending request. Select it and Click **Actions then choose Accept Request**.
* A peering request has been sent from Virginia to Mumbai.
##### Task 10: Accept VPC Peering Connection (from Mumbai)
1. Switch to the **Mumbai region (ap-south-1)**.
2. Go to **VPC Dashboard, Choose Peering Connections**.
3. You will see the pending request. Select it and Click **Actions then choose Accept Request**.
 4. Confirm the acceptance.
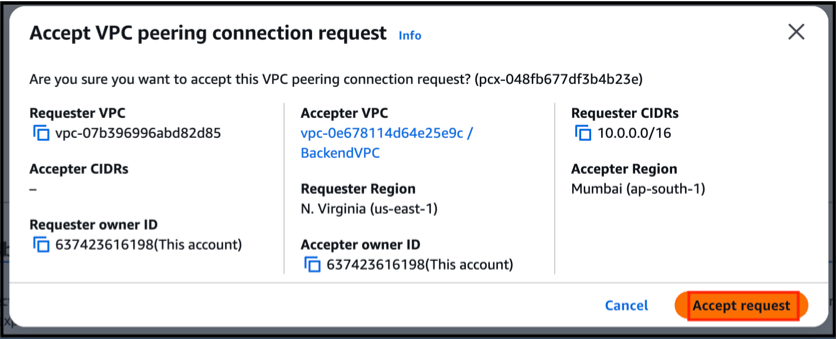 * The VPC peering connection is now active between **Virginia and Mumbai**.
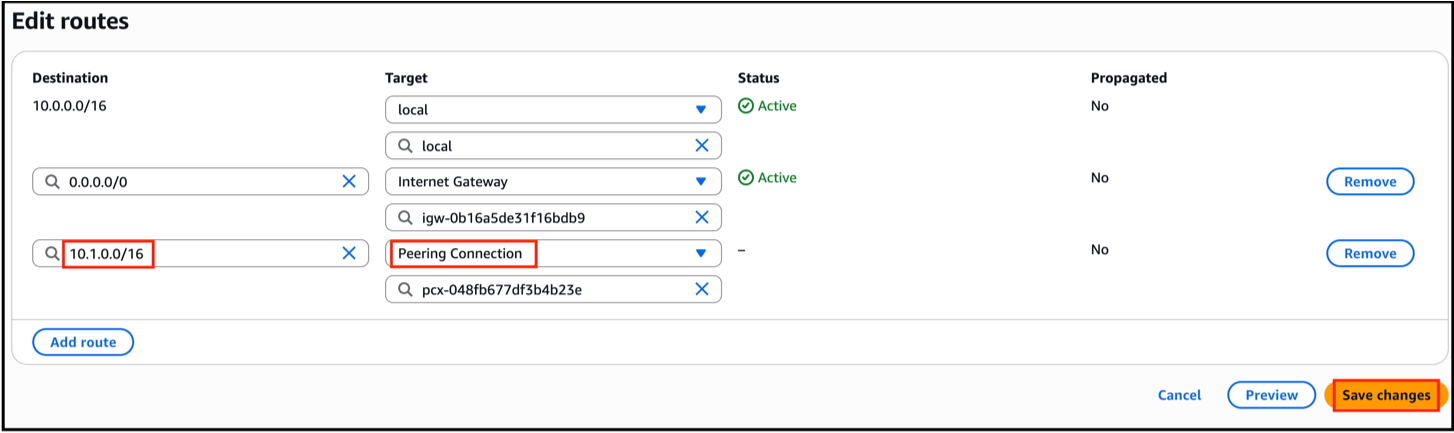
##### Task 11: Update Route Tables in Both Regions
For communication to work, you must update the route tables in **both regions** to direct traffic through the peering connection.
###### In Virginia (FrontendVPC):
1. Go to **Route Tables**.
2. Select **Frontend-RT**.
3. Under **Routes, Select Edit routes and click on Add route**:
* **Destination:** 10.1.0.0/16 (CIDR of Mumbai VPC)
* **Target:** The Virginia-Mumbai Peering Connection
4. Click **Save**.
* The VPC peering connection is now active between **Virginia and Mumbai**.
##### Task 11: Update Route Tables in Both Regions
For communication to work, you must update the route tables in **both regions** to direct traffic through the peering connection.
###### In Virginia (FrontendVPC):
1. Go to **Route Tables**.
2. Select **Frontend-RT**.
3. Under **Routes, Select Edit routes and click on Add route**:
* **Destination:** 10.1.0.0/16 (CIDR of Mumbai VPC)
* **Target:** The Virginia-Mumbai Peering Connection
4. Click **Save**.
 ###### In Mumbai (BackendVPC):
1. Go to **Route Tables**.
2. Select **Backend-RT**.
3. Under **Routes, Select Edit routes and click on Add route:**
* **Destination**: 10.0.0.0/16 (CIDR of Virginia VPC)
* **Target**: The Virginia-Mumbai Peering Connection
4. Click **Save.**
###### In Mumbai (BackendVPC):
1. Go to **Route Tables**.
2. Select **Backend-RT**.
3. Under **Routes, Select Edit routes and click on Add route:**
* **Destination**: 10.0.0.0/16 (CIDR of Virginia VPC)
* **Target**: The Virginia-Mumbai Peering Connection
4. Click **Save.**
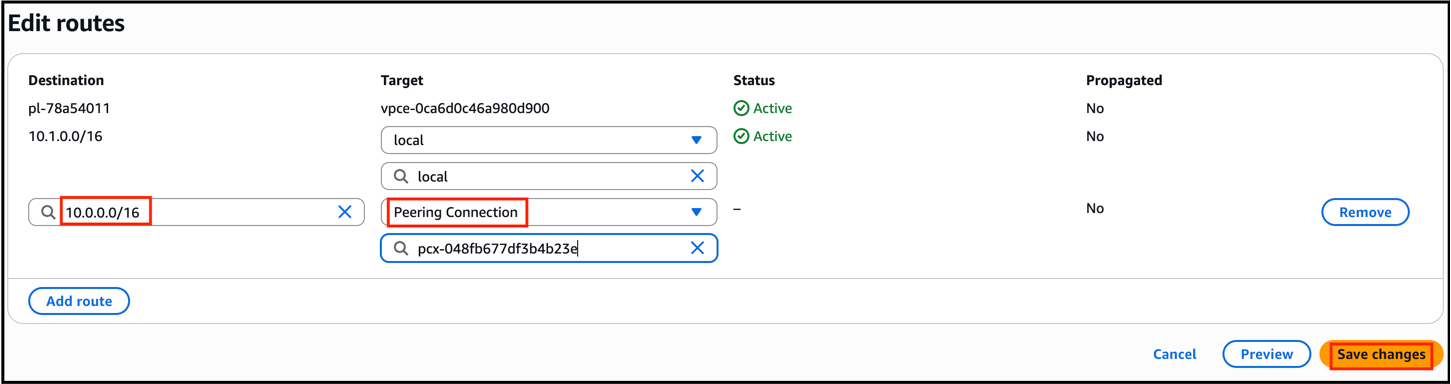 * Both VPCs can now communicate privately over the peering connection.
##### Task 12: Update S3 Bucket Policy (Allow Access from Virginia VPC)
Finally, update the S3 bucket policy so that only traffic coming from the Virginia VPC via peering is allowed.
1. Go to **S3 Console**, Click on **Your Bucket**
2. Select **Permissions** and click on **Bucket Policy**.
3. Paste the following policy (replace **\, \** and **\** with actual values):
```
{
"Version": "2012-10-17",
"Statement": [
{
"Sid": "AllowVPCPeeringAccess",
"Effect": "Allow",
"Principal": "*",
"Action": "s3:*",
"Resource": [
"arn:aws:s3:::",
"arn:aws:s3:::/*"
],
"Condition": {
"StringEquals": {
"aws:SourceVpc": "",
"aws:SourceAccount": ""
}
}
}
]
}
```
* Both VPCs can now communicate privately over the peering connection.
##### Task 12: Update S3 Bucket Policy (Allow Access from Virginia VPC)
Finally, update the S3 bucket policy so that only traffic coming from the Virginia VPC via peering is allowed.
1. Go to **S3 Console**, Click on **Your Bucket**
2. Select **Permissions** and click on **Bucket Policy**.
3. Paste the following policy (replace **\, \** and **\** with actual values):
```
{
"Version": "2012-10-17",
"Statement": [
{
"Sid": "AllowVPCPeeringAccess",
"Effect": "Allow",
"Principal": "*",
"Action": "s3:*",
"Resource": [
"arn:aws:s3:::",
"arn:aws:s3:::/*"
],
"Condition": {
"StringEquals": {
"aws:SourceVpc": "",
"aws:SourceAccount": ""
}
}
}
]
}
```
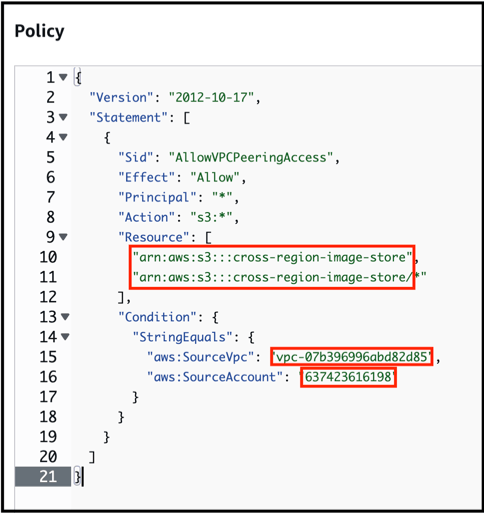 3. Click **Save Changes**.
* Now, only the Virginia VPC can securely access the private S3 bucket in Mumbai.
#### Milestone 4: EC2 Setup in Virginia (Frontend Viewer App)
This EC2 instance will act as the **frontend application server**. It will run a **Streamlit app** that fetches and displays images stored in the private S3 bucket (located in Mumbai).
##### Task 13: Launch EC2 Instance in Virginia (Frontend)
1. Make sure you’re in **Virginia** region. Go to **EC2 Dashboard**
2. Click **Launch Instance**.
3. Fill in the details:
* **Name:** Frontend-Viewer-EC2
* **AMI:** Amazon Linux 2023 (64-bit x86)
3. Click **Save Changes**.
* Now, only the Virginia VPC can securely access the private S3 bucket in Mumbai.
#### Milestone 4: EC2 Setup in Virginia (Frontend Viewer App)
This EC2 instance will act as the **frontend application server**. It will run a **Streamlit app** that fetches and displays images stored in the private S3 bucket (located in Mumbai).
##### Task 13: Launch EC2 Instance in Virginia (Frontend)
1. Make sure you’re in **Virginia** region. Go to **EC2 Dashboard**
2. Click **Launch Instance**.
3. Fill in the details:
* **Name:** Frontend-Viewer-EC2
* **AMI:** Amazon Linux 2023 (64-bit x86)
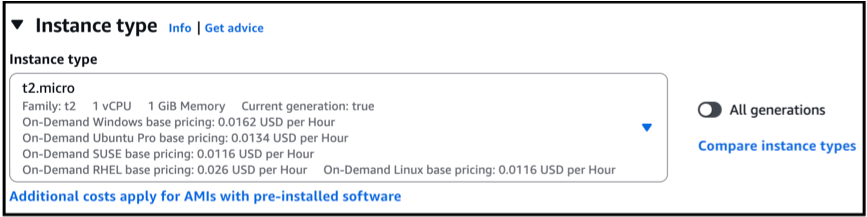
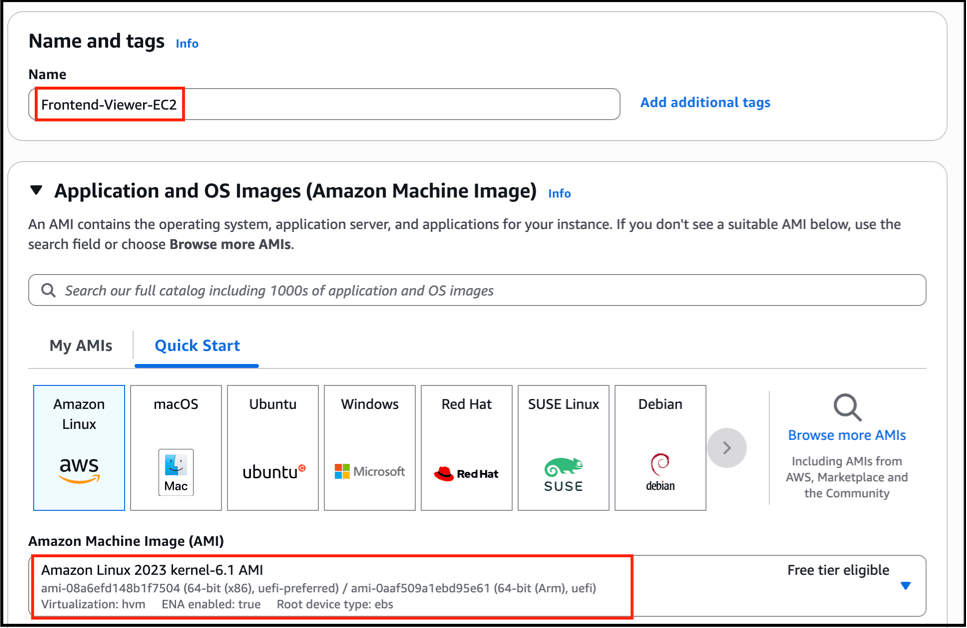 * **Instance Type:** t2.micro (Free Tier eligible)
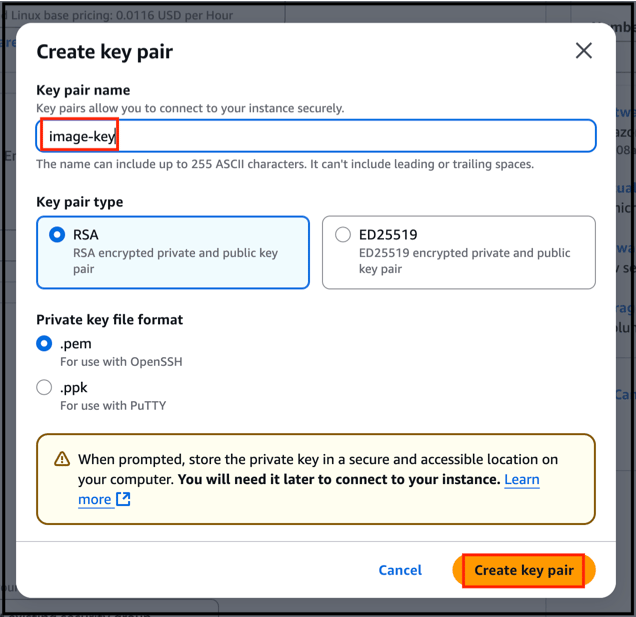
 * **Key Pair (login):** Use an existing key pair (or create a new one, e.g. image-key).
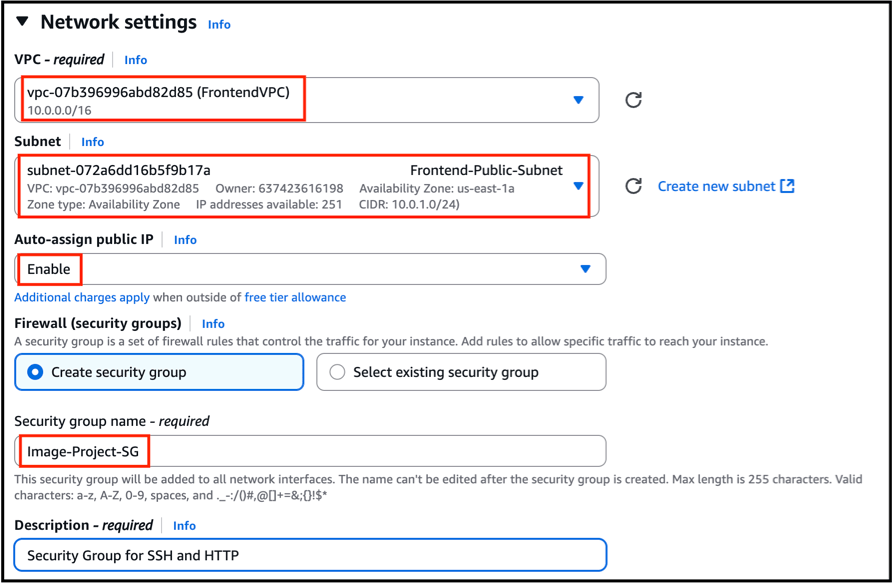
 * **Network Settings:**
* **VPC:** FrontendVPC (Virginia)
* **Subnet:** Frontend-Public-Subnet
* **Auto-assign Public IP:** Enable
* In Security Group, Give name as **Image-Project-SG**
* **Network Settings:**
* **VPC:** FrontendVPC (Virginia)
* **Subnet:** Frontend-Public-Subnet
* **Auto-assign Public IP:** Enable
* In Security Group, Give name as **Image-Project-SG**
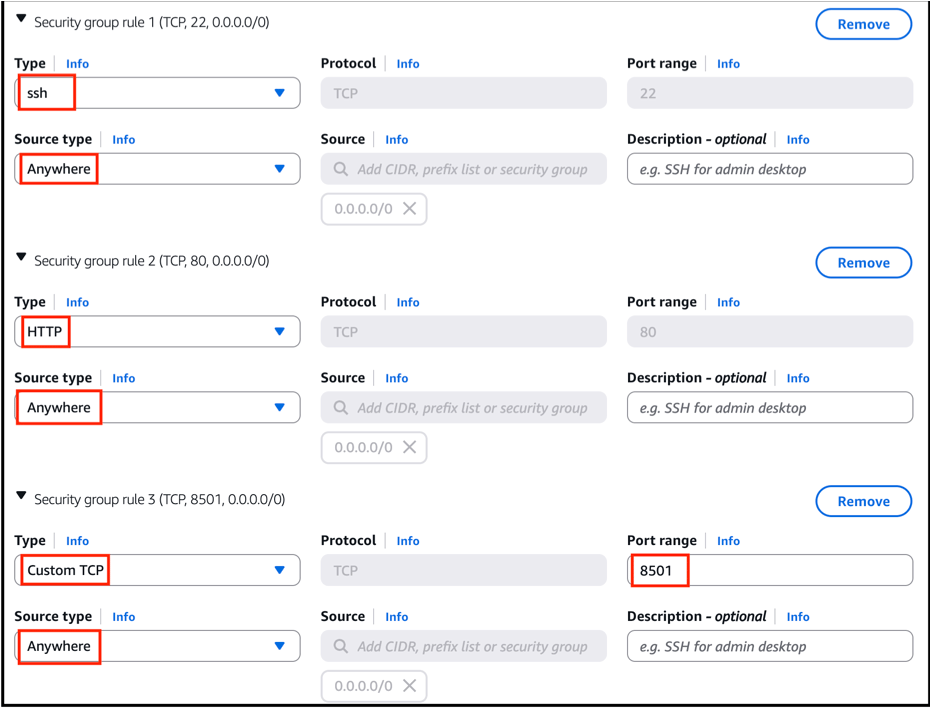
 * **Firewall (Security Group):** Create new, allow:
* **SSH (22)** from Anywhere
* **HTTP (80)** from Anywhere
* **Custom TCP (8501)** from Anywhere (for Streamlit UI)
* **Firewall (Security Group):** Create new, allow:
* **SSH (22)** from Anywhere
* **HTTP (80)** from Anywhere
* **Custom TCP (8501)** from Anywhere (for Streamlit UI)
 * **Storage:** Keep default 8 GiB
* **IAM Role:** Attach the IAM Role of **cross\_region\_project\_\**
* **Storage:** Keep default 8 GiB
* **IAM Role:** Attach the IAM Role of **cross\_region\_project\_\**
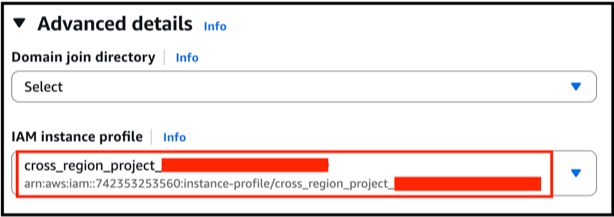 4. Click **Review and Launch**.
 * EC2 is launched successfully.
##### Task 14: Connect to the EC2 Instance
Once the EC2 is running:
1. Open your local terminal.
2. Set proper key permissions:
```
chmod 400 image-key.pem
```
3. Connect to EC2 using SSH:
```
ssh -i image-key.pem ec2-user@
```
> **NOTE:** Replace **\** with the Public IPv4 address from the EC2 console.
* If you see the Streamlit sample app, everything’s ready!
##### Task 15: Install Python, Streamlit, boto3 and Pillow
Run these commands **inside EC2** after connecting:
1. **Update packages**:
```
sudo dnf update -y
```
2. **Install Python 3**:
```
sudo dnf install python3 -y
python3 --version
```
3. **Install pip**:
```
sudo dnf install python3-pip -y
pip3 --version
```
4. **Install required libraries**:
```
pip3 install streamlit boto3 pillow
```
##### Task 16: Create the Streamlit Application
1. Create a new Python file:
```
nano app.py
```
2. Paste the following code into the editor:
```
import streamlit as st
import boto3
from PIL import Image
import io
# Page Setup
st.set_page_config(page_title="Cross-Region Image Viewer")
st.title("Cross-Region Image Viewer")
st.subheader("Private Image Viewer")
st.markdown("Images stored privately in Mumbai S3, viewed in Virginia EC2.")
# S3 Setup
bucket_name = "cross-region-image-store" # Replace with your exact bucket name
region = "ap-south-1"
# Boto3 client
s3 = boto3.client('s3', region_name=region)
# List images from S3
def list_images(bucket):
response = s3.list_objects_v2(Bucket=bucket)
if 'Contents' not in response:
return []
return [obj['Key'] for obj in response['Contents'] if obj['Key'].lower().endswith(('jpg', 'png'))]
# App UI
images = list_images(bucket_name)
if images:
# Insert "Choose me" as the first option
options = ["Choose me"] + images
selected = st.selectbox("Choose an image to view:", options)
if selected != "Choose me":
obj = s3.get_object(Bucket=bucket_name, Key=selected)
img_data = obj['Body'].read()
image = Image.open(io.BytesIO(img_data))
st.image(image, caption=f"{selected} (fetched from Mumbai)", use_column_width=True)
else:
st.warning("No images found in the bucket.")
```
3. Save and exit Nano:
* Press **Ctrl + X** then **Y** and then Click **Enter**
> **Note:** Replace your actual bucket name accordingly
##### Task 17: Run the Streamlit Application
1. Start the app:
```
streamlit run app.py --server.port 8501
```
* At this point, your frontend EC2 in Virginia can securely fetch and display private images stored in Mumbai S3 using cross-region VPC peering.
#### Milestone 5: Testing the Cross-Region Image Viewer Application
In this milestone, you will test the Streamlit app running on the Virginia EC2 instance to ensure it can display private images stored in the Mumbai S3 bucket.
##### Task 18: Access the Viewer App
1. Open your browser and go to:
```
http://:8501
```
> **Note:** Replace **\** with the public IP address of the Virginia EC2 instance.
##### Task 19: Use the Application
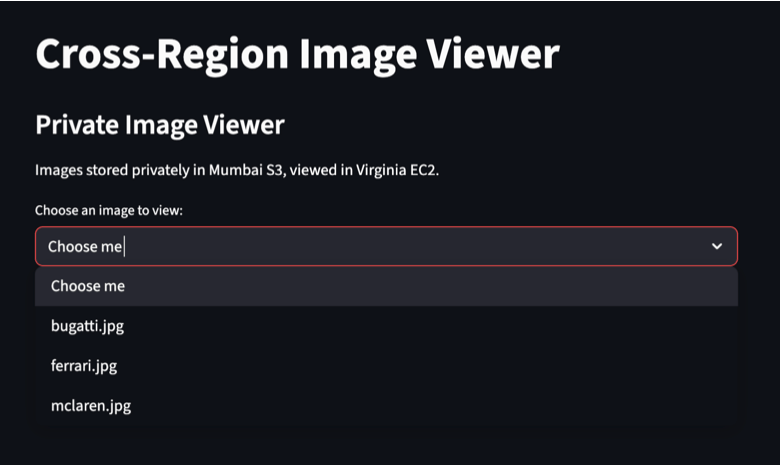
1. The **Cross-Region Image Viewer** application will open.
2. In the dropdown menu labeled “**Choose me**” option, click to expand.
* EC2 is launched successfully.
##### Task 14: Connect to the EC2 Instance
Once the EC2 is running:
1. Open your local terminal.
2. Set proper key permissions:
```
chmod 400 image-key.pem
```
3. Connect to EC2 using SSH:
```
ssh -i image-key.pem ec2-user@
```
> **NOTE:** Replace **\** with the Public IPv4 address from the EC2 console.
* If you see the Streamlit sample app, everything’s ready!
##### Task 15: Install Python, Streamlit, boto3 and Pillow
Run these commands **inside EC2** after connecting:
1. **Update packages**:
```
sudo dnf update -y
```
2. **Install Python 3**:
```
sudo dnf install python3 -y
python3 --version
```
3. **Install pip**:
```
sudo dnf install python3-pip -y
pip3 --version
```
4. **Install required libraries**:
```
pip3 install streamlit boto3 pillow
```
##### Task 16: Create the Streamlit Application
1. Create a new Python file:
```
nano app.py
```
2. Paste the following code into the editor:
```
import streamlit as st
import boto3
from PIL import Image
import io
# Page Setup
st.set_page_config(page_title="Cross-Region Image Viewer")
st.title("Cross-Region Image Viewer")
st.subheader("Private Image Viewer")
st.markdown("Images stored privately in Mumbai S3, viewed in Virginia EC2.")
# S3 Setup
bucket_name = "cross-region-image-store" # Replace with your exact bucket name
region = "ap-south-1"
# Boto3 client
s3 = boto3.client('s3', region_name=region)
# List images from S3
def list_images(bucket):
response = s3.list_objects_v2(Bucket=bucket)
if 'Contents' not in response:
return []
return [obj['Key'] for obj in response['Contents'] if obj['Key'].lower().endswith(('jpg', 'png'))]
# App UI
images = list_images(bucket_name)
if images:
# Insert "Choose me" as the first option
options = ["Choose me"] + images
selected = st.selectbox("Choose an image to view:", options)
if selected != "Choose me":
obj = s3.get_object(Bucket=bucket_name, Key=selected)
img_data = obj['Body'].read()
image = Image.open(io.BytesIO(img_data))
st.image(image, caption=f"{selected} (fetched from Mumbai)", use_column_width=True)
else:
st.warning("No images found in the bucket.")
```
3. Save and exit Nano:
* Press **Ctrl + X** then **Y** and then Click **Enter**
> **Note:** Replace your actual bucket name accordingly
##### Task 17: Run the Streamlit Application
1. Start the app:
```
streamlit run app.py --server.port 8501
```
* At this point, your frontend EC2 in Virginia can securely fetch and display private images stored in Mumbai S3 using cross-region VPC peering.
#### Milestone 5: Testing the Cross-Region Image Viewer Application
In this milestone, you will test the Streamlit app running on the Virginia EC2 instance to ensure it can display private images stored in the Mumbai S3 bucket.
##### Task 18: Access the Viewer App
1. Open your browser and go to:
```
http://:8501
```
> **Note:** Replace **\** with the public IP address of the Virginia EC2 instance.
##### Task 19: Use the Application
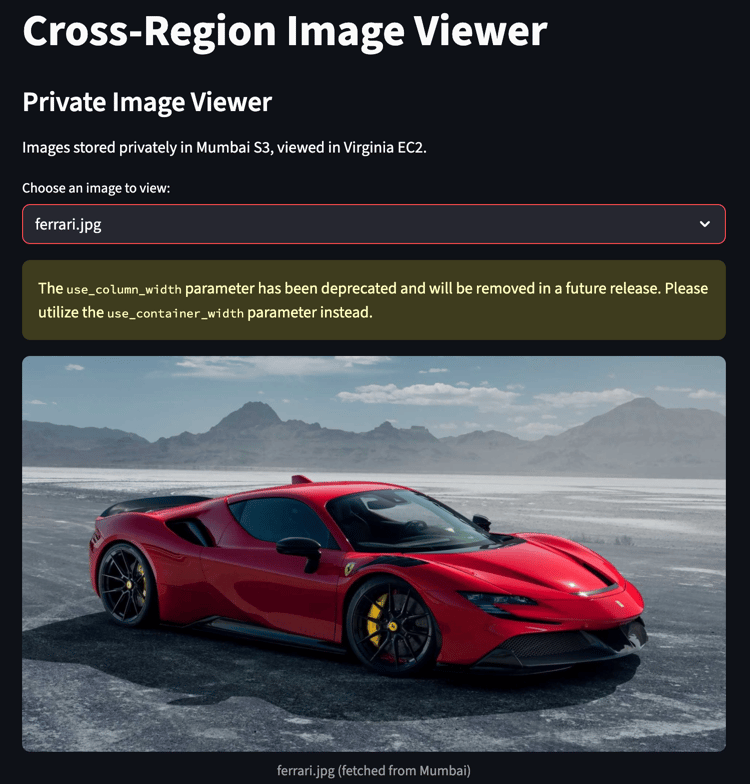
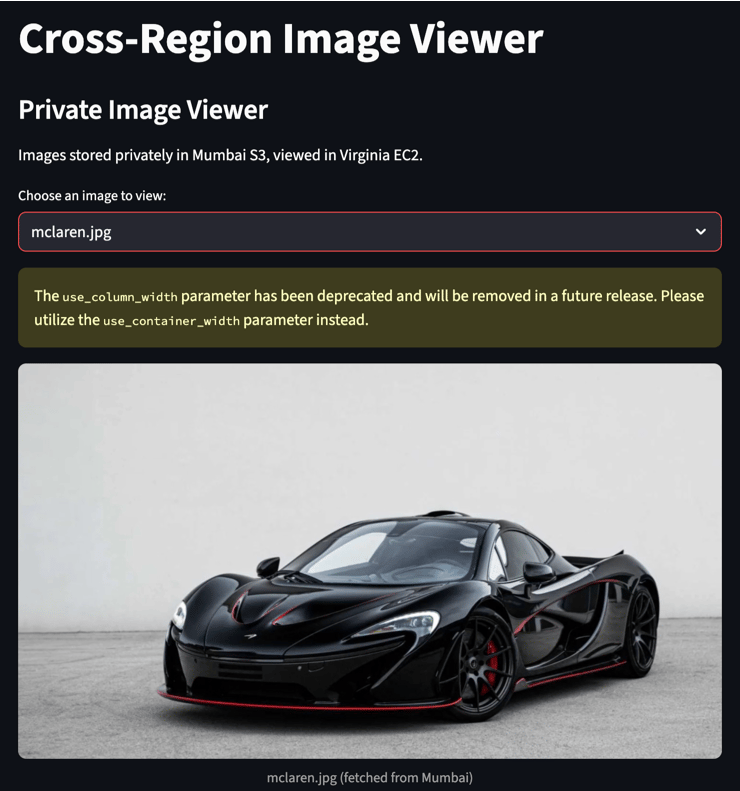
1. The **Cross-Region Image Viewer** application will open.
2. In the dropdown menu labeled “**Choose me**” option, click to expand.
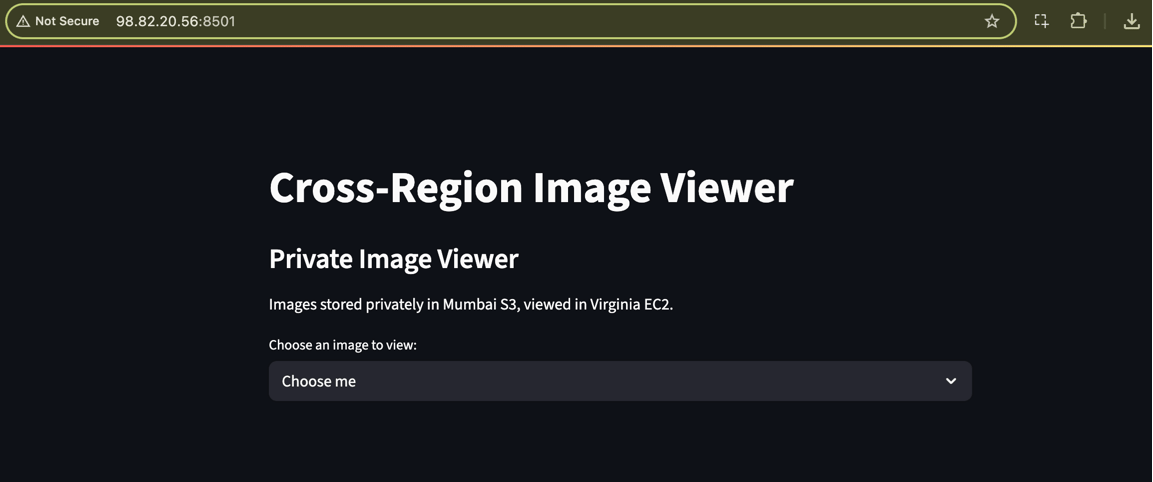 3. You will see a list of objects (images) that you uploaded earlier to the **Mumbai S3 bucket** (cross-region-image-store).
4. Select **any image** from the list and click on **Enter.**
3. You will see a list of objects (images) that you uploaded earlier to the **Mumbai S3 bucket** (cross-region-image-store).
4. Select **any image** from the list and click on **Enter.**
 5. The selected image will be fetched **securely across regions** (from Mumbai to Virginia) and displayed in the application interface.
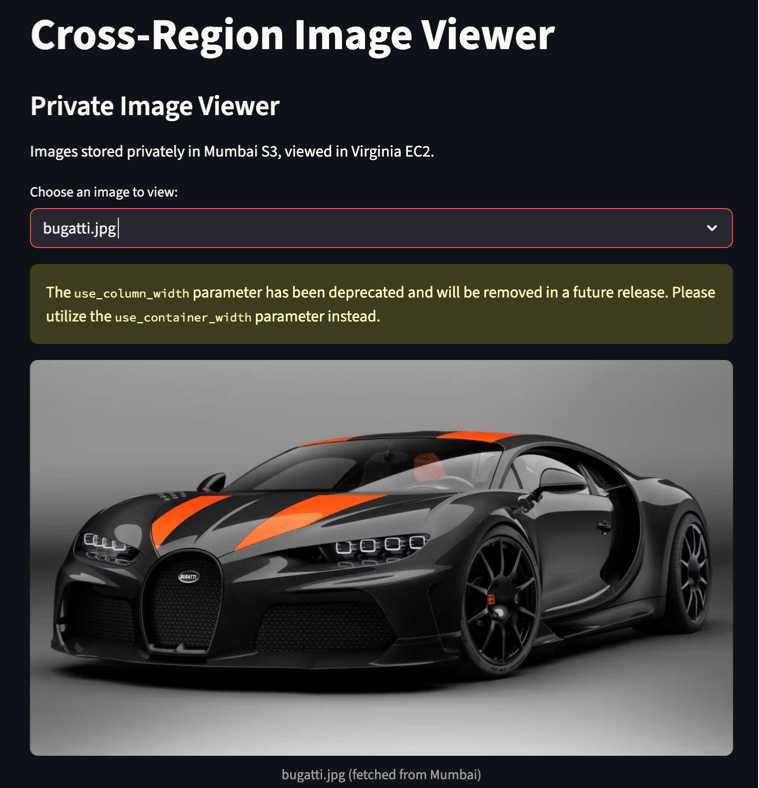
 * If you can see your images, the **cross-region architecture is working correctly**.
* All communication happens **privately via VPC peering**, without making the S3 bucket public.
### Completion and Conclusion
1. You have successfully created two isolated VPCs in Mumbai and Virginia , established Inter-Region VPC Peering for private connectivity.
2. You have successfully configured an S3 Gateway Endpoint in Mumbai to enable secure, private access to the S3 bucket.
3. You have successfully created a private S3 bucket in Mumbai, uploaded test images, and applied strict bucket policies and IAM roles.
4. You have successfully launched an EC2 instance in Virginia, installed dependencies, and deployed a Streamlit image viewer app.
5. You have successfully ensured that all data transfer between regions happens privately over AWS’s backbone network, without using the public internet.
6. You have successfully simulated a real-world multi-region SaaS architecture, showcasing network security, cost optimization, and resilience against ransomware-style attacks.
### End Project
1. Sign out of AWS Account.
2. You have successfully completed the Project.
3. Once you have completed the steps, click on **End Project** from the IP Lab Portal dashboard.
## What gets checked
When you press **Check my work**, the platform verifies each of these:
* **Create Amazon Custom VPC** — Check whether a Custom VPC is created or not.
* **Create Amazon Custom VPC Subnet** — Check whether a Subnet is created for the Custom VPC or not.
* **Create Amazon Custom VPC Public Route Table** — Check whether a Custom VPC Public Route Table is created and an Internet Gateway route is added or not.
* **Launch an EC2 Instance** — Check whether an EC2 Instance is launched or not.
* **Launch EC2 AMI type Amazon Linux** — Check whether the EC2 instance is launched using an Amazon AMI.
## Related help
* [FAQs and Troubleshooting](/aws-saa/support/faqs-and-troubleshooting)
This documentation is built and hosted on [Mintlify](https://mintlify.com), a developer documentation platform.
* If you can see your images, the **cross-region architecture is working correctly**.
* All communication happens **privately via VPC peering**, without making the S3 bucket public.
### Completion and Conclusion
1. You have successfully created two isolated VPCs in Mumbai and Virginia , established Inter-Region VPC Peering for private connectivity.
2. You have successfully configured an S3 Gateway Endpoint in Mumbai to enable secure, private access to the S3 bucket.
3. You have successfully created a private S3 bucket in Mumbai, uploaded test images, and applied strict bucket policies and IAM roles.
4. You have successfully launched an EC2 instance in Virginia, installed dependencies, and deployed a Streamlit image viewer app.
5. You have successfully ensured that all data transfer between regions happens privately over AWS’s backbone network, without using the public internet.
6. You have successfully simulated a real-world multi-region SaaS architecture, showcasing network security, cost optimization, and resilience against ransomware-style attacks.
### End Project
1. Sign out of AWS Account.
2. You have successfully completed the Project.
3. Once you have completed the steps, click on **End Project** from the IP Lab Portal dashboard.
## What gets checked
When you press **Check my work**, the platform verifies each of these:
* **Create Amazon Custom VPC** — Check whether a Custom VPC is created or not.
* **Create Amazon Custom VPC Subnet** — Check whether a Subnet is created for the Custom VPC or not.
* **Create Amazon Custom VPC Public Route Table** — Check whether a Custom VPC Public Route Table is created and an Internet Gateway route is added or not.
* **Launch an EC2 Instance** — Check whether an EC2 Instance is launched or not.
* **Launch EC2 AMI type Amazon Linux** — Check whether the EC2 instance is launched using an Amazon AMI.
## Related help
* [FAQs and Troubleshooting](/aws-saa/support/faqs-and-troubleshooting)
This documentation is built and hosted on [Mintlify](https://mintlify.com), a developer documentation platform.