> ## Documentation Index
> Fetch the complete documentation index at: https://cloud-architect.ipoint-labs.com/llms.txt
> Use this file to discover all available pages before exploring further.
# Implementing VPC peering on AWS
> Hands-on lab · 45m
Launch this lab in the IP Lab Portal, then follow the steps below in the AWS console.
Open IP Lab Portal
## Overview
### Project Details
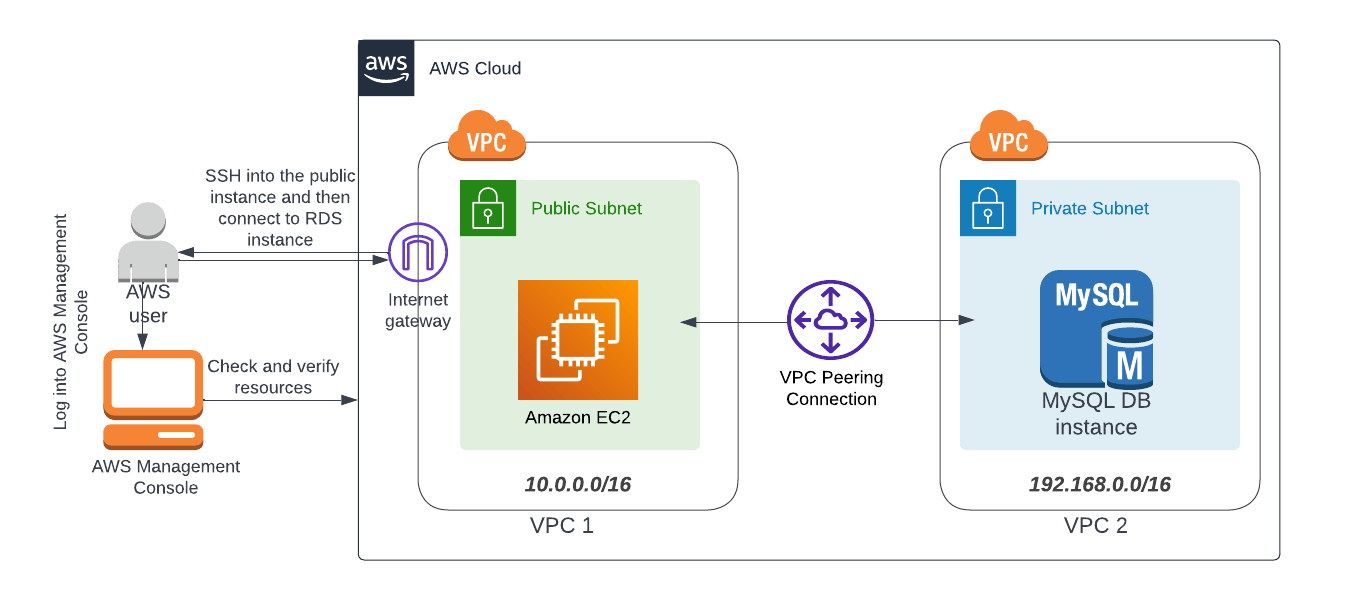
1. This project walks you through the steps to implement VPC peering in AWS.
2. Duration: **01:00:00 Hrs**
3. AWS Region: **US East (N. Virginia)**
### Introduction
#### AWS VPC Peering
* Amazon VPC allows us to launch the **AWS resources in an isolated network** that is defined by us in a **more private and secure environment.**
* VPC peering connection is connecting two VPCs which enables us to **communicate** between the VPCs as if they are in the **same network.**
* VPC peering connection can be established between VPCs of the **same AWS account** or of two **different AWS accounts.**
* VPC peering connections can be established between VPCs of the same or different accounts in **different AWS regions** too (cross regions).
* VPC peering connection enables us to **access the AWS resources** in another VPC
* The **traffic flow** between the instances in the two peered VPcs happens via the **private network.**
* The **communication** between the AWS resources in the VPC peered network can be done with the help of **private IP addresses.**
* The **traffic** between the VPC resources is **encrypted** and hidden from the outside world which makes communication between the peered resources highly secured.
* **Transfer of data** between the resources in a VPC peered network is very **cost-efficient** and **simple**.
#### Points to remember while creating a VPC peering connection
* The two VPC’s CIDR block should not be overlapping
* It cannot resolve private DNS values across VPCs
* No cross-referencing of security groups between VPCs(security group is within a VPC and even though it peered same security group cannot be used)
* NAT routing between the VPCs is not allowed
### Architecture Diagram
 ### Project Tasks
1. Sign in to the AWS Management Console
2. Create two VPCs’ in N. Virginia region
3. Create and attach an Internet gateway
4. Creating subnets for both the VPCs
5. Creating Route tables, configuring routes, and associating subnets
6. Creating VPC Peering Connection
7. Editing routes in the Route table
8. Creating an EC2 Instance
9. Creating a Security Group for the RDS instance
10. Create a RDS Instance
11. SSH into EC2 and Connect to Your Database
### Launching Project Environment
1. To launch the lab environment, Click on the **Start Project** button.
2. Please wait until the cloud environment is provisioned. It will take less than a minute to provision.
3. Once the Lab is started, you will be provided with an **IAM username**, **Password**, **Access** **Key**, and **Secret** **Access** **Key**.?
> **Note**: You can only start one Project at any given time
## Lab guide
### Project Steps
#### Task 1: Sign in to the AWS Management Console
1. Click on the **Open Console** button, and you will get redirected to AWS Console in a new browser tab.
2. On the AWS sign-in page,
* Leave the **Account ID** as default. Never edit/remove the 12-digit Account ID present in the AWS Console. otherwise, you cannot proceed with the lab.
* Now copy your **User Name** and **Password** in the Lab Console to the **IAM Username** and **Password** in the AWS Console and click on the **Sign in** button.
3. Once Signed In to the AWS Management Console, Make the default AWS Region as **US East (N. Virginia) us-east-1**.
#### Task 2: Create two VPCs’ in N. Virginia region
1. Make sure you are in the **N. Virginia** region.
2. Navigate to **VPC** by clicking on the **Services** menu at the top, then click on **VPC** in the **Network and Content Delivery** section.
3. Navigate to **Your VPCs** on the left panel and click on the **Create VPC** button.
* Resources to create: Select **VPC only**
* Name tag: Enter **whizlabs\_VPC1**
* IPv4 CIDR block: Enter **10.0.0.0/16**
### Project Tasks
1. Sign in to the AWS Management Console
2. Create two VPCs’ in N. Virginia region
3. Create and attach an Internet gateway
4. Creating subnets for both the VPCs
5. Creating Route tables, configuring routes, and associating subnets
6. Creating VPC Peering Connection
7. Editing routes in the Route table
8. Creating an EC2 Instance
9. Creating a Security Group for the RDS instance
10. Create a RDS Instance
11. SSH into EC2 and Connect to Your Database
### Launching Project Environment
1. To launch the lab environment, Click on the **Start Project** button.
2. Please wait until the cloud environment is provisioned. It will take less than a minute to provision.
3. Once the Lab is started, you will be provided with an **IAM username**, **Password**, **Access** **Key**, and **Secret** **Access** **Key**.?
> **Note**: You can only start one Project at any given time
## Lab guide
### Project Steps
#### Task 1: Sign in to the AWS Management Console
1. Click on the **Open Console** button, and you will get redirected to AWS Console in a new browser tab.
2. On the AWS sign-in page,
* Leave the **Account ID** as default. Never edit/remove the 12-digit Account ID present in the AWS Console. otherwise, you cannot proceed with the lab.
* Now copy your **User Name** and **Password** in the Lab Console to the **IAM Username** and **Password** in the AWS Console and click on the **Sign in** button.
3. Once Signed In to the AWS Management Console, Make the default AWS Region as **US East (N. Virginia) us-east-1**.
#### Task 2: Create two VPCs’ in N. Virginia region
1. Make sure you are in the **N. Virginia** region.
2. Navigate to **VPC** by clicking on the **Services** menu at the top, then click on **VPC** in the **Network and Content Delivery** section.
3. Navigate to **Your VPCs** on the left panel and click on the **Create VPC** button.
* Resources to create: Select **VPC only**
* Name tag: Enter **whizlabs\_VPC1**
* IPv4 CIDR block: Enter **10.0.0.0/16**
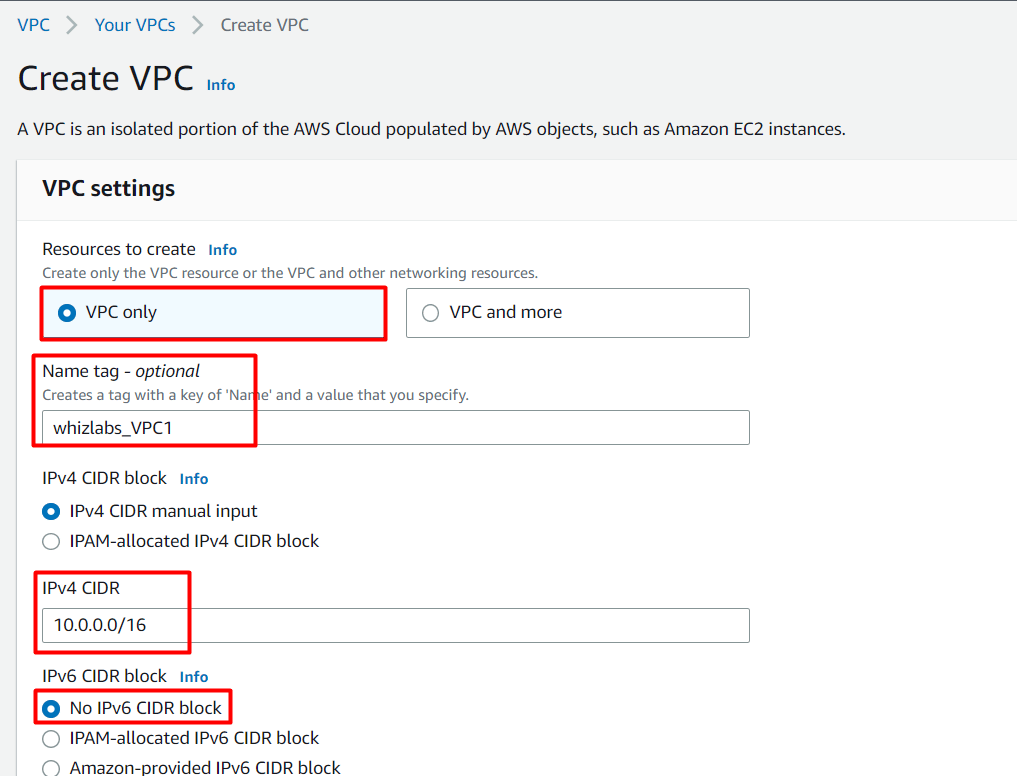 4. Click on **Create VPC**. To create the 2nd VPC, click on the **Create VPC** at the top right.
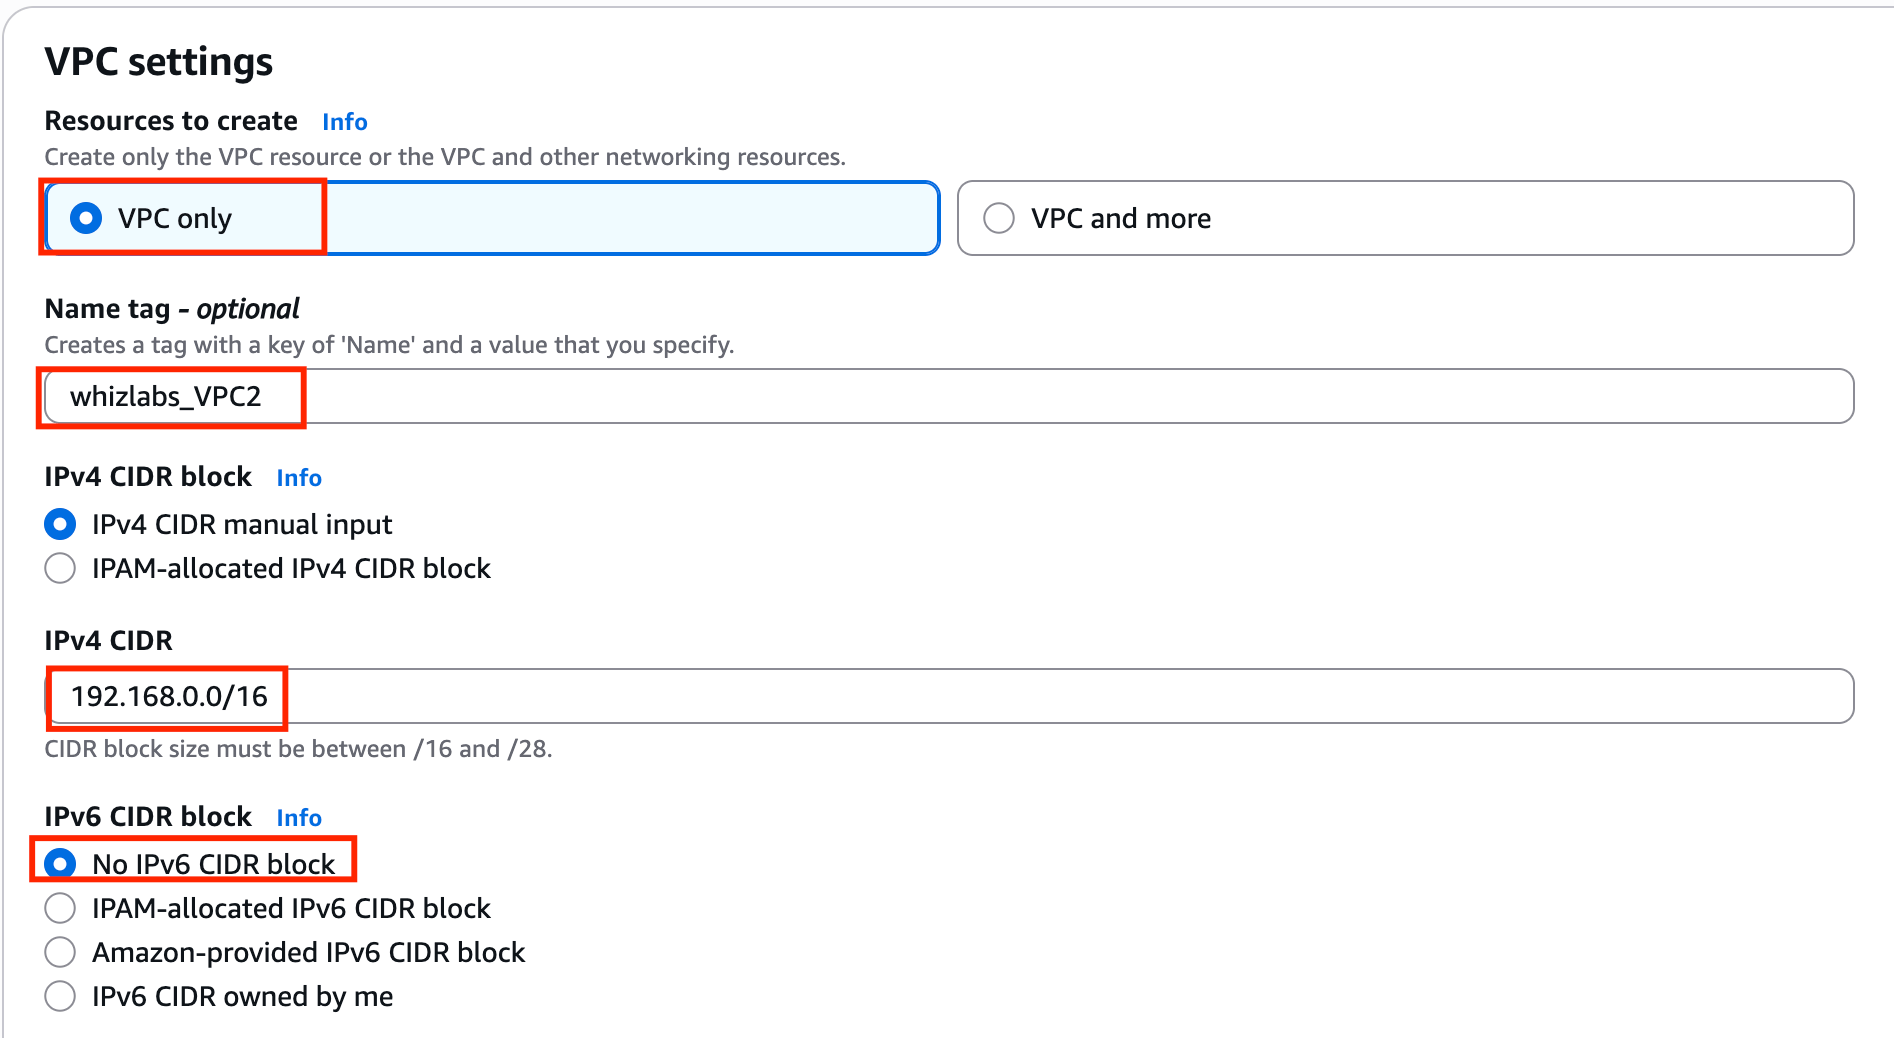
* Resources to create: Select **VPC only**
* Name tag: Enter **whizlabs\_VPC2**
* IPv4 CIDR block: Enter **192.168.0.0/16**
* Click on the **Create VPC** button.
4. Click on **Create VPC**. To create the 2nd VPC, click on the **Create VPC** at the top right.
* Resources to create: Select **VPC only**
* Name tag: Enter **whizlabs\_VPC2**
* IPv4 CIDR block: Enter **192.168.0.0/16**
* Click on the **Create VPC** button.
 **Note: Kindly note that there will be a Default VPC and don't edit or delete the default VPC.**
#### Task 3: Create and attach an Internet gateway
1. Navigate to the **Internet Gateways** from the left side menu and click on the **Create internet gateway** button.
* Name tag: Enter **whizlabs\_IGW**
2. Click on the **Create internet gateway**
3. Now click on the **Action** button and select **Attach to VPC**.
* Available VPCs: Select **whizlabs\_VPC1** from the list.
**Note: Kindly note that there will be a Default VPC and don't edit or delete the default VPC.**
#### Task 3: Create and attach an Internet gateway
1. Navigate to the **Internet Gateways** from the left side menu and click on the **Create internet gateway** button.
* Name tag: Enter **whizlabs\_IGW**
2. Click on the **Create internet gateway**
3. Now click on the **Action** button and select **Attach to VPC**.
* Available VPCs: Select **whizlabs\_VPC1** from the list.
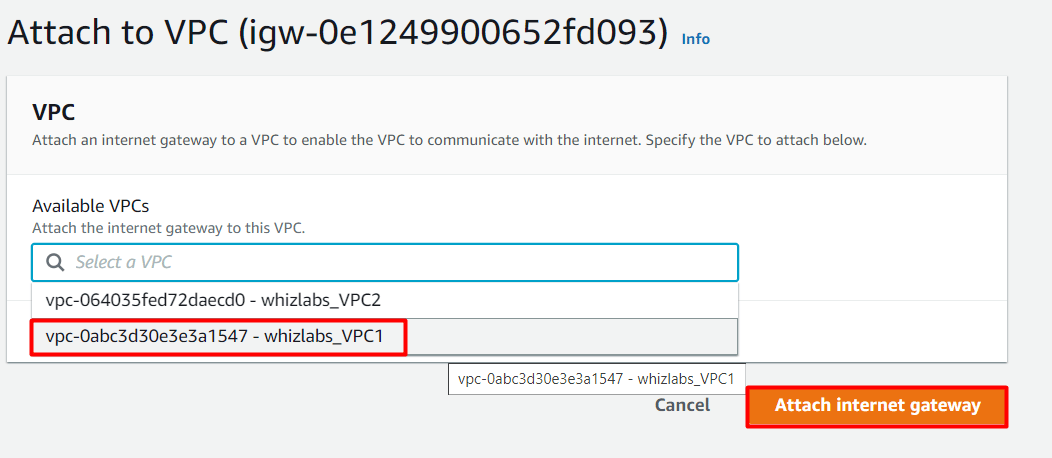 4. Now click on the **Attach internet gateway**.
#### Task 4: Creating subnets for both the VPCs
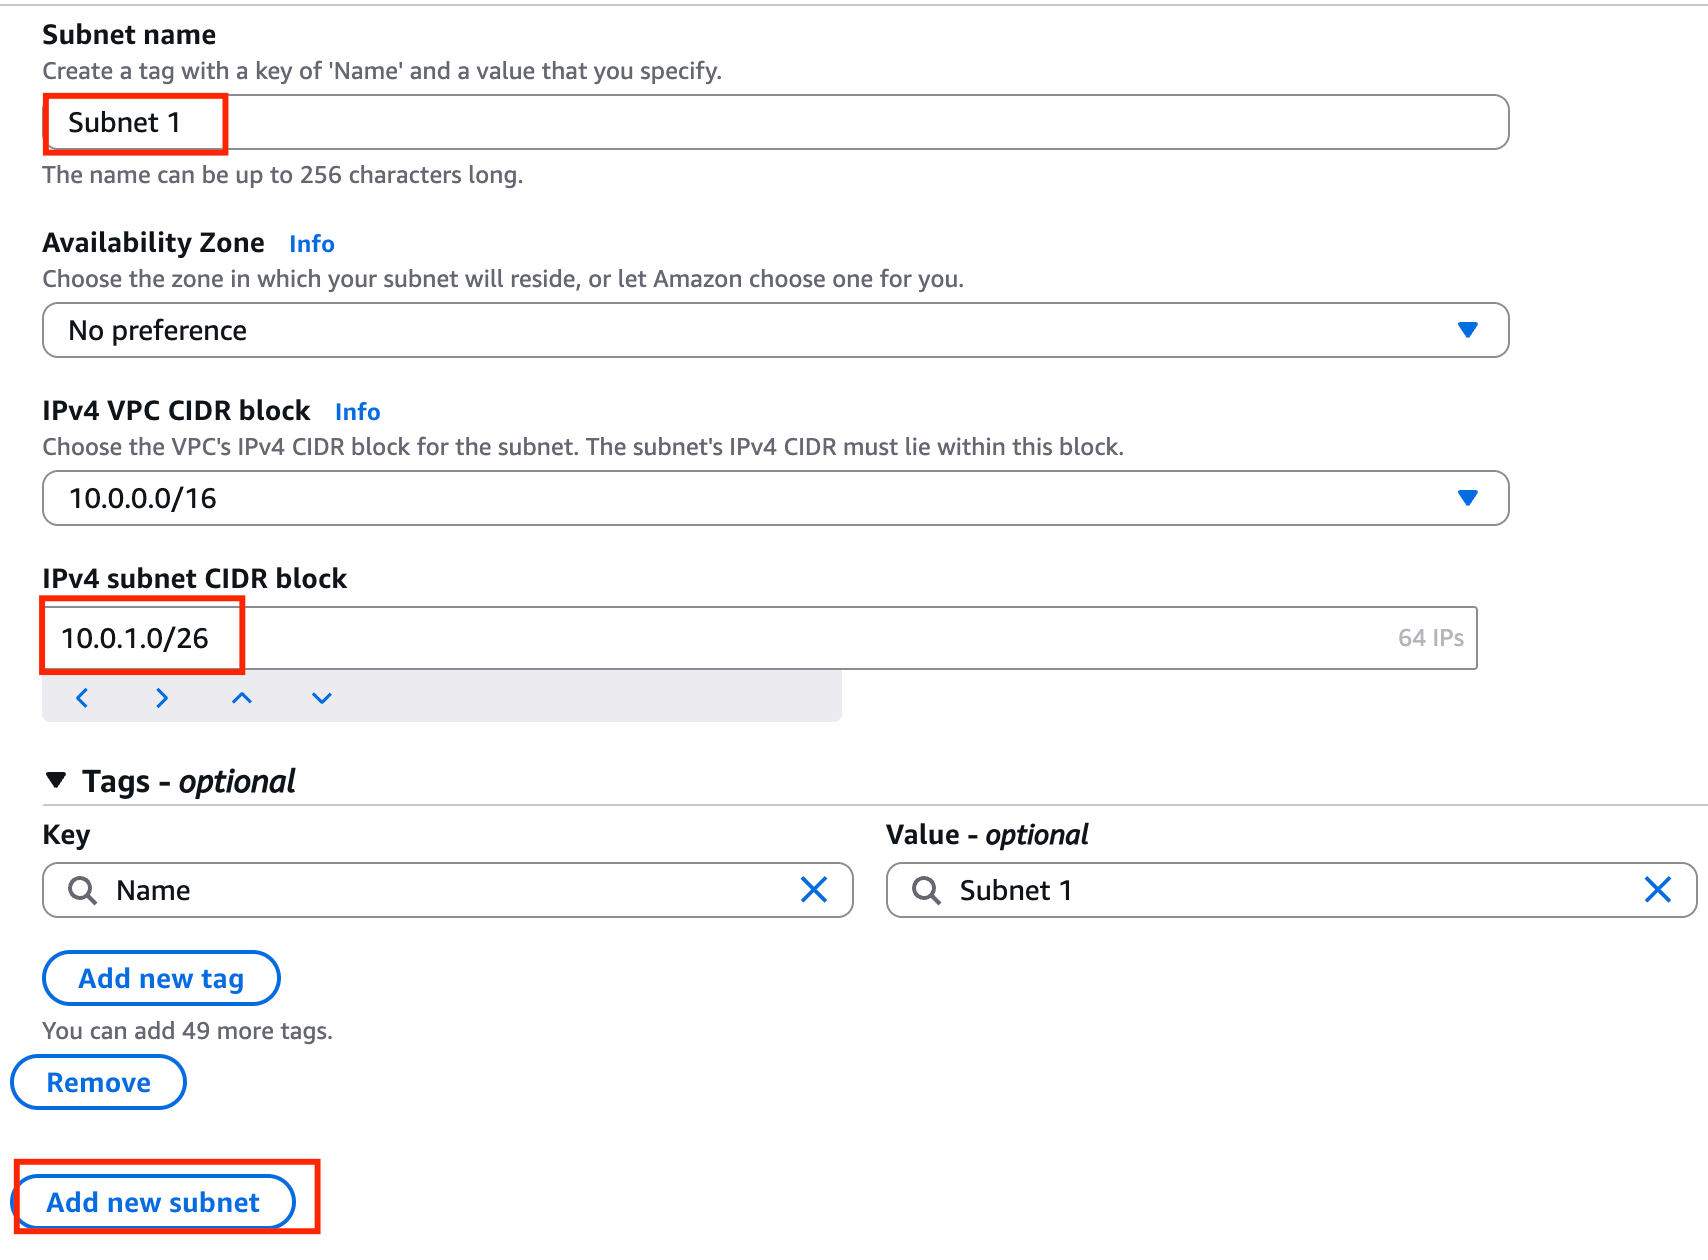
1. Navigate to **Subnets** from the left side menu and click on **Create Subnet.**
* VPC ID: Select the **whizlabs\_VPC1** VPC from the list.
* Subnet name: Enter **Subnet 1**
* Availability Zone: Leave as No Preference
* IPv4 CIDR block: Enter **10.0.1.0/26**
4. Now click on the **Attach internet gateway**.
#### Task 4: Creating subnets for both the VPCs
1. Navigate to **Subnets** from the left side menu and click on **Create Subnet.**
* VPC ID: Select the **whizlabs\_VPC1** VPC from the list.
* Subnet name: Enter **Subnet 1**
* Availability Zone: Leave as No Preference
* IPv4 CIDR block: Enter **10.0.1.0/26**
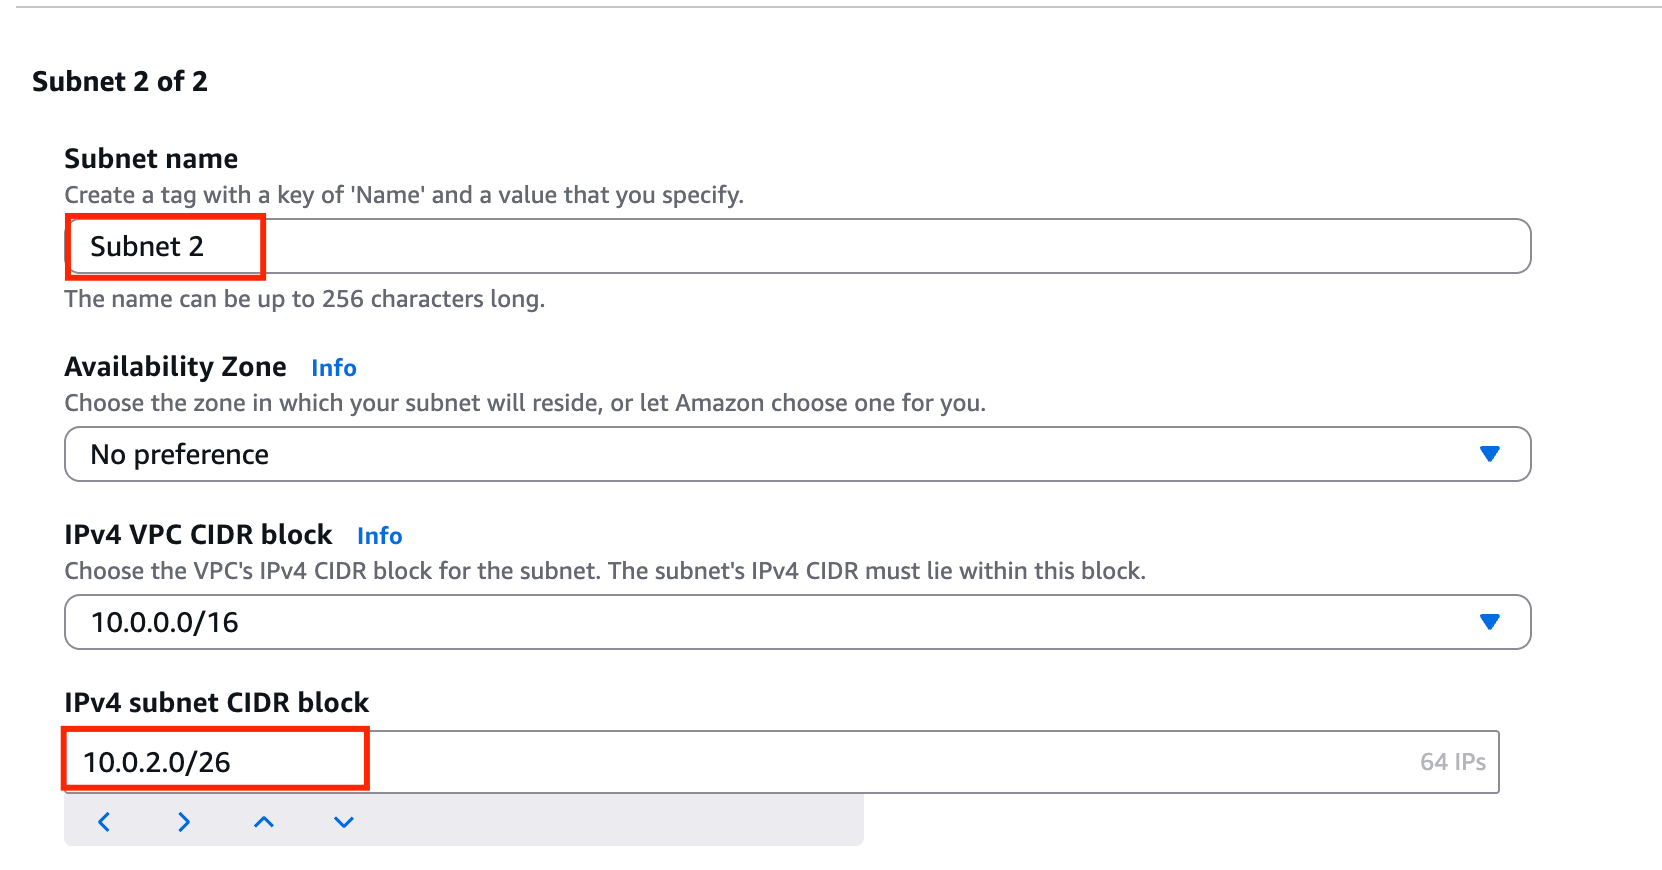
 2. Click on **Add new subnet** again to create one more subnet
* VPC ID: Select the **whizlabs\_VPC1** VPC from the list.
* Subnet name: Enter **Subnet 2**
* Availability Zone: Leave as No Preference
* IPv4 CIDR block: Enter **10.0.2.0/26**
2. Click on **Add new subnet** again to create one more subnet
* VPC ID: Select the **whizlabs\_VPC1** VPC from the list.
* Subnet name: Enter **Subnet 2**
* Availability Zone: Leave as No Preference
* IPv4 CIDR block: Enter **10.0.2.0/26**
 3. Now click on the **Create subnet** button.
4. Similarly, Create 2 Subnets in the VPC named **whizlabs\_VPC2** which can be used either for public or private resources.
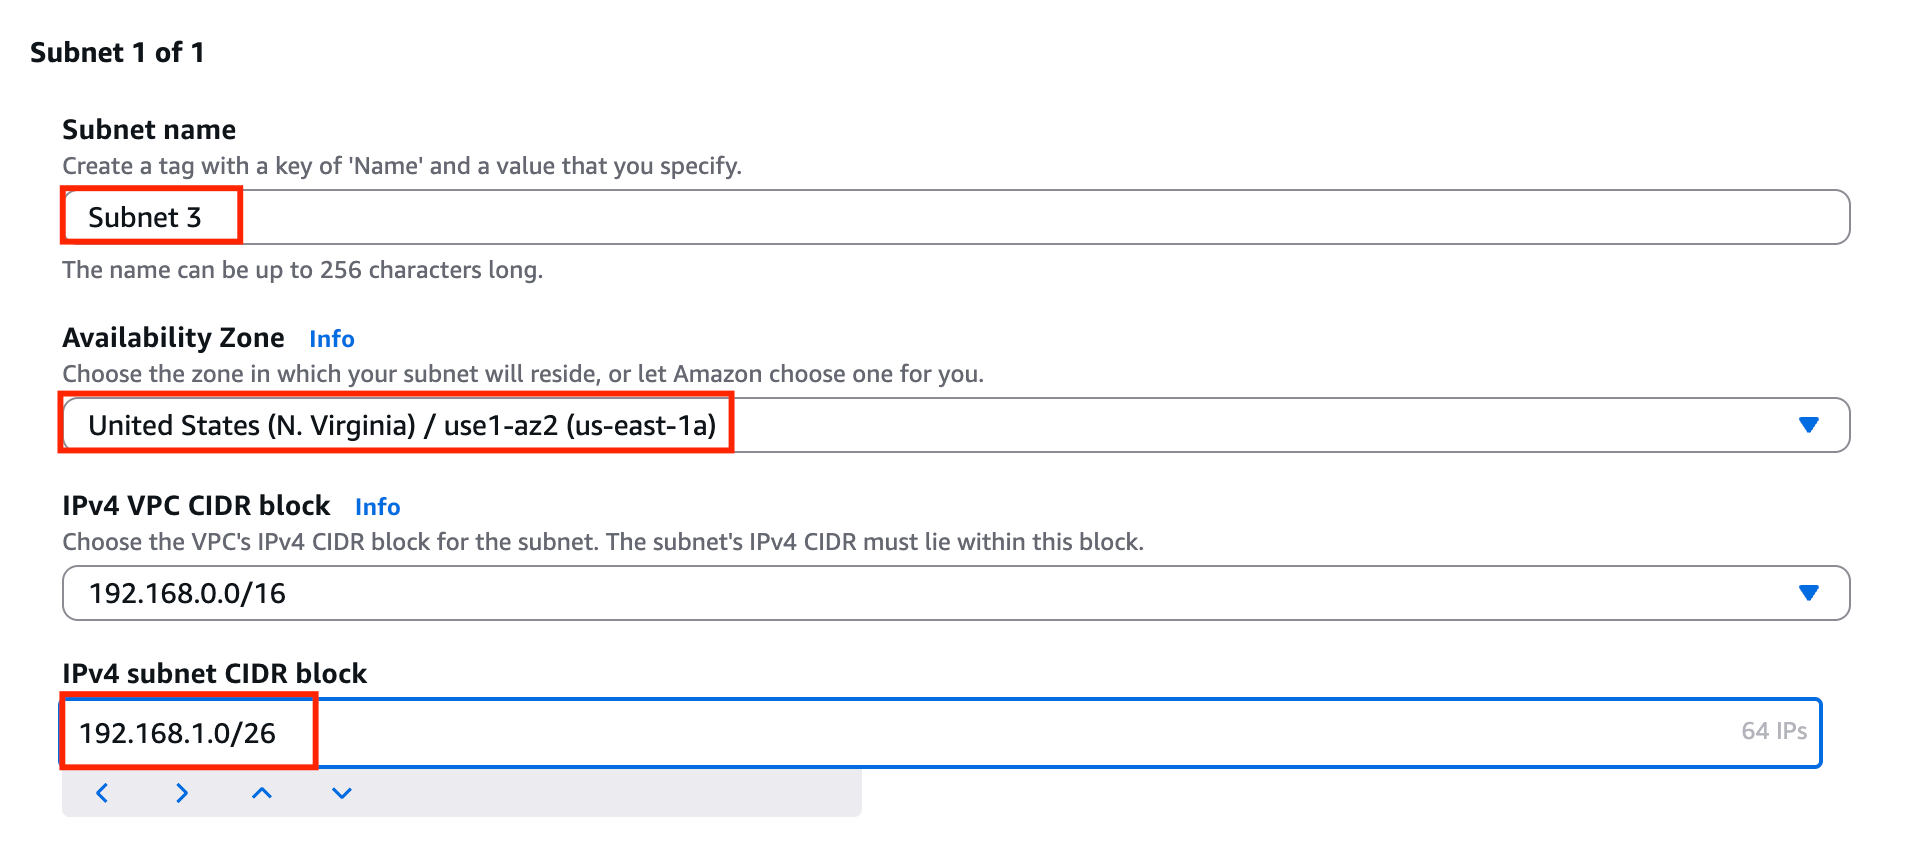
5. **For Subnet 1:**
* VPC ID: Select the **whizlabs\_VPC2** VPC from the list.
* Subnet name: Enter **Subnet 3**
* Availability Zone: Select **us-east-1a**
* IPv4 CIDR block: Enter **192.168.1.0/26**
3. Now click on the **Create subnet** button.
4. Similarly, Create 2 Subnets in the VPC named **whizlabs\_VPC2** which can be used either for public or private resources.
5. **For Subnet 1:**
* VPC ID: Select the **whizlabs\_VPC2** VPC from the list.
* Subnet name: Enter **Subnet 3**
* Availability Zone: Select **us-east-1a**
* IPv4 CIDR block: Enter **192.168.1.0/26**
 6. Click on **Add new subnet** to create one more subnet
* VPC ID: Select the **whizlabs\_VPC2** VPC from the list.
* Subnet name: Enter **Subnet 4**
* Availability Zone: Select **us-east-1b**
* IPv4 CIDR block: Enter **192.168.2.0/26**
7. Click on the **Create Subnet** button.
**Note: There will be 6 default subnets available in the N.Virginia region don’t delete or edit the subnets.**
#### Task 5: Creating Route tables and configuring routes and associating subnets
1. Create 2 route tables one for the Public route and another for the private route in different VPCs
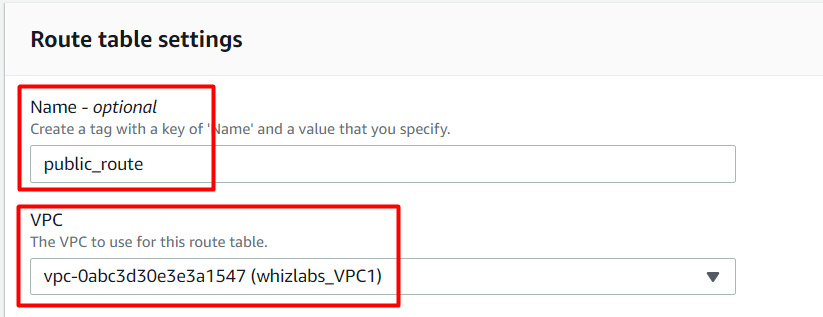
2. Navigate to **Route Tables** on the left side panel and click on the **Create route table** button.
* Name tag: Enter **public\_route**
* VPC: Select the **whizlabs\_VPC1** from the list.
6. Click on **Add new subnet** to create one more subnet
* VPC ID: Select the **whizlabs\_VPC2** VPC from the list.
* Subnet name: Enter **Subnet 4**
* Availability Zone: Select **us-east-1b**
* IPv4 CIDR block: Enter **192.168.2.0/26**
7. Click on the **Create Subnet** button.
**Note: There will be 6 default subnets available in the N.Virginia region don’t delete or edit the subnets.**
#### Task 5: Creating Route tables and configuring routes and associating subnets
1. Create 2 route tables one for the Public route and another for the private route in different VPCs
2. Navigate to **Route Tables** on the left side panel and click on the **Create route table** button.
* Name tag: Enter **public\_route**
* VPC: Select the **whizlabs\_VPC1** from the list.
 3. Now click on the **Create route table** button.
4. **Select** the **public\_route** from the list and go to the **Subnet Associations** tab in below.
5. Click on the **Edit subnet associations tab**.
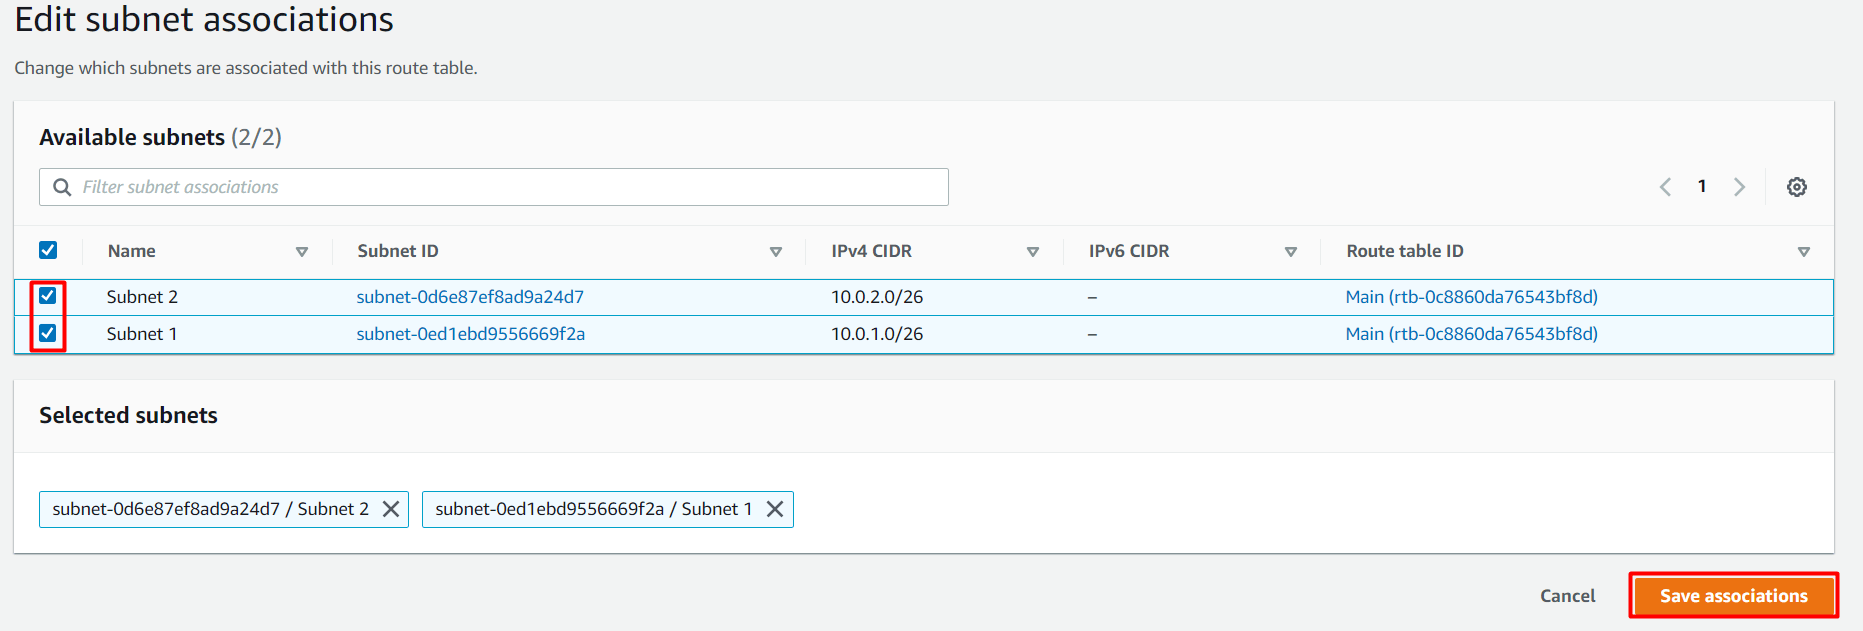
6. Now **Select** the subnet **Subnet 1** and **Subnet 2** and click on the **Save associations** button.
3. Now click on the **Create route table** button.
4. **Select** the **public\_route** from the list and go to the **Subnet Associations** tab in below.
5. Click on the **Edit subnet associations tab**.
6. Now **Select** the subnet **Subnet 1** and **Subnet 2** and click on the **Save associations** button.
 7. Click on the **Create route table button** again.
* Name tag: Enter **private\_route**
* VPC: Select the **whizlabs\_VPC2** from the list.
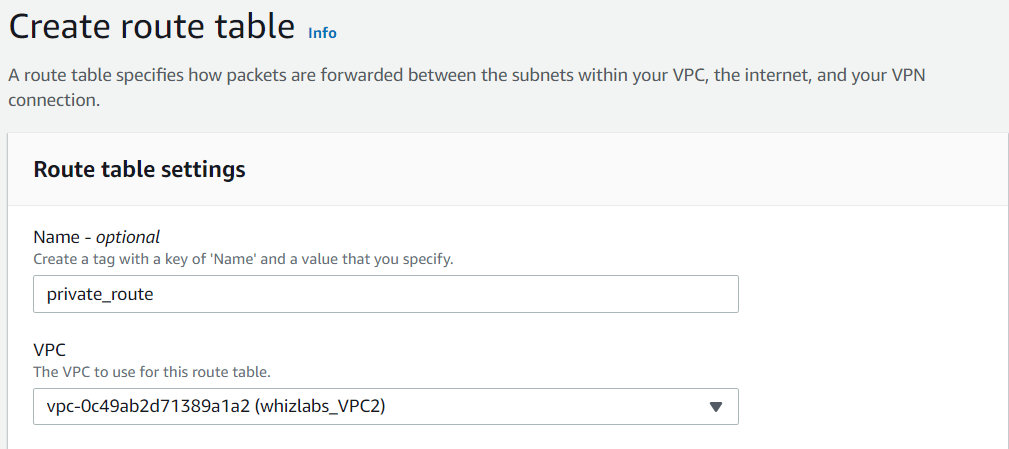
7. Click on the **Create route table button** again.
* Name tag: Enter **private\_route**
* VPC: Select the **whizlabs\_VPC2** from the list.
 8. Now click on the **Create route table** button.
9. **Select** the **private\_route** from the list and go to the **Subnet Associations** tab in below.
10. Click on the **Edit subnet associations** button.
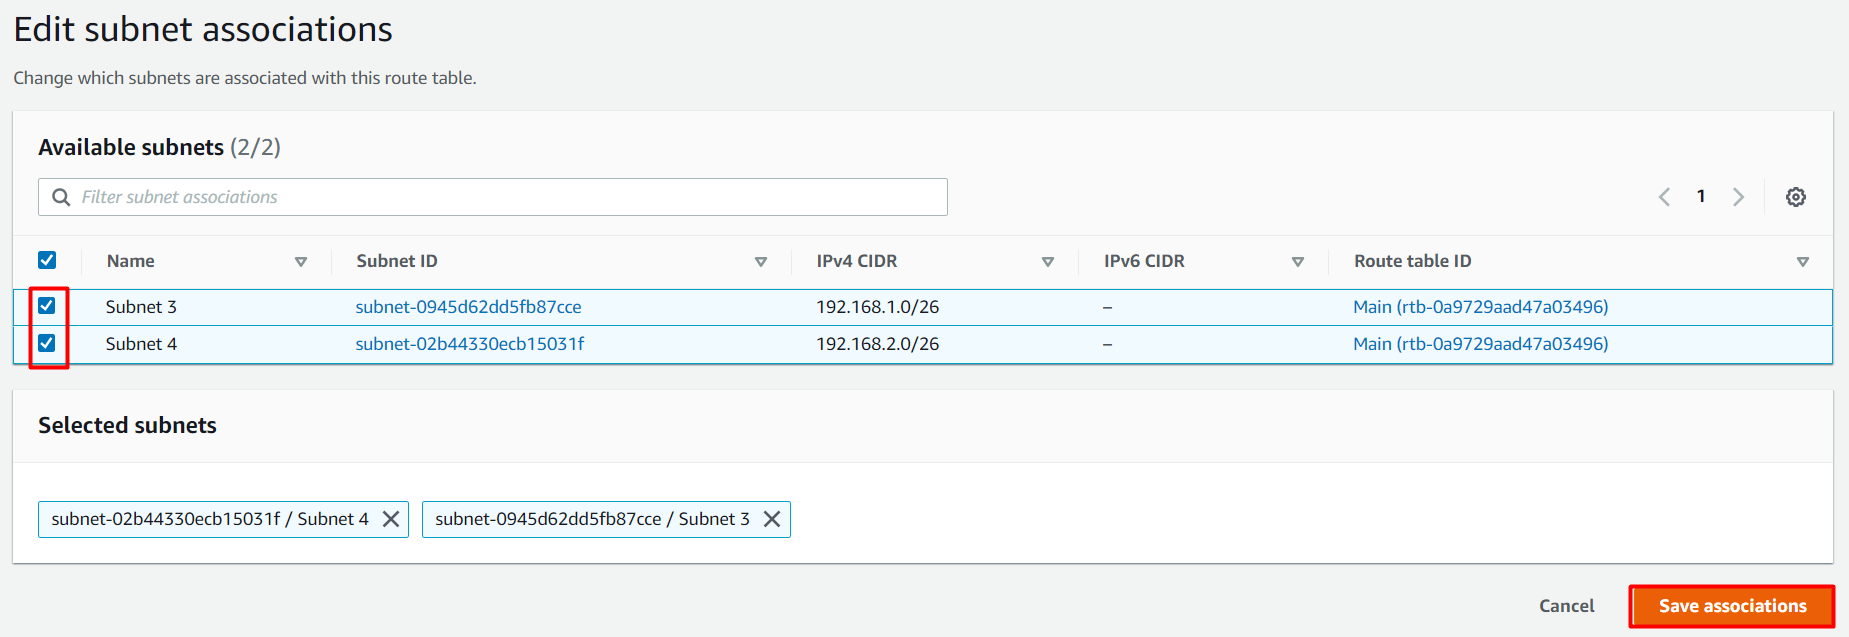
11. Now select **Subnet 3** and **Subnet 4** and click on the **Save associations** button.
8. Now click on the **Create route table** button.
9. **Select** the **private\_route** from the list and go to the **Subnet Associations** tab in below.
10. Click on the **Edit subnet associations** button.
11. Now select **Subnet 3** and **Subnet 4** and click on the **Save associations** button.
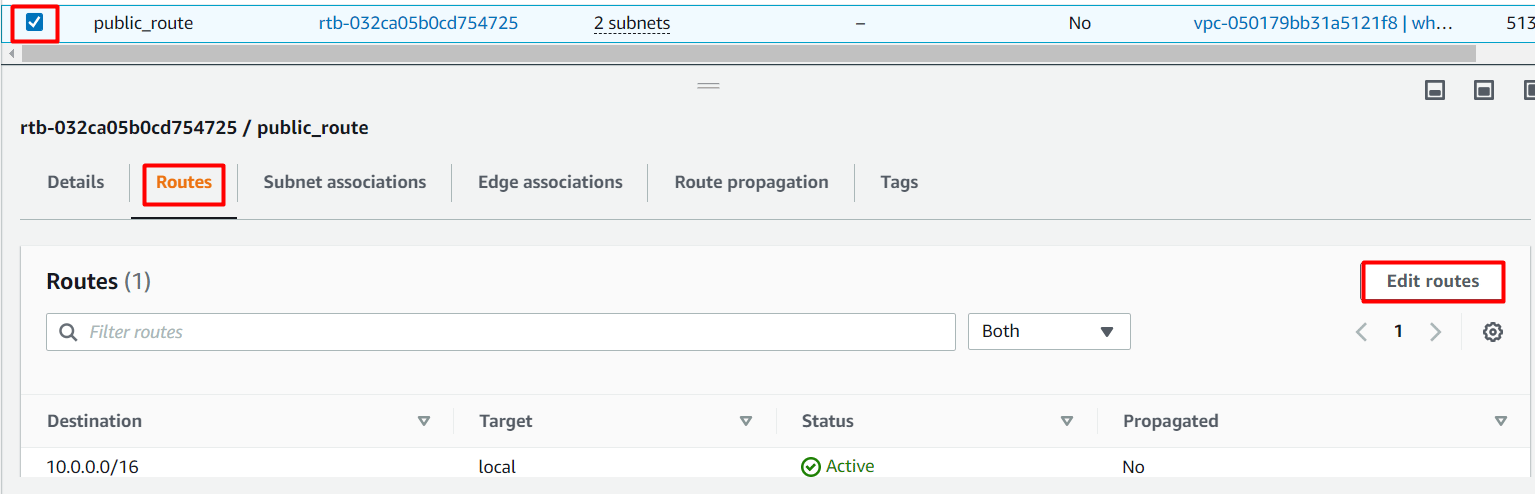
 12. **Select** the **public\_route** table. Go to the **Routes** tab below and click on the **Edit Routes** button.
 13. Now click on the **Add route** button.
* Destination: Enter **0.0.0.0/0**
* Target: Select **Internet Gateway** **whizlabs\_IGW** and then select the Internet Gateway id.
13. Now click on the **Add route** button.
* Destination: Enter **0.0.0.0/0**
* Target: Select **Internet Gateway** **whizlabs\_IGW** and then select the Internet Gateway id.
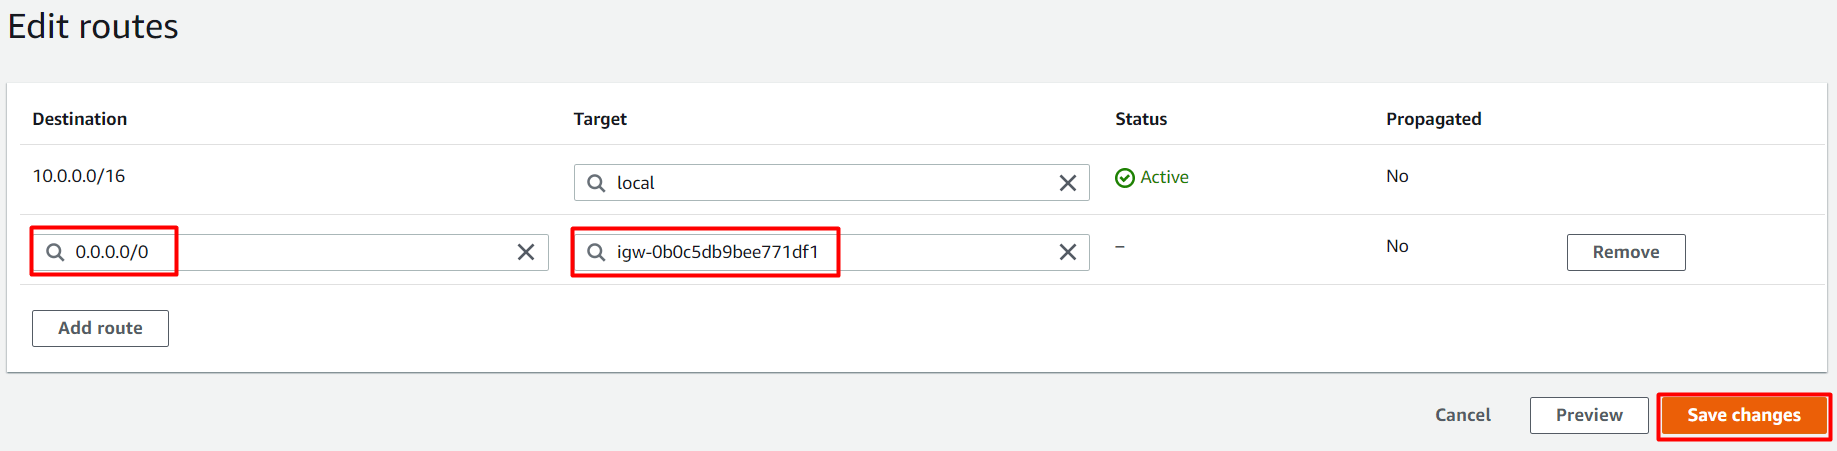 14. Click on the **Save changes** button.
**Note: Here we haven’t created any routes for the private\_route table. Don’t edit or delete the default Route table.**
#### Task 6: Creating VPC Peering Connection
1. Now Navigate to your **N.Virginia** region VPC page.
2. On the left side menu, select **Peering Connections** and click on **Create Peering connection**
* Peering connection name tag: Enter **whizlabs\_peer**
* VPC ID (Requester): Select **whizlabs\_VPC1**
* Account leave as default
* Region: Select This region (us-east-1)
* VPC ID (Accepter): **whizlabs\_VPC2**
14. Click on the **Save changes** button.
**Note: Here we haven’t created any routes for the private\_route table. Don’t edit or delete the default Route table.**
#### Task 6: Creating VPC Peering Connection
1. Now Navigate to your **N.Virginia** region VPC page.
2. On the left side menu, select **Peering Connections** and click on **Create Peering connection**
* Peering connection name tag: Enter **whizlabs\_peer**
* VPC ID (Requester): Select **whizlabs\_VPC1**
* Account leave as default
* Region: Select This region (us-east-1)
* VPC ID (Accepter): **whizlabs\_VPC2**
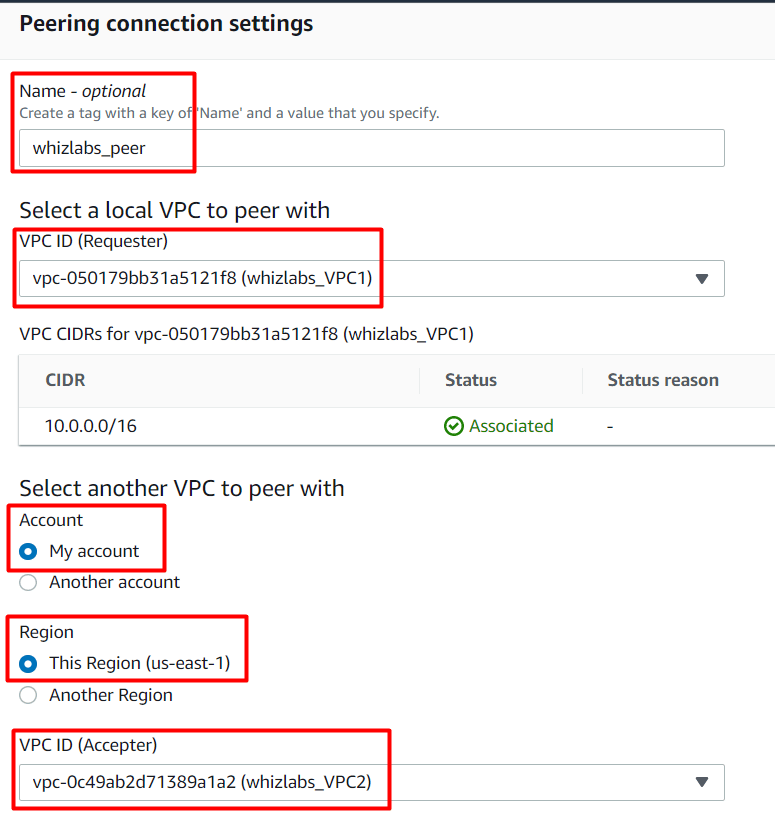 3. Click on the **Create peering connection** button.
4. Now the status of the peering will be in Pending Acceptance.
3. Click on the **Create peering connection** button.
4. Now the status of the peering will be in Pending Acceptance.
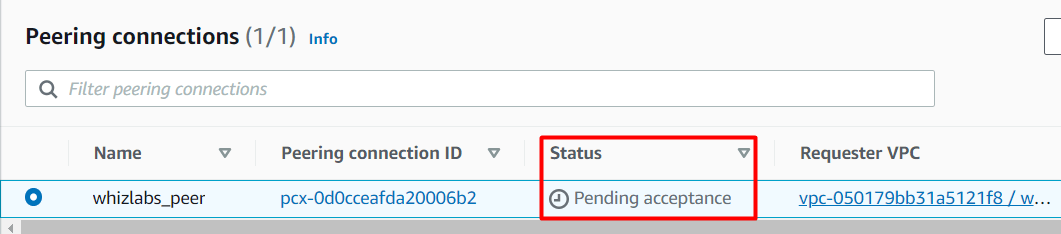 5. Select the peering connection and click on Action and then click on Accept Request.
6. Click on **Accept request** in the popup message.
5. Select the peering connection and click on Action and then click on Accept Request.
6. Click on **Accept request** in the popup message.
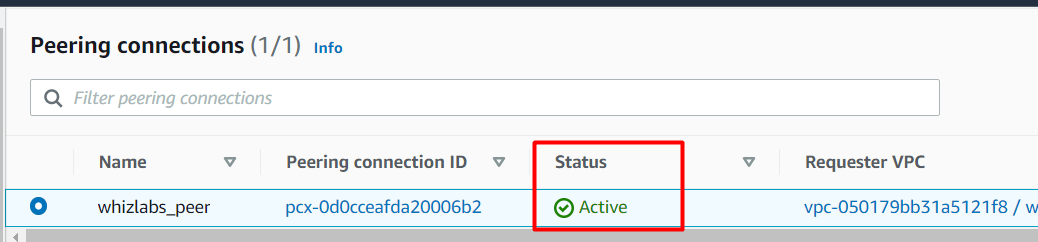
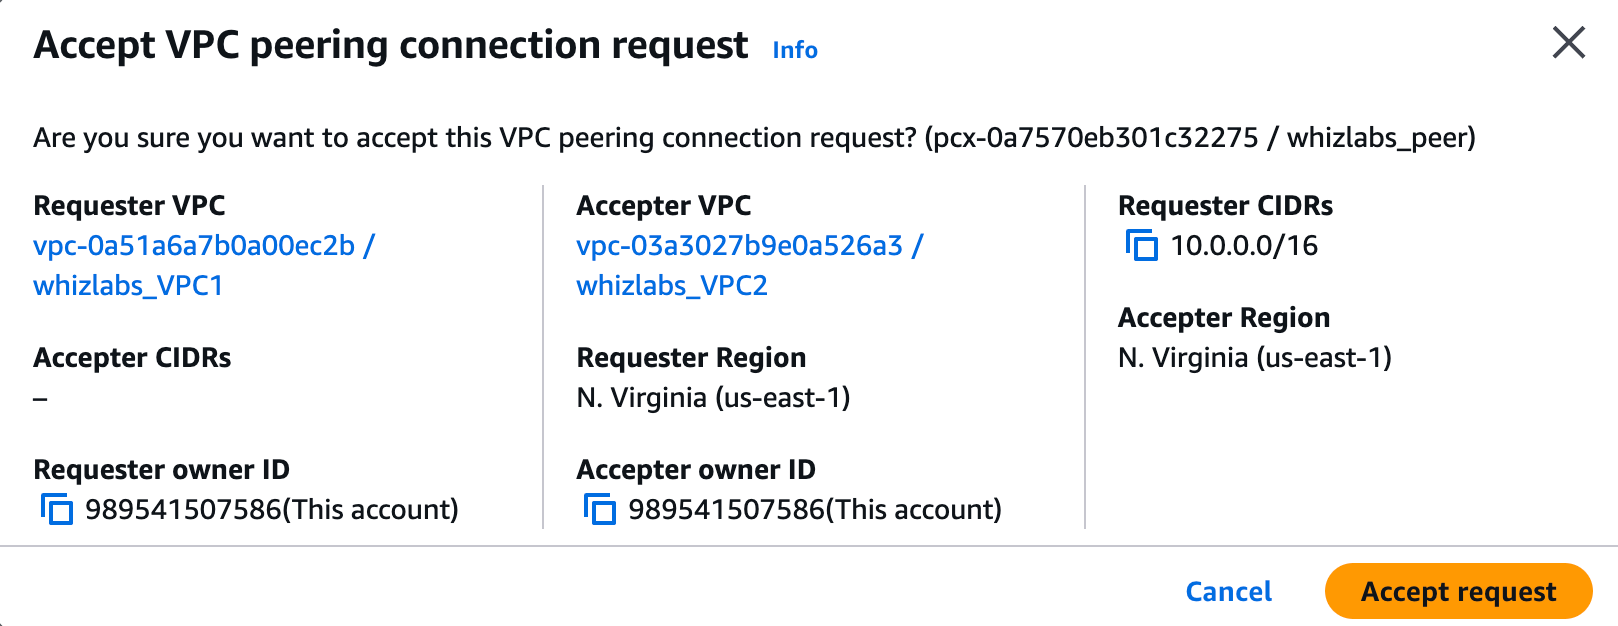 7. Once this is done, the Status changes to Active. If not please refresh the page.
 8. Now you need to add peering rules in route tables in both the VPC’s.
9. This is because, without this route, the traffic will not pass the route table and reach the EC2s.
**Note:** We can also establish a peering connection between different AWS accounts in that case you need to Choose Another account and have to provide another accounts Account ID. Peering connections can be established between Cross Region for this you need to select Another Region and have to Choose a region from the dropdown menu.
#### Task 7: Editing routes in the Route table
1. Once the peering connection is established you need to edit the route tables that you have created earlier to include the route of CIDR block of other VPC.
2. You need to add routes to the route table that you have created to include the VPC CIDR range of the other VPC you need to peer.
3. Go to Services, and click on **VPC**. Choose **Route Tables** and select **public\_route** table.
4. Select the **public\_route** table. Go to the **Routes** tab below and click on the **Edit routes** button.
5. Now click on the **Add route** button.
* Destination: Enter **192.168.0.0/16**
* Target: Select **Peering Connection** and then select the **whizlabs\_peer.**
8. Now you need to add peering rules in route tables in both the VPC’s.
9. This is because, without this route, the traffic will not pass the route table and reach the EC2s.
**Note:** We can also establish a peering connection between different AWS accounts in that case you need to Choose Another account and have to provide another accounts Account ID. Peering connections can be established between Cross Region for this you need to select Another Region and have to Choose a region from the dropdown menu.
#### Task 7: Editing routes in the Route table
1. Once the peering connection is established you need to edit the route tables that you have created earlier to include the route of CIDR block of other VPC.
2. You need to add routes to the route table that you have created to include the VPC CIDR range of the other VPC you need to peer.
3. Go to Services, and click on **VPC**. Choose **Route Tables** and select **public\_route** table.
4. Select the **public\_route** table. Go to the **Routes** tab below and click on the **Edit routes** button.
5. Now click on the **Add route** button.
* Destination: Enter **192.168.0.0/16**
* Target: Select **Peering Connection** and then select the **whizlabs\_peer.**
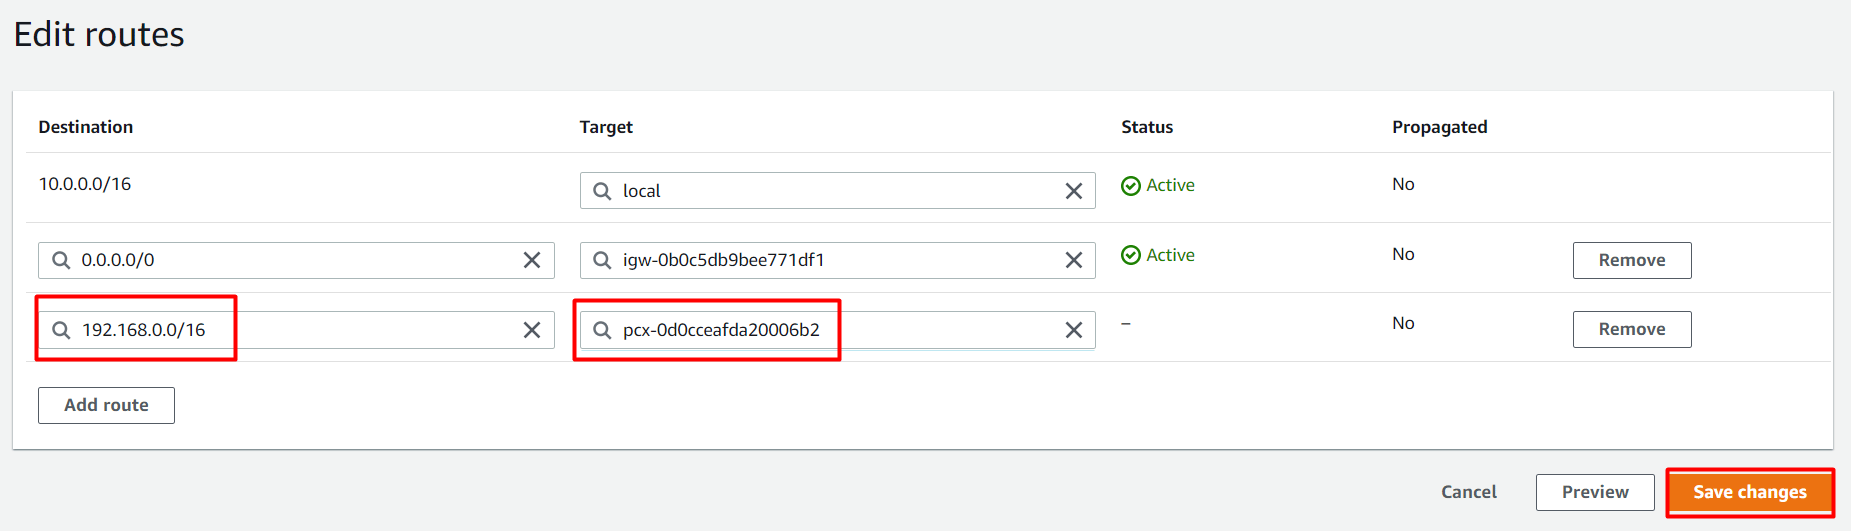 6. Click on the **Save changes** button.
7. Now Select the **private\_route** table. Go to the **Routes** tab below and click on the **Edit routes** button.
8. Click on the **Add route** button.
* Destination: Enter **10.0.0.0/16**
* Target: Select **Peering Connection** and then select the **whizlabs\_peer**.
6. Click on the **Save changes** button.
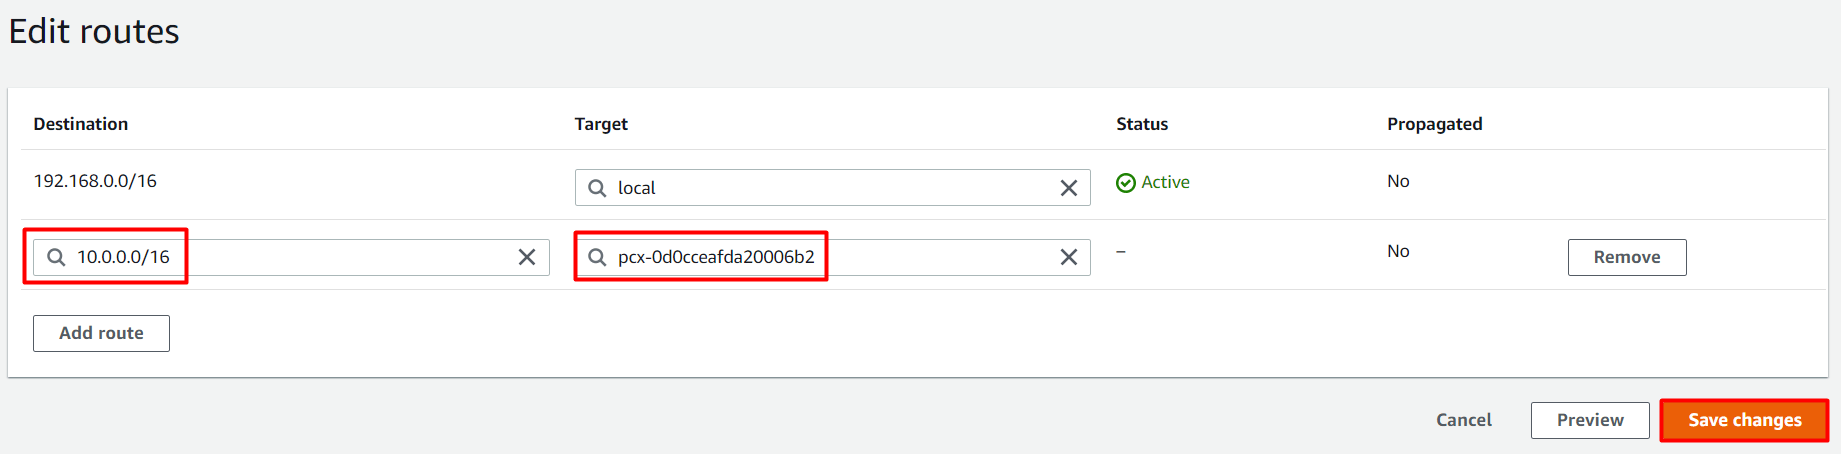
7. Now Select the **private\_route** table. Go to the **Routes** tab below and click on the **Edit routes** button.
8. Click on the **Add route** button.
* Destination: Enter **10.0.0.0/16**
* Target: Select **Peering Connection** and then select the **whizlabs\_peer**.
 #### Task 8: Creating an EC2 Instance
1. Make sure you are in the **N.Virginia** Region.
2. Navigate to **EC2** by clicking on the **Services** menu at the top, then click on **EC2** in the **Compute** section.
3. Navigate to **Instances** from the left side menu and click on the **Launch Instance** button.
4. Enter Name as **VPC\_peering\_EC2**.
5. Choose an Amazon Machine Image (AMI): Select **Amazon Linux 2023 kernel-6.1 AMI** in the drop-down.
* Choose **architecture** as **64-bit(x86)**
#### Task 8: Creating an EC2 Instance
1. Make sure you are in the **N.Virginia** Region.
2. Navigate to **EC2** by clicking on the **Services** menu at the top, then click on **EC2** in the **Compute** section.
3. Navigate to **Instances** from the left side menu and click on the **Launch Instance** button.
4. Enter Name as **VPC\_peering\_EC2**.
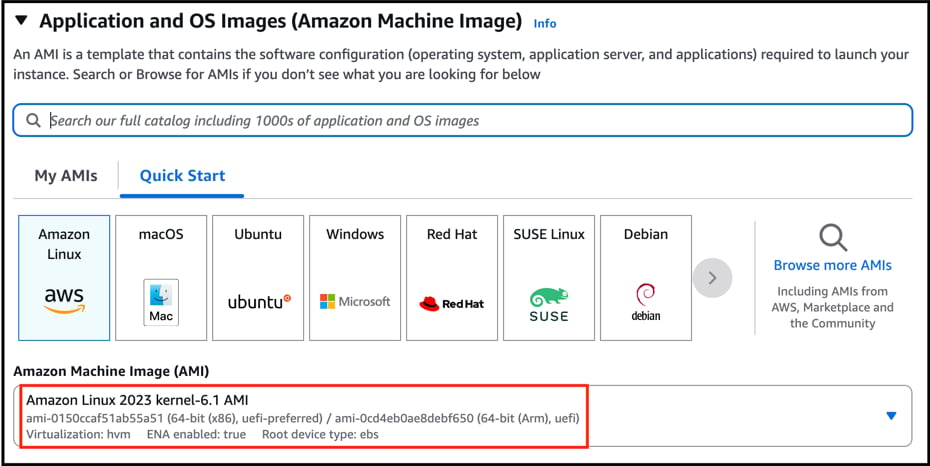
5. Choose an Amazon Machine Image (AMI): Select **Amazon Linux 2023 kernel-6.1 AMI** in the drop-down.
* Choose **architecture** as **64-bit(x86)**
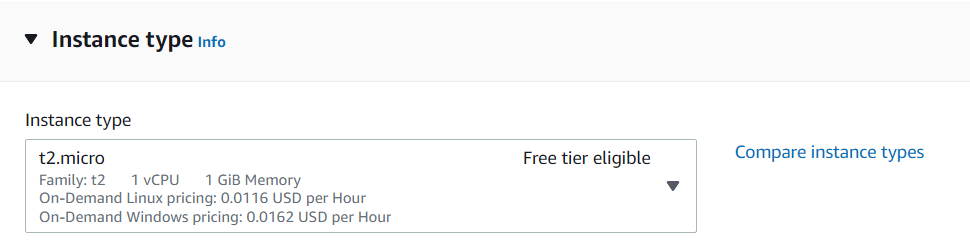
 6. Choose an Instance Type: Select **t2.micro.**
 7. For Key pair: Select **Create a new key pair** Button
* Key pair name: Enter **WhizKey**
* Key pair type: Select **RSA**
* Private key file format: Select **.pem**
8. Select **the Create key pair** Button.
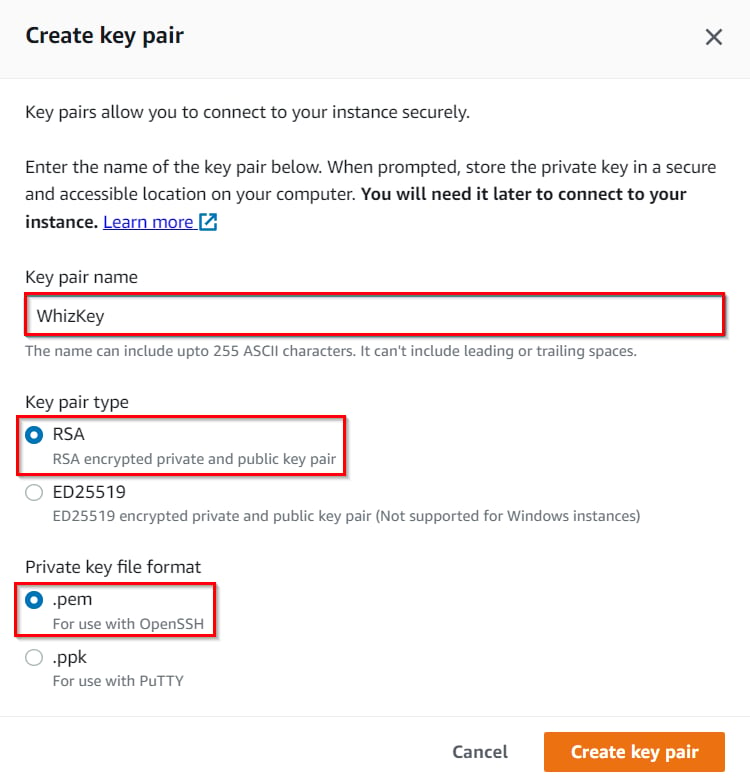
7. For Key pair: Select **Create a new key pair** Button
* Key pair name: Enter **WhizKey**
* Key pair type: Select **RSA**
* Private key file format: Select **.pem**
8. Select **the Create key pair** Button.
 9. In Network Settings Click on **Edit** Button:
* VPC - required: Select **whizlabs\_VPC1**
* Subnet name: **Select any Subnet**
* Auto-assign public IP: **Enable**
* Select **Create new Security group**
* Security group name: Enter **MyEC2Server\_SG**
* Description: Enter **Security Group to allow traffic to EC2**
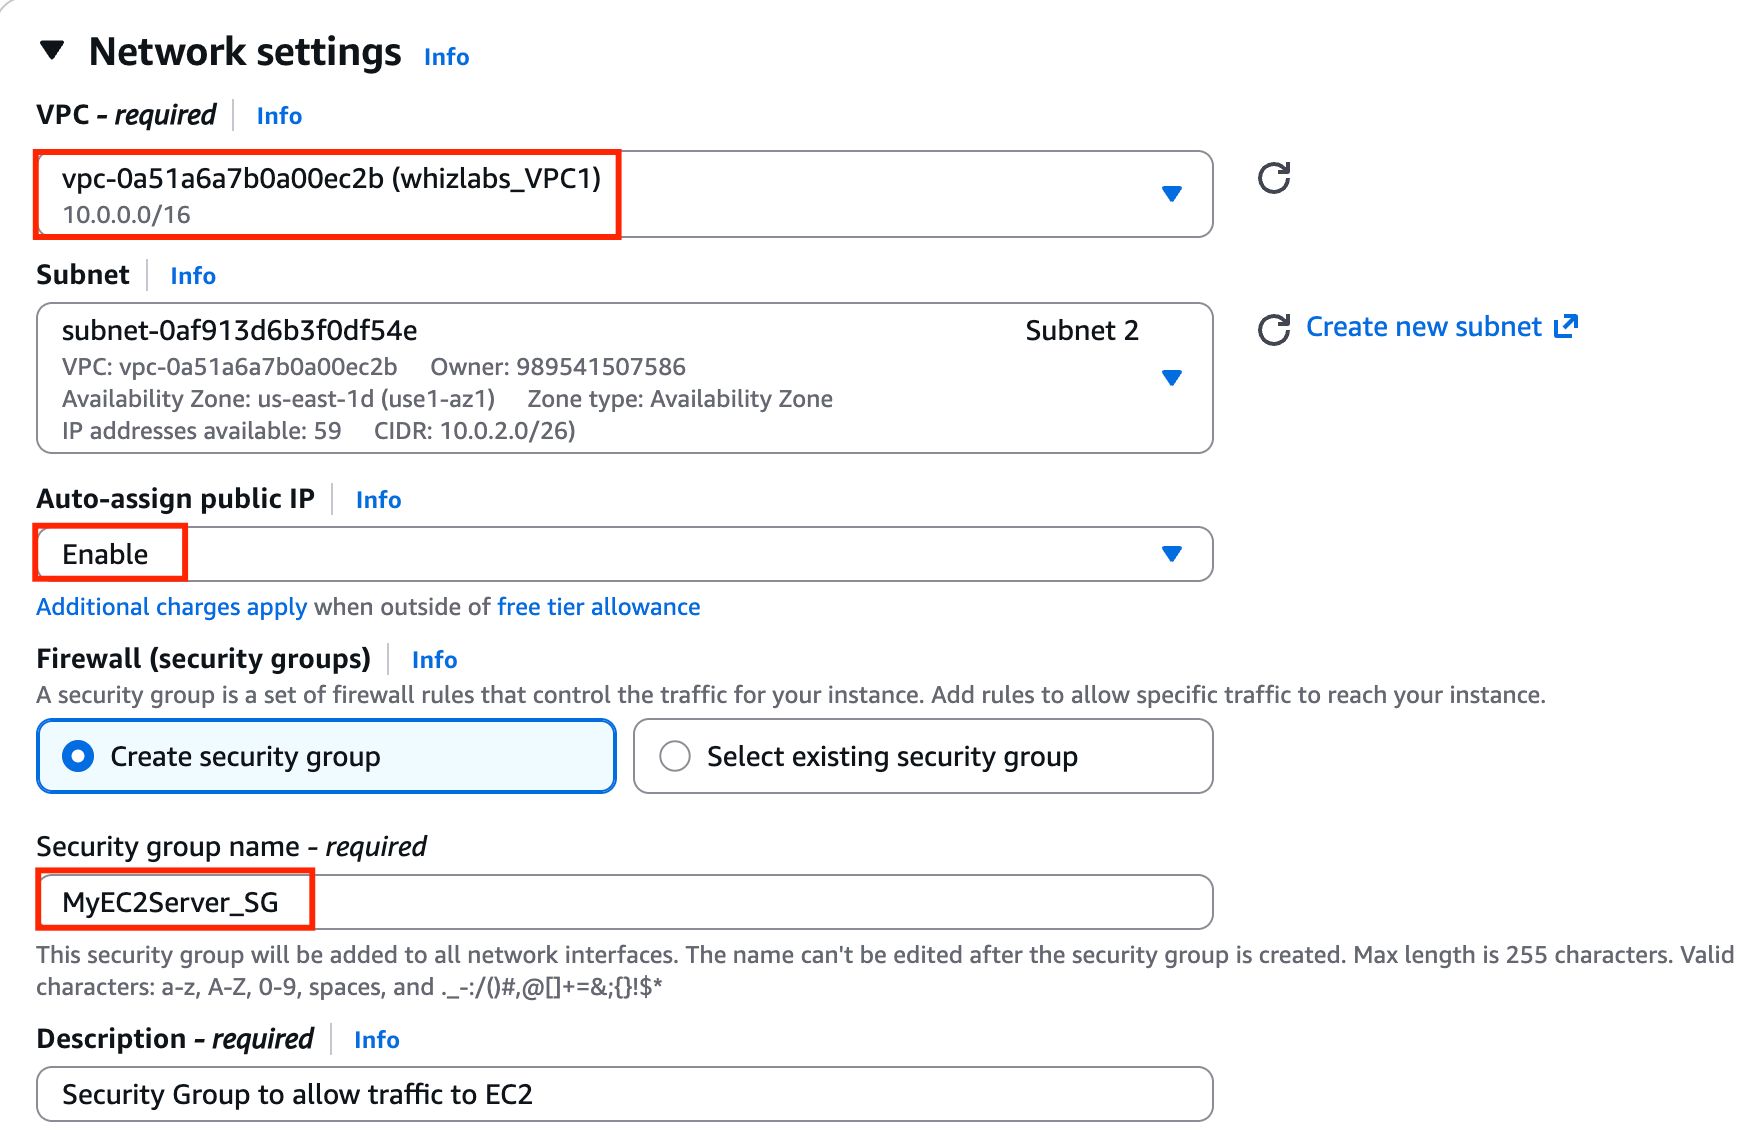
9. In Network Settings Click on **Edit** Button:
* VPC - required: Select **whizlabs\_VPC1**
* Subnet name: **Select any Subnet**
* Auto-assign public IP: **Enable**
* Select **Create new Security group**
* Security group name: Enter **MyEC2Server\_SG**
* Description: Enter **Security Group to allow traffic to EC2**
 * To add SSH,
* Choose Type: **SSH**
* Source: Select **Anywhere**
10. Now under **Advanced Details**, scroll down to **User Data**, and copy and **paste** the script:
```
#!/bin/bash
sudo su
dnf update -y
dnf install mariadb105 -y
```
11. Keep the Rest thing Default and Click on **the Launch Instance** Button.
12. Launch Status: Your instance is now launching, Click on the instance ID and wait for the complete initialization of the instance till the status changes to running.
* To add SSH,
* Choose Type: **SSH**
* Source: Select **Anywhere**
10. Now under **Advanced Details**, scroll down to **User Data**, and copy and **paste** the script:
```
#!/bin/bash
sudo su
dnf update -y
dnf install mariadb105 -y
```
11. Keep the Rest thing Default and Click on **the Launch Instance** Button.
12. Launch Status: Your instance is now launching, Click on the instance ID and wait for the complete initialization of the instance till the status changes to running.
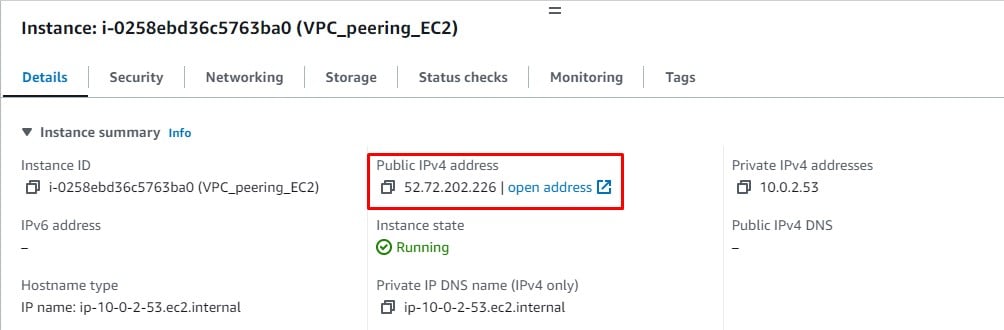
 13. Note down the sample IPv4 Public IP Address of the EC2 instance. A sample is shown in the screenshot below.
 #### Task 9: Creating a Security Group for the RDS instance
1. Create a security group for the RDS instance which will provide access for the EC2 instance to connect with the RDS.
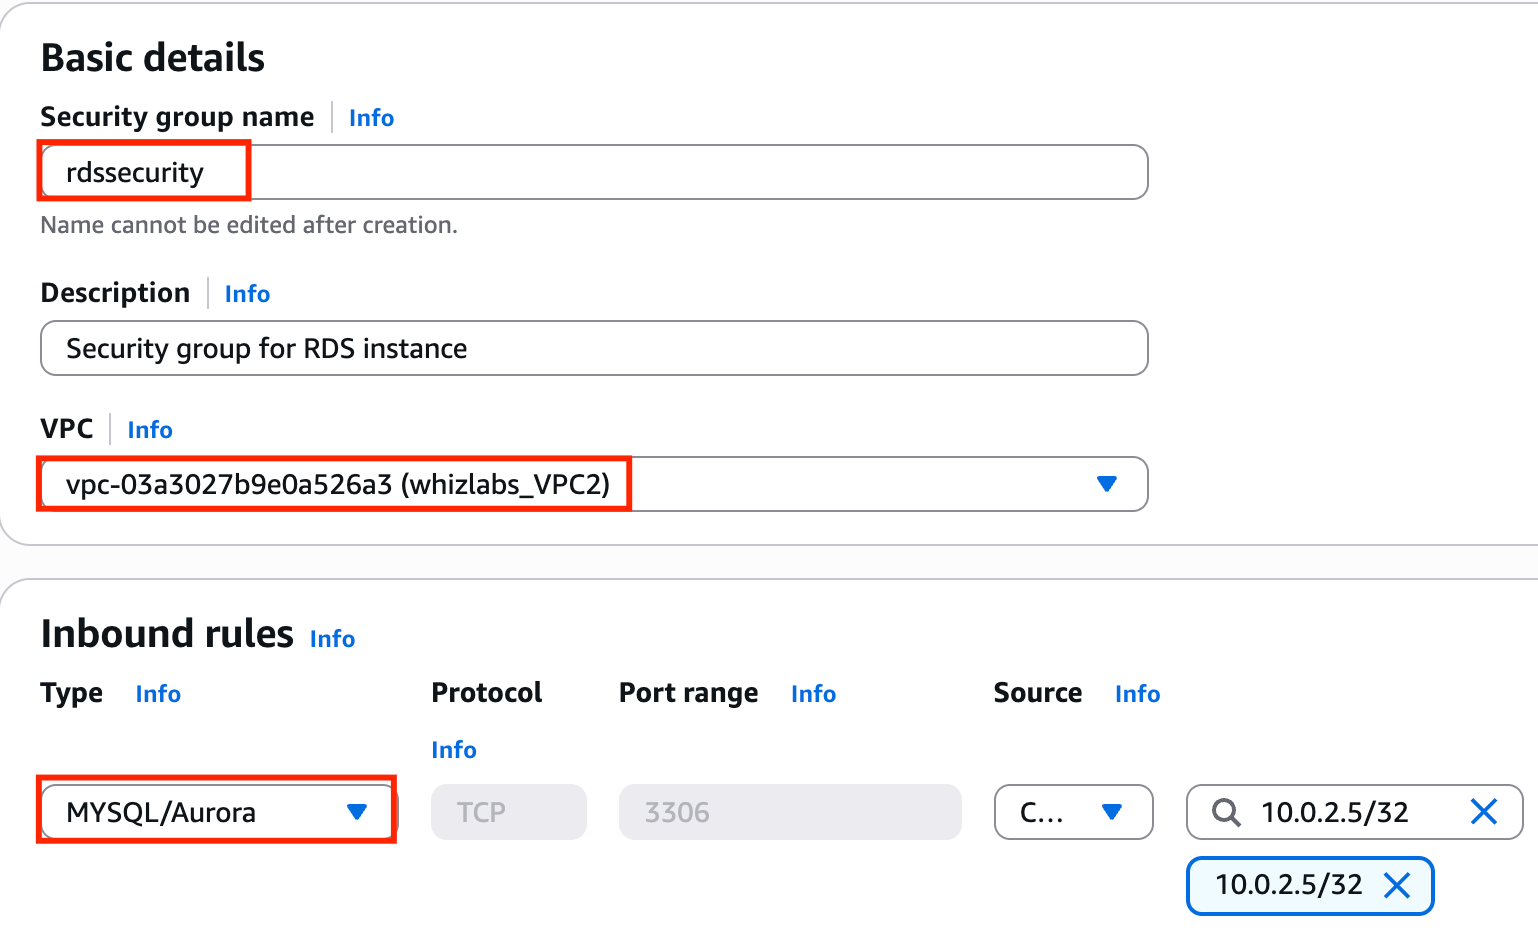
2. Navigate to **VPC** by clicking **Services** on the top menu. Click on **Security Groups** in the left navigation panel. Click on the **Create Security Group** button and then provide the following details
* Security group name: Enter **rdssecurity**
* Description: **Security group for RDS instance**
* VPC: **whizlabs\_VPC2** (select from the dropdown)
3. Now you need to add Inbound rules to the Security group that you have created, Click on **Add rule** under **Inbound Rules**
* Type: **MYSQL/Aurora** (select from the drop-down)
* Source: **Custom**: Copy and **paste the EC2 instance’s private IP** from the instance description page along with a CIDR block range /32 at the end (in my case it is 10.0.1.61/32 )
* Click on the **Create Security Group** button\*\*.\*\*
#### Task 9: Creating a Security Group for the RDS instance
1. Create a security group for the RDS instance which will provide access for the EC2 instance to connect with the RDS.
2. Navigate to **VPC** by clicking **Services** on the top menu. Click on **Security Groups** in the left navigation panel. Click on the **Create Security Group** button and then provide the following details
* Security group name: Enter **rdssecurity**
* Description: **Security group for RDS instance**
* VPC: **whizlabs\_VPC2** (select from the dropdown)
3. Now you need to add Inbound rules to the Security group that you have created, Click on **Add rule** under **Inbound Rules**
* Type: **MYSQL/Aurora** (select from the drop-down)
* Source: **Custom**: Copy and **paste the EC2 instance’s private IP** from the instance description page along with a CIDR block range /32 at the end (in my case it is 10.0.1.61/32 )
* Click on the **Create Security Group** button\*\*.\*\*
 #### Task 10: Create a RDS Instance
1. Navigate to **RDS** available under the database section of the Services menu.
2. Make sure you are in the **N.Virginia** Region.
3. Click on **Databases** in the left panel.
4. Click on **Create Database**.
5. Let’s configure the database in the Create Database Page
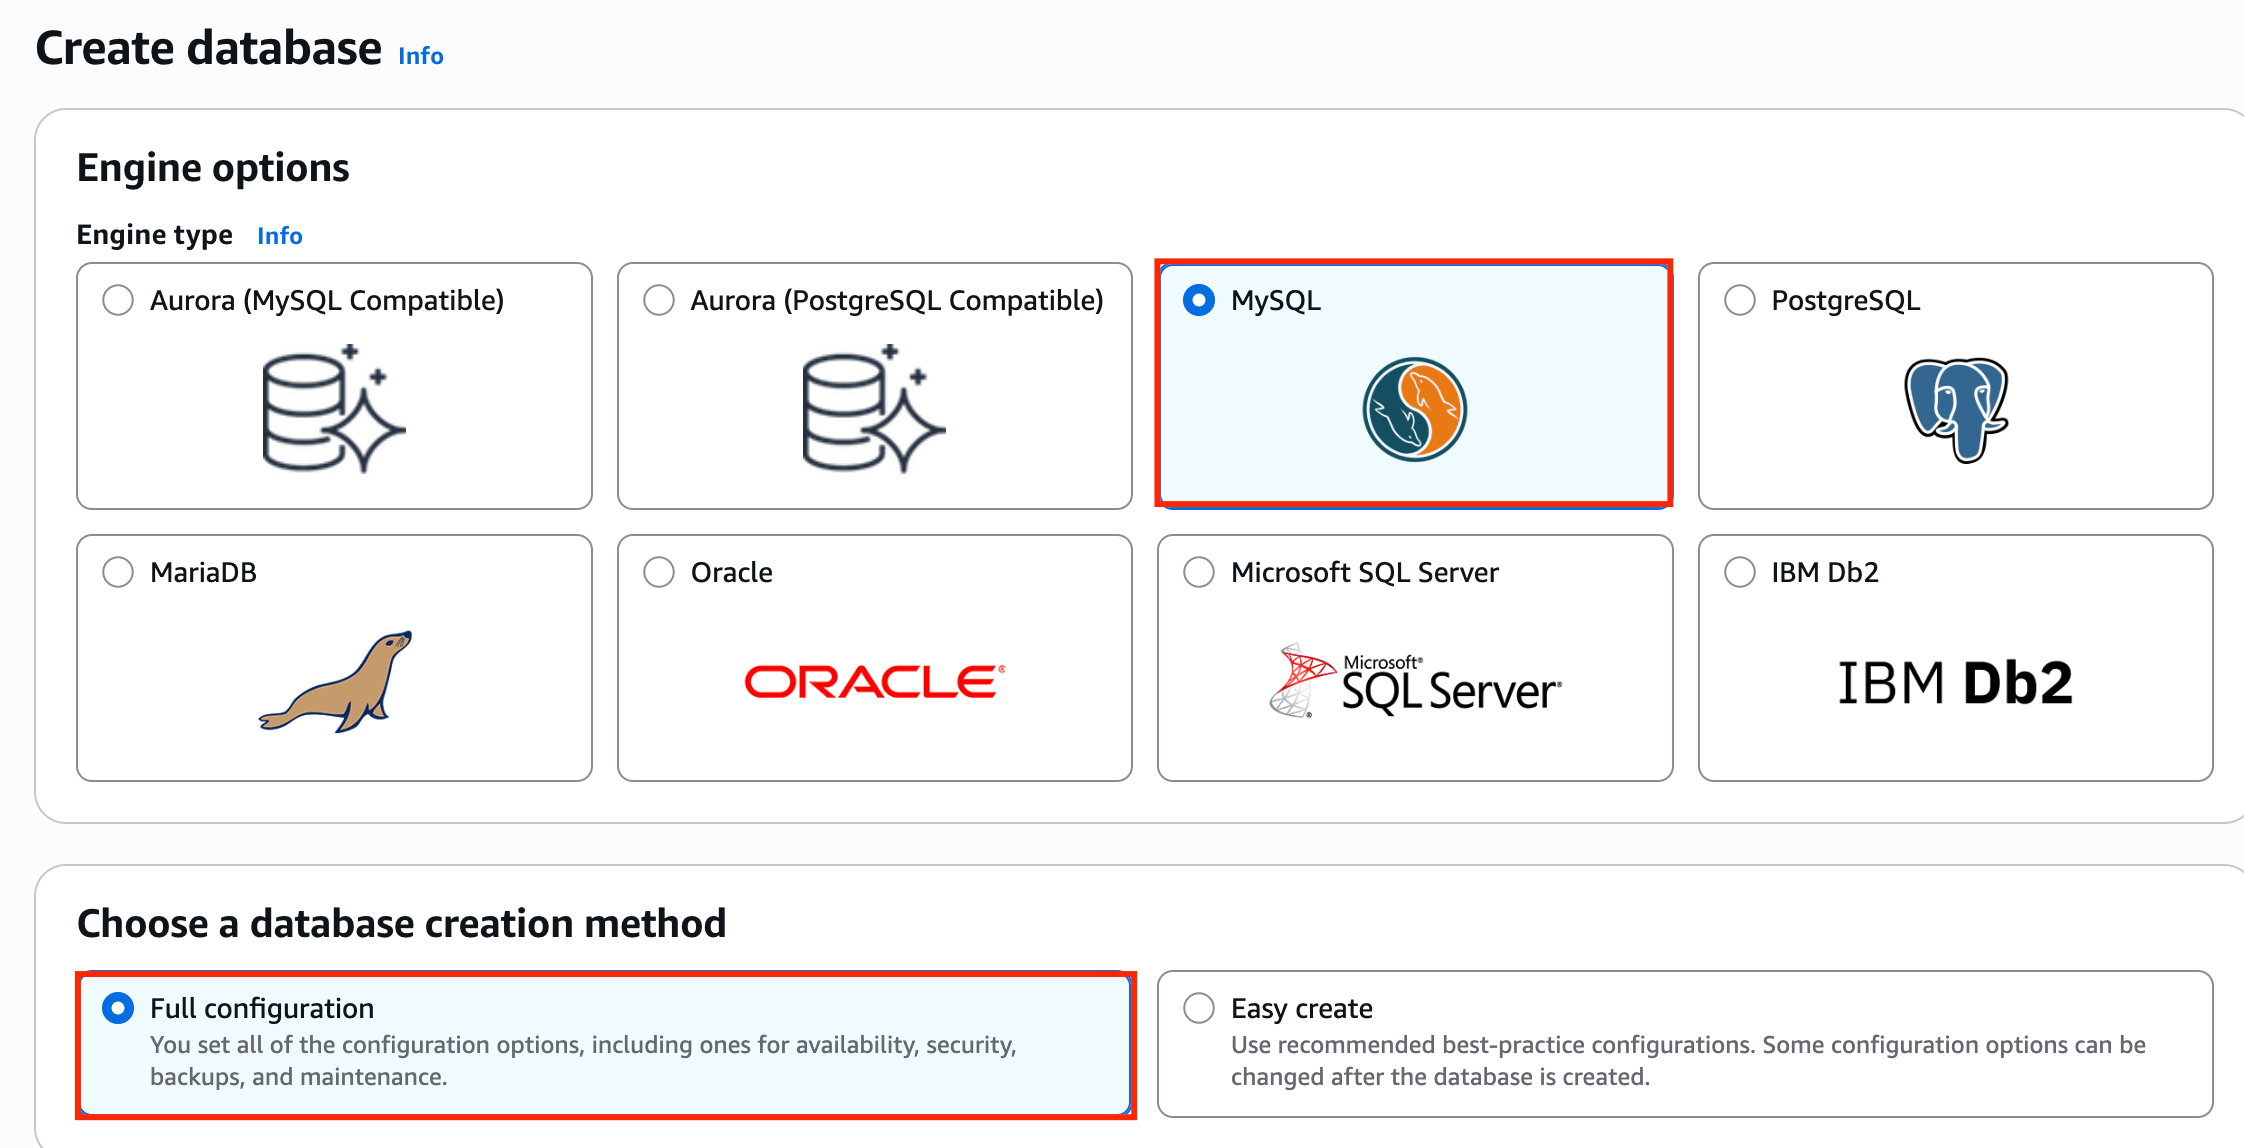
In Choose a Database Creation Method: Select **Full Configuration**
* In Engine options
* Engine type: Choose **MySQL**
#### Task 10: Create a RDS Instance
1. Navigate to **RDS** available under the database section of the Services menu.
2. Make sure you are in the **N.Virginia** Region.
3. Click on **Databases** in the left panel.
4. Click on **Create Database**.
5. Let’s configure the database in the Create Database Page
In Choose a Database Creation Method: Select **Full Configuration**
* In Engine options
* Engine type: Choose **MySQL**
 * In Templates: Choose **Sandbox/Free Tier**
 * In Settings
* DB cluster identifier: **Specify cluster identifier** name as **whizlabs-identifier**
* In credential settings
* Master Username: Enter **whizlabs\_admin**
* Master password: Enter **Whizlabs123**
* Confirm password: Enter **Whizlabs123**
* **Note: These are the username and password used to log on to your database. Please make note of them.**
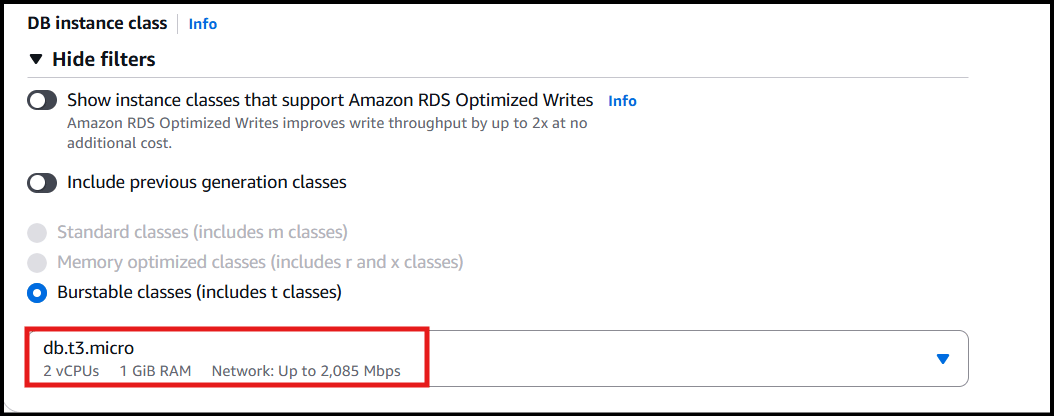
* In DB instance size:
* DB instance class: Choose **Burstable classes (includes t classes)**
* Select **db.t3.micro** from the available list
* In Settings
* DB cluster identifier: **Specify cluster identifier** name as **whizlabs-identifier**
* In credential settings
* Master Username: Enter **whizlabs\_admin**
* Master password: Enter **Whizlabs123**
* Confirm password: Enter **Whizlabs123**
* **Note: These are the username and password used to log on to your database. Please make note of them.**
* In DB instance size:
* DB instance class: Choose **Burstable classes (includes t classes)**
* Select **db.t3.micro** from the available list
 * **Uncheck** the Enable storage autoscaling checkbox.
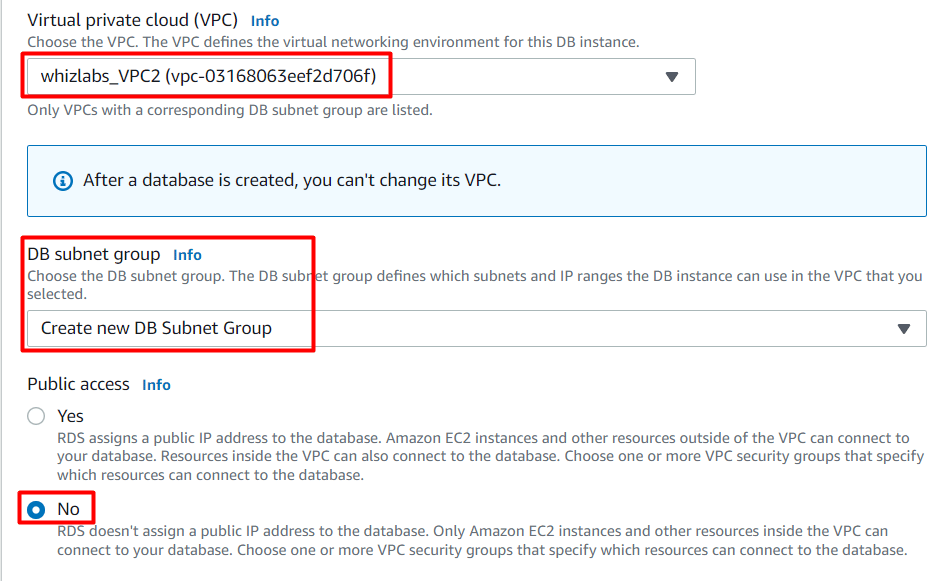
* Connectivity
* Virtual Private Cloud: Choose **whizlabs\_VPC2**
* Subnet group: **Create New subnet group**
* Publicly accessible: No
* **Uncheck** the Enable storage autoscaling checkbox.
* Connectivity
* Virtual Private Cloud: Choose **whizlabs\_VPC2**
* Subnet group: **Create New subnet group**
* Publicly accessible: No
 * VPC security group: Select **Choose existing**
* Existing VPC Security group: **rdssecuritygroup** (remove the default and select it from the drop-down)
* Availability Zone: No preference
* Database port: 3306
* Click on Additional Configuration.
* Database options
* Initial database name: Enter **whizlabsdb**
* **Uncheck** the Enable automated backups checkbox.
* **Uncheck** the Enable auto minor version upgrade checkbox
6. Once filled in all the necessary then click on **Create database.**
7. It will take around **10-15** minutes for the database to be created. Please wait until the database status changes from creating to available.
8. Once the database is created, you can see the Status as **Available.**
9. To connect the RDS instance we need the Endpoint (DNS name for RDS instance).
10. Click on the RDS instance created and then navigate to Connectivity & security to find the endpoint of your RDS instances with which you can connect to your DB instance.
* VPC security group: Select **Choose existing**
* Existing VPC Security group: **rdssecuritygroup** (remove the default and select it from the drop-down)
* Availability Zone: No preference
* Database port: 3306
* Click on Additional Configuration.
* Database options
* Initial database name: Enter **whizlabsdb**
* **Uncheck** the Enable automated backups checkbox.
* **Uncheck** the Enable auto minor version upgrade checkbox
6. Once filled in all the necessary then click on **Create database.**
7. It will take around **10-15** minutes for the database to be created. Please wait until the database status changes from creating to available.
8. Once the database is created, you can see the Status as **Available.**
9. To connect the RDS instance we need the Endpoint (DNS name for RDS instance).
10. Click on the RDS instance created and then navigate to Connectivity & security to find the endpoint of your RDS instances with which you can connect to your DB instance.
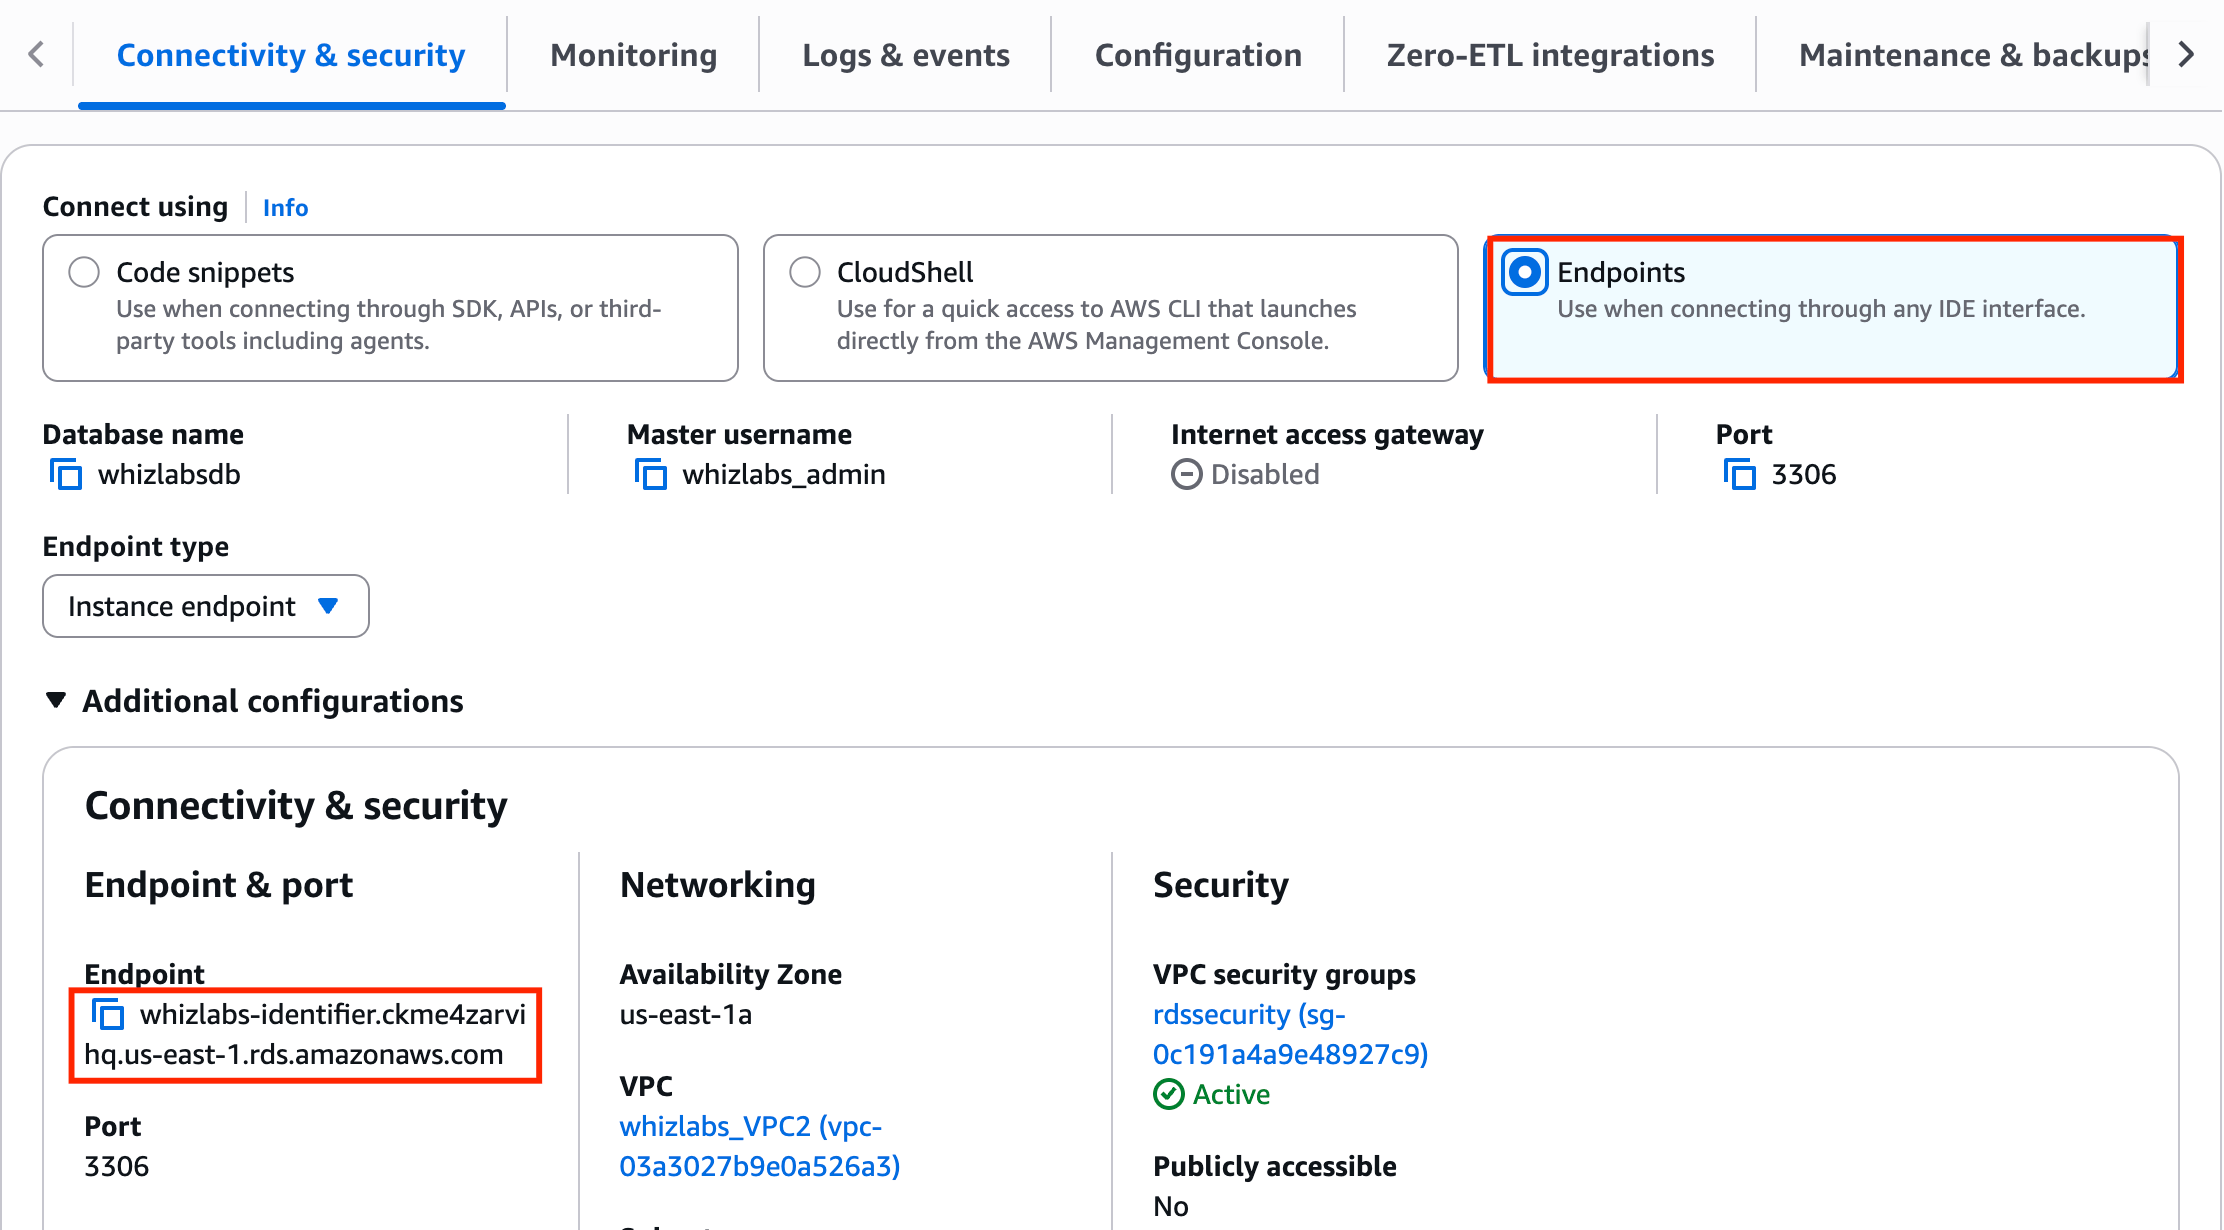 11. My RDS endpoint: whizlabs-identifier.ckme4zarvihq.us-east-1.rds.amazonaws.com
#### Task 11: SSH into EC2 and Connect to Your Database
1. SSH into the EC2 instance using the following steps in [SSH into EC2 Instance](https://play.whizlabs.com/site/task_support/ssh-into-ec-instance).
2. Switch to root user using the command:
```plaintext theme={null}
sudo -s
```
3. Now login to the RDS instance using the command below
```plaintext theme={null}
mysql -h -u whizlabs_admin -p whizlabsdb
```
* Hostname: whizlabs-cluster.cdegnvsebaim.us-east-1.rds.amazonaws.com (In the above command you have to remove the RDS endpoint and use your RDS’s endpoint )
* User name: **whizlabs\_admin**
* Enter the Password: **Whizlabs123**
* Database name: **whizlabsrds**
* You can now able to log in to the database as shown below:
11. My RDS endpoint: whizlabs-identifier.ckme4zarvihq.us-east-1.rds.amazonaws.com
#### Task 11: SSH into EC2 and Connect to Your Database
1. SSH into the EC2 instance using the following steps in [SSH into EC2 Instance](https://play.whizlabs.com/site/task_support/ssh-into-ec-instance).
2. Switch to root user using the command:
```plaintext theme={null}
sudo -s
```
3. Now login to the RDS instance using the command below
```plaintext theme={null}
mysql -h -u whizlabs_admin -p whizlabsdb
```
* Hostname: whizlabs-cluster.cdegnvsebaim.us-east-1.rds.amazonaws.com (In the above command you have to remove the RDS endpoint and use your RDS’s endpoint )
* User name: **whizlabs\_admin**
* Enter the Password: **Whizlabs123**
* Database name: **whizlabsrds**
* You can now able to log in to the database as shown below:
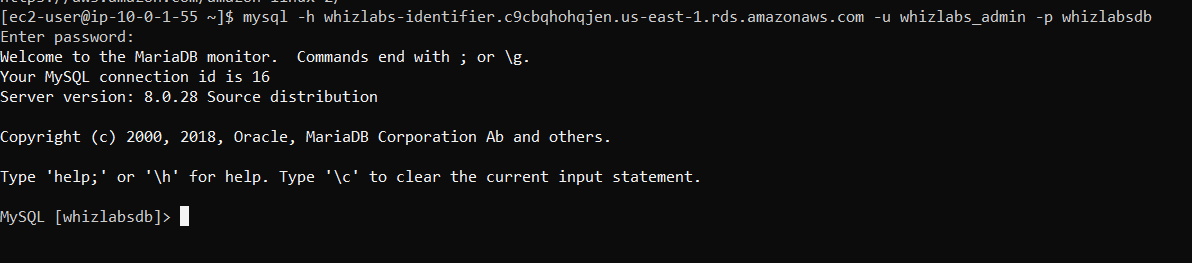 * EC2 instance can able to establish a connection with the RDS instance if it is in the same VPC but in our case, we can able to connect the RDS instance from the EC2 instance even though they are in different VPCs. This can only be possible if a peering connection is established between the VPC's.
> #### Do you know?
>
> It's important to note that VPC peering is limited to specific scenarios. For example, it's only possible to peer VPCs within the same AWS region, and you cannot peer VPCs that have overlapping IP address ranges. Additionally, some advanced networking features may not work across peered VPCs.
1. Once the project steps are completed, please click on the **Validation** button on the Right side panel.
### Completion and Conclusion
1. In this lab, you have successfully created 2 VPCs with non-overlapping CIDR blocks.
2. You have successfully created an Internet gateway and associated it with any of the created VPC.
3. You have successfully created 4 subnets, 2 subnets per VPC.
4. You have successfully created 2 Route tables each in a separate VPC.
5. You have successfully created Associate the subnets with the route tables.
6. You have successfully created the Initiate VPC Peering connection from VPC1 to VPC2 and accepted the connection.
7. You have successfully edited route tables to have access to the other VPC CIDR blocks in the routes.
8. You have successfully created a Security group to allow SSH access from anywhere in the inbound rule.
9. You have successfully launched an EC2 instance in a VPC with auto-assigned IP
10. You have successfully created another security group with port 3306 open only for the private IP of the EC2 instance.
11. You have successfully launched an RDS instance in another VPC.
12. You have successfully SSH into the EC2 instance.
13. You have successfully logged into the RDS instance from the EC2 instance.
### End Project
1. Sign out of the AWS Account
2. You have successfully completed the project.
3. Click on the **End Project** button from the IP Lab Portal console and wait till the process gets completed.
## What gets checked
When you press **Check my work**, the platform verifies each of these:
* **Create Amazon Custom VPC** — Check whether a Custom VPC is created or not.
* **Create VPC Peering Connection** — Check whether a VPC Peering Connection is created with Active status or not.
* **Launch an EC2 Instance** — Check whether an EC2 Instance is launched or not.
* **Validate EC2 Instance Type t2.micro** — Check whether the EC2 instance type is t2.micro.
* **Launch EC2 AMI type Amazon Linux** — Check whether the EC2 instance is launched using an Amazon AMI.
* **Launch RDS instance** — Check whether an RDS Instance is created or not
* **Check whether RDS database Engine type is mysql** — Check whether allowed database type mysql is deployed or not
## Related help
* [FAQs and Troubleshooting](/aws-saa/support/faqs-and-troubleshooting)
* [SSH into EC2 Instance](/aws-saa/support/ssh-into-ec2-instance)
This documentation is built and hosted on [Mintlify](https://mintlify.com), a developer documentation platform.
* EC2 instance can able to establish a connection with the RDS instance if it is in the same VPC but in our case, we can able to connect the RDS instance from the EC2 instance even though they are in different VPCs. This can only be possible if a peering connection is established between the VPC's.
> #### Do you know?
>
> It's important to note that VPC peering is limited to specific scenarios. For example, it's only possible to peer VPCs within the same AWS region, and you cannot peer VPCs that have overlapping IP address ranges. Additionally, some advanced networking features may not work across peered VPCs.
1. Once the project steps are completed, please click on the **Validation** button on the Right side panel.
### Completion and Conclusion
1. In this lab, you have successfully created 2 VPCs with non-overlapping CIDR blocks.
2. You have successfully created an Internet gateway and associated it with any of the created VPC.
3. You have successfully created 4 subnets, 2 subnets per VPC.
4. You have successfully created 2 Route tables each in a separate VPC.
5. You have successfully created Associate the subnets with the route tables.
6. You have successfully created the Initiate VPC Peering connection from VPC1 to VPC2 and accepted the connection.
7. You have successfully edited route tables to have access to the other VPC CIDR blocks in the routes.
8. You have successfully created a Security group to allow SSH access from anywhere in the inbound rule.
9. You have successfully launched an EC2 instance in a VPC with auto-assigned IP
10. You have successfully created another security group with port 3306 open only for the private IP of the EC2 instance.
11. You have successfully launched an RDS instance in another VPC.
12. You have successfully SSH into the EC2 instance.
13. You have successfully logged into the RDS instance from the EC2 instance.
### End Project
1. Sign out of the AWS Account
2. You have successfully completed the project.
3. Click on the **End Project** button from the IP Lab Portal console and wait till the process gets completed.
## What gets checked
When you press **Check my work**, the platform verifies each of these:
* **Create Amazon Custom VPC** — Check whether a Custom VPC is created or not.
* **Create VPC Peering Connection** — Check whether a VPC Peering Connection is created with Active status or not.
* **Launch an EC2 Instance** — Check whether an EC2 Instance is launched or not.
* **Validate EC2 Instance Type t2.micro** — Check whether the EC2 instance type is t2.micro.
* **Launch EC2 AMI type Amazon Linux** — Check whether the EC2 instance is launched using an Amazon AMI.
* **Launch RDS instance** — Check whether an RDS Instance is created or not
* **Check whether RDS database Engine type is mysql** — Check whether allowed database type mysql is deployed or not
## Related help
* [FAQs and Troubleshooting](/aws-saa/support/faqs-and-troubleshooting)
* [SSH into EC2 Instance](/aws-saa/support/ssh-into-ec2-instance)
This documentation is built and hosted on [Mintlify](https://mintlify.com), a developer documentation platform.