> ## Documentation Index
> Fetch the complete documentation index at: https://cloud-architect.ipoint-labs.com/llms.txt
> Use this file to discover all available pages before exploring further.
# Migrating EBS volumes from gp2 to gp3
> Hands-on lab · 45m
Launch this lab in the IP Lab Portal, then follow the steps below in the AWS console.
Open IP Lab Portal
## Overview
### Lab Details
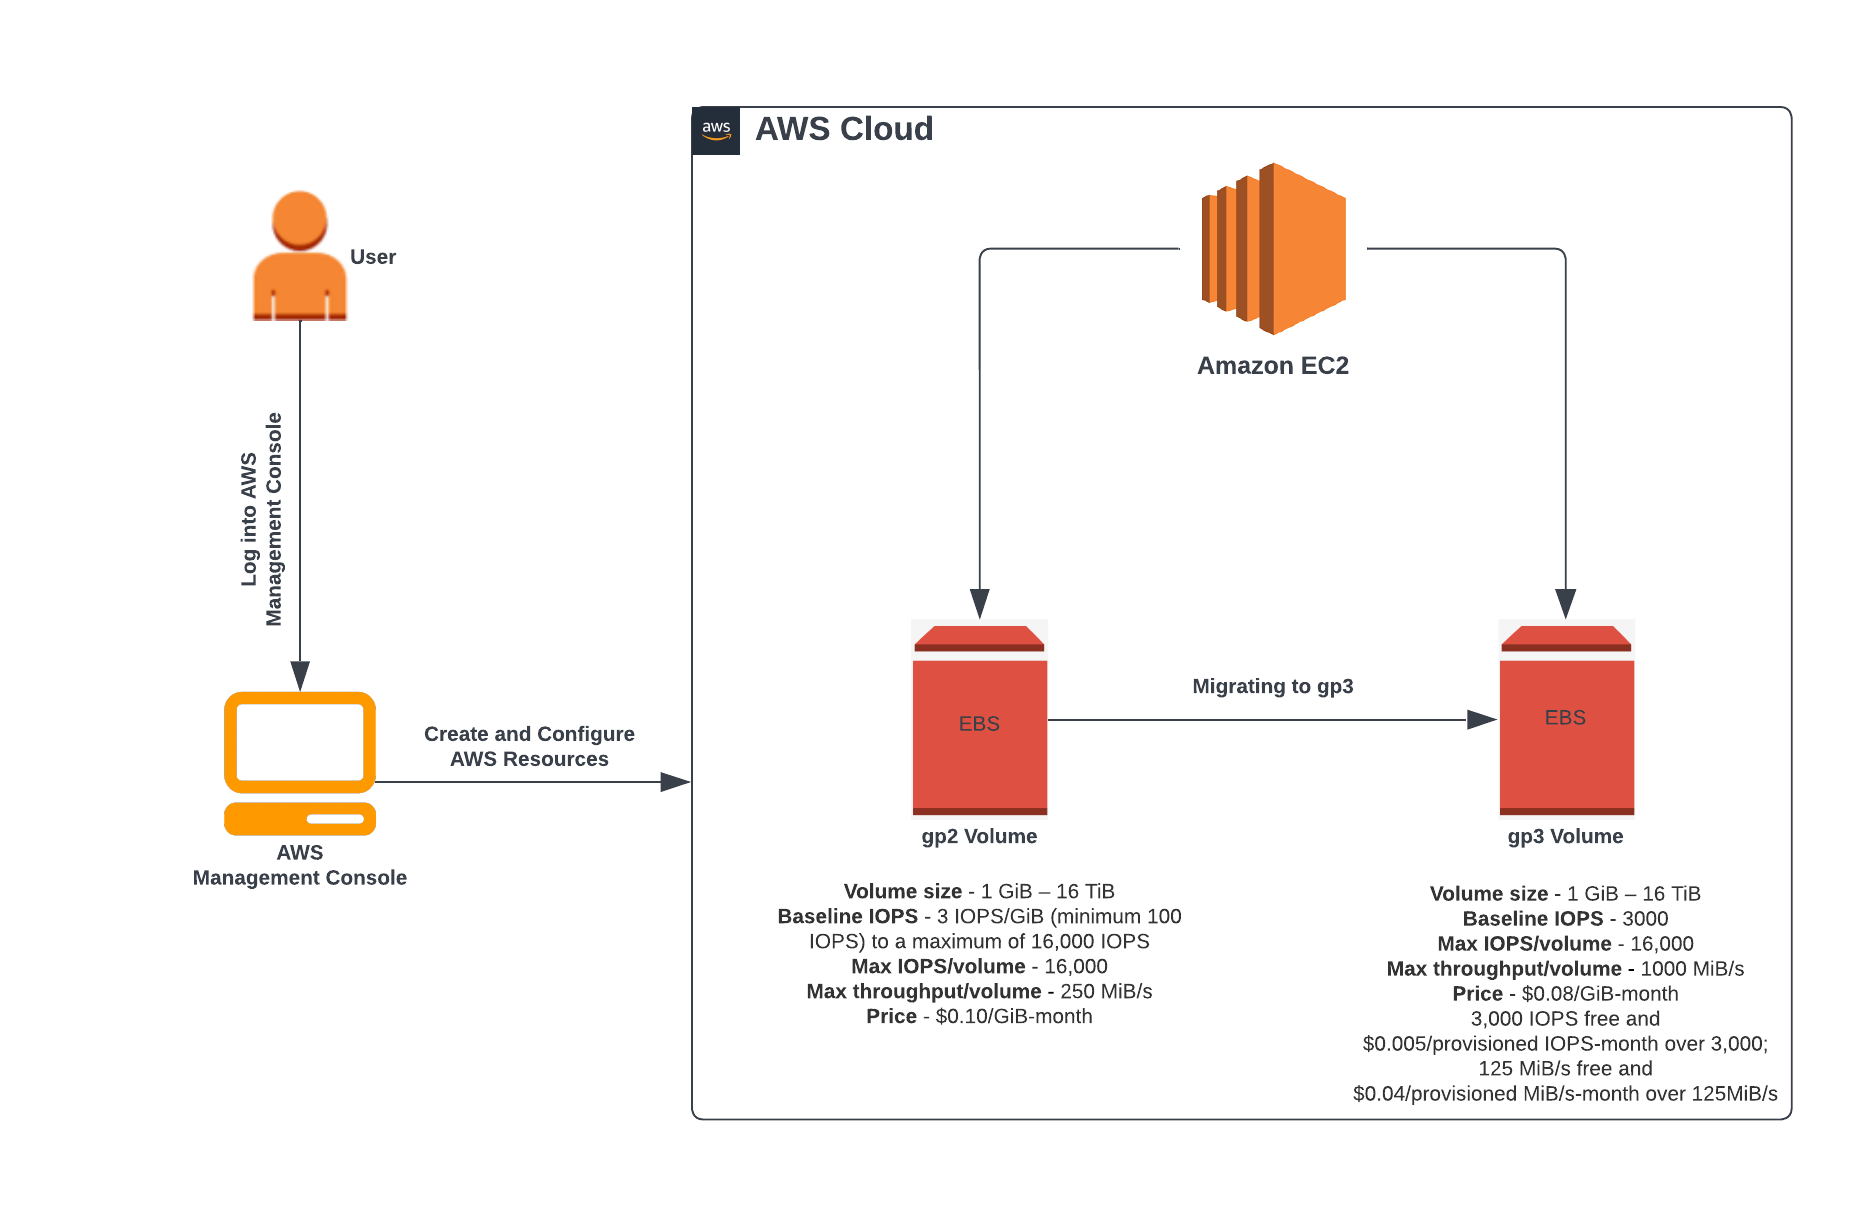
1. This lab walks you through the steps to migrate EBS volumes used by EC2 instances from gp2 to gp3.
2. Duration: **60 minutes**
3. AWS Region: **US East (N. Virginia) us-east-1**
### Introduction
#### What is EC2?
* AWS defines it as Elastic Compute Cloud.
* It’s a virtual environment where “you rent” to have your environment created, without purchasing.
* Amazon refers to these virtual machines as Instances.
* Preconfigured templates can be used to launch instances. These templates are referred to as images. Amazon provides these images in the form of AMIs (Amazon Machine Images).
* Allows you to install custom applications and services.
* Scaling of infrastructure i.e., up or down is easy based on the demand you face.
* AWS provides multiple configurations of CPU, memory, storage etc., through which you can pick the flavor that's required for your environment.
* No limitation on storage. You can pick the storage based on the type of the instance that you are working on.
* Temporary storage volumes are provided, which are called Instance Store Volumes. Data stored in this gets deleted once the instance is terminated.
* Persistent storage volumes are available and are referred to as EBS (Elastic Block Store) volumes.
#### What Is EBS?
* Amazon Elastic Block Store (EBS) is a high-performance block storage solution designed to be used with EC2 instances.
* It works by providing the user with access to several little network-attached blocks, each of which is shown as a simple volume.
* EBS volumes are very easy to use, whether you need to add them to or remove them from the EC2 instance, modify their size, or change their type.
* With only a couple of clicks, you can create an EBS snapshot, effectively making a backup of your entire volume. This can later be used to recreate the data if necessary.
* The block storage offered by EBS volumes can cover any workload, from the most demanding mission-critical applications requiring high throughput to large sequential jobs like data warehousing and log processing.
* If the provided performance is not enough, you can also combine multiple volumes on a single instance to achieve even better results.
* EBS provides a very secure data storage solution, since it was built with compliance in mind. Each volume allows for in transit, at rest, and backup encryption.
* EBS volumes are also very cost-effective.
#### General Purpose SSD (gp2) Volumes
* The most popular type of volume is General Purpose SSD (gp2) volumes.
* They were created to be a storage solution that is affordable for a wide range of workloads.
* Gp2 volumes include system volumes, development and testing environments, and a variety of low-latency applications.
* They are available in capacities ranging from 1 GB to 16 GB and have extremely low latency—down to single-digit milliseconds.
* They have a good IOPS (ranging from 100 to 16000 IOPS) and a maximum throughput of 250MiB/s.
* To get even better performance on a single instance, you can create a RAID with several EBS volume types.
#### General Purpose SSD (gp3) Volumes
* The newest version of general-purpose SSD-based EBS volumes, known as Amazon EBS gp3 volumes, allows users to provide performance independent of storage capacity and offers up to 20% cheaper price per GB than gp2 volumes.
* Customers can scale throughput and IOPS (input/output operations per second) using gp3 volumes without adding more block storage space.
* Customers only pay for the storage they really use.
### Architecture Diagram
 ### Task Details
1. Sign in to AWS Management Console.
2. Launching an EC2 Instance.
3. Migrating the EBS Volumes from gp2 to gp3.
### Launching Lab Environment
1. To launch the lab environment, Click on the **Start Lab** button.
2. Please wait until the cloud environment is provisioned. It will take less than a minute to provision.
3. Once the Lab is started, you will be provided with **IAM user name**, **Password**, **Access** **Key**, and **Secret** **Access** **Key**.
## Lab guide
#### Task 1: Sign in to AWS Management Console
1. Click on the **Open Console** button, and you will get redirected to AWS Console in a new browser tab.
2. On the AWS sign-in page,
* Leave the Account ID as default. Never edit/remove the 12 digit Account ID present in the AWS Console. otherwise, you cannot proceed with the lab.
* Now copy your **User Name** and **Password** in the Lab Console to the **IAM Username and Password** in AWS Console and click on the **Sign in** button.
3. Once Signed In to the AWS Management Console, Make the default AWS Region as **US East (N. Virginia) us-east-1.**
#### Task 2: Launching an EC2 Instance
1. Make sure you are in the US East **(N. Virginia) us-east-1** Region.
2. Navigate to EC2 by clicking on **Services** the menu in the top, then click on **Ec2** in the **Compute** section.
3. Navigate to **Instances** on the left panel and click on **Launch Instances** Button.
4. Name : Enter ***MyEC2Server***
### Task Details
1. Sign in to AWS Management Console.
2. Launching an EC2 Instance.
3. Migrating the EBS Volumes from gp2 to gp3.
### Launching Lab Environment
1. To launch the lab environment, Click on the **Start Lab** button.
2. Please wait until the cloud environment is provisioned. It will take less than a minute to provision.
3. Once the Lab is started, you will be provided with **IAM user name**, **Password**, **Access** **Key**, and **Secret** **Access** **Key**.
## Lab guide
#### Task 1: Sign in to AWS Management Console
1. Click on the **Open Console** button, and you will get redirected to AWS Console in a new browser tab.
2. On the AWS sign-in page,
* Leave the Account ID as default. Never edit/remove the 12 digit Account ID present in the AWS Console. otherwise, you cannot proceed with the lab.
* Now copy your **User Name** and **Password** in the Lab Console to the **IAM Username and Password** in AWS Console and click on the **Sign in** button.
3. Once Signed In to the AWS Management Console, Make the default AWS Region as **US East (N. Virginia) us-east-1.**
#### Task 2: Launching an EC2 Instance
1. Make sure you are in the US East **(N. Virginia) us-east-1** Region.
2. Navigate to EC2 by clicking on **Services** the menu in the top, then click on **Ec2** in the **Compute** section.
3. Navigate to **Instances** on the left panel and click on **Launch Instances** Button.
4. Name : Enter ***MyEC2Server***
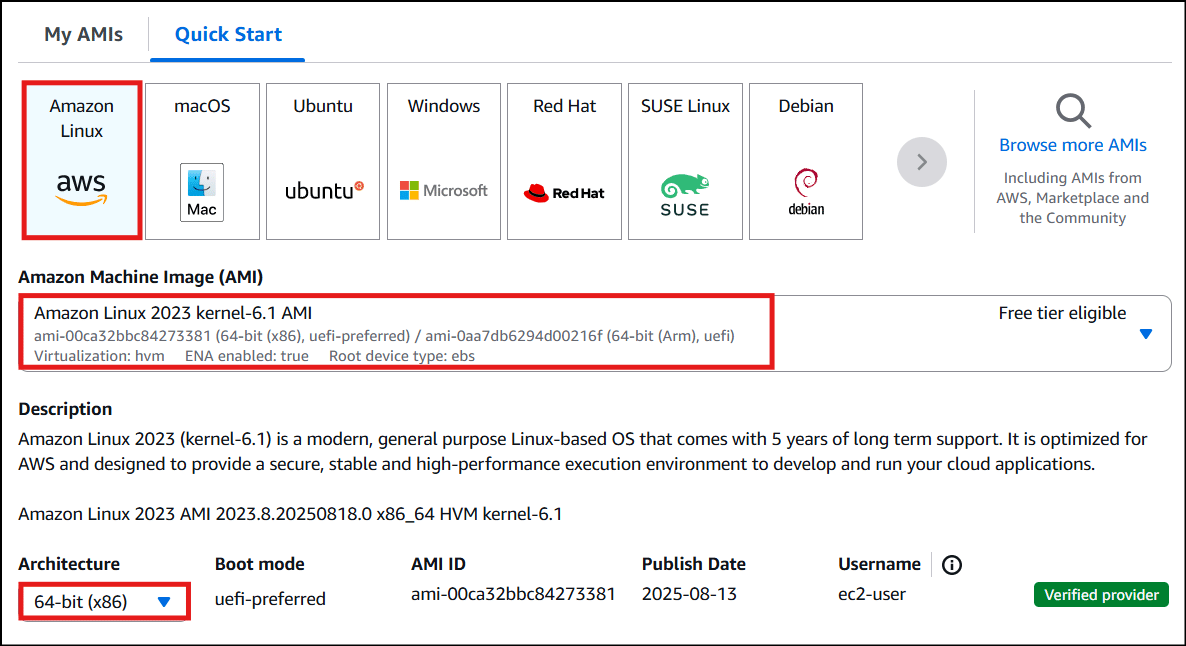
 5. **For Amazon Machine Image (AMI)**: Choose **Amazon Linux 2023 kernel-6.1 AMI**.
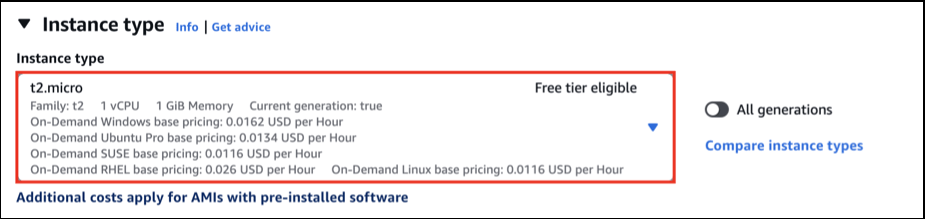
 6. **For Instance Type**: select *t2.micro*
 7. **For Key pair**: Select **Create a new key pair** Button
* Key pair name: **WhizKey**
* Key pair type: **RSA**
* Private key file format: **.pem**
8. Select **Create key pair** Button.
9. In Network Settings Click on **Edit** Button:
* Auto-assign public IP: **Enable**
* Select **Create new Security group**
* Security group name : Enter **MyEC2Server\_SG**
* Description : Enter **Security Group to allow traffic to EC2.**
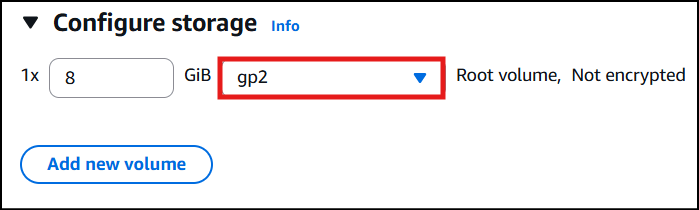
**In** Configure storage, choose **gp2.**
7. **For Key pair**: Select **Create a new key pair** Button
* Key pair name: **WhizKey**
* Key pair type: **RSA**
* Private key file format: **.pem**
8. Select **Create key pair** Button.
9. In Network Settings Click on **Edit** Button:
* Auto-assign public IP: **Enable**
* Select **Create new Security group**
* Security group name : Enter **MyEC2Server\_SG**
* Description : Enter **Security Group to allow traffic to EC2.**
**In** Configure storage, choose **gp2.**
 10. Keep Rest thing Default and Click on **Launch Instance** Button.
11. Select **View all Instances** to View Instance you Created
12. **Launch Status:** Your instance is now launching, Click on the instance ID and wait for complete initialization of the instance till status changes to **Running**.
10. Keep Rest thing Default and Click on **Launch Instance** Button.
11. Select **View all Instances** to View Instance you Created
12. **Launch Status:** Your instance is now launching, Click on the instance ID and wait for complete initialization of the instance till status changes to **Running**.
 13. Note down the Instance ID of the EC2 instance. A sample is shown in the screenshot below
 #### Task 3: Migrating the EBS Volumes from gp2 to gp3
1. Make sure you are in the US East **(N.Virginia) us-east-1** Region.
2. Navigate to EC2 by clicking on the **Services** menu in the top, then click on the **Volumes** under **Elastic Block Store** section on the left navigation panel.
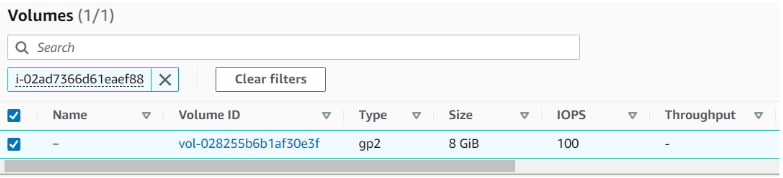
3. In the **Search Box**, paste the **Instance ID** of your EC2 Instance.
#### Task 3: Migrating the EBS Volumes from gp2 to gp3
1. Make sure you are in the US East **(N.Virginia) us-east-1** Region.
2. Navigate to EC2 by clicking on the **Services** menu in the top, then click on the **Volumes** under **Elastic Block Store** section on the left navigation panel.
3. In the **Search Box**, paste the **Instance ID** of your EC2 Instance.
 4. Select the **Volume** associated with your EC2 Instance.
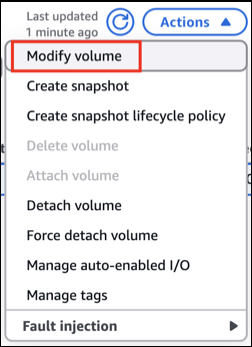
 5. After selecting **Volume**, expand the **Actions** button and click on **Modify Volume**.
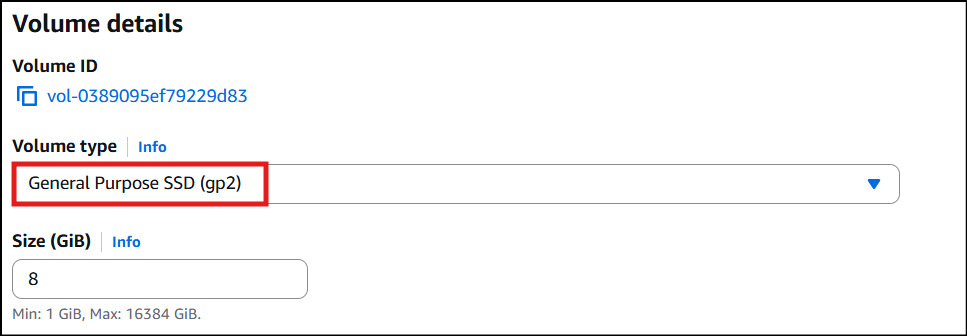
 6. In the **Modify Volume**, expand **Volume type**.
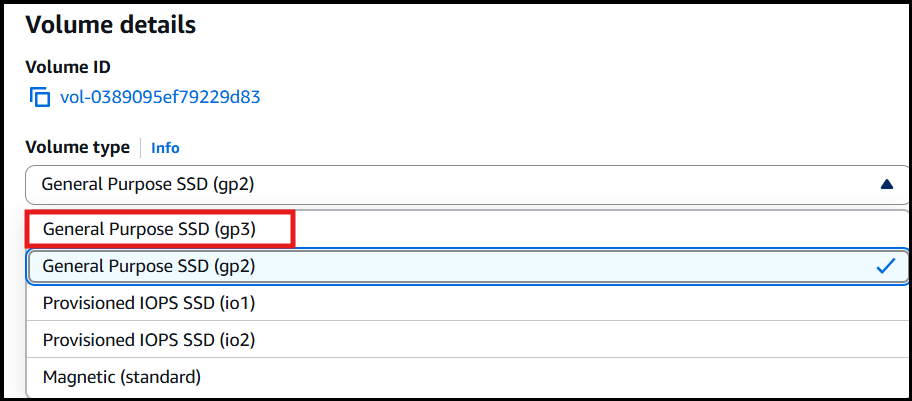
 7. Click on **General Purpose SSD (gp3).**
 8. Keep Rest thing Default and Click on **Modify** Button.
9. You will get a prompt to Modify the Volume, Click on **Modify** Button.
8. Keep Rest thing Default and Click on **Modify** Button.
9. You will get a prompt to Modify the Volume, Click on **Modify** Button.
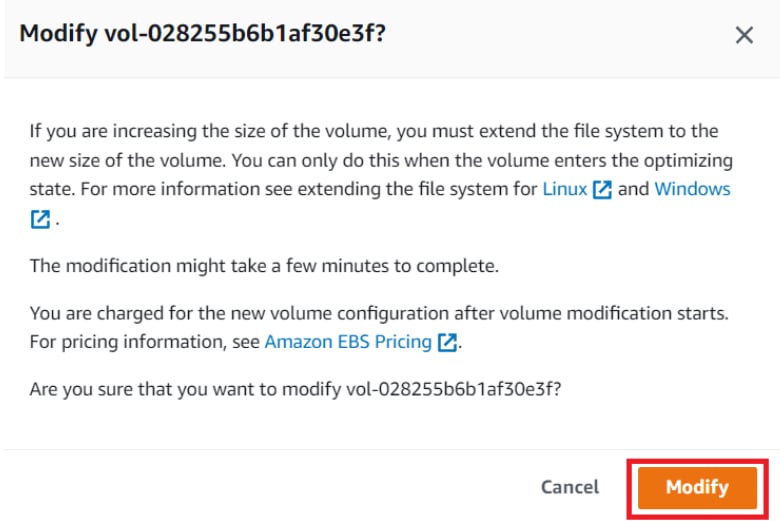 10. It will take some time for the **Volume** to be modified.
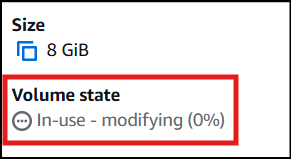 11. After some time, the **Volume State** status will change to **inuse** and **type** will also be changed to **gp3** from **gp2**.
 ### Completion and Conclusion
1. You have successfully logged in to AWS Console.
2. You have successfully created an EC2 Instance.
3. You have successfully migrated volumes from gp2 to gp3.
4. You have successfully validated the lab.
### End Lab
1. Sign out from the AWS Management Console.
2. Click on **End Lab** button from IP Lab Portal Labs console and wait till the process gets completed.
## What gets checked
When you press **Check my work**, the platform verifies each of these:
* **Launch an EC2 Instance** — Check whether an EC2 Instance is launched or not.
* **Launch EC2 AMI type Amazon Linux** — Check whether the EC2 instance is launched using an Amazon AMI.
* **Create Items in DynamoDB Table** — Check whether items in the DynamoDB table are created or not.
This documentation is built and hosted on [Mintlify](https://mintlify.com), a developer documentation platform.
### Completion and Conclusion
1. You have successfully logged in to AWS Console.
2. You have successfully created an EC2 Instance.
3. You have successfully migrated volumes from gp2 to gp3.
4. You have successfully validated the lab.
### End Lab
1. Sign out from the AWS Management Console.
2. Click on **End Lab** button from IP Lab Portal Labs console and wait till the process gets completed.
## What gets checked
When you press **Check my work**, the platform verifies each of these:
* **Launch an EC2 Instance** — Check whether an EC2 Instance is launched or not.
* **Launch EC2 AMI type Amazon Linux** — Check whether the EC2 instance is launched using an Amazon AMI.
* **Create Items in DynamoDB Table** — Check whether items in the DynamoDB table are created or not.
This documentation is built and hosted on [Mintlify](https://mintlify.com), a developer documentation platform.