> ## Documentation Index
> Fetch the complete documentation index at: https://cloud-architect.ipoint-labs.com/llms.txt
> Use this file to discover all available pages before exploring further.
# Configuring Amazon FSx for Lustre with EC2 Instances for Shared High-Performance Storage Access
> Hands-on lab · 45m
Launch this lab in the IP Lab Portal, then follow the steps below in the AWS console.
Open IP Lab Portal
## Overview
### Lab Details
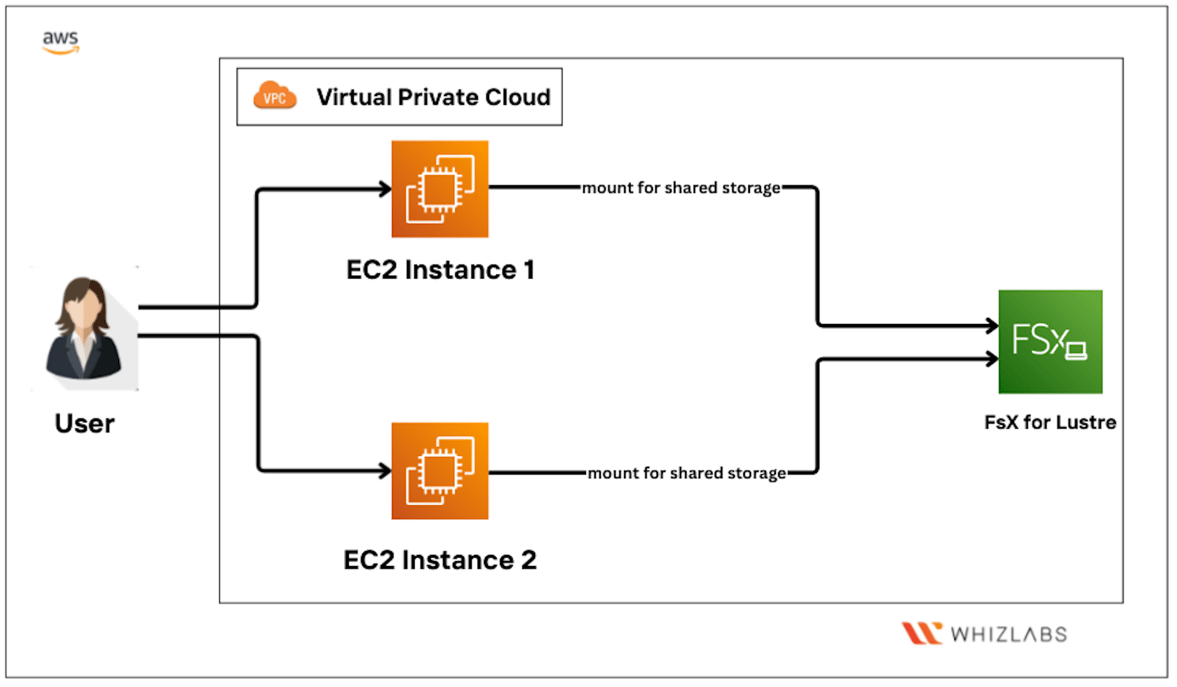
1. In this lab, you will create an Amazon FSx for Lustre file system with a storage capacity of 1.2 TB. Next, you will launch and configure two EC2 instances to mount the FSx Lustre file system and create files on it. Additionally, a third EC2 instance will be set up to mount the same FSx Lustre file system and view the files created by the other instances. This setup demonstrates shared high-performance storage access across multiple EC2 instances.
2. Duration: **45 minutes**.
3. AWS Region: **US East (N. Virginia) us-east-1**.
### Introduction
#### What is FSx Lustre?
* **Amazon FSx** for Lustre is a fully managed, high-performance file system built on the open-source Lustre technology. It is designed to provide fast, scalable, and shared storage for compute-intensive workloads. FSx Lustre integrates seamlessly with Amazon EC2, enabling multiple instances to access data concurrently with low latency.
* Provides low-latency, high-throughput shared storage
* Supports multiple EC2 instances accessing data simultaneously
* Ideal for workloads like machine learning, big data, and HPC
#### Lab Feature:
* In this lab, you will create a 1.2 TB Amazon FSx for Lustre file system and configure multiple EC2 instances to mount and access it. You will practice creating and sharing files across the EC2 instances using the high-performance Lustre file system. The lab demonstrates concurrent read and write operations, providing hands-on experience with FSx Lustre integration and management on AWS.
#### Benefits:
* Provides high-speed, low-latency access to shared storage across multiple EC2 instances
* Enables efficient processing of large datasets with scalable storage capacity
* Fully managed service, reducing storage management overhead
### Architecture Diagram
 ### Task Details
1. Sign in to the AWS Management Console.
2. Create a FXs File System
3. Launch an EC2 Instances
4. Mount FSx for Lustre on EC2
5. Delete Fxs file System
### Launching Lab Environment
1. To launch the lab environment, Click on the **Start Lab** button.
2. Please wait until the cloud environment is provisioned. It will take less than a minute to provision.
3. Once the Lab is started, you will be provided with **IAM user name, Password, Access Key,** and **Secret Access Key**.
> **Note:** You can only start one lab at any given time.
## Lab guide
#### Lab Steps
#### Task 1: Sign in to AWS Management Console
1. Click on the **Open Console** button, and you will get redirected to AWS Console in a new browser tab.
2. On the AWS sign-in page,
* Leave the **Account ID** as default. Never edit/remove the 12 digit Account ID present in the AWS Console. otherwise, you cannot proceed with the lab.
* Now copy your **User Name** and **Password** in the Lab Console to the **IAM Username and Password** in AWS Console and click on the **Sign in** button.
3. Once Signed In to the AWS Management Console, Make the default AWS Region as **US East (N. Virginia) us-east-1**.
#### Task 2: Create a FXs File System
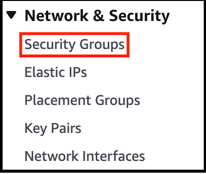
1. Navigate to the EC2 portal, click Security Groups in the left-hand panel under Network & Security
### Task Details
1. Sign in to the AWS Management Console.
2. Create a FXs File System
3. Launch an EC2 Instances
4. Mount FSx for Lustre on EC2
5. Delete Fxs file System
### Launching Lab Environment
1. To launch the lab environment, Click on the **Start Lab** button.
2. Please wait until the cloud environment is provisioned. It will take less than a minute to provision.
3. Once the Lab is started, you will be provided with **IAM user name, Password, Access Key,** and **Secret Access Key**.
> **Note:** You can only start one lab at any given time.
## Lab guide
#### Lab Steps
#### Task 1: Sign in to AWS Management Console
1. Click on the **Open Console** button, and you will get redirected to AWS Console in a new browser tab.
2. On the AWS sign-in page,
* Leave the **Account ID** as default. Never edit/remove the 12 digit Account ID present in the AWS Console. otherwise, you cannot proceed with the lab.
* Now copy your **User Name** and **Password** in the Lab Console to the **IAM Username and Password** in AWS Console and click on the **Sign in** button.
3. Once Signed In to the AWS Management Console, Make the default AWS Region as **US East (N. Virginia) us-east-1**.
#### Task 2: Create a FXs File System
1. Navigate to the EC2 portal, click Security Groups in the left-hand panel under Network & Security
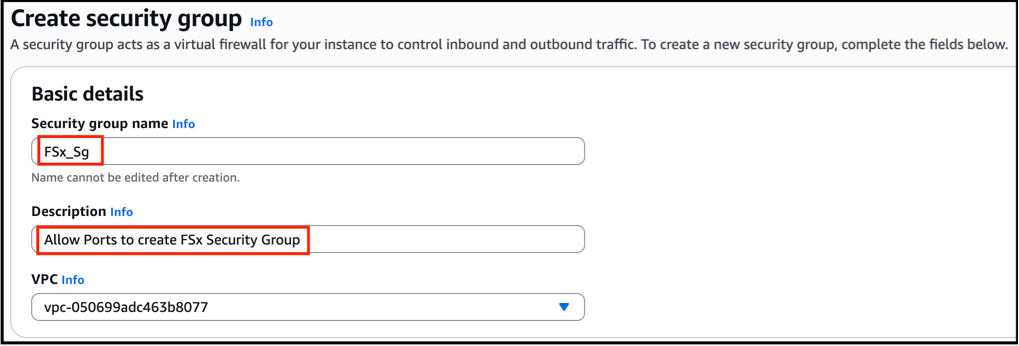
 2. Then click "Create Security Group".
* Enter the name as "FSx\_Sg"
* Enter Description as "Allow Ports to create FSx Security Group"
* Select the **default VPC .**
2. Then click "Create Security Group".
* Enter the name as "FSx\_Sg"
* Enter Description as "Allow Ports to create FSx Security Group"
* Select the **default VPC .**
 3. Under Inbound rules, add a rule for
* **SSH Rule**:
* Type : **SSH,** Protocol **: TCP,** Port Range: **22,** Source: **Anywhere (0.0.0.0/0)**
* **Custom TCP Rule**:
* Type : **Custom TCP,** Protocol **: TCP,** Port Range: **988,** Source: **Anywhere (0.0.0.0/0)**
* Leave other settings as default.
> **Note :** Port **988** is opened to allow EC2 instances to connect with the **Lustre file system**.
* Click **Create Security Group.**
3. Under Inbound rules, add a rule for
* **SSH Rule**:
* Type : **SSH,** Protocol **: TCP,** Port Range: **22,** Source: **Anywhere (0.0.0.0/0)**
* **Custom TCP Rule**:
* Type : **Custom TCP,** Protocol **: TCP,** Port Range: **988,** Source: **Anywhere (0.0.0.0/0)**
* Leave other settings as default.
> **Note :** Port **988** is opened to allow EC2 instances to connect with the **Lustre file system**.
* Click **Create Security Group.**
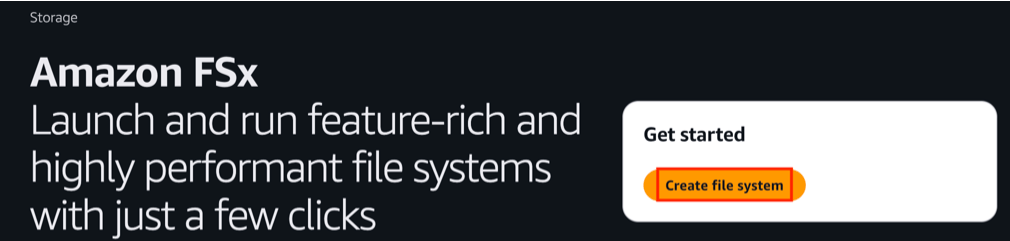
 3. Navigate to **FSx.** Ensure, you are in the **US East (N. Virginia) us-east-1** region to begin launching an EC2 instance in the Amazon cloud.
* Click **Create file System.**
3. Navigate to **FSx.** Ensure, you are in the **US East (N. Virginia) us-east-1** region to begin launching an EC2 instance in the Amazon cloud.
* Click **Create file System.**
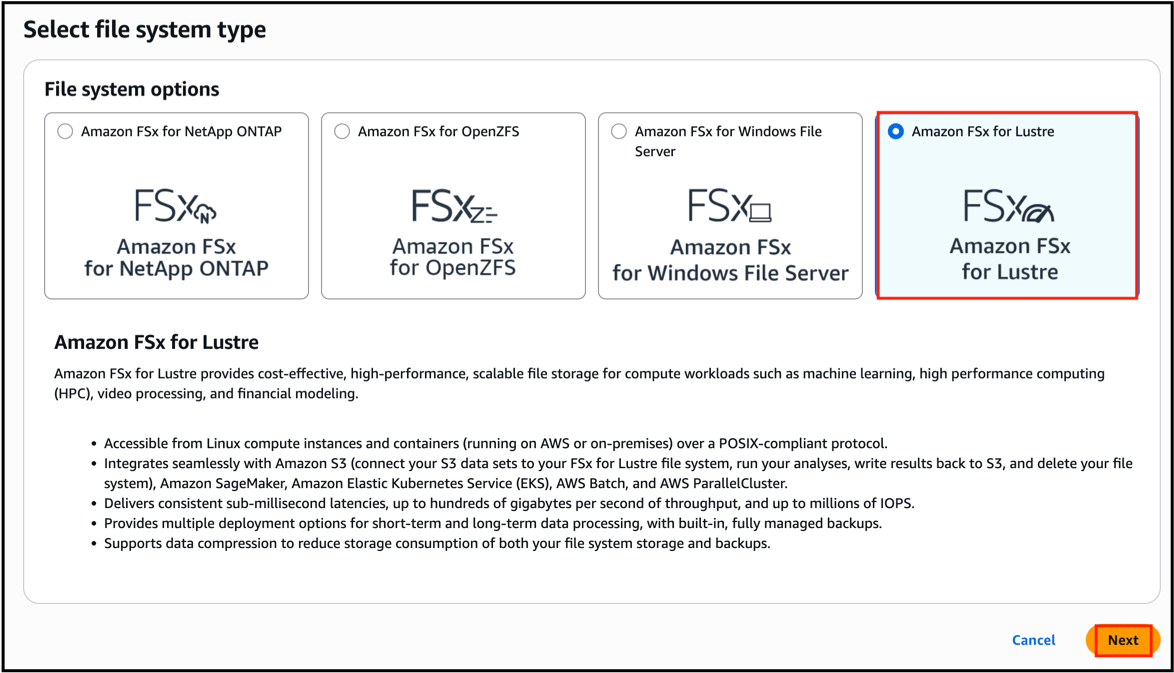
 **Step 1: Select File system type**
4. Select **Amazon FSx for Lustre** as your file system option type.
* Click "**Next**".
**Step 1: Select File system type**
4. Select **Amazon FSx for Lustre** as your file system option type.
* Click "**Next**".
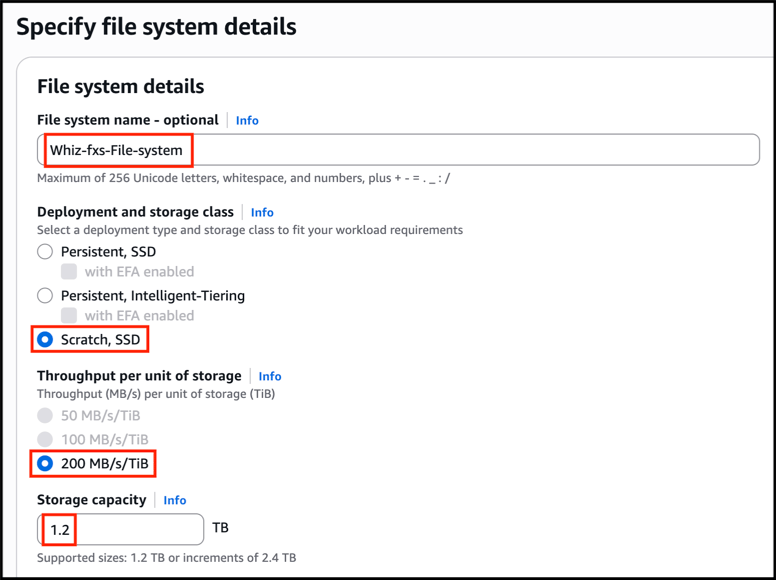
 **Step 2 : Specify File system details**
5. In the **File system name** field - Enter **Whiz-fxs-File-system**
* Choose a Deployment and Storage class as **Scratch, SSD**
* Select Throughput as **200MB/s/TiB**
* Enter Storage capacity : **1.2 TB**
**Step 2 : Specify File system details**
5. In the **File system name** field - Enter **Whiz-fxs-File-system**
* Choose a Deployment and Storage class as **Scratch, SSD**
* Select Throughput as **200MB/s/TiB**
* Enter Storage capacity : **1.2 TB**
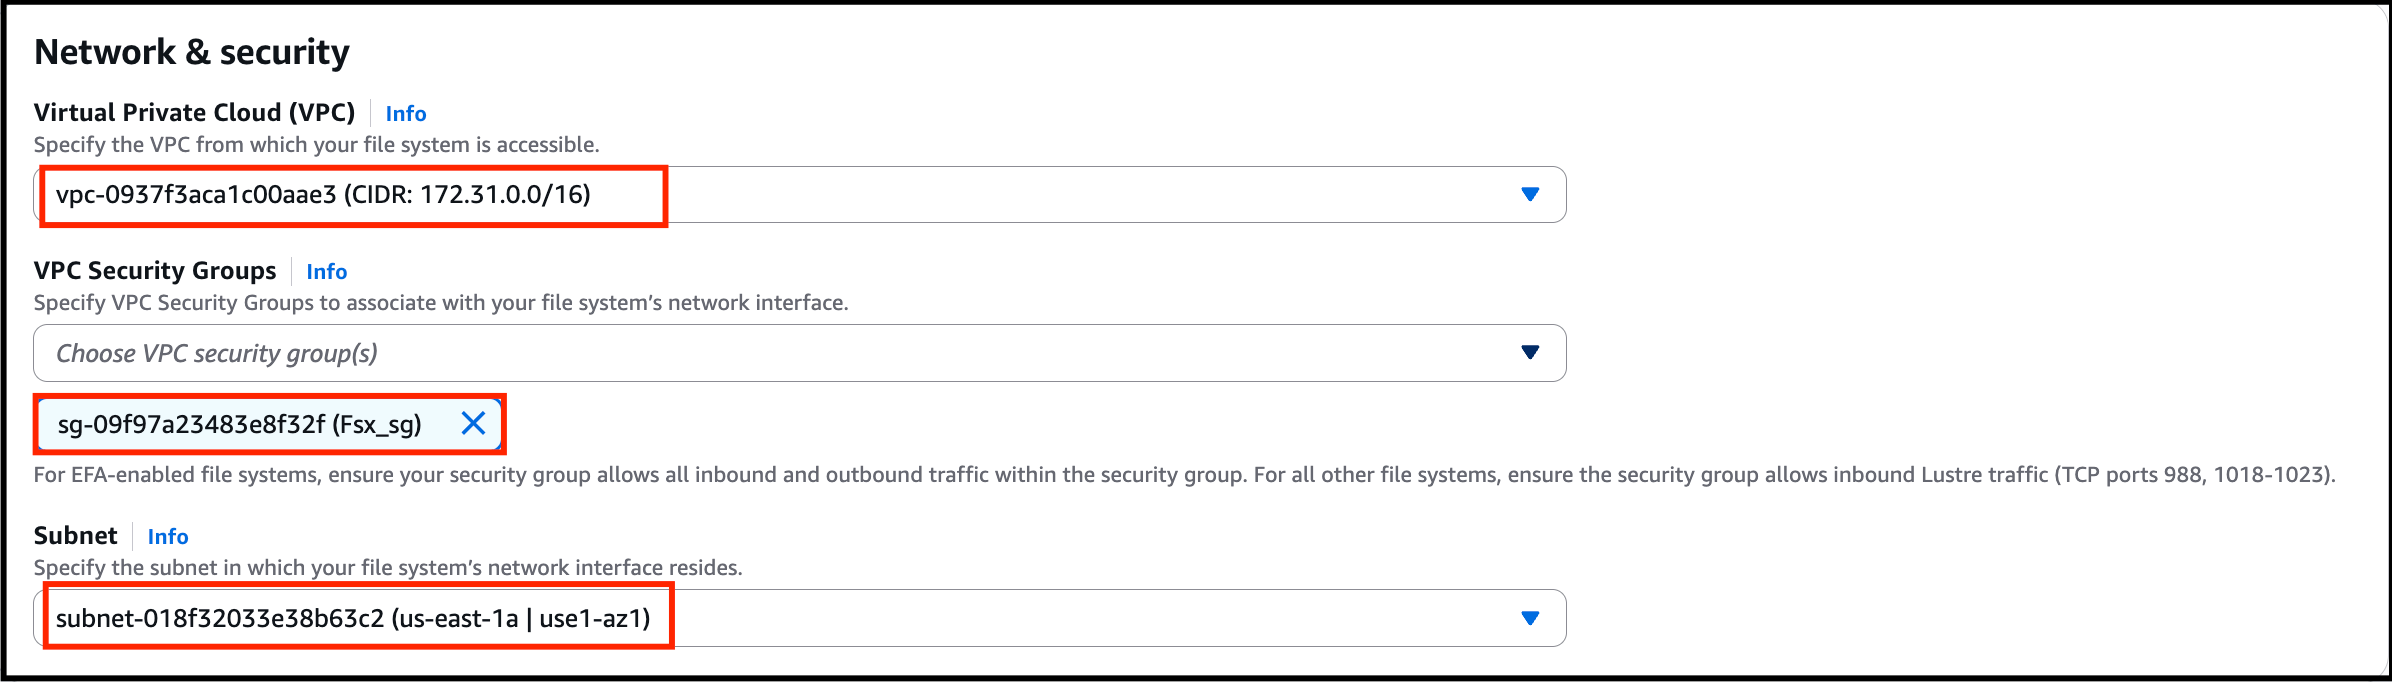
 6. In the Network & Security section, choose the **default VPC**, and Remove the default Security Group and select the **Fsx\_sg** , Select **subnet** of **us-east-1a** Availability Zone\*\*.\*\*
 7. Uncheck the Logging Optional (Log errors ,Log warnings) and Click **Next**.
 **Step 3 : Review and Create**
8. Click to **Create file system**
> **Note:** The FSx for Lustre file system takes 10 to 15 minutes from creation to becoming available.
#### Task 3: Launch an EC2 Instances
1. Ensure you are in the **US East (N. Virginia) us-east-1** Region to begin launching an EC2 instance in the Amazon cloud.
2. Navigate to **EC2** by clicking on the **Services** menu in the top, then click on **EC2** in the **Compute** section.
3. Click on the **Instances** option on the left panel, and then click on the **Launch Instances** button.
4. Name: Enter **EC2Server**
**Step 3 : Review and Create**
8. Click to **Create file system**
> **Note:** The FSx for Lustre file system takes 10 to 15 minutes from creation to becoming available.
#### Task 3: Launch an EC2 Instances
1. Ensure you are in the **US East (N. Virginia) us-east-1** Region to begin launching an EC2 instance in the Amazon cloud.
2. Navigate to **EC2** by clicking on the **Services** menu in the top, then click on **EC2** in the **Compute** section.
3. Click on the **Instances** option on the left panel, and then click on the **Launch Instances** button.
4. Name: Enter **EC2Server**
 5. Select **Amazon Linux 2023 AMI** from the dropdown.
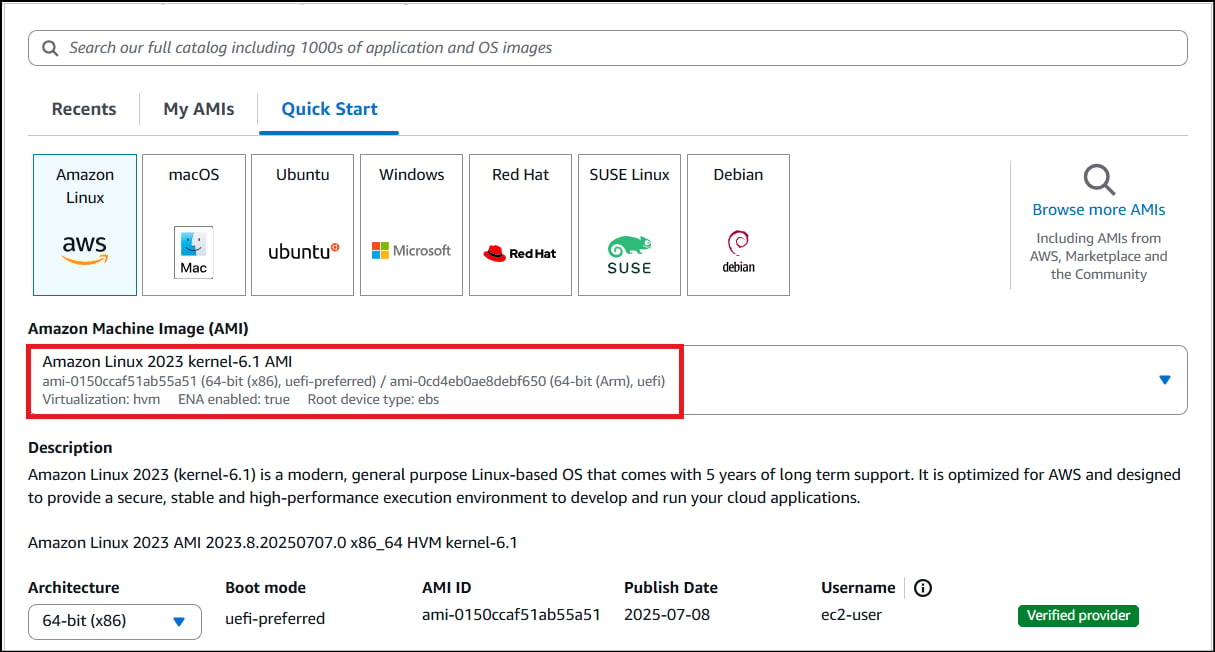 > **Note:** if there are two AMI's present for Amazon Linux 2o23 kernel-6.1 AMI.
6. An instance type in AWS refers to a virtual server configuration that determines the computing resources, such as CPU, memory, and storage, available to an instance. It is the basic building block for creating an EC2 instance in the AWS cloud.
* For Instance Type: Select **t3.micro**
> **Note:** if there are two AMI's present for Amazon Linux 2o23 kernel-6.1 AMI.
6. An instance type in AWS refers to a virtual server configuration that determines the computing resources, such as CPU, memory, and storage, available to an instance. It is the basic building block for creating an EC2 instance in the AWS cloud.
* For Instance Type: Select **t3.micro**
 > **Note:** t3.micro is an instance type in AWS that comes with 2 vCPU, and 1GB memory and is suitable for low-traffic web servers, small development environments, and other lightweight applications.
7. AWS key pair is a secure pair of keys used for login and access to EC2 instances. It includes a public key placed on the instance and a private key kept on the user's local computer, used for authentication to prevent unauthorized access.
* For **Key pair (login)**: Select **Create a new key pair** Button
* Key pair name: **WhizKey**
* Key pair type: **RSA**
* Private key file format: **.pem**
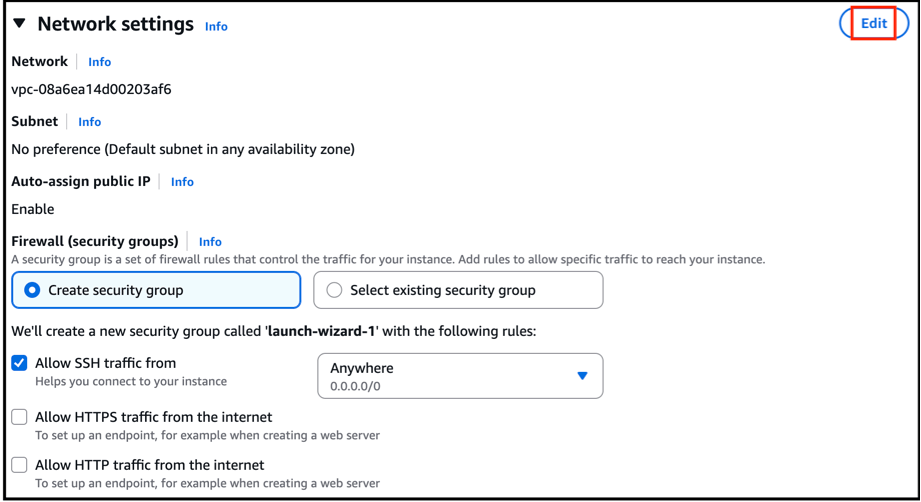
8. Click the **Edit** button in the network settings.
> **Note:** t3.micro is an instance type in AWS that comes with 2 vCPU, and 1GB memory and is suitable for low-traffic web servers, small development environments, and other lightweight applications.
7. AWS key pair is a secure pair of keys used for login and access to EC2 instances. It includes a public key placed on the instance and a private key kept on the user's local computer, used for authentication to prevent unauthorized access.
* For **Key pair (login)**: Select **Create a new key pair** Button
* Key pair name: **WhizKey**
* Key pair type: **RSA**
* Private key file format: **.pem**
8. Click the **Edit** button in the network settings.
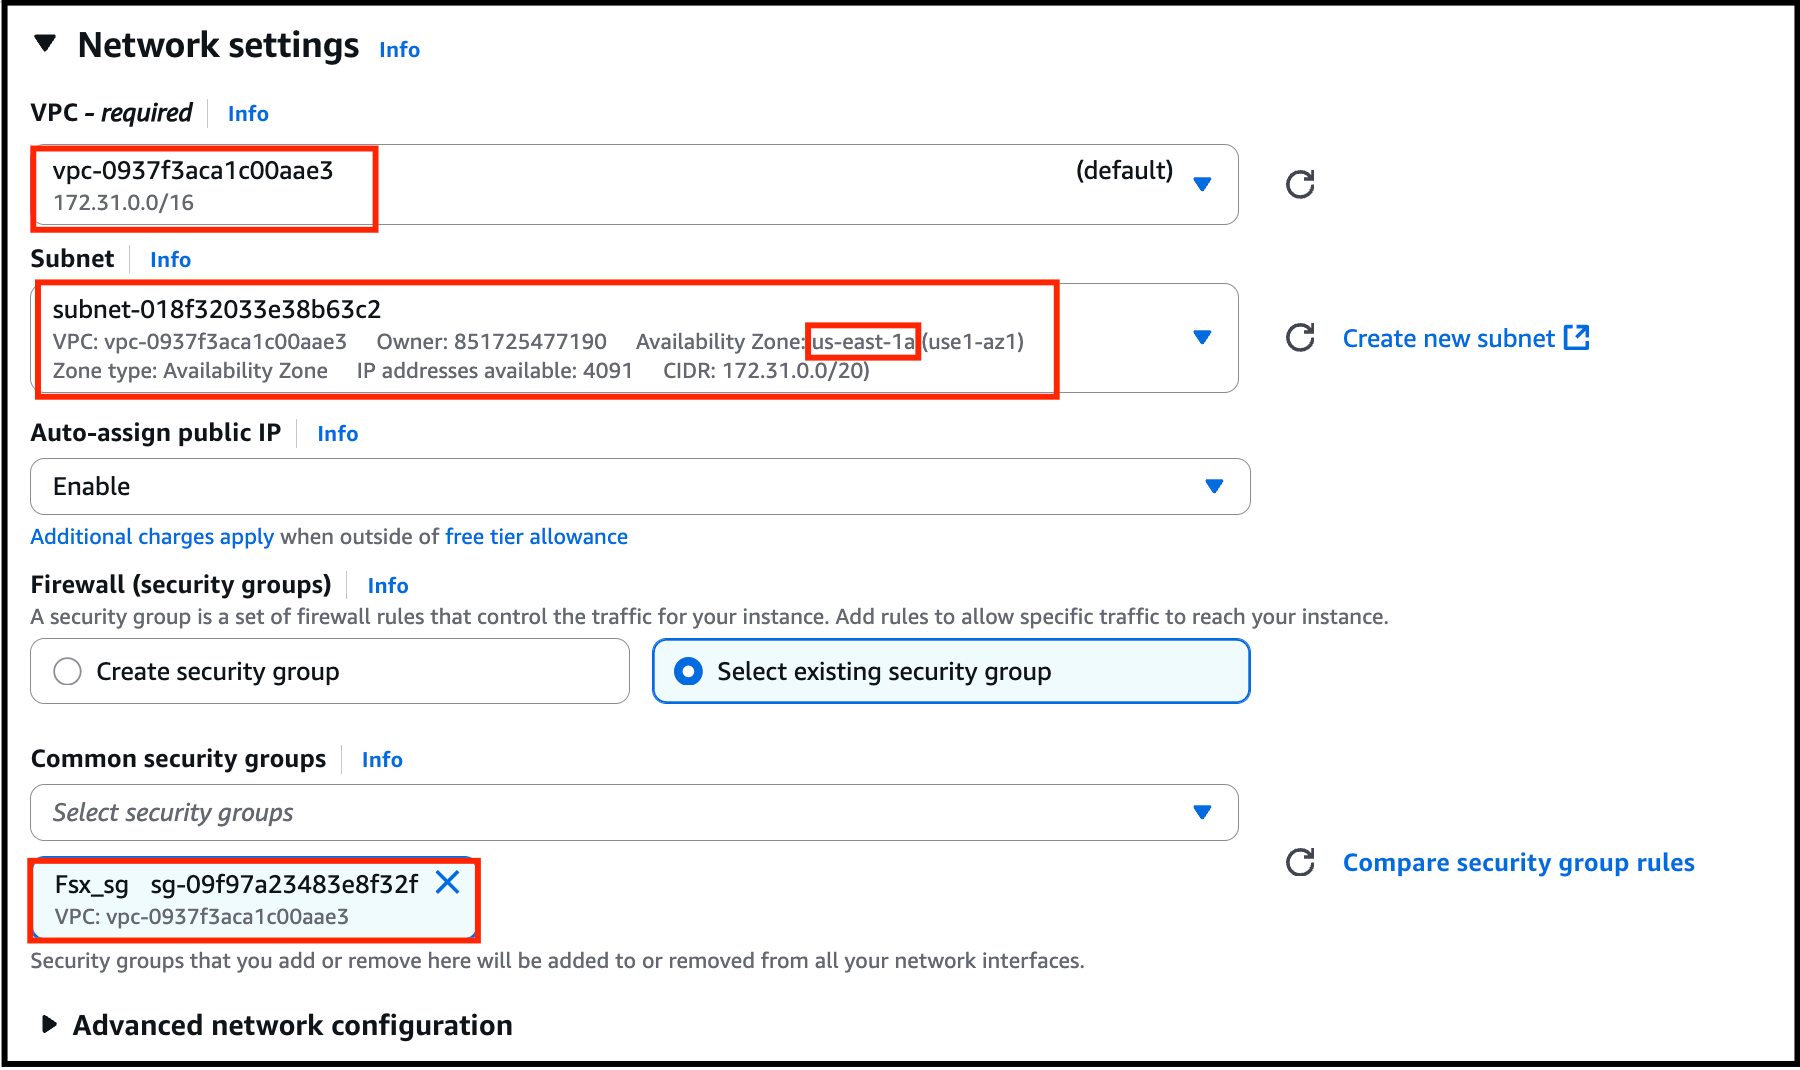
 * Select the **default VPC** and a subnet in the **us-east-1** region.
* Enable '**Auto-assign Public IP**', Select **Existing** **Security Group**, Select **FSx\_sg**, and leave all other settings as default.
* Select the **default VPC** and a subnet in the **us-east-1** region.
* Enable '**Auto-assign Public IP**', Select **Existing** **Security Group**, Select **FSx\_sg**, and leave all other settings as default.
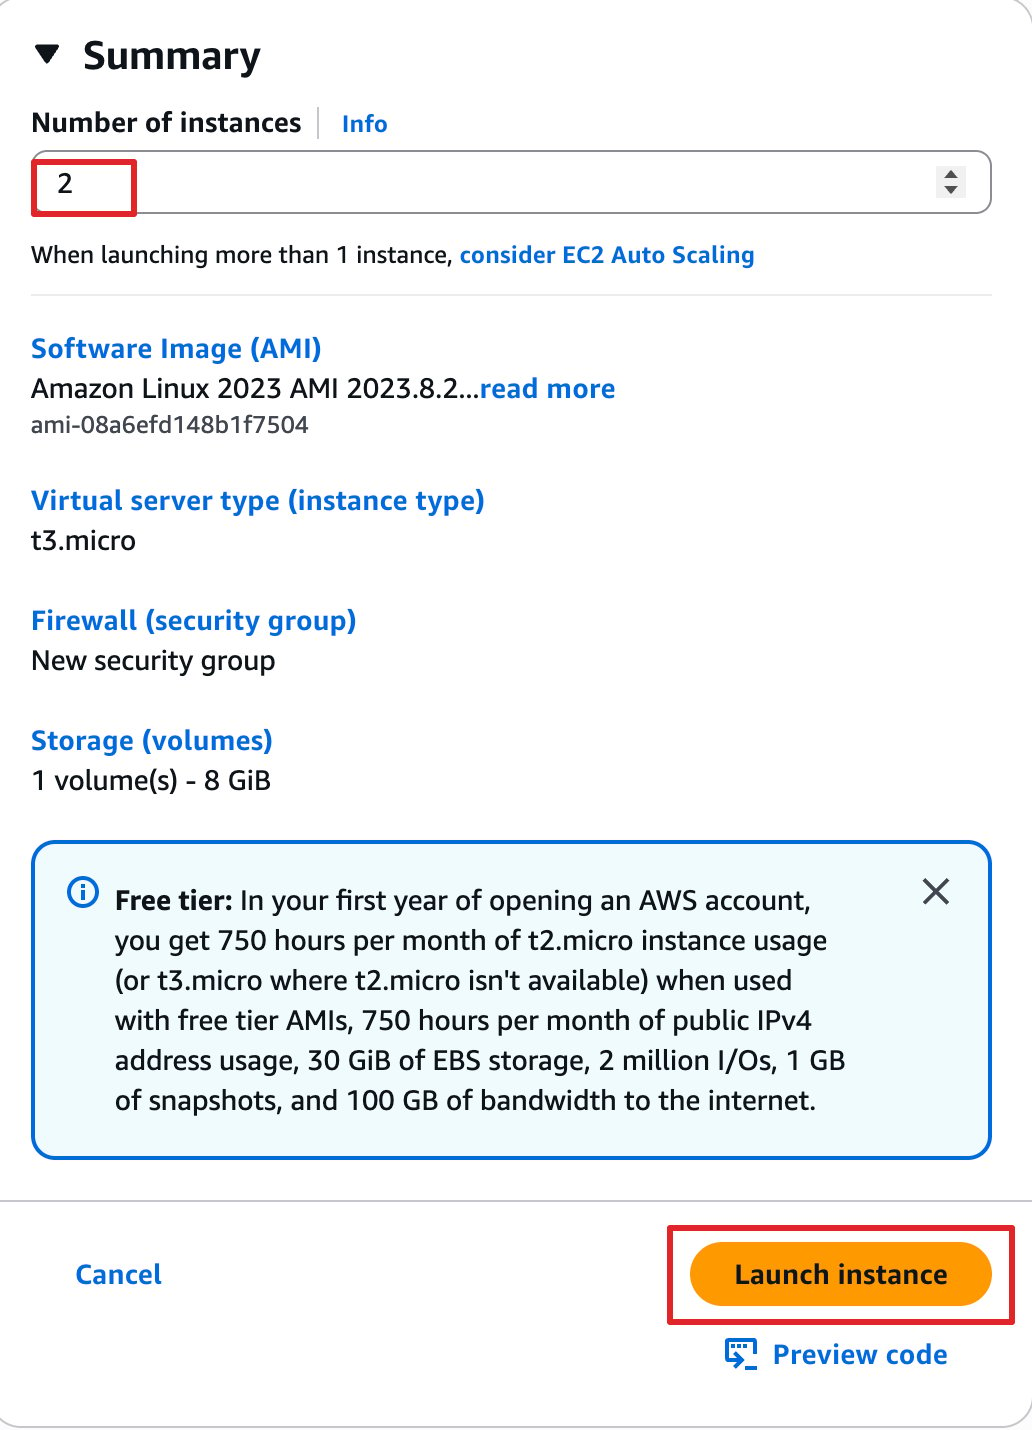
 9. At the top right, set the Number of instances to **2**, then click **Launch instance.**
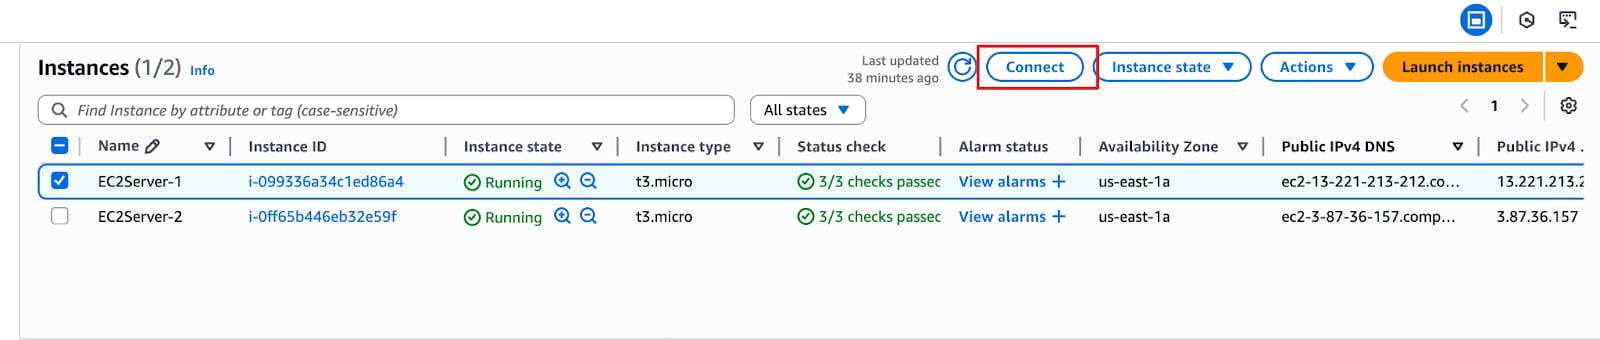
 10. After creating the EC2 instances, rename the first instance from **EC2server** to ‘**EC2server-1**' and the second instance from '**EC2server**' to '**EC2server-2**'.
 #### Task 4: Mount FSx for Lustre on EC2
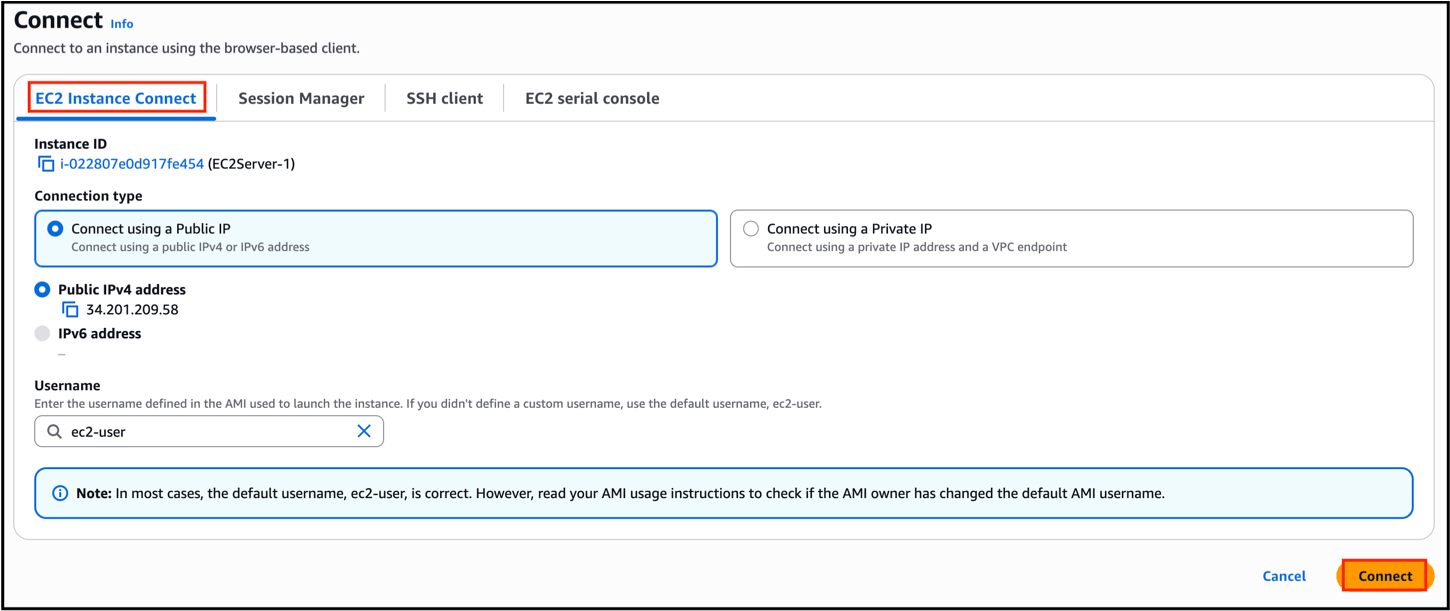
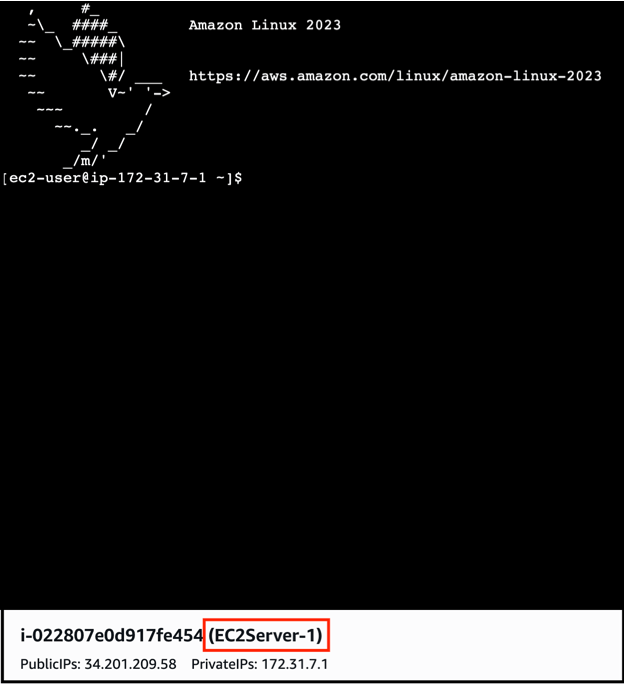
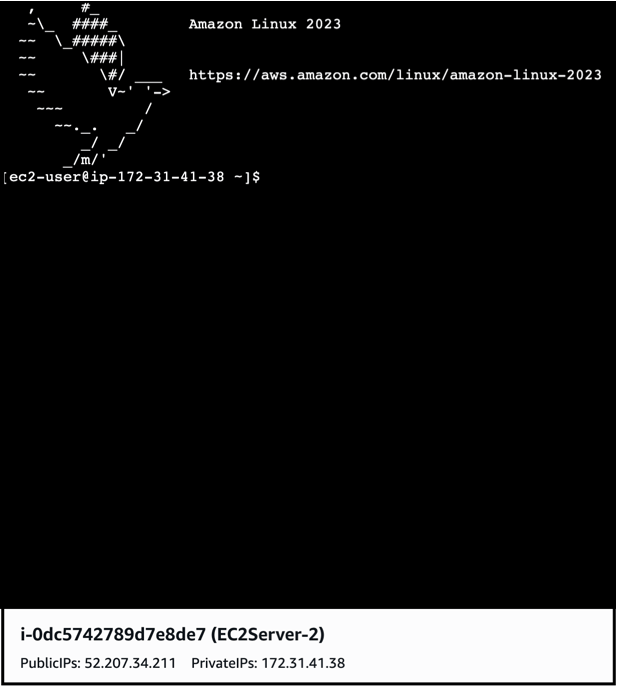
1. Use **EC2 Instance Connect** to access and establish a connection between EC2Server-1 and EC2Server-2 via the browser.
> **Note :** Make sure to connect both **EC2Server-1** and **EC2Server-2** in separate browser, as below we have shown screenshot for EC2Server-1 alone. Ignore the Error message which pops up!
#### Task 4: Mount FSx for Lustre on EC2
1. Use **EC2 Instance Connect** to access and establish a connection between EC2Server-1 and EC2Server-2 via the browser.
> **Note :** Make sure to connect both **EC2Server-1** and **EC2Server-2** in separate browser, as below we have shown screenshot for EC2Server-1 alone. Ignore the Error message which pops up!
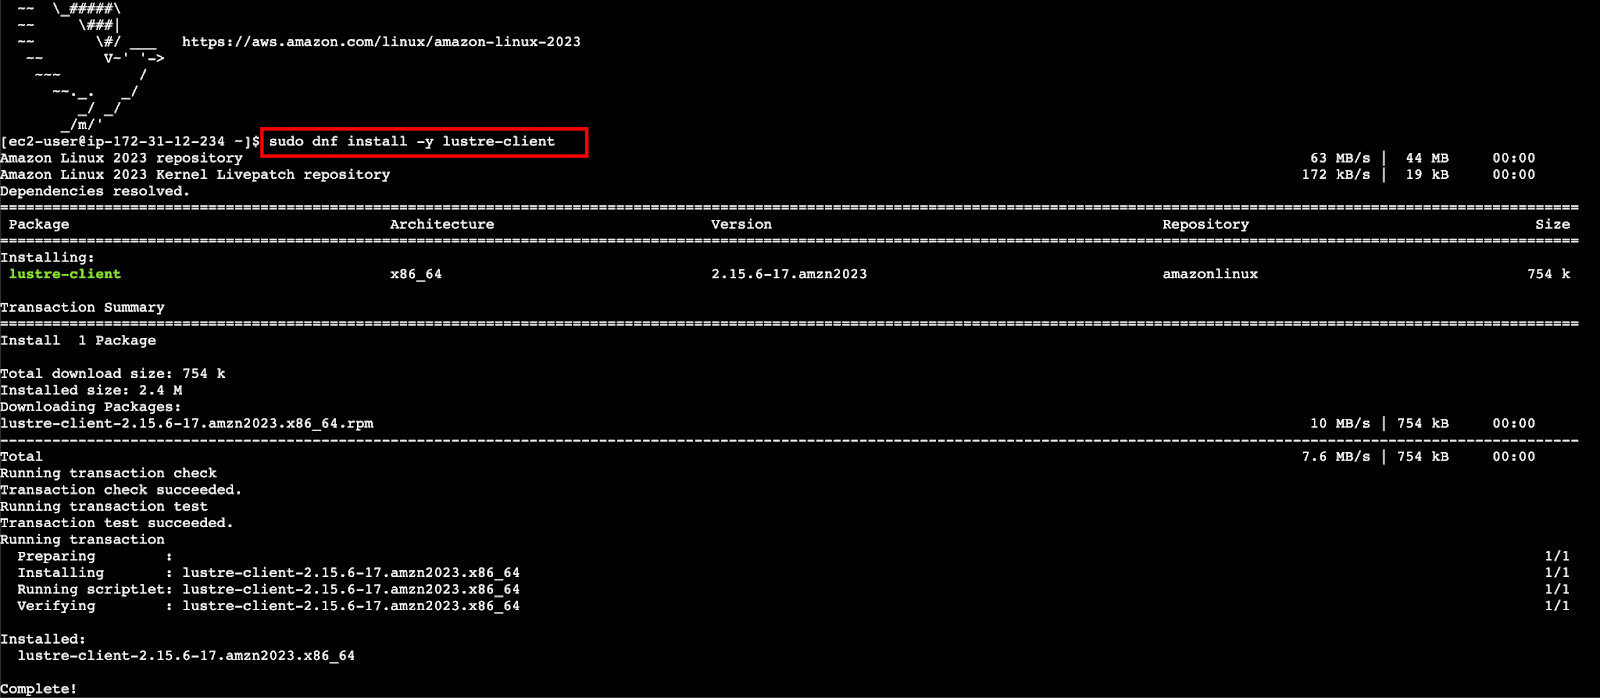
 2. On **Both EC2 instances**, Run this commands.
```
sudo dnf install -y lustre-client
```
2. On **Both EC2 instances**, Run this commands.
```
sudo dnf install -y lustre-client
```
 3. Go to the **FSx file systems** page, select the file system we recently created, then click **Attach** to **copy** the mount commands.
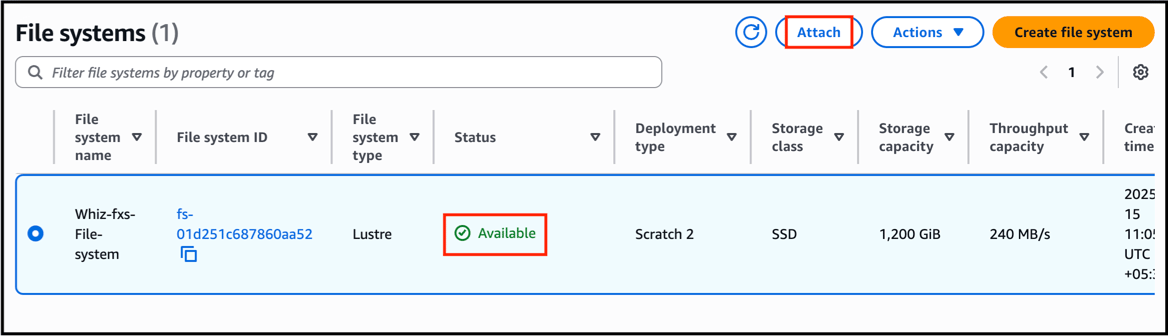
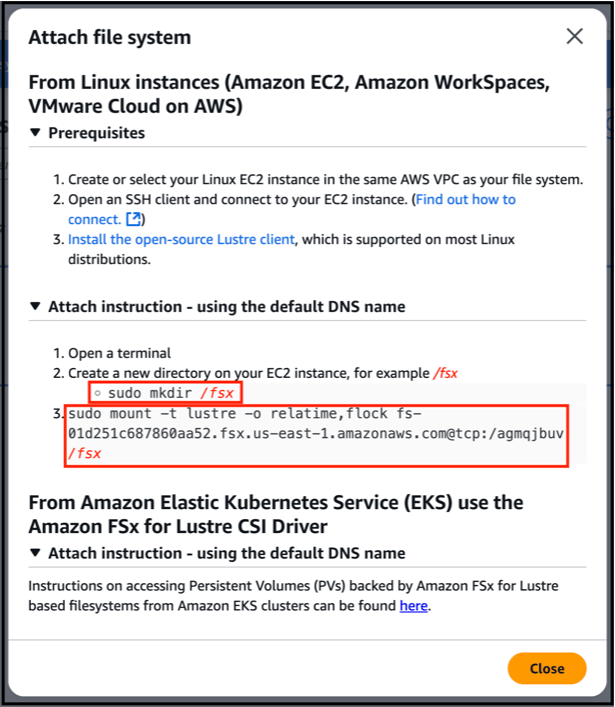 4. Run the mount commands on both EC2 instances.
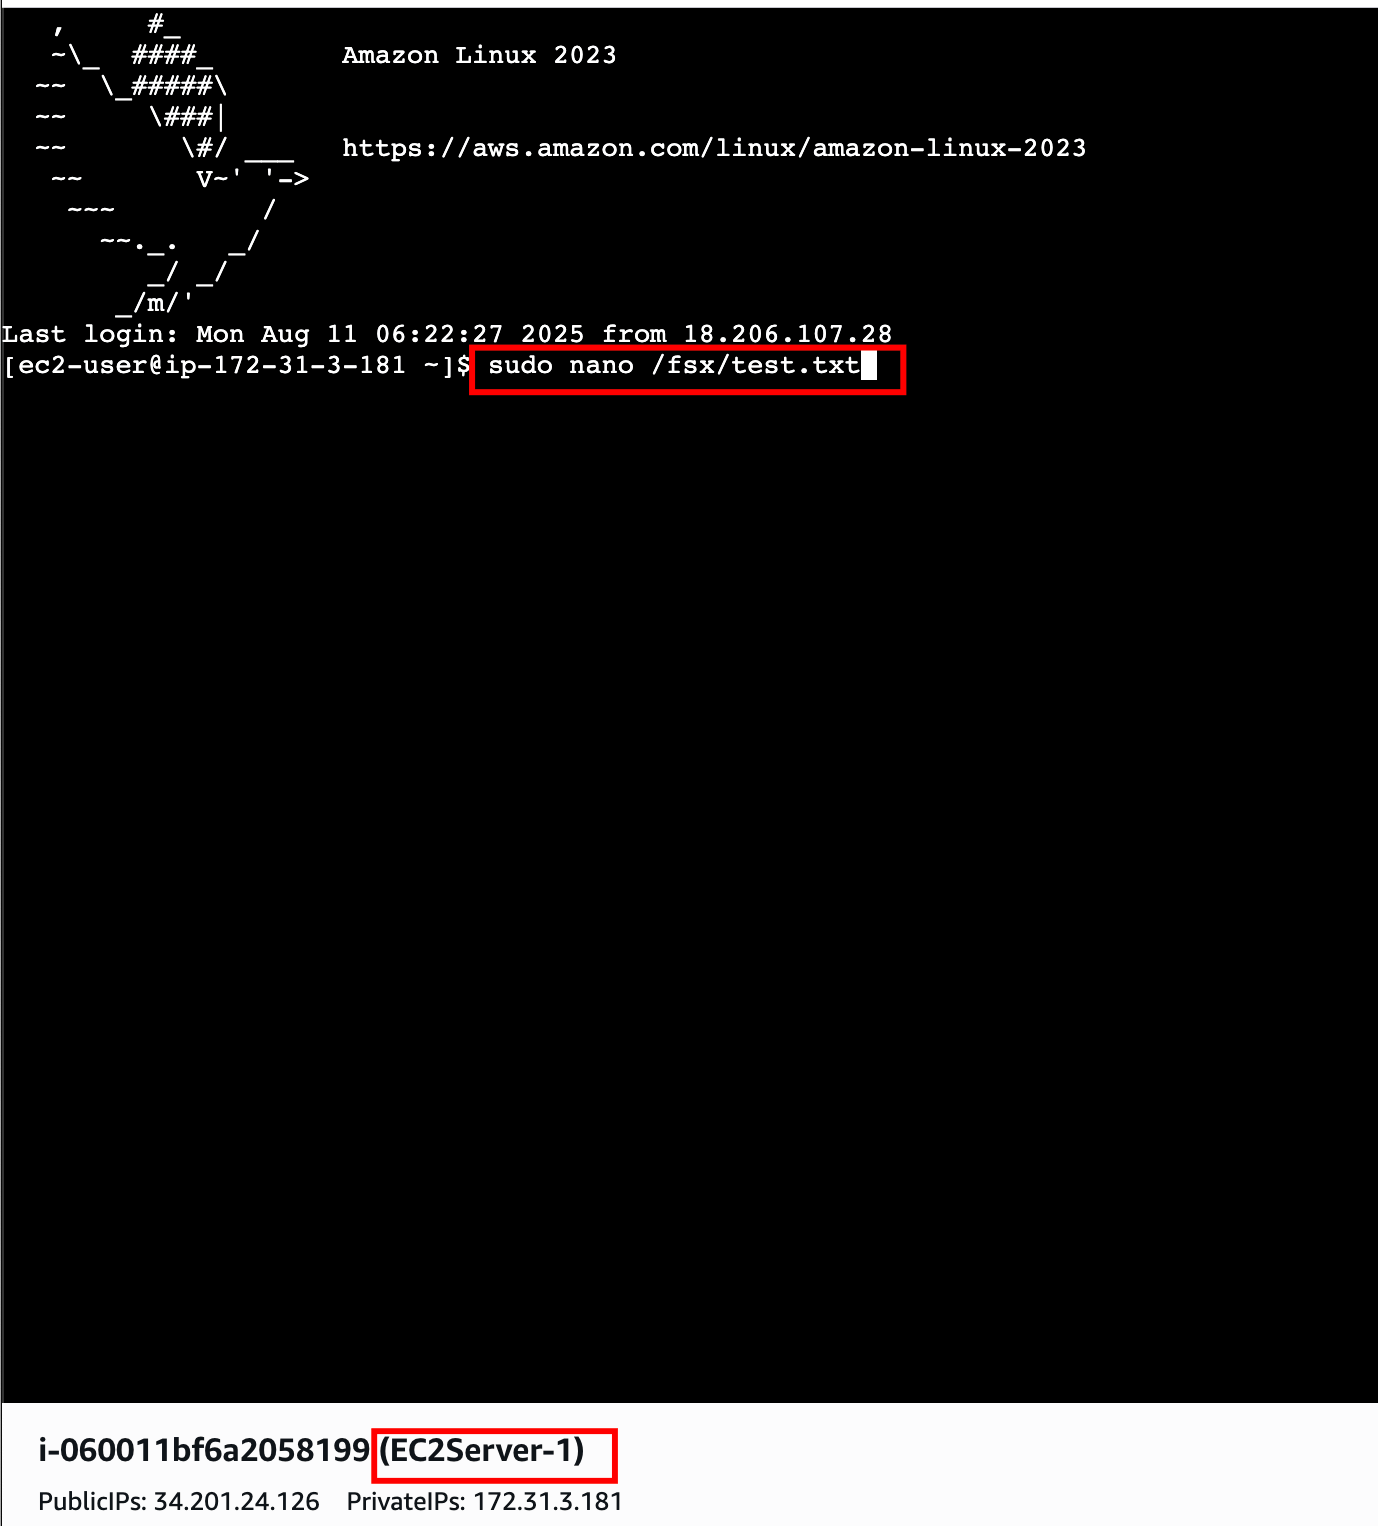
 5. Create a text file on **EC2-Server-1**
```
sudo nano /fsx/test.txt
```
5. Create a text file on **EC2-Server-1**
```
sudo nano /fsx/test.txt
```
 * Type “**Hello from instance A**”
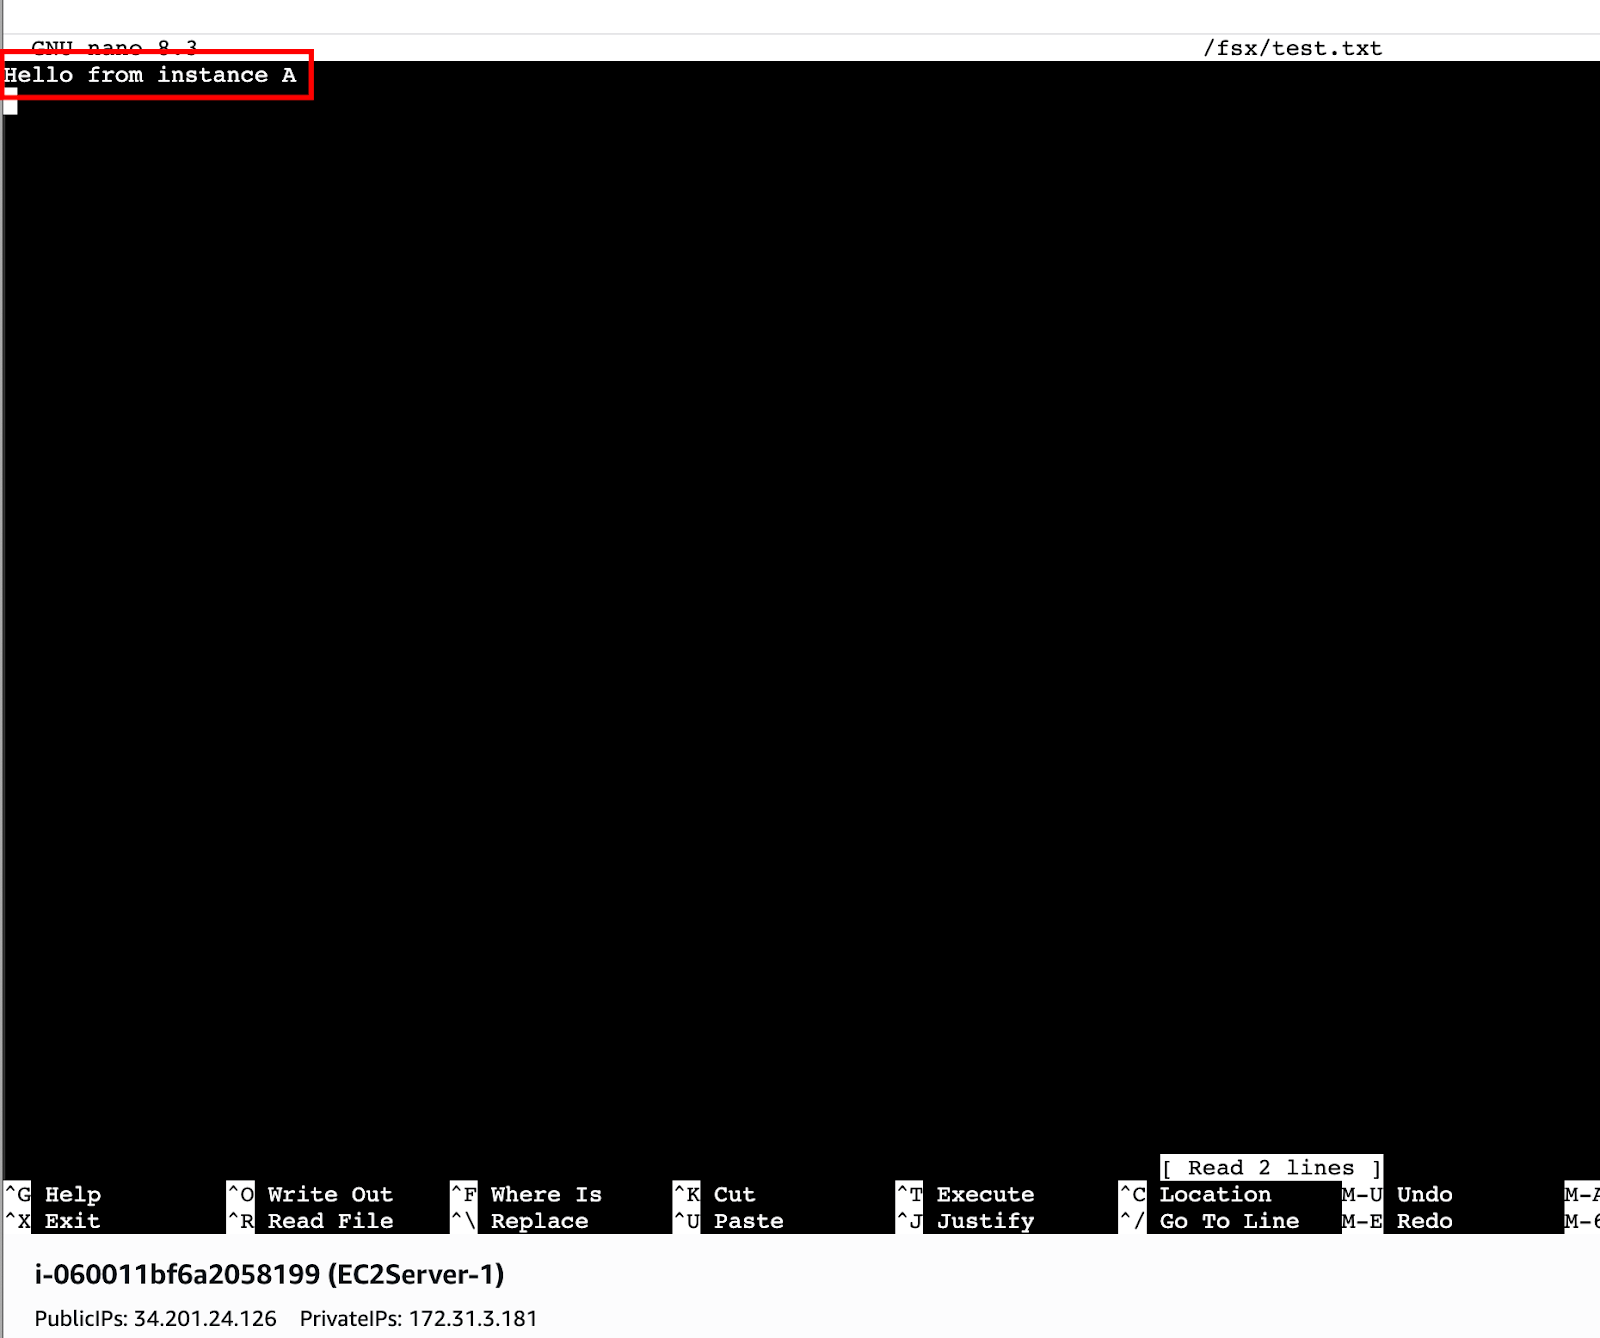 5. Save and exit the file .
* Press “**CTRL + X**” to save. Press “**Y**”
* Press **Enter** to confirm the file name.
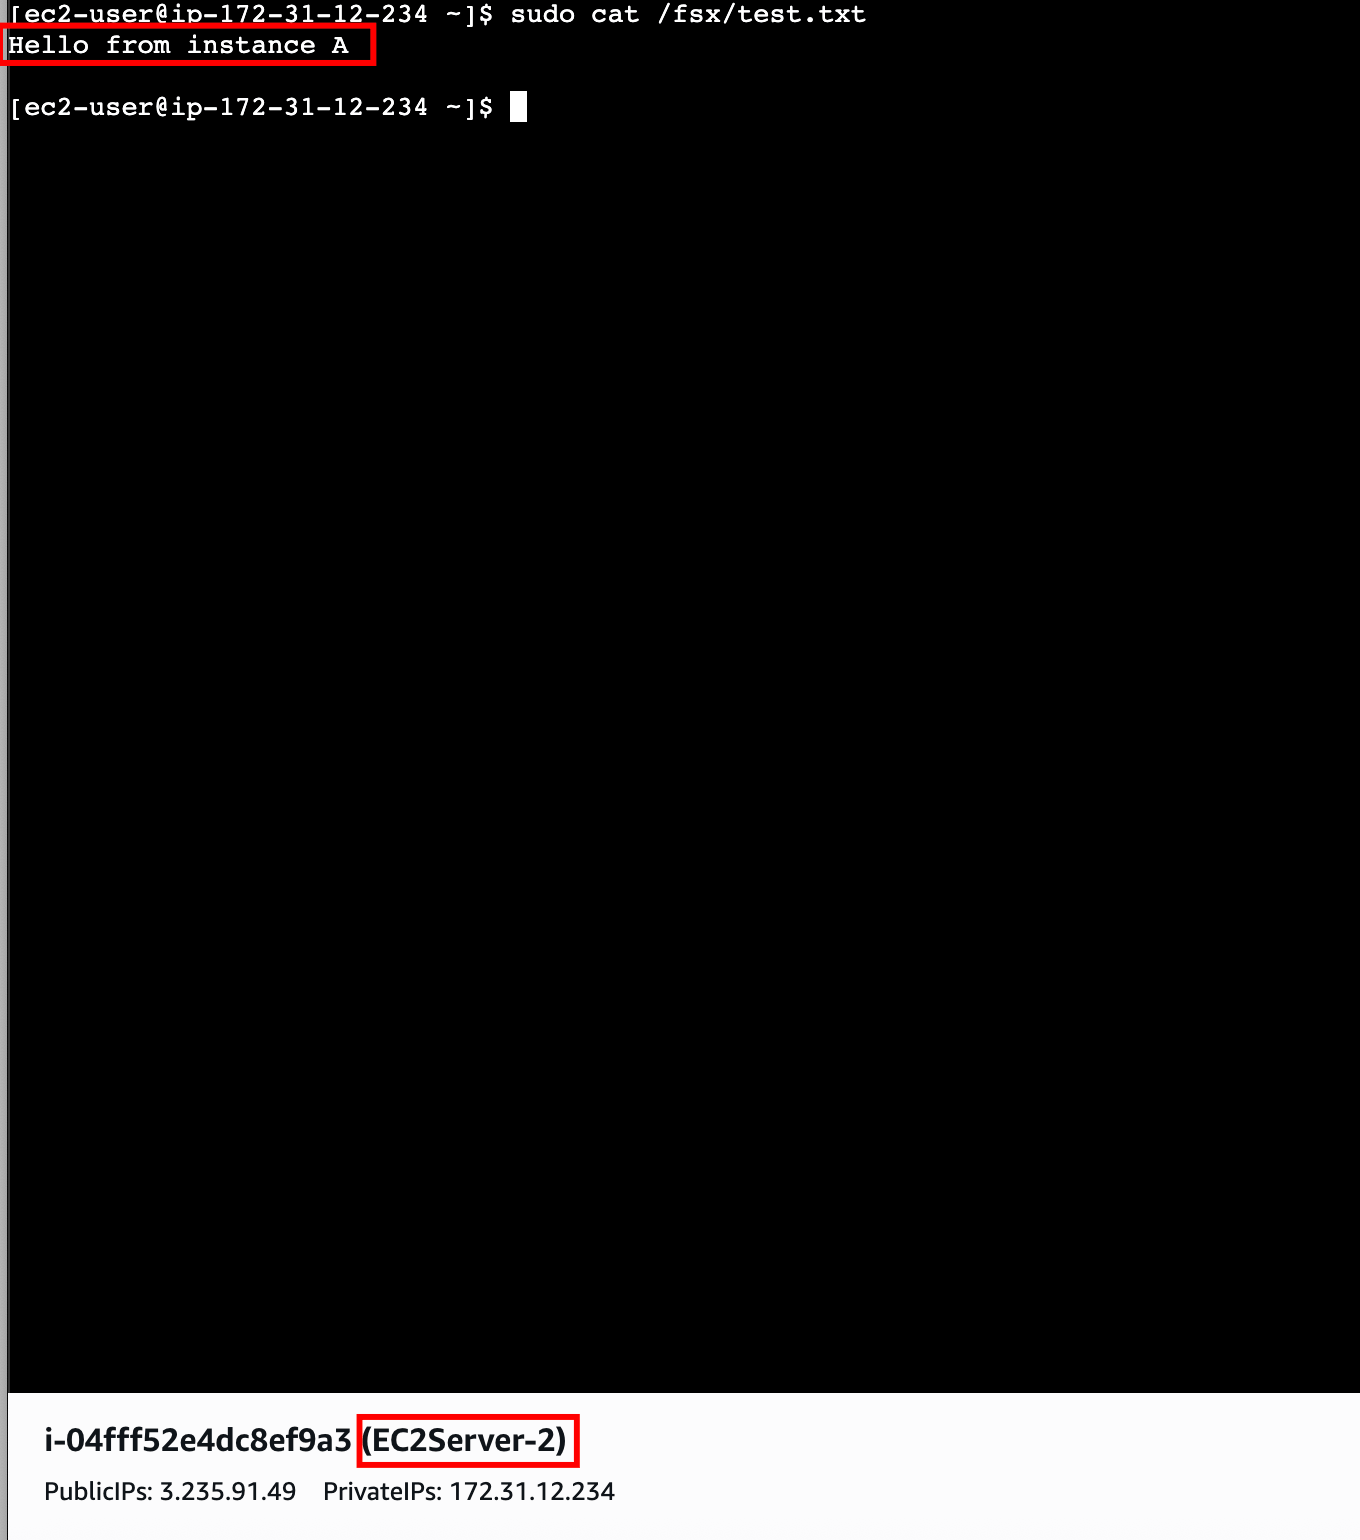
6. Open EC2-Server-2, run the command, and you should see the message: 'Hello from Instance A'.
```
sudo cat /fsx/test.txt
```
5. Save and exit the file .
* Press “**CTRL + X**” to save. Press “**Y**”
* Press **Enter** to confirm the file name.
6. Open EC2-Server-2, run the command, and you should see the message: 'Hello from Instance A'.
```
sudo cat /fsx/test.txt
```
 > ##### Do You Know ?
>
> Amazon FSx for Lustre can deliver sub-millisecond latencies and throughput of hundreds of gigabytes per second. It’s widely used in fields like genomics, financial modeling, and media rendering where fast data access is critical. FSx Lustre can also transparently link to Amazon S3, allowing seamless data transfer between cloud storage and high-performance compute workloads.
#### Task 5: Delete Fxs file System
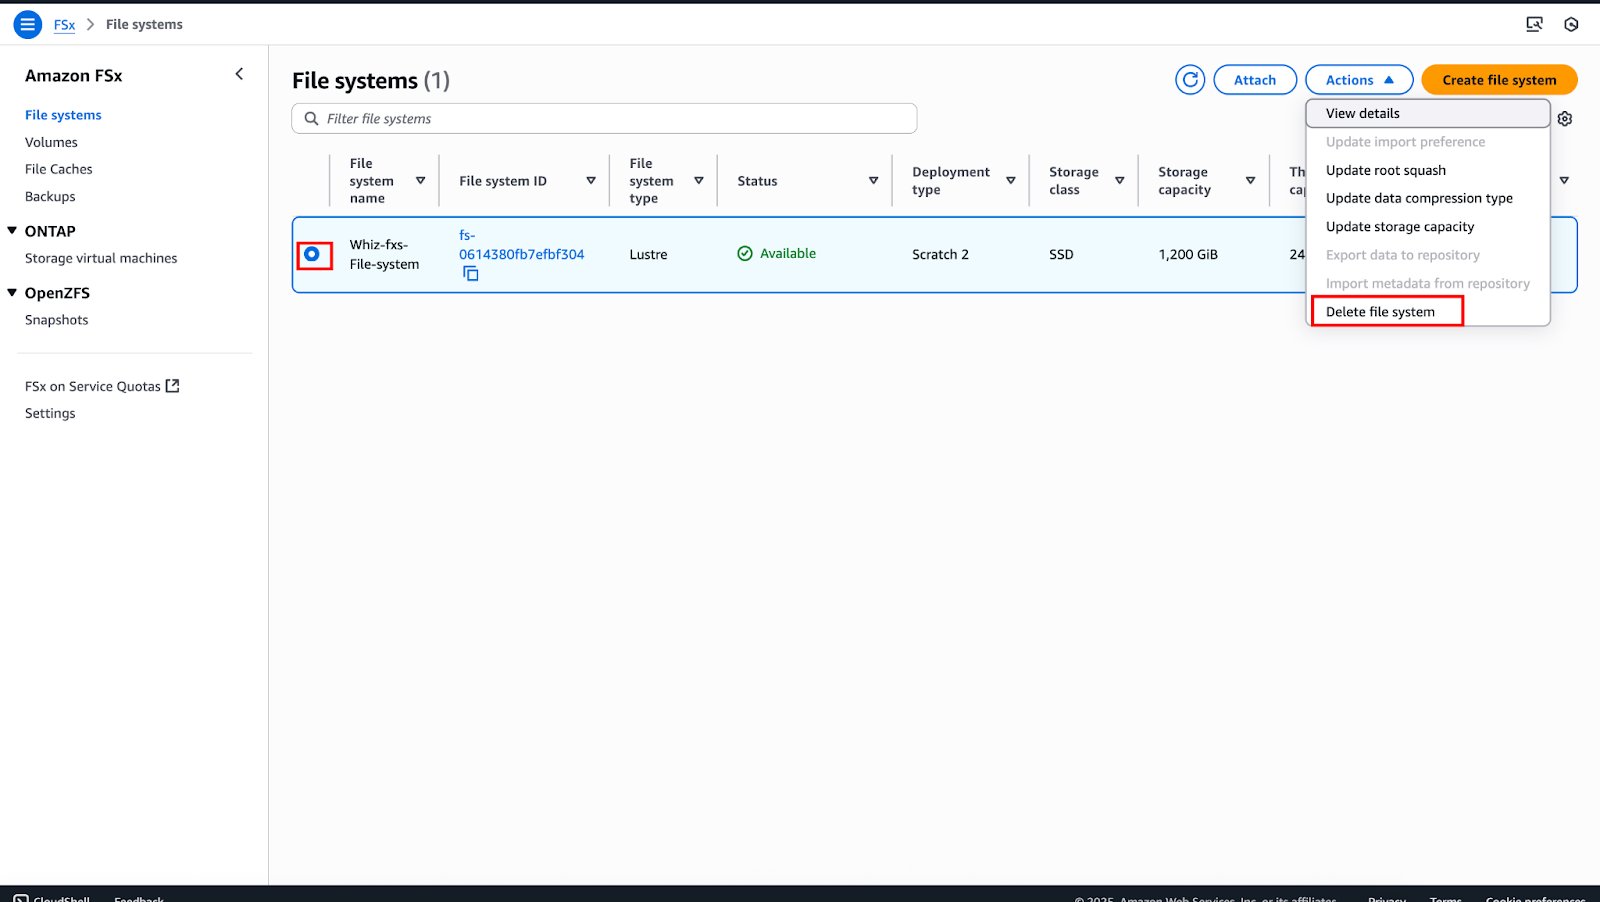
1. Go to the Amazon FSx console, select the '**Whiz-fxs-File-system**', then click 'Actions' and choose '**Delete file system**'.
> ##### Do You Know ?
>
> Amazon FSx for Lustre can deliver sub-millisecond latencies and throughput of hundreds of gigabytes per second. It’s widely used in fields like genomics, financial modeling, and media rendering where fast data access is critical. FSx Lustre can also transparently link to Amazon S3, allowing seamless data transfer between cloud storage and high-performance compute workloads.
#### Task 5: Delete Fxs file System
1. Go to the Amazon FSx console, select the '**Whiz-fxs-File-system**', then click 'Actions' and choose '**Delete file system**'.
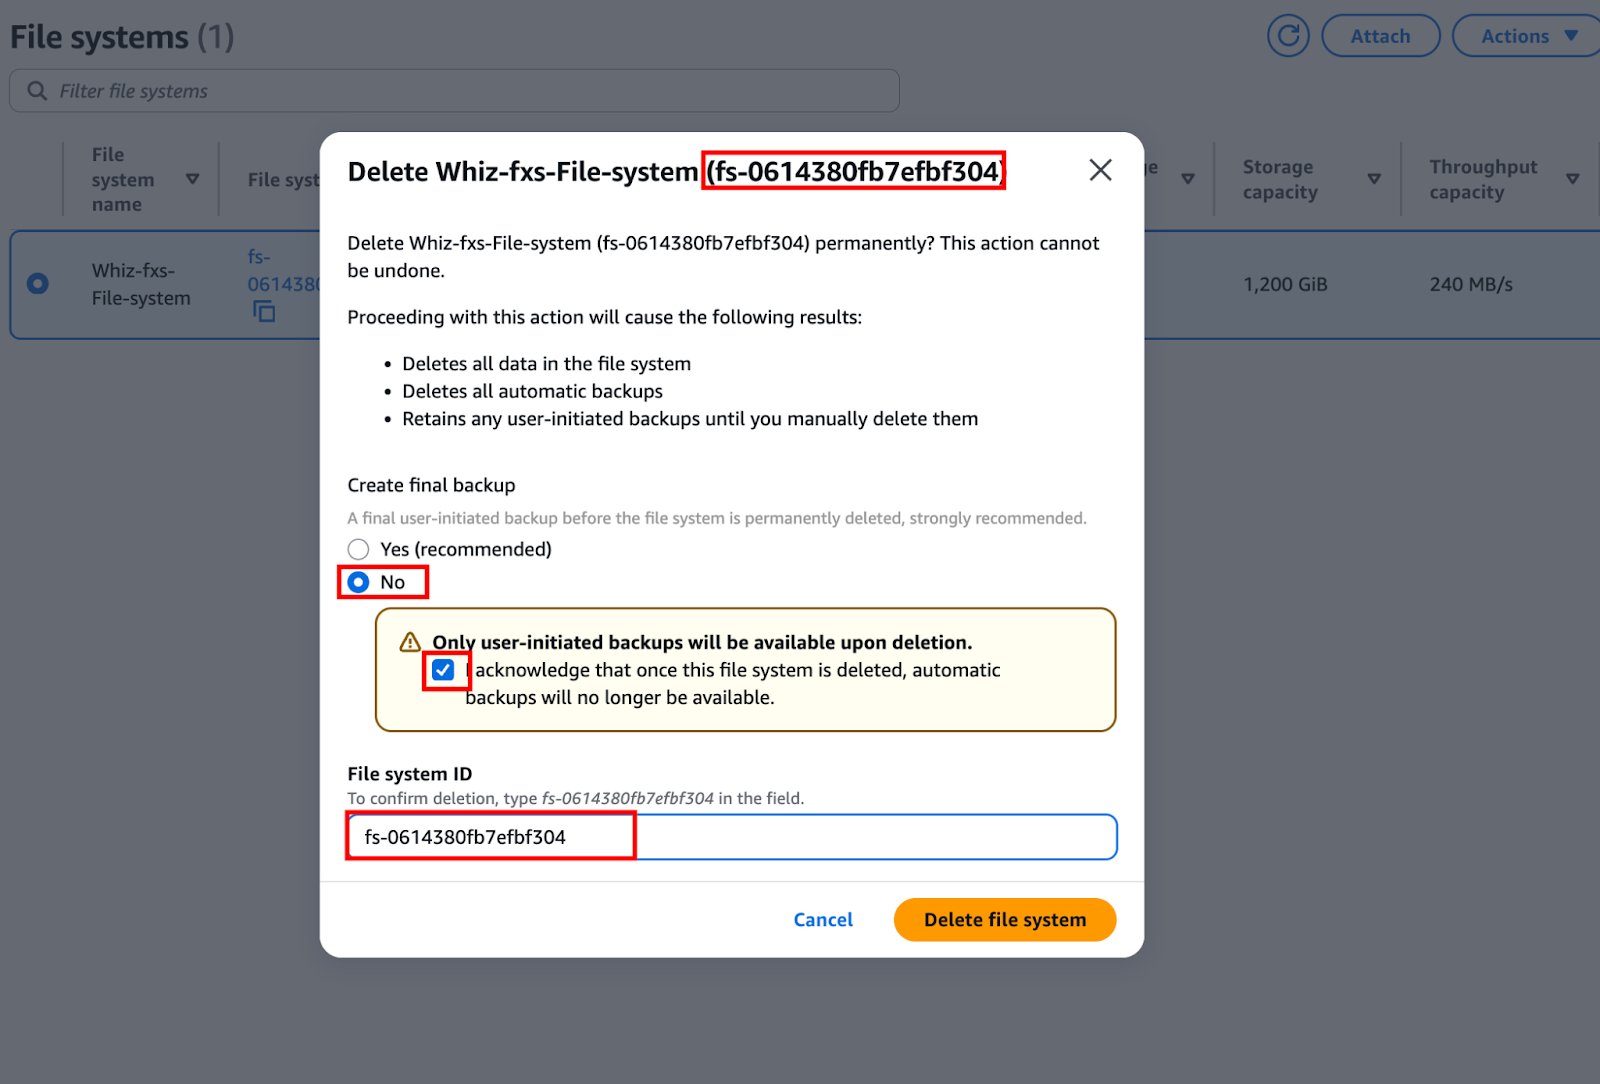
 2. Choose '**No**' for creating a final backup, check the acknowledgment box, paste the file system ID into the field, and click '**Delete file system**'.
 ### Completion and Conclusion
1. You successfully created an Amazon FSx for Lustre file system with 1.2 TB capacity.
2. You successfully launched and configured EC2 instances.
3. You successfully mounted the FSx Lustre file system on the EC2 instances.
4. You successfully created and read files on the EC2 instances using the shared FSx Lustre storage.
### End Lab
1. Sign out of AWS Account.
2. You have successfully completed the lab.
3. Once you completed the steps, click on **End Lab** from your IP Lab Portal and wait till the process gets completed.
## What gets checked
When you press **Check my work**, the platform verifies each of these:
* **Validate EC2 Instance Type t3.micro** — Check whether the EC2 instance type is t3.micro.
* **Check EC2 Instance Public IP** — Check whether the EC2 instance has a public IP address assigned.
## Related help
* [FAQs and Troubleshooting](/aws-saa/support/faqs-and-troubleshooting)
This documentation is built and hosted on [Mintlify](https://mintlify.com), a developer documentation platform.
### Completion and Conclusion
1. You successfully created an Amazon FSx for Lustre file system with 1.2 TB capacity.
2. You successfully launched and configured EC2 instances.
3. You successfully mounted the FSx Lustre file system on the EC2 instances.
4. You successfully created and read files on the EC2 instances using the shared FSx Lustre storage.
### End Lab
1. Sign out of AWS Account.
2. You have successfully completed the lab.
3. Once you completed the steps, click on **End Lab** from your IP Lab Portal and wait till the process gets completed.
## What gets checked
When you press **Check my work**, the platform verifies each of these:
* **Validate EC2 Instance Type t3.micro** — Check whether the EC2 instance type is t3.micro.
* **Check EC2 Instance Public IP** — Check whether the EC2 instance has a public IP address assigned.
## Related help
* [FAQs and Troubleshooting](/aws-saa/support/faqs-and-troubleshooting)
This documentation is built and hosted on [Mintlify](https://mintlify.com), a developer documentation platform.