> ## Documentation Index
> Fetch the complete documentation index at: https://cloud-architect.ipoint-labs.com/llms.txt
> Use this file to discover all available pages before exploring further.
# Connecting RDS from EC2 Instance
> Hands-on lab · 55m
Launch this lab in the IP Lab Portal, then follow the steps below in the AWS console.
Open IP Lab Portal
## Overview
### Lab Details
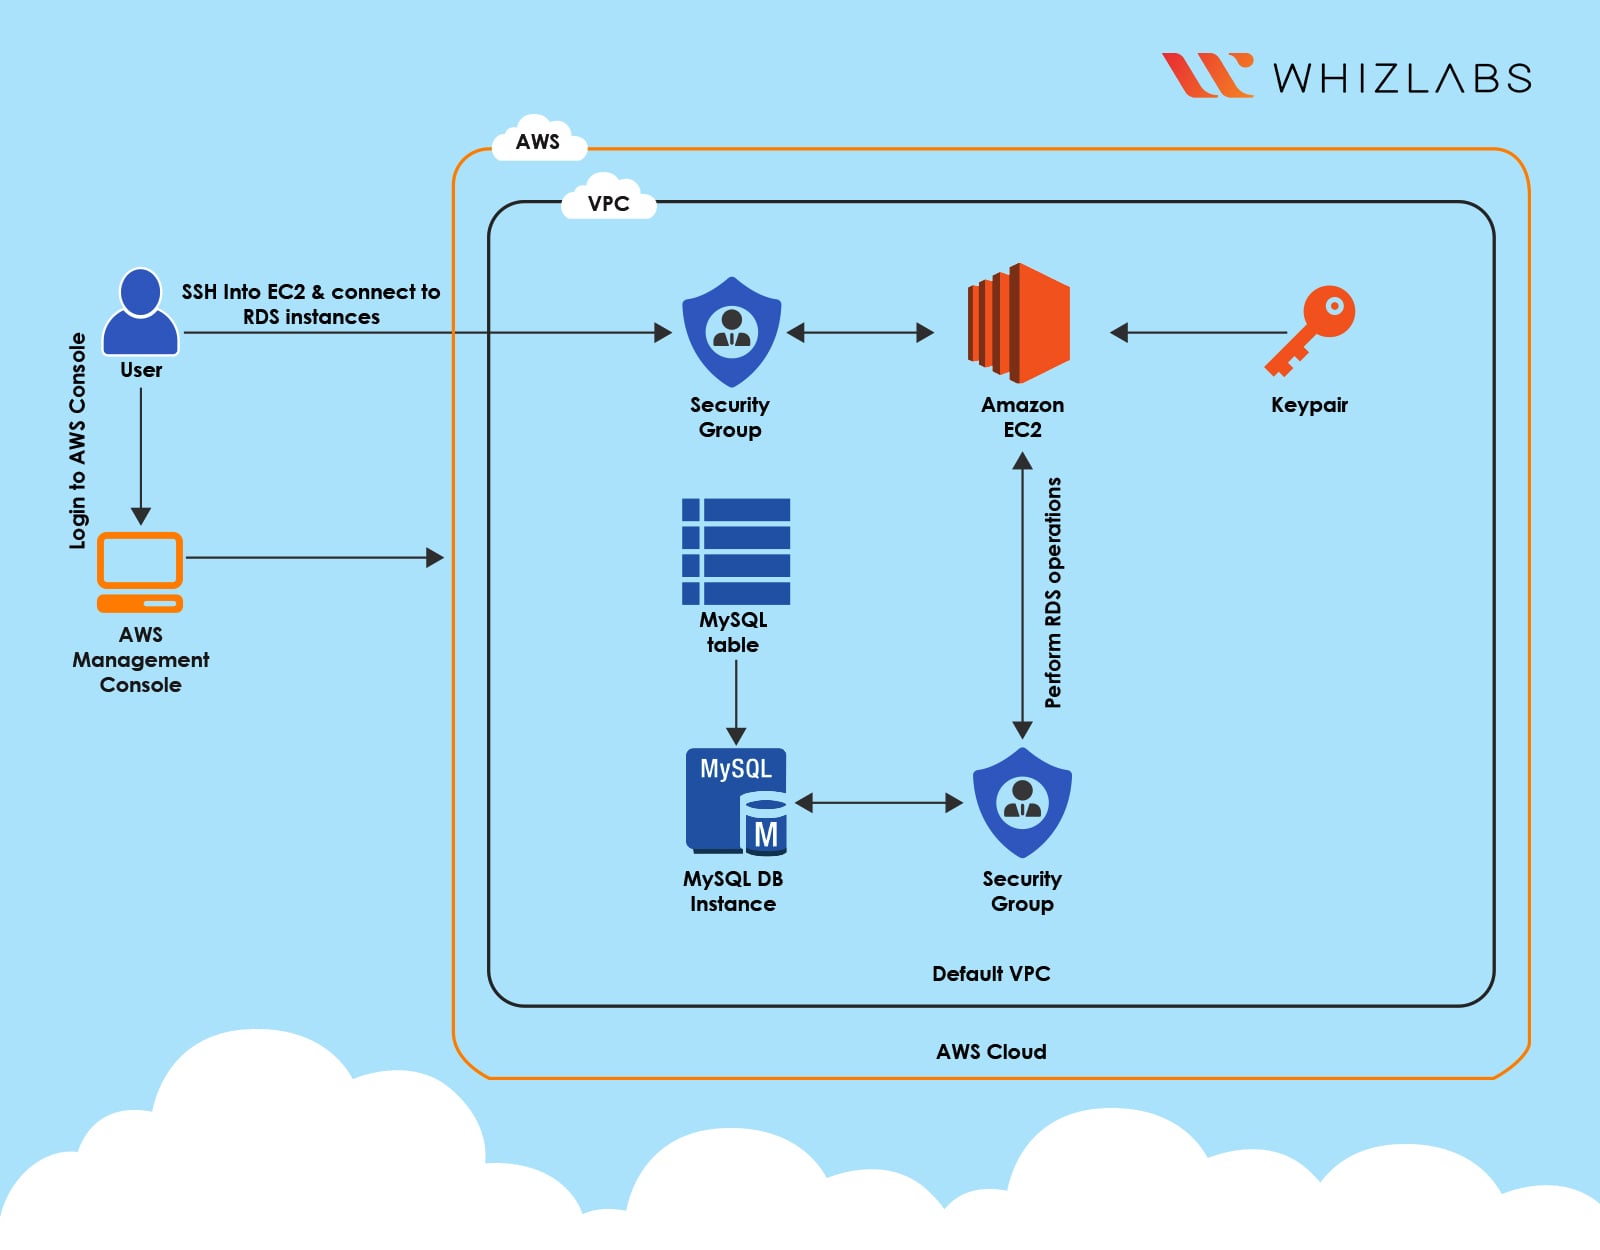
1. This lab walks you through the steps of connecting Amazon EC2 with Amazon RDS Instance.
2. We will create an EC2 instance inside a public subnet and an Amazon RDS in a private subnet group.
3. Duration: **55 minutes**
4. AWS Region: **US East (N. Virginia) us-east-1.**
### Architecture Diagram
 ### Task Details
1. Sign in to AWS Management Console
2. Create an EC2 instance.
3. Create an Amazon RDS instance.
4. Create a connection to the Amazon RDS database from the EC2 instance.
5. Create a Database, Table, and insert data for testing.
6. Deleting AWS resources.
### Launching Lab Environment
1. To launch the lab environment, Click on the **Start Lab** button.
2. Please wait until the cloud environment is provisioned. It will take less than a minute to provision.
3. Once the Lab is started, you will be provided with **IAM user name**, **Password**, **Access** **Key**, and **Secret** **Access** **Key**.
**Note** : You can only start one lab at any given time
## Lab guide
#### Lab Steps
#### Task 1: Sign in to AWS Management Console
1. Click on the **Open Console** button, and you will get redirected to AWS Console in a new browser tab.
2. On the AWS sign-in page,
* Leave the Account ID as default. Never edit/remove the 12-digit Account ID present in the AWS Console. Otherwise, you cannot proceed with the lab.
* Now copy your **Username** and **Password** in the Lab Console to the **IAM Username and Password** in AWS Console and click on the **Sign-in** button.
3. Once Signed In to the AWS Management Console, make the default AWS Region as **US East (N. Virginia) us-east-1.**
> **Note :** If you face any issues, please go through [**FAQs and Troubleshooting for Labs**](https://play.whizlabs.com/site/task_support/faqs-and-troubleshooting).
#### Task 2: Launch EC2 Instance
1. Make sure you are in **US East (N.Virginia) us-east-1** Region.
2. Navigate to EC2 by clicking on the **Services** menu in the top, then click on the **EC2** in the **Compute** section.
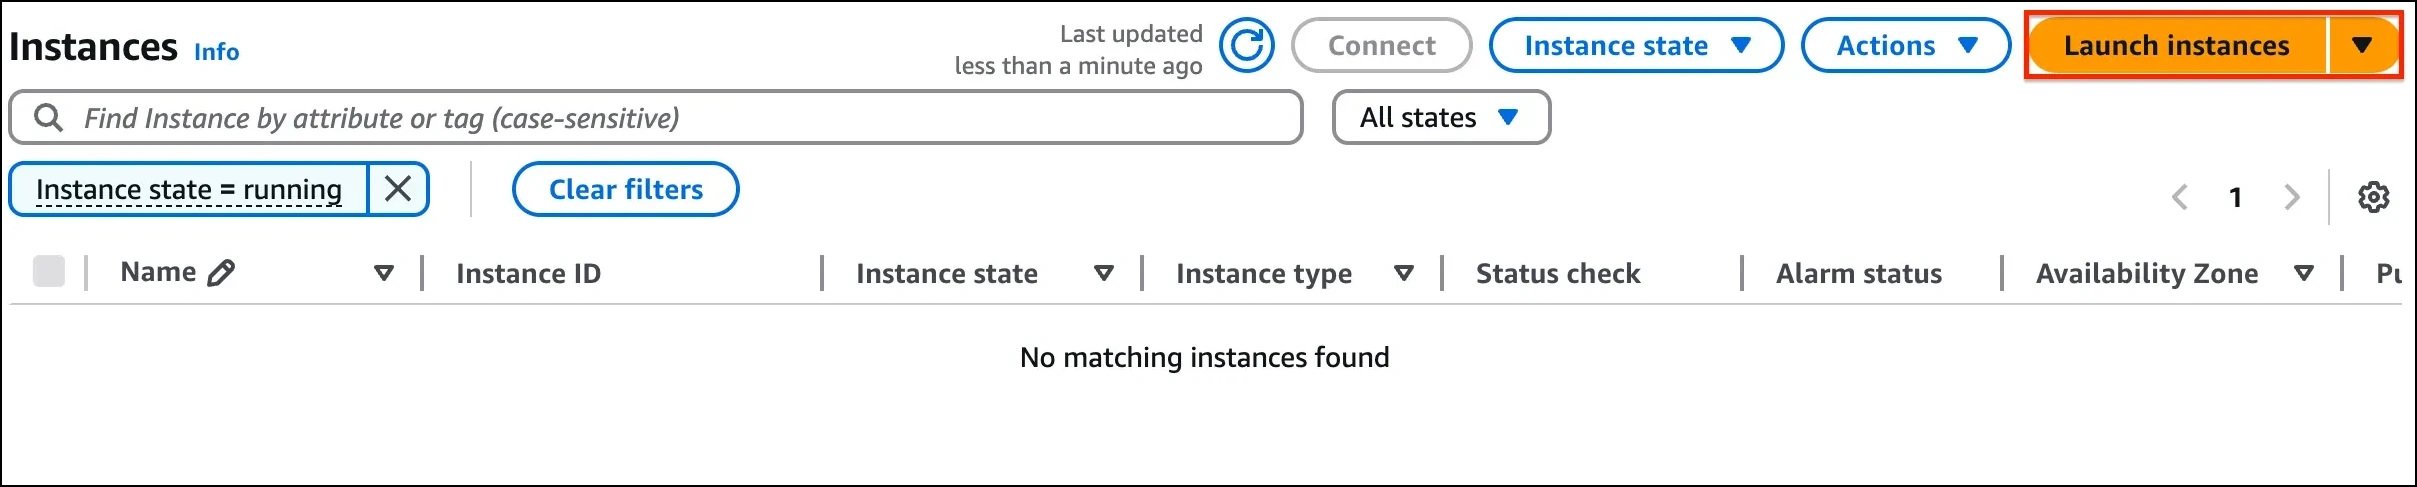
3. Navigate to **Instances** on the left panel and click on **Launch instances.**
### Task Details
1. Sign in to AWS Management Console
2. Create an EC2 instance.
3. Create an Amazon RDS instance.
4. Create a connection to the Amazon RDS database from the EC2 instance.
5. Create a Database, Table, and insert data for testing.
6. Deleting AWS resources.
### Launching Lab Environment
1. To launch the lab environment, Click on the **Start Lab** button.
2. Please wait until the cloud environment is provisioned. It will take less than a minute to provision.
3. Once the Lab is started, you will be provided with **IAM user name**, **Password**, **Access** **Key**, and **Secret** **Access** **Key**.
**Note** : You can only start one lab at any given time
## Lab guide
#### Lab Steps
#### Task 1: Sign in to AWS Management Console
1. Click on the **Open Console** button, and you will get redirected to AWS Console in a new browser tab.
2. On the AWS sign-in page,
* Leave the Account ID as default. Never edit/remove the 12-digit Account ID present in the AWS Console. Otherwise, you cannot proceed with the lab.
* Now copy your **Username** and **Password** in the Lab Console to the **IAM Username and Password** in AWS Console and click on the **Sign-in** button.
3. Once Signed In to the AWS Management Console, make the default AWS Region as **US East (N. Virginia) us-east-1.**
> **Note :** If you face any issues, please go through [**FAQs and Troubleshooting for Labs**](https://play.whizlabs.com/site/task_support/faqs-and-troubleshooting).
#### Task 2: Launch EC2 Instance
1. Make sure you are in **US East (N.Virginia) us-east-1** Region.
2. Navigate to EC2 by clicking on the **Services** menu in the top, then click on the **EC2** in the **Compute** section.
3. Navigate to **Instances** on the left panel and click on **Launch instances.**
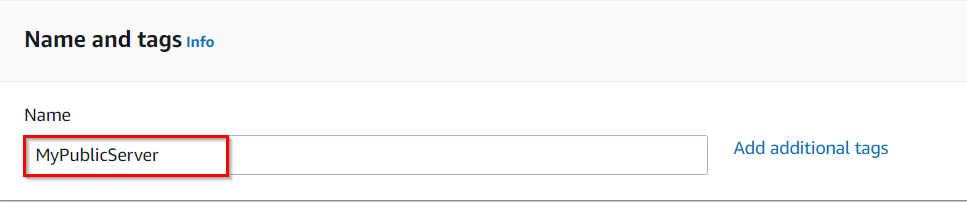
 4. Name : Enter **MyPublicServer**
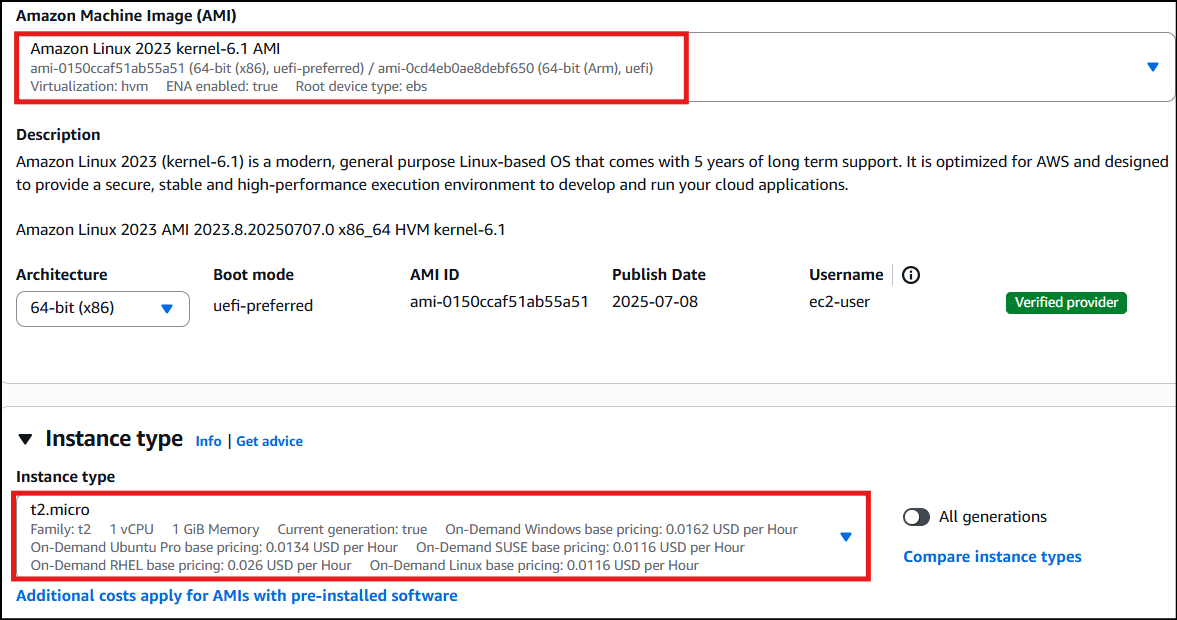
 5. **For Amazon Machine Image (AMI):** Search for **Amazon Linux 2023** **kernel-6.1** **AMI** in Quick Start menu.
6. For Instance Type: select **t2.micro**
5. **For Amazon Machine Image (AMI):** Search for **Amazon Linux 2023** **kernel-6.1** **AMI** in Quick Start menu.
6. For Instance Type: select **t2.micro**
 7. **For Key pair:** Select **Create a new key pair** Button
* Key pair name: Enter **WhizKey**
* Key pair type: Select **RSA**
* Private key file format: Select **.pem**
8. Select **Create key pair** Button.
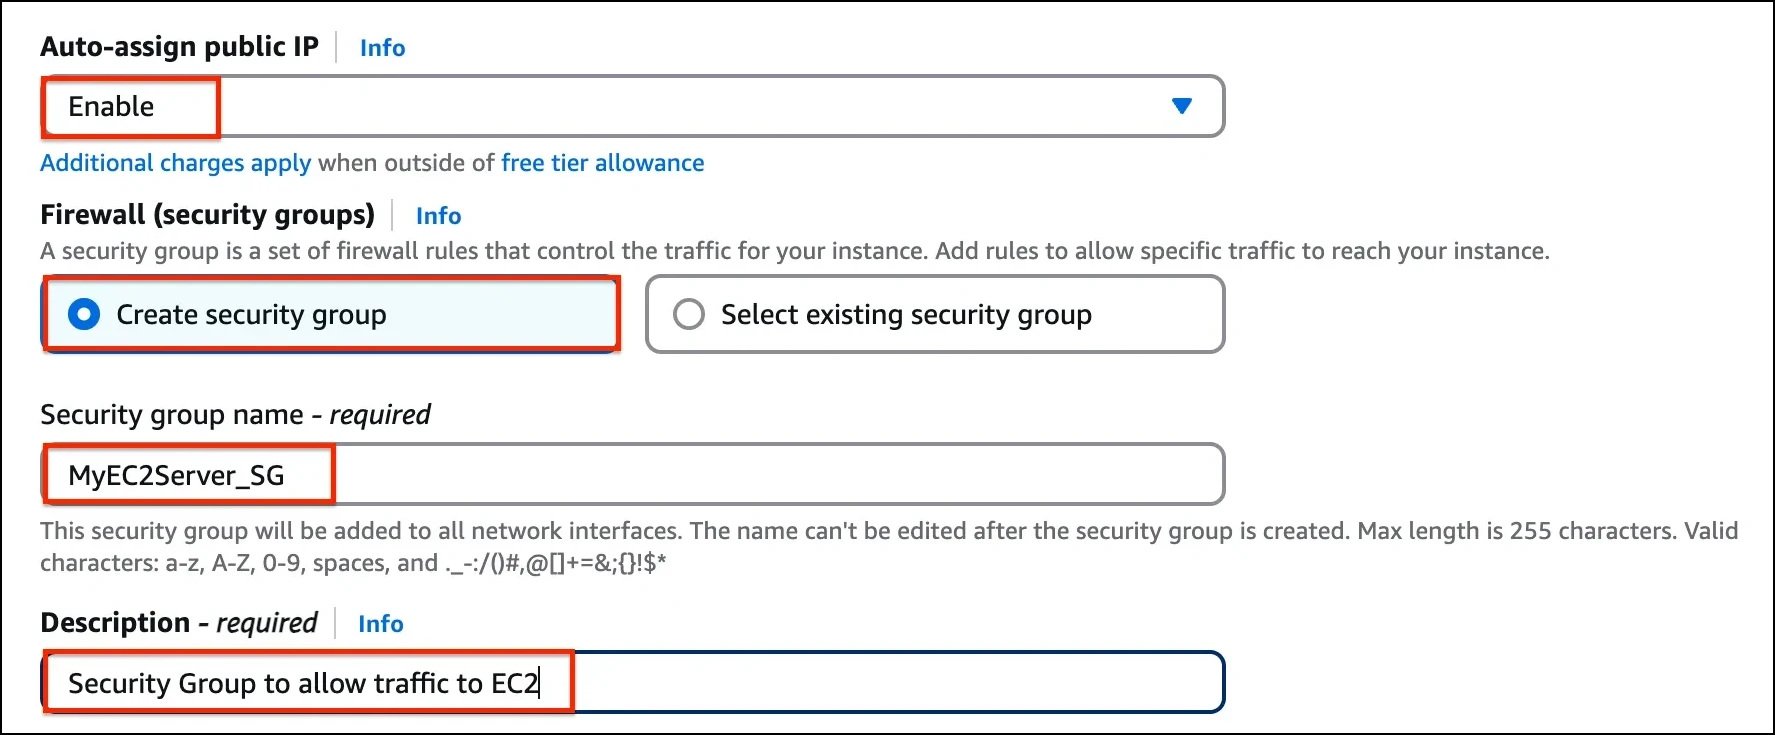
9. In Network Settings, Click on **Edit**:
* Auto-assign public IP: **Enable**
* Select **Create new Security group**
* Security group name : Enter **MyEC2Server\_SG**
* Description : Enter **Security Group to allow traffic to EC2**
7. **For Key pair:** Select **Create a new key pair** Button
* Key pair name: Enter **WhizKey**
* Key pair type: Select **RSA**
* Private key file format: Select **.pem**
8. Select **Create key pair** Button.
9. In Network Settings, Click on **Edit**:
* Auto-assign public IP: **Enable**
* Select **Create new Security group**
* Security group name : Enter **MyEC2Server\_SG**
* Description : Enter **Security Group to allow traffic to EC2**
 10. To add **SSH:**
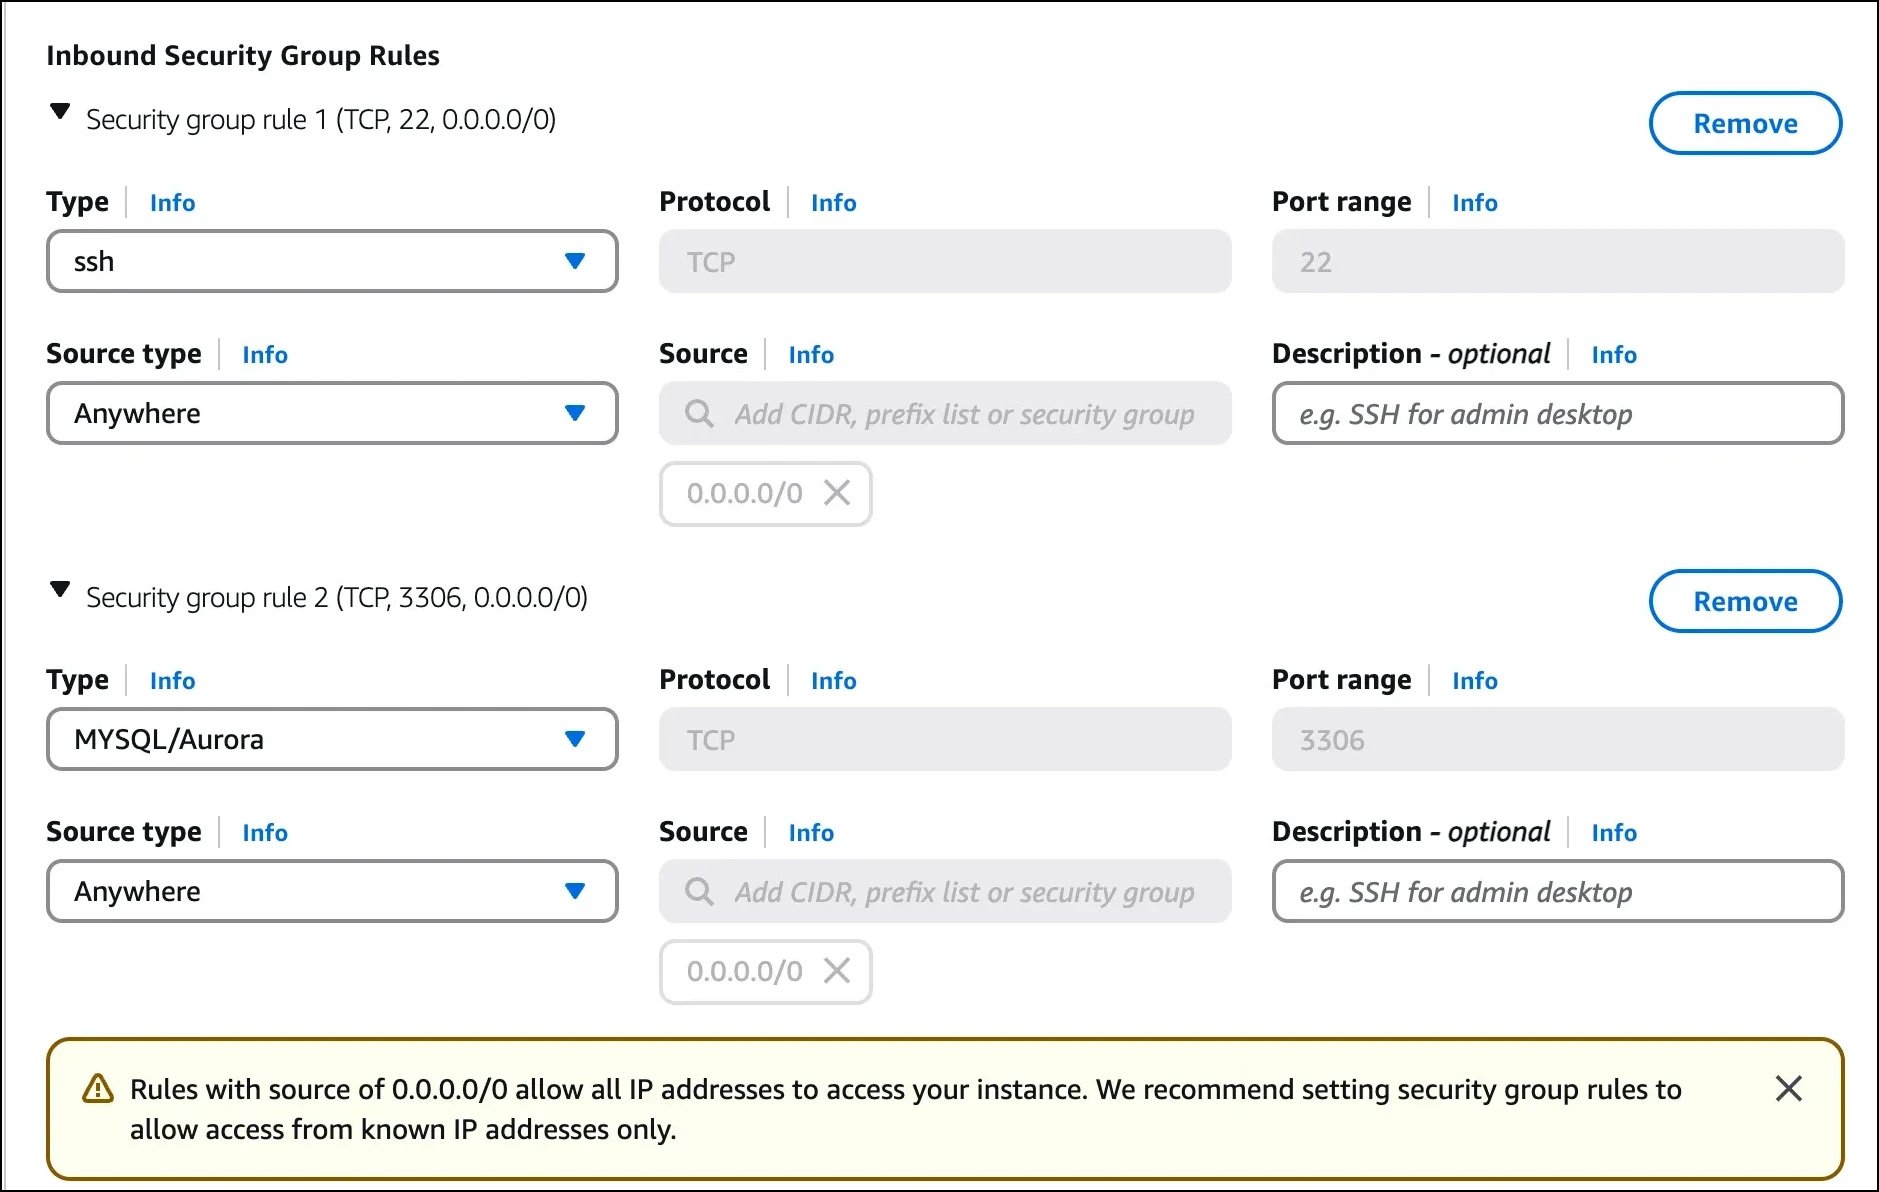
* Choose Type: **SSH**
* Source: **Anywhere**
11. For **RDS:**
* Click on **Add security group role**
* Choose Type: **MySQL/Aurora**
* Source: **Anywhere**
10. To add **SSH:**
* Choose Type: **SSH**
* Source: **Anywhere**
11. For **RDS:**
* Click on **Add security group role**
* Choose Type: **MySQL/Aurora**
* Source: **Anywhere**
 12. Click on Advanced Details. Under the User data section, enter the following script, (which installs MySQL):
```
#!/bin/bash
# Download the MySQL repository package
wget https://dev.mysql.com/get/mysql80-community-release-el9-5.noarch.rpm
# Install the MySQL repository package
sudo dnf install mysql80-community-release-el9-5.noarch.rpm -y
# Enable the MySQL community repository
sudo dnf repolist enabled | grep "mysql.*-community.*"
# Install MySQL
sudo dnf install mysql -y
```
13. Keep rest thing Default and Click on **Launch Instance** Button.
14. Select **View all Instances** to View the Instance you Created
15. **Launch Status:** Your instance is now launching. Click on the instance ID and wait for complete initialization of the instance (until the status changes to running).
#### Task 3: Create an Amazon RDS Database
1. Navigate to **Aurora and RDS** under **Database.**
2. Click on **Create Database** button
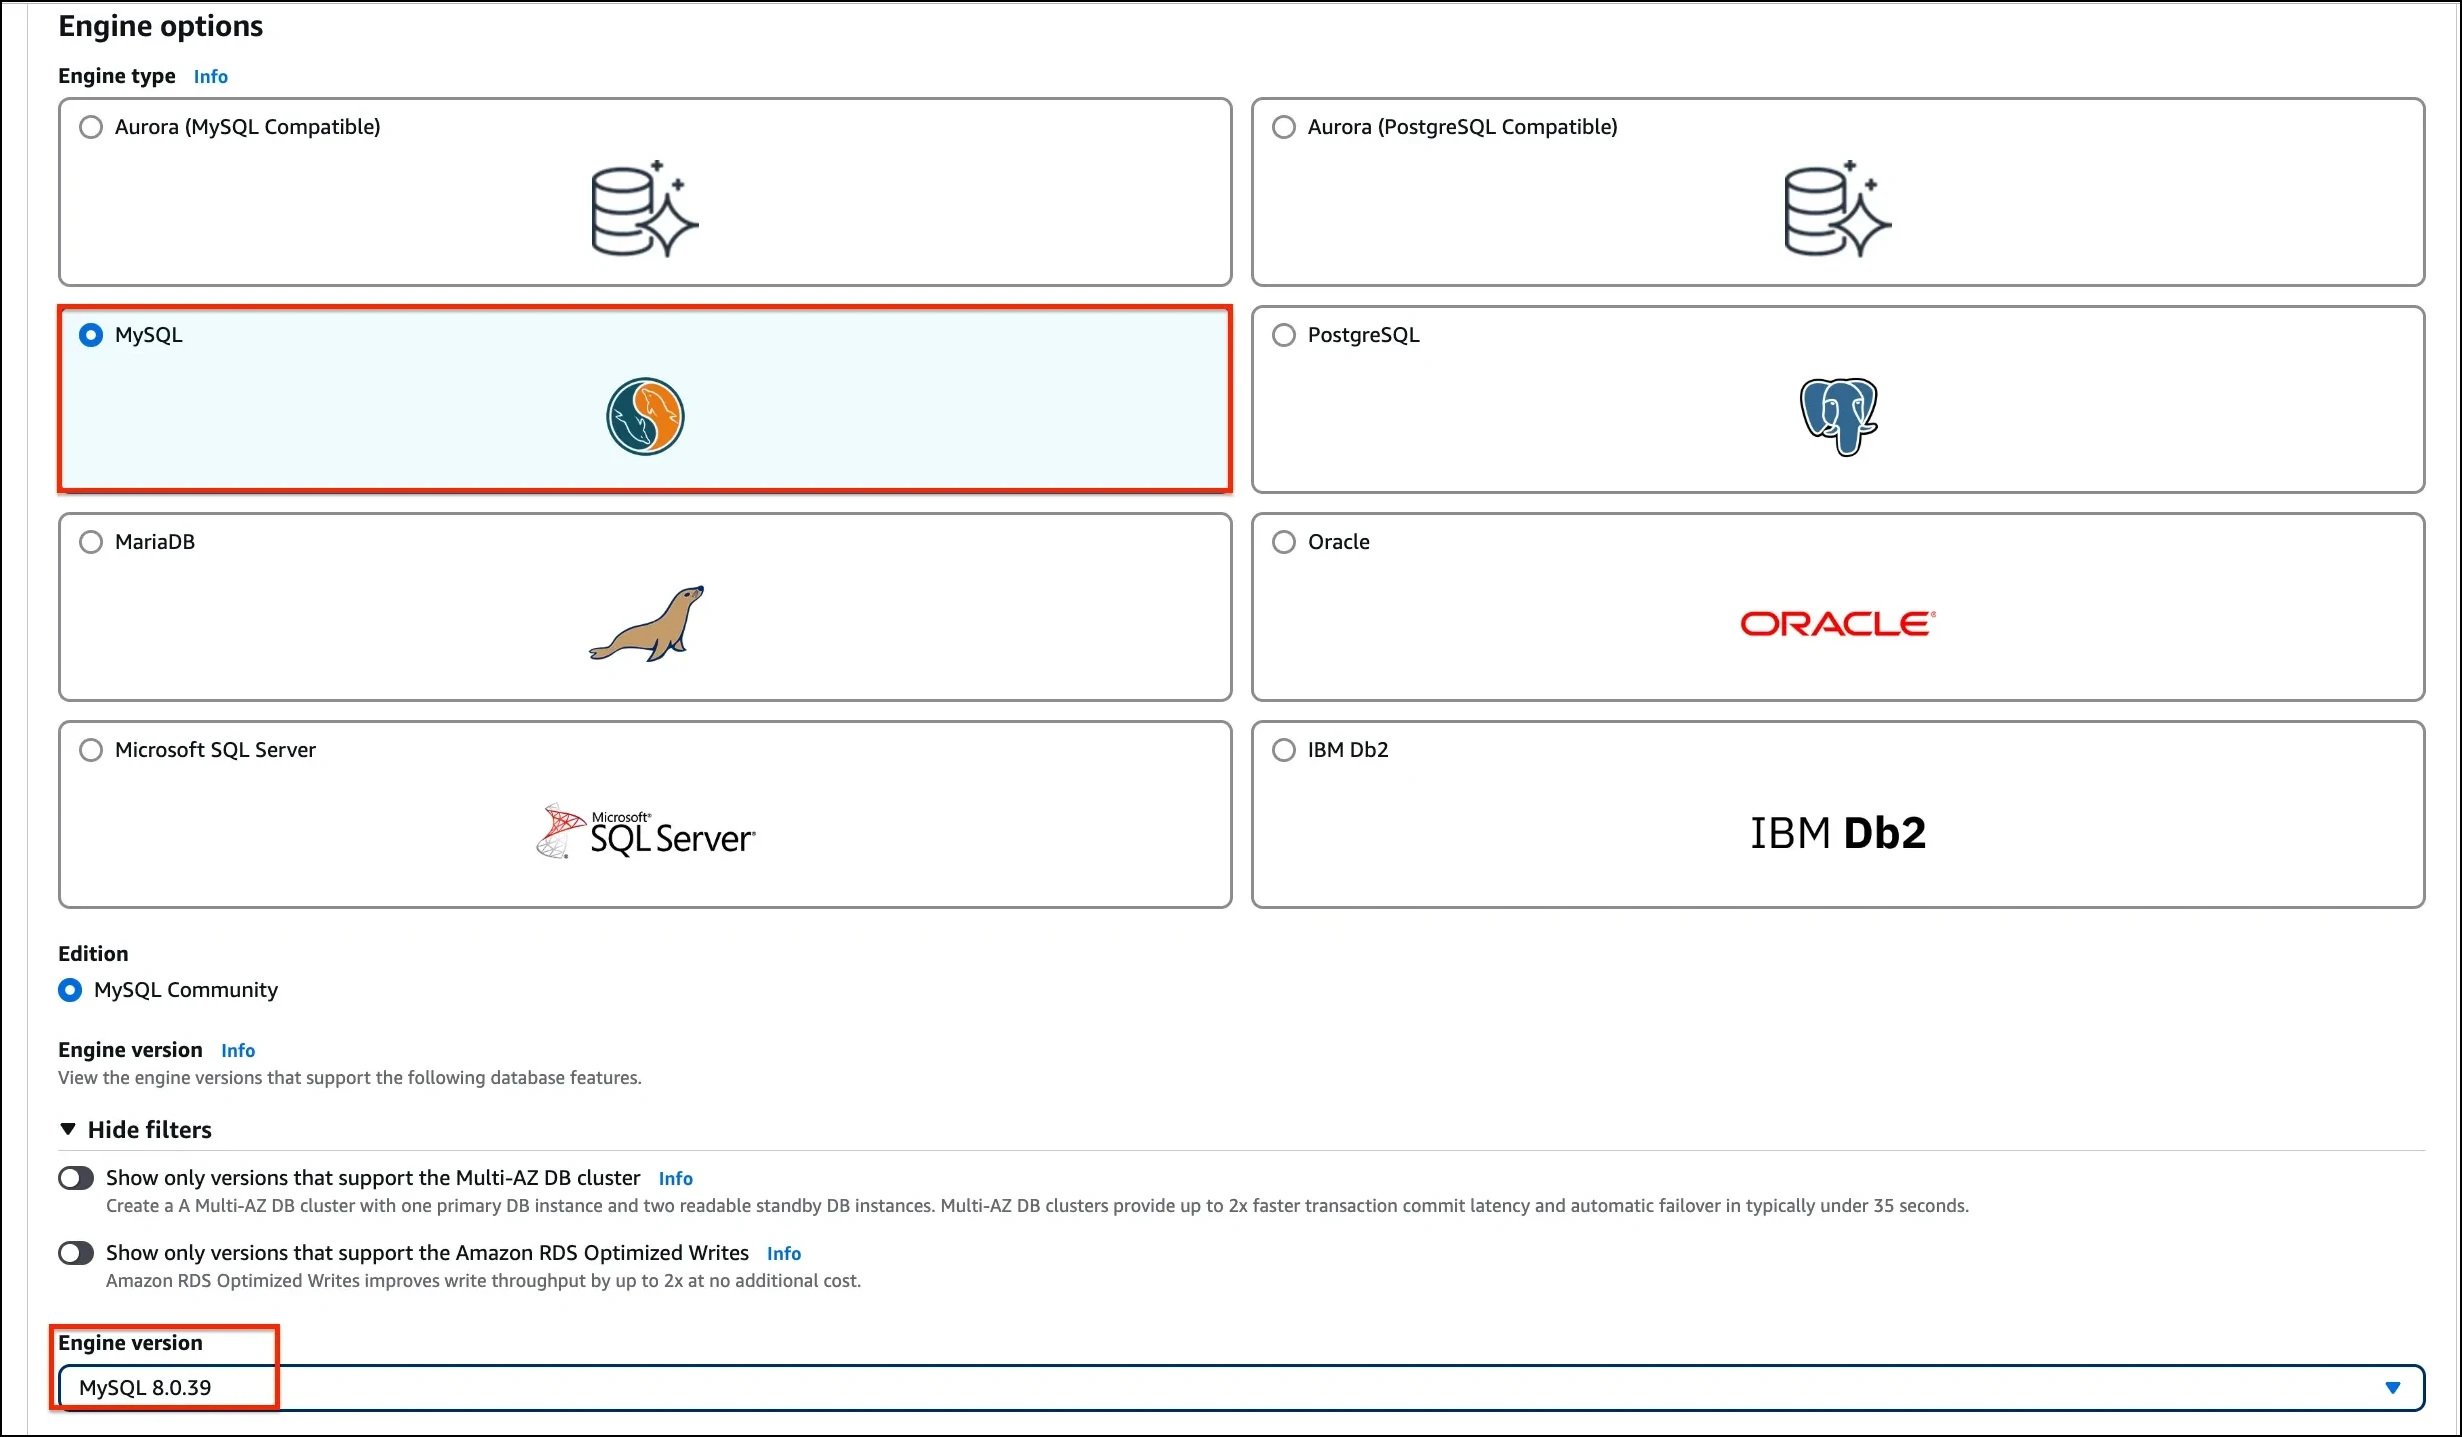
3. **Specify DB Details**:
* Database creation method : Select **Standard create**
12. Click on Advanced Details. Under the User data section, enter the following script, (which installs MySQL):
```
#!/bin/bash
# Download the MySQL repository package
wget https://dev.mysql.com/get/mysql80-community-release-el9-5.noarch.rpm
# Install the MySQL repository package
sudo dnf install mysql80-community-release-el9-5.noarch.rpm -y
# Enable the MySQL community repository
sudo dnf repolist enabled | grep "mysql.*-community.*"
# Install MySQL
sudo dnf install mysql -y
```
13. Keep rest thing Default and Click on **Launch Instance** Button.
14. Select **View all Instances** to View the Instance you Created
15. **Launch Status:** Your instance is now launching. Click on the instance ID and wait for complete initialization of the instance (until the status changes to running).
#### Task 3: Create an Amazon RDS Database
1. Navigate to **Aurora and RDS** under **Database.**
2. Click on **Create Database** button
3. **Specify DB Details**:
* Database creation method : Select **Standard create**
 * Engine options : Select **MySQL**
* Version : **Default**
* Engine options : Select **MySQL**
* Version : **Default**
 * Templates : Select **Sandbox**
 * DB instance identifier : Enter **mydbinstance**
* Master username : Enter **rdsuser**
* Master password and Confirm password: Enter **whizlabs123**
* **Note:** This is the username/password combo used to log onto your database. Please make note of them somewhere safe.
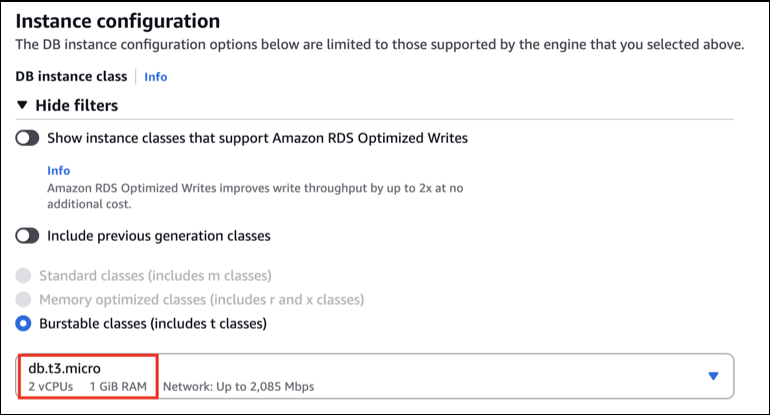
* DB instance class : **db.t3.micro — 1 vCPU, 1 GiB RAM**
* DB instance identifier : Enter **mydbinstance**
* Master username : Enter **rdsuser**
* Master password and Confirm password: Enter **whizlabs123**
* **Note:** This is the username/password combo used to log onto your database. Please make note of them somewhere safe.
* DB instance class : **db.t3.micro — 1 vCPU, 1 GiB RAM**
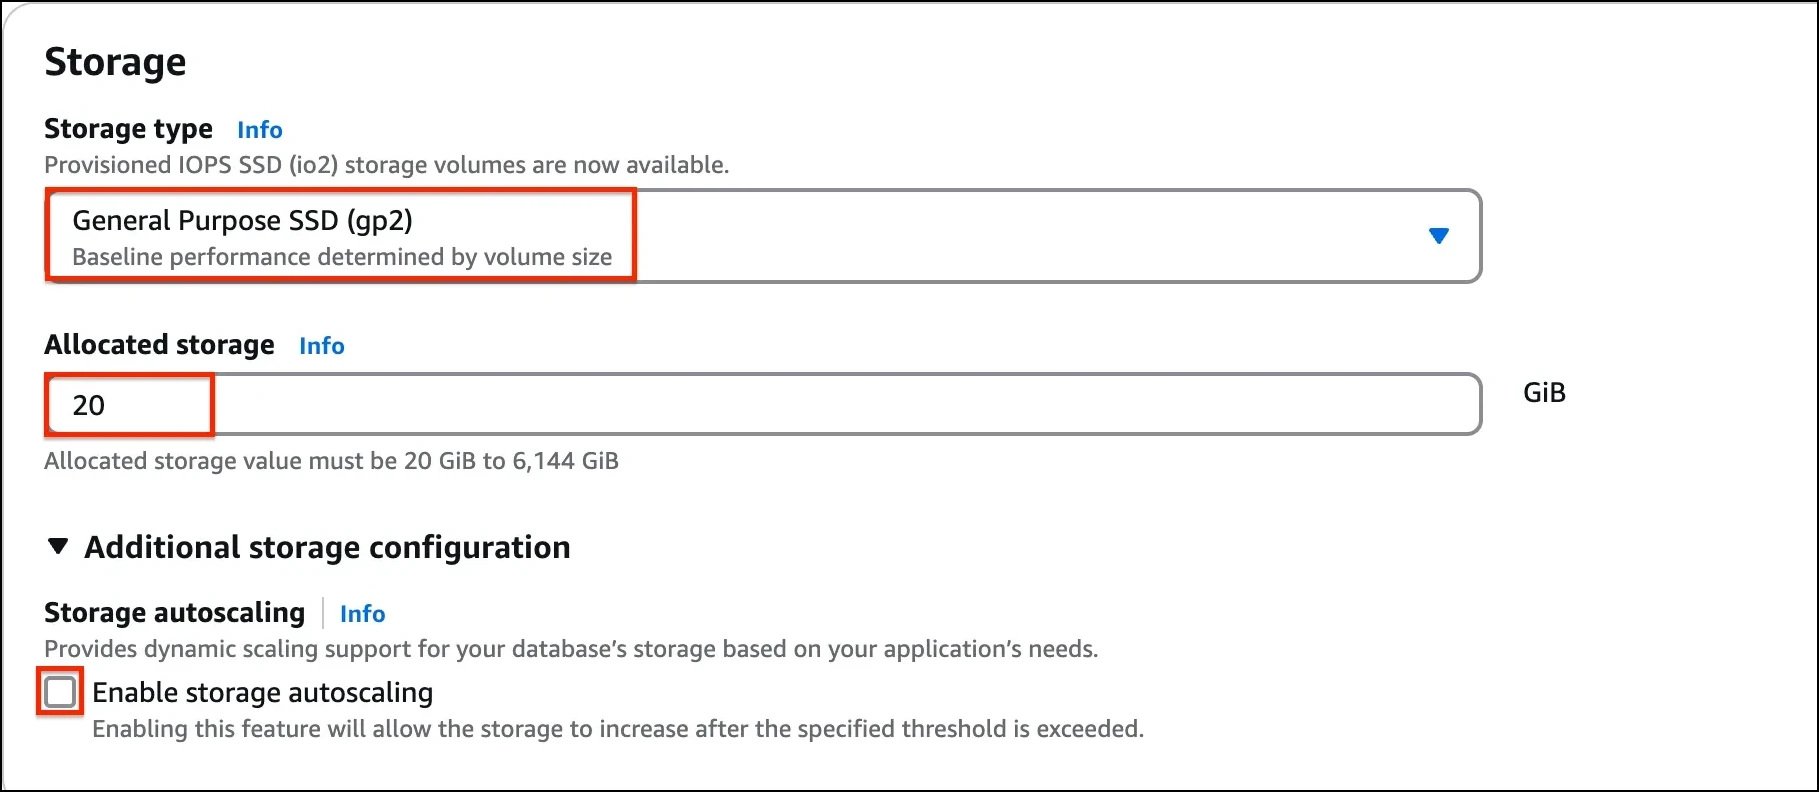
 * Storage type : **General Purpose SSD (gp2)**
* Allocated storage : **20**
* Enable storage autoscaling : Uncheck
* Storage type : **General Purpose SSD (gp2)**
* Allocated storage : **20**
* Enable storage autoscaling : Uncheck
 * Public access : Select **No**
* VPC Security groups : Select **Choose existing**
* Existing VPC security groups : **Remove the default one and Select MyEC2Server\_SG**
* Go to Additional Configuration options
* Initial database name: Enter **mydbinstance**
* DB parameter group: **default**
* Option group: **default**
* Enable automated backups: **uncheck**
* Log Exports: **Not needed for the purpose of this lab.**
* **Note: Leave all the other settings as default**
* Click on **Create database**
4. Navigate to **databases.**
5. On the RDS console, the details for the new DB instance appear. The DB instance has a status of creating until the DB instance is ready to use. When the state changes to **Available**, you can connect to the DB instance. It can take up to 20 minutes before the new instance status becomes **Available**.
6. Once the database becomes **Available**, click on the database name and copy the **Endpoint** under **Connectivity & security** tab.
#### Task 4: Create a connection to the Amazon RDS database from the EC2 instance
In this task, we are going to establish a connection between the EC2 instance and the RDS database.
1. Now navigate to EC2 by clicking on the **Services** menu in the top, then click on the **EC2** in the **Compute** section.
2. Navigate to **Instances** on the left panel and select your EC2 instance(**MyPublicServer**) and click on the **Connect** button.
* Public access : Select **No**
* VPC Security groups : Select **Choose existing**
* Existing VPC security groups : **Remove the default one and Select MyEC2Server\_SG**
* Go to Additional Configuration options
* Initial database name: Enter **mydbinstance**
* DB parameter group: **default**
* Option group: **default**
* Enable automated backups: **uncheck**
* Log Exports: **Not needed for the purpose of this lab.**
* **Note: Leave all the other settings as default**
* Click on **Create database**
4. Navigate to **databases.**
5. On the RDS console, the details for the new DB instance appear. The DB instance has a status of creating until the DB instance is ready to use. When the state changes to **Available**, you can connect to the DB instance. It can take up to 20 minutes before the new instance status becomes **Available**.
6. Once the database becomes **Available**, click on the database name and copy the **Endpoint** under **Connectivity & security** tab.
#### Task 4: Create a connection to the Amazon RDS database from the EC2 instance
In this task, we are going to establish a connection between the EC2 instance and the RDS database.
1. Now navigate to EC2 by clicking on the **Services** menu in the top, then click on the **EC2** in the **Compute** section.
2. Navigate to **Instances** on the left panel and select your EC2 instance(**MyPublicServer**) and click on the **Connect** button.
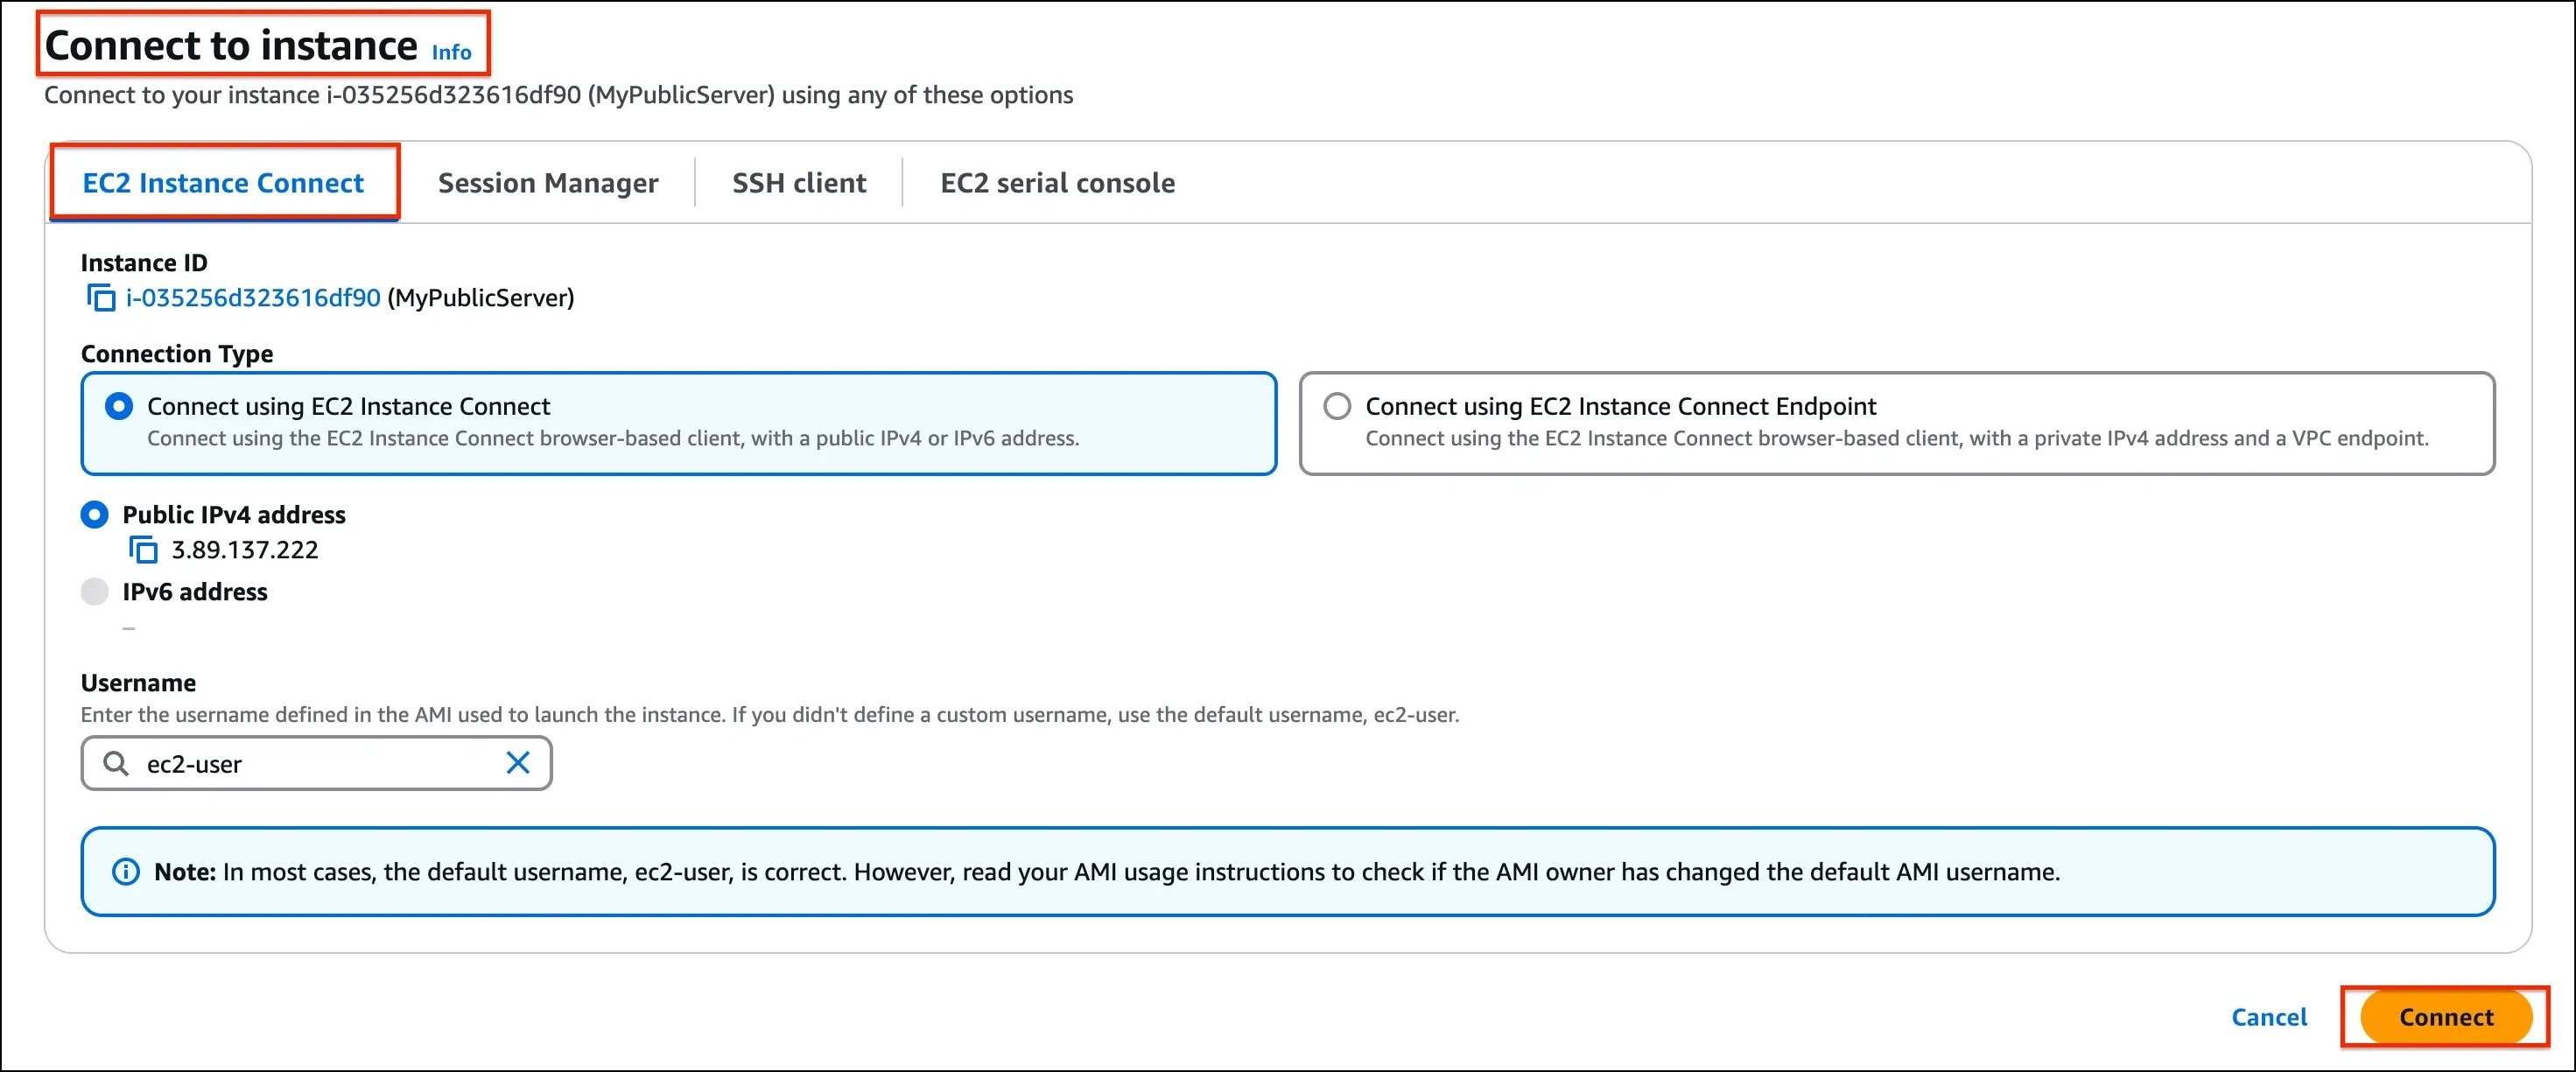
 3. Select **EC2 Instance Connect** option and click on **Connect** button.(Keep everything else as default)
 4. A new tab will open in the browser where you can execute the CLI Commands.
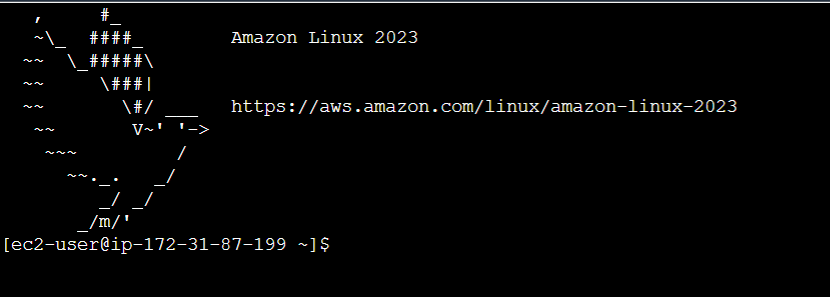 5. Once connected to the server:
* Switch to the root user using the command:
```
sudo su
```
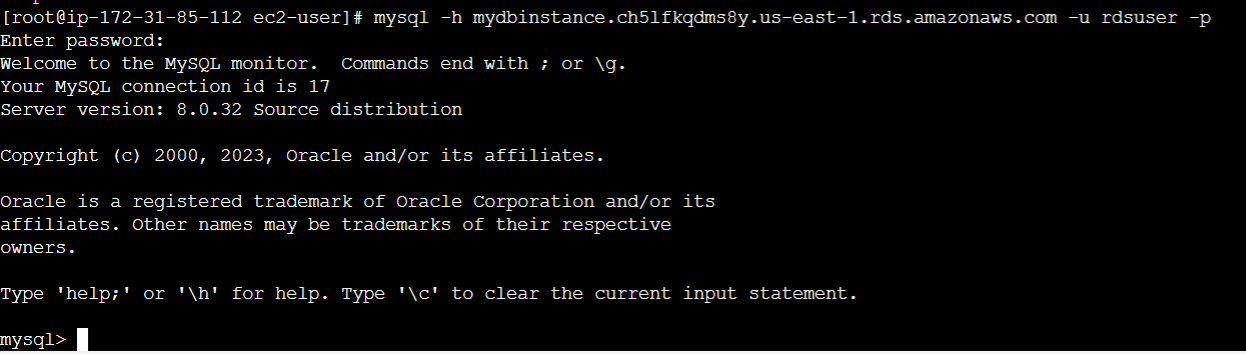
6. Connect to the MySQL RDS Instance with the following command:
* Syntax: **mysql -h** \ **-u** \ **-p**
* In our case: **mysql -h** mydbinstance.c1sh5a4j91dp.us-east-1.rds.amazonaws.com **-u** rdsuser **-p**
* Password : Enter **whizlabs123**
7. You will enter the MYSQL command line.
5. Once connected to the server:
* Switch to the root user using the command:
```
sudo su
```
6. Connect to the MySQL RDS Instance with the following command:
* Syntax: **mysql -h** \ **-u** \ **-p**
* In our case: **mysql -h** mydbinstance.c1sh5a4j91dp.us-east-1.rds.amazonaws.com **-u** rdsuser **-p**
* Password : Enter **whizlabs123**
7. You will enter the MYSQL command line.
 #### Task 5: Create a Database, Table and insert data for testing
Lets create a simple database and table to see if it's working.
* Create a database:
```
CREATE DATABASE SchoolDB;
```
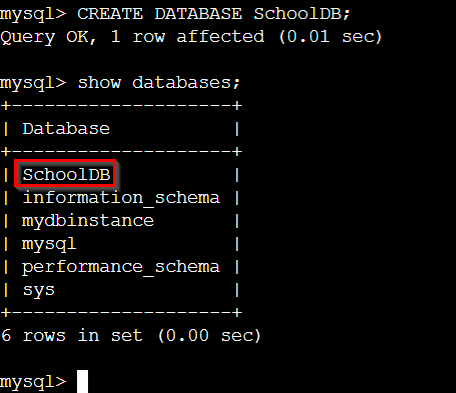
* You can see the created database with following command:
```
show databases;
```
#### Task 5: Create a Database, Table and insert data for testing
Lets create a simple database and table to see if it's working.
* Create a database:
```
CREATE DATABASE SchoolDB;
```
* You can see the created database with following command:
```
show databases;
```
 * Switch to the database named **SchoolDB.**
```
use SchoolDB;
```
* Create a sample table consisting of **Subjects.**
```
CREATE TABLE IF NOT EXISTS subjects (subject_id INT AUTO_INCREMENT,subject_name VARCHAR(255) NOT NULL,teacher VARCHAR(255),start_date DATE,lesson TEXT,PRIMARY KEY (subject_id)) ENGINE=INNODB;
```
* Insert some details into the table:
```
INSERT INTO subjects(subject_name, teacher) VALUES ('English', 'John Taylor');
```
```
INSERT INTO subjects(subject_name, teacher) VALUES ('Science', 'Mary Smith');
```
```
INSERT INTO subjects(subject_name, teacher) VALUES ('Maths', 'Ted Miller');
```
```
INSERT INTO subjects(subject_name, teacher) VALUES ('Arts', 'Suzan Carpenter');
```
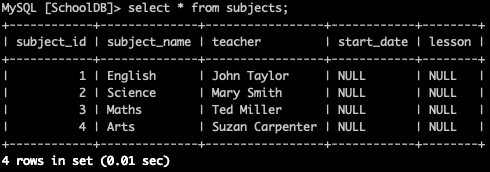
* Let's check the items we added into the table:
```
select * from subjects;
```
* Switch to the database named **SchoolDB.**
```
use SchoolDB;
```
* Create a sample table consisting of **Subjects.**
```
CREATE TABLE IF NOT EXISTS subjects (subject_id INT AUTO_INCREMENT,subject_name VARCHAR(255) NOT NULL,teacher VARCHAR(255),start_date DATE,lesson TEXT,PRIMARY KEY (subject_id)) ENGINE=INNODB;
```
* Insert some details into the table:
```
INSERT INTO subjects(subject_name, teacher) VALUES ('English', 'John Taylor');
```
```
INSERT INTO subjects(subject_name, teacher) VALUES ('Science', 'Mary Smith');
```
```
INSERT INTO subjects(subject_name, teacher) VALUES ('Maths', 'Ted Miller');
```
```
INSERT INTO subjects(subject_name, teacher) VALUES ('Arts', 'Suzan Carpenter');
```
* Let's check the items we added into the table:
```
select * from subjects;
```
 * Try out some more SQL commands and play around with the table to strengthen your understanding.
* Run below command to exit the mysql command
```
exit;
```
> ##### Do You Know?
>
> The combination of Amazon RDS and Amazon EC2 provides a powerful and scalable infrastructure for building robust and high-performing applications.
1. Once the lab steps are completed, please click on the **Validation** button on the left side panel.
2. This will validate the resources in the AWS account and shows you whether you have completed this lab successfully or not.
#### Task 6: Delete AWS Resources
##### 7.1 Deleting EC2 Instance
1. Navigate to EC2 by clicking on the **Services** menu in the top, then click on the **EC2** in the **Compute** section.
2. All the EC2 Instances will be listed here,
* Try out some more SQL commands and play around with the table to strengthen your understanding.
* Run below command to exit the mysql command
```
exit;
```
> ##### Do You Know?
>
> The combination of Amazon RDS and Amazon EC2 provides a powerful and scalable infrastructure for building robust and high-performing applications.
1. Once the lab steps are completed, please click on the **Validation** button on the left side panel.
2. This will validate the resources in the AWS account and shows you whether you have completed this lab successfully or not.
#### Task 6: Delete AWS Resources
##### 7.1 Deleting EC2 Instance
1. Navigate to EC2 by clicking on the **Services** menu in the top, then click on the **EC2** in the **Compute** section.
2. All the EC2 Instances will be listed here,
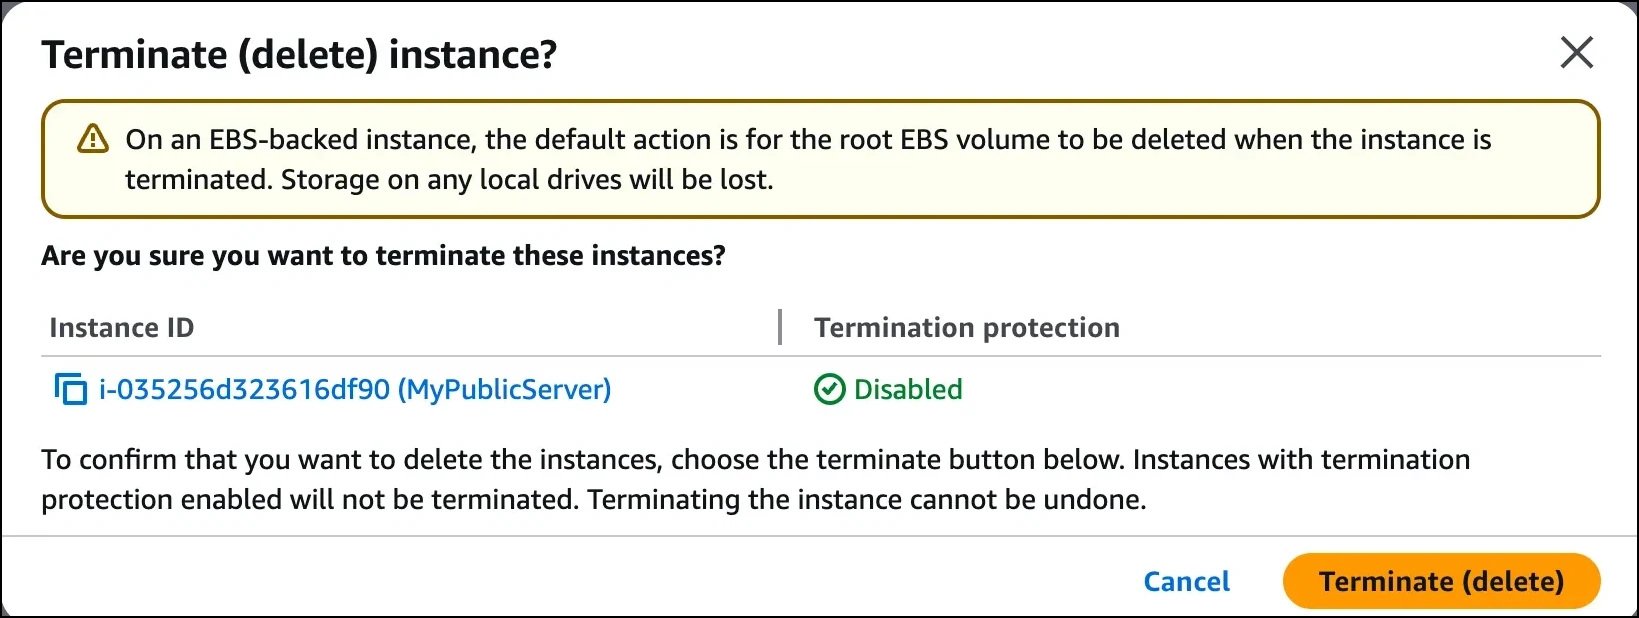
 3. To terminate the EC2, perform the following task:
* Select **MyPublicServer**,
* Click on Instance state (If you don't see an **Instance state** option, click on the **Actions** button and then choose **Instance state**)
* Select **Terminate instance**
3. To terminate the EC2, perform the following task:
* Select **MyPublicServer**,
* Click on Instance state (If you don't see an **Instance state** option, click on the **Actions** button and then choose **Instance state**)
* Select **Terminate instance**
 4. Finally, Click on terminate
 5. EC2 Instance is terminated.
##### 7.2 Deleting RDS DB Instance
1. Navigate to **RDS** by clicking on the **Services** menu available under the **Database** section.
2. Click on DB Instances
3. It will list all the RDS databases
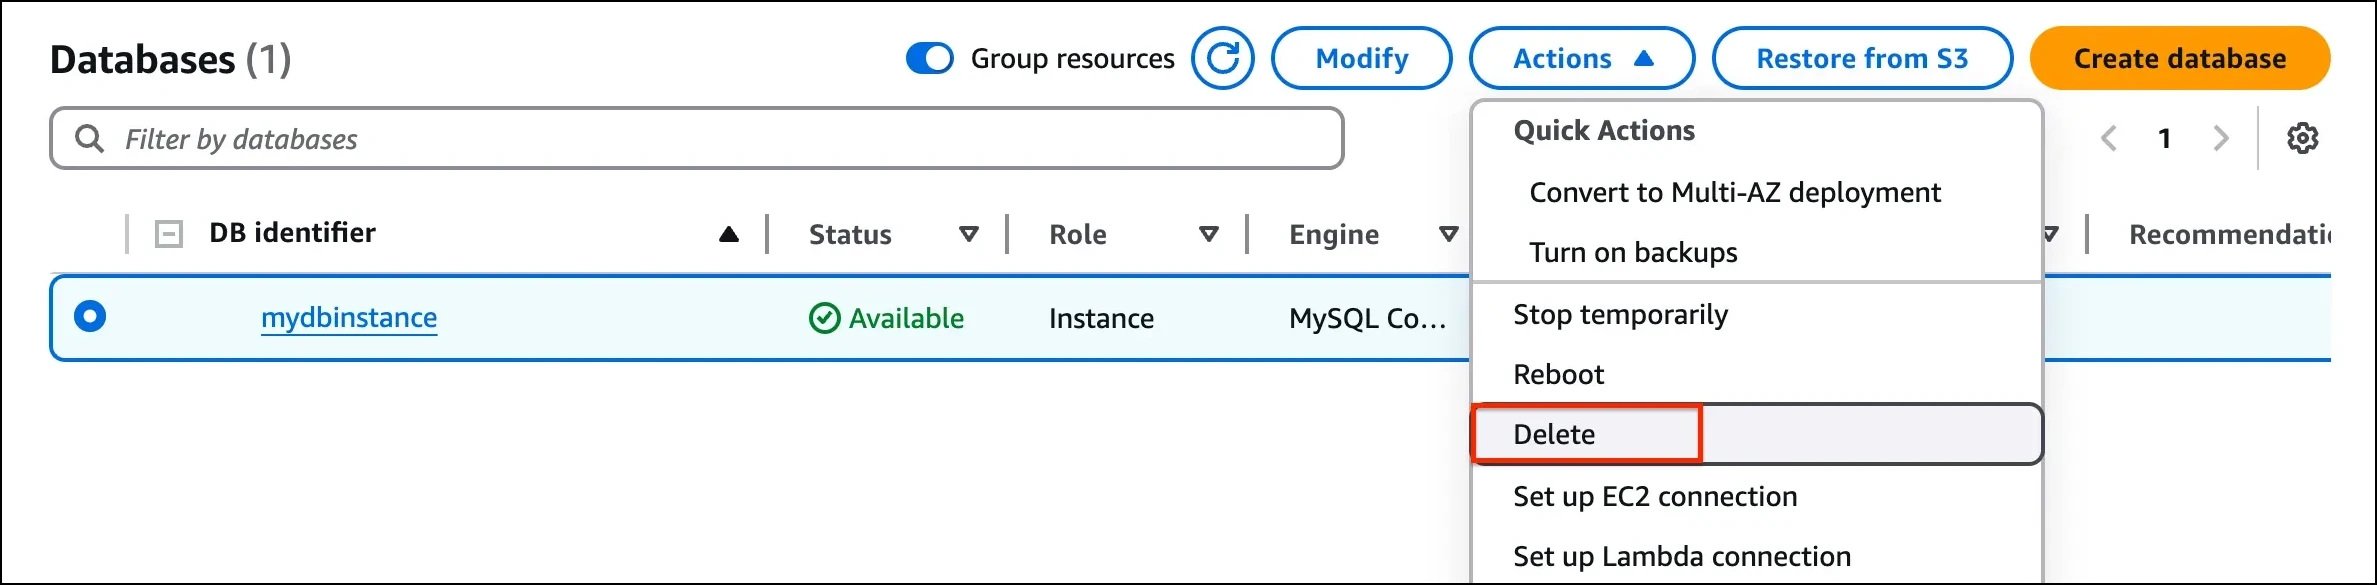
4. Click on **Actions** and select **Delete**
5. EC2 Instance is terminated.
##### 7.2 Deleting RDS DB Instance
1. Navigate to **RDS** by clicking on the **Services** menu available under the **Database** section.
2. Click on DB Instances
3. It will list all the RDS databases
4. Click on **Actions** and select **Delete**
 5. To delete, we have to perform several tasks:
* Uncheck the option of **Create final snapshot**,
* Acknowledge by **selecting** the second option,
* Type **delete me** to confirm
* And finally, click on **Delete** button below.
5. To delete, we have to perform several tasks:
* Uncheck the option of **Create final snapshot**,
* Acknowledge by **selecting** the second option,
* Type **delete me** to confirm
* And finally, click on **Delete** button below.
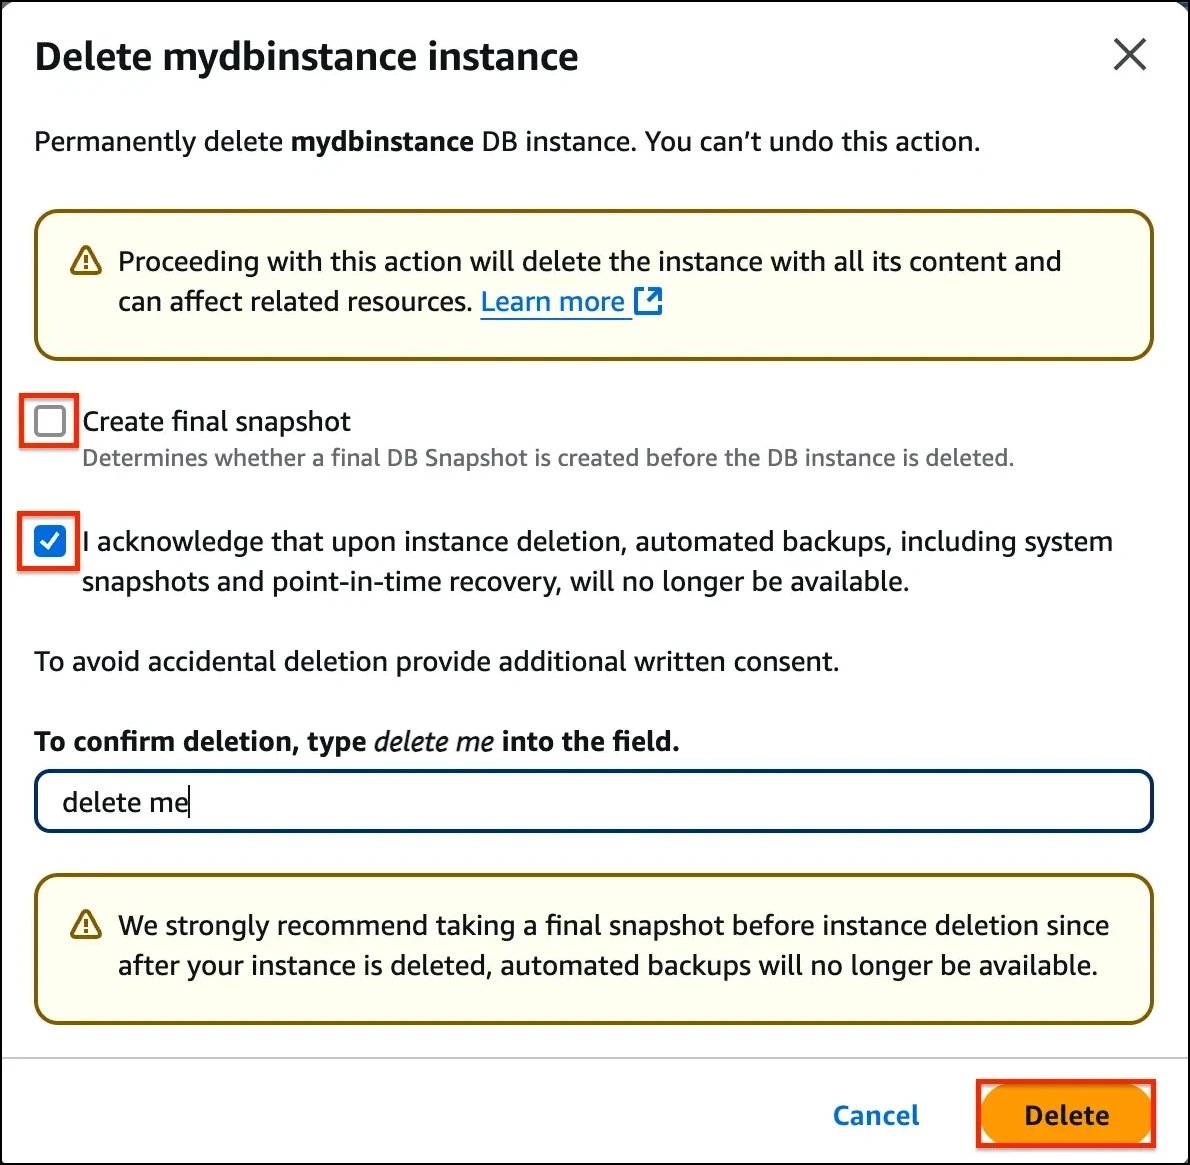 6. It will take around, 5 minutes to delete the instance, you can end the lab now.
### Completion and Conclusion
1. You have successfully launched an EC2 Instance in a default VPC.
2. You successfully ran a MySQL command and performed operations on a database created with Amazon RDS.
### End Lab
1. Sign out of AWS Account.
2. You have successfully completed the lab.
3. Once you have completed the steps, click on **End Lab** from the IP Lab Portal dashboard.
## What gets checked
When you press **Check my work**, the platform verifies each of these:
* **Launch an EC2 Instance** — Check whether an EC2 Instance is launched or not.
* **Launch EC2 AMI type Amazon Linux** — Check whether the EC2 instance is launched using an Amazon AMI.
* **Launch RDS instance** — Check whether an RDS Instance is created or not
* **Check whether RDS database Engine type is mysql** — Check whether allowed database type mysql is deployed or not
## Related help
* [FAQs and Troubleshooting](/aws-saa/support/faqs-and-troubleshooting)
* [SSH into EC2 Instance](/aws-saa/support/ssh-into-ec2-instance)
This documentation is built and hosted on [Mintlify](https://mintlify.com), a developer documentation platform.
6. It will take around, 5 minutes to delete the instance, you can end the lab now.
### Completion and Conclusion
1. You have successfully launched an EC2 Instance in a default VPC.
2. You successfully ran a MySQL command and performed operations on a database created with Amazon RDS.
### End Lab
1. Sign out of AWS Account.
2. You have successfully completed the lab.
3. Once you have completed the steps, click on **End Lab** from the IP Lab Portal dashboard.
## What gets checked
When you press **Check my work**, the platform verifies each of these:
* **Launch an EC2 Instance** — Check whether an EC2 Instance is launched or not.
* **Launch EC2 AMI type Amazon Linux** — Check whether the EC2 instance is launched using an Amazon AMI.
* **Launch RDS instance** — Check whether an RDS Instance is created or not
* **Check whether RDS database Engine type is mysql** — Check whether allowed database type mysql is deployed or not
## Related help
* [FAQs and Troubleshooting](/aws-saa/support/faqs-and-troubleshooting)
* [SSH into EC2 Instance](/aws-saa/support/ssh-into-ec2-instance)
This documentation is built and hosted on [Mintlify](https://mintlify.com), a developer documentation platform.