> ## Documentation Index
> Fetch the complete documentation index at: https://cloud-architect.ipoint-labs.com/llms.txt
> Use this file to discover all available pages before exploring further.
# Create and Configure Amazon EC2 Auto Scaling with Launch Templates
> Hands-on lab · 55m
Launch this lab in the IP Lab Portal, then follow the steps below in the AWS console.
Open IP Lab Portal
## Overview
### Lab Details
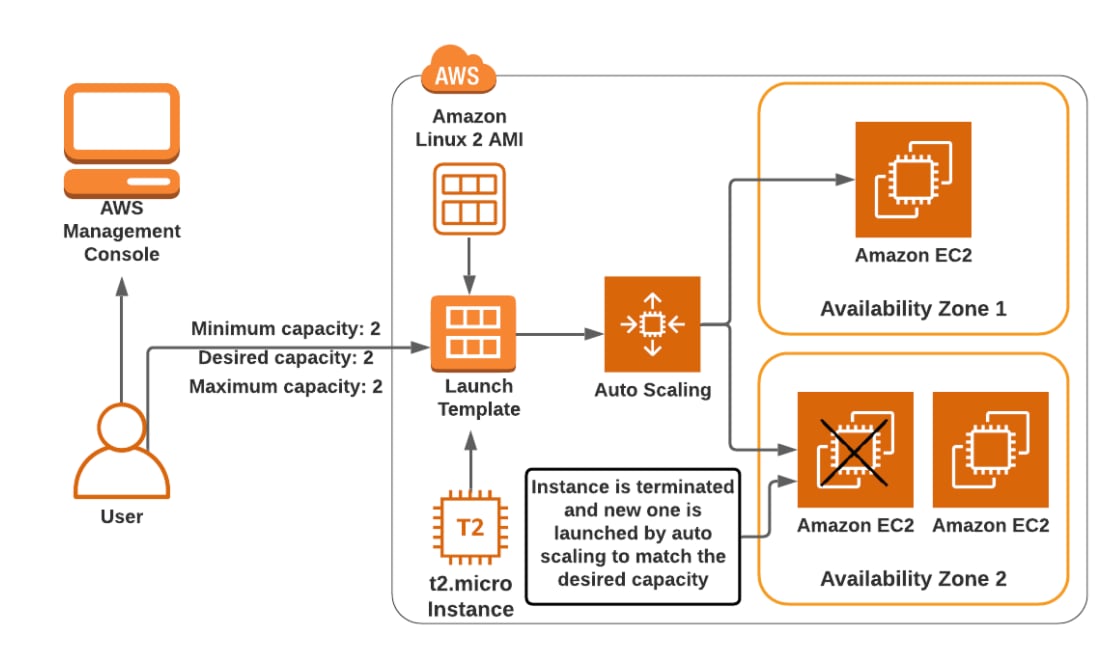
1. This lab walks you through the steps to create and configure an Amazon EC2 Auto Scaling with Launch templates using the AWS Management Console.
2. You will practice using Amazon Machine Image (AMI) to launch Amazon EC2 Instances using Launch templates and will use key pairs for SSH authentication to log into your instance.
3. You will create a web page and publish it.
4. Duration: **55 minutes**
5. **AWS Region: US East (N. Virginia) us-east-1**
### Architecture Diagram
 ### Task Details
1. Sign into AWS Management Console.
2. Create a security group for Launch template
3. Create a key pair for the Launch template.
4. Create a launch template
5. Create an EC2 Auto Scaling group
6. Test Auto scaling group
### Launching Lab Environment
1. To launch the lab environment, Click on the **Start Lab** button.
2. Please wait until the cloud environment is provisioned. It will take less than a minute to provision.
3. Once the Lab is started, you will be provided with **IAM user name**, **Password**, **Access** **Key**, and **Secret** **Access** **Key**.
> **Note** : You can only start one lab at any given time
## Lab guide
### Lab Steps
#### Task 1: Sign in to AWS Management Console
1. Click on the **Open Console** button, and you will get redirected to AWS Console in a new browser tab.
2. On the AWS sign-in page,
* Leave the Account ID as default. Never edit/remove the 12 digit Account ID present in the AWS Console. otherwise, you cannot proceed with the lab.
* Now copy your **User Name** and **Password** in the Lab Console to the **IAM Username and Password** in AWS Console and click on the **Sign in** button
3. Once Signed In to the AWS Management Console, Make the default AWS Region as **US East (N. Virginia) us-east-1.**
#### Task 2: Create a Security Group for Launch template
1. Make sure you are in the **N.Virginia** Region.
2. Navigate to **EC2** by clicking on the **Services** menu available under the **Compute** section.
3. On the left panel menu, select the security group under the Network **& Security** section.
4. Click on the **Create Security Group**.
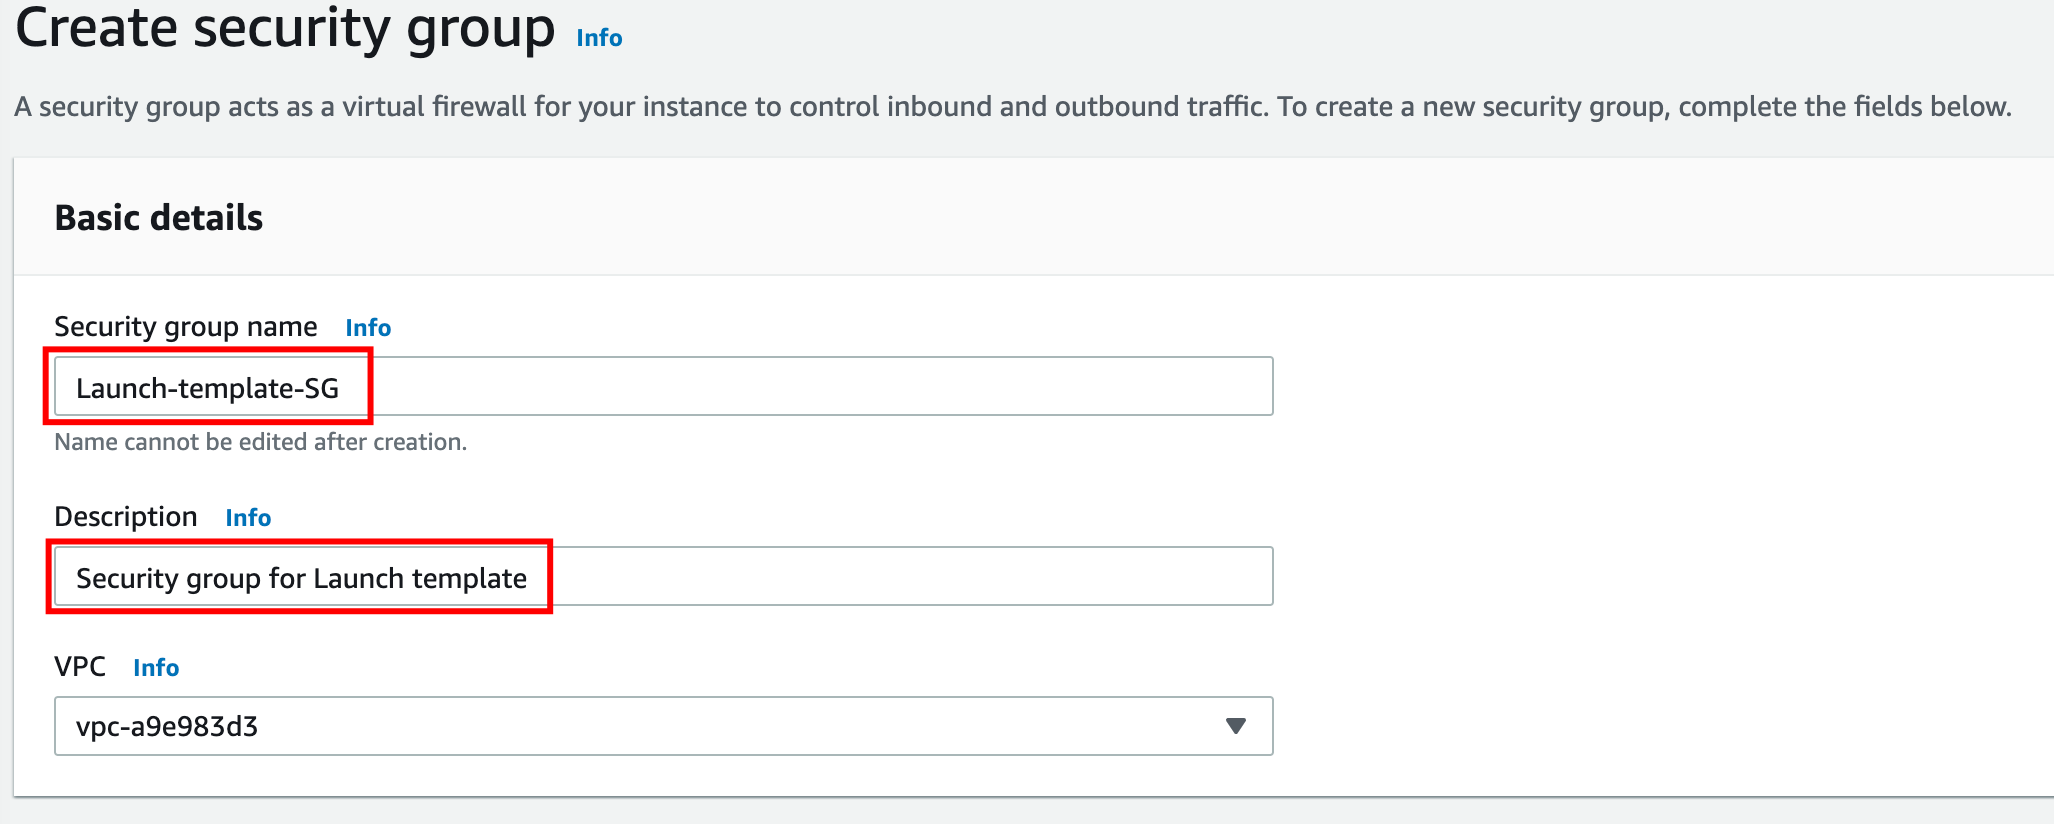
5. We are going to create a Security group for the Launch template with port 80 number enabled.
* Security group name: Enter ***Launch-template-SG***
* Description: Enter ***Security group for Launch template***
* VPC: Select **Default VPC**
### Task Details
1. Sign into AWS Management Console.
2. Create a security group for Launch template
3. Create a key pair for the Launch template.
4. Create a launch template
5. Create an EC2 Auto Scaling group
6. Test Auto scaling group
### Launching Lab Environment
1. To launch the lab environment, Click on the **Start Lab** button.
2. Please wait until the cloud environment is provisioned. It will take less than a minute to provision.
3. Once the Lab is started, you will be provided with **IAM user name**, **Password**, **Access** **Key**, and **Secret** **Access** **Key**.
> **Note** : You can only start one lab at any given time
## Lab guide
### Lab Steps
#### Task 1: Sign in to AWS Management Console
1. Click on the **Open Console** button, and you will get redirected to AWS Console in a new browser tab.
2. On the AWS sign-in page,
* Leave the Account ID as default. Never edit/remove the 12 digit Account ID present in the AWS Console. otherwise, you cannot proceed with the lab.
* Now copy your **User Name** and **Password** in the Lab Console to the **IAM Username and Password** in AWS Console and click on the **Sign in** button
3. Once Signed In to the AWS Management Console, Make the default AWS Region as **US East (N. Virginia) us-east-1.**
#### Task 2: Create a Security Group for Launch template
1. Make sure you are in the **N.Virginia** Region.
2. Navigate to **EC2** by clicking on the **Services** menu available under the **Compute** section.
3. On the left panel menu, select the security group under the Network **& Security** section.
4. Click on the **Create Security Group**.
5. We are going to create a Security group for the Launch template with port 80 number enabled.
* Security group name: Enter ***Launch-template-SG***
* Description: Enter ***Security group for Launch template***
* VPC: Select **Default VPC**
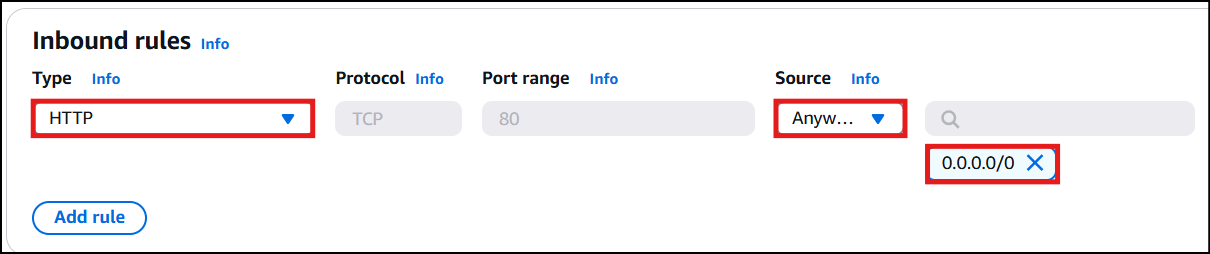
 * Click on the **Add rule** under **Inbound rules.**
* Type : Select **HTTP**
* Source : Select **Anywhere-IPv4**
* In the textbox add **0.0.0.0/0**
* Click on the **Add rule** under **Inbound rules.**
* Type : Select **HTTP**
* Source : Select **Anywhere-IPv4**
* In the textbox add **0.0.0.0/0**
 6. Leave everything as default and click on the **Create Security Group**.
 #### Task 3: Create a Key pair for the Launch template
1. In the left navigation pane (scroll down) within **Network & Security**, click on the **Key Pairs**.
2. To create a new key pair, click on the **Create Key Pair**.
3. Fill in the details below:
* Name: Enter ***WhizKeyPair***
* File format: **pem (Linux & Mac Users)** or **ppk (Windows users)**
* Leave other options as default.
* Click on the **Create Key Pair**.
#### Task 3: Create a Key pair for the Launch template
1. In the left navigation pane (scroll down) within **Network & Security**, click on the **Key Pairs**.
2. To create a new key pair, click on the **Create Key Pair**.
3. Fill in the details below:
* Name: Enter ***WhizKeyPair***
* File format: **pem (Linux & Mac Users)** or **ppk (Windows users)**
* Leave other options as default.
* Click on the **Create Key Pair**.
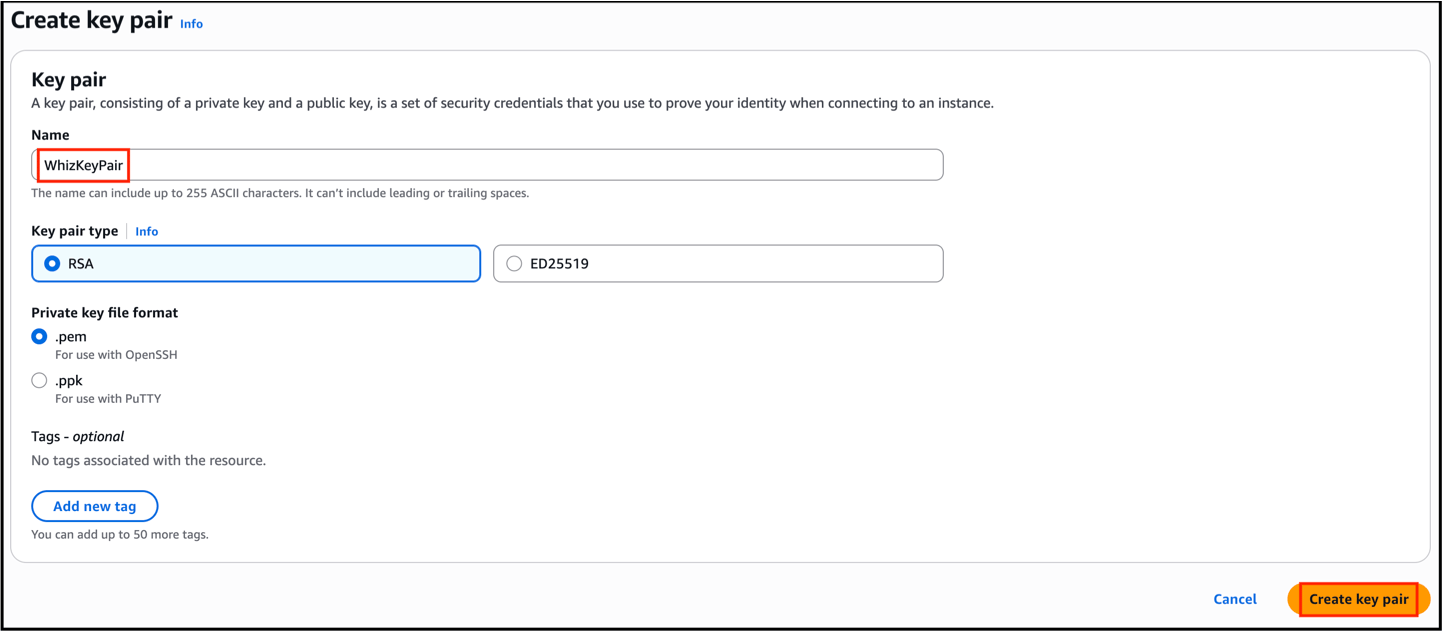 4. Key pair will be created.
#### Task 4: Creating a Launch template
1. In the left navigation pane (scroll down) within **Instances**, click on the **Launch Templates**
2. Click on the **Create Launch Template**
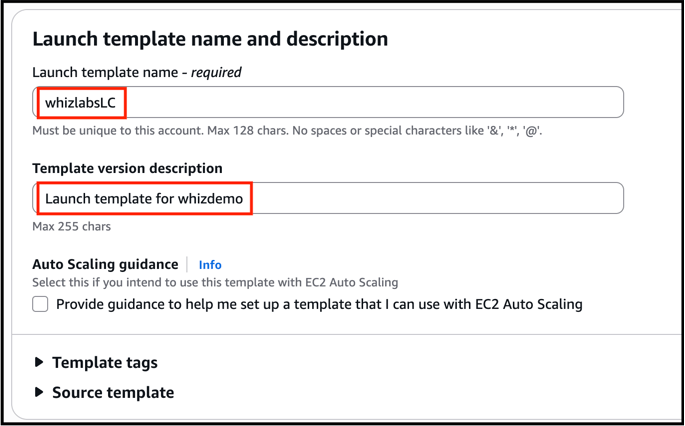
3. Under **Launch template name and description** section:
* Launch template name: Enter **whizlabsLC**
* Template version description: Type **Launch template for whizdemo**
* **Leave other options as default.**
4. Key pair will be created.
#### Task 4: Creating a Launch template
1. In the left navigation pane (scroll down) within **Instances**, click on the **Launch Templates**
2. Click on the **Create Launch Template**
3. Under **Launch template name and description** section:
* Launch template name: Enter **whizlabsLC**
* Template version description: Type **Launch template for whizdemo**
* **Leave other options as default.**
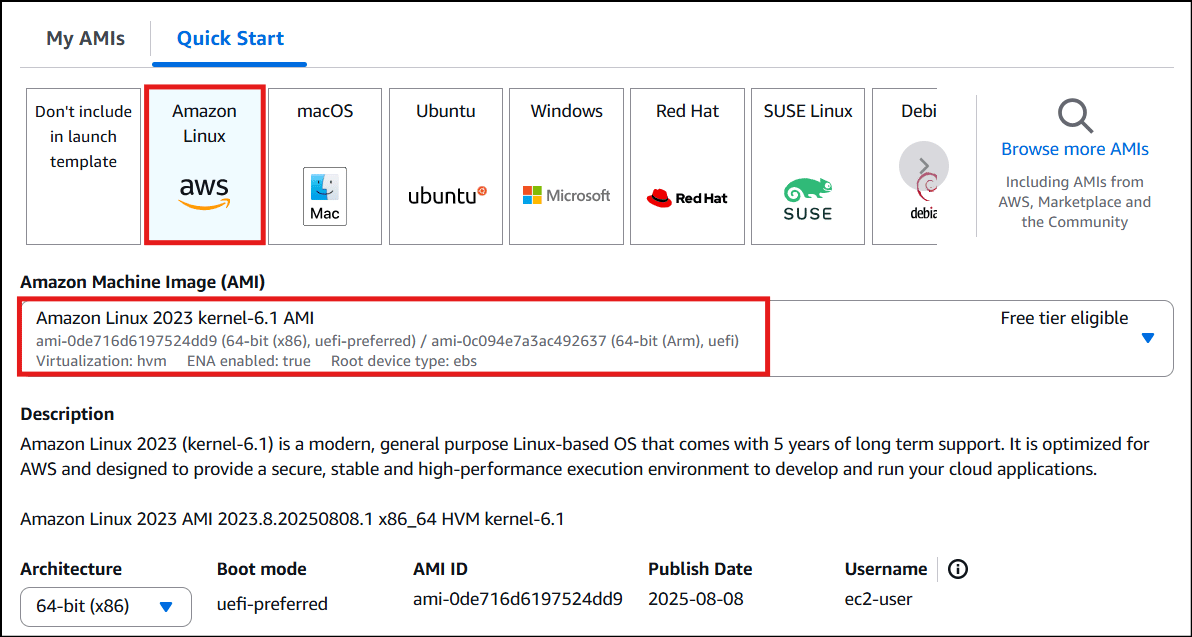
 4. Under Launch template contents:
* Amazon machine image (AMI): Select **Amazon Linux 2023 kernel-6.1 AMI.**
4. Under Launch template contents:
* Amazon machine image (AMI): Select **Amazon Linux 2023 kernel-6.1 AMI.**
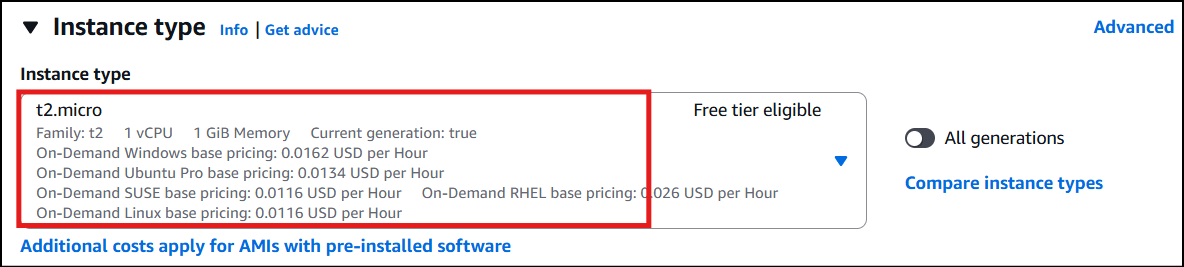
 * Under Instance type:
* Select **t2.micro** from the below list.
* Under Instance type:
* Select **t2.micro** from the below list.
 * Key pair (Login): Select **WhizKeyPair**
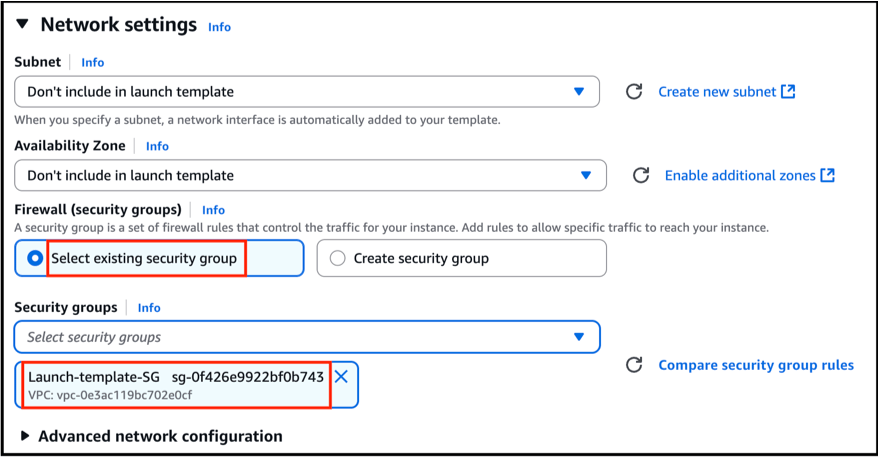
 * Networking settings:
* Firewall(security groups): Select **Select existing security group**
* Security groups: Select **Launch-template-SG** from the drop-down
* Networking settings:
* Firewall(security groups): Select **Select existing security group**
* Security groups: Select **Launch-template-SG** from the drop-down
 * Leave all other options as **default**.
* Expand the option of **Advance details**, Go to the **User data** at the bottom of the page and paste the below script.
\#!/bin/bash
```python theme={null}
dnf update -y
dnf install -y httpd
systemctl start httpd
systemctl enable httpd
echo "
* Leave all other options as **default**.
* Expand the option of **Advance details**, Go to the **User data** at the bottom of the page and paste the below script.
\#!/bin/bash
```python theme={null}
dnf update -y
dnf install -y httpd
systemctl start httpd
systemctl enable httpd
echo "Response coming from Amazon Linux 2023 Server
" > /var/www/html/index.html
```
9. To create, click on the **Create launch template**. Upon successful creation, it will create a Launch template. Click on **View launch templates** button.
 #### Task 5: Create an Auto Scaling Group
1. An Auto Scaling group is a scalable collection of EC2 instances. When you create an Auto Scaling group, you include information such as the subnets for the instances and the number of instances the group must maintain at all times.
2. Go to the left menu under EC2 and choose **Auto Scaling Groups** under **Auto Scaling.**
3. Click on the **Create Auto Scaling Group**.
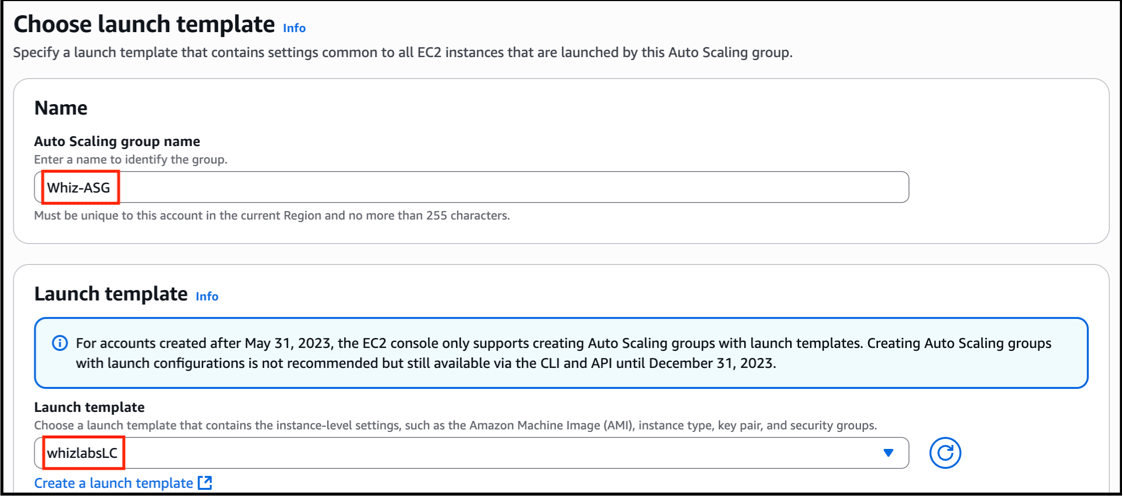
4. **Step 1 : Choose launch template**
* Auto Scaling group name : Enter **Whiz-ASG**
* Select the Launch template **whizlabsLC** from the list. Leave everything as default and click on the **Next**
#### Task 5: Create an Auto Scaling Group
1. An Auto Scaling group is a scalable collection of EC2 instances. When you create an Auto Scaling group, you include information such as the subnets for the instances and the number of instances the group must maintain at all times.
2. Go to the left menu under EC2 and choose **Auto Scaling Groups** under **Auto Scaling.**
3. Click on the **Create Auto Scaling Group**.
4. **Step 1 : Choose launch template**
* Auto Scaling group name : Enter **Whiz-ASG**
* Select the Launch template **whizlabsLC** from the list. Leave everything as default and click on the **Next**
 5. **Step 2: Choose instance launch options**
* VPC: Select the **Default VPC** from the list.
* Subnet: Select any **two subnets** for your Auto Scaling instances.
* Click on the **Next**
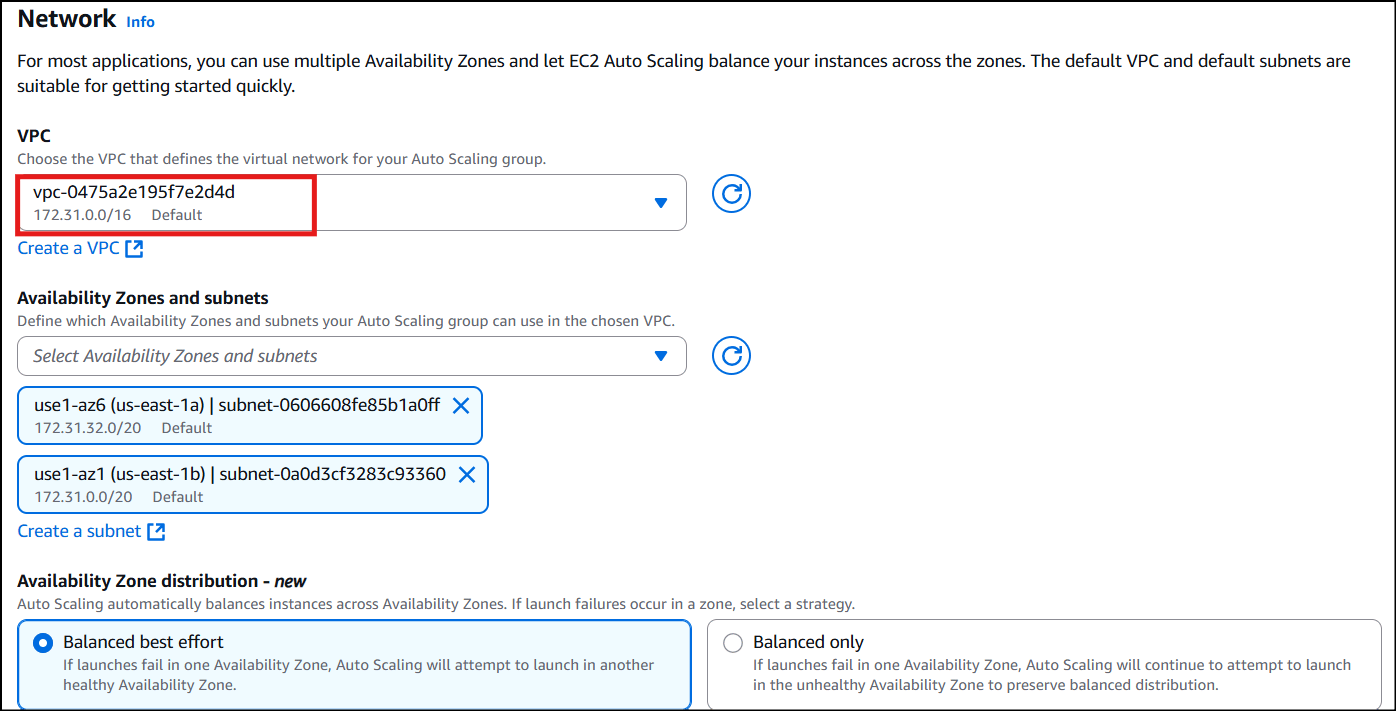
5. **Step 2: Choose instance launch options**
* VPC: Select the **Default VPC** from the list.
* Subnet: Select any **two subnets** for your Auto Scaling instances.
* Click on the **Next**
 6. **Step 3: Integrate with other services**
* No changes needed in this page, click on the **Next**
7. **Step 4: Configure group size and scaling**
* Under Group size - optional
* Desired capacity : Enter **2**
* **Under Scaling:**
* Minimum capacity : Enter **2**
* Maximum capacity : Enter **2**
6. **Step 3: Integrate with other services**
* No changes needed in this page, click on the **Next**
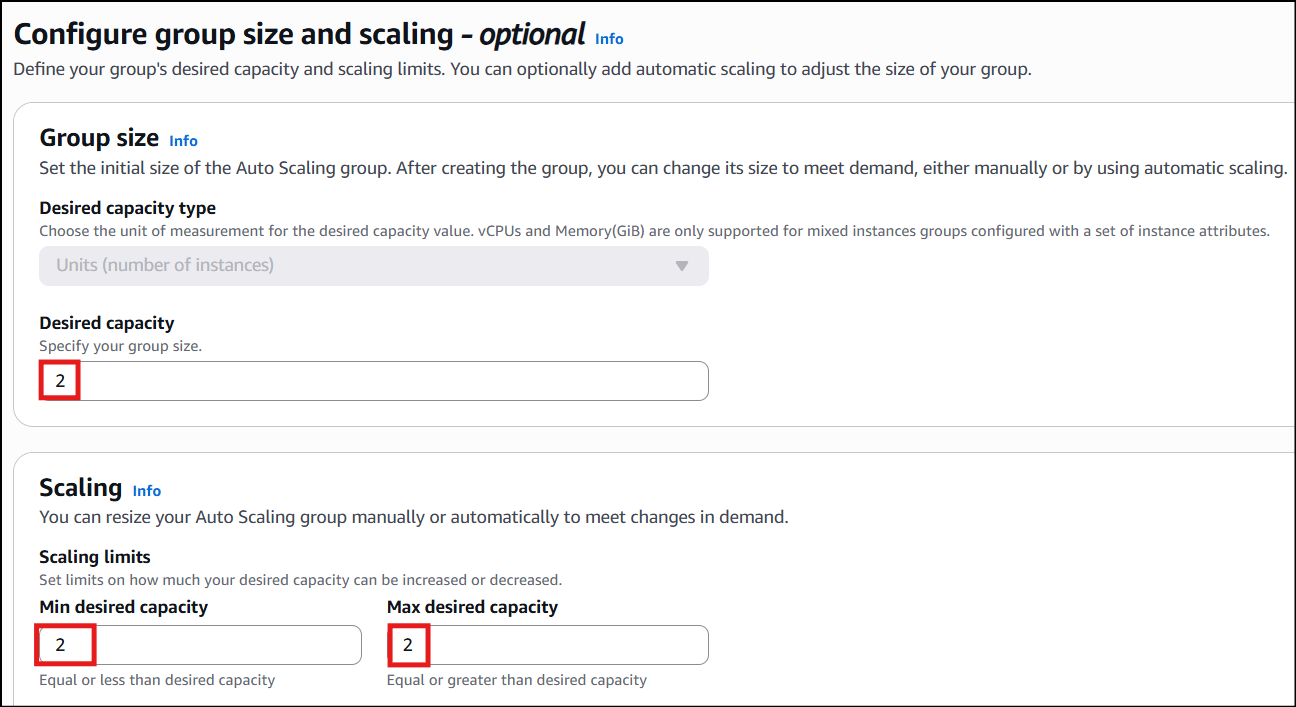
7. **Step 4: Configure group size and scaling**
* Under Group size - optional
* Desired capacity : Enter **2**
* **Under Scaling:**
* Minimum capacity : Enter **2**
* Maximum capacity : Enter **2**
 * Under Automatic Scaling - optional
* Select **No scaling policies**
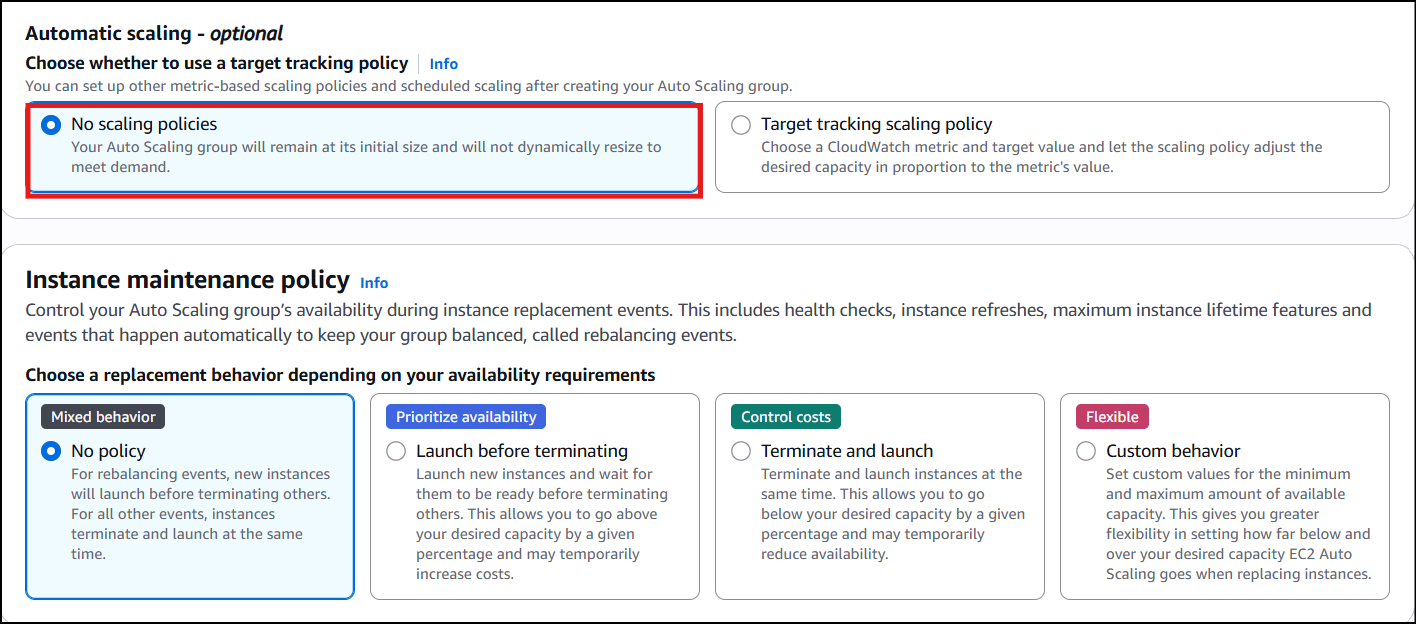
* Under Automatic Scaling - optional
* Select **No scaling policies**
 * Under Instance scale-in protection
* No changes are needed, click on the **Next**
8. **Step 5: Add notifications**
* No changes are needed in this page, click on the **Next**
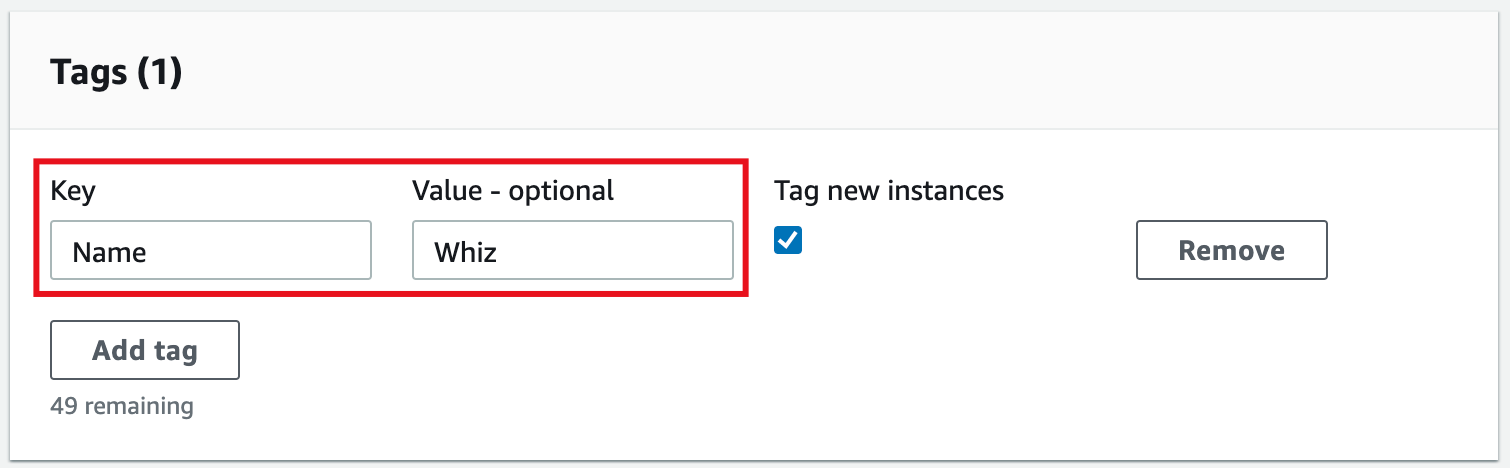
9. **Step 6: Add tags**
* Enter tags in key-value pairs to identify your auto scaling group **instances**.
* Key : Enter **Name**
* Value : Enter **Whiz**
* Under Instance scale-in protection
* No changes are needed, click on the **Next**
8. **Step 5: Add notifications**
* No changes are needed in this page, click on the **Next**
9. **Step 6: Add tags**
* Enter tags in key-value pairs to identify your auto scaling group **instances**.
* Key : Enter **Name**
* Value : Enter **Whiz**
 * Click on the **Next**
10. Now Review, scrolldown and click on the **Create Auto Scaling Group**.
11. You will be redirected to the autoscaling group page, you will be able to see that two instances are launched by the autoscaling groups
* Click on the **Next**
10. Now Review, scrolldown and click on the **Create Auto Scaling Group**.
11. You will be redirected to the autoscaling group page, you will be able to see that two instances are launched by the autoscaling groups
 12. Now go to the EC2 instances list. You will see that there are **two new running instances** (which were created by your autoscaling group) You can confirm this from their tag name, which you gave at the time of creating the autoscaling group.
13. You have successfully created an autoscaling group with a policy to a minimum of **2** and a maximum of **2** instances.
#### Task 6: Test Auto Scaling Group
1. For testing the auto-scaling policy, go to the EC2 instance list and select one of your instances.
2. To terminate the EC2 instances manually:
* Select one of the instances randomly
* Click on the **Instance state**
* Choose to terminate the instance by clicking on **Terminate instance.**
12. Now go to the EC2 instances list. You will see that there are **two new running instances** (which were created by your autoscaling group) You can confirm this from their tag name, which you gave at the time of creating the autoscaling group.
13. You have successfully created an autoscaling group with a policy to a minimum of **2** and a maximum of **2** instances.
#### Task 6: Test Auto Scaling Group
1. For testing the auto-scaling policy, go to the EC2 instance list and select one of your instances.
2. To terminate the EC2 instances manually:
* Select one of the instances randomly
* Click on the **Instance state**
* Choose to terminate the instance by clicking on **Terminate instance.**
 3. Confirm the termination by clicking on the Terminate button.
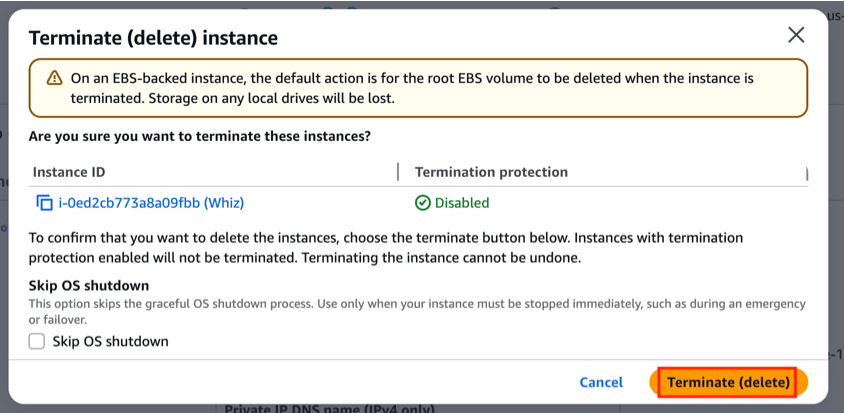 4. This will terminate your instance.
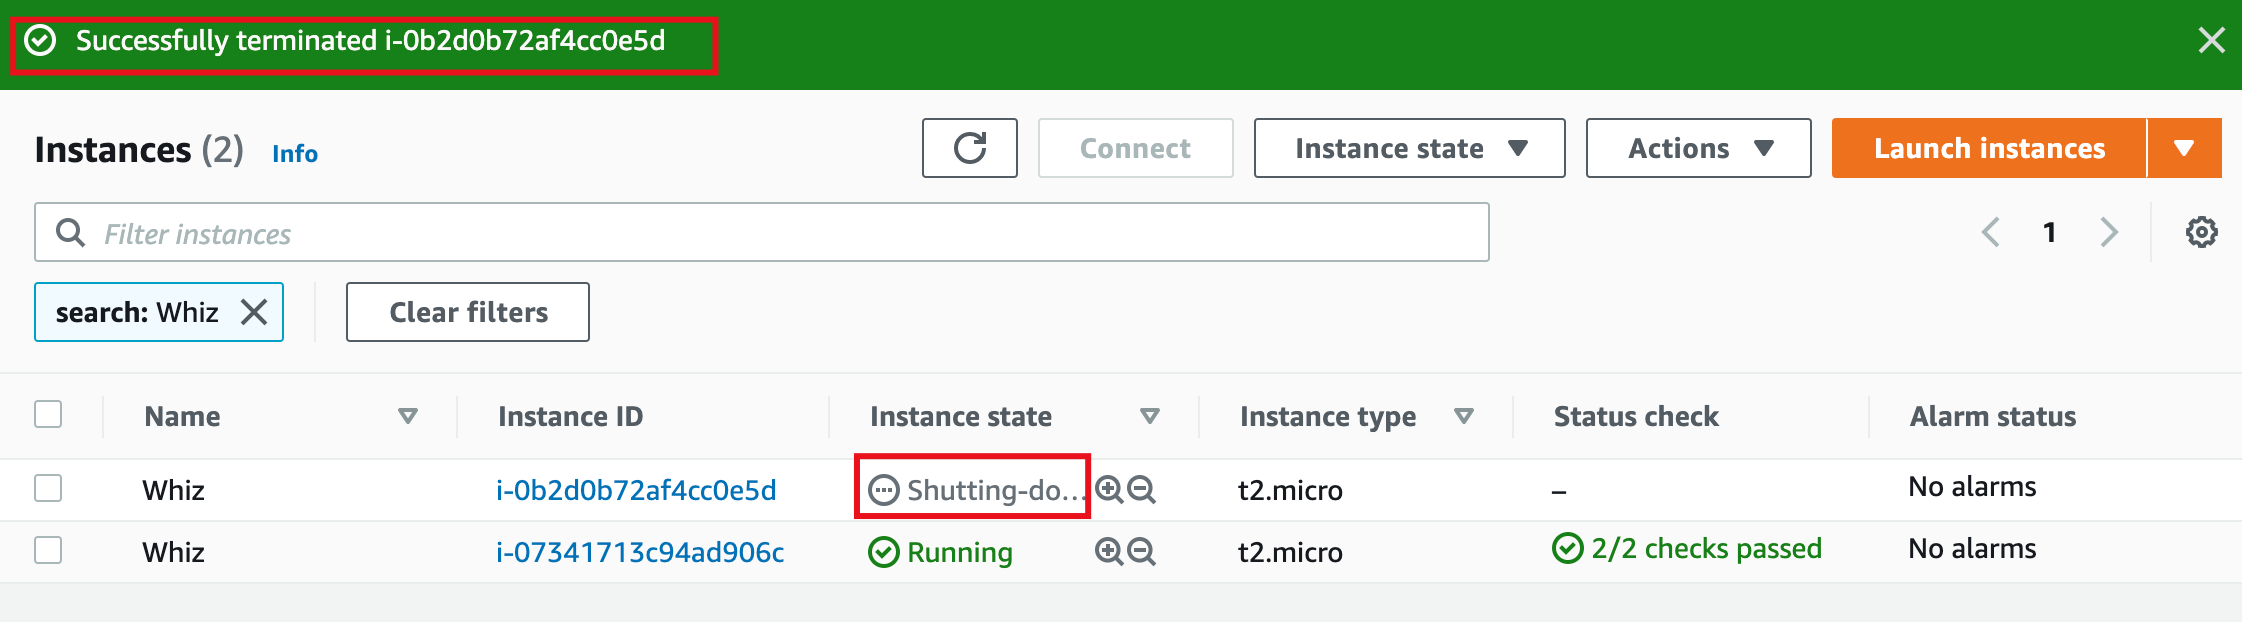 5. Once your instance is terminated. You can go to the **Auto scaling groups** page and see the **Instances is 1** and the **Status** is **Updating capacity**
 6. Alternatively, you can look for the **Activity history** under **Activity** of your Auto scaling group to see what happened.
7. Meanwhile, A new instance will be launched to fulfill the policy condition.
A sample screenshot is provided below:
6. Alternatively, you can look for the **Activity history** under **Activity** of your Auto scaling group to see what happened.
7. Meanwhile, A new instance will be launched to fulfill the policy condition.
A sample screenshot is provided below:
 > **Note:** Launching a new instance may take up to 5 minutes, you can refresh the page to view the new instance.
> **Do you Know ?**
> Launch templates support versioning, allowing you to create and manage multiple versions of a template. This enables you to easily roll back to previous configurations or test new settings without impacting existing Auto Scaling groups.
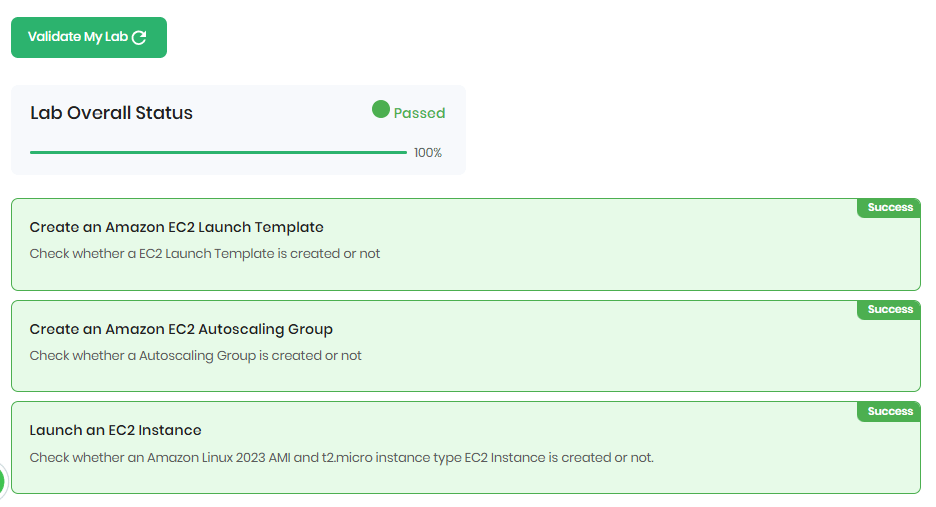
1. Once the lab steps are completed, please click on the **Validation** button on the left side panel.
> **Note:** Launching a new instance may take up to 5 minutes, you can refresh the page to view the new instance.
> **Do you Know ?**
> Launch templates support versioning, allowing you to create and manage multiple versions of a template. This enables you to easily roll back to previous configurations or test new settings without impacting existing Auto Scaling groups.
1. Once the lab steps are completed, please click on the **Validation** button on the left side panel.
 ### Completion and Conclusion
1. You have created a security group and key pair for the Launch template.
2. You created a **Launch template** and **Auto Scaling**.
3. You have launched two EC2 instances through Auto scaling.
4. You have tested the Auto scaling by terminating one of the instances manually.
### End Lab
1. Sign out of the AWS Account
2. You have successfully completed the lab.
3. Once you have completed the steps, click on **End Lab** from the IP Lab Portal dashboard.
## What gets checked
When you press **Check my work**, the platform verifies each of these:
* **Launch an EC2 Instance** — Check whether an EC2 Instance is launched or not.
* **Create Amazon EC2 Auto Scaling Group** — Check whether an Auto Scaling Group is created or not.
* **Create Amazon EC2 Launch Template** — Check whether an EC2 Launch Template is created or not.
This documentation is built and hosted on [Mintlify](https://mintlify.com), a developer documentation platform.
### Completion and Conclusion
1. You have created a security group and key pair for the Launch template.
2. You created a **Launch template** and **Auto Scaling**.
3. You have launched two EC2 instances through Auto scaling.
4. You have tested the Auto scaling by terminating one of the instances manually.
### End Lab
1. Sign out of the AWS Account
2. You have successfully completed the lab.
3. Once you have completed the steps, click on **End Lab** from the IP Lab Portal dashboard.
## What gets checked
When you press **Check my work**, the platform verifies each of these:
* **Launch an EC2 Instance** — Check whether an EC2 Instance is launched or not.
* **Create Amazon EC2 Auto Scaling Group** — Check whether an Auto Scaling Group is created or not.
* **Create Amazon EC2 Launch Template** — Check whether an EC2 Launch Template is created or not.
This documentation is built and hosted on [Mintlify](https://mintlify.com), a developer documentation platform.