> ## Documentation Index
> Fetch the complete documentation index at: https://cloud-architect.ipoint-labs.com/llms.txt
> Use this file to discover all available pages before exploring further.
# Deploying a Highly Available Web Application and Bastion Host in AWS
> Hands-on lab · 30m
Launch this lab in the IP Lab Portal, then follow the steps below in the AWS console.
Open IP Lab Portal
## Overview
### Lab Details
1. This lab walks you through the steps to deploy a highly available Web application and use Bastion host to control the access to underlying private instances.
2. Duration: **90 minutes**
3. AWS Region: **US East (N. Virginia) us-east-1**
### Introduction
#### Bastion Host
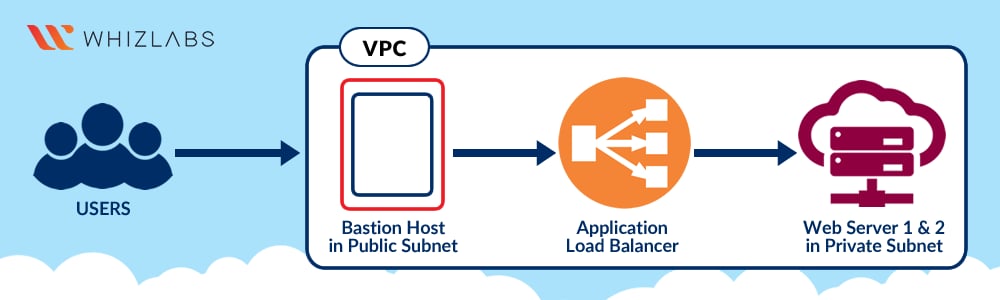
* **A bastion host is a system** that is exposed to the internet.
* In terms of security, Bastion is the only server that is exposed to the internet and should be highly protective to malicious attacks.
* **A Bastion host** is also **known as a Jump Box**. It is a computer that acts like a proxy server and that allows the client machine to connect to the remote server.
* It usually resides outside the firewall.
* The Bastion server filters the incoming traffic and prevents unwanted connections entering the network thus acting as a gateway to maintain the security of bastion hosts, all unnecessary software, daemons.
#### High Availability
* Consider your application is running on a single EC2 instance. If the traffic to your application increases and you need further resources, we can launch multiple EC2 instances from an already running server and then **use Elastic Load Balancing** to distribute the traffic to your application among the newly-created servers.
* We can also **eliminate the Fault tolerance** in your application by placing the servers ( EC2 instances) across different availability zones.
* In the event of **Failure of one Availability zone**, your application will serve or handle the **traffic from another availability zone.**
* High **Availability and fault tolerance** can be **achieved using Elastic Load balancers.**
#### Elastic Load Balancer
* **Load Balancer is** a **service** that **allows you to distribute the incoming application or network traffic across multiple targets** (such as Amazon EC2 instances, containers, and IP addresses) in multiple Availability Zones.
* AWS currently offers three types of load balancers:
* Application Load Balancer is best suited for load balancing of HTTP and HTTPS traffic.
* Network Load Balancer is used to distribute the traffic or load using TCP/UDP protocols.
* Classic Load Balancer provides basic load balancing across multiple Amazon EC2 instances.
### Architecture Diagram
 ### Task Details
1. Sign into the AWS Management Console.
2. Check Cloudformation stack is created
3. Create a Bastion Server
4. Creating a Security Group for the Load Balancer
5. Steps to create Web-servers
6. Create a Target Group
7. Create a Load Balancer
8. Connecting to web server via Bastion
9. Checking the health of the load balancer
10. Test case for High Availability
### Launching Lab Environment
1. To launch the lab environment, Click on the **Start Lab** button.
2. Please wait until the cloud environment is provisioned. It will take less than a minute to provision.
3. Once the Lab is started, you will be provided with **IAM user name**, **Password**, **Access** **Key**, and **Secret** **Access** **Key**.
**Note** : You can only start one lab at any given time
## Lab guide
### Lab Steps
#### Task 1: Sign in to AWS Management Console
1. Click on the **Open Console** button, and you will get redirected to AWS Console in a new browser tab.
2. On the AWS sign-in page,
* Leave the Account ID as default. Never edit/remove the 12 digit Account ID present in the AWS Console. otherwise, you cannot proceed with the lab.
* Now copy your **User Name** and **Password** in the Lab Console to the **IAM Username and Password** in AWS Console and click on the **Sign in** button.
3. Once Signed In to the AWS Management Console, Make the default AWS Region as **US East (N. Virginia) us-east-1.**
> **Note :** If you face any issues, please go through [**FAQs and Troubleshooting for Labs**](https://play.whizlabs.com/site/task_support/faqs-and-troubleshooting).
#### Task 2: Check CloudFormation stack is created
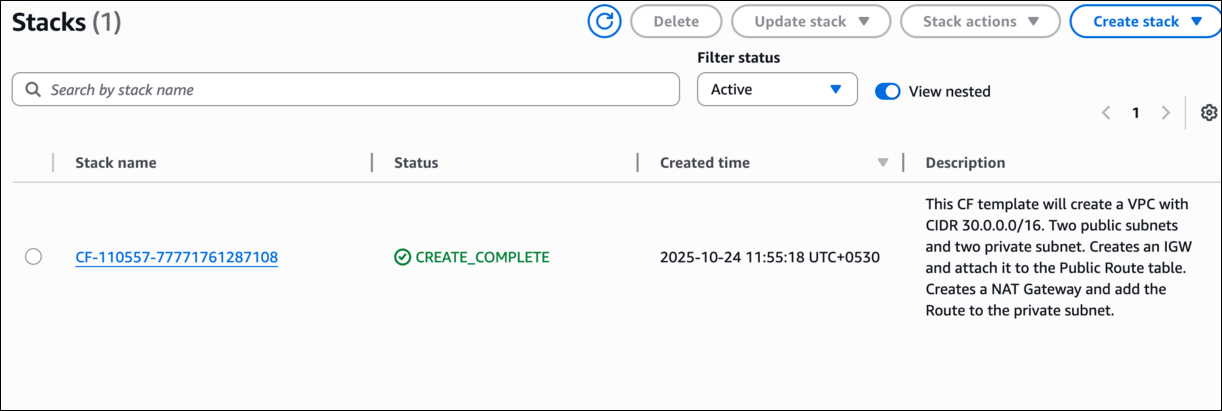
In this lab we will create a VPC using CloudFormation with one public and two private subnets. This VPC will be used in the lab to create resources.
1. Make sure you are in the **US East (N. Virginia) us-east-1** Region.
2. Navigate to the **Management & Governance** section and locate the **Services** button. Once you click on the **Services** button, then select **CloudFormation**
3. Under CloudFormation stacks, you will be able to see a stack getting created.
4. Now wait until the Stack status changes to **CREATE\_COMPLETE** and please refresh the stack page to view the latest status.
### Task Details
1. Sign into the AWS Management Console.
2. Check Cloudformation stack is created
3. Create a Bastion Server
4. Creating a Security Group for the Load Balancer
5. Steps to create Web-servers
6. Create a Target Group
7. Create a Load Balancer
8. Connecting to web server via Bastion
9. Checking the health of the load balancer
10. Test case for High Availability
### Launching Lab Environment
1. To launch the lab environment, Click on the **Start Lab** button.
2. Please wait until the cloud environment is provisioned. It will take less than a minute to provision.
3. Once the Lab is started, you will be provided with **IAM user name**, **Password**, **Access** **Key**, and **Secret** **Access** **Key**.
**Note** : You can only start one lab at any given time
## Lab guide
### Lab Steps
#### Task 1: Sign in to AWS Management Console
1. Click on the **Open Console** button, and you will get redirected to AWS Console in a new browser tab.
2. On the AWS sign-in page,
* Leave the Account ID as default. Never edit/remove the 12 digit Account ID present in the AWS Console. otherwise, you cannot proceed with the lab.
* Now copy your **User Name** and **Password** in the Lab Console to the **IAM Username and Password** in AWS Console and click on the **Sign in** button.
3. Once Signed In to the AWS Management Console, Make the default AWS Region as **US East (N. Virginia) us-east-1.**
> **Note :** If you face any issues, please go through [**FAQs and Troubleshooting for Labs**](https://play.whizlabs.com/site/task_support/faqs-and-troubleshooting).
#### Task 2: Check CloudFormation stack is created
In this lab we will create a VPC using CloudFormation with one public and two private subnets. This VPC will be used in the lab to create resources.
1. Make sure you are in the **US East (N. Virginia) us-east-1** Region.
2. Navigate to the **Management & Governance** section and locate the **Services** button. Once you click on the **Services** button, then select **CloudFormation**
3. Under CloudFormation stacks, you will be able to see a stack getting created.
4. Now wait until the Stack status changes to **CREATE\_COMPLETE** and please refresh the stack page to view the latest status.
 #### Task 3: Create a Bastion Server
1. Make sure you are in the **US East (N. Virginia) us-east-1** Region.
2. Navigate to **EC2** by clicking on the **Services** menu at the top, then click on **EC2** in the **Compute** section.
3. Navigate to **Instances** on the left panel and click on **Launch Instances**
4. Name : Enter ***Bastion-Server***
#### Task 3: Create a Bastion Server
1. Make sure you are in the **US East (N. Virginia) us-east-1** Region.
2. Navigate to **EC2** by clicking on the **Services** menu at the top, then click on **EC2** in the **Compute** section.
3. Navigate to **Instances** on the left panel and click on **Launch Instances**
4. Name : Enter ***Bastion-Server***
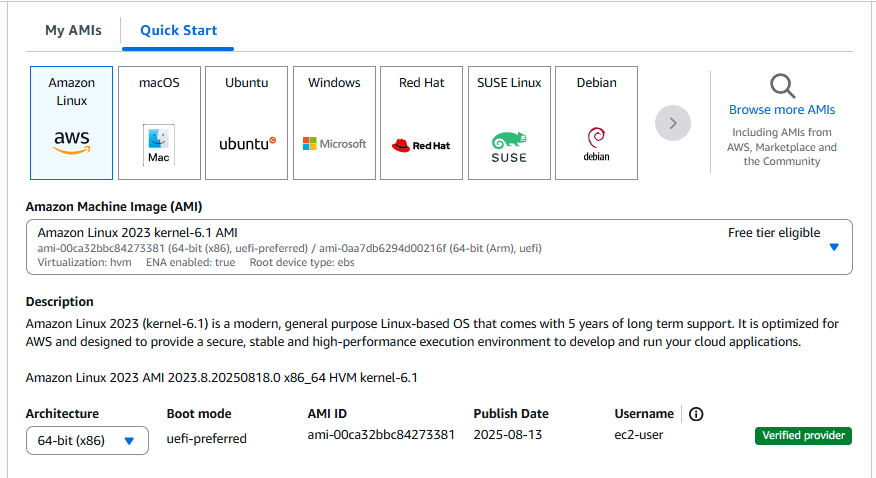
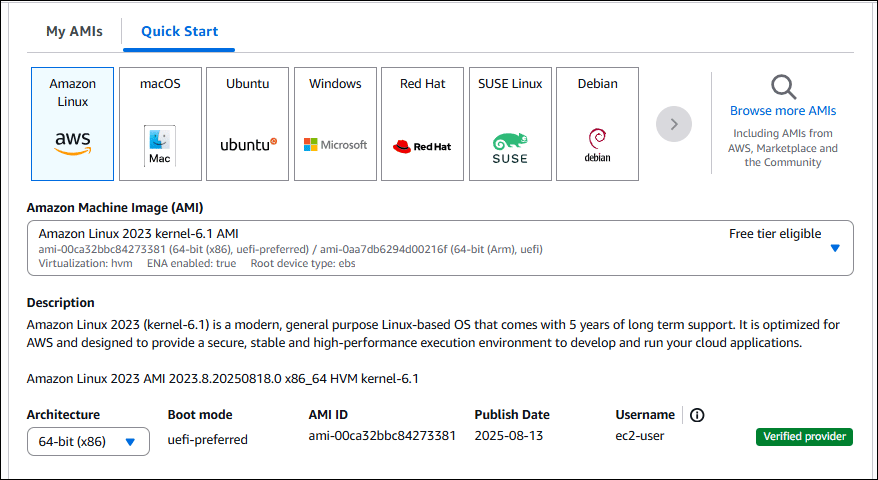
 5. **For Amazon Machine Image (AMI):** Make sure that the selected machine is **Amazon Linux AMI 2023.**
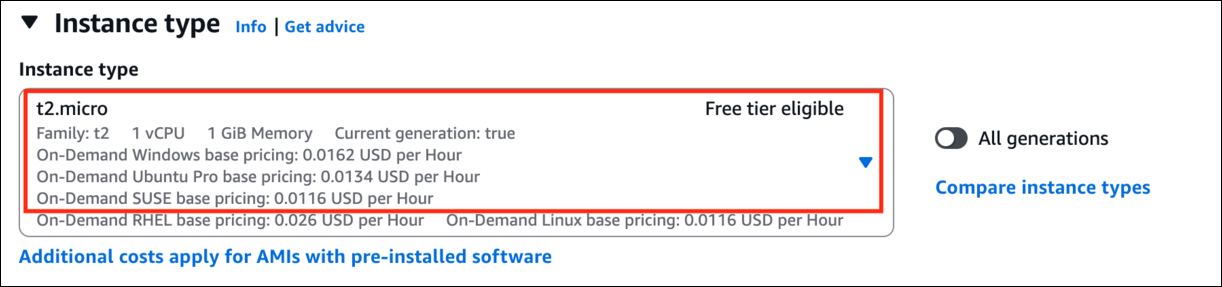
 6. Instance Type: Select **t2.micro**
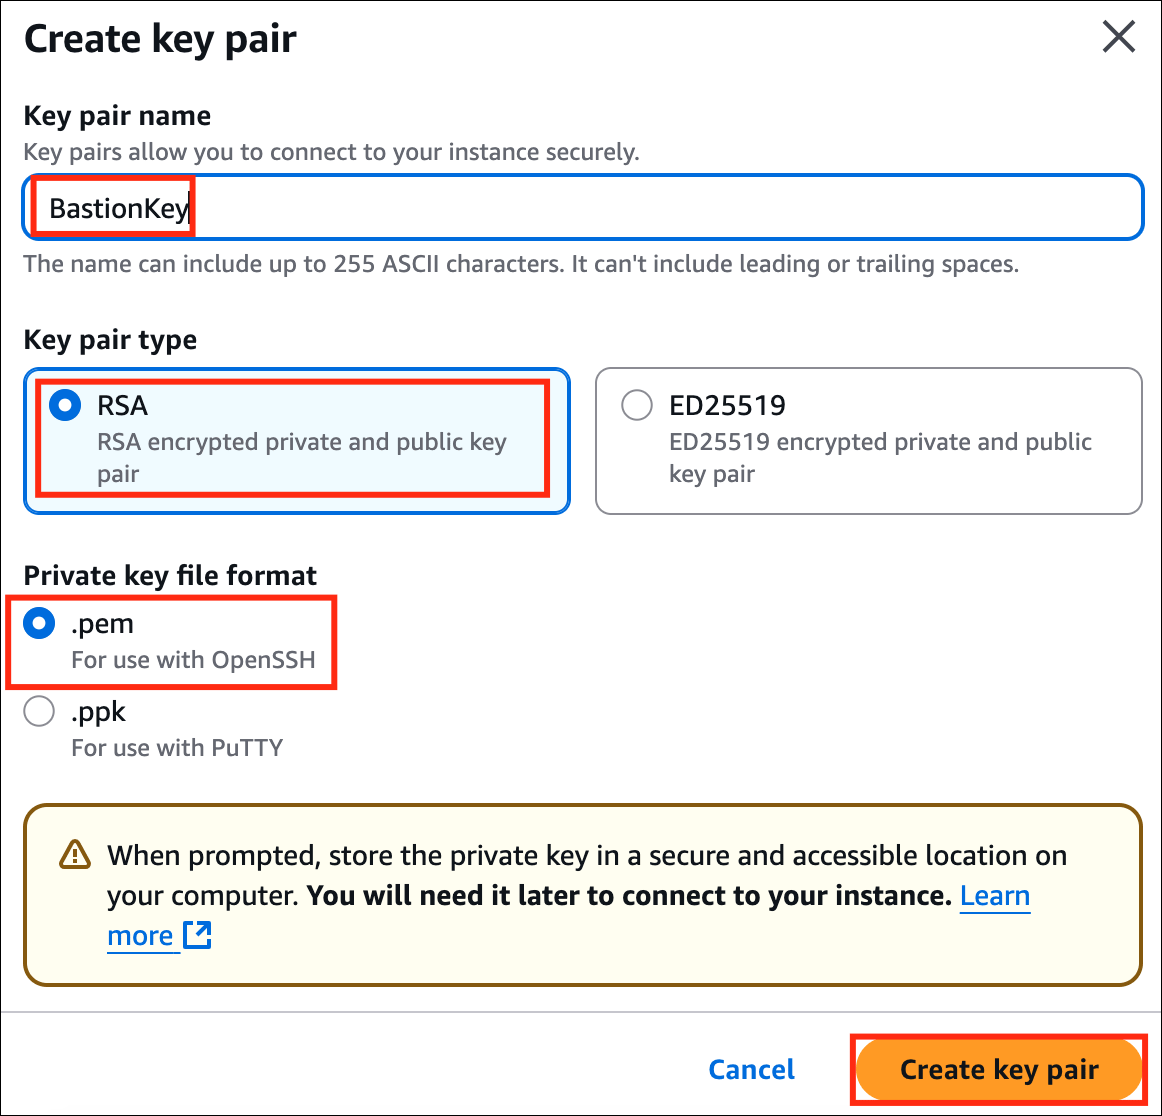
 7. **For Key pair:** Select **Create a new key pair**
* Key pair name: **BastionKey**
* Key pair type: **RSA**
* Private key file format: .**pem**
8. Select **Create key pair** Button.
7. **For Key pair:** Select **Create a new key pair**
* Key pair name: **BastionKey**
* Key pair type: **RSA**
* Private key file format: .**pem**
8. Select **Create key pair** Button.
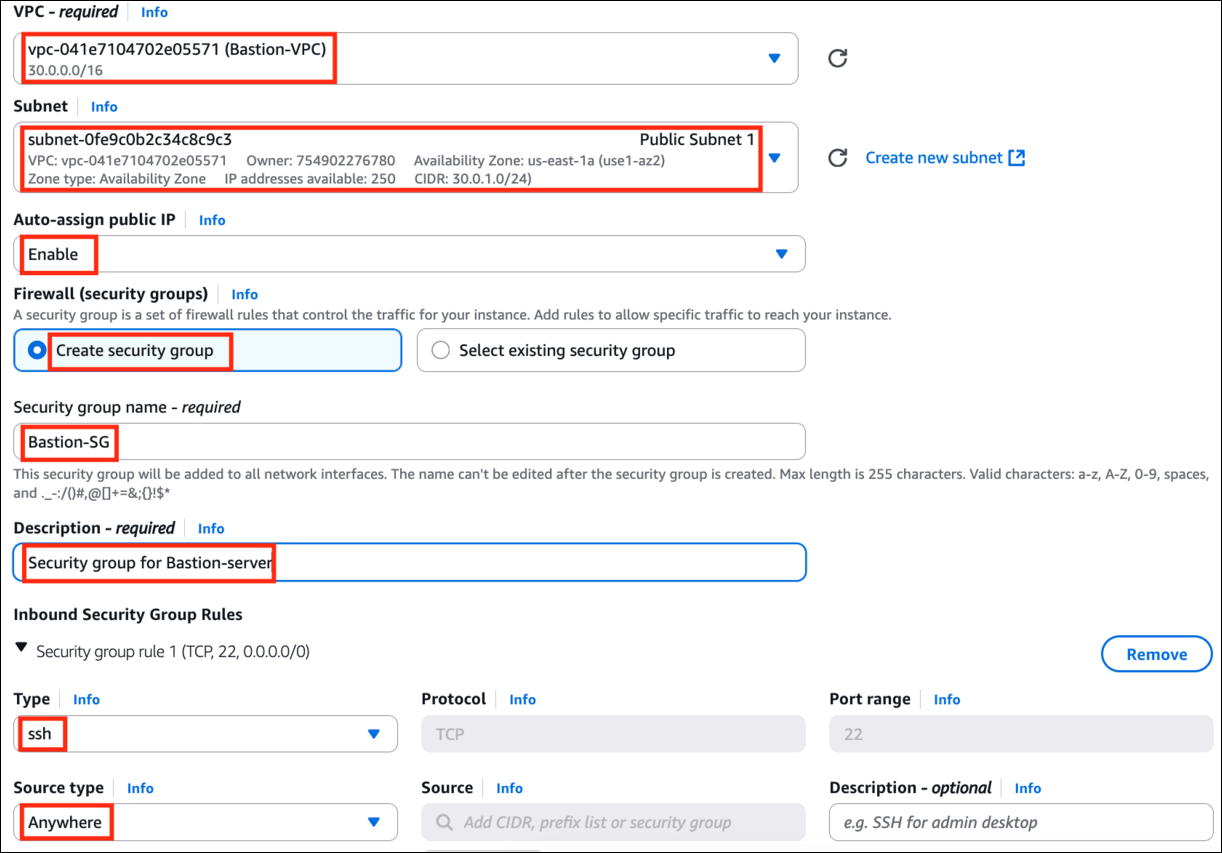
 9. In Network Settings Click on **Edit**:
* VPC : Select **Bastion-VPC**
* Subnet : Select **Public Subnet 1**
* Auto-assign public IP: **Enable**
* Select **Create new Security group**
* Security group name : Enter ***Bastion-SG***
* Description : Enter ***Security group for Bastion-server***
* To add **SSH:**
* Choose Type : **SSH**
* Source : **Anywhere**
9. In Network Settings Click on **Edit**:
* VPC : Select **Bastion-VPC**
* Subnet : Select **Public Subnet 1**
* Auto-assign public IP: **Enable**
* Select **Create new Security group**
* Security group name : Enter ***Bastion-SG***
* Description : Enter ***Security group for Bastion-server***
* To add **SSH:**
* Choose Type : **SSH**
* Source : **Anywhere**
 10. Keep Rest thing Default and Click on **Launch Instance** Button.
11. Select **View all Instances** to View Instance you Created
12. **Launch Status:** Your instances are now launching, navigate to **Instances** and wait for 1-2 minutes (until the Bastion-server's status changes from pending to running).
10. Keep Rest thing Default and Click on **Launch Instance** Button.
11. Select **View all Instances** to View Instance you Created
12. **Launch Status:** Your instances are now launching, navigate to **Instances** and wait for 1-2 minutes (until the Bastion-server's status changes from pending to running).
 #### Task 4: Creating a Security Group for the Load Balancer
1. Navigate to the Ec2 Dashboard, scroll down to **Security Groups** in left menu and click on **Create security group**.
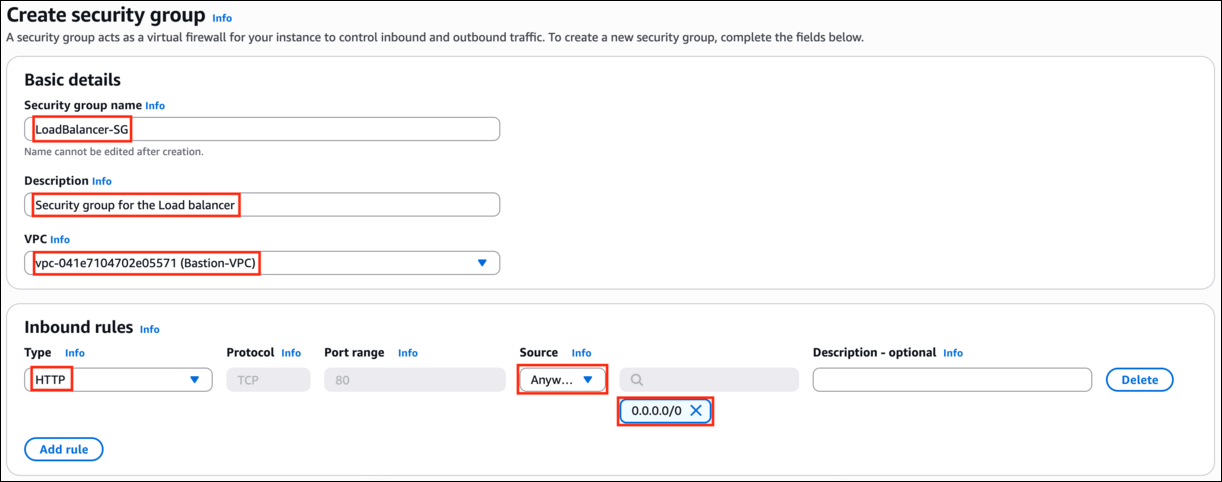
2. **Configure the security** group as follows:
* Security group name: Enter ***LoadBalancer-SG***
* Description: Enter ***Security group for the Load balancer***
* VPC: Select **Bastion-VPC** (remove the default VPC)
* Click on **Inbound Rules** and add the port as follows:
* Type : Select **HTTP**
* Source: Select **Anywhere-IPv4**
#### Task 4: Creating a Security Group for the Load Balancer
1. Navigate to the Ec2 Dashboard, scroll down to **Security Groups** in left menu and click on **Create security group**.
2. **Configure the security** group as follows:
* Security group name: Enter ***LoadBalancer-SG***
* Description: Enter ***Security group for the Load balancer***
* VPC: Select **Bastion-VPC** (remove the default VPC)
* Click on **Inbound Rules** and add the port as follows:
* Type : Select **HTTP**
* Source: Select **Anywhere-IPv4**
 3. Leave everything as default and click on **Create Security Group**.
4. The security group for the load balancer will be created.
#### Task 5: Creating Web-servers
> **Note:** As part of AWS best practices, the **web servers should reside in private subnets**. We have created a private subnet and NAT gateway. The private subnet is attached to a route table to route traffic via NAT gateway to the internet. Please select the private subnet while launching web servers in the next section.
1. Make sure you are in the **US East (N. Virginia) us-east-1** Region.
2. Navigate to **Instances** and Click on **Launch Instances**.
3. Name : Enter ***Web-server-1***
3. Leave everything as default and click on **Create Security Group**.
4. The security group for the load balancer will be created.
#### Task 5: Creating Web-servers
> **Note:** As part of AWS best practices, the **web servers should reside in private subnets**. We have created a private subnet and NAT gateway. The private subnet is attached to a route table to route traffic via NAT gateway to the internet. Please select the private subnet while launching web servers in the next section.
1. Make sure you are in the **US East (N. Virginia) us-east-1** Region.
2. Navigate to **Instances** and Click on **Launch Instances**.
3. Name : Enter ***Web-server-1***
 4. **For Amazon Machine Image (AMI):** Make sure that the selected machine is **Amazon Linux AMI 2023.**
 5. Instance Type: Select **t2.micro**.
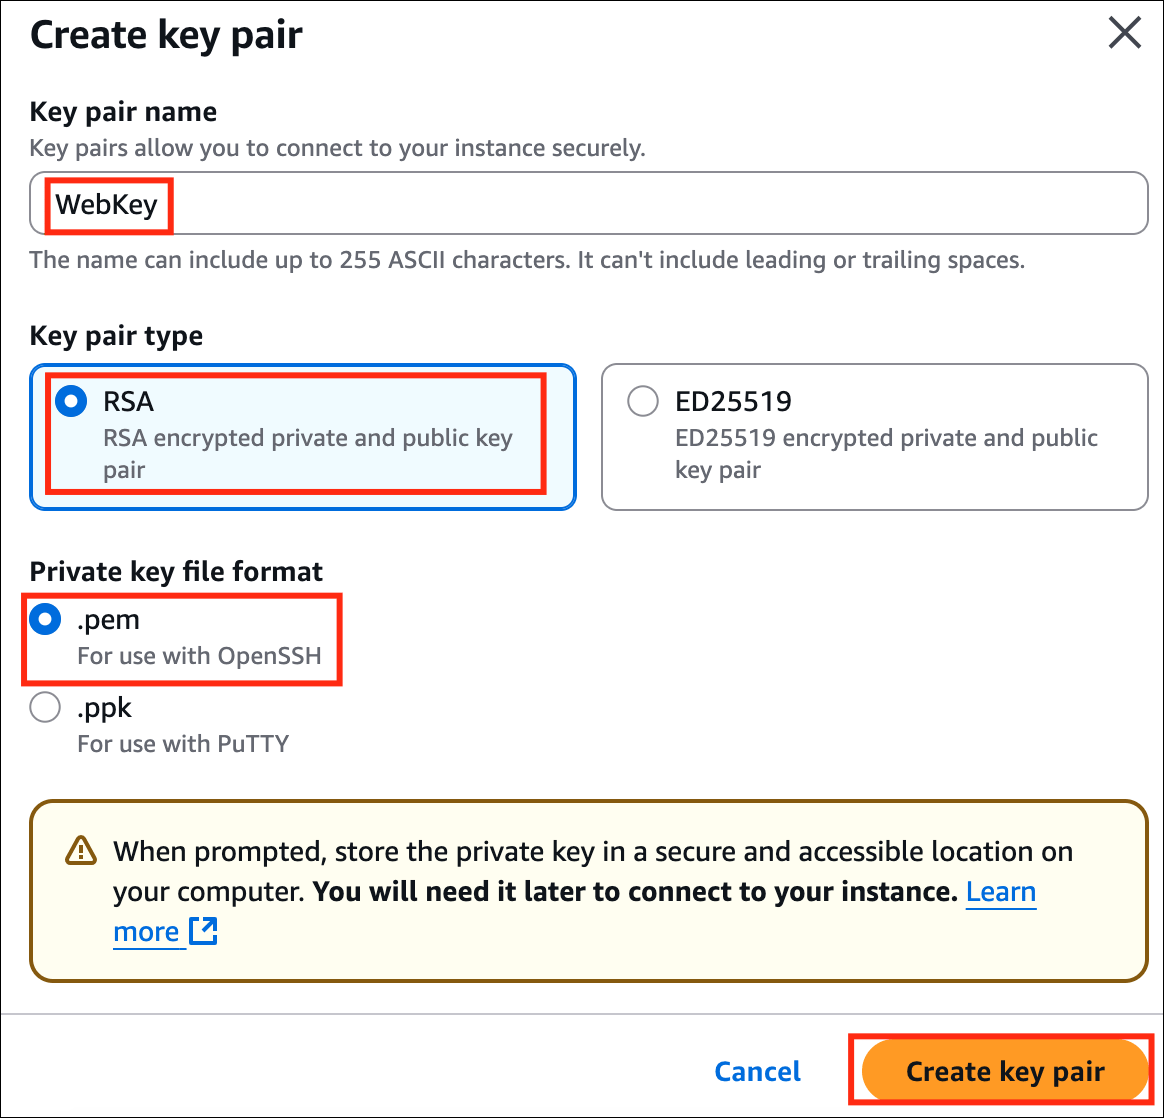
 6. For Key pair: Select **Create a new key** pair Button
* Key pair name: **WebKey**
* Key pair type: **RSA**
* Private key file format: **.pem**
7. Select **Create key pair** Button.
6. For Key pair: Select **Create a new key** pair Button
* Key pair name: **WebKey**
* Key pair type: **RSA**
* Private key file format: **.pem**
7. Select **Create key pair** Button.
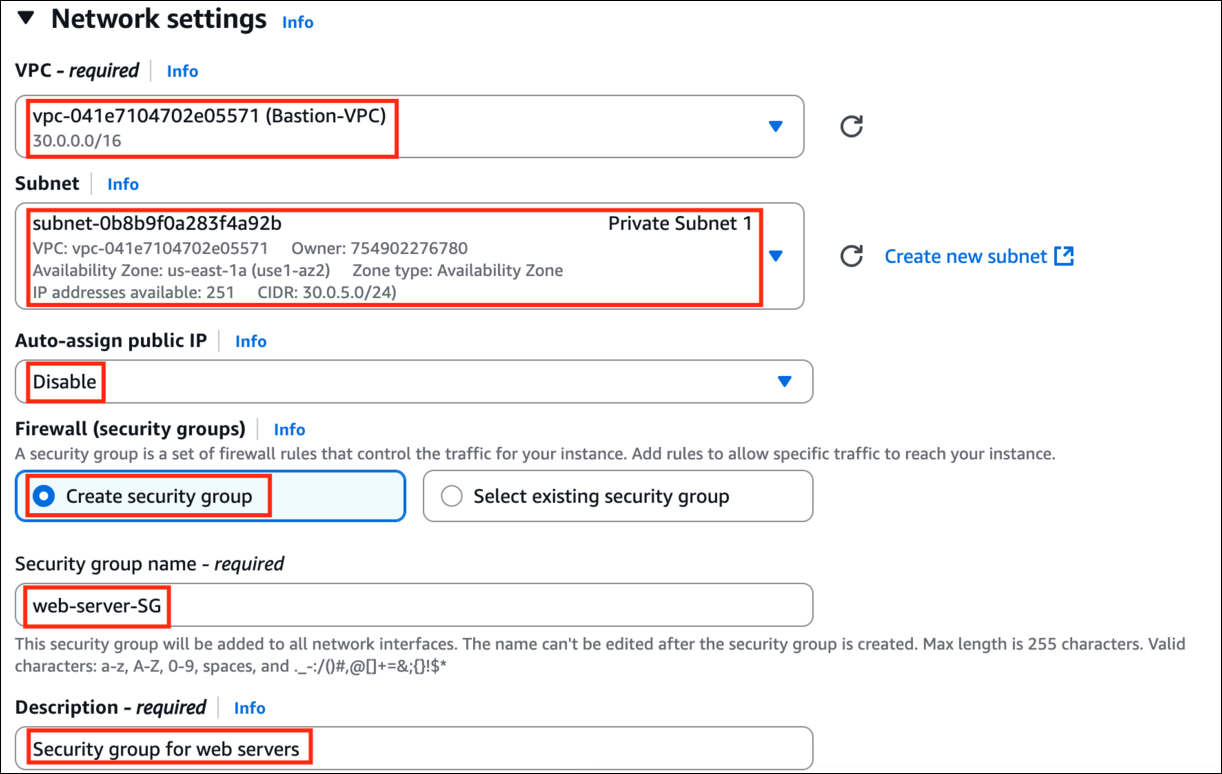
 8. In Network Settings Click on **Edit**:
* VPC : Select **Bastion-VPC**
* Subnet : Select **Private Subnet 1**
* Select **Create new Security group**
* Security group name : Enter ***web-server-SG***
* Description : Enter **Security group for web servers**
8. In Network Settings Click on **Edit**:
* VPC : Select **Bastion-VPC**
* Subnet : Select **Private Subnet 1**
* Select **Create new Security group**
* Security group name : Enter ***web-server-SG***
* Description : Enter **Security group for web servers**
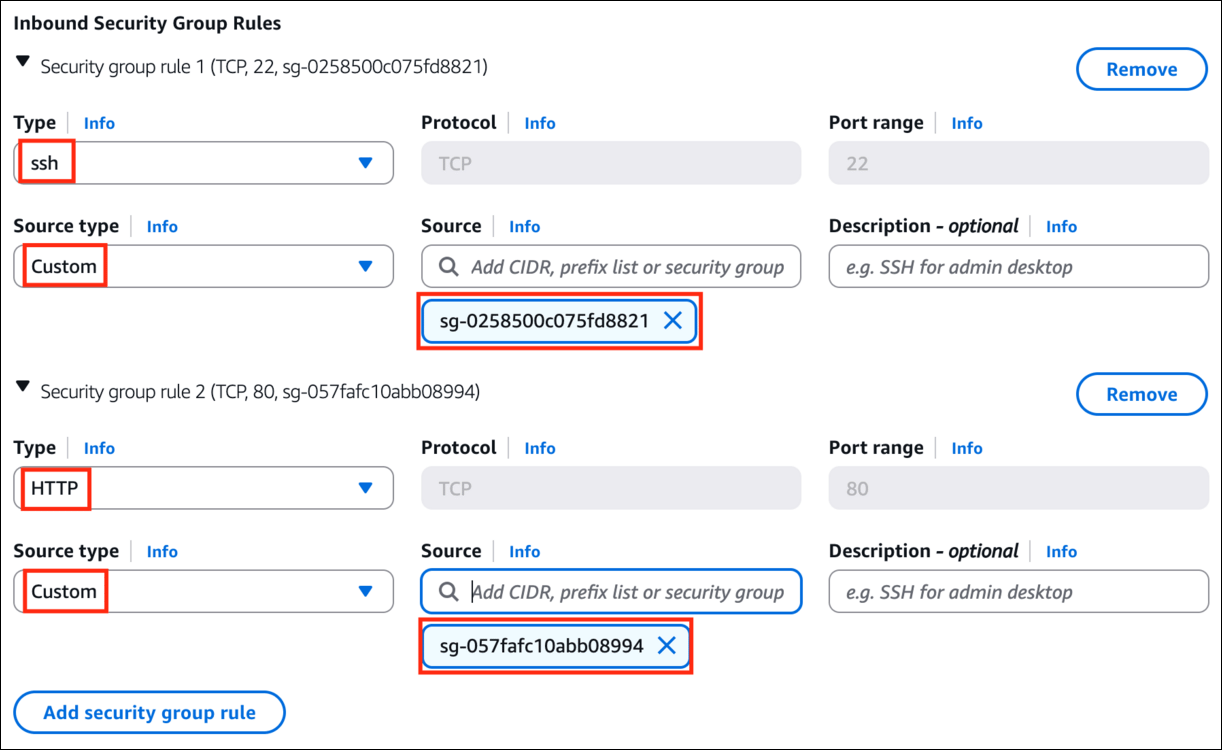
 * On **port 22**, we choose the **Bastion-SG security group as its source to allow SSH connection to web servers from only the bastion server** by restricting the public SSH connection. Type bastion in source and select the **Bastion-SG**.
* On **port 80**, choose the **LoadBalancer-SG as its source** to serve the traffic coming through the load balancer. Type Load in source and select **LoadBalancer-SG**.
* To add **SSH:**
* Choose Type **: SSH**
* Source : **Custom** and Select **Bastion-SG**
* To add **HTTP:** Click on **Add security group rule**
* Choose Type **: HTTP**
* Source : **Custom** and Select **LoadBalancer-SG**
* On **port 22**, we choose the **Bastion-SG security group as its source to allow SSH connection to web servers from only the bastion server** by restricting the public SSH connection. Type bastion in source and select the **Bastion-SG**.
* On **port 80**, choose the **LoadBalancer-SG as its source** to serve the traffic coming through the load balancer. Type Load in source and select **LoadBalancer-SG**.
* To add **SSH:**
* Choose Type **: SSH**
* Source : **Custom** and Select **Bastion-SG**
* To add **HTTP:** Click on **Add security group rule**
* Choose Type **: HTTP**
* Source : **Custom** and Select **LoadBalancer-SG**
 9. **Click on Advanced Details and under the User data: section, enter the following script:**
```
#!/bin/bash
sudo su
dnf update -y
dnf install httpd -y
systemctl start httpd
systemctl enable httpd
echo "REQUEST HANDLING BY SERVER 1" > /var/www/html/index.html
```
10. Keep everything as default and click on **Launch Instance** button. Select **View all Instances** to View Instance you Created
11. **Launch Status:** Your instances are now launching,Navigate to **Instances** and wait for 1-2 minutes (until the Bastion-server's status changes from pending to running).
12. After a few minutes, you will see the new instance named **web-server-1** running along with the **Bastion-server** created in the earlier step.
9. **Click on Advanced Details and under the User data: section, enter the following script:**
```
#!/bin/bash
sudo su
dnf update -y
dnf install httpd -y
systemctl start httpd
systemctl enable httpd
echo "REQUEST HANDLING BY SERVER 1" > /var/www/html/index.html
```
10. Keep everything as default and click on **Launch Instance** button. Select **View all Instances** to View Instance you Created
11. **Launch Status:** Your instances are now launching,Navigate to **Instances** and wait for 1-2 minutes (until the Bastion-server's status changes from pending to running).
12. After a few minutes, you will see the new instance named **web-server-1** running along with the **Bastion-server** created in the earlier step.
 13. Repeat the above steps from Step1 to create **Web-server-2**. You need 2 instances for this lab.
14. For key, select **WebKey**
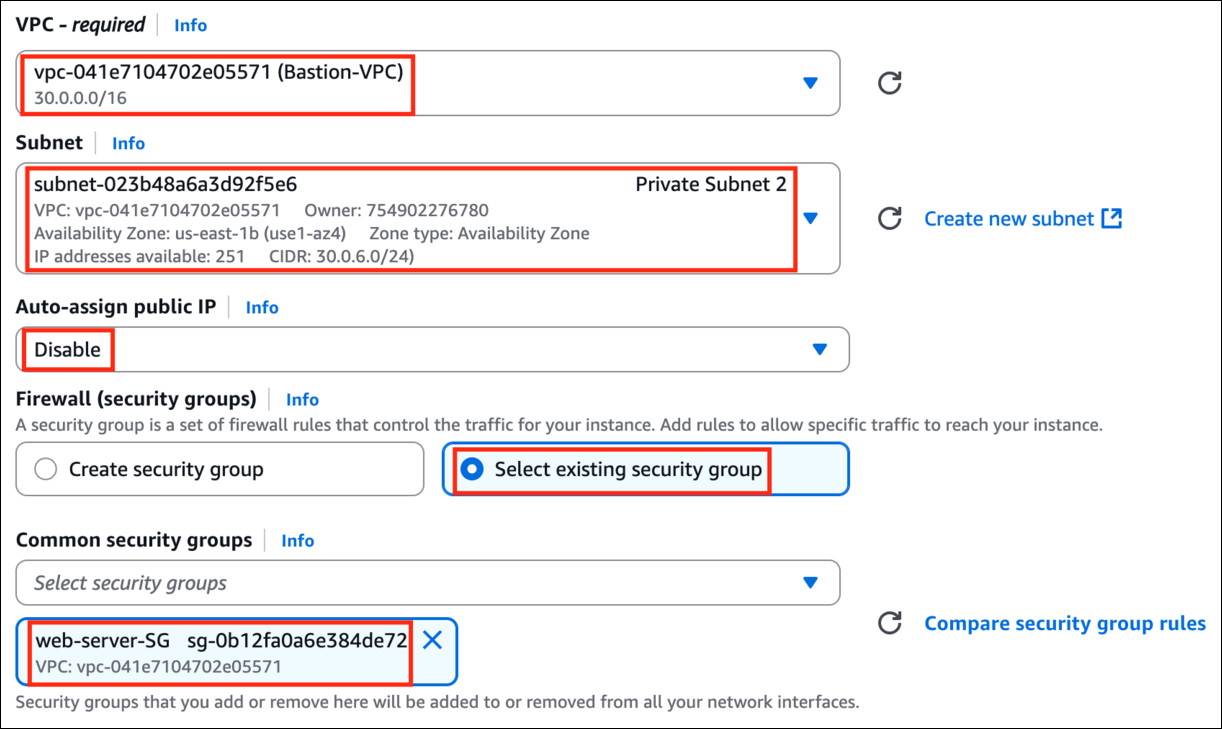
15. In Network Settings Click on **Edit**:
* VPC : Select **Bastion-VPC**
* Subnet : Select **Private Subnet 2**
* Security group : **Select existing security group**
* Select **web-server-SG**
13. Repeat the above steps from Step1 to create **Web-server-2**. You need 2 instances for this lab.
14. For key, select **WebKey**
15. In Network Settings Click on **Edit**:
* VPC : Select **Bastion-VPC**
* Subnet : Select **Private Subnet 2**
* Security group : **Select existing security group**
* Select **web-server-SG**
 16. Click on **Advanced Details** and under the **User data:** section, enter the following script:
```
#!/bin/bash
sudo su
dnf update -y
dnf install httpd -y
systemctl start httpd
systemctl enable httpd
echo "REQUEST HANDLING BY SERVER 2" > /var/www/html/index.html
```
17. Keep Rest thing Default and Click on **Launch Instance** Button. Select **View all Instances** to View Instance you Created.
18. Now you will see three servers running namely **Bastion-server**, **Web-server-1, and Web-server-2.**
16. Click on **Advanced Details** and under the **User data:** section, enter the following script:
```
#!/bin/bash
sudo su
dnf update -y
dnf install httpd -y
systemctl start httpd
systemctl enable httpd
echo "REQUEST HANDLING BY SERVER 2" > /var/www/html/index.html
```
17. Keep Rest thing Default and Click on **Launch Instance** Button. Select **View all Instances** to View Instance you Created.
18. Now you will see three servers running namely **Bastion-server**, **Web-server-1, and Web-server-2.**
 #### Task 6: Creating a Target Group
1. In the left side menu, scroll down to the bottom and click on **Target Groups** under **Load Balancing**
2. Click on the **Create Target Group**
3. Under **Basic Configuration**:
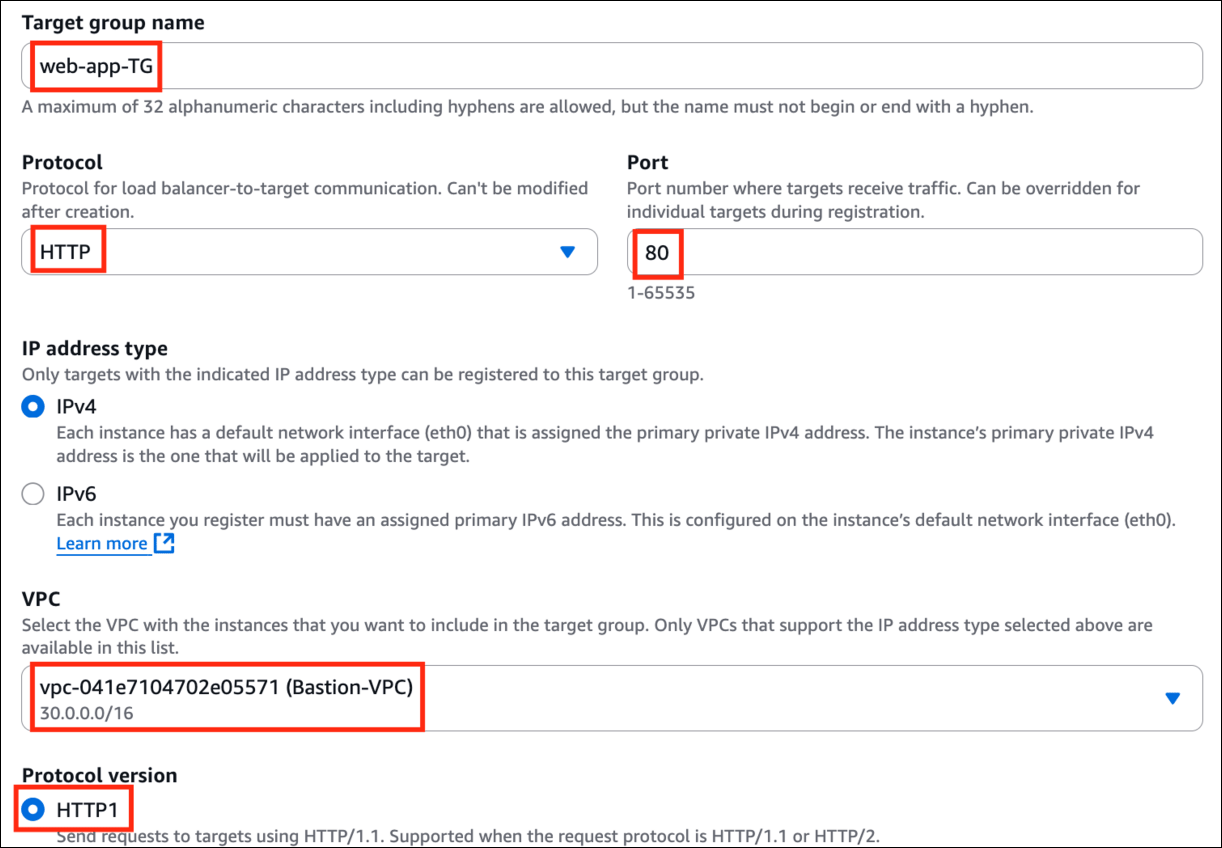
* Under **settings** :
* Choose a target type : Select **Instances**
* Target group name : Enter ***web-app-TG***
* Protocol : **HTTP**
* Port : **80**
* VPC : Select **Bastion-VPC**
* Protocol version: Select **HTTP1**
#### Task 6: Creating a Target Group
1. In the left side menu, scroll down to the bottom and click on **Target Groups** under **Load Balancing**
2. Click on the **Create Target Group**
3. Under **Basic Configuration**:
* Under **settings** :
* Choose a target type : Select **Instances**
* Target group name : Enter ***web-app-TG***
* Protocol : **HTTP**
* Port : **80**
* VPC : Select **Bastion-VPC**
* Protocol version: Select **HTTP1**
 * Health check protocol : Select **HTTP** (default)
* Path : Enter ***/index.html***
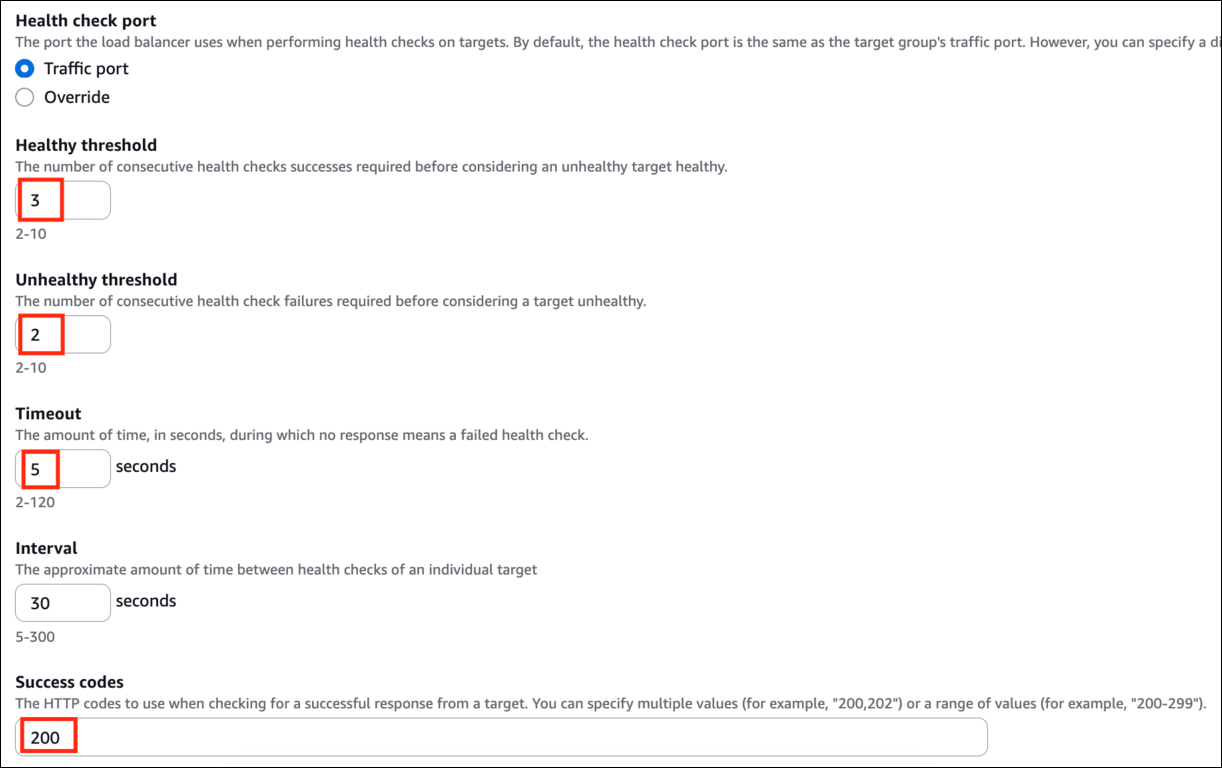
4. Click on **Advanced health check settings** to expand it:
* **Healthy threshold:** Enter ***3***
* **Unhealthy threshold:** **2** (Default)
* **Timeout:** **5** seconds (Default)
* **Interval:** Enter ***6*** seconds
* **Success codes:** 200 (Default)
* Health check protocol : Select **HTTP** (default)
* Path : Enter ***/index.html***
4. Click on **Advanced health check settings** to expand it:
* **Healthy threshold:** Enter ***3***
* **Unhealthy threshold:** **2** (Default)
* **Timeout:** **5** seconds (Default)
* **Interval:** Enter ***6*** seconds
* **Success codes:** 200 (Default)
 5. Click on **Next**
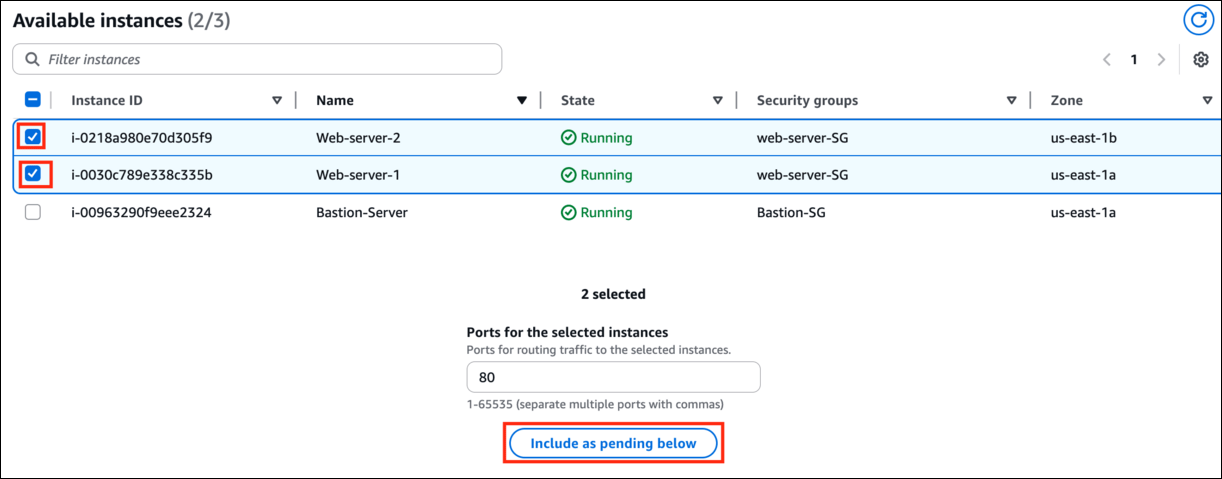
6. **Register Targets :**
* Under Instances, select the **two web-server EC2 instances** which you created in the above step and click on **Include as pending below.**
5. Click on **Next**
6. **Register Targets :**
* Under Instances, select the **two web-server EC2 instances** which you created in the above step and click on **Include as pending below.**
 7. **Review targets:**
* Review everything and click on **Create Target Group**
7. **Review targets:**
* Review everything and click on **Create Target Group**
 8. You have successfully created a target group.
 #### Task 7: Creating a load balancer
1. In the **EC2** console, navigate to **Load Balancer** in the left side panel.
2. Click on **Create Load Balancer** at the top left to create a new load balancer for our web servers.
3. On the next screen, choose **Create** under **Application Load balancer** since we are testing the high availability of the web app.
4. The next few screens will require some custom configurations. If a field is not mentioned, leave it as default or empty.
* Scroll down to **Basic Configuration:**
* Load balancer name : Enter ***Web-application-LB***
* Scheme : Choose **internet-facing**
* IP address type : Select **IPv4**
5. **Network mapping:**
* **VPC:** Select **Bastion-VPC**
* **Mappings:** Make sure you select the two **Public Subnets in the Availability zone** i.e **us-east-1a** and **us-east-1b.**
6. **Security groups:**
* Remove the default security group and Select **LoadBalancer-SG** from the drop-down menu.
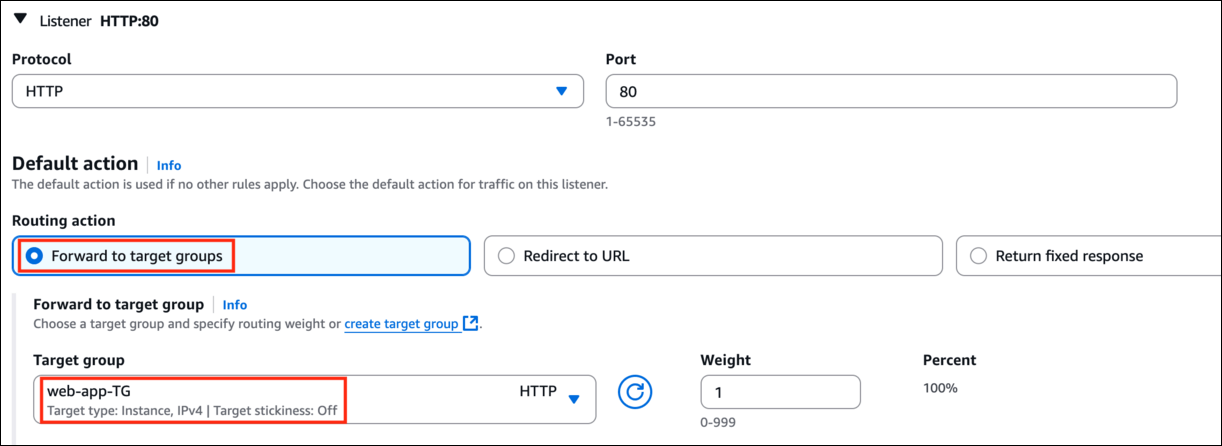
7. **Listeners and routing:**
* Protocol : **HTTP**
* Port : **80**
**Default action(forward to):** Select the target group ***web-app-TG*** from the drop-down menu.
#### Task 7: Creating a load balancer
1. In the **EC2** console, navigate to **Load Balancer** in the left side panel.
2. Click on **Create Load Balancer** at the top left to create a new load balancer for our web servers.
3. On the next screen, choose **Create** under **Application Load balancer** since we are testing the high availability of the web app.
4. The next few screens will require some custom configurations. If a field is not mentioned, leave it as default or empty.
* Scroll down to **Basic Configuration:**
* Load balancer name : Enter ***Web-application-LB***
* Scheme : Choose **internet-facing**
* IP address type : Select **IPv4**
5. **Network mapping:**
* **VPC:** Select **Bastion-VPC**
* **Mappings:** Make sure you select the two **Public Subnets in the Availability zone** i.e **us-east-1a** and **us-east-1b.**
6. **Security groups:**
* Remove the default security group and Select **LoadBalancer-SG** from the drop-down menu.
7. **Listeners and routing:**
* Protocol : **HTTP**
* Port : **80**
**Default action(forward to):** Select the target group ***web-app-TG*** from the drop-down menu.
 8. Now scroll down and click on **Create Load Balancer** button.
9. You have successfully created an application load balancer.
10. Please wait for 3-4 minutes to see this **ALB** change to **Active** state.
8. Now scroll down and click on **Create Load Balancer** button.
9. You have successfully created an application load balancer.
10. Please wait for 3-4 minutes to see this **ALB** change to **Active** state.
 #### Task 8: Connecting to web server via Bastion
1. [SSH into the Bastion server](https://play.whizlabs.com/site/task_support/ssh-into-ec-instance) using the Bastion PEM key: **bastionkey.pem**
2. To SSH into web servers via Bastion server, we need the web server key that we used to launch the previous web servers (web-serverkey).
3. Open the **web-serverkey** file on your local system and then **copy the text content**.
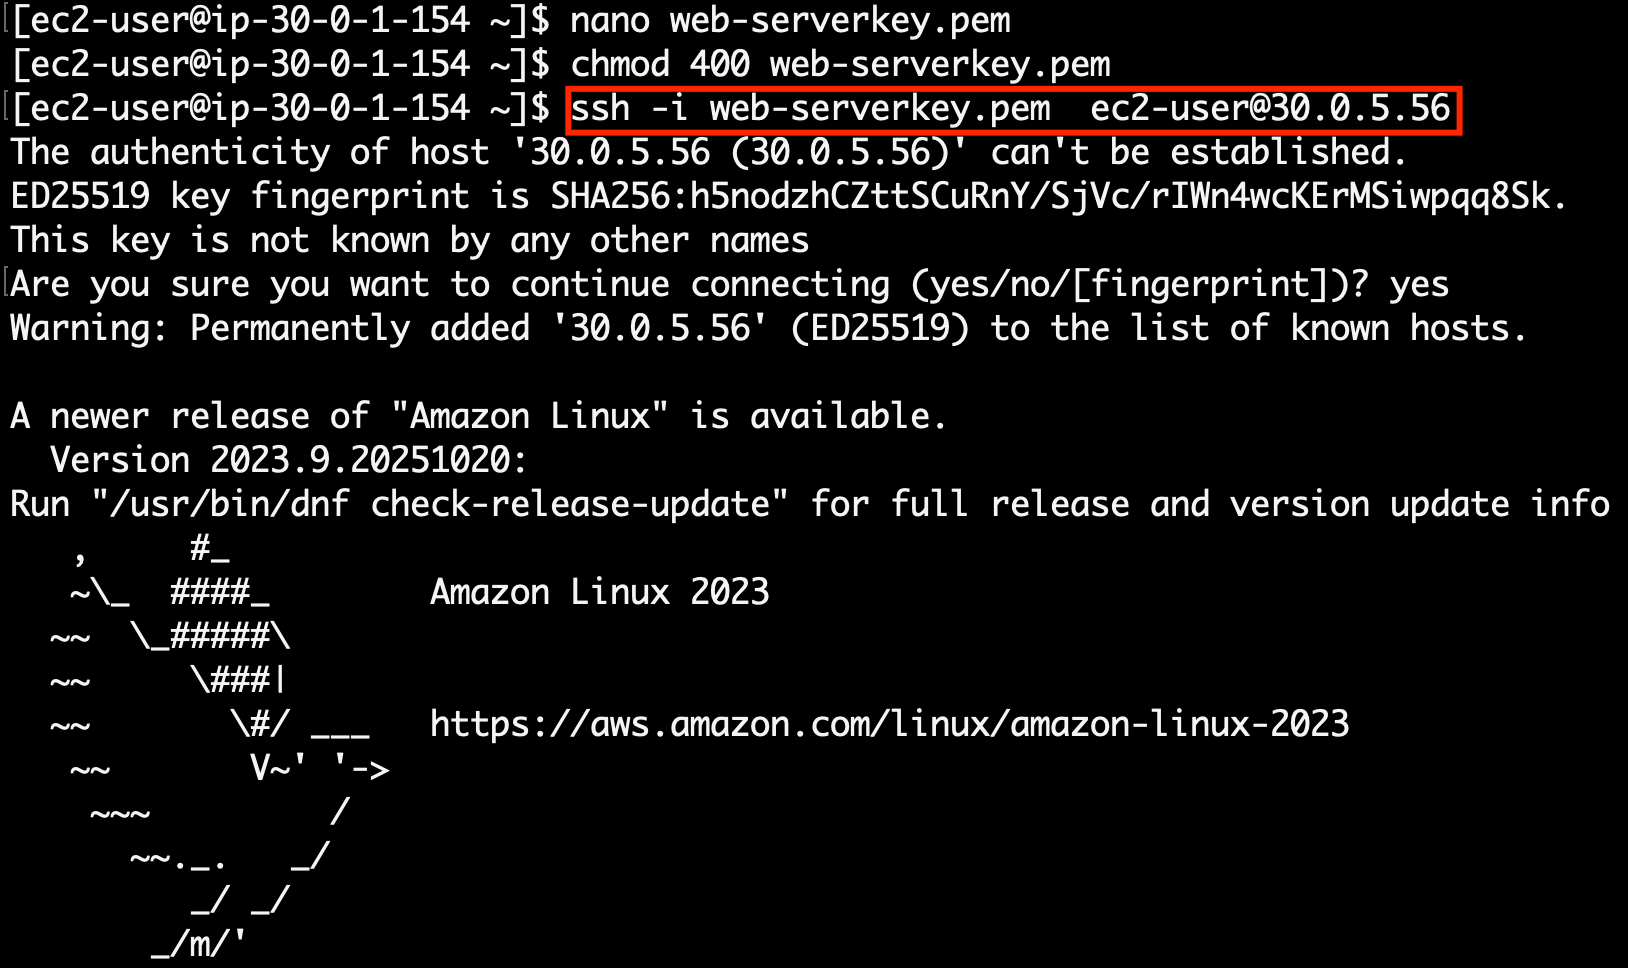
4. Navigate to the Bastion server and create a file named **web-serverkey.pem** using below command.
```
nano web-serverkey.pem
```
5. Paste the content and save it by click **CTRL+X** then **Y** and press **Enter** to save your private key.
6. Make sure you have changed the **permission of the key file to 400**. You can change the permission using below command
```
chmod 400 web-serverkey.pem
```
7. Now **you can log into the web servers** using the private key copied to the bastion server with the help of below commands.
> **Note:** You **don't have a public IPs** for the web servers since we created them in a private **subnet.**
* Syntax **: ssh -i web-serverkey.pem ec2-user@\<**Web-server-1 private IP**>**
* Example: **ssh -i web-serverkey.pem ec2-user\@172.31.101.237**
#### Task 8: Connecting to web server via Bastion
1. [SSH into the Bastion server](https://play.whizlabs.com/site/task_support/ssh-into-ec-instance) using the Bastion PEM key: **bastionkey.pem**
2. To SSH into web servers via Bastion server, we need the web server key that we used to launch the previous web servers (web-serverkey).
3. Open the **web-serverkey** file on your local system and then **copy the text content**.
4. Navigate to the Bastion server and create a file named **web-serverkey.pem** using below command.
```
nano web-serverkey.pem
```
5. Paste the content and save it by click **CTRL+X** then **Y** and press **Enter** to save your private key.
6. Make sure you have changed the **permission of the key file to 400**. You can change the permission using below command
```
chmod 400 web-serverkey.pem
```
7. Now **you can log into the web servers** using the private key copied to the bastion server with the help of below commands.
> **Note:** You **don't have a public IPs** for the web servers since we created them in a private **subnet.**
* Syntax **: ssh -i web-serverkey.pem ec2-user@\<**Web-server-1 private IP**>**
* Example: **ssh -i web-serverkey.pem ec2-user\@172.31.101.237**
 #### Task 9: Checking the health of the load balancer
1. Navigate to **Target Groups** under the **Load Balancers**
2. Select the target group you created and then click on **Targets** to see the **Status** of the attached targets.
3. It should show **Healthy** for the Load Balancer to work properly. You may need to wait for 2-5 minutes before the load balancer's status updates to "Healthy"
4. Now navigate to **Load Balancers** and select the **load balancer** that you created earlier. Under **Details**, copy the **DNS name** and paste it into the browser.
* Example: **DNS URL: Web-application-LB-1317306189.us-east-1.elb.amazonaws.com**
#### Task 9: Checking the health of the load balancer
1. Navigate to **Target Groups** under the **Load Balancers**
2. Select the target group you created and then click on **Targets** to see the **Status** of the attached targets.
3. It should show **Healthy** for the Load Balancer to work properly. You may need to wait for 2-5 minutes before the load balancer's status updates to "Healthy"
4. Now navigate to **Load Balancers** and select the **load balancer** that you created earlier. Under **Details**, copy the **DNS name** and paste it into the browser.
* Example: **DNS URL: Web-application-LB-1317306189.us-east-1.elb.amazonaws.com**
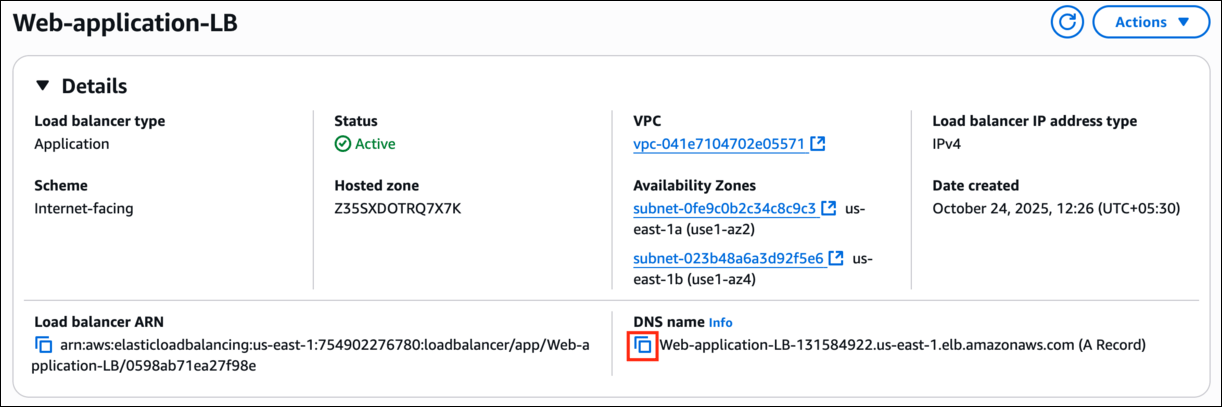 5. Refresh the browser a couple of times to see the requests being served from both servers. Seeing output similar to **REQUEST HANDLING BY SERVER 1 & REQUEST HANDLING BY SERVER 2** implies that load is shared between the two web servers via Application Load Balancer.

 6. Now we have successfully created a **bastion server, two web servers and an Application Load balancer,** registered the targets to the load balancer and tested the working of Load Balancer.
#### Task 10: Test case for High Availability
1. To check for high availability, we will make one of the instances unhealthy and test whether we get response from the other server.
2. If your instance is shown as Unhealthy then it's status would be one of the following:
* stopping
* stopped
* terminating
* Terminated
3. Navigate to the EC2 dashboard and select **Web-server-1.** Click on **Instance state** and then click on **Stop instance.** Click **Stop** to confirm.
6. Now we have successfully created a **bastion server, two web servers and an Application Load balancer,** registered the targets to the load balancer and tested the working of Load Balancer.
#### Task 10: Test case for High Availability
1. To check for high availability, we will make one of the instances unhealthy and test whether we get response from the other server.
2. If your instance is shown as Unhealthy then it's status would be one of the following:
* stopping
* stopped
* terminating
* Terminated
3. Navigate to the EC2 dashboard and select **Web-server-1.** Click on **Instance state** and then click on **Stop instance.** Click **Stop** to confirm.
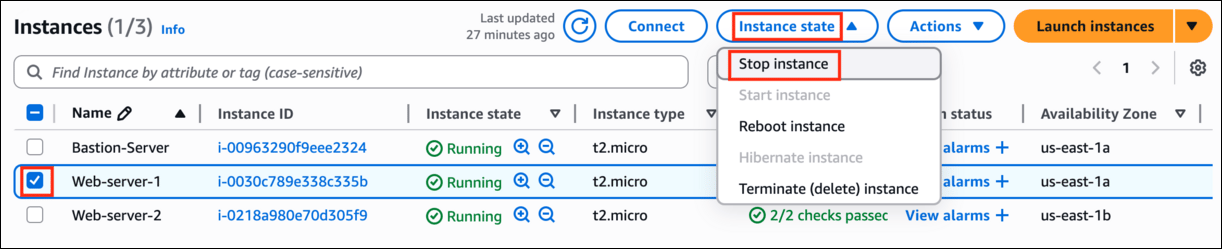 4. Navigate to **Target groups** and click on **web-app-TG.** Here you will find the status of Web-server-1 (which should be unhealthy because it is unused).
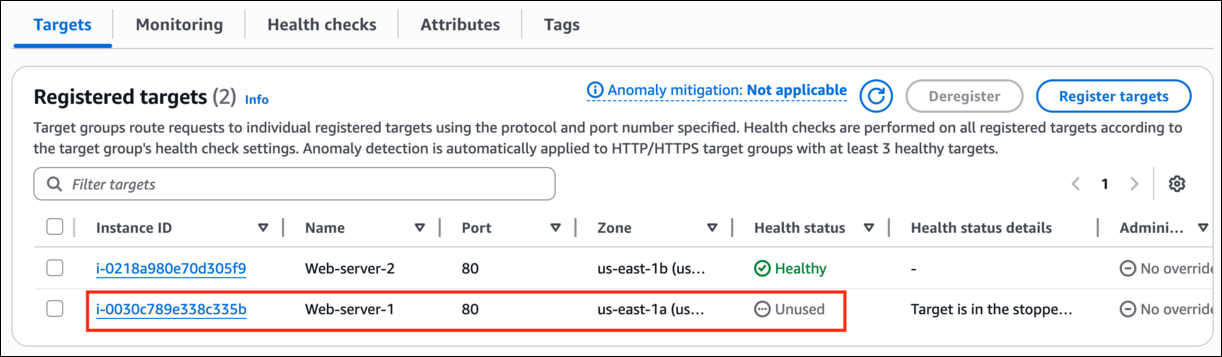 5. Navigate to **Load balancers-->Description-->DNS name. Copy** the **DNS name** and paste it into your browser. You should see the response "**REQUEST HANDLING BY SERVER 2**" FROM WEB-SERVER-2\*\*.\*\*
6. If you refresh a few times, you will continue to see the response only from Web-server-2
7. Repeat step 3 by stopping **Web-server-2** and starting **Web-server-1** back up. This time you should see the response "**REQUEST HANDLING BY SERVER 1**" from Web-server-1.
> **Do You Know ?**
> In addition to SSH and RDP access, a **bastion server** can be configured to support other secure remote access protocols such as HTTPS, allowing for flexible and secure management of resources.
8. Once the lab steps are completed, please click on the **Validation** button on the left side panel.
### Completion and Conclusion
1. We have launched a Bastion server and two web-servers. We were able to SSH into the servers via Bastion Server successfully.
2. We launched an Application Load Balancer and associated our web servers with the load balancer.
3. We tested the load sharing between web servers.
4. We successfully tested the high availability of the web application by making one of the web servers unhealthy.
### End Lab
1. Sign out of the AWS Account.
2. You have successfully completed the lab.
3. Once you have completed the steps, click on **End Lab** from the IP Lab Portal dashboard.
## What gets checked
When you press **Check my work**, the platform verifies each of these:
* **Launch an EC2 Instance** — Check whether an EC2 Instance is launched or not.
* **Launch EC2 AMI type Amazon Linux** — Check whether the EC2 instance is launched using an Amazon AMI.
* **Create a Application Load Balancer** — Check if given type of Load Balancer is created or not.
* **Invoke Load Balancer DNS** — Check whether the Elastic Load Balancer DNS URL is accessible from the internet or not.
* **Create ELB Target Group** — Check if given type of Load Balancer is created or not.
## Related help
* [FAQs and Troubleshooting](/aws-saa/support/faqs-and-troubleshooting)
* [SSH into EC2 Instance](/aws-saa/support/ssh-into-ec2-instance)
This documentation is built and hosted on [Mintlify](https://mintlify.com), a developer documentation platform.
5. Navigate to **Load balancers-->Description-->DNS name. Copy** the **DNS name** and paste it into your browser. You should see the response "**REQUEST HANDLING BY SERVER 2**" FROM WEB-SERVER-2\*\*.\*\*
6. If you refresh a few times, you will continue to see the response only from Web-server-2
7. Repeat step 3 by stopping **Web-server-2** and starting **Web-server-1** back up. This time you should see the response "**REQUEST HANDLING BY SERVER 1**" from Web-server-1.
> **Do You Know ?**
> In addition to SSH and RDP access, a **bastion server** can be configured to support other secure remote access protocols such as HTTPS, allowing for flexible and secure management of resources.
8. Once the lab steps are completed, please click on the **Validation** button on the left side panel.
### Completion and Conclusion
1. We have launched a Bastion server and two web-servers. We were able to SSH into the servers via Bastion Server successfully.
2. We launched an Application Load Balancer and associated our web servers with the load balancer.
3. We tested the load sharing between web servers.
4. We successfully tested the high availability of the web application by making one of the web servers unhealthy.
### End Lab
1. Sign out of the AWS Account.
2. You have successfully completed the lab.
3. Once you have completed the steps, click on **End Lab** from the IP Lab Portal dashboard.
## What gets checked
When you press **Check my work**, the platform verifies each of these:
* **Launch an EC2 Instance** — Check whether an EC2 Instance is launched or not.
* **Launch EC2 AMI type Amazon Linux** — Check whether the EC2 instance is launched using an Amazon AMI.
* **Create a Application Load Balancer** — Check if given type of Load Balancer is created or not.
* **Invoke Load Balancer DNS** — Check whether the Elastic Load Balancer DNS URL is accessible from the internet or not.
* **Create ELB Target Group** — Check if given type of Load Balancer is created or not.
## Related help
* [FAQs and Troubleshooting](/aws-saa/support/faqs-and-troubleshooting)
* [SSH into EC2 Instance](/aws-saa/support/ssh-into-ec2-instance)
This documentation is built and hosted on [Mintlify](https://mintlify.com), a developer documentation platform.