> ## Documentation Index
> Fetch the complete documentation index at: https://cloud-architect.ipoint-labs.com/llms.txt
> Use this file to discover all available pages before exploring further.
# Deploying Amazon RDS Multi-AZ and Read Replica, Simulate Failover
> Hands-on lab · 30m
Launch this lab in the IP Lab Portal, then follow the steps below in the AWS console.
Open IP Lab Portal
## Overview
### Lab Details
1. This lab walks you through the steps to launch an Amazon Aurora RDS DB instance with multi-AZ enabled. We will also simulate a database failover from one AZ to another.
2. You will practice using Amazon Aurora.
3. Duration: **1 hour 30 minutes**
4. AWS Region: **US East (N. Virginia) us-east-1.**
### Introduction
#### What is Amazon RDS?
##### Amazon RDS
* Amazon Relational Database Service (Amazon RDS) is a Relational Database service that offers high availability and throughput.
* Amazon RDS comes with great features that include **Multi-AZ** feature and **Read Replica** that ensures no data loss.
* Amazon RDS also provides you high scalability where you can scale up and scale down depending on your needs.
* Amazon RDS provides you with six familiar database engines which include **MySQL, Amazon Aurora, PostgreSQL, MariaDB, Oracle Database and SQL Server.**
##### Multi-AZ
* Multi-Availability zone (Multi-AZ) is a feature that comes with Amazon RDS that provides you with high availability and durability for Database instances.
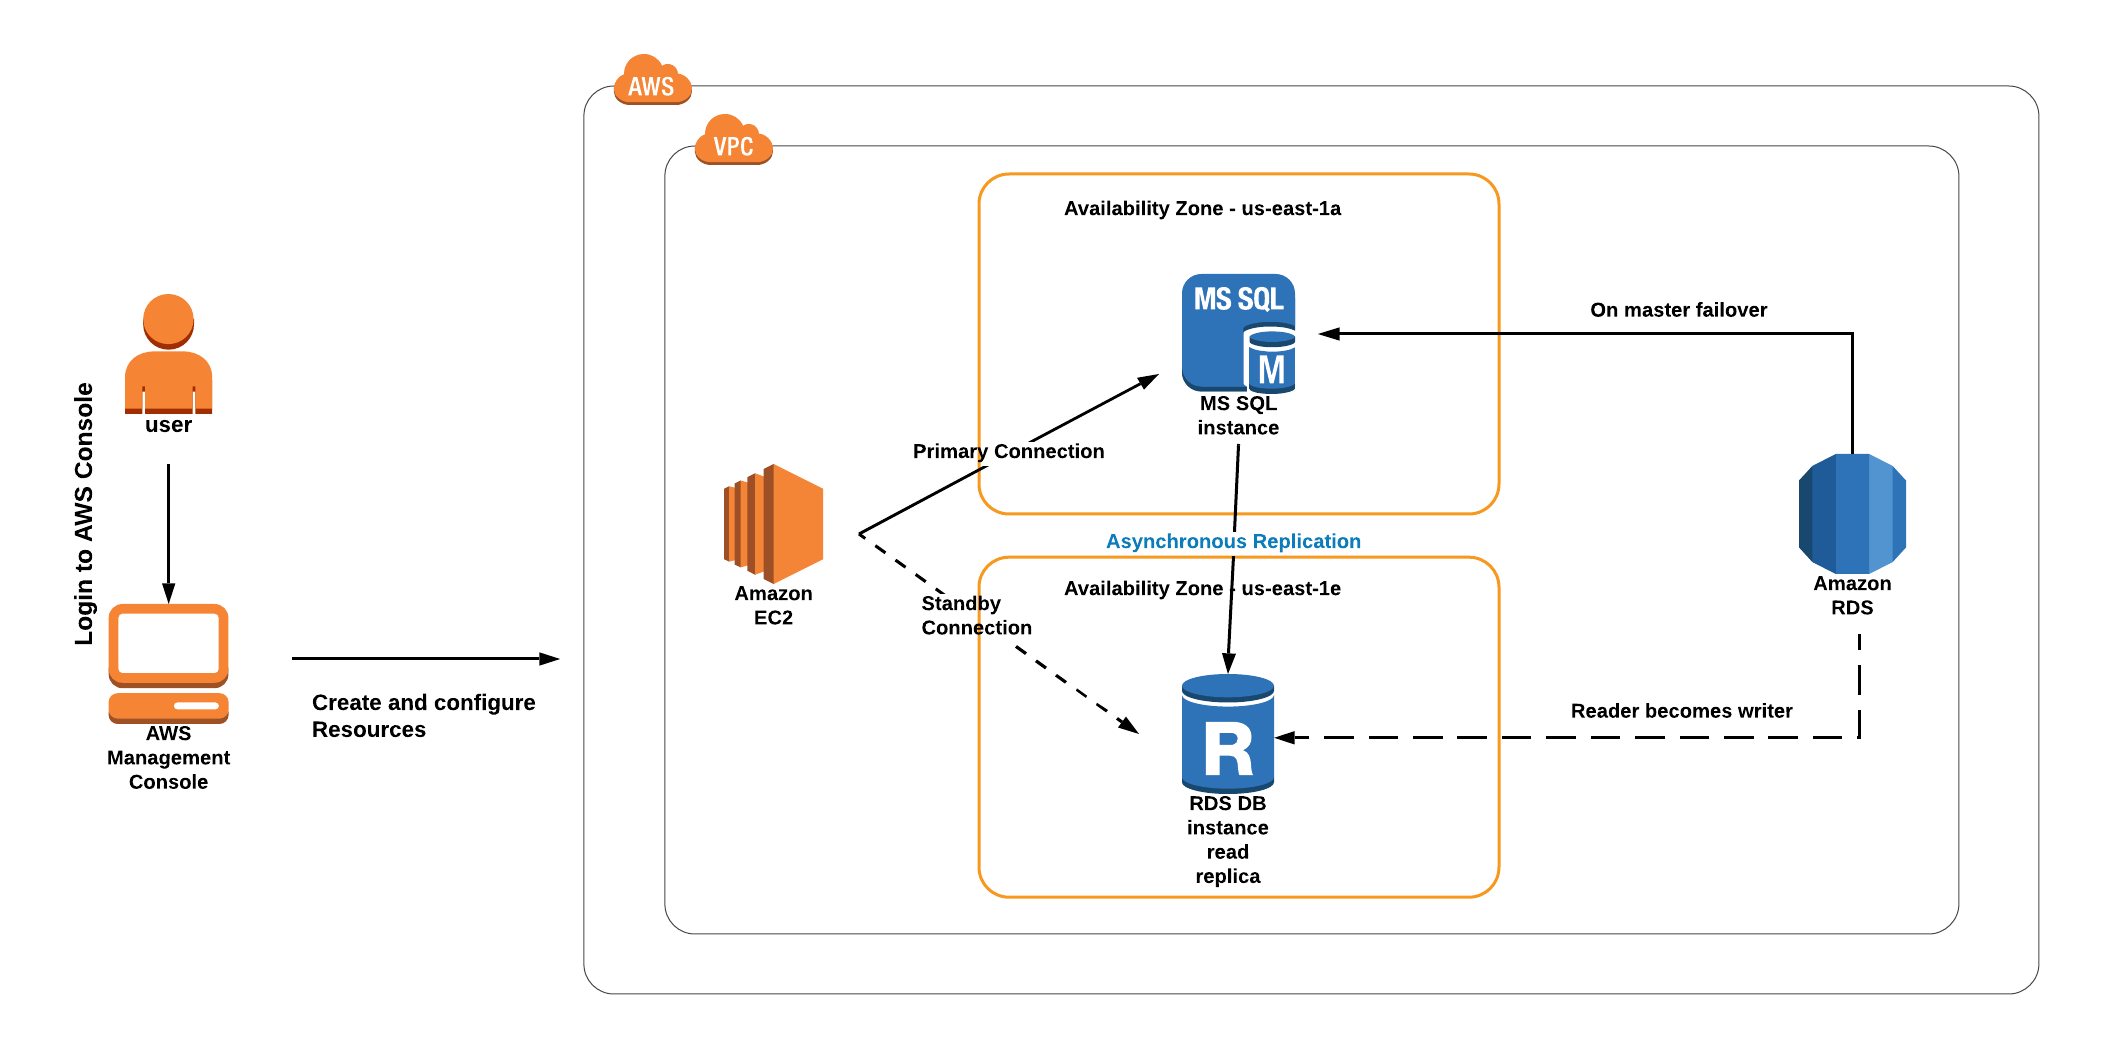
* When we are opting for the Multi-AZ database instance, it will automatically create a Primary DB instance and parallelly replicate the data to the standby instances in different availability zones in that region. However, we can't access the standby instances, unlike primary instances.
* The **main purpose** of Multi-AZ is to provide a **failover option** for primary RDS instances.
* Amazon RDS uses the Failover mechanism for Oracle, MYSQL, MariaDB and PostgreSQL instances.
* **The RDS Failover process** happens automatically and is **managed by AWS** without human intervention.
* Amazon RDS **uses** the concept of **SQL Mirroring** for Replicating data to standby instances in the different availability zones, and **both primary and standby** instances **use the same endpoint.**
#####
##### Reasons for Failover
* The failover process will take place due to one of the following reasons, occurring in the primary instances:
* Host Failure
* DB instance class modification.
* Instance rebooting
* Availability zone failure
* RDS maintenance
##### Conditions for enabling Multi-AZ on RDS
* A **minimum of two different availability zones** should be present in a **DB subnet group** where you are launching your Primary DB instance.
##### Amazon Aurora and Read Replica
* Amazon Aurora is the DB instance, which is a little different when comparing to the above-mentioned Instance types.
* Aurora uses the concept of a DB cluster, where the primary instance replicates its data across different availability zones.
* In the case of a primary instance failure, Aurora automatically launches its primary instance from the replicated instance in a different availability zone.
* Multi-AZ on Aurora clusters makes RDS replicate or provision a replica of the master database to a different availability zone within a Region.
###
### Architecture Diagram
 ### Task Details
1. Sign into the AWS Management Console.
2. Launch an EC2 Instance
3. Create a Security Group for RDS instance
4. Create an Amazon Aurora database with Multi-AZ enabled
5. Connecting to the Aurora (MySQL) database on RDS
6. Connecting the EC2 Server to RDS
7. Execute Database Operations via SSH
8. Forcing a Failover to Test Multi-AZ
9. Testing the Failover Condition
10. Deleting AWS resources
### Launching Lab Environment
1. To launch the lab environment, click on the **Start Lab** button.
2. Please wait until the cloud environment is provisioned. It will take less than a minute to provision.
3. Once the Lab is started, you will be provided with **IAM username**, **Password**, **Access** **Key**, and **Secret** **Access** **Key**.
**Note** : You can only start one lab at any given time
## Lab guide
### Lab Steps
#### Task 1: Sign in to AWS Management Console
1. Click on the Open Console button, and you will get redirected to AWS Console in a new browser tab.
2. On the AWS sign-in page,
* Leave the Account ID as default. Never edit/remove the 12-digit Account ID present in the AWS Console. Otherwise, you cannot proceed with the lab.
* Now copy your **Username** and **Password** in the Lab Console to the **IAM Username and Password** in AWS Console and click on the **Sign in** button.
3. Once Signed In to the AWS Management Console, make the default AWS Region as **US East (N. Virginia) us-east-1.**
> **Note :** If you face any issues, please go through [**FAQs and Troubleshooting for Labs**](https://play.whizlabs.com/site/task_support/faqs-and-troubleshooting).
####
#### Task 2: Launch an EC2 instance
In this task, we are going to launch an EC2 instance which will be used for connecting to the Amazon Aurora RDS DB instance later in the lab.
1. Navigate to **EC2** by clicking on the **Services** menu in the top, then click on **EC2** in the **Compute** section.
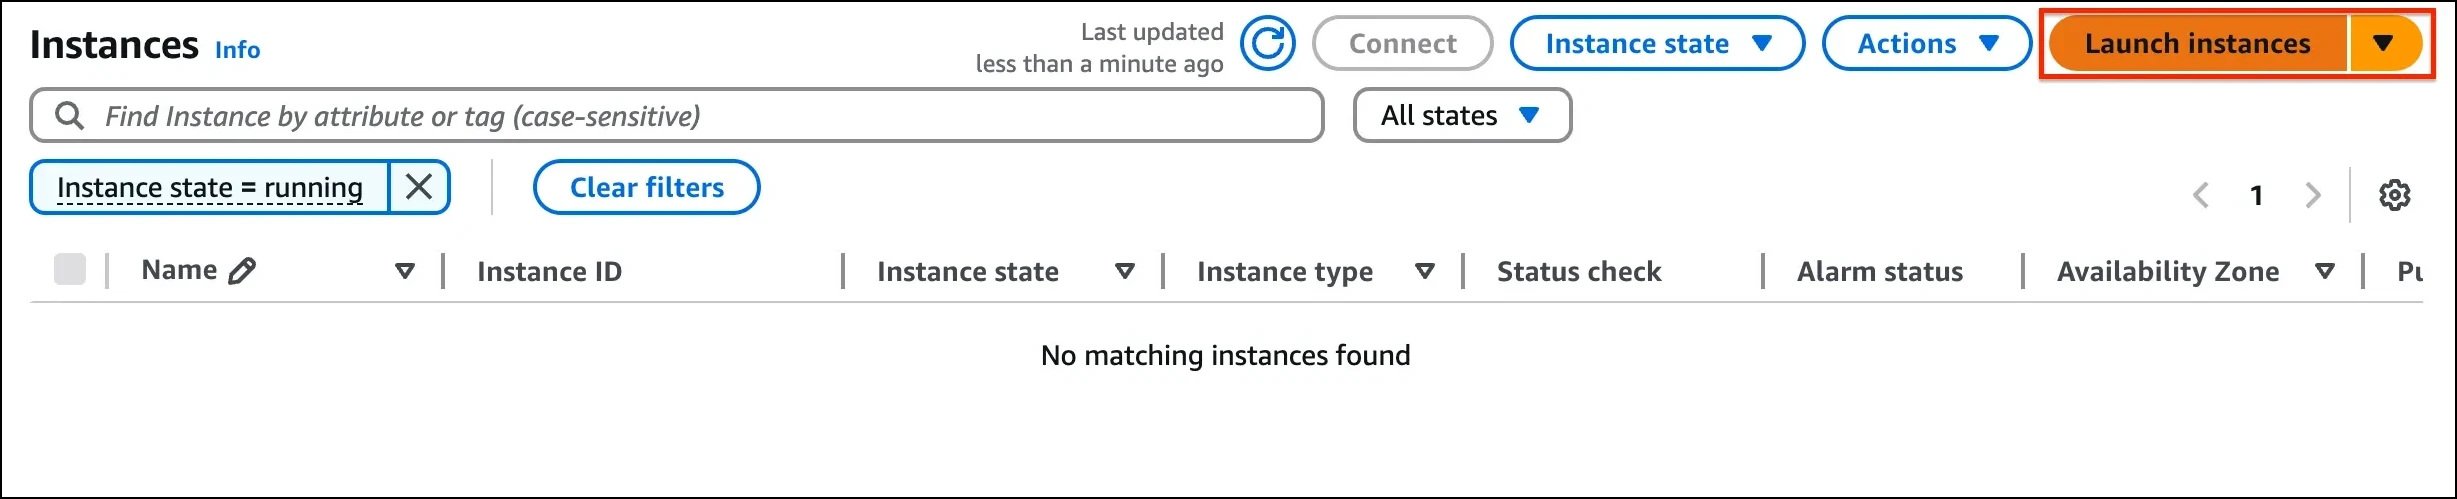
2. Click on **Instances** from the left sidebar and then click on **Launch instances**
### Task Details
1. Sign into the AWS Management Console.
2. Launch an EC2 Instance
3. Create a Security Group for RDS instance
4. Create an Amazon Aurora database with Multi-AZ enabled
5. Connecting to the Aurora (MySQL) database on RDS
6. Connecting the EC2 Server to RDS
7. Execute Database Operations via SSH
8. Forcing a Failover to Test Multi-AZ
9. Testing the Failover Condition
10. Deleting AWS resources
### Launching Lab Environment
1. To launch the lab environment, click on the **Start Lab** button.
2. Please wait until the cloud environment is provisioned. It will take less than a minute to provision.
3. Once the Lab is started, you will be provided with **IAM username**, **Password**, **Access** **Key**, and **Secret** **Access** **Key**.
**Note** : You can only start one lab at any given time
## Lab guide
### Lab Steps
#### Task 1: Sign in to AWS Management Console
1. Click on the Open Console button, and you will get redirected to AWS Console in a new browser tab.
2. On the AWS sign-in page,
* Leave the Account ID as default. Never edit/remove the 12-digit Account ID present in the AWS Console. Otherwise, you cannot proceed with the lab.
* Now copy your **Username** and **Password** in the Lab Console to the **IAM Username and Password** in AWS Console and click on the **Sign in** button.
3. Once Signed In to the AWS Management Console, make the default AWS Region as **US East (N. Virginia) us-east-1.**
> **Note :** If you face any issues, please go through [**FAQs and Troubleshooting for Labs**](https://play.whizlabs.com/site/task_support/faqs-and-troubleshooting).
####
#### Task 2: Launch an EC2 instance
In this task, we are going to launch an EC2 instance which will be used for connecting to the Amazon Aurora RDS DB instance later in the lab.
1. Navigate to **EC2** by clicking on the **Services** menu in the top, then click on **EC2** in the **Compute** section.
2. Click on **Instances** from the left sidebar and then click on **Launch instances**
 3. Name : Enter **MyRdsEc2server.**
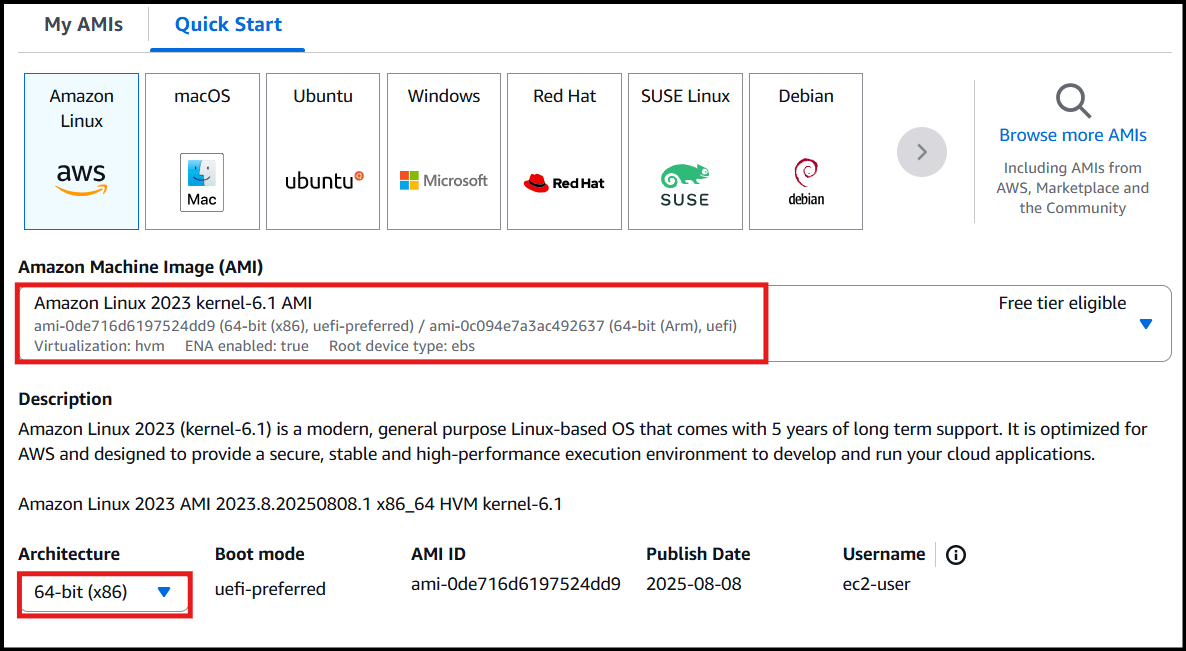
4. **For Amazon Machine Image (AMI):** In Quick Start menu, select **Amazon Linux 2023 kernel-6.1 AMI.**
3. Name : Enter **MyRdsEc2server.**
4. **For Amazon Machine Image (AMI):** In Quick Start menu, select **Amazon Linux 2023 kernel-6.1 AMI.**
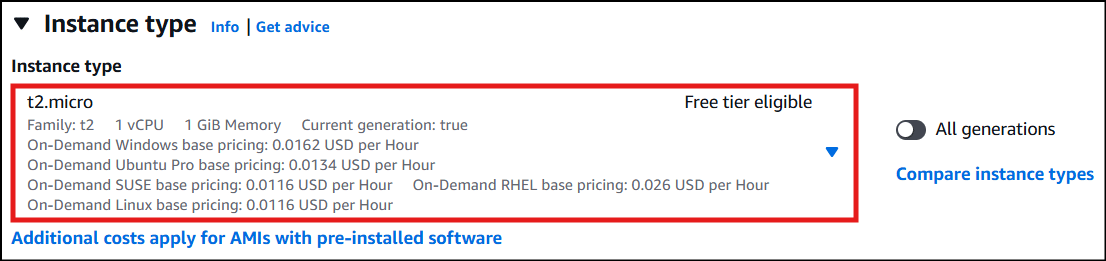
 5. **For Instance Type:** select **t2.micro**
 6. **For Key pair:** Select **Create a new key pair**
* Key pair name: **MySSHKey**
* Key pair type: **RSA**
* Private key file format: **.pem**
**Note: If you are using putty, select the Private key file format as .ppk**
7. Select **Create key pair** Button.
8. In Network Settings, Click on **Edit**:
* Auto-assign public IP: **Enable**
* Select **Create new Security group**
* Security group name : Enter ***MyEC2Server\_SG***
* Description : Enter ***Security for ec2 server to connect with RDS***
* **To add SSH:**
* Choose Type: **SSH**
* **Source**: select **Anywhere**
9. Click on **Advanced Details .** Under the **User data** section, enter the following script, (which installs MySQL):
\#!/bin/bash
# Download the MySQL repository package
```python theme={null}
wget https://dev.mysql.com/get/mysql80-community-release-el9-5.noarch.rpm
# Install the MySQL repository package
sudo dnf install mysql80-community-release-el9-5.noarch.rpm -y
# Enable the MySQL community repository
sudo dnf repolist enabled | grep "mysql.*-community.*"
# Install MySQL
sudo dnf install mysql -y
```
**Note: After pasting the user data, make sure to remove extra spacing.**
10. Keep rest thing Default and Click on **Launch Instance** Button.
11. Select **View all Instances** to View the Instance you Created
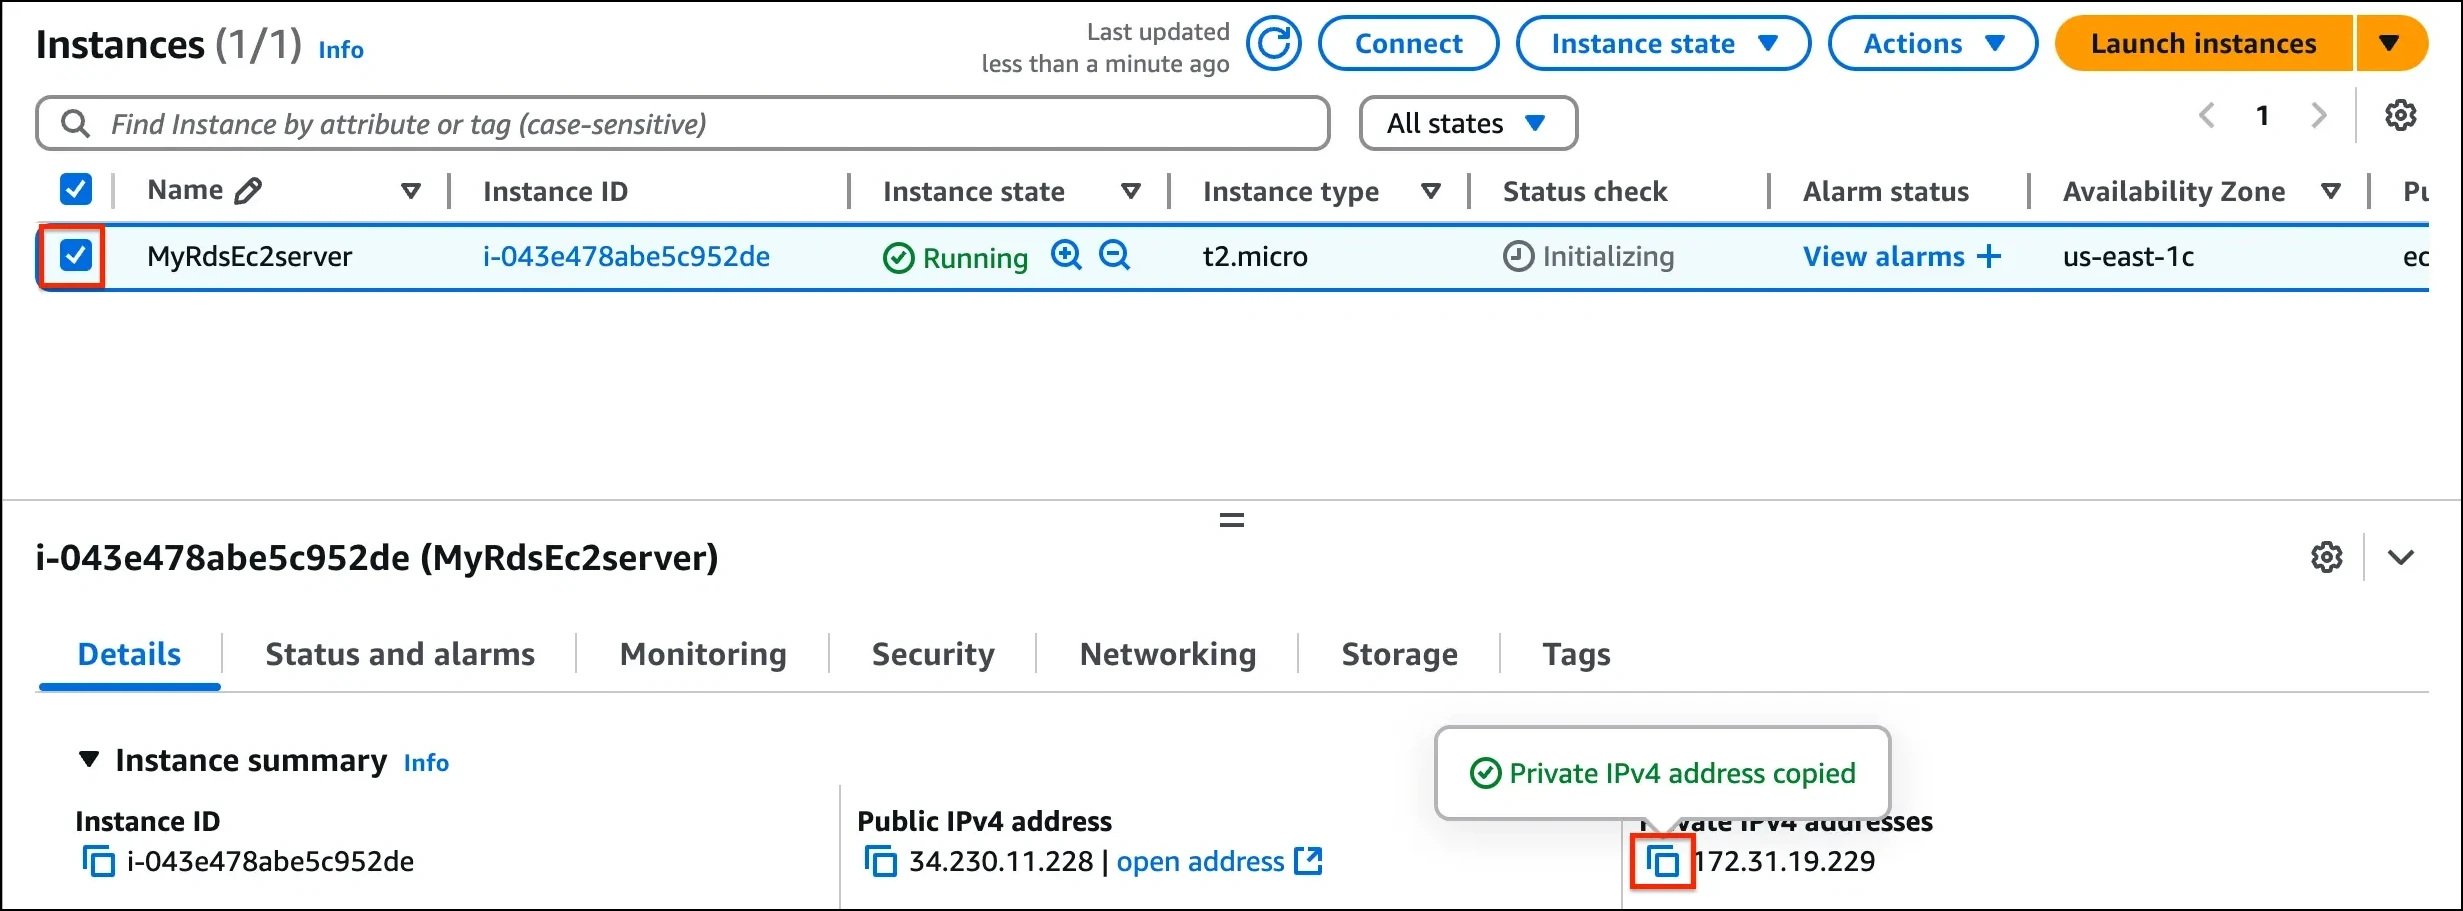
12. After 1-2 minutes, the **Instance State** will become **running** as shown below:
6. **For Key pair:** Select **Create a new key pair**
* Key pair name: **MySSHKey**
* Key pair type: **RSA**
* Private key file format: **.pem**
**Note: If you are using putty, select the Private key file format as .ppk**
7. Select **Create key pair** Button.
8. In Network Settings, Click on **Edit**:
* Auto-assign public IP: **Enable**
* Select **Create new Security group**
* Security group name : Enter ***MyEC2Server\_SG***
* Description : Enter ***Security for ec2 server to connect with RDS***
* **To add SSH:**
* Choose Type: **SSH**
* **Source**: select **Anywhere**
9. Click on **Advanced Details .** Under the **User data** section, enter the following script, (which installs MySQL):
\#!/bin/bash
# Download the MySQL repository package
```python theme={null}
wget https://dev.mysql.com/get/mysql80-community-release-el9-5.noarch.rpm
# Install the MySQL repository package
sudo dnf install mysql80-community-release-el9-5.noarch.rpm -y
# Enable the MySQL community repository
sudo dnf repolist enabled | grep "mysql.*-community.*"
# Install MySQL
sudo dnf install mysql -y
```
**Note: After pasting the user data, make sure to remove extra spacing.**
10. Keep rest thing Default and Click on **Launch Instance** Button.
11. Select **View all Instances** to View the Instance you Created
12. After 1-2 minutes, the **Instance State** will become **running** as shown below:
 13. **Select** the EC2 Instance and **copy** the Private IPv4 address. Note down **IPv4 Private IP address** in your text editor, navigate to the EC2 Dashboard and look in the instance details.
 #### Task 3: Create a Security Group for RDS instance
In this task, we will create a security group specifically for the Amazon Aurora RDS instance which ensures that the RDS instance has appropriate network security settings by allowing access only through the MySQL/Aurora port (3306) from any IP address (0.0.0.0/0).
1. Make sure you are in the **N.Virginia** Region.
2. Navigate to **EC2** by clicking on the **Services** menu available under the **Compute** section.
3. On the left panel menu, select the security group under the **Network & Security** section.
4. Click on the **Create security group** button.
#### Task 3: Create a Security Group for RDS instance
In this task, we will create a security group specifically for the Amazon Aurora RDS instance which ensures that the RDS instance has appropriate network security settings by allowing access only through the MySQL/Aurora port (3306) from any IP address (0.0.0.0/0).
1. Make sure you are in the **N.Virginia** Region.
2. Navigate to **EC2** by clicking on the **Services** menu available under the **Compute** section.
3. On the left panel menu, select the security group under the **Network & Security** section.
4. Click on the **Create security group** button.
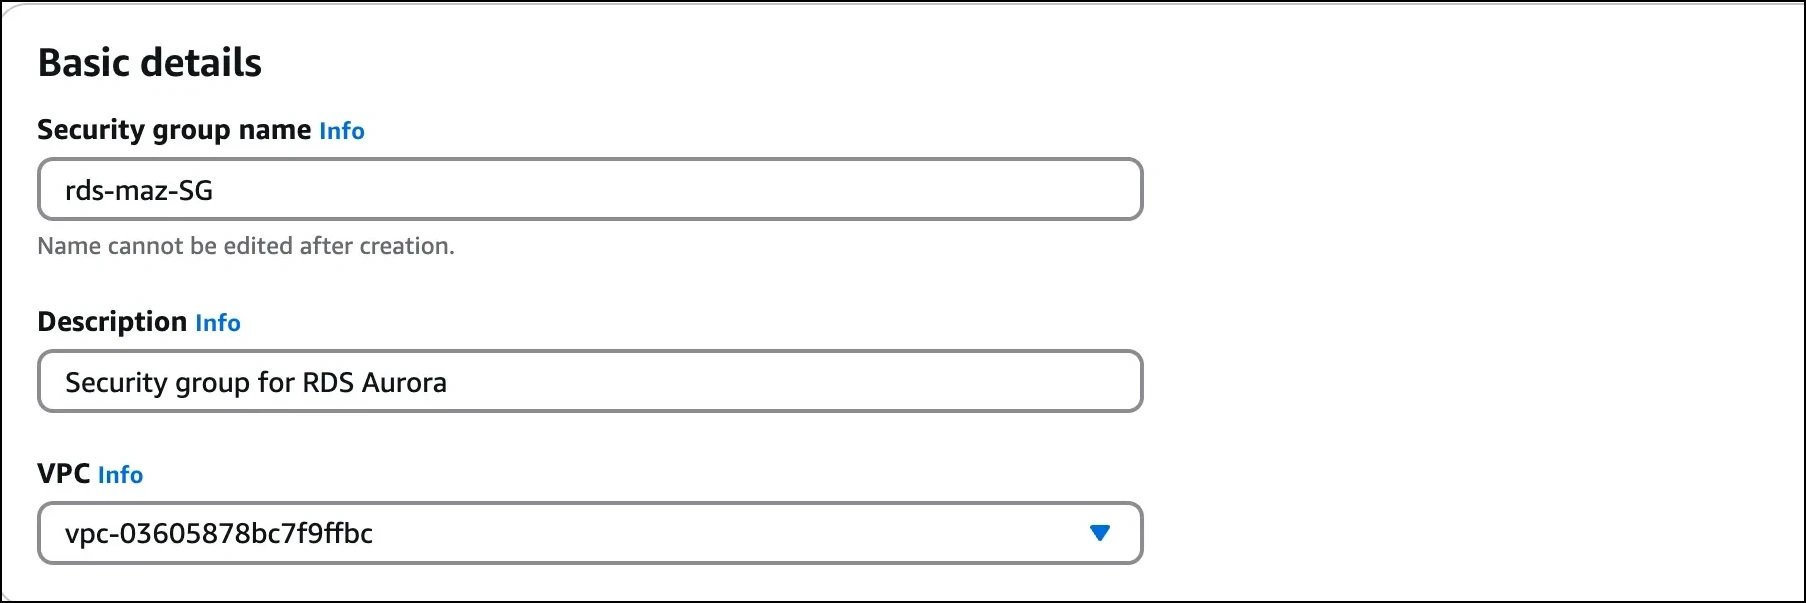
 5. We are going to create a Security group for RDS with 3306 port number enabled.
* Security group name : Enter **rds-maz-SG**
* Description : Enter **Security group for RDS Aurora**
* VPC : Select **Default VPC**
5. We are going to create a Security group for RDS with 3306 port number enabled.
* Security group name : Enter **rds-maz-SG**
* Description : Enter **Security group for RDS Aurora**
* VPC : Select **Default VPC**
 * Click on the **Add rule** button under **Inbound rules.**
* Type : Select **MYSQL/Aurora**
* Source : Select **Anywhere IPv4**
6. Leave everything as default and click on the **Create security group** button.
#### Task 4: Create an Amazon Aurora database with Multi-AZ enabled
In this task, we will create an aurora database using AWS RDS service. The database is configured with Multi-AZ deployment, which replicates data to a standby instance in a different availability zone, providing high availability and durability.
1. Make sure you are in **US East (N.Virginia) us-east-1** Region.
2. Navigate to **RDS** under the **database** section of the **Services** menu.
3. Click on **Databases** in the left Panel.
4. Click on **Created database** button and choose **Full Configuration** Option.
* Click on the **Add rule** button under **Inbound rules.**
* Type : Select **MYSQL/Aurora**
* Source : Select **Anywhere IPv4**
6. Leave everything as default and click on the **Create security group** button.
#### Task 4: Create an Amazon Aurora database with Multi-AZ enabled
In this task, we will create an aurora database using AWS RDS service. The database is configured with Multi-AZ deployment, which replicates data to a standby instance in a different availability zone, providing high availability and durability.
1. Make sure you are in **US East (N.Virginia) us-east-1** Region.
2. Navigate to **RDS** under the **database** section of the **Services** menu.
3. Click on **Databases** in the left Panel.
4. Click on **Created database** button and choose **Full Configuration** Option.
 5. Next, we'll configure the database on the **Create Database** Page
* Choose a **Database Creation Method:**
* Select **Standard Create**
5. Next, we'll configure the database on the **Create Database** Page
* Choose a **Database Creation Method:**
* Select **Standard Create**
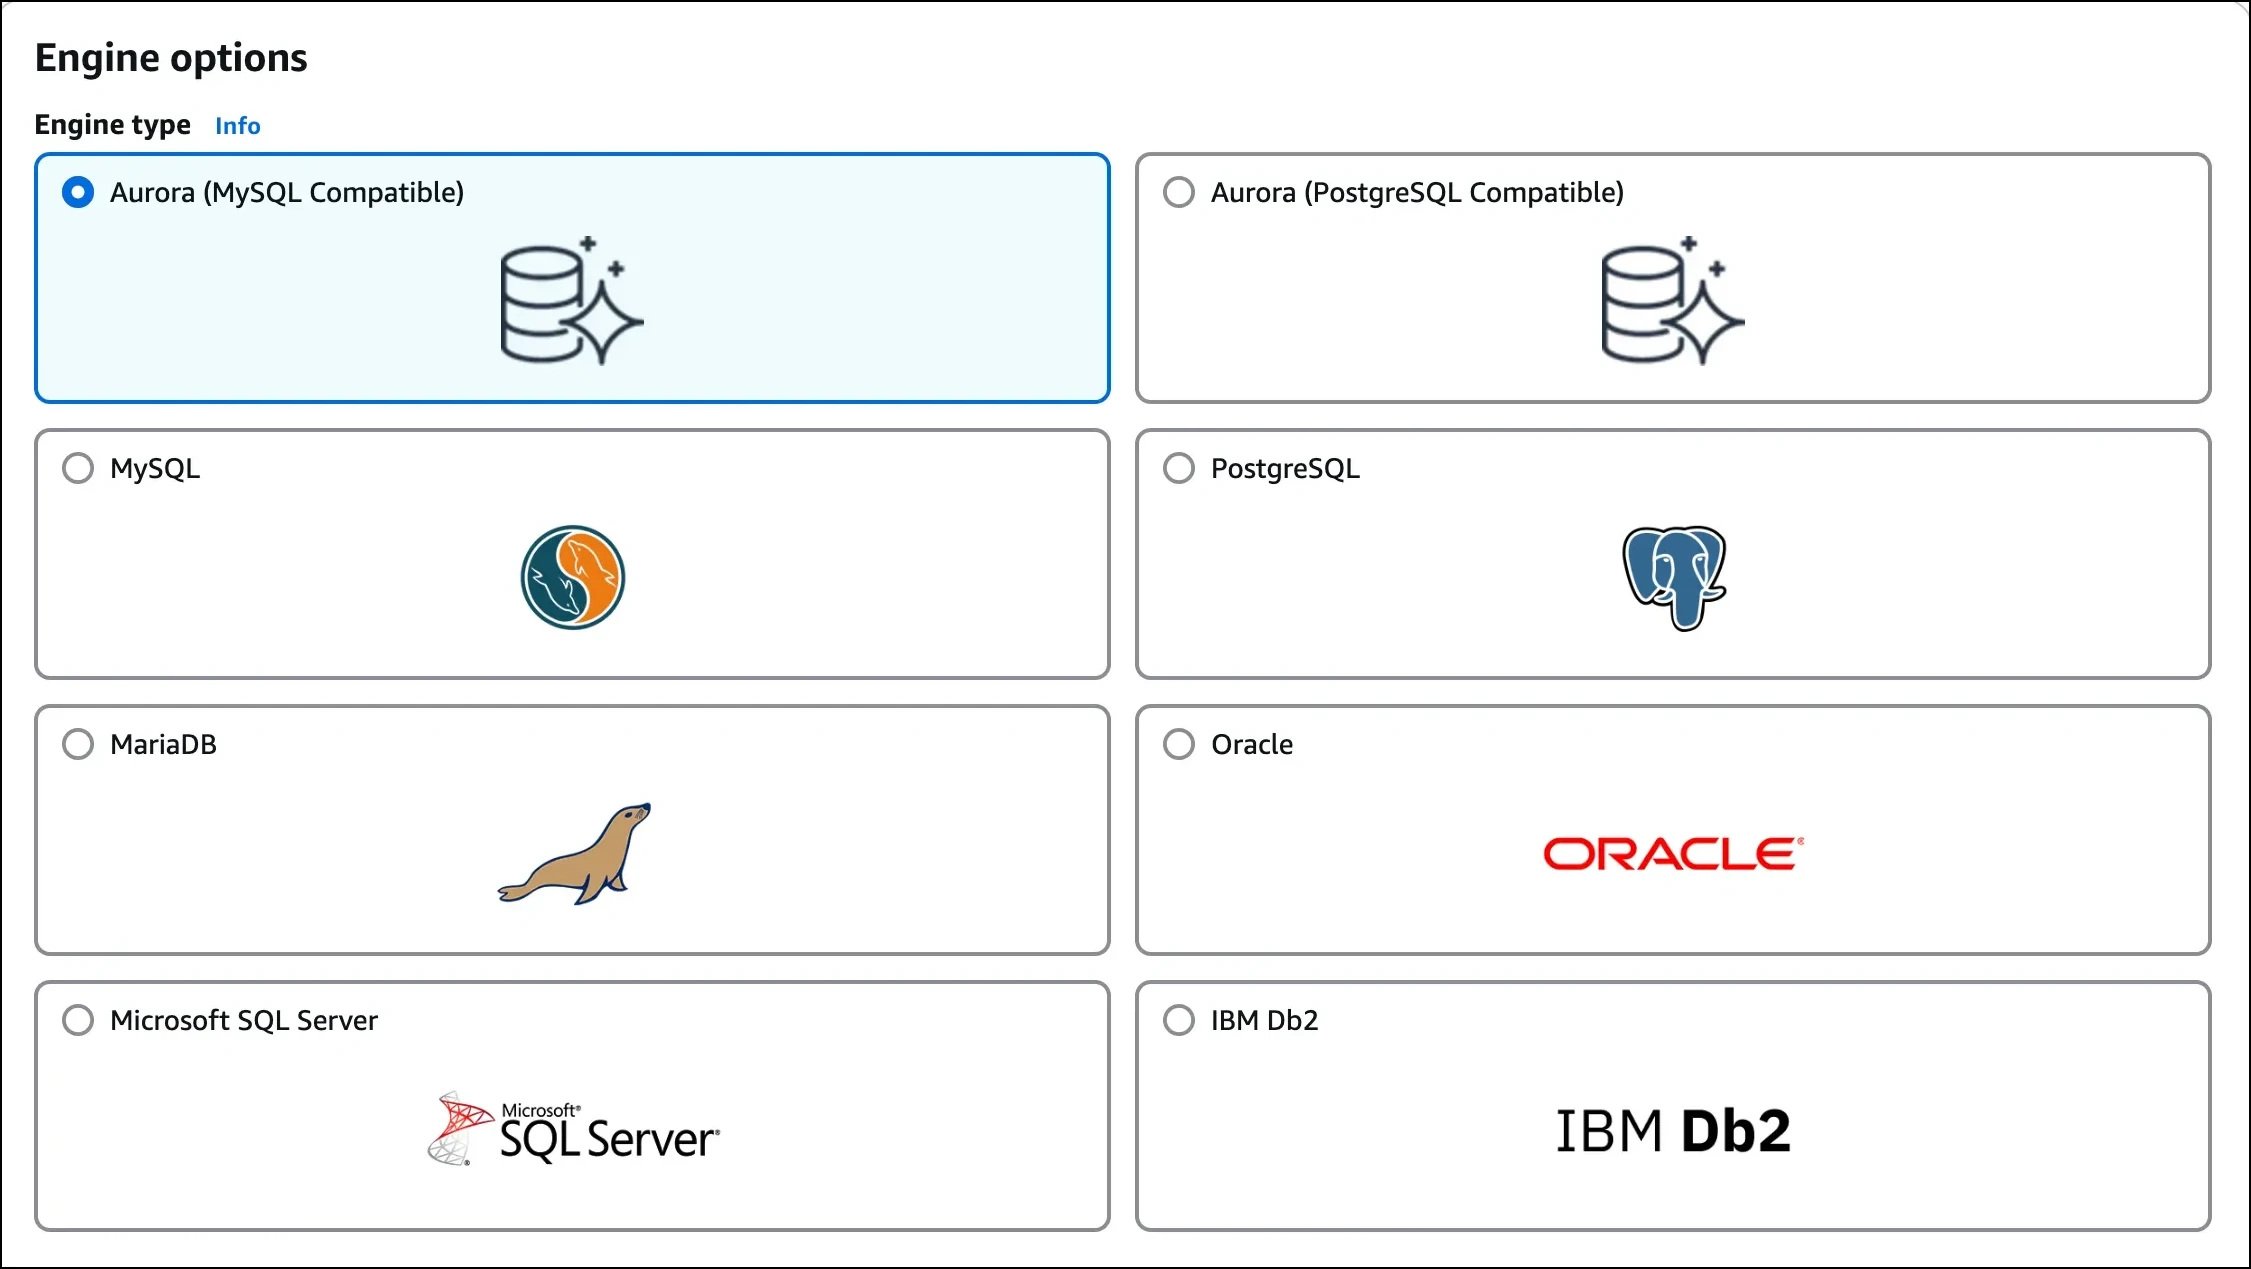
 * In **Engine options:**
* Engine type : Choose **Aurora (MySQL Compatible)**
* In **Engine options:**
* Engine type : Choose **Aurora (MySQL Compatible)**
 * Available versions: Leave it as **Default**
* Choose **Template: Dev/Test**
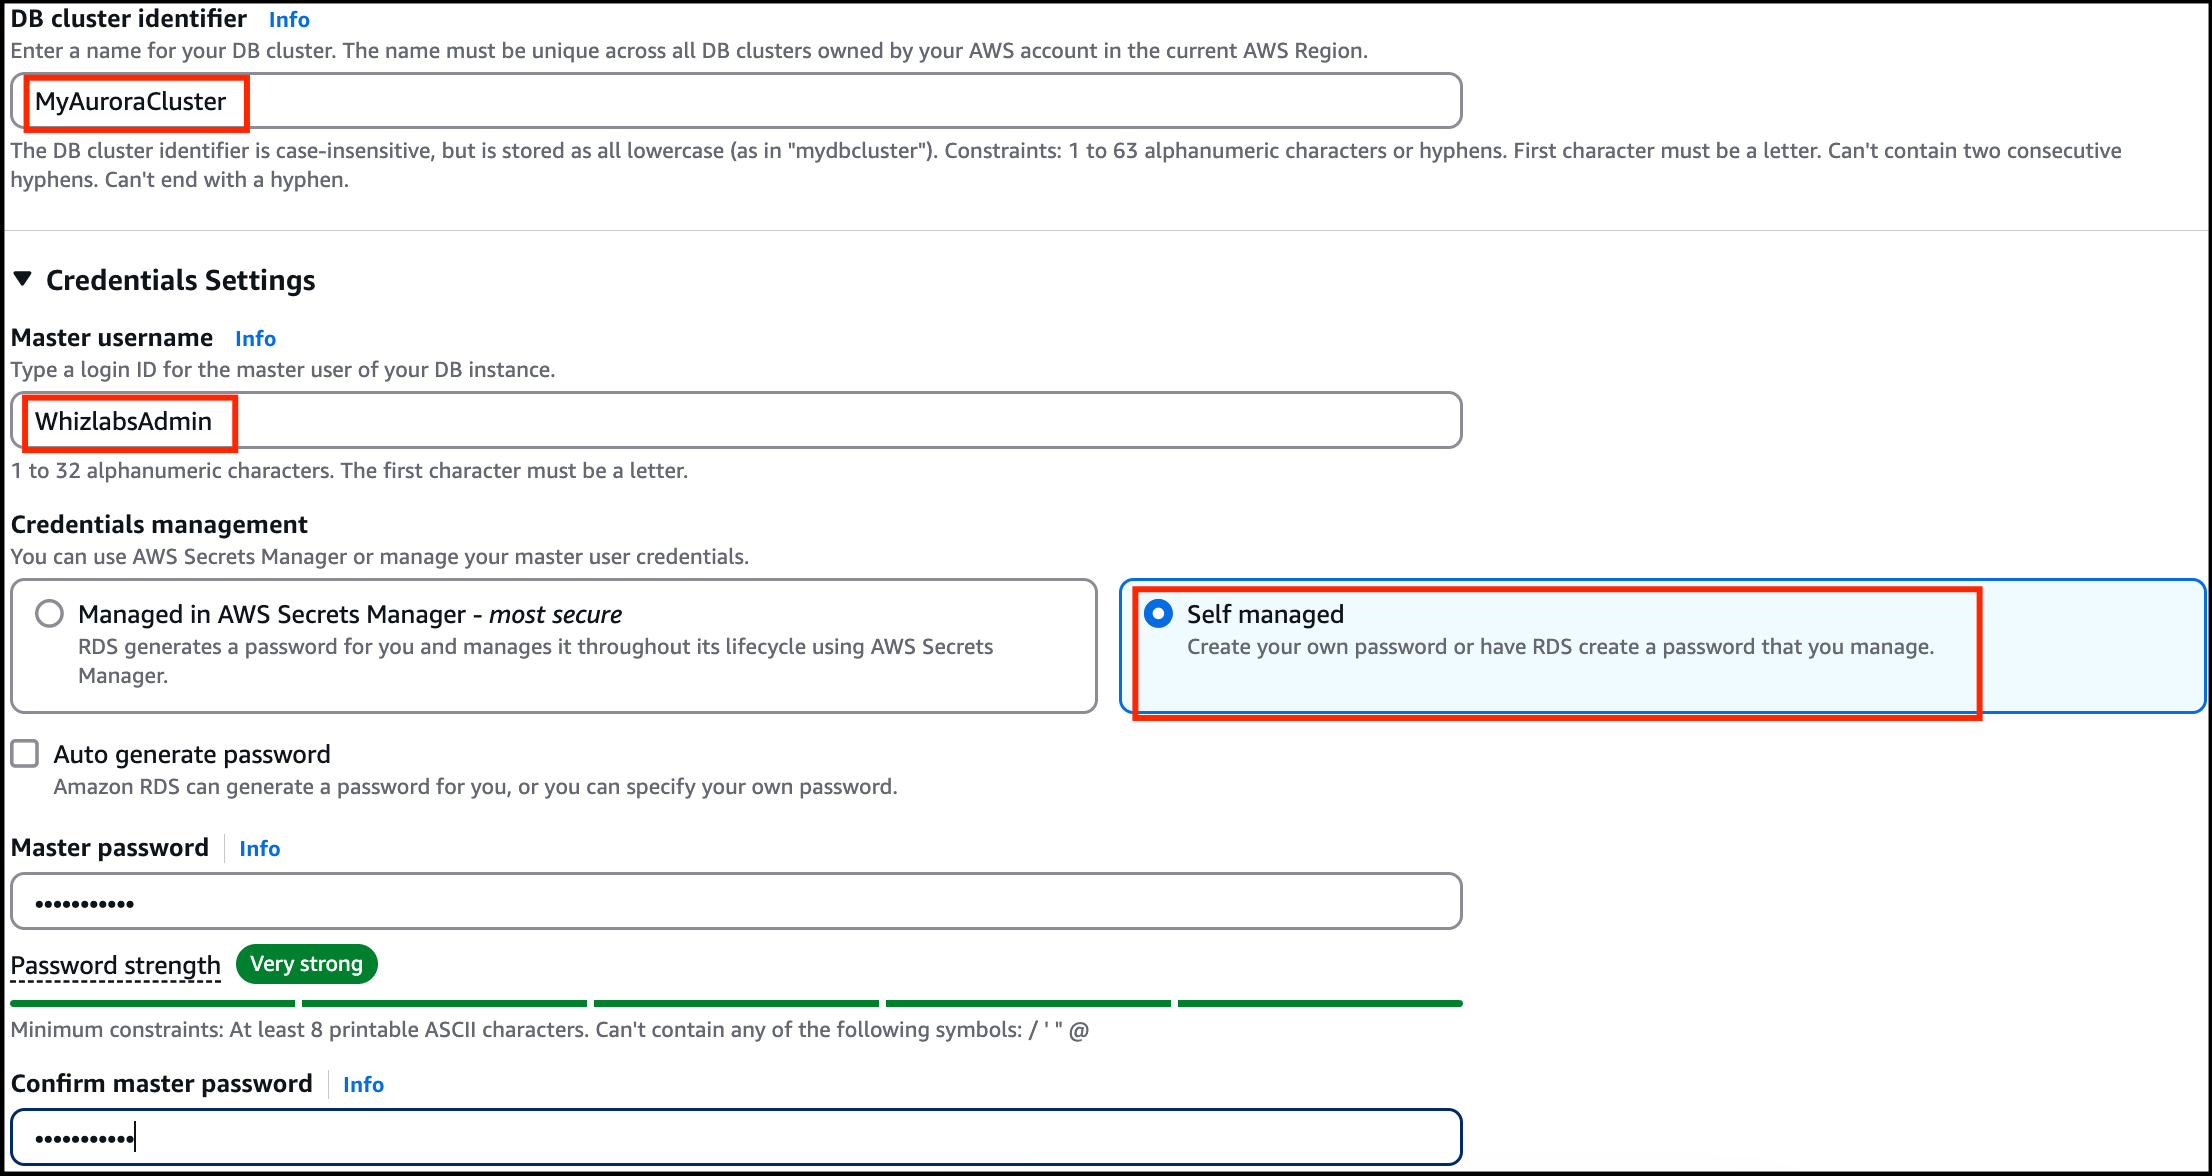
* Fill in the required details for the database (Aurora Cluster Settings)
* **DB cluster identifier:** Specify cluster name **MyAuroraCluster**
* Give the following details in the **credential settings**
* Master Username: Enter **WhizlabsAdmin**
* ?Credentials management: Select **Self managed**
* Master password: Enter **Whizlabs123**
* Confirm password: Enter **Whizlabs123**
* **Note:** This is the username and password used to log into your database. Please make note of them.
* Available versions: Leave it as **Default**
* Choose **Template: Dev/Test**
* Fill in the required details for the database (Aurora Cluster Settings)
* **DB cluster identifier:** Specify cluster name **MyAuroraCluster**
* Give the following details in the **credential settings**
* Master Username: Enter **WhizlabsAdmin**
* ?Credentials management: Select **Self managed**
* Master password: Enter **Whizlabs123**
* Confirm password: Enter **Whizlabs123**
* **Note:** This is the username and password used to log into your database. Please make note of them.
 * Choosing **DB instance size**
* DB instance class: Choose **Burstable classes (includes t classes)**
* **Select db.t3.medium instance.**
* Choosing **DB instance size**
* DB instance class: Choose **Burstable classes (includes t classes)**
* **Select db.t3.medium instance.**
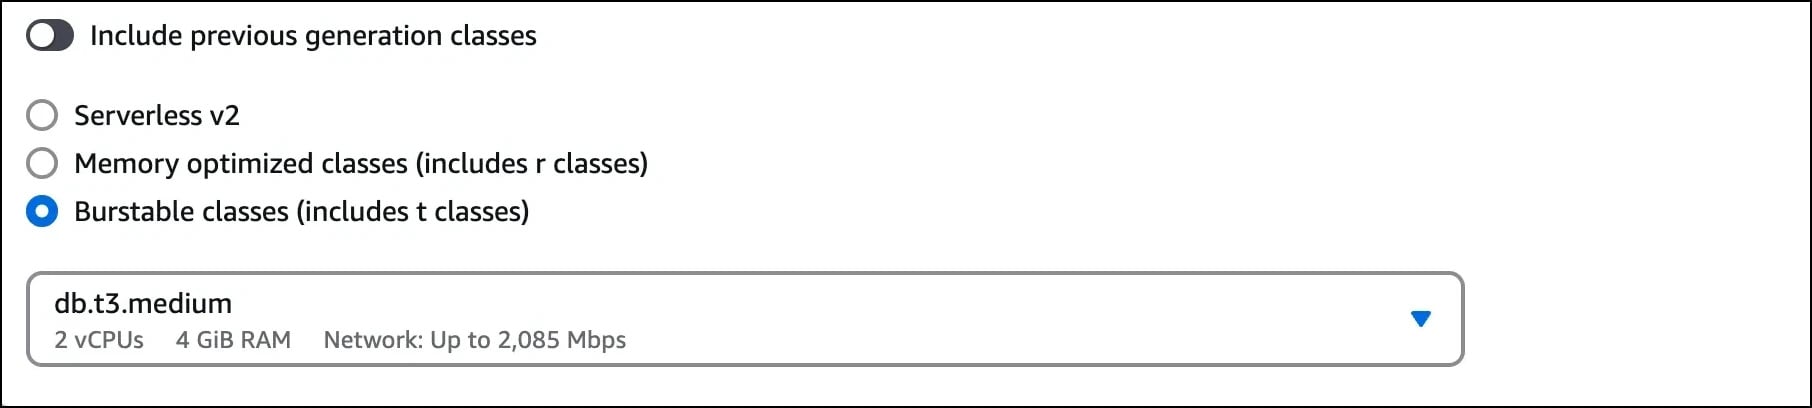 * **Availability and Durability**: Choose Multi-AZ deployment: **Create Aurora Replica or Reader node in a different AZ** as shown below:
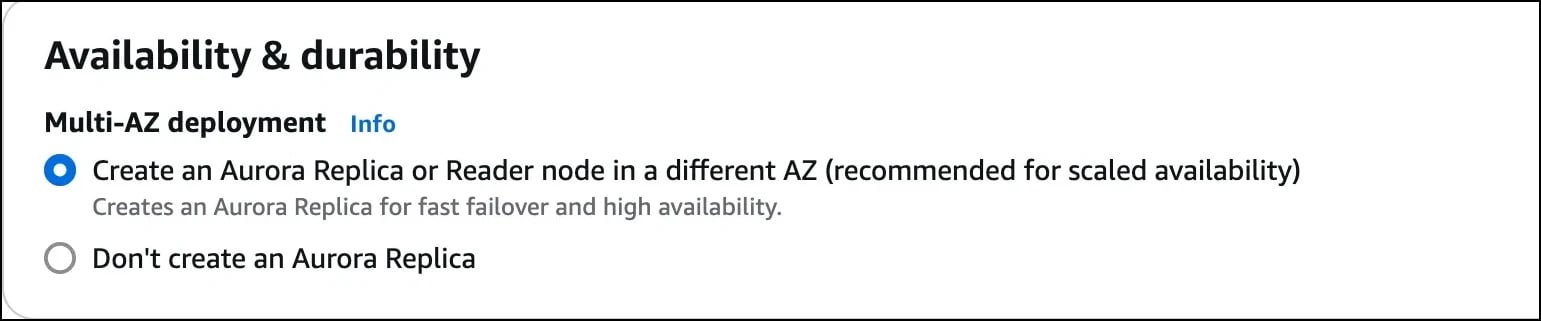 * **Connectivity**
* Choose the Default VPC
* **Connectivity**
* Choose the Default VPC
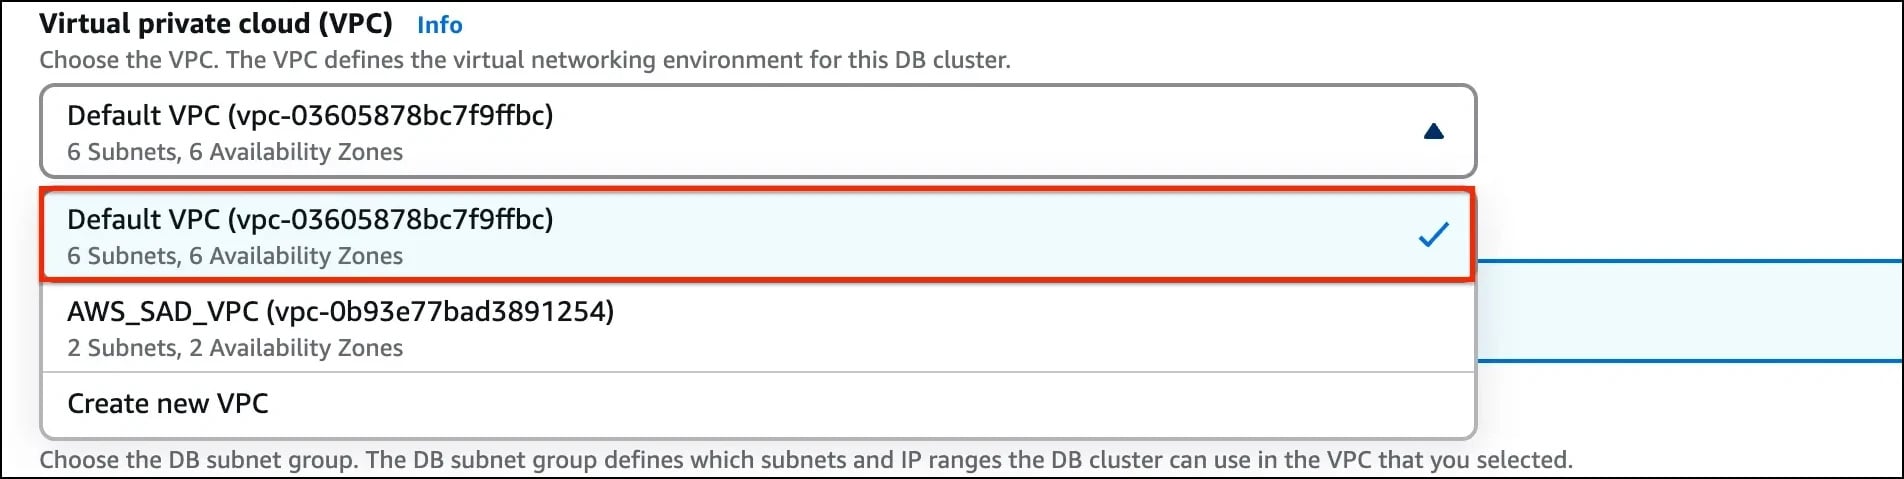 * Additional connectivity configuration
* Subnet group\*\*: Default\*\*
* Publicly accessible: **Yes \{IMPORTANT}**
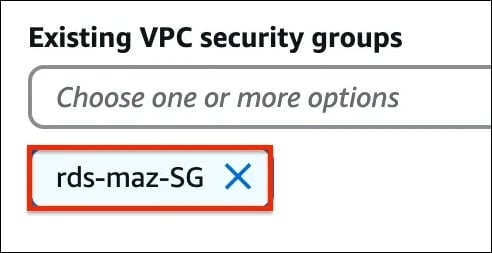
* Existing VPC security groups :
* Remove the Default security group, which is selected by default :
* Additional connectivity configuration
* Subnet group\*\*: Default\*\*
* Publicly accessible: **Yes \{IMPORTANT}**
* Existing VPC security groups :
* Remove the Default security group, which is selected by default :
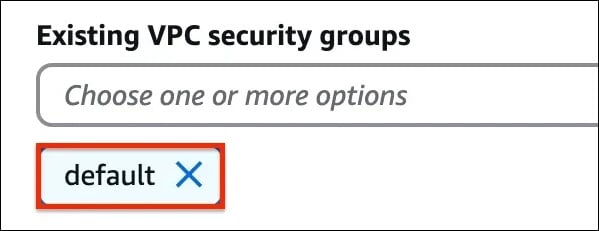 * Select **rds-maz-SG** for the dropdown.(This is the security group which you have created in the beginning)
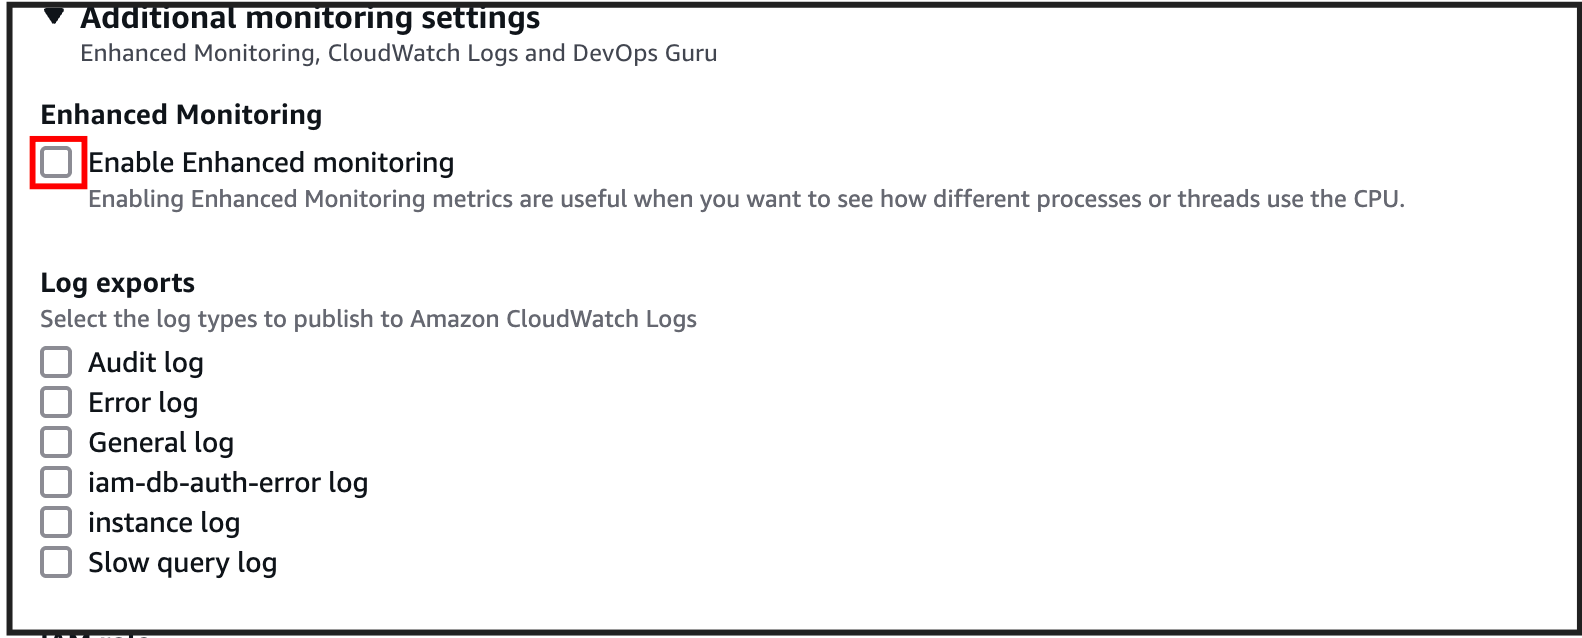
 * Under Monitoring, **uncheck** monitoring option.
 * Select the **Additional configuration** present at the bottom of the page and enter the following details\*\*:\*\*
* Database options
* Initial database name: Enter **whizlabsrds**
* Select the **Additional configuration** present at the bottom of the page and enter the following details\*\*:\*\*
* Database options
* Initial database name: Enter **whizlabsrds**
 * Leave other settings **as default**
6. Once the details above have been filled in, click on **Create database** button.
7. It will take around **10-15 minutes** for the database to be created. Please wait until database status changes from **creating** to **Available**.
8. Once the database has been created, you should see the following page:
* Leave other settings **as default**
6. Once the details above have been filled in, click on **Create database** button.
7. It will take around **10-15 minutes** for the database to be created. Please wait until database status changes from **creating** to **Available**.
8. Once the database has been created, you should see the following page:
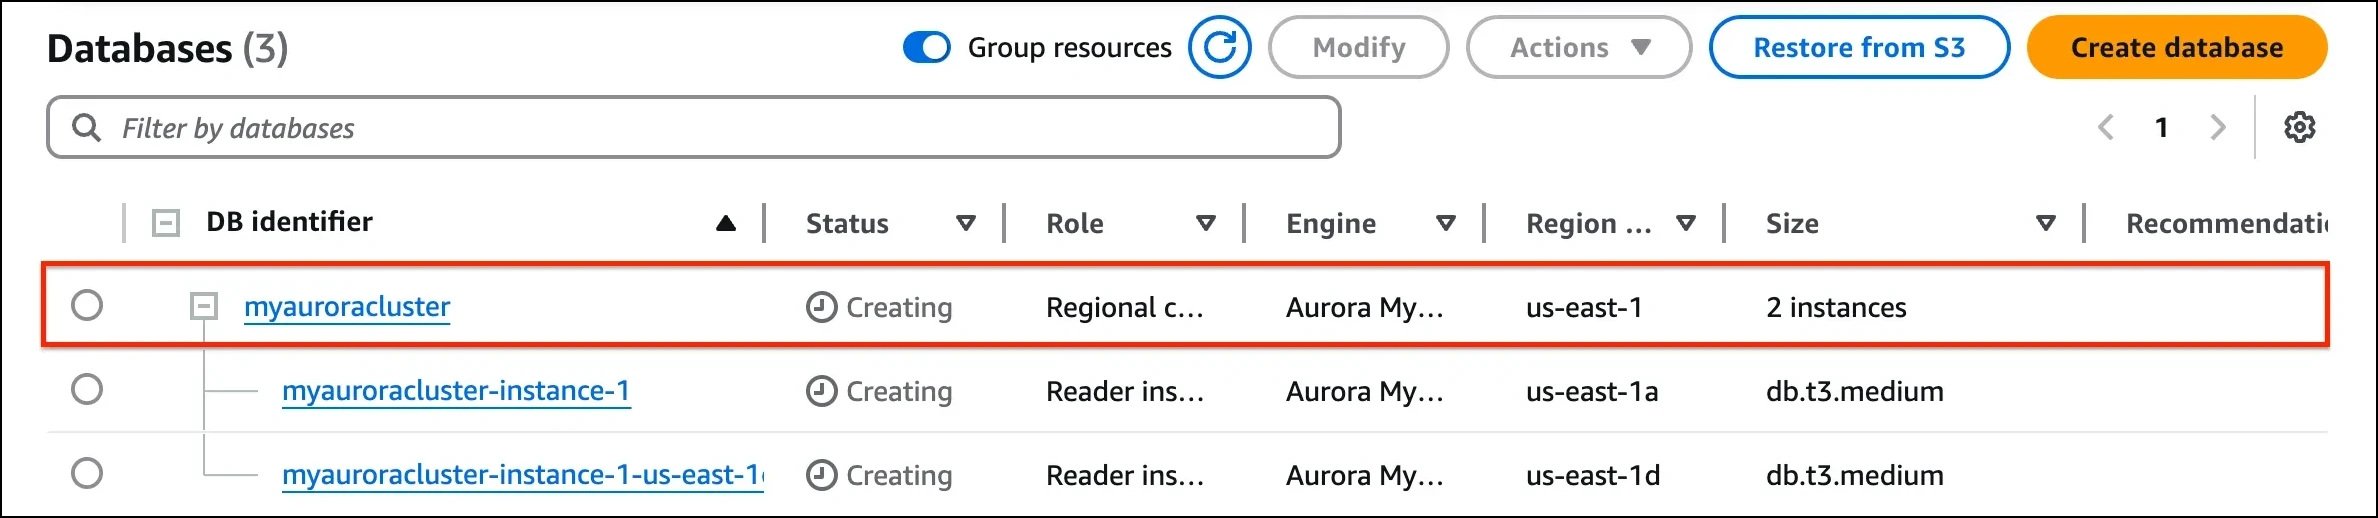 * Similar to the screenshot, you should be able to see that our database launched in multiple AZs, namely **us-east-1c and us-east-1a**
#### Task 5: Connecting to the Aurora (MySQL) database on RDS
Now we have successfully launched Aurora RDS with Multi-AZ enabled. To connect to the new Aurora database, we need the **endpoint.**
1. Click on the **RDS cluster name** and then navigate to **Connectivity & security** to find the endpoint of your **Master (Writer) and Reader** instances, with which you can connect to your DB instance.
* Similar to the screenshot, you should be able to see that our database launched in multiple AZs, namely **us-east-1c and us-east-1a**
#### Task 5: Connecting to the Aurora (MySQL) database on RDS
Now we have successfully launched Aurora RDS with Multi-AZ enabled. To connect to the new Aurora database, we need the **endpoint.**
1. Click on the **RDS cluster name** and then navigate to **Connectivity & security** to find the endpoint of your **Master (Writer) and Reader** instances, with which you can connect to your DB instance.
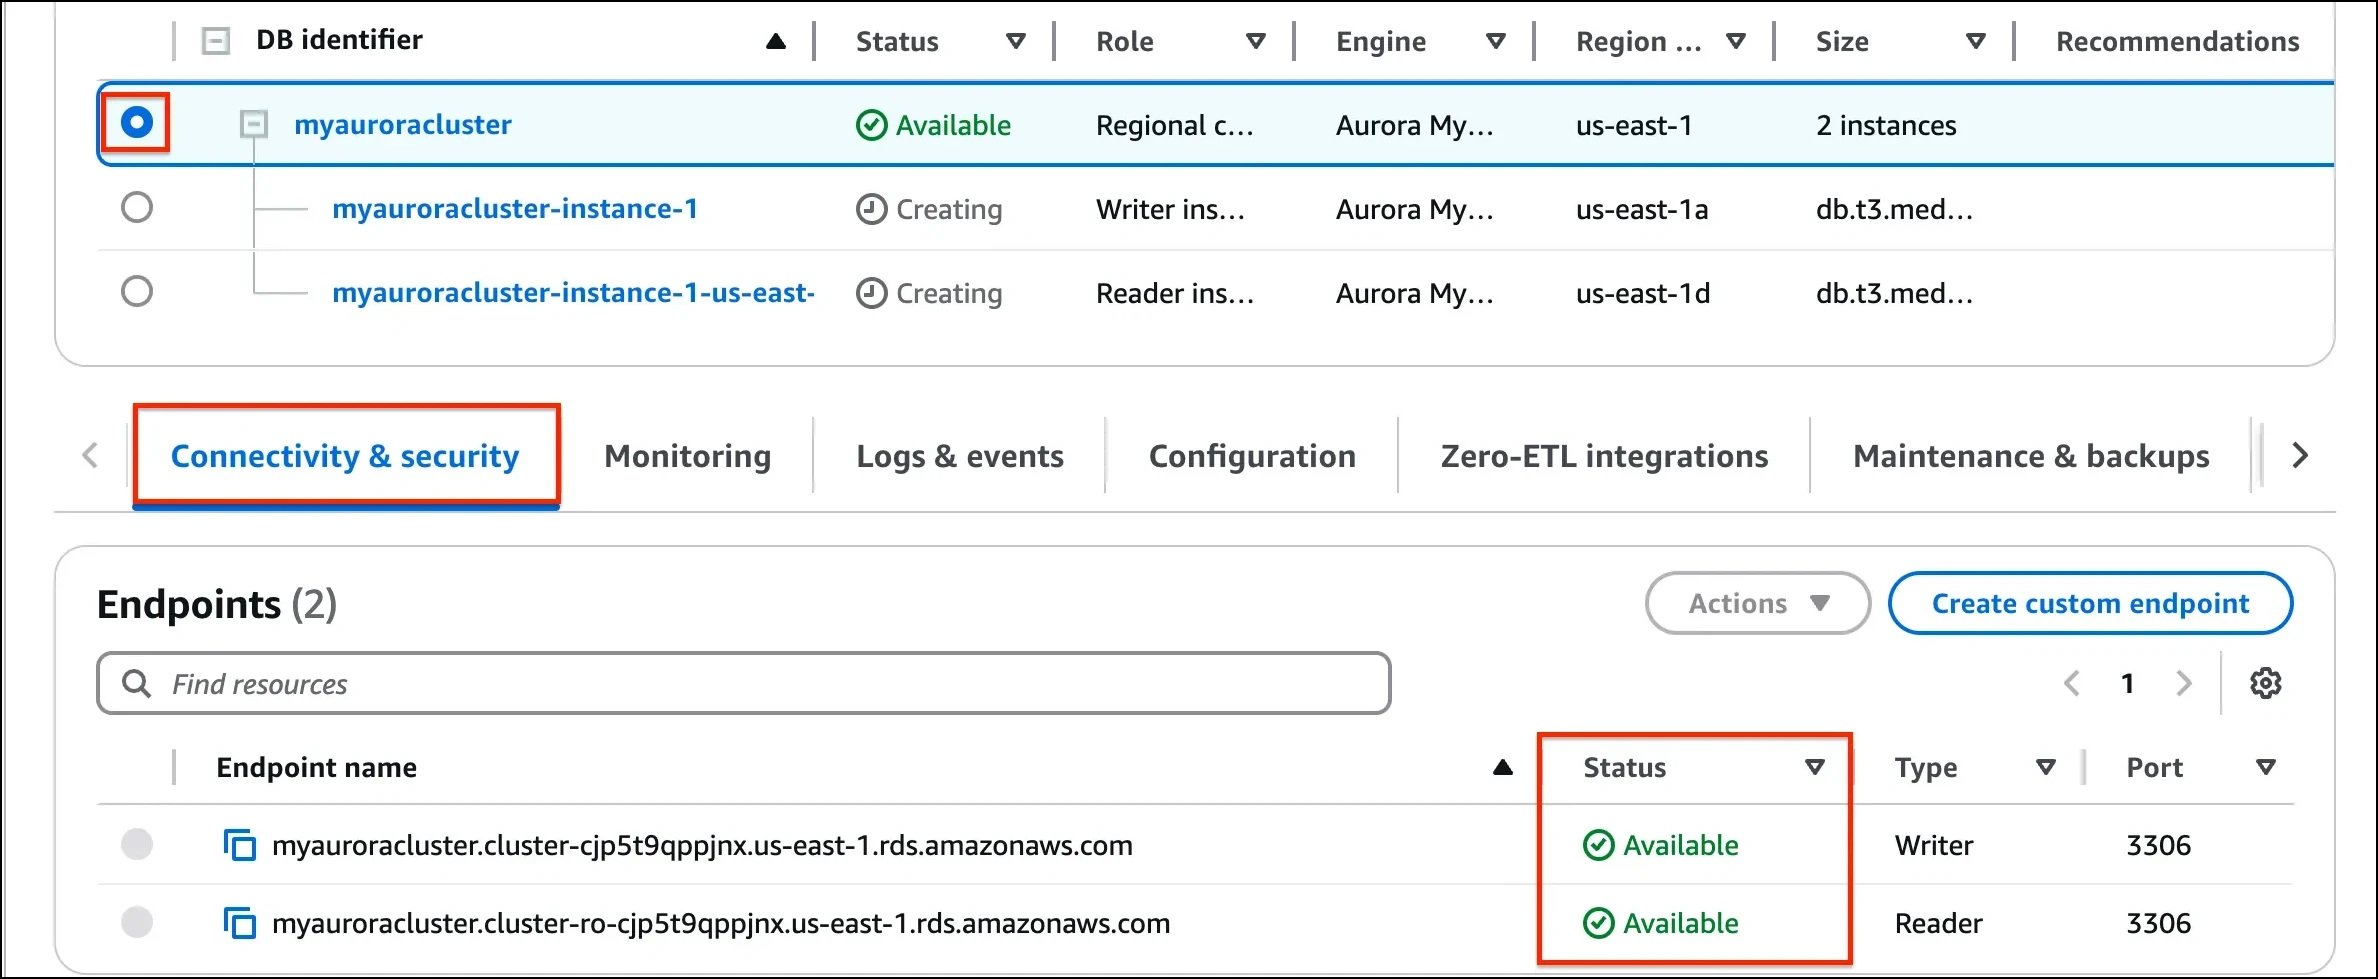 * The endpoints you see to be similar to these examples:
**Master (Writer): myauroracluster.cluster-c2tbqtanuaea.us-east-1.rds.amazonaws.com**
**Reader**: **myauroracluster.cluster-ro-c2tbqtanuaea.us-east-1.rds.amazonaws.com**
* The endpoints you see to be similar to these examples:
**Master (Writer): myauroracluster.cluster-c2tbqtanuaea.us-east-1.rds.amazonaws.com**
**Reader**: **myauroracluster.cluster-ro-c2tbqtanuaea.us-east-1.rds.amazonaws.com**
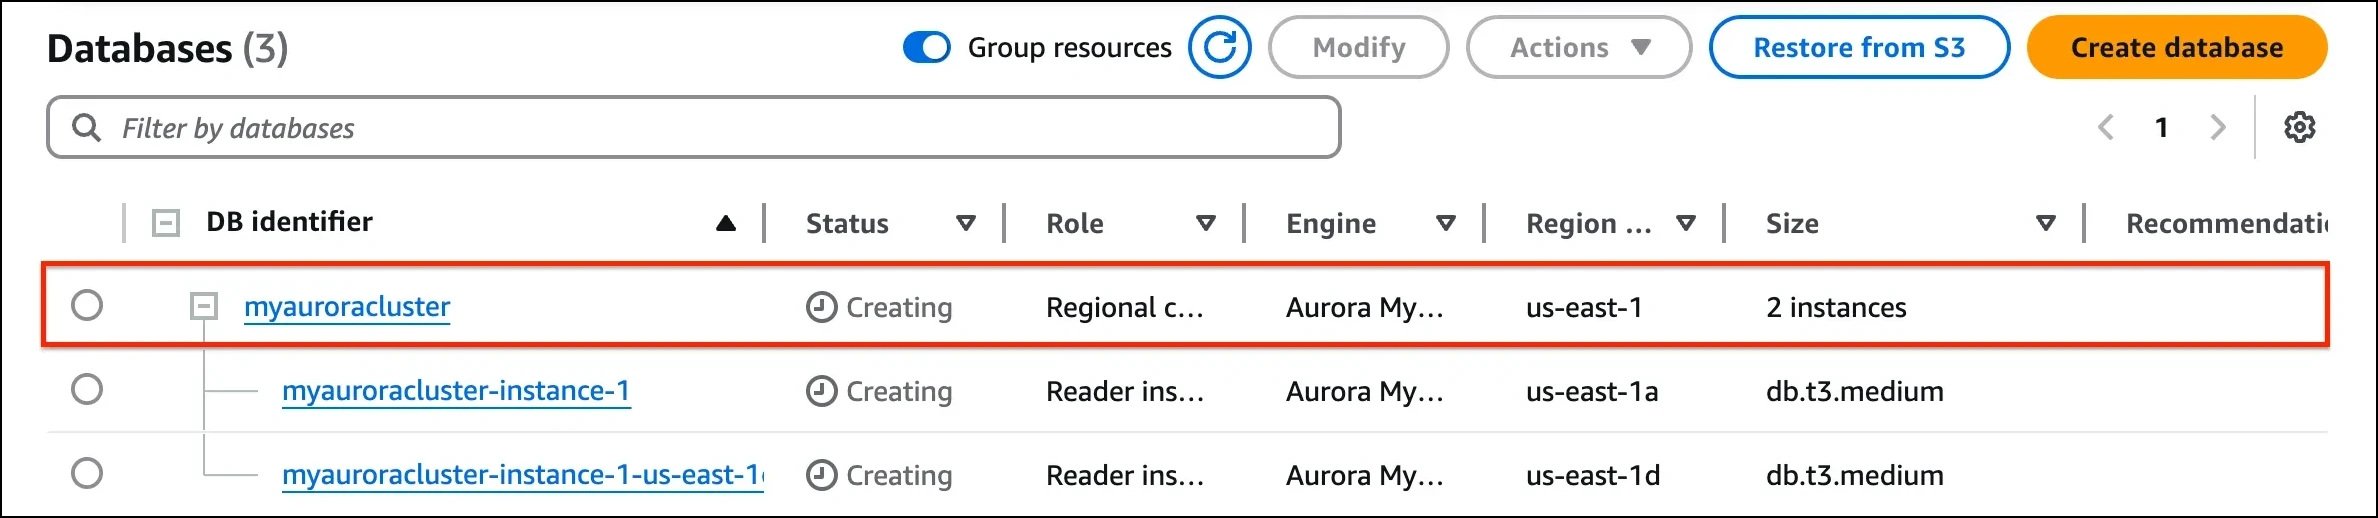 **Note: Please carefully look at the role of the DB instance (reader vs Master (Writer)) and their respective availability zones. (here us-east-1c and us-east-1a)**
#### Task 6: Connecting the EC2 Server to RDS:
In this task, we are going to establish connectivity between the EC2 instance created earlier and the Amazon Aurora RDS database. By modifying the security group of the RDS instance, they allow access from the EC2 instance, enabling communication between the two resources.
1. Now we need to connect the RDS with EC2 instance in order to eventually connect with the Aurora database.
2. Navigate to **RDS** available under the **Database** section of the **Services** menu.
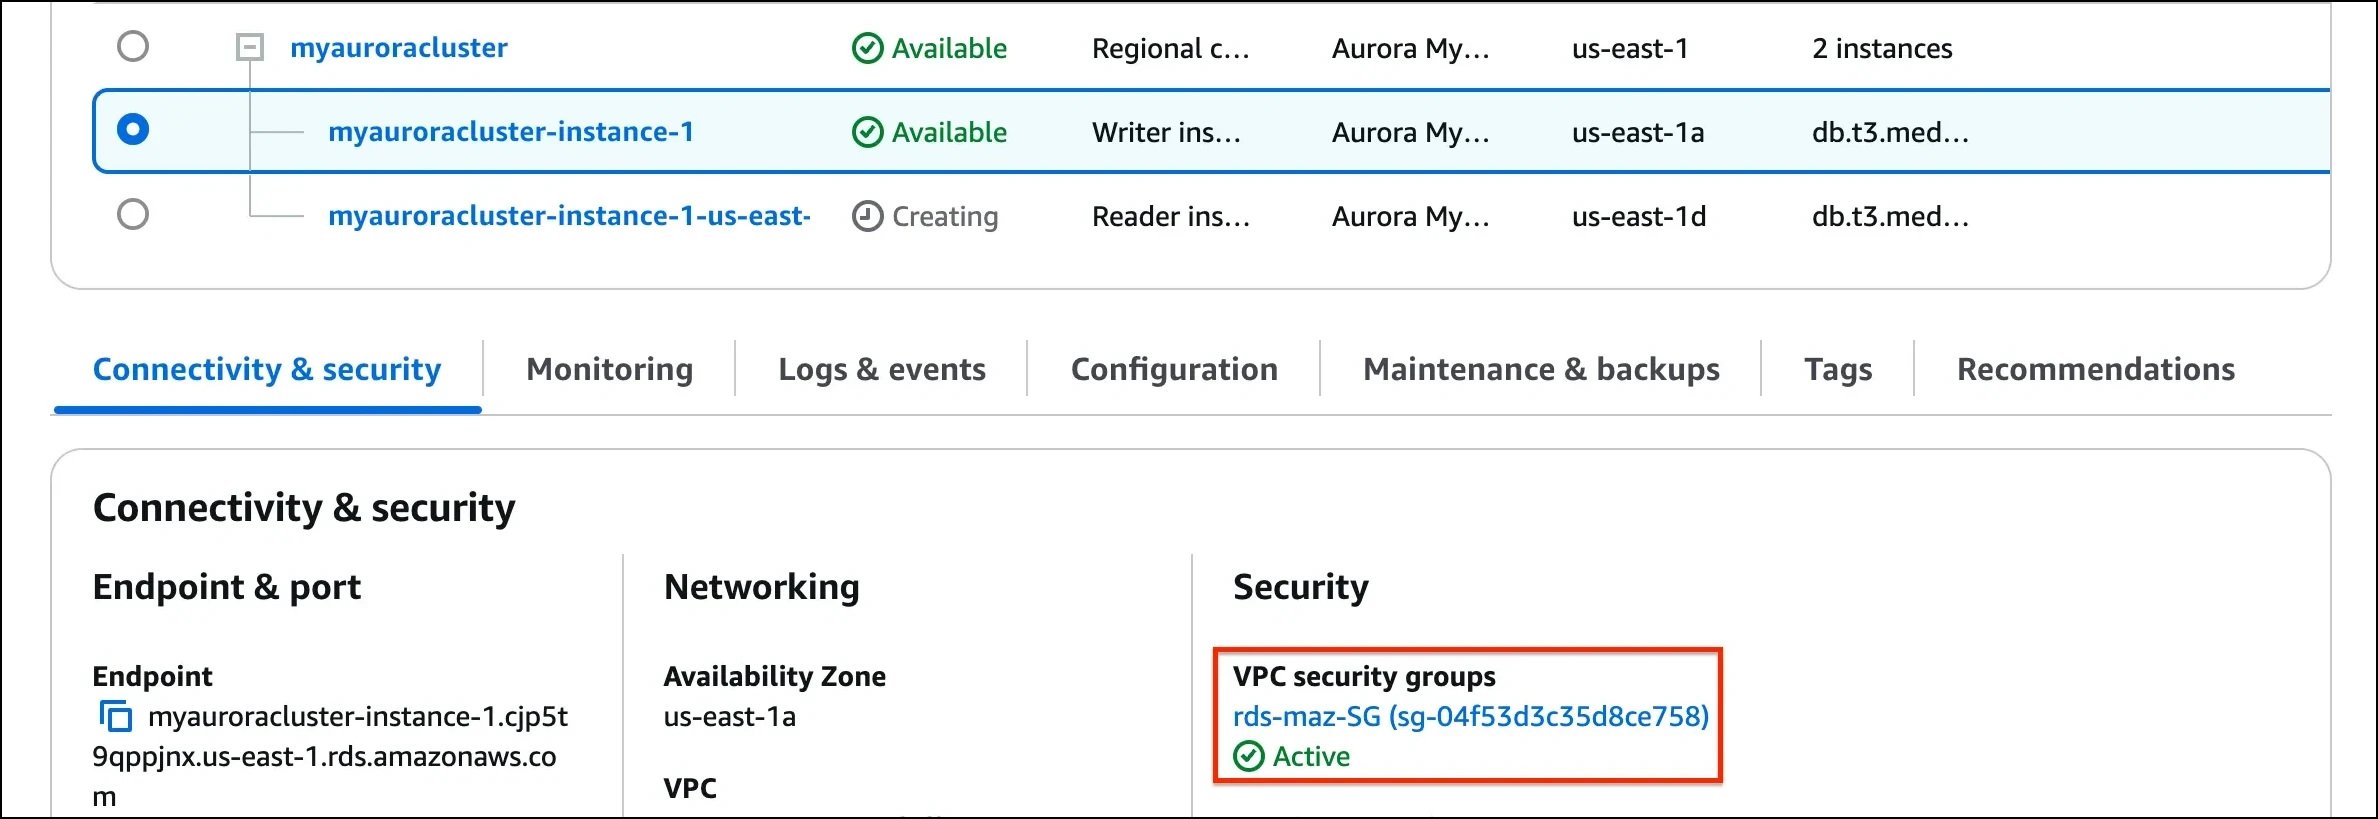
3. Click on **Master (writer) database** and click on the security group name in this example it is **rds-maz-SG** under VPC security groups as shown below:
**Note: Please carefully look at the role of the DB instance (reader vs Master (Writer)) and their respective availability zones. (here us-east-1c and us-east-1a)**
#### Task 6: Connecting the EC2 Server to RDS:
In this task, we are going to establish connectivity between the EC2 instance created earlier and the Amazon Aurora RDS database. By modifying the security group of the RDS instance, they allow access from the EC2 instance, enabling communication between the two resources.
1. Now we need to connect the RDS with EC2 instance in order to eventually connect with the Aurora database.
2. Navigate to **RDS** available under the **Database** section of the **Services** menu.
3. Click on **Master (writer) database** and click on the security group name in this example it is **rds-maz-SG** under VPC security groups as shown below:
 4. It will open the Security Group page. Click on **Inbound rules.**
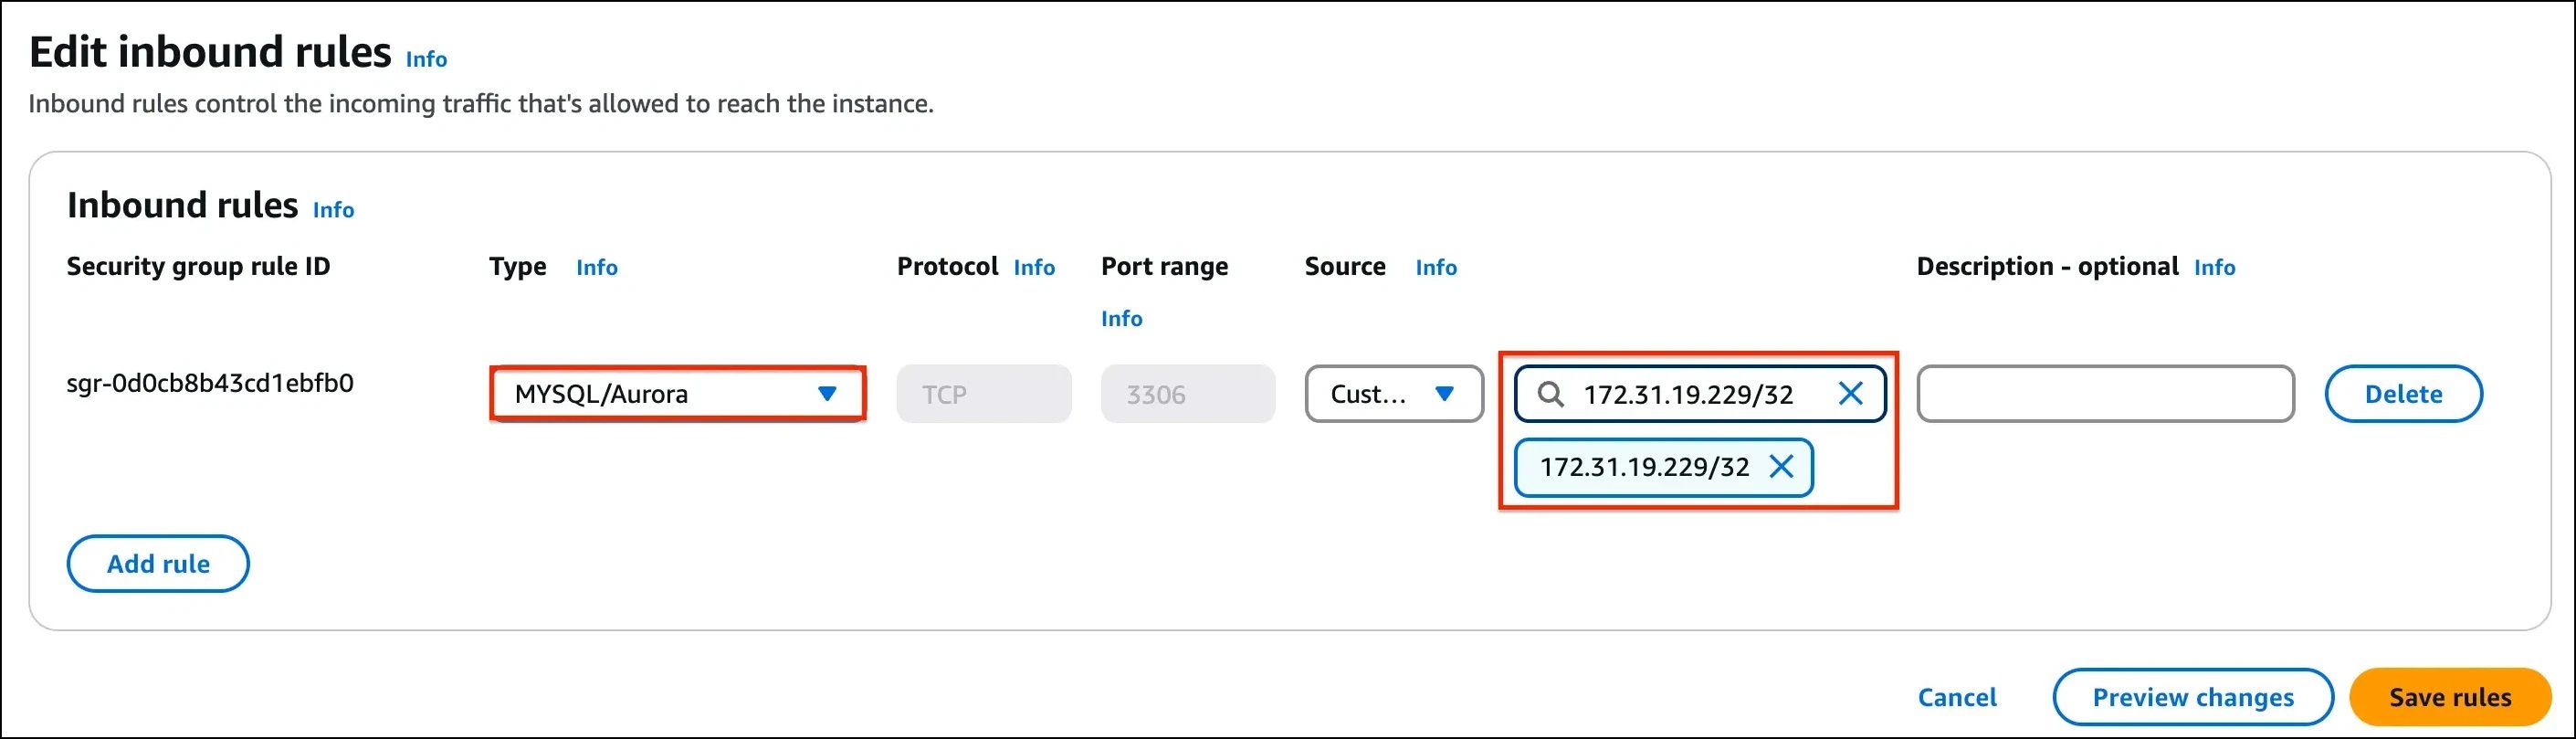
* Click on **Edit inbound rules**. The MySQL rule will already exist.
* Click on **Add rule** button.
* Type: Select **MYSQL/Aurora**
* Source: **Paste** the Private IP address of your **MyRdsEc2server** EC2 instance.
* **Delete** the old rule and then Click on **Save rules** button.
4. It will open the Security Group page. Click on **Inbound rules.**
* Click on **Edit inbound rules**. The MySQL rule will already exist.
* Click on **Add rule** button.
* Type: Select **MYSQL/Aurora**
* Source: **Paste** the Private IP address of your **MyRdsEc2server** EC2 instance.
* **Delete** the old rule and then Click on **Save rules** button.
 #### Task 7: Execute Database Operations via SSH
In this task, we are going to execute database operations on the Amazon Aurora RDS database. By SSHing into the EC2 instance and accessing the database using MySQL, they can create tables, insert data, and perform queries.
1. Navigate to the EC2 Dashboard and select the instance created.
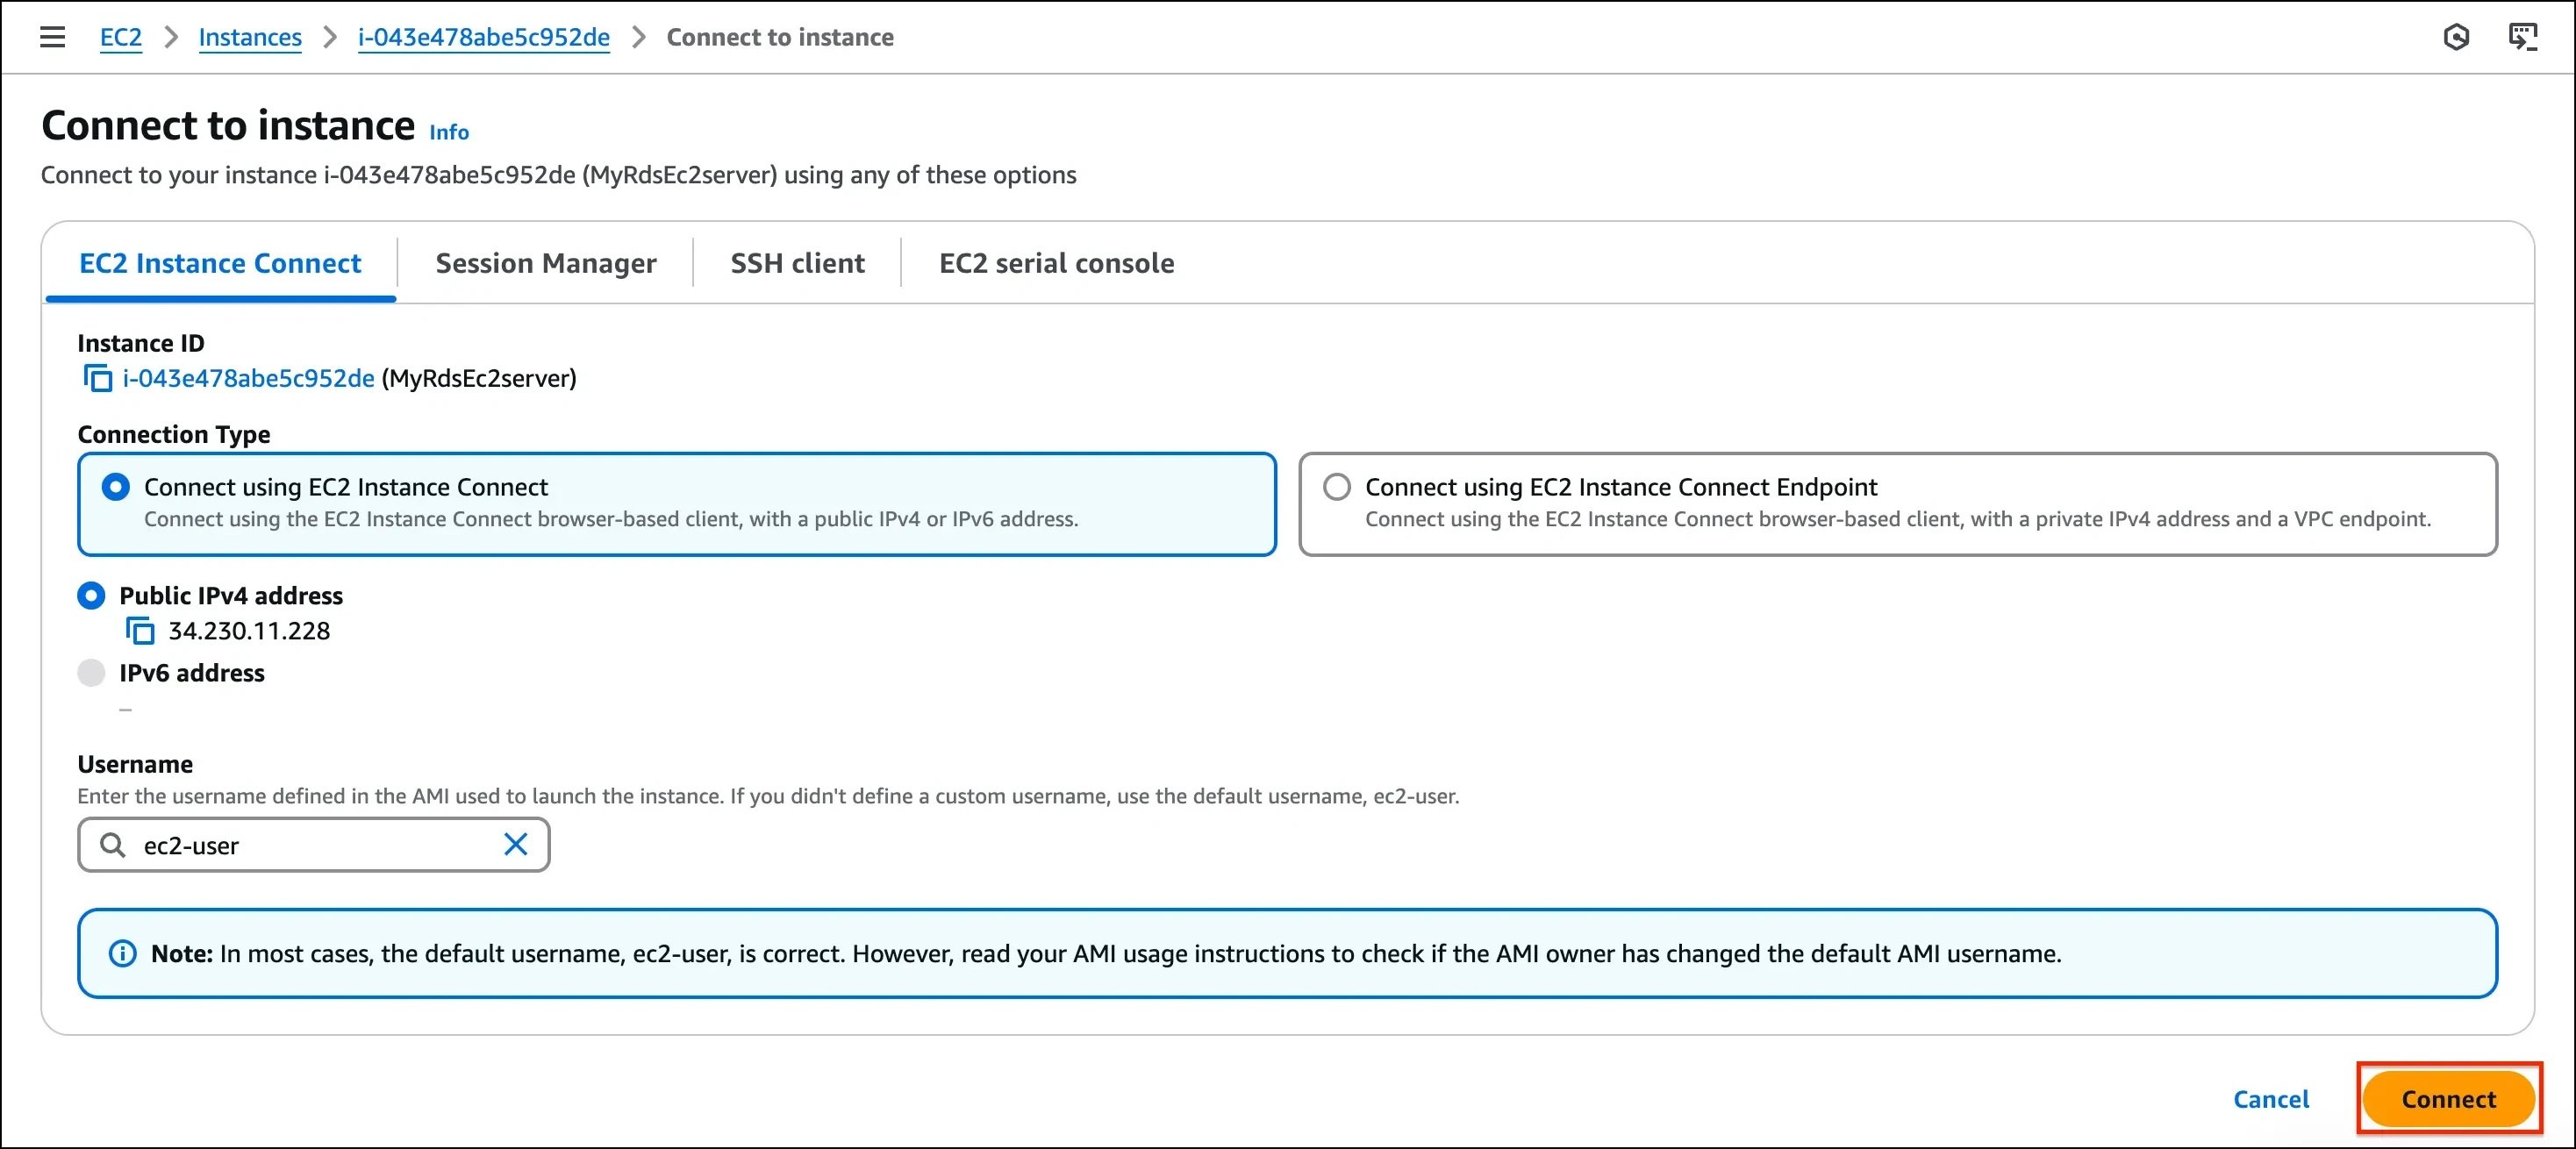
2. Once the instance is launched, Select **EC2 Instance Connect** option and click on **Connect** button.
#### Task 7: Execute Database Operations via SSH
In this task, we are going to execute database operations on the Amazon Aurora RDS database. By SSHing into the EC2 instance and accessing the database using MySQL, they can create tables, insert data, and perform queries.
1. Navigate to the EC2 Dashboard and select the instance created.
2. Once the instance is launched, Select **EC2 Instance Connect** option and click on **Connect** button.
 3. Please follow the steps in [SSH into EC2 Instance](https://play.whizlabs.com/site/task_support/ssh-into-ec-instance) for more option to SSH.
4. Switch to the root user using the command :
```
sudo su
```
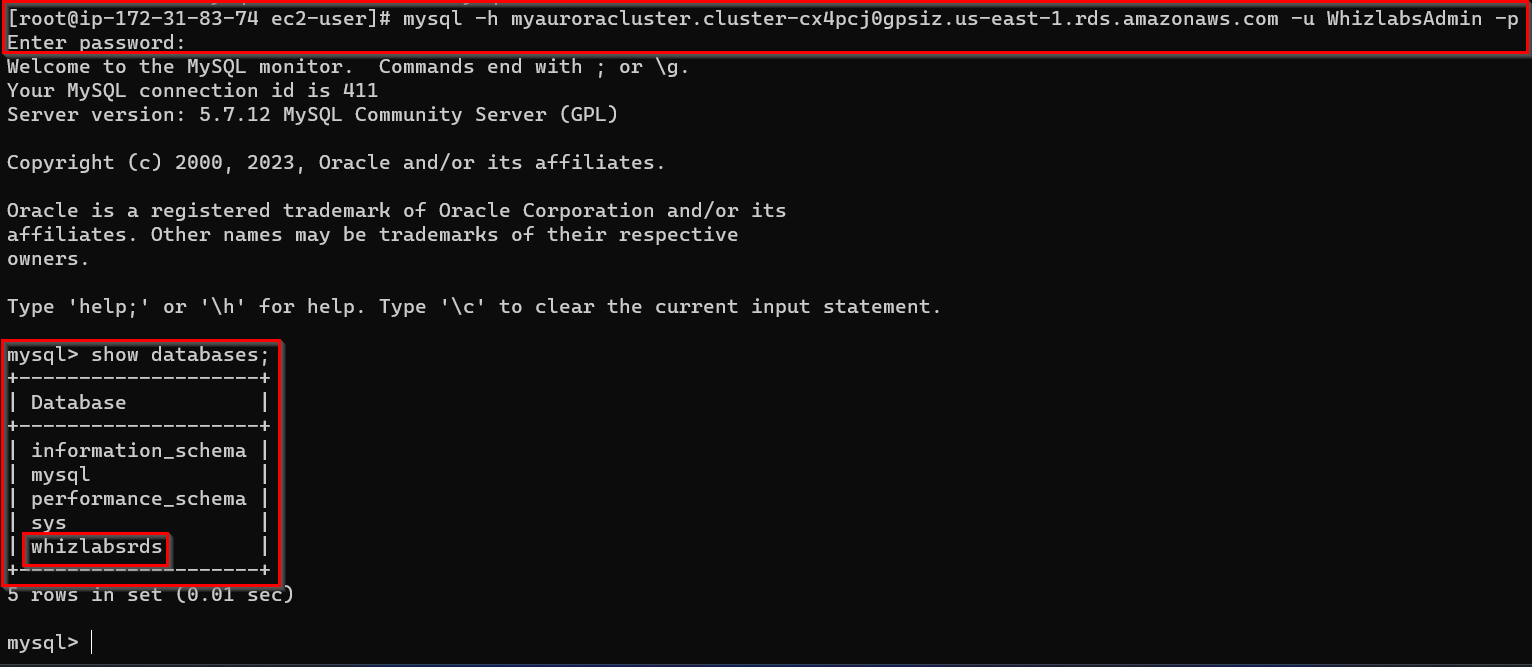
5. Log into the RDS instance using the below command:
* **mysql -h myauroracluster.cluster-cjp5t9qppjnx.us-east-1.rds.amazonaws.com -u WhizlabsAdmin** **-p**
* **Syntax: mysql -h \ -u \ -p**
* **Note:** Make sure to change the above **Master (Writer)Cluster endpoint** and **Username** with yours.
* Host name : **myauroracluster.cluster-cpoz6c7903cx.us-east-1.rds.amazonaws.com (Master(Writer)cluster endpoint)**
* Username : Enter **WhizlabsAdmin**
* Password : Enter **Whizlabs123** (Use yours incase you changed the password while creating RDS)
* You should now be able to log into the database,
6. List all Databases using the below command. You will see the database **whizlabsrds** created while launching the RDS cluster.
```
show databases;
```
3. Please follow the steps in [SSH into EC2 Instance](https://play.whizlabs.com/site/task_support/ssh-into-ec-instance) for more option to SSH.
4. Switch to the root user using the command :
```
sudo su
```
5. Log into the RDS instance using the below command:
* **mysql -h myauroracluster.cluster-cjp5t9qppjnx.us-east-1.rds.amazonaws.com -u WhizlabsAdmin** **-p**
* **Syntax: mysql -h \ -u \ -p**
* **Note:** Make sure to change the above **Master (Writer)Cluster endpoint** and **Username** with yours.
* Host name : **myauroracluster.cluster-cpoz6c7903cx.us-east-1.rds.amazonaws.com (Master(Writer)cluster endpoint)**
* Username : Enter **WhizlabsAdmin**
* Password : Enter **Whizlabs123** (Use yours incase you changed the password while creating RDS)
* You should now be able to log into the database,
6. List all Databases using the below command. You will see the database **whizlabsrds** created while launching the RDS cluster.
```
show databases;
```
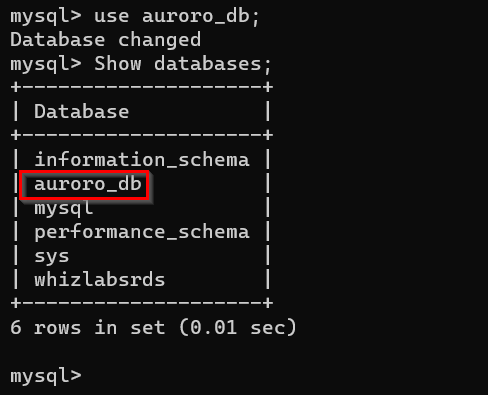
 7. Now create the database in the **Master(Writer) RDS** as given in the screenshot. We'll create a demo database named **auroro\_db.**
```
Create database auroro_db;
```
8. Select the newly-created database:
```
use auroro_db;
```
9. List all Databases:
```
Show databases;
```
7. Now create the database in the **Master(Writer) RDS** as given in the screenshot. We'll create a demo database named **auroro\_db.**
```
Create database auroro_db;
```
8. Select the newly-created database:
```
use auroro_db;
```
9. List all Databases:
```
Show databases;
```
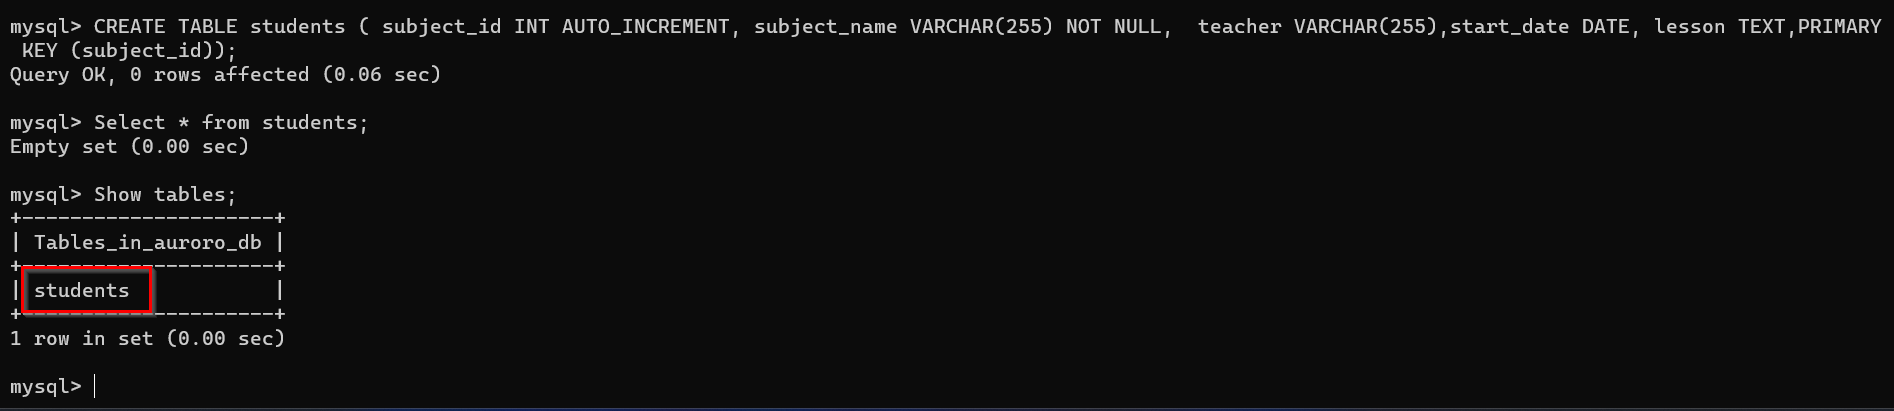
 10. Next we'll create a table named **students** and insert few rows of data using list of commands:
```python theme={null}
CREATE TABLE students ( subject_id INT AUTO_INCREMENT, subject_name VARCHAR(255) NOT NULL, teacher VARCHAR(255),start_date DATE, lesson TEXT,PRIMARY KEY (subject_id));
```
Select \* from students;
Show tables;
10. Next we'll create a table named **students** and insert few rows of data using list of commands:
```python theme={null}
CREATE TABLE students ( subject_id INT AUTO_INCREMENT, subject_name VARCHAR(255) NOT NULL, teacher VARCHAR(255),start_date DATE, lesson TEXT,PRIMARY KEY (subject_id));
```
Select \* from students;
Show tables;
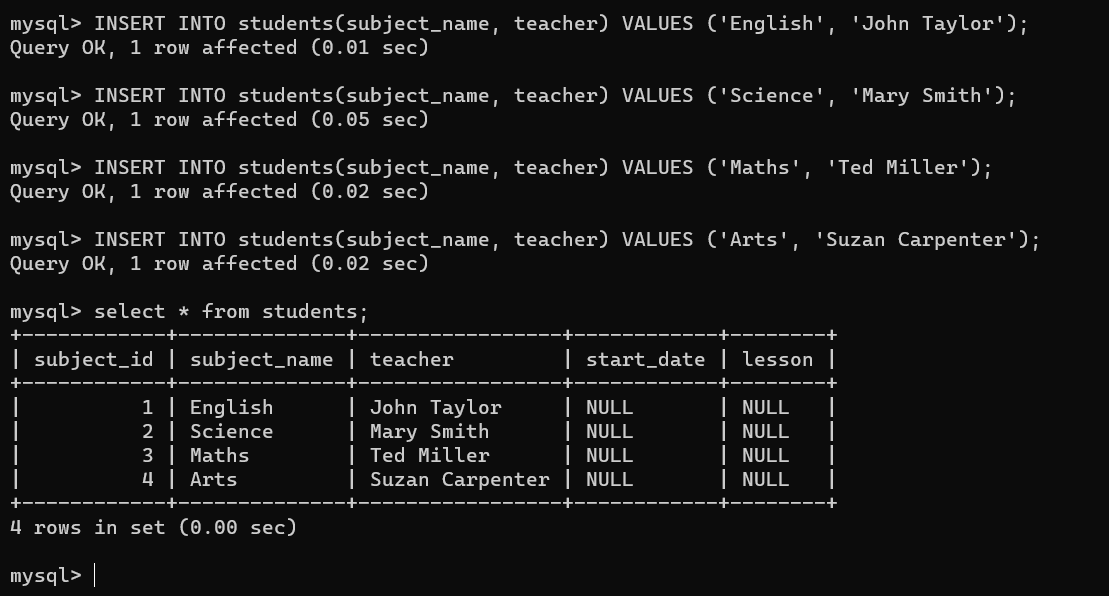
 11. Insert data into the table:
```
INSERT INTO students(subject_name, teacher) VALUES ('English', 'John Taylor');
```
```
INSERT INTO students(subject_name, teacher) VALUES ('Science', 'Mary Smith');
```
```
INSERT INTO students(subject_name, teacher) VALUES ('Maths', 'Ted Miller');
```
```
INSERT INTO students(subject_name, teacher) VALUES ('Arts', 'Suzan Carpenter');
```
12. Now you can view the contents of the table student using the below command:
```
select * from students;
```
11. Insert data into the table:
```
INSERT INTO students(subject_name, teacher) VALUES ('English', 'John Taylor');
```
```
INSERT INTO students(subject_name, teacher) VALUES ('Science', 'Mary Smith');
```
```
INSERT INTO students(subject_name, teacher) VALUES ('Maths', 'Ted Miller');
```
```
INSERT INTO students(subject_name, teacher) VALUES ('Arts', 'Suzan Carpenter');
```
12. Now you can view the contents of the table student using the below command:
```
select * from students;
```
 13. Exit from mysql console use the below command:
```
exit;
```
#### Task 8: Forcing a Failover to Test Multi-AZ
In this task, we are going to simulate a failover scenario in which the master instance fails, and the read replica takes over as the new master.
1. Navigate to **RDS Database** and in Database section Select **Master(Writer)** Instance and in Actions dropdown, click on failover
2. To test if Multi-AZ is working, we will create a situation where master fails and the read replica has to become the new Master(Writer).
13. Exit from mysql console use the below command:
```
exit;
```
#### Task 8: Forcing a Failover to Test Multi-AZ
In this task, we are going to simulate a failover scenario in which the master instance fails, and the read replica takes over as the new master.
1. Navigate to **RDS Database** and in Database section Select **Master(Writer)** Instance and in Actions dropdown, click on failover
2. To test if Multi-AZ is working, we will create a situation where master fails and the read replica has to become the new Master(Writer).
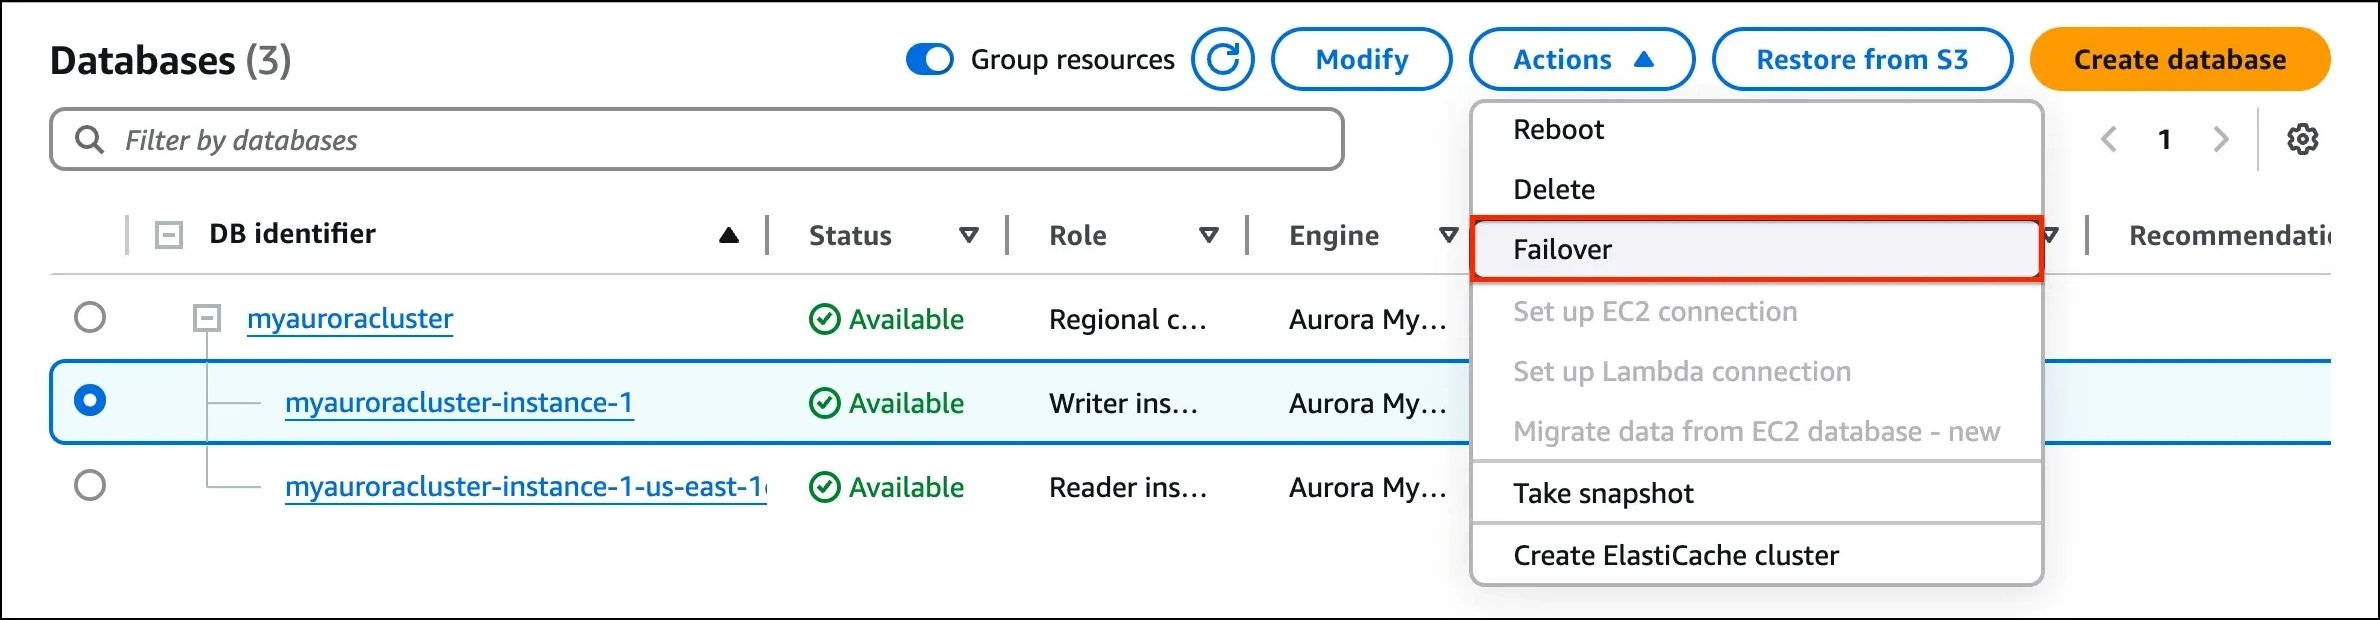 3. On the next screen, confirm the Failover.
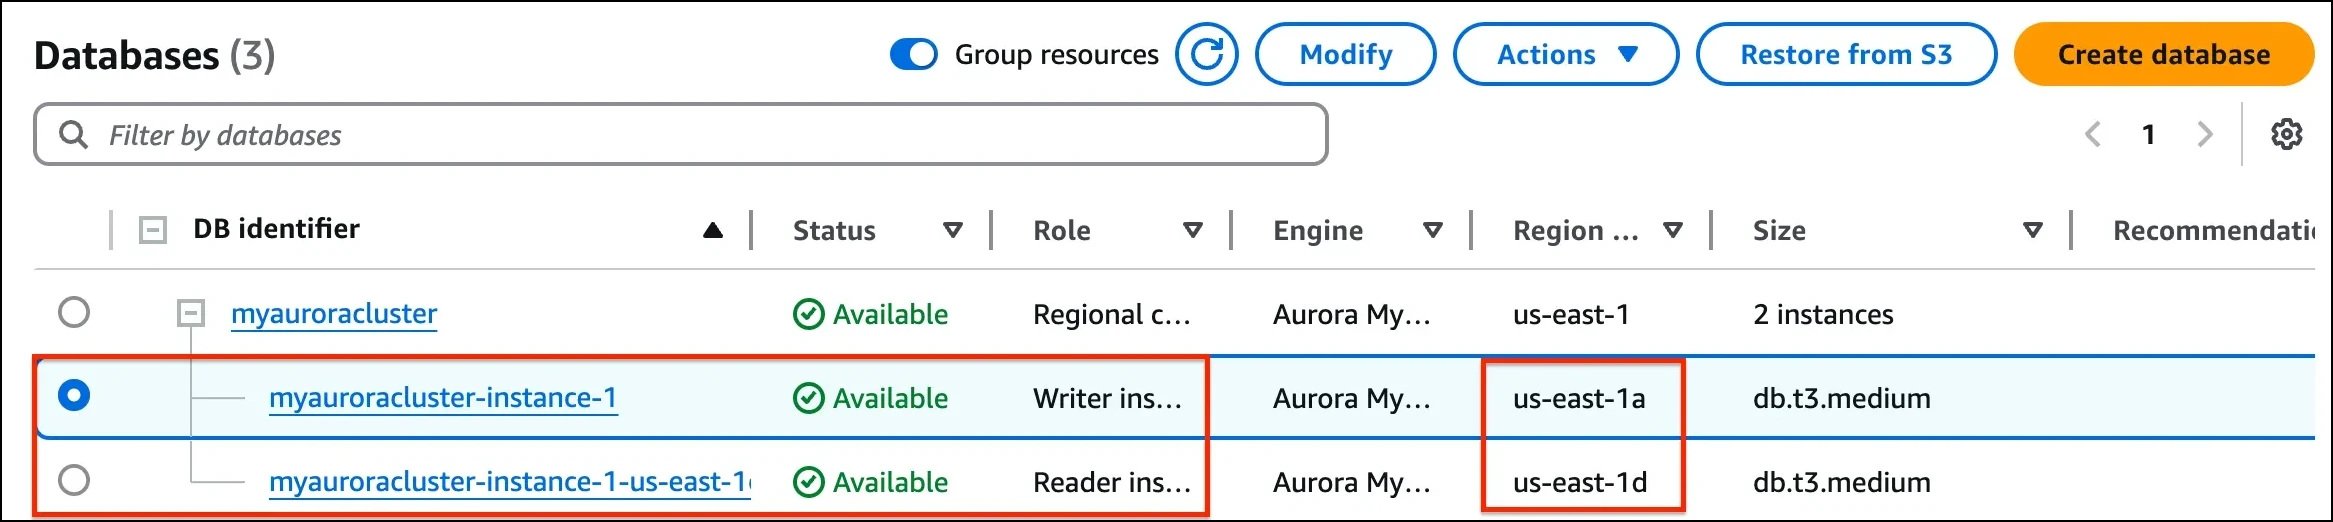
 4. Wait for a few minutes for the RDS instances to failover.
* **(i.e Master (Writer) becomes Reader and Reader becomes Master (Writer) as shown below)**
4. Wait for a few minutes for the RDS instances to failover.
* **(i.e Master (Writer) becomes Reader and Reader becomes Master (Writer) as shown below)**
 #### Task 9: Testing the Failover Condition
In this task, we are going to the new master instance and verify the presence of the database, table, and data created earlier. This step ensures that the failover was successful, and the new master instance is functioning as expected.
1. Now connect to RDS with new Master endpoint
* Copy the endpoint of the **new Master(Writer)cluster** and replace it with your endpoint link.
**Mysql -h \ -u \ -p** and press **\[Enter]**
* **mysql -h myauroracluster.cluster-ro-cjp5t9qppjnx.us-east-1.rds.amazonaws.com -u WhizlabsAdmin -p**
* Password\*\*:\*\* Enter **Whizlabs123**
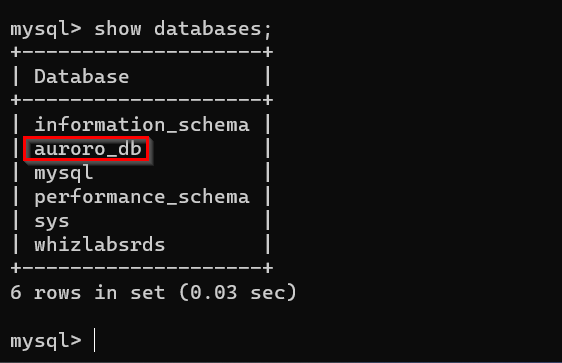
2. You will be **able to Log** into MySQL and check for the database and table created in the master DB instance before the failover.
* You can notice the resources created on the original master db are present, implying that the Failover worked successfully.
```
Show databases;
```
#### Task 9: Testing the Failover Condition
In this task, we are going to the new master instance and verify the presence of the database, table, and data created earlier. This step ensures that the failover was successful, and the new master instance is functioning as expected.
1. Now connect to RDS with new Master endpoint
* Copy the endpoint of the **new Master(Writer)cluster** and replace it with your endpoint link.
**Mysql -h \ -u \ -p** and press **\[Enter]**
* **mysql -h myauroracluster.cluster-ro-cjp5t9qppjnx.us-east-1.rds.amazonaws.com -u WhizlabsAdmin -p**
* Password\*\*:\*\* Enter **Whizlabs123**
2. You will be **able to Log** into MySQL and check for the database and table created in the master DB instance before the failover.
* You can notice the resources created on the original master db are present, implying that the Failover worked successfully.
```
Show databases;
```
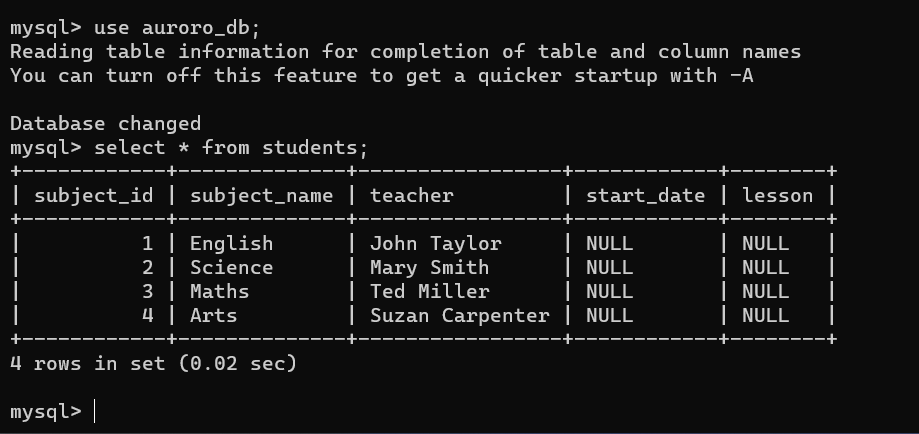
 3. Now check the existence of table named **students and data** (that we created earlier in the lab):
```
use auroro_db;
```
```
select * from students;
```
3. Now check the existence of table named **students and data** (that we created earlier in the lab):
```
use auroro_db;
```
```
select * from students;
```
 > ##### Do you Know?
>
> With Multi-AZ deployment, your database's transaction logs are synchronously replicated to the standby instance. This ensures that your data is durable and protected against potential data loss in the event of a primary instance failure.
1. Once the lab steps are completed, please click on the **Validation** button on the left side panel.
2. This will validate the resources in the AWS account and shows you whether you have completed this lab successfully or not.
#### Task 10: Delete AWS Resources
##### Terminate EC2 Instance
1. Navigate to EC2 by clicking on the **Services** menu in the top, then click on the **EC2** in the **Compute** section.
2. All the EC2 Instances will be listed here,
> ##### Do you Know?
>
> With Multi-AZ deployment, your database's transaction logs are synchronously replicated to the standby instance. This ensures that your data is durable and protected against potential data loss in the event of a primary instance failure.
1. Once the lab steps are completed, please click on the **Validation** button on the left side panel.
2. This will validate the resources in the AWS account and shows you whether you have completed this lab successfully or not.
#### Task 10: Delete AWS Resources
##### Terminate EC2 Instance
1. Navigate to EC2 by clicking on the **Services** menu in the top, then click on the **EC2** in the **Compute** section.
2. All the EC2 Instances will be listed here,
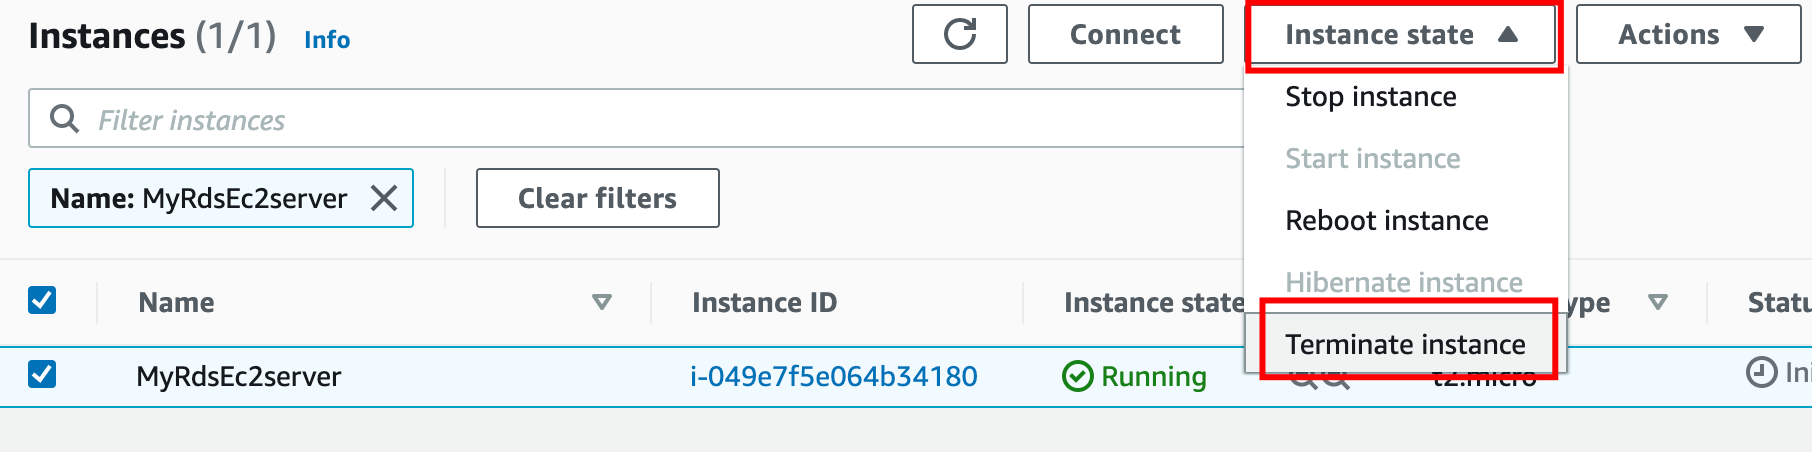
 1. To terminate the EC2, perform the following task:
* Select **MyRdsEc2server,**
* Click on **Instance state**
* Select **Terminate instance**
1. To terminate the EC2, perform the following task:
* Select **MyRdsEc2server,**
* Click on **Instance state**
* Select **Terminate instance**
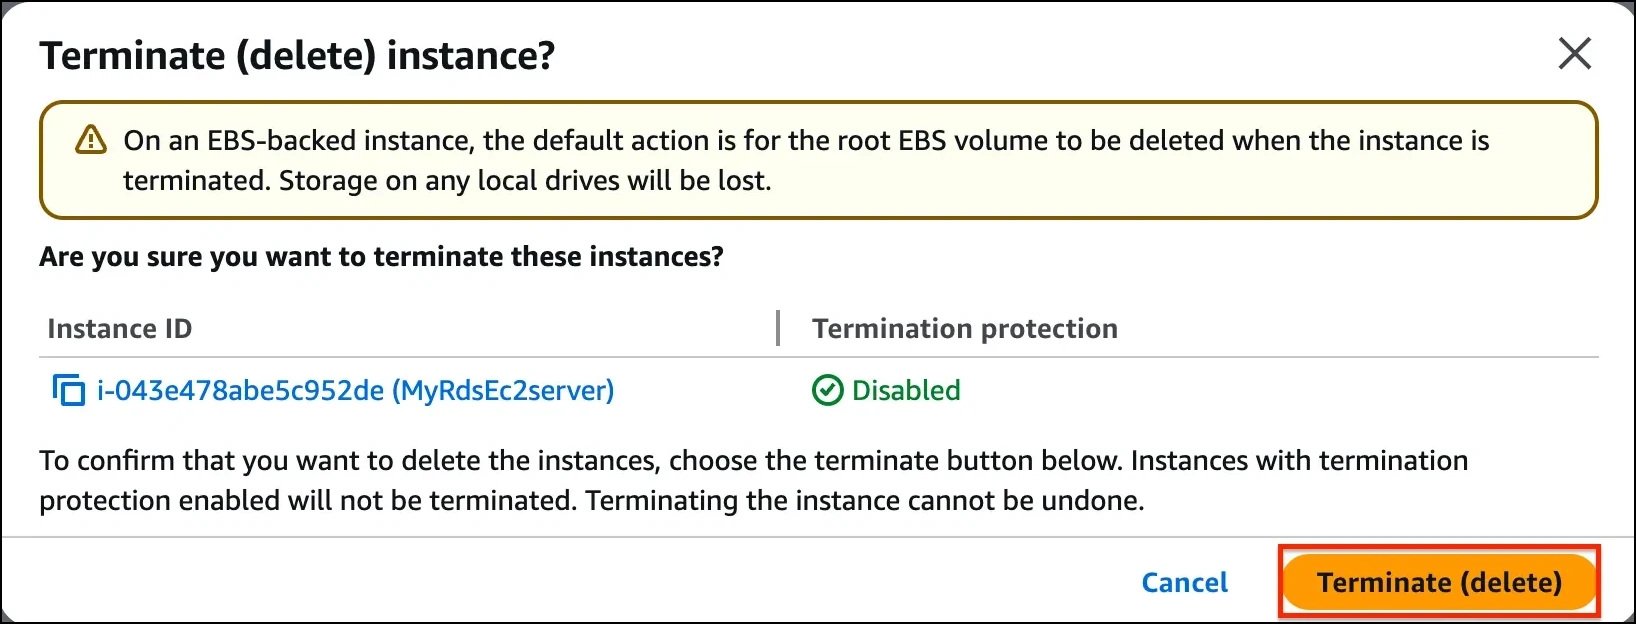
 2. Finally, Click on **Terminate** button.
 1. EC2 Instance will be terminated.
##### Delete RDS DB Instances
1. Navigate to **RDS** by clicking on the **Services** menu available under the **Database** section.
2. Click on **Databaes**
3. It will list all the RDS databases
1. EC2 Instance will be terminated.
##### Delete RDS DB Instances
1. Navigate to **RDS** by clicking on the **Services** menu available under the **Database** section.
2. Click on **Databaes**
3. It will list all the RDS databases
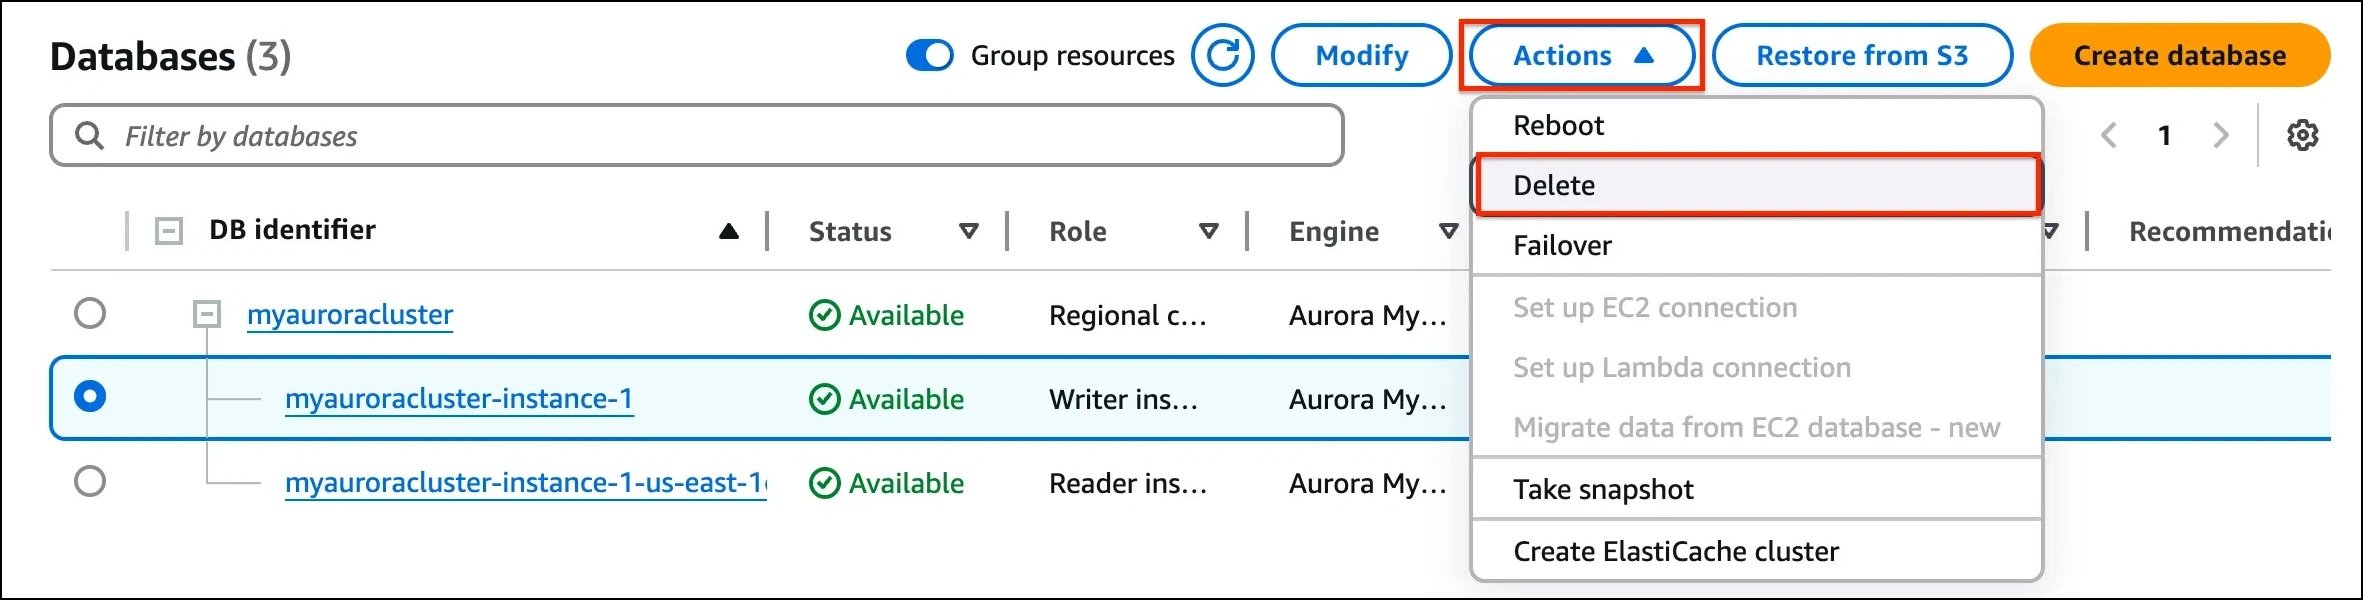
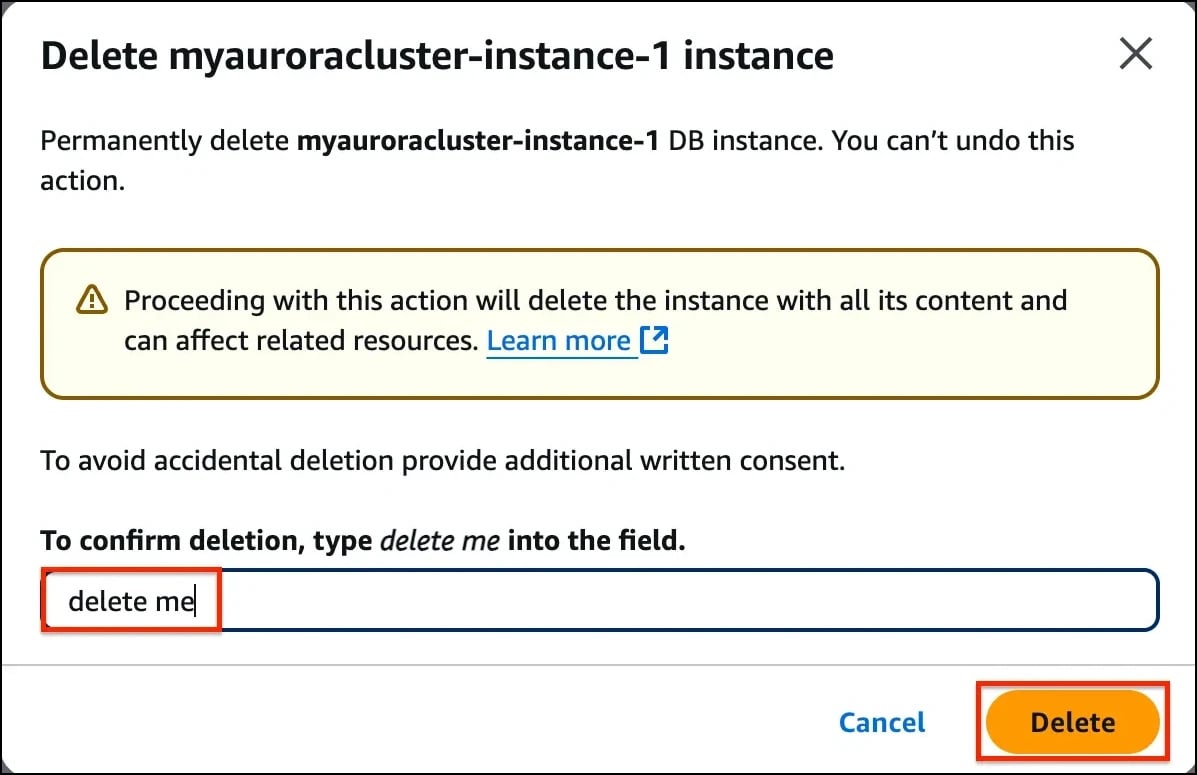
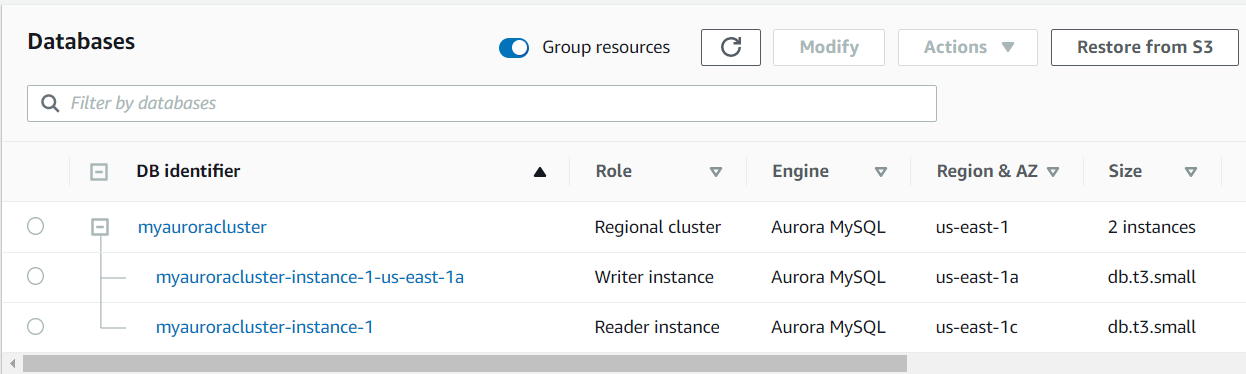 4. Let's delete the **Reader** first, Click on **Actions,** and select **Delete**
 1. To delete we have to perform several tasks:
* Type **delete me** to confirm
* And finally, click on the **Delete** button below.
1. To delete we have to perform several tasks:
* Type **delete me** to confirm
* And finally, click on the **Delete** button below.
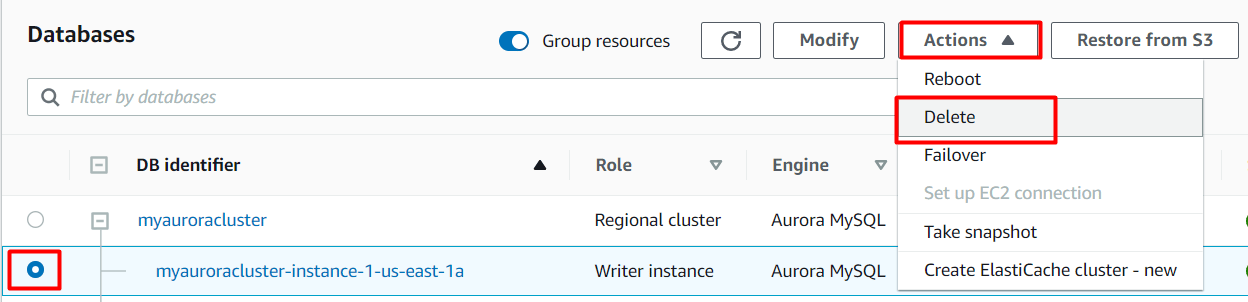
 2. Now it's time to delete **Writer** first, Click on **Actions,** and select **Delete**
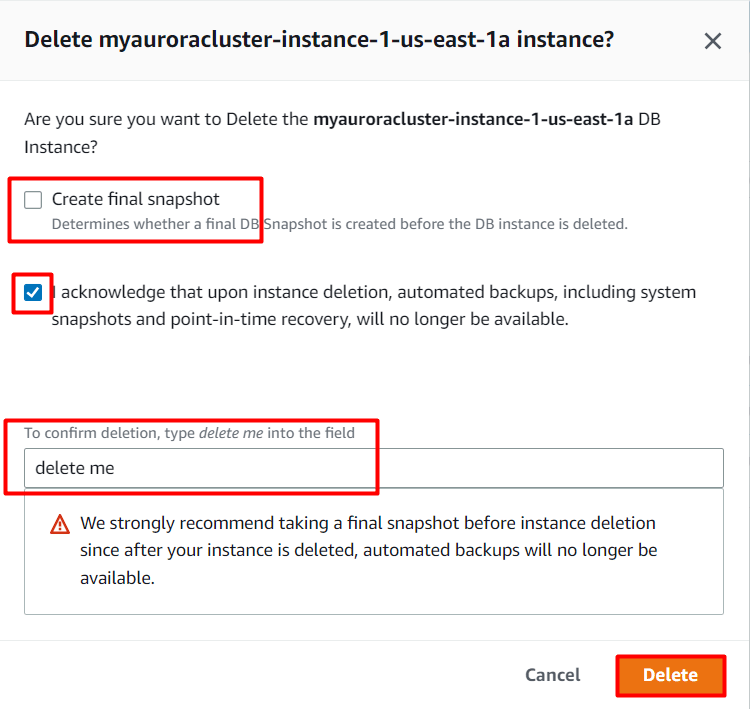
 3. To delete we have to perform several tasks:
* Uncheck the option of **Create final snapshot**
* Check the **acknowledge** option.
* Type **delete me** for confirmation
* And finally, click on the **Delete** button below.
3. To delete we have to perform several tasks:
* Uncheck the option of **Create final snapshot**
* Check the **acknowledge** option.
* Type **delete me** for confirmation
* And finally, click on the **Delete** button below.
 4. It will take around 4 minutes to delete the database instance, you can end the lab now.
### Completion and Conclusion
* You have successfully used the AWS management console to create an Amazon Aurora MySQL database with Multi-Az enabled.
* You have created an Amazon Aurora database on RDS.
* You have successfully connected to the Amazon Aurora database and tested the failover condition with Multi-AZ enabled.
* You have successfully validated the lab.
### End Lab
1. Sign out of AWS Account.
2. You have successfully completed the lab.
3. Once you have completed the steps, click on **End lab** from the IP Lab Portal dashboard.
## What gets checked
When you press **Check my work**, the platform verifies each of these:
* **Launch an EC2 Instance** — Check whether an EC2 Instance is launched or not.
* **Validate EC2 Instance Type t2.micro** — Check whether the EC2 instance type is t2.micro.
* **Launch EC2 AMI type Amazon Linux** — Check whether the EC2 instance is launched using an Amazon AMI.
* **Create RDS Cluster** — Check whether RDS Cluster is created or not.
* **Force RDS Database Failover** — Check whether RDS database failover is done or not.
## Related help
* [FAQs and Troubleshooting](/aws-saa/support/faqs-and-troubleshooting)
* [SSH into EC2 Instance](/aws-saa/support/ssh-into-ec2-instance)
This documentation is built and hosted on [Mintlify](https://mintlify.com), a developer documentation platform.
4. It will take around 4 minutes to delete the database instance, you can end the lab now.
### Completion and Conclusion
* You have successfully used the AWS management console to create an Amazon Aurora MySQL database with Multi-Az enabled.
* You have created an Amazon Aurora database on RDS.
* You have successfully connected to the Amazon Aurora database and tested the failover condition with Multi-AZ enabled.
* You have successfully validated the lab.
### End Lab
1. Sign out of AWS Account.
2. You have successfully completed the lab.
3. Once you have completed the steps, click on **End lab** from the IP Lab Portal dashboard.
## What gets checked
When you press **Check my work**, the platform verifies each of these:
* **Launch an EC2 Instance** — Check whether an EC2 Instance is launched or not.
* **Validate EC2 Instance Type t2.micro** — Check whether the EC2 instance type is t2.micro.
* **Launch EC2 AMI type Amazon Linux** — Check whether the EC2 instance is launched using an Amazon AMI.
* **Create RDS Cluster** — Check whether RDS Cluster is created or not.
* **Force RDS Database Failover** — Check whether RDS database failover is done or not.
## Related help
* [FAQs and Troubleshooting](/aws-saa/support/faqs-and-troubleshooting)
* [SSH into EC2 Instance](/aws-saa/support/ssh-into-ec2-instance)
This documentation is built and hosted on [Mintlify](https://mintlify.com), a developer documentation platform.