> ## Documentation Index
> Fetch the complete documentation index at: https://cloud-architect.ipoint-labs.com/llms.txt
> Use this file to discover all available pages before exploring further.
# DynamoDB & Global Secondary Index
> Hands-on lab · 45m
Launch this lab in the IP Lab Portal, then follow the steps below in the AWS console.
Open IP Lab Portal
## Overview
### Lab Details
1. This lab provides a hands-on experience with Amazon DynamoDB, a fully managed NoSQL database service offered by AWS. You will learn how to create a DynamoDB table, define and utilize global secondary indexes (GSIs), and perform various operations on the database using the AWS Management Console.
2. Duration: **45 minutes**
3. AWS Region: **US East (N. Virginia) us-east-1**
### Introduction
#### Definition
* DynamoDB is a fast and flexible NoSQL database and for applications that need consistent single digit millisecond latency at any scale. It is a fully managed database and it supports both document and key value data models.
* It has a very flexible data model. This means that you don't need to define your database schema upfront. Performance is great as well.
* And all of these attributes make it a great fit for mobile gaming, ad-tech, IoT and many other applications.
#### DynamoDB Tables
##### DynamoDB tables consist of
* Items (Think of a row of data in a table).
* Attributes (Think of a column of data in a table).
* Supports key-value and document data structures.
* Key= the name of the data. Value= the data itself.
* Document can be written in JSON, HTML or XML.
##### DynamoDB- Primary Keys
* DynamoDB stores and retrieve data based on a Primary key
* There are 2 types of Primary Key. Keys: A simple primary key (partition key) and a composite key (partition key and sort key).
* Partition Keys are important because they are the input for an internal hash function which determines the partition or physical location of which the stored data.
* If you are using the partition key as your Primary key, then no two items will have the same Partition key.
* 2 items can have the same partition key, but they must have a different sort key.
* All items with the same partition key are stored together, then sorted according to the sort key value.
##### What is an Index in DynamoDB
* In SQL databases, an index is a data structure which allows you to perform queries on specific columns in a table.
* You select the column that is required to include in the index and run the searches on the index instead of on the entire dataset.
##### In DynamoDB, two types of indexes are supported to help speed-up your queries.
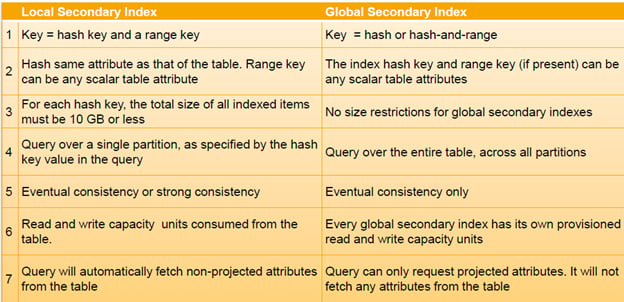
* Local secondary Index.
* Global Secondary Index.
##### Local Secondary Index
* Can only be created when you are creating the table.
* Cannot be removed, added or modified later.
* It has the same partition key as the original table.
* Has a different Sort key.
* Gives you a different view of your data, organized according to an alternate sort key.
* Any queries based on Sort key are much faster using the index than the main table.
##### Global Secondary Index
* You can create a GSI on creation or you can add it later.
* Different partition key as well as different sort key.
* It gives a completely different view of the data.
* Speeds up the queries relating to this alternative Partition or Sort Key.
 #### Case Study: Creating a Global Secondary Index
Let's get our hands dirty by creating a table and adding a GSI on the table.
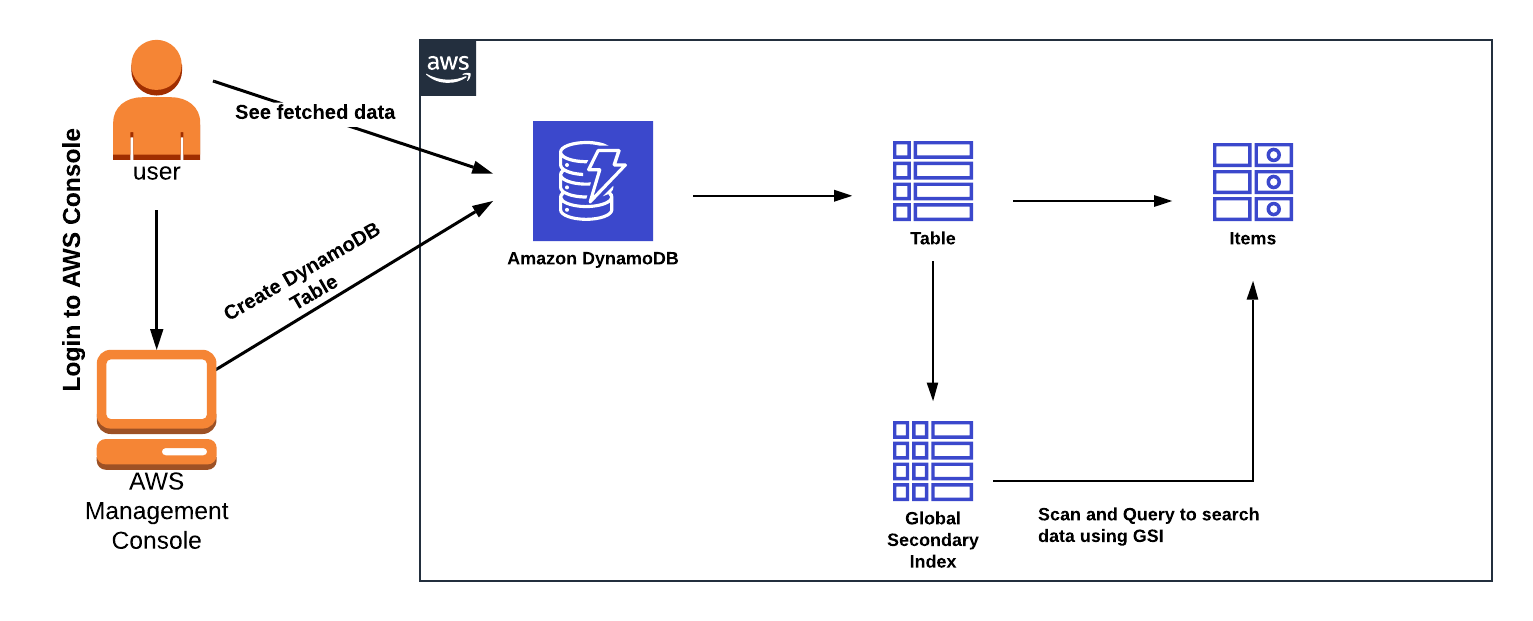
In this example, imagine we want to keep track of orders that were returned by our users. We'll store the date of the return in a ReturnDate attribute. We'll also add a global secondary index with a composite key schema using ReturnDate as the HASH key and UserAmount as the RANGE key.
### Architecture Diagram
#### Case Study: Creating a Global Secondary Index
Let's get our hands dirty by creating a table and adding a GSI on the table.
In this example, imagine we want to keep track of orders that were returned by our users. We'll store the date of the return in a ReturnDate attribute. We'll also add a global secondary index with a composite key schema using ReturnDate as the HASH key and UserAmount as the RANGE key.
### Architecture Diagram
 ### Task Details
1. Sign into the AWS Management Console.
2. Create DynamoDB Table
3. Create Item
4. Use Global Secondary Index to Fetch Data
### Launching Lab Environment
1. To launch the lab environment, Click on the **Start Lab** button.
2. Please wait until the cloud environment is provisioned. It will take less than a minute to provision.
3. Once the Lab is started, you will be provided with **IAM user name**, **Password**, **Access** **Key**, and **Secret** **Access** **Key**.
**Note** : You can only start one lab at any given time
## Lab guide
### Lab Steps
#### Task 1: Sign in to AWS Management Console
1. Click on the **Open Console** button, and you will get redirected to AWS Console in a new browser tab.
2. On the AWS sign-in page,
* Leave the Account ID as default. Never edit/remove the 12 digit Account ID present in the AWS Console. otherwise, you cannot proceed with the lab.
* Now copy your **User Name** and **Password** in the Lab Console to the **IAM Username and Password** in AWS Console and click on the **Sign in** button.
3. Once Signed In to the AWS Management Console, Make the default AWS Region as **US East (N. Virginia) us-east-1.**
> **Note :** If you face any issues, please go through [**FAQs and Troubleshooting for Labs**](https://play.whizlabs.com/site/task_support/faqs-and-troubleshooting).
####
#### Task 2 : Create DynamoDB Table
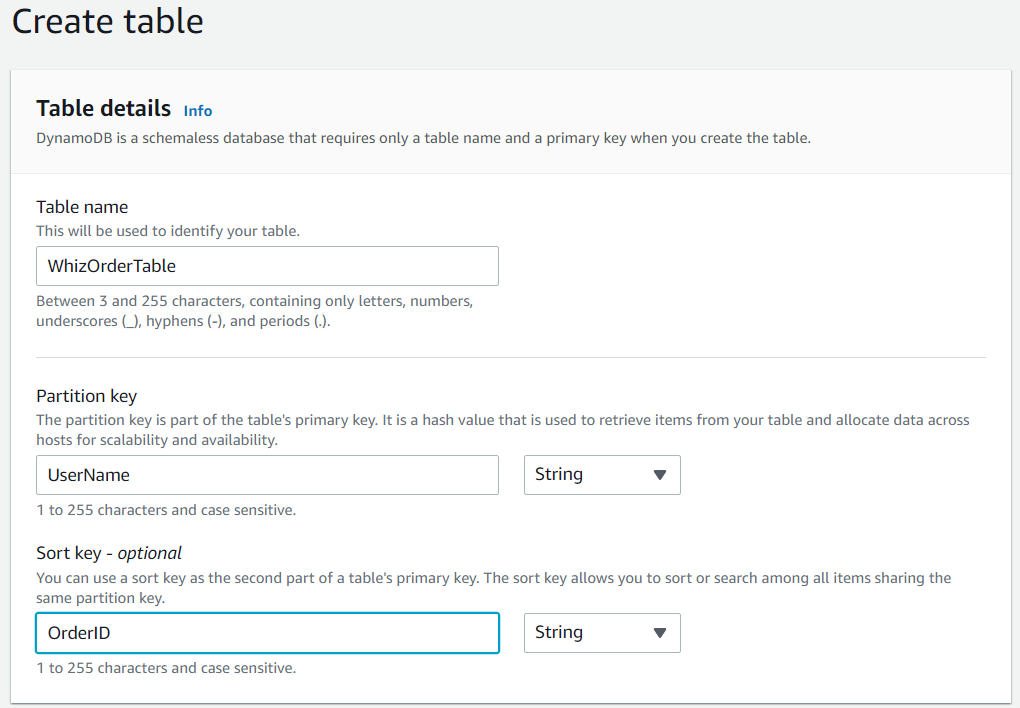
In this task, you will create a DynamoDB table named "WhizOrderTable" with specific configuration settings. Follow the steps below:
1. Make sure you are in the **US East (N. Virginia) us-east-1** Region.
2. Navigate to **DynamoDB** page by clicking on the **Services** menu at the top. DynamoDB is available under the **Database** section.
3. Once you have selected **Dynamodb,** click on the **Create Table**
4. Table details:
* Table name : ***WhizOrderTable***
* Partition Key : ***UserName*** (String)
* sort key : ***OrderID*** (String)
### Task Details
1. Sign into the AWS Management Console.
2. Create DynamoDB Table
3. Create Item
4. Use Global Secondary Index to Fetch Data
### Launching Lab Environment
1. To launch the lab environment, Click on the **Start Lab** button.
2. Please wait until the cloud environment is provisioned. It will take less than a minute to provision.
3. Once the Lab is started, you will be provided with **IAM user name**, **Password**, **Access** **Key**, and **Secret** **Access** **Key**.
**Note** : You can only start one lab at any given time
## Lab guide
### Lab Steps
#### Task 1: Sign in to AWS Management Console
1. Click on the **Open Console** button, and you will get redirected to AWS Console in a new browser tab.
2. On the AWS sign-in page,
* Leave the Account ID as default. Never edit/remove the 12 digit Account ID present in the AWS Console. otherwise, you cannot proceed with the lab.
* Now copy your **User Name** and **Password** in the Lab Console to the **IAM Username and Password** in AWS Console and click on the **Sign in** button.
3. Once Signed In to the AWS Management Console, Make the default AWS Region as **US East (N. Virginia) us-east-1.**
> **Note :** If you face any issues, please go through [**FAQs and Troubleshooting for Labs**](https://play.whizlabs.com/site/task_support/faqs-and-troubleshooting).
####
#### Task 2 : Create DynamoDB Table
In this task, you will create a DynamoDB table named "WhizOrderTable" with specific configuration settings. Follow the steps below:
1. Make sure you are in the **US East (N. Virginia) us-east-1** Region.
2. Navigate to **DynamoDB** page by clicking on the **Services** menu at the top. DynamoDB is available under the **Database** section.
3. Once you have selected **Dynamodb,** click on the **Create Table**
4. Table details:
* Table name : ***WhizOrderTable***
* Partition Key : ***UserName*** (String)
* sort key : ***OrderID*** (String)
 5. Keep all other settings as default. Click on **Create Table.**
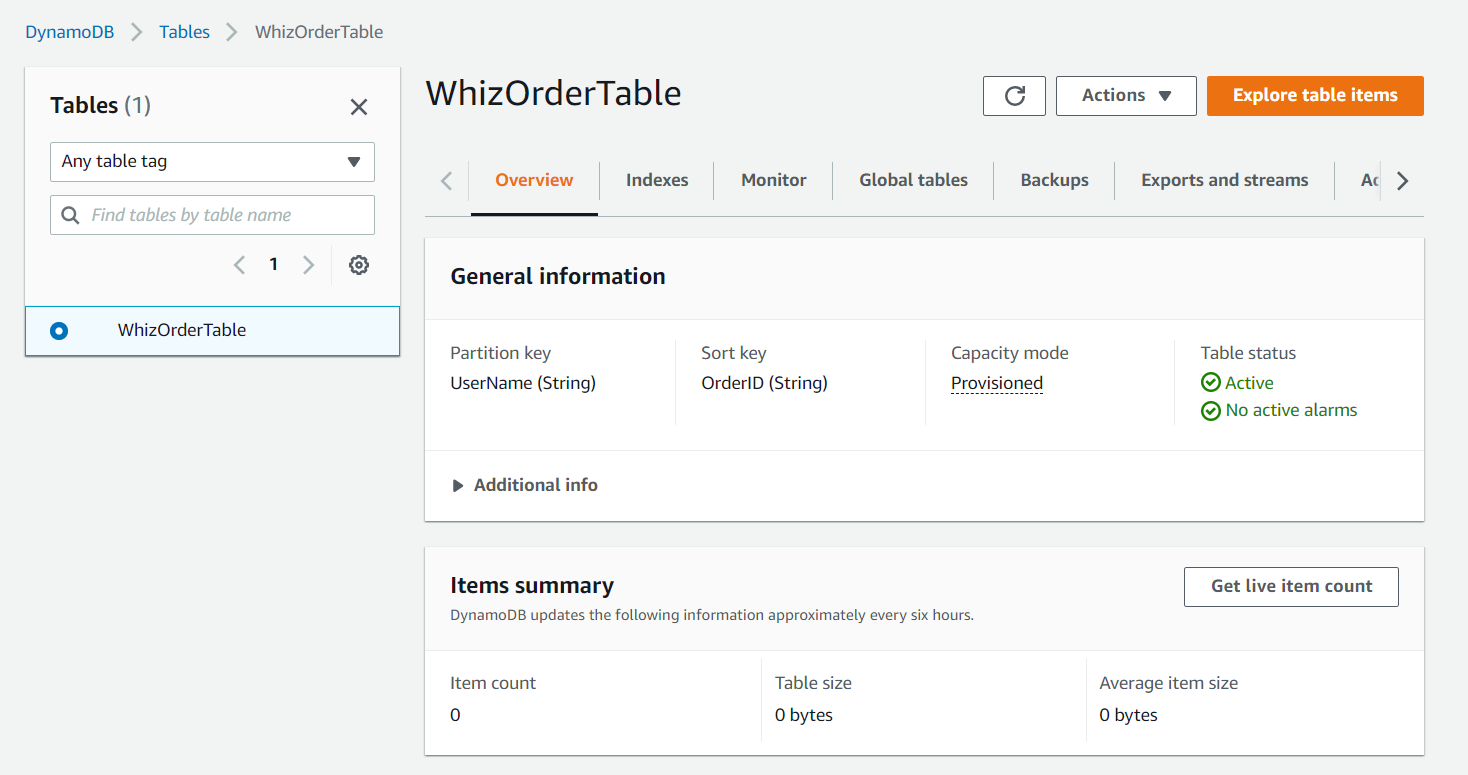
6. Once the table is created, click on the table you have created and select **ExploreTable Items** tab to review the default setting of the table.
5. Keep all other settings as default. Click on **Create Table.**
6. Once the table is created, click on the table you have created and select **ExploreTable Items** tab to review the default setting of the table.
 #### Task 3 : Create Item
In this task, you will create items in the DynamoDB table named "WhizOrderTable" with specific attribute values. Follow the steps below:
1. On the right side panel, click on the **Explore Items** under **Tables**.
2. Now select the table you have created i.e **WhizOrderTable** and click on **Create Item**.
3. Once you select the **create item**, you’ll see **UserName and** **OrderID,** but we need 2 more attributes in our table. Click on **Add new attribute** and then select **String** from the drop down menu.
4. Give the attribute name as ***ReturnDate***
5. Click on **Add new attribute** again and select **String** from the drop down menu.
6. Now Give the attribute name as ***UserAmount***
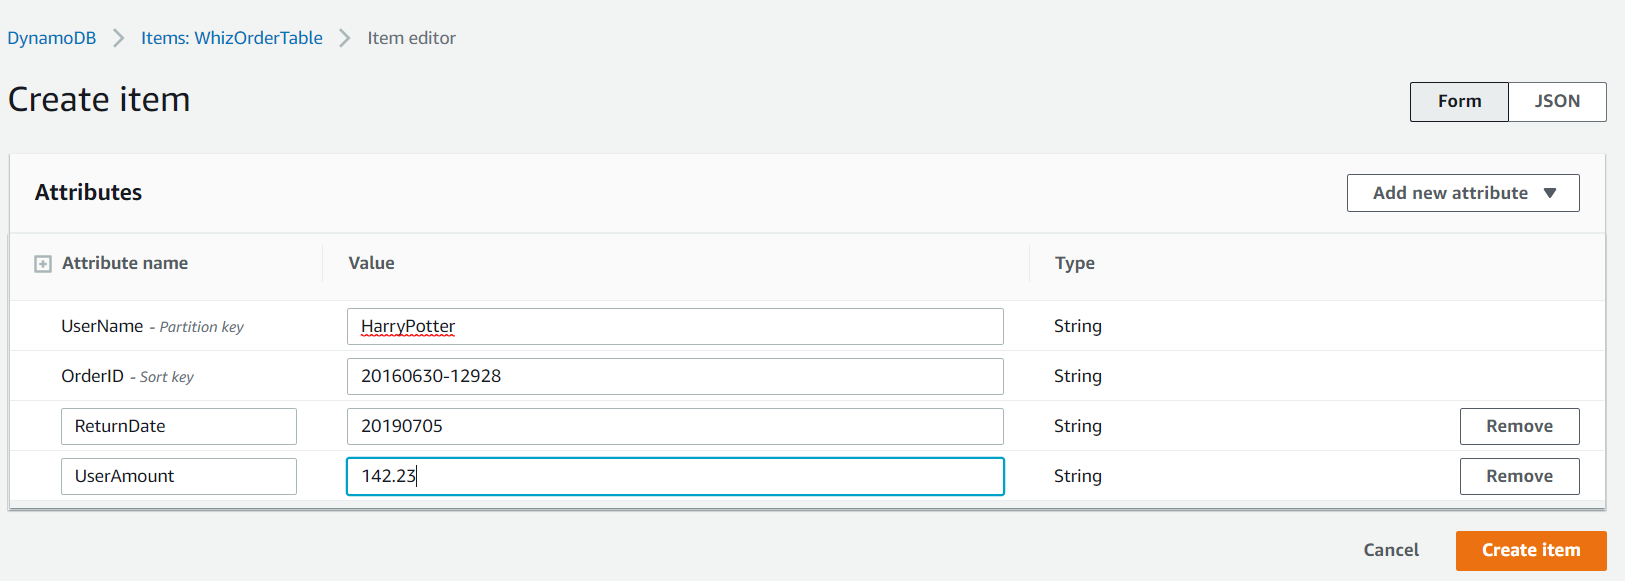
7. Now enter the values as shown below:
* UserName : Enter ***HarryPotter***
* OrderID : Enter ***20160630-12928***
* ReturnDate : Enter ***20190705***
* UserAmount : Enter ***142.23***
#### Task 3 : Create Item
In this task, you will create items in the DynamoDB table named "WhizOrderTable" with specific attribute values. Follow the steps below:
1. On the right side panel, click on the **Explore Items** under **Tables**.
2. Now select the table you have created i.e **WhizOrderTable** and click on **Create Item**.
3. Once you select the **create item**, you’ll see **UserName and** **OrderID,** but we need 2 more attributes in our table. Click on **Add new attribute** and then select **String** from the drop down menu.
4. Give the attribute name as ***ReturnDate***
5. Click on **Add new attribute** again and select **String** from the drop down menu.
6. Now Give the attribute name as ***UserAmount***
7. Now enter the values as shown below:
* UserName : Enter ***HarryPotter***
* OrderID : Enter ***20160630-12928***
* ReturnDate : Enter ***20190705***
* UserAmount : Enter ***142.23***
 8. Now click on **create item**.
9. Navigate to the **Tables** and click on **Index** tab next to Overview section.
8. Now click on **create item**.
9. Navigate to the **Tables** and click on **Index** tab next to Overview section.
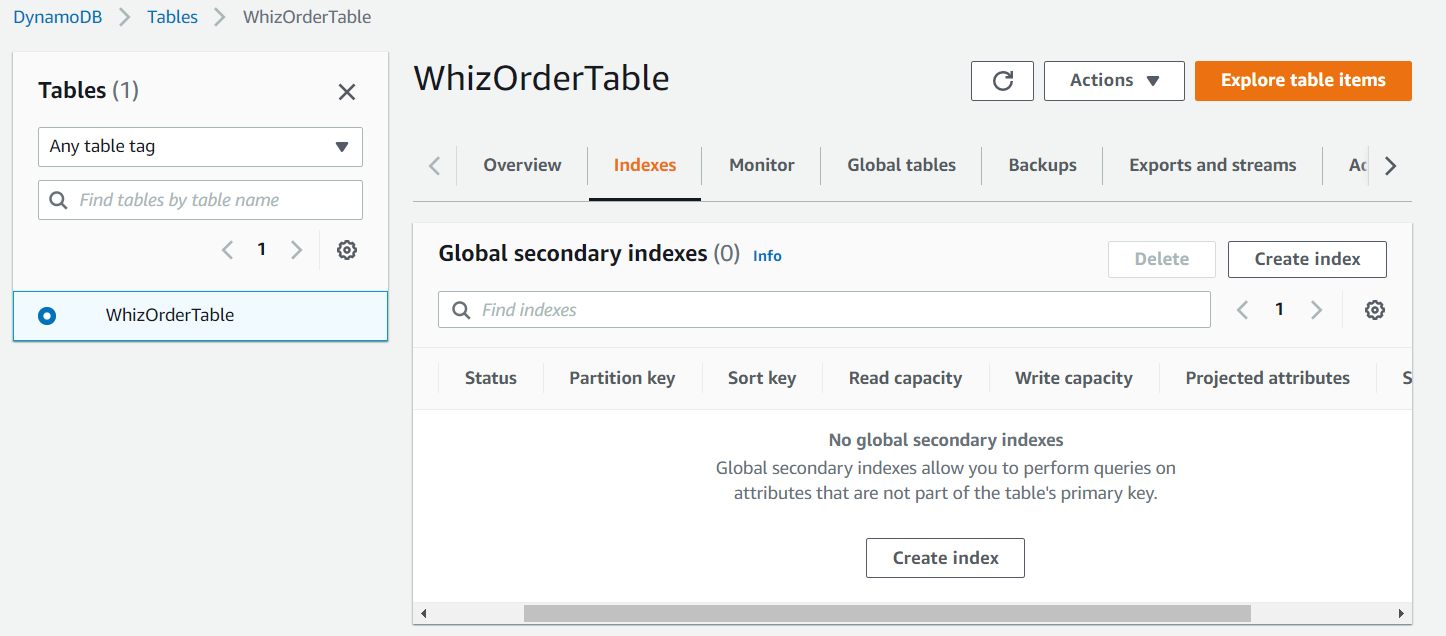 10. Click on **Create Index**.
11. Enter the Paritition key as ***ReturnDate*** and Sort key as ***UserAmount***
12. Leave everything as default and Click on **Create index** and wait until the index state changes to **Active**. The nomenclature for Index name is a combination of the columns we selected, followed by Index. You can modify the index name as per the requirement.
13. Once the Global Secondary Index is active, you can check the **Indexes** tab to confirm.
* **Note:** It will take 5-10 minutes to be active.
14. Move to the **Explore Items** tab and click on **Create item**. Insert the following additional data into the table and click on **Create item**.
* Attribute name - Attribute Value
* Enter ***UserName*** : Enter ***HarryPotter***
* Enter ***OrderID*** : Enter ***20160630-28176***
* Enter ***ReturnDate*** : Enter ***20190513***
* Enter ***UserAmount*** : Enter ***88.30***
* Attribute name - Attribute Value
* Enter ***UserName*** : Enter ***Ron***
* Enter ***OrderID*** : Enter ***20170609-25875***
* Enter ***ReturnDate*** : Enter ***20190628***
* Enter ***UserAmount*** : Enter ***116.86***
* Attribute name - Attribute Value
* Enter ***UserName*** : Enter ***Ron***
* Enter ***OrderID*** : Enter ***20170609-4177***
* Enter ***ReturnDate*** : Enter ***20190731***
* Enter ***UserAmount*** : Enter ***27.89***
* Attribute name - Attribute Value
* Enter ***UserName*** : Enter ***Voldemort***
* Enter ***OrderID*** : Enter ***20170609-17146***
* Enter ***ReturnDate*** : Enter ***20190511***
* Enter ***UserAmount*** : Enter ***114.00***
* Attribute name - Attribute Value
* Enter ***UserName*** : Enter ***Voldemort***
* Enter ***OrderID*** : Enter ***20170609-18618***
* Enter ***ReturnDate*** : Enter ***20190615***
* Enter ***UserAmount*** : Enter ***122.45***
15. Please note that, you need to create items for individual person. Do not add all the details of every person at once and create a single item.
16. The table looks something like this after creating all the items with provided data.
10. Click on **Create Index**.
11. Enter the Paritition key as ***ReturnDate*** and Sort key as ***UserAmount***
12. Leave everything as default and Click on **Create index** and wait until the index state changes to **Active**. The nomenclature for Index name is a combination of the columns we selected, followed by Index. You can modify the index name as per the requirement.
13. Once the Global Secondary Index is active, you can check the **Indexes** tab to confirm.
* **Note:** It will take 5-10 minutes to be active.
14. Move to the **Explore Items** tab and click on **Create item**. Insert the following additional data into the table and click on **Create item**.
* Attribute name - Attribute Value
* Enter ***UserName*** : Enter ***HarryPotter***
* Enter ***OrderID*** : Enter ***20160630-28176***
* Enter ***ReturnDate*** : Enter ***20190513***
* Enter ***UserAmount*** : Enter ***88.30***
* Attribute name - Attribute Value
* Enter ***UserName*** : Enter ***Ron***
* Enter ***OrderID*** : Enter ***20170609-25875***
* Enter ***ReturnDate*** : Enter ***20190628***
* Enter ***UserAmount*** : Enter ***116.86***
* Attribute name - Attribute Value
* Enter ***UserName*** : Enter ***Ron***
* Enter ***OrderID*** : Enter ***20170609-4177***
* Enter ***ReturnDate*** : Enter ***20190731***
* Enter ***UserAmount*** : Enter ***27.89***
* Attribute name - Attribute Value
* Enter ***UserName*** : Enter ***Voldemort***
* Enter ***OrderID*** : Enter ***20170609-17146***
* Enter ***ReturnDate*** : Enter ***20190511***
* Enter ***UserAmount*** : Enter ***114.00***
* Attribute name - Attribute Value
* Enter ***UserName*** : Enter ***Voldemort***
* Enter ***OrderID*** : Enter ***20170609-18618***
* Enter ***ReturnDate*** : Enter ***20190615***
* Enter ***UserAmount*** : Enter ***122.45***
15. Please note that, you need to create items for individual person. Do not add all the details of every person at once and create a single item.
16. The table looks something like this after creating all the items with provided data.
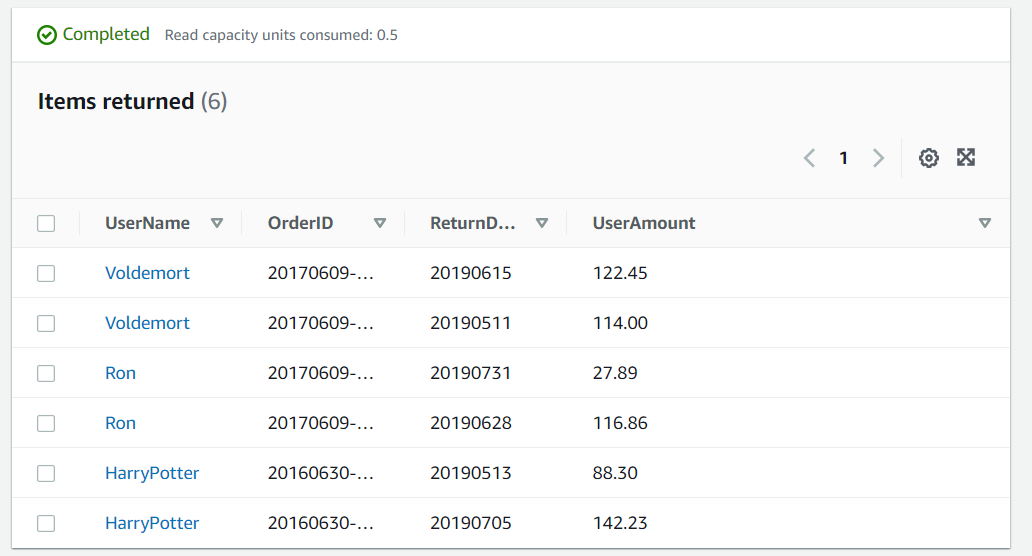 17. Also you can edit the values if you have made any mistake while creating the items by selecting the item, editing it and saving the changes.
#### Task 4 : Use Global Secondary Index to Fetch Data
In this task, you will utilize the Global Secondary Index (ReturnDate-UserAmount-index) to fetch data from the DynamoDB table named "WhizOrderTable." Follow the steps below:
1. Now go to **Explore Table items** and click on the **Scan** or **Query** option for ***WhizOrderTable***.
17. Also you can edit the values if you have made any mistake while creating the items by selecting the item, editing it and saving the changes.
#### Task 4 : Use Global Secondary Index to Fetch Data
In this task, you will utilize the Global Secondary Index (ReturnDate-UserAmount-index) to fetch data from the DynamoDB table named "WhizOrderTable." Follow the steps below:
1. Now go to **Explore Table items** and click on the **Scan** or **Query** option for ***WhizOrderTable***.
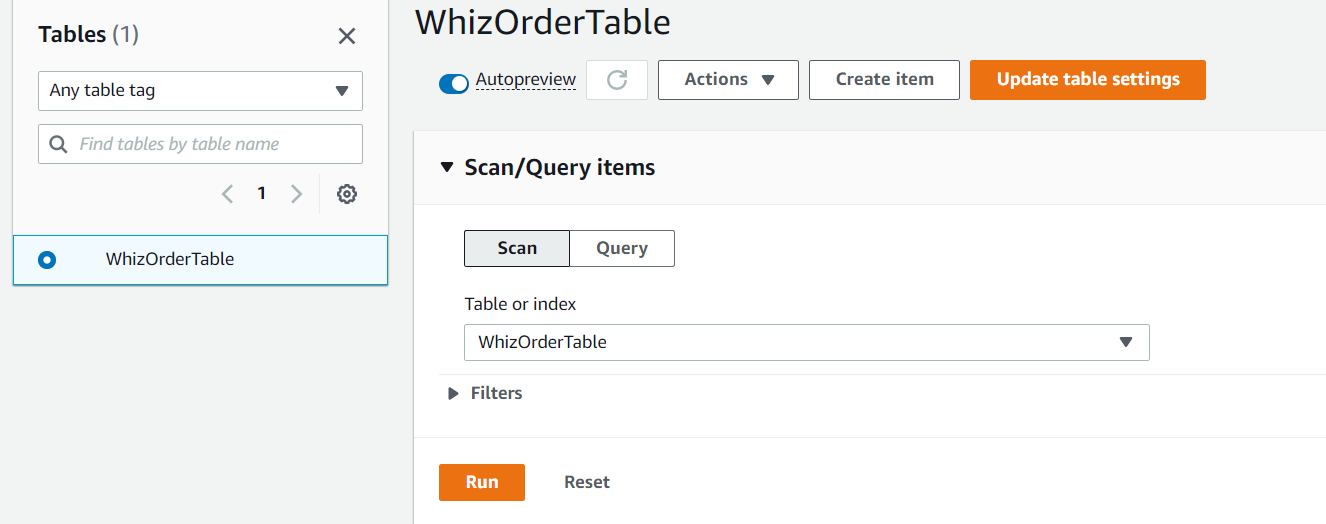 2. Refresh the page before using the scan option to display the index.
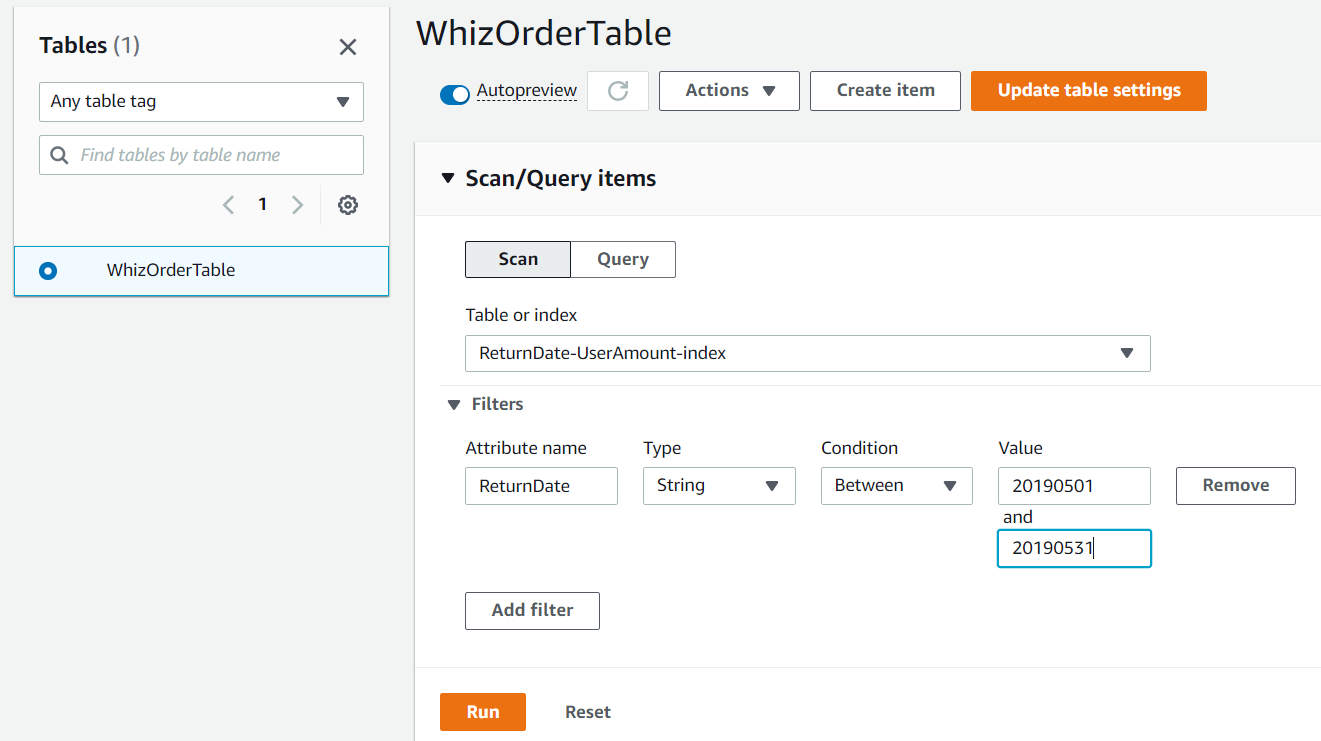
3. Lets try with the **Scan** option to search for data.
* Select the “**Scan**” option (which is in the left upper corner).
* Table or index : Select **ReturnDate-UserAmount-index**
* Expand Filters,
* Attribute name : Enter ***ReturnDate***
* Type : Select **String**
* Condition : Select **Between**
* Value : Enter ***20190501*** and ***20190531***
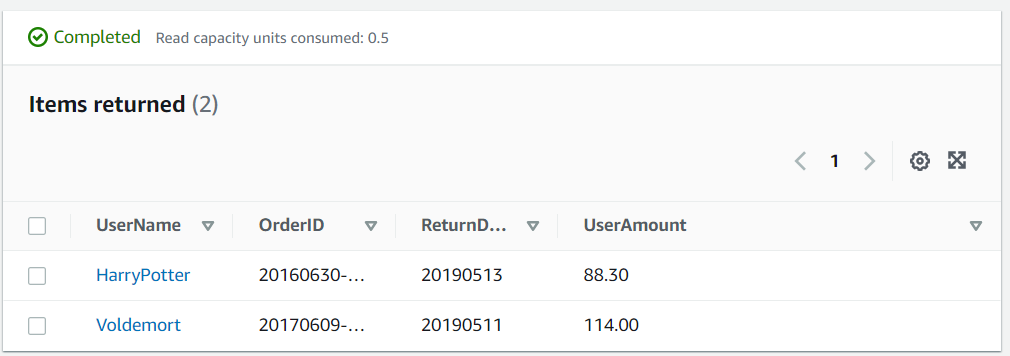
* In this example, we are trying to fetch the users who returned their orders in the month of May.
* Now click on **Run** button.
> **Note: If the Global secondary index is not showing in the Scan list, Please wait another 5 to 10 minutes and reload the entire page. This is an AWS side delay.**
2. Refresh the page before using the scan option to display the index.
3. Lets try with the **Scan** option to search for data.
* Select the “**Scan**” option (which is in the left upper corner).
* Table or index : Select **ReturnDate-UserAmount-index**
* Expand Filters,
* Attribute name : Enter ***ReturnDate***
* Type : Select **String**
* Condition : Select **Between**
* Value : Enter ***20190501*** and ***20190531***
* In this example, we are trying to fetch the users who returned their orders in the month of May.
* Now click on **Run** button.
> **Note: If the Global secondary index is not showing in the Scan list, Please wait another 5 to 10 minutes and reload the entire page. This is an AWS side delay.**
 4. Now you will be able to see the **items returned** below based on the search filters we have given.
 5. Lets try with the **Query** option to search for some data.
6. Click on **Query** next to Scan.
* Table or index : Select **ReturnDate-UserAmount-index**
* ReturnDate : Enter ***20190628***
* UserAmount (Sort key) : Select **Greater than or equal to**
* Enter sort key : Enter ***100***
7. Here we need to check which users returned an item on that particular day. To do so, we use the sort key to qualify the amount, as per the requirement.
8. Click on **Run** button.
5. Lets try with the **Query** option to search for some data.
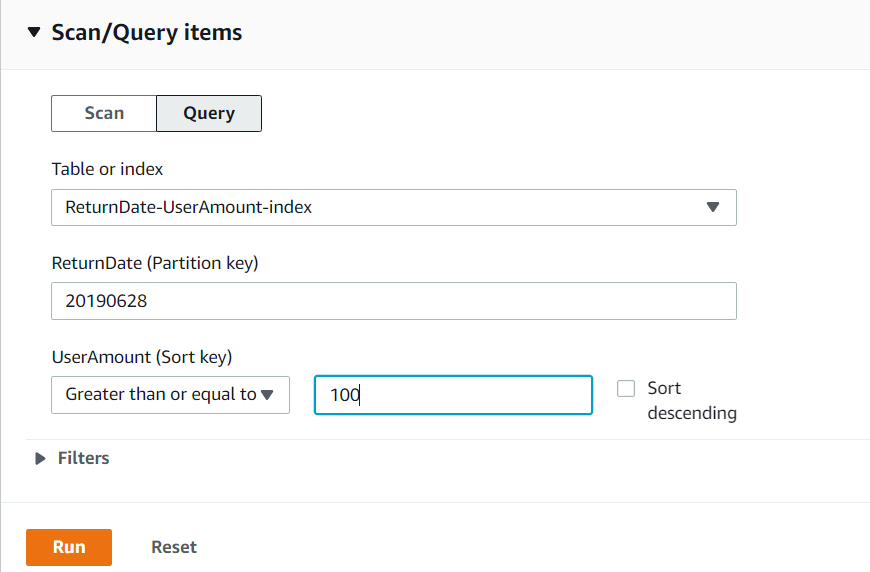
6. Click on **Query** next to Scan.
* Table or index : Select **ReturnDate-UserAmount-index**
* ReturnDate : Enter ***20190628***
* UserAmount (Sort key) : Select **Greater than or equal to**
* Enter sort key : Enter ***100***
7. Here we need to check which users returned an item on that particular day. To do so, we use the sort key to qualify the amount, as per the requirement.
8. Click on **Run** button.
 9. Now you will be able to see the **items returned** below based on the search filters we have given.
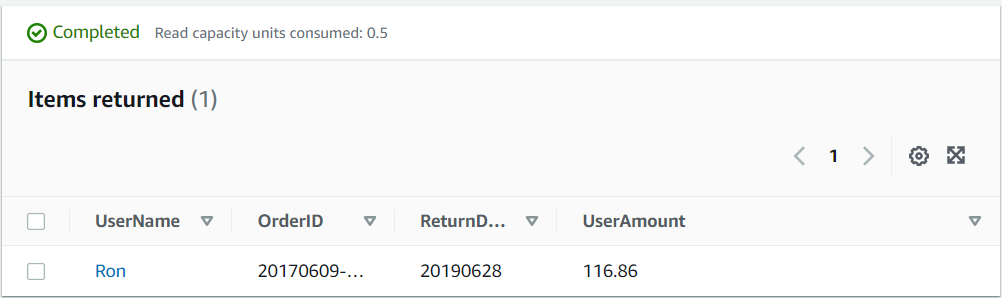 This way global secondary index allows us to quickly find all the returns entered on various dates, which would normally require full table scans.
> ##### Do You Know?
>
> DynamoDB's Global Secondary Indexes provide flexible querying options by enabling you to create alternative indexes on non-key attributes, extending the querying capabilities beyond the primary key.
### Completion and Conclusion
1. You have created a DynamoDB table with Global Secondary Indexes.
2. You have successfully fetched data using Global Secondary Indexes.
### End Lab
1. Sign out of the AWS account.
2. You have successfully completed the lab.
3. Once you have completed the steps, click on **End Lab** from the IP Lab Portal dashboard.
## What gets checked
When you press **Check my work**, the platform verifies each of these:
* **Create Amazon DynamoDB Table** — Check whether a DynamoDB Table is created or not.
* **Create Items in DynamoDB Table** — Check whether items in the DynamoDB table are created or not.
## Related help
* [FAQs and Troubleshooting](/aws-saa/support/faqs-and-troubleshooting)
* [SSH into EC2 Instance](/aws-saa/support/ssh-into-ec2-instance)
This documentation is built and hosted on [Mintlify](https://mintlify.com), a developer documentation platform.
This way global secondary index allows us to quickly find all the returns entered on various dates, which would normally require full table scans.
> ##### Do You Know?
>
> DynamoDB's Global Secondary Indexes provide flexible querying options by enabling you to create alternative indexes on non-key attributes, extending the querying capabilities beyond the primary key.
### Completion and Conclusion
1. You have created a DynamoDB table with Global Secondary Indexes.
2. You have successfully fetched data using Global Secondary Indexes.
### End Lab
1. Sign out of the AWS account.
2. You have successfully completed the lab.
3. Once you have completed the steps, click on **End Lab** from the IP Lab Portal dashboard.
## What gets checked
When you press **Check my work**, the platform verifies each of these:
* **Create Amazon DynamoDB Table** — Check whether a DynamoDB Table is created or not.
* **Create Items in DynamoDB Table** — Check whether items in the DynamoDB table are created or not.
## Related help
* [FAQs and Troubleshooting](/aws-saa/support/faqs-and-troubleshooting)
* [SSH into EC2 Instance](/aws-saa/support/ssh-into-ec2-instance)
This documentation is built and hosted on [Mintlify](https://mintlify.com), a developer documentation platform.