> ## Documentation Index
> Fetch the complete documentation index at: https://cloud-architect.ipoint-labs.com/llms.txt
> Use this file to discover all available pages before exploring further.
# How to Query into RDS MySQL Using AWS Lambda
> Hands-on lab · 15m
Launch this lab in the IP Lab Portal, then follow the steps below in the AWS console.
Open IP Lab Portal
## Overview
### Lab Details
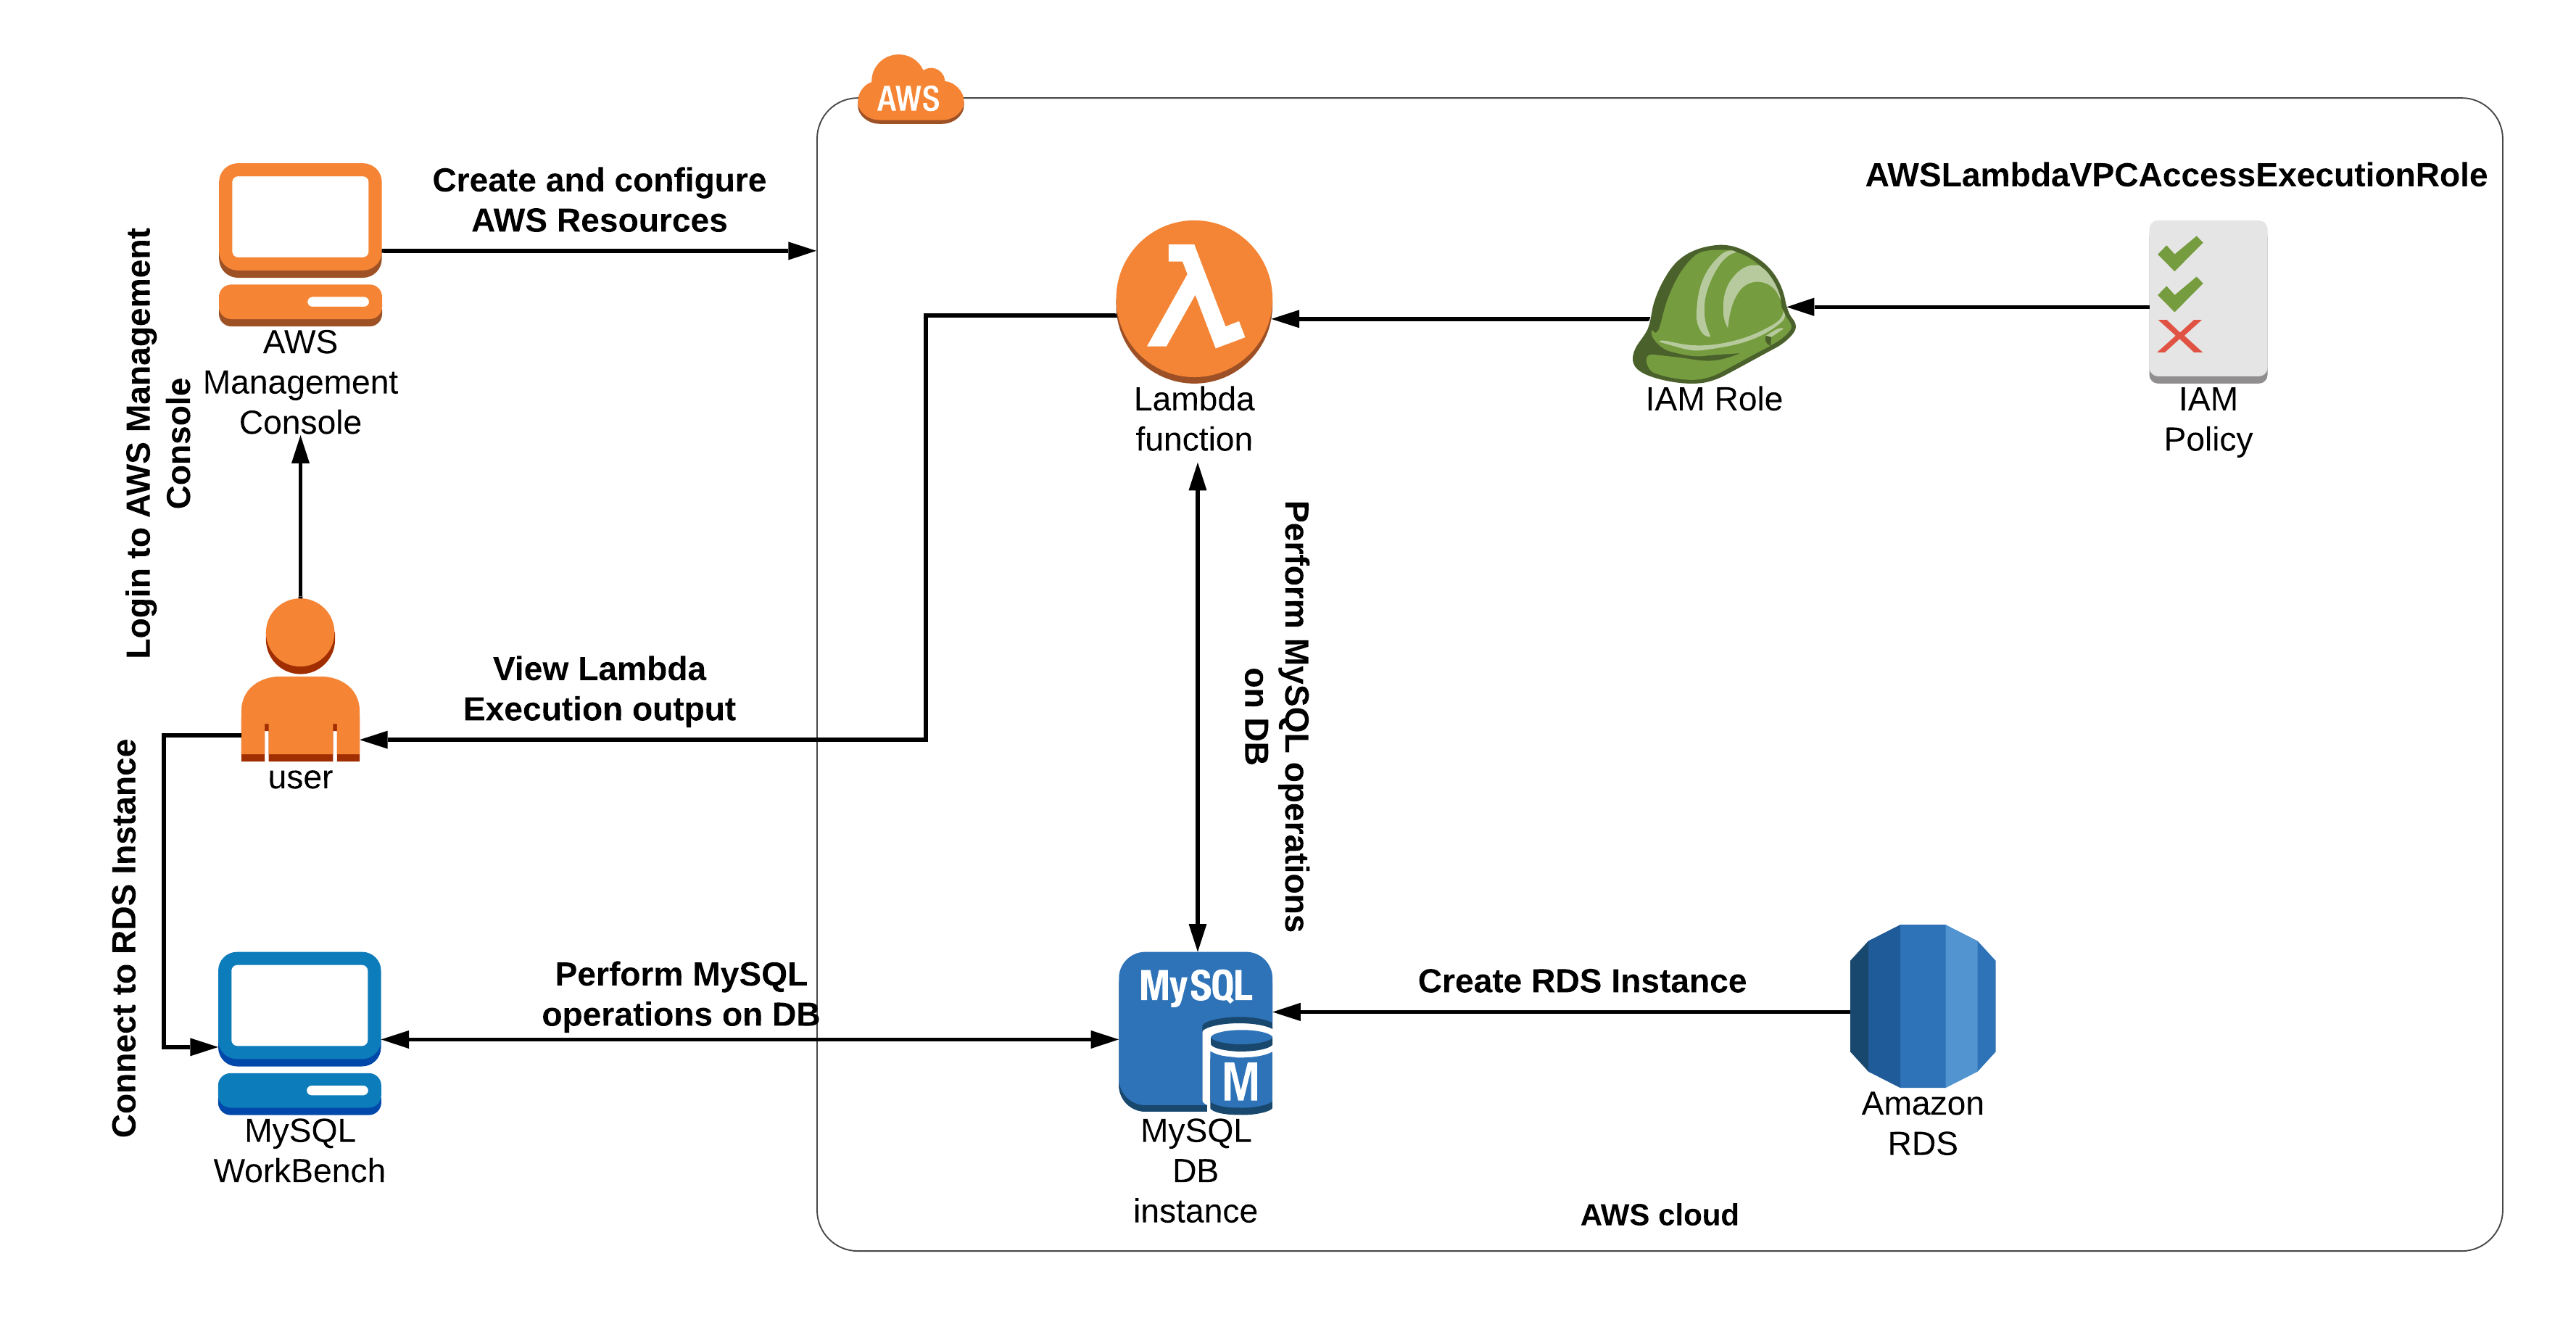
1. This lab walks you through the creation of an RDS MySQL Database, creating a table and inserting some values using MySQL Workbench. Now we will create a Lambda function and write MySQL queries to read and write data into the database.
2. Duration: **75 minutes**
3. AWS Region: **US East (N. Virginia)** **us-east-1**
### Introduction
1. Creating a MySQL database on Amazon RDS will configure the database instance with the desired specifications such as **instance type, storage size, and security settings.**
2. Connecting to RDS MySQL from Lambda: Within your Lambda function code, use the programming language's MySQL library or a MySQL connector to establish a connection with the RDS MySQL database. Pass the RDS endpoint, username, password, and database name to establish the connection.
3. Test and deploy: Test your Lambda function locally and ensure that it can successfully query the RDS MySQL database. Once you are satisfied with the functionality, deploy the Lambda function to AWS and test it in the production environment. Monitor the logs and performance of your Lambda function to ensure it is functioning as expected.
### Architecture Diagram
 ### Task Details
1. Sign in to AWS Management Console
2. Create a security group for RDS Instance
3. Create RDS Database Instance
4. Connect to the RDS instance using MySQL Workbench
5. Create a Lambda function
6. Deleting AWS Resources
### Prerequisites
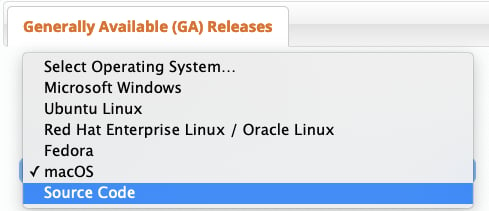
1. For testing this lab, it is necessary to download the MySql GUI Tool, To download it, go to the [Download MySQL Workbench page](https://dev.mysql.com/downloads/workbench/). Based on your OS, select the respective option under **Generally Available (GA) Releases**. Download and Install.
### Task Details
1. Sign in to AWS Management Console
2. Create a security group for RDS Instance
3. Create RDS Database Instance
4. Connect to the RDS instance using MySQL Workbench
5. Create a Lambda function
6. Deleting AWS Resources
### Prerequisites
1. For testing this lab, it is necessary to download the MySql GUI Tool, To download it, go to the [Download MySQL Workbench page](https://dev.mysql.com/downloads/workbench/). Based on your OS, select the respective option under **Generally Available (GA) Releases**. Download and Install.
 ### Launching Lab Environment
1. To launch the lab environment, click on the **Start Lab** button.
2. Please wait until the cloud environment is provisioned. It will take less than a minute to provision.
3. Once the Lab is started, you will be provided with **IAM username**, **Password**, **Access** **Key**, and **Secret** **Access** **Key**.
> **Note** : You can only start one lab at any given time
## Files you need
Download these before you start — the lab cannot be completed without them.
* [Download Zip](/images/saa-files/how-to-query-into-rds-mysql-using-aws-lambda/download-zip.zip)
* [Lambda code 2](/images/saa-files/how-to-query-into-rds-mysql-using-aws-lambda/lambda-code-2.py)
## Lab guide
### Lab Steps
#### Task 1: Sign in to AWS Management Console
1. Click on the **Open Console** button, and you will get redirected to AWS Console in a new browser tab.
2. On the AWS sign-in page,
* Leave the Account ID as default. Never edit/remove the 12 digit Account ID present in the AWS Console. otherwise, you cannot proceed with the lab.
* Now copy your **User Name** and **Password** in the Lab Console to the **IAM Username and Password** in AWS Console and click on the **Sign in** button
3. Once Signed In to the AWS Management Console, Make the default AWS Region as **US East (N. Virginia) us-east-1.**
#### Task 2: Create a Security Group for RDS instance
1. Make sure you are in the **N.Virginia us-east-1** Region.
2. Click on **Services** and select **EC2** under the **Compute** section.
3. On the left panel menu, select the **Security Groups** under the **Network & Security** section.
4. Click on the **Create Security Group.**
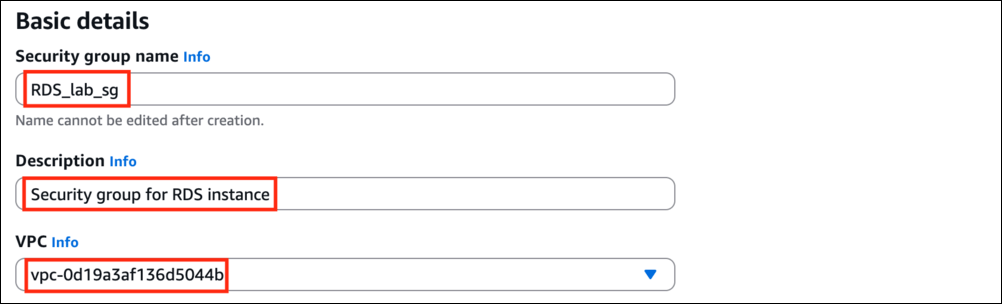
5. We are going to create a Security group for RDS with a 3306 port number enabled.
* Security group name : Enter ***RDS\_lab\_sg***
* Description: Enter ***Security group for RDS instance***
* VPC: Select Default VPC
### Launching Lab Environment
1. To launch the lab environment, click on the **Start Lab** button.
2. Please wait until the cloud environment is provisioned. It will take less than a minute to provision.
3. Once the Lab is started, you will be provided with **IAM username**, **Password**, **Access** **Key**, and **Secret** **Access** **Key**.
> **Note** : You can only start one lab at any given time
## Files you need
Download these before you start — the lab cannot be completed without them.
* [Download Zip](/images/saa-files/how-to-query-into-rds-mysql-using-aws-lambda/download-zip.zip)
* [Lambda code 2](/images/saa-files/how-to-query-into-rds-mysql-using-aws-lambda/lambda-code-2.py)
## Lab guide
### Lab Steps
#### Task 1: Sign in to AWS Management Console
1. Click on the **Open Console** button, and you will get redirected to AWS Console in a new browser tab.
2. On the AWS sign-in page,
* Leave the Account ID as default. Never edit/remove the 12 digit Account ID present in the AWS Console. otherwise, you cannot proceed with the lab.
* Now copy your **User Name** and **Password** in the Lab Console to the **IAM Username and Password** in AWS Console and click on the **Sign in** button
3. Once Signed In to the AWS Management Console, Make the default AWS Region as **US East (N. Virginia) us-east-1.**
#### Task 2: Create a Security Group for RDS instance
1. Make sure you are in the **N.Virginia us-east-1** Region.
2. Click on **Services** and select **EC2** under the **Compute** section.
3. On the left panel menu, select the **Security Groups** under the **Network & Security** section.
4. Click on the **Create Security Group.**
5. We are going to create a Security group for RDS with a 3306 port number enabled.
* Security group name : Enter ***RDS\_lab\_sg***
* Description: Enter ***Security group for RDS instance***
* VPC: Select Default VPC
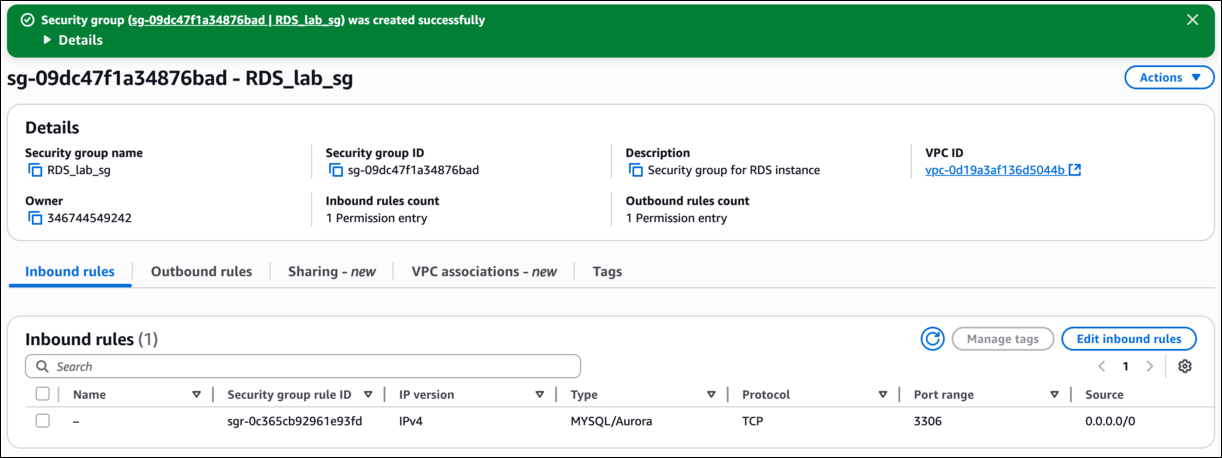
 6. Click on the **Add rule** button under **Inbound rules.**
* Type: Select **MYSQL/Aurora**
* Source: Select **Anywhere-IPv4**
* In the textbox add ***0.0.0.0/0***
6. Click on the **Add rule** button under **Inbound rules.**
* Type: Select **MYSQL/Aurora**
* Source: Select **Anywhere-IPv4**
* In the textbox add ***0.0.0.0/0***
 7. Leave everything as default and click on the **Create Security Group.**
 #### Task 3: Create RDS Database Instance
1. Make sure you are in the **US East (N. Virginia) us-east-1** Region.
2. Navigate to **Aurora and RDS** by clicking on the **Services** menu available under the **Database** section.
3. Click on **Databases** on the left panel and then click on **Create Database**.
#### Task 3: Create RDS Database Instance
1. Make sure you are in the **US East (N. Virginia) us-east-1** Region.
2. Navigate to **Aurora and RDS** by clicking on the **Services** menu available under the **Database** section.
3. Click on **Databases** on the left panel and then click on **Create Database**.
 * Database creation method : **Standard create**
 * Engine options : Select **MySQL**
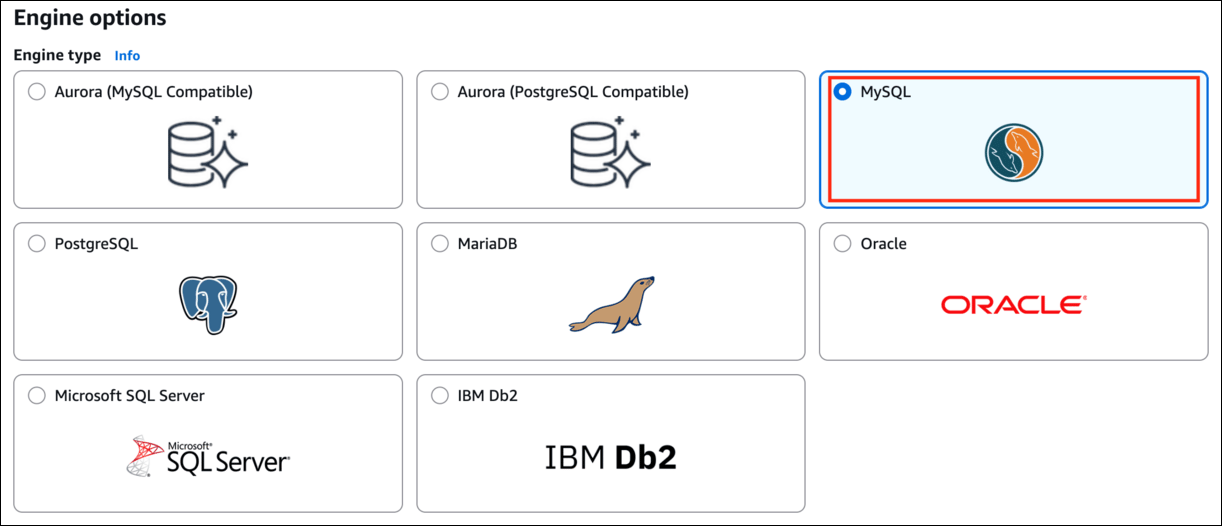 * Version : **Default**
* Templates : Select **Sandbox**
**Note: Selecting the Sandbox as a template is compulsory, else database won't be created.**
* Version : **Default**
* Templates : Select **Sandbox**
**Note: Selecting the Sandbox as a template is compulsory, else database won't be created.**
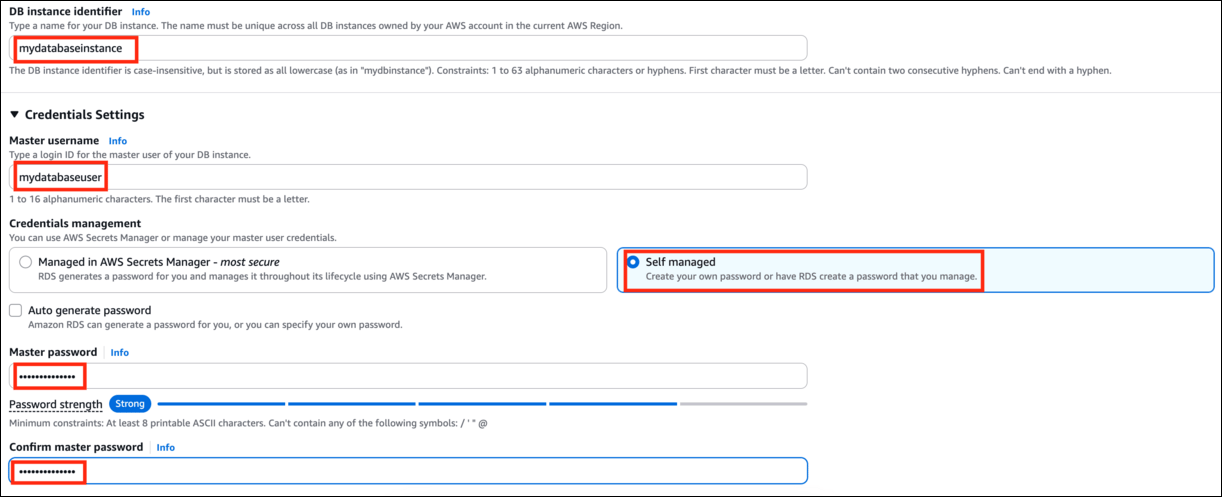
 * DB instance identifier : ***mydatabaseinstance***
* Master username: ***mydatabaseuser***
* Credentials management: Select **Self managed**
* Master password and Confirm password: ***mydatabasepassword***
* DB instance identifier : ***mydatabaseinstance***
* Master username: ***mydatabaseuser***
* Credentials management: Select **Self managed**
* Master password and Confirm password: ***mydatabasepassword***
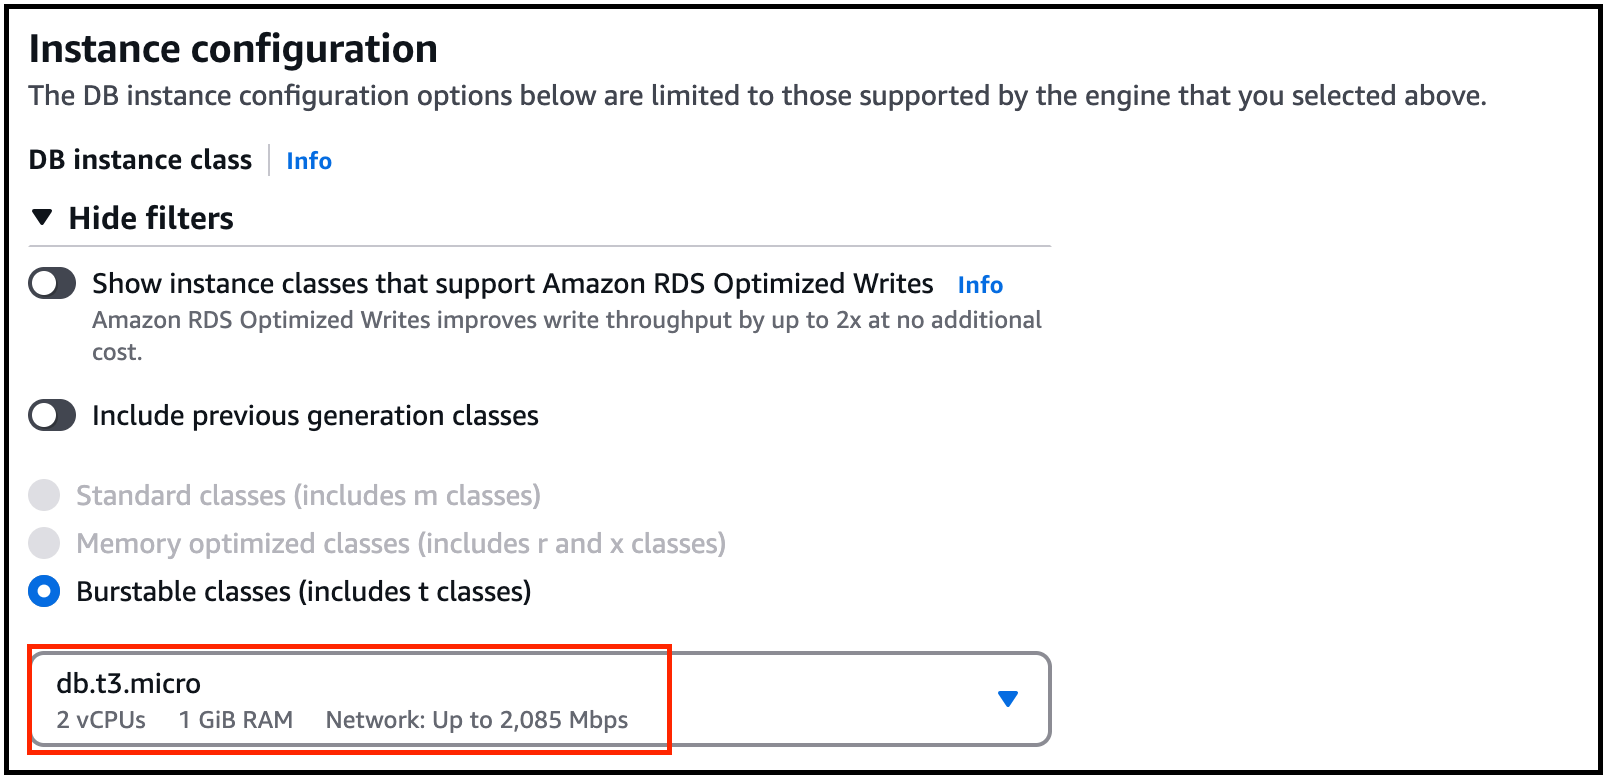
 * DB instance class : **db.t3.micro — 2 vCPU, 1 GiB RAM**
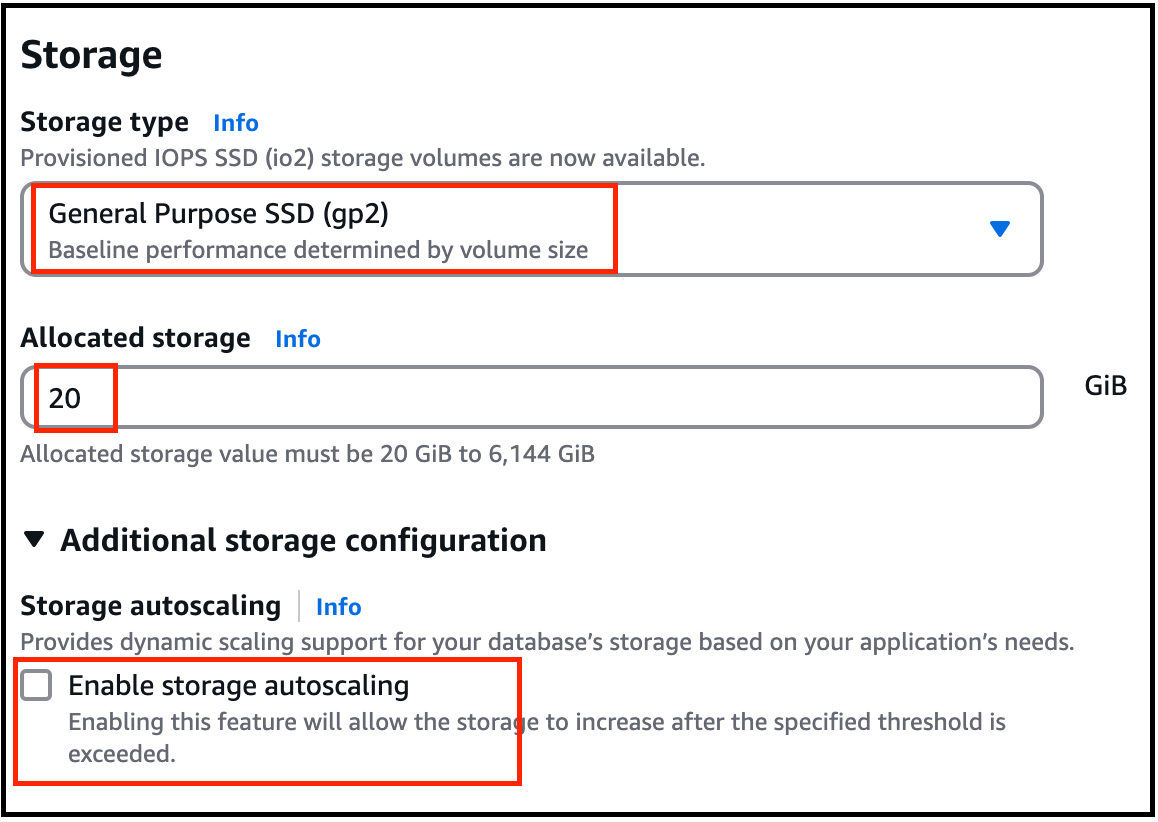
 * Storage type : **General Purpose (SSD)**
* Allocated storage : **20 (default)**
* Click on **Additional storage configuration** to expand.
* Enable storage autoscaling : **Uncheck**
* Storage type : **General Purpose (SSD)**
* Allocated storage : **20 (default)**
* Click on **Additional storage configuration** to expand.
* Enable storage autoscaling : **Uncheck**
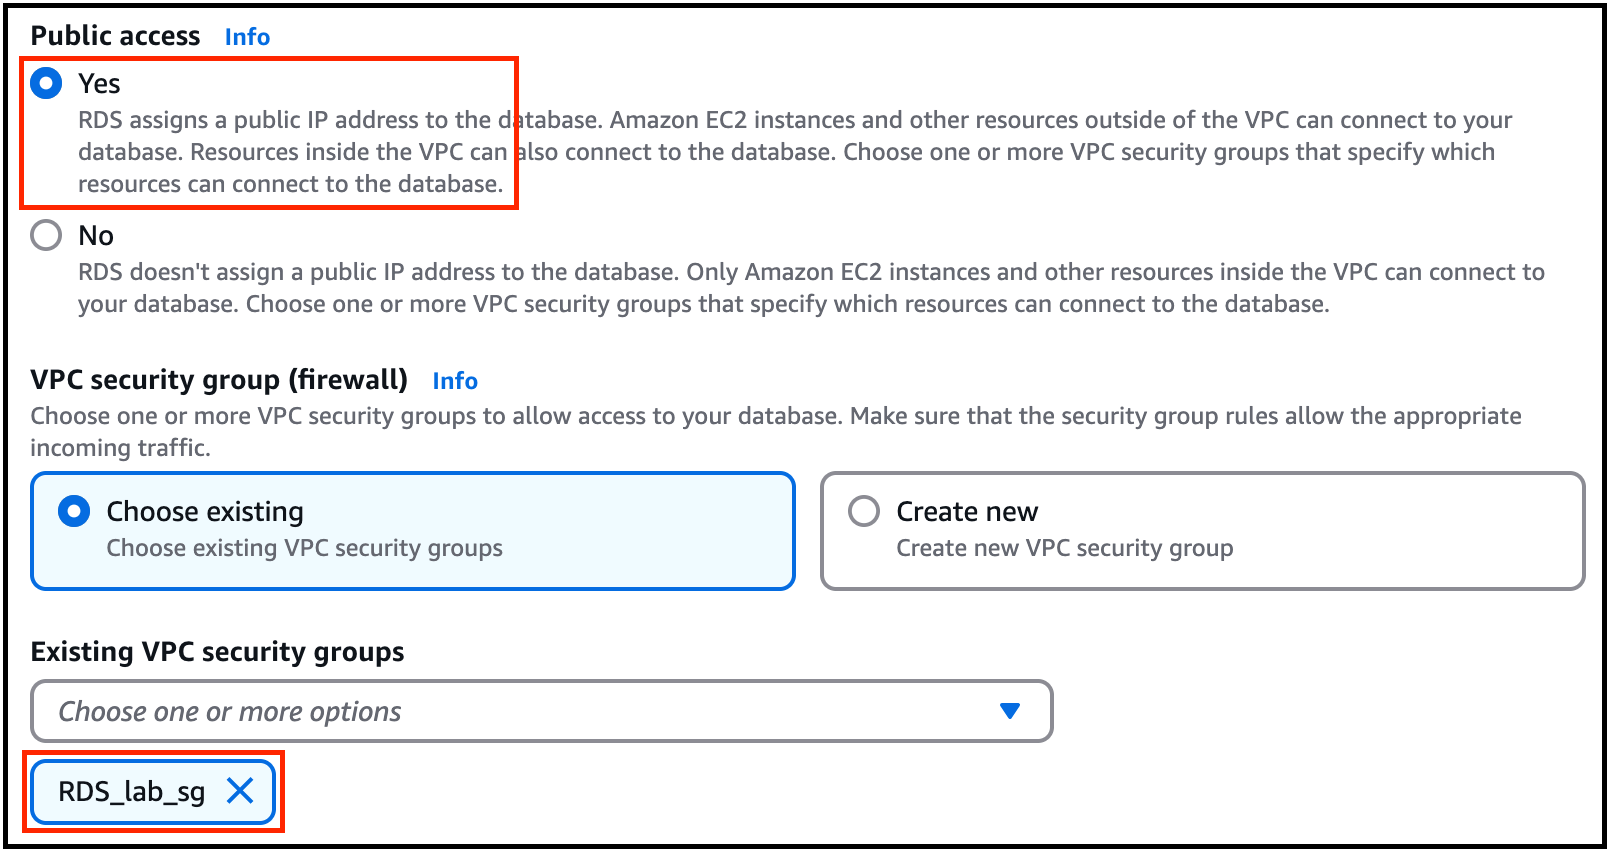
 * Public access : Select **Yes**
* VPC security groups **: Select Choose existing**
**Note: Remove the default one and select RDS\_lab\_sg instead**
* Public access : Select **Yes**
* VPC security groups **: Select Choose existing**
**Note: Remove the default one and select RDS\_lab\_sg instead**
 Click on **Additional Configuration** in the bottom of the page to expand it:
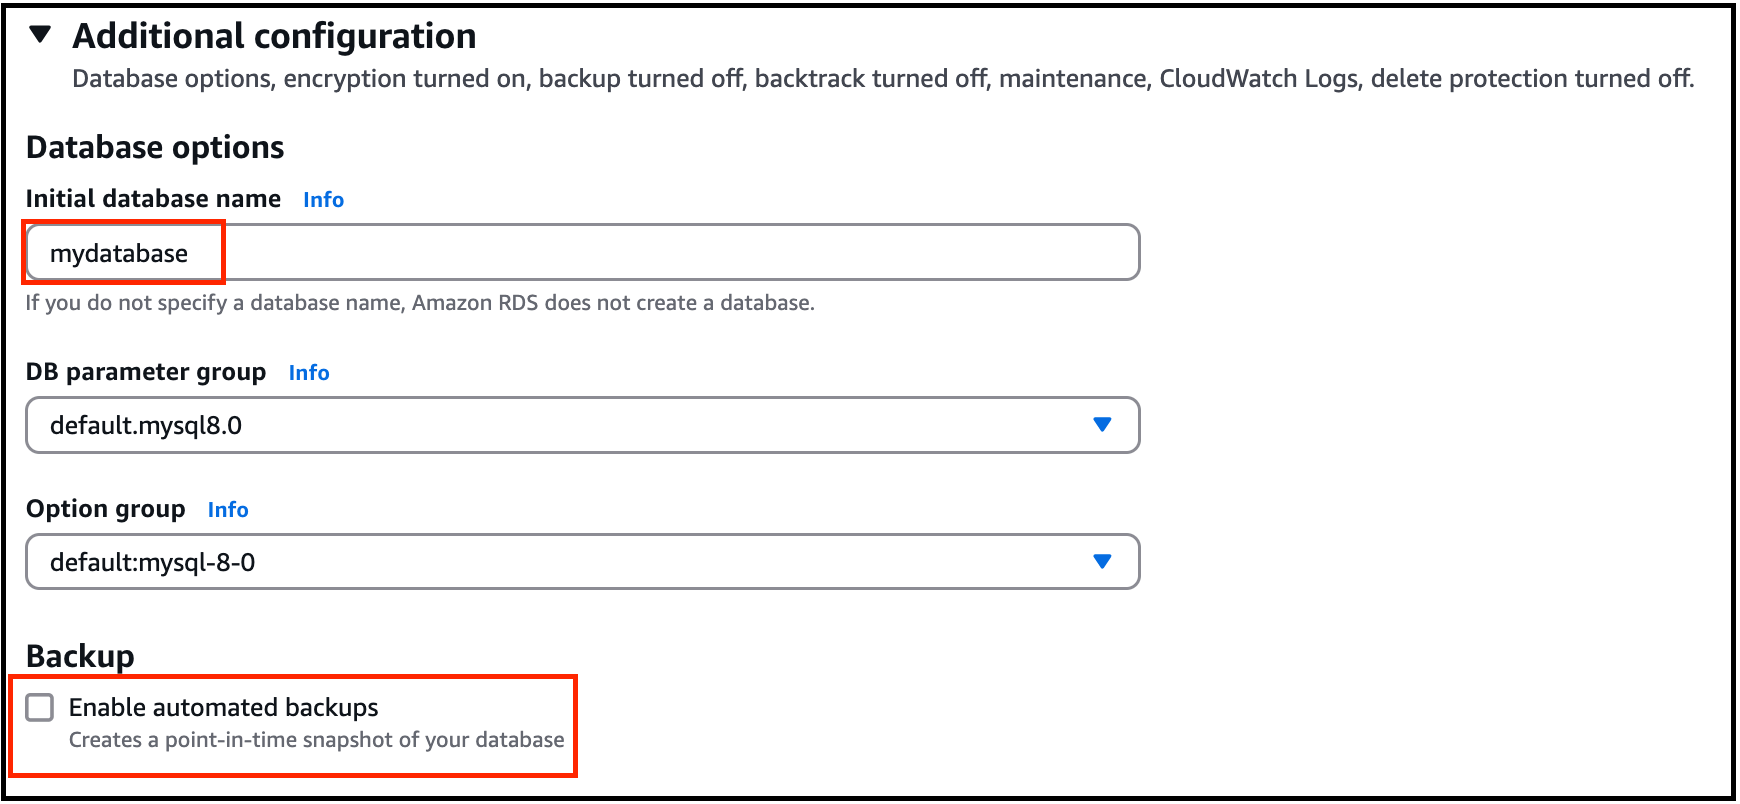
* Initial database name: ***mydatabase***
* DB parameter group: **default**
* Option group: **default**
* Enable automated backups: **uncheck**
Click on **Additional Configuration** in the bottom of the page to expand it:
* Initial database name: ***mydatabase***
* DB parameter group: **default**
* Option group: **default**
* Enable automated backups: **uncheck**
 > **Note: Leave all the other setting as default**
4. Click on **Create database**
5. Navigate to **Databases.**
6. On the RDS console, the details for the new DB instance appear. The DB instance has a status of creating until the DB instance is ready to use. When the state changes to **Available**, you can connect to the DB instance. It can take up to 20 minutes before the new instance status becomes **Available**.
> **Note: Leave all the other setting as default**
4. Click on **Create database**
5. Navigate to **Databases.**
6. On the RDS console, the details for the new DB instance appear. The DB instance has a status of creating until the DB instance is ready to use. When the state changes to **Available**, you can connect to the DB instance. It can take up to 20 minutes before the new instance status becomes **Available**.
 #### Task 4: Connecting to RDS Database on a DB Instance using the MySQL Workbench
One GUI-based application you can use to connect is MySQL workbench, which you have already downloaded and installed based on instructions in the **prerequisite** section.
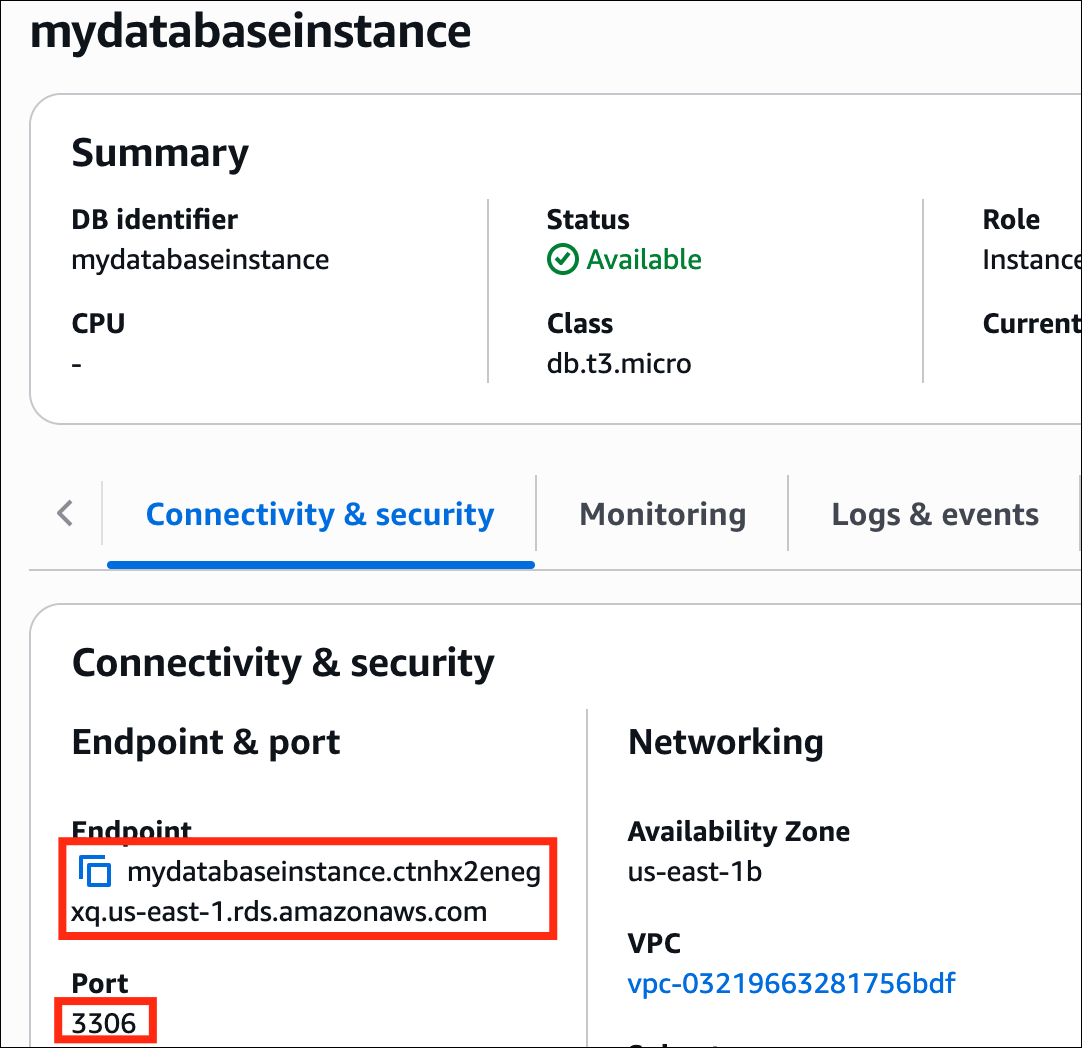
1. To connect to a database on a DB instance using MySQL monitor, find the endpoint (DNS name) and port number for your DB Instance.
* Navigate to **Databases** and click on **mydatabaseinstance.**
* Under **Connectivity & security** section, copy and note the **endpoint** and **port**.
**Example**:
* **Endpoint :** mydatabaseinstance.c81x4bxxayay.us-east-1.rds.amazonaws.com
* **Port :** 3306
#### Task 4: Connecting to RDS Database on a DB Instance using the MySQL Workbench
One GUI-based application you can use to connect is MySQL workbench, which you have already downloaded and installed based on instructions in the **prerequisite** section.
1. To connect to a database on a DB instance using MySQL monitor, find the endpoint (DNS name) and port number for your DB Instance.
* Navigate to **Databases** and click on **mydatabaseinstance.**
* Under **Connectivity & security** section, copy and note the **endpoint** and **port**.
**Example**:
* **Endpoint :** mydatabaseinstance.c81x4bxxayay.us-east-1.rds.amazonaws.com
* **Port :** 3306
 2. Open MySQL Workbench. Click on the **MYSQL Connection plus icon IN your left** **side.**
* Connection Name: Enter a sample name ***MyDatabseConnection***
* Connection Method: Select **Standard (TCP/IP)**
* Host Name: Enter your RDS endpoint : **mydatabaseinstance.c81x4bxxayay.us-east-1.rds.amazonaws.com**
* Port: **3306**
* Username: ***mydatabaseuser***
* Password: Click on **Store in Vault** and enter password ***mydatabasepassword*** Click on the **OK** button.
2. Open MySQL Workbench. Click on the **MYSQL Connection plus icon IN your left** **side.**
* Connection Name: Enter a sample name ***MyDatabseConnection***
* Connection Method: Select **Standard (TCP/IP)**
* Host Name: Enter your RDS endpoint : **mydatabaseinstance.c81x4bxxayay.us-east-1.rds.amazonaws.com**
* Port: **3306**
* Username: ***mydatabaseuser***
* Password: Click on **Store in Vault** and enter password ***mydatabasepassword*** Click on the **OK** button.
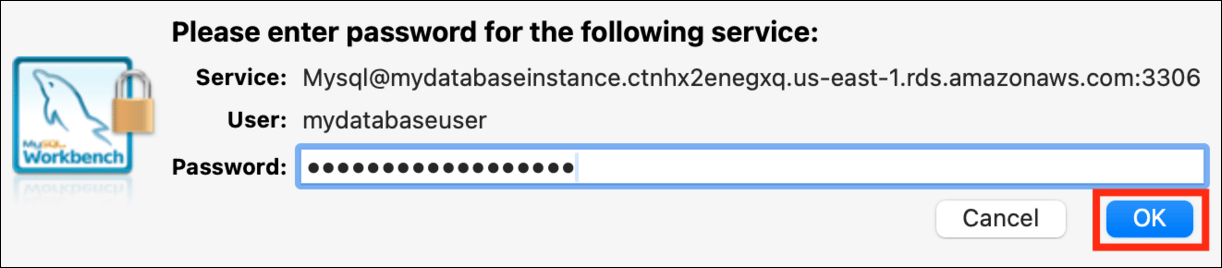 * Now click on the test connection button. It shows success connection message.
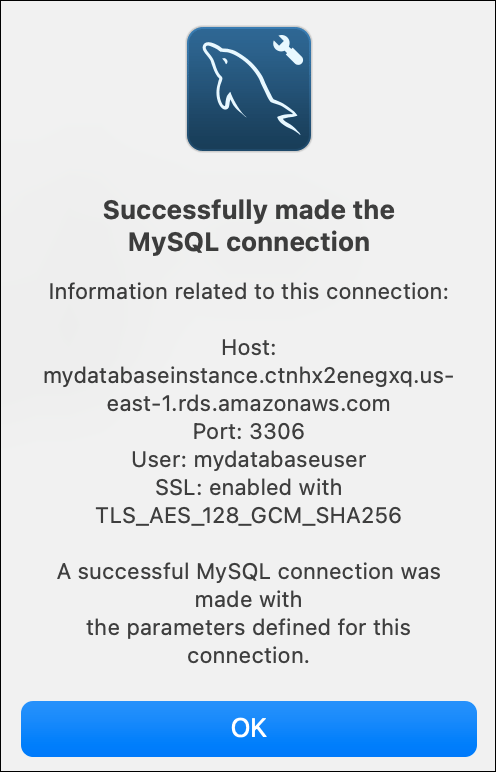 * Now click on **OK** button and then click on the **OK** button in the main screen.
3. A database connection will be created in MySQL Workbench.
4. Wait for a few seconds to connect to your RDS Machine.
* Now click on **OK** button and then click on the **OK** button in the main screen.
3. A database connection will be created in MySQL Workbench.
4. Wait for a few seconds to connect to your RDS Machine.
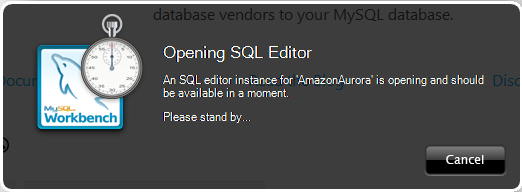 5. If you see a similar screen as shown below then you have successfully connected to the RDS.
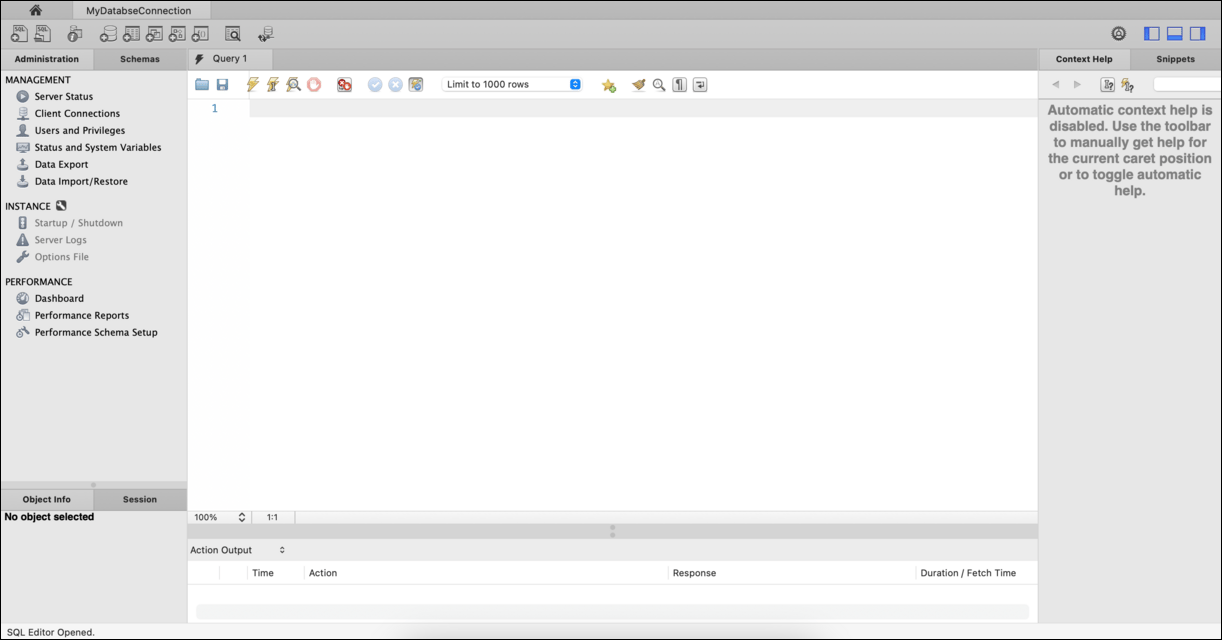 6. Now copy the below MySQL command and paste it in the Query tab.
CREATE DATABASE StudentDB;
Use StudentDB;
CREATE TABLE students (
studentId INT AUTO\_INCREMENT,
studentName VARCHAR(50) NOT NULL,
Course VARCHAR(55),Semester VARCHAR(50) NOT NULL,PRIMARY KEY (studentId));
INSERT INTO students(studentName, Course, Semester) VALUES ('Paul', 'MBA', 'Second');
INSERT INTO students(studentName, Course, Semester) VALUES ('John', 'IT', 'Third');
INSERT INTO students(studentName, Course, Semester) VALUES ('Sebastian', 'Medicine', 'fifth');
SELECT \* FROM students;
7. MySQL Query Explanation:
* Create a Database StudentDB.
```
CREATE DATABASE StudentDB;
```
* Select the database
```
Use StudentDB;
```
* Create a table student with fields - student id, studnentName, Course and Semester.
```
CREATE TABLE students (studentId INT AUTO_INCREMENT, studentName VARCHAR(50) NOT NULL, Course VARCHAR(55),Semester VARCHAR(50) NOT NULL,PRIMARY KEY (studentId));
```
* Insert three values to the table.
```
INSERT INTO students(studentName, Course, Semester) VALUES ('Paul', 'MBA', 'Second');
```
* View the table data.
```
SELECT * FROM students;
```
8. Now Click on the **Execute** icon to start the execution and wait for a few minutes.
6. Now copy the below MySQL command and paste it in the Query tab.
CREATE DATABASE StudentDB;
Use StudentDB;
CREATE TABLE students (
studentId INT AUTO\_INCREMENT,
studentName VARCHAR(50) NOT NULL,
Course VARCHAR(55),Semester VARCHAR(50) NOT NULL,PRIMARY KEY (studentId));
INSERT INTO students(studentName, Course, Semester) VALUES ('Paul', 'MBA', 'Second');
INSERT INTO students(studentName, Course, Semester) VALUES ('John', 'IT', 'Third');
INSERT INTO students(studentName, Course, Semester) VALUES ('Sebastian', 'Medicine', 'fifth');
SELECT \* FROM students;
7. MySQL Query Explanation:
* Create a Database StudentDB.
```
CREATE DATABASE StudentDB;
```
* Select the database
```
Use StudentDB;
```
* Create a table student with fields - student id, studnentName, Course and Semester.
```
CREATE TABLE students (studentId INT AUTO_INCREMENT, studentName VARCHAR(50) NOT NULL, Course VARCHAR(55),Semester VARCHAR(50) NOT NULL,PRIMARY KEY (studentId));
```
* Insert three values to the table.
```
INSERT INTO students(studentName, Course, Semester) VALUES ('Paul', 'MBA', 'Second');
```
* View the table data.
```
SELECT * FROM students;
```
8. Now Click on the **Execute** icon to start the execution and wait for a few minutes.
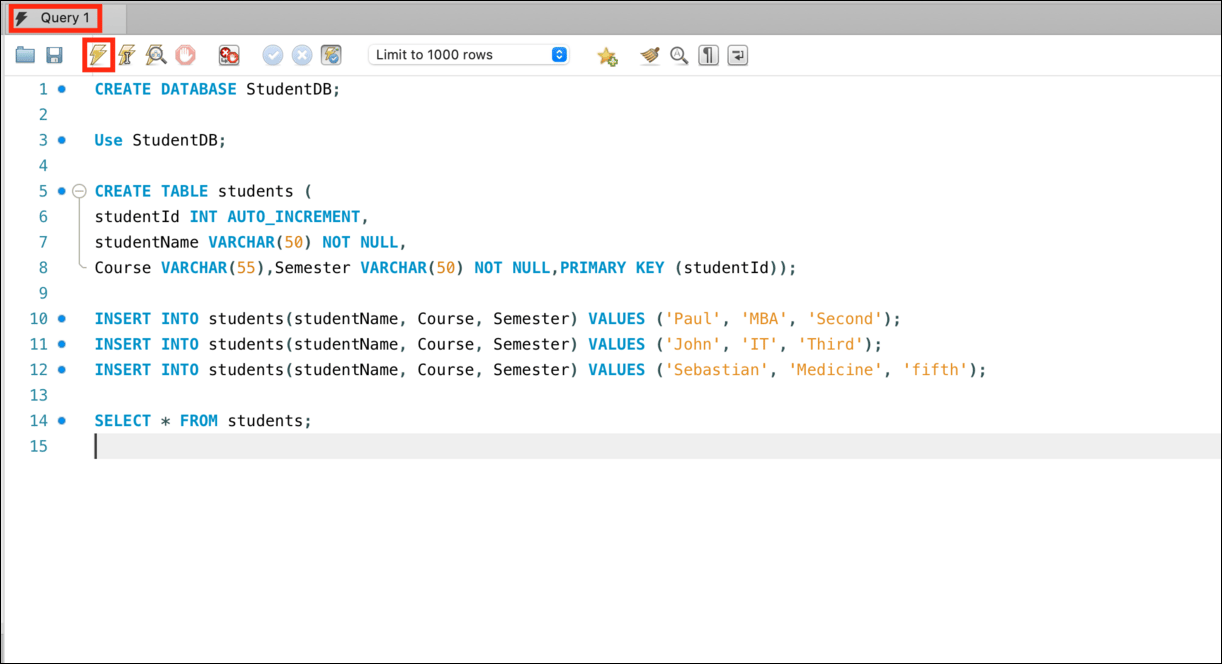
 9. Now You will be able to see the students table with these following values.
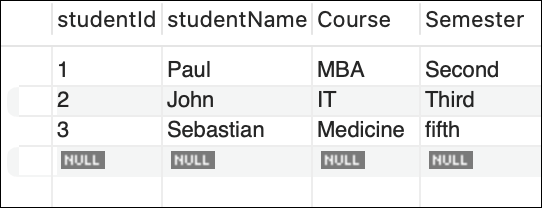 **Don't close the MySQL workbench window, keep it as minimized.**
#### Task 5: Create a Lambda function
1. Navigate to the **Services** menu at the top, then click on **Lambda** under the **Compute** section.
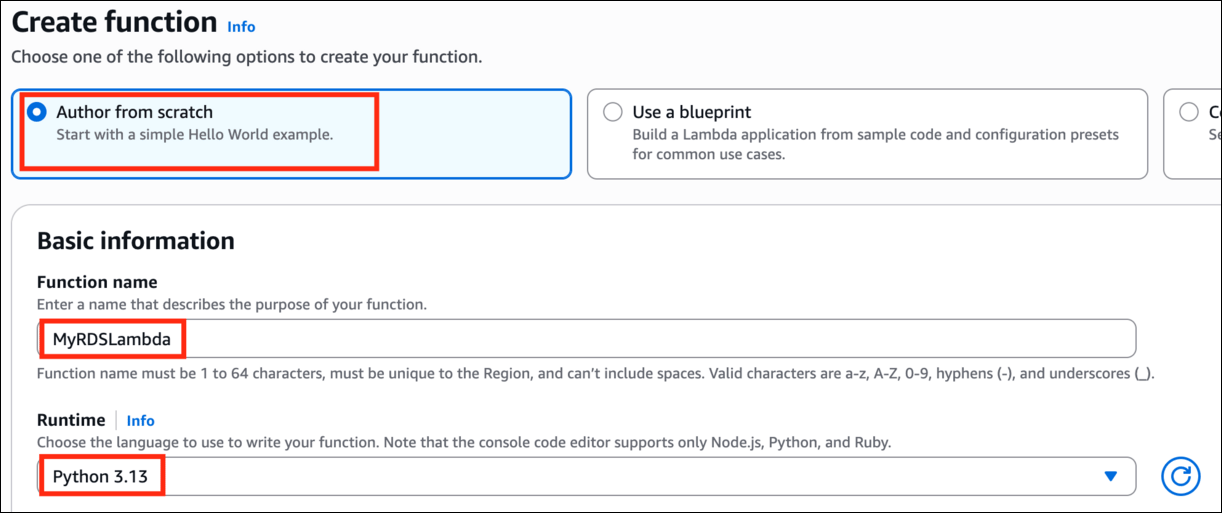
2. Click on **Create function**
* Select **Author from Scratch**
* Function Name : Enter ***MyRDSLambda***
* Runtime : Select **the latest version of Python**
**Don't close the MySQL workbench window, keep it as minimized.**
#### Task 5: Create a Lambda function
1. Navigate to the **Services** menu at the top, then click on **Lambda** under the **Compute** section.
2. Click on **Create function**
* Select **Author from Scratch**
* Function Name : Enter ***MyRDSLambda***
* Runtime : Select **the latest version of Python**
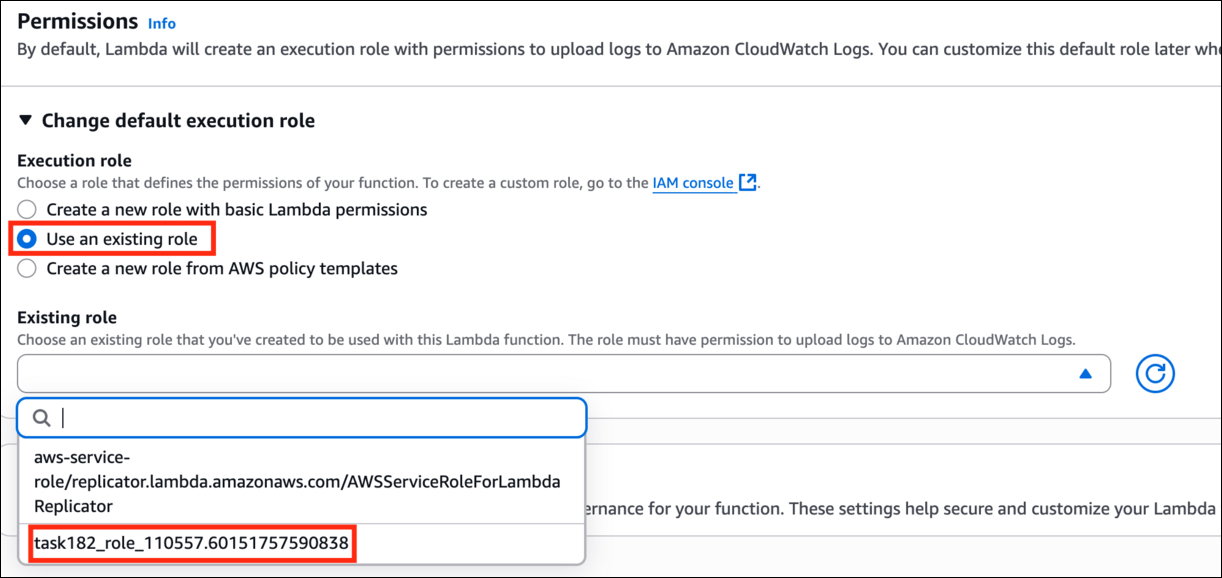
 * Permissions :
* Change default execution role : Select **Use an existing role**
* Existing Role : Select ***task182\_role\_\.*** This role has already been created for you.
* Permissions :
* Change default execution role : Select **Use an existing role**
* Existing Role : Select ***task182\_role\_\.*** This role has already been created for you.
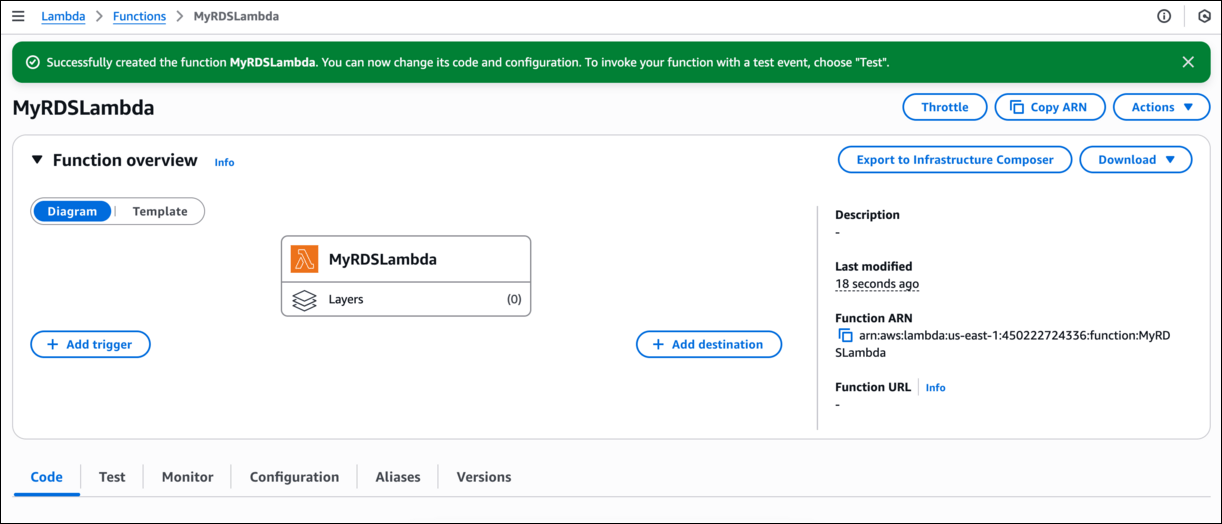
 3. Click on **Create Function** Button.
4. Once the Lambda Function is created successfully, it will look like the screenshot below:
3. Click on **Create Function** Button.
4. Once the Lambda Function is created successfully, it will look like the screenshot below:
 5. Click on this [link](https://labresources.whizlabs.com/bfc92112b69418ca6b34e00b4e475e78/RDS_SQL_query.zip) to download the Lambda zip code
6. Click on the **Upload from** button and select the **.zip file** option
* Click the **Upload** button and upload the zip file that we just downloaded and the click on the **Save** button.
5. Click on this [link](https://labresources.whizlabs.com/bfc92112b69418ca6b34e00b4e475e78/RDS_SQL_query.zip) to download the Lambda zip code
6. Click on the **Upload from** button and select the **.zip file** option
* Click the **Upload** button and upload the zip file that we just downloaded and the click on the **Save** button.
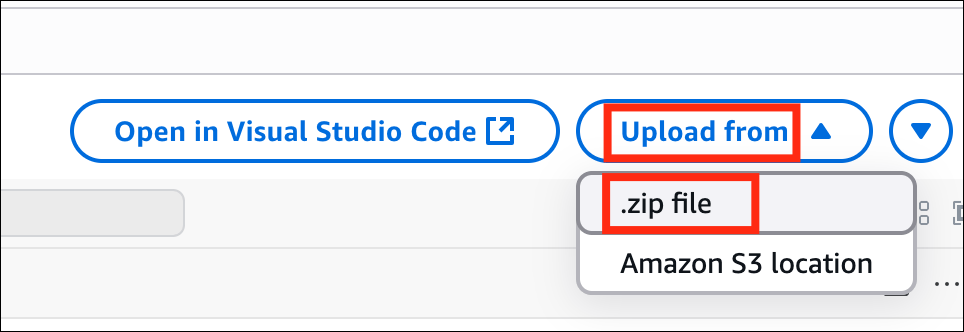
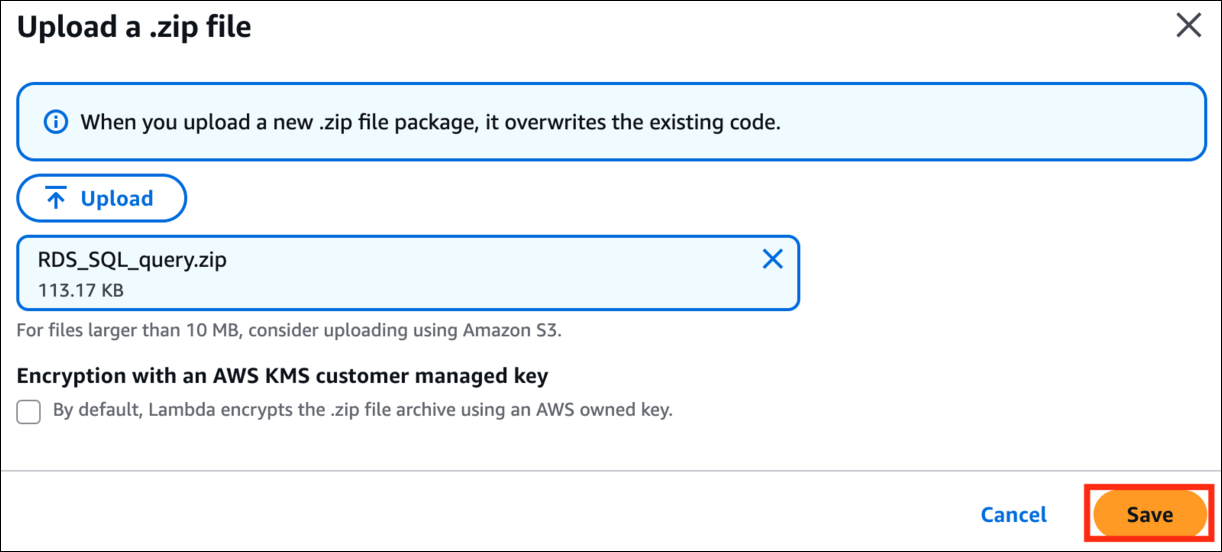 7. Now in the code section, go to zip file and select **lambda\_function**.**py**
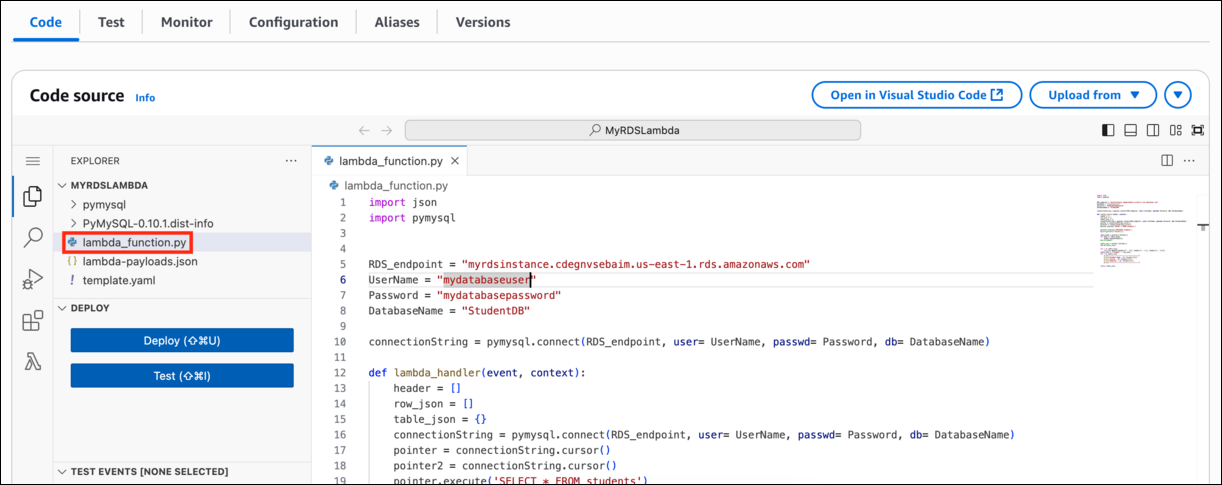 8. In the code, go to line 5 and replace the **endpoint, username and password** in the python code with your values and click on the **Deploy** button. Wait till the deployment gets success.
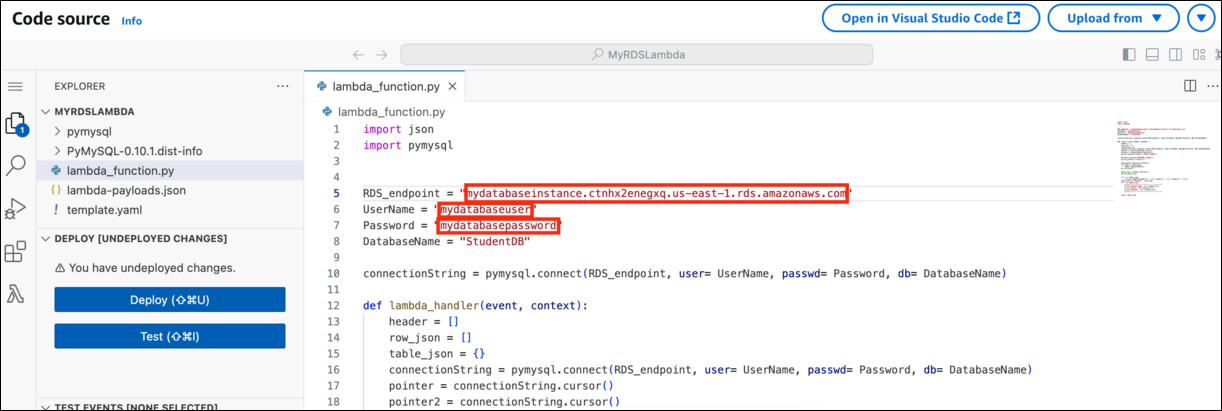 9. **Lambda code explanation** :
* The zip file contains pre installed python module used for performing MySQL queries in Python.
* First we provide the RDS endpoint, username, password and database values.
* Create a connection to the RDS instance.
* Perform MySQL query “SELECT \* FROM students” to fetch the table data.
* Create a json value and print the table data in the lambda function.
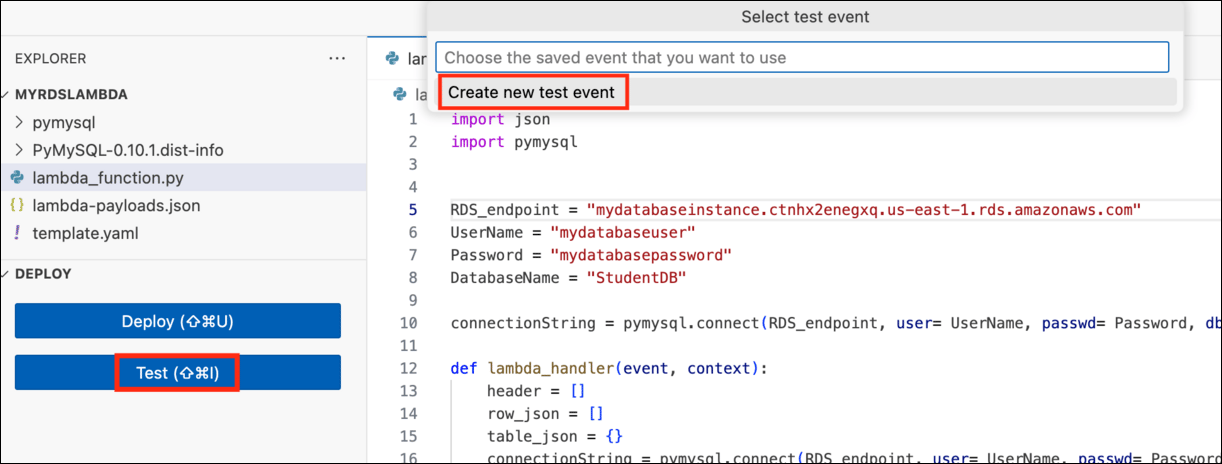
10. Now click on the **Test** button and select **Create new test event**,
9. **Lambda code explanation** :
* The zip file contains pre installed python module used for performing MySQL queries in Python.
* First we provide the RDS endpoint, username, password and database values.
* Create a connection to the RDS instance.
* Perform MySQL query “SELECT \* FROM students” to fetch the table data.
* Create a json value and print the table data in the lambda function.
10. Now click on the **Test** button and select **Create new test event**,
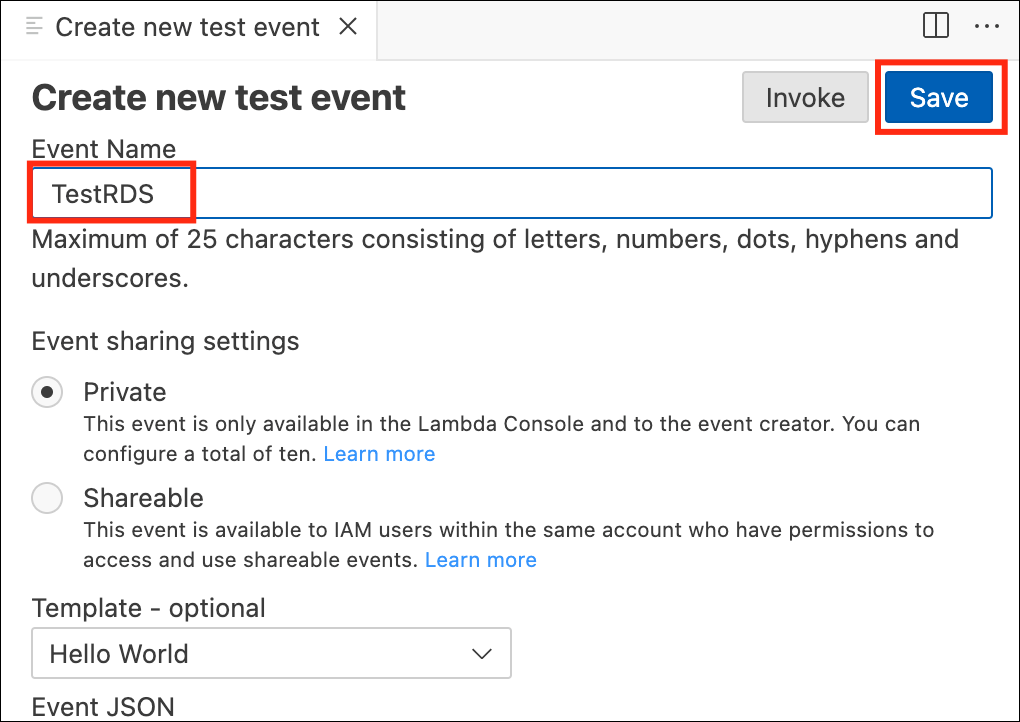
 * Event name : Enter ***TestRDS***
* Leave everything as default
* Click the **Save** button.
* Event name : Enter ***TestRDS***
* Leave everything as default
* Click the **Save** button.
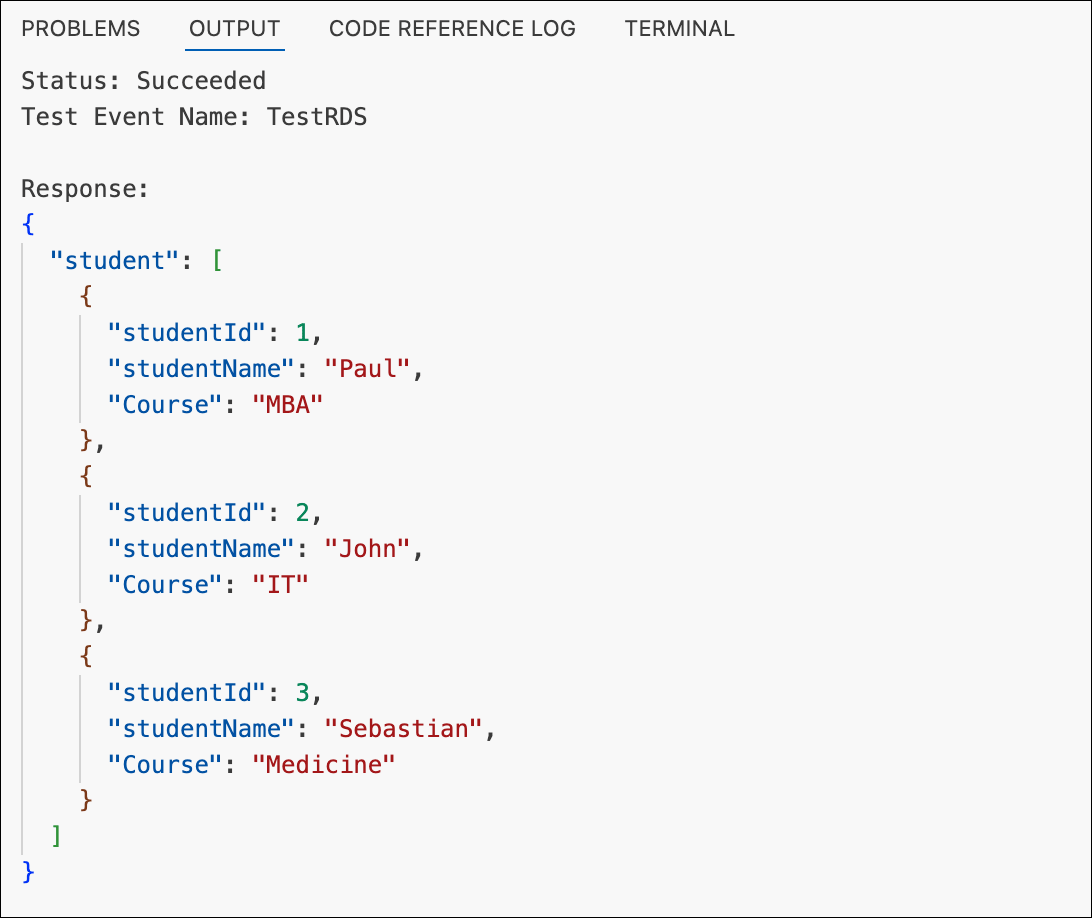
 11. Now click on the **Invoke** button and you will be able to see the **students** table values in the Lambda output (JSON).
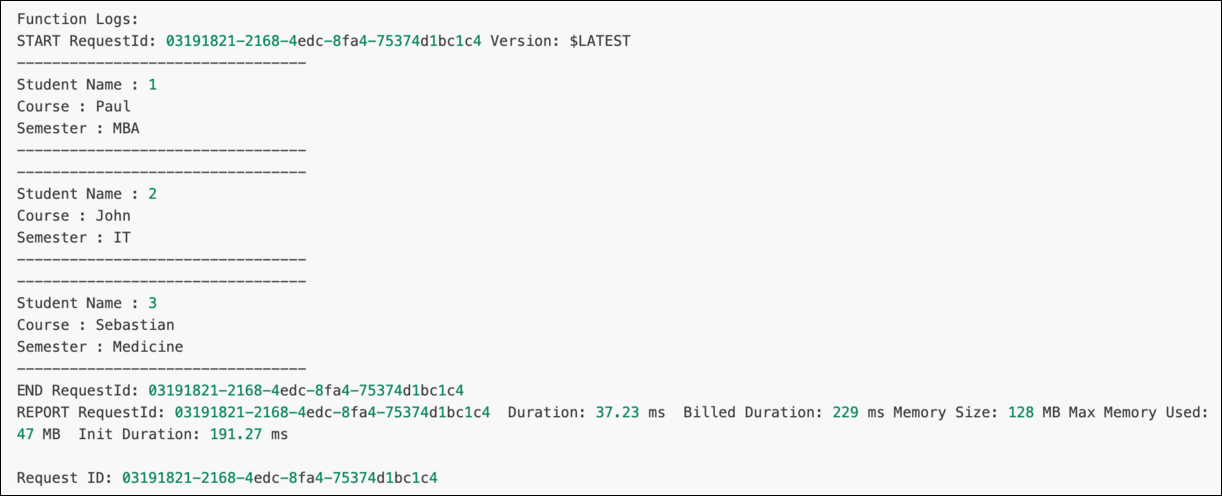
 12. Scroll down the **Execution result** : (String)
 13. Go to **Function code**, inside the **lambda\_function**.**py** replace the existing code with the below:
```
import json
import pymysql
RDS_endpoint = "myrdsinstance.cdegnvsebaim.us-east-1.rds.amazonaws.com"
UserName = "mydatabaseuser"
Password = "mydatabasepassword"
DatabaseName = "StudentDB"
connectionString = pymysql.connect(RDS_endpoint, user=UserName, passwd=Password, db=DatabaseName)
def lambda_handler(event, context):
header = []
row_json = []
table_json = {}
pointer = connectionString.cursor()
pointer.execute("INSERT INTO students(studentName, Course, Semester) VALUES ('Elizabeth', 'Art', 'first')")
connectionString.commit()
connectionString.close()
return ("Insertion Success")
```
14. On line number 5, replace the **endpoint, username and password** in the python code with your values and click on the **Deploy** button.
13. Go to **Function code**, inside the **lambda\_function**.**py** replace the existing code with the below:
```
import json
import pymysql
RDS_endpoint = "myrdsinstance.cdegnvsebaim.us-east-1.rds.amazonaws.com"
UserName = "mydatabaseuser"
Password = "mydatabasepassword"
DatabaseName = "StudentDB"
connectionString = pymysql.connect(RDS_endpoint, user=UserName, passwd=Password, db=DatabaseName)
def lambda_handler(event, context):
header = []
row_json = []
table_json = {}
pointer = connectionString.cursor()
pointer.execute("INSERT INTO students(studentName, Course, Semester) VALUES ('Elizabeth', 'Art', 'first')")
connectionString.commit()
connectionString.close()
return ("Insertion Success")
```
14. On line number 5, replace the **endpoint, username and password** in the python code with your values and click on the **Deploy** button.
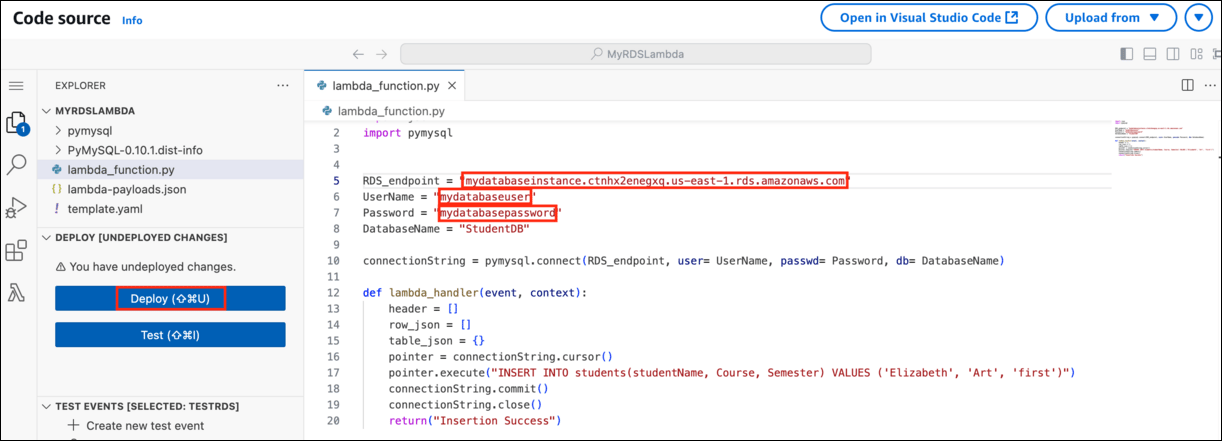 15. **Lambda code explanation** :
* This code is used to insert a value into the **students** table.
* First we provide the RDS endpoint, username, password and database values.
* Create a connection to the RDS instance.
* Perform MySQL query “INSERT INTO students(studentName, Course, Semester) VALUES ('Elizabeth', 'Art', 'first')” to insert value into the table.
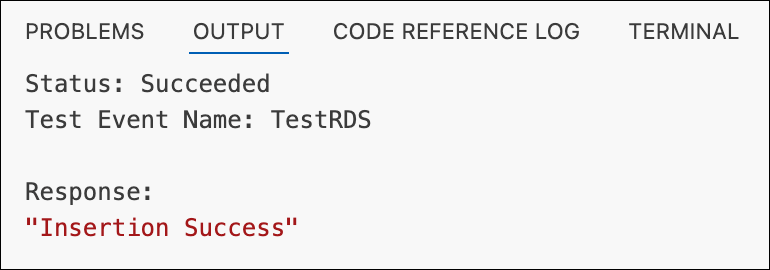
16. Click on the **Test** button and select **TestRDS** and click the **Invoke** button, you will get an insertion success message in lambda response.
15. **Lambda code explanation** :
* This code is used to insert a value into the **students** table.
* First we provide the RDS endpoint, username, password and database values.
* Create a connection to the RDS instance.
* Perform MySQL query “INSERT INTO students(studentName, Course, Semester) VALUES ('Elizabeth', 'Art', 'first')” to insert value into the table.
16. Click on the **Test** button and select **TestRDS** and click the **Invoke** button, you will get an insertion success message in lambda response.
 17. Now navigate to the MySQL Workbench application and replace the existing query with the below.
```
Use StudentDB;
SELECT * FROM students;
```
17. Now navigate to the MySQL Workbench application and replace the existing query with the below.
```
Use StudentDB;
SELECT * FROM students;
```
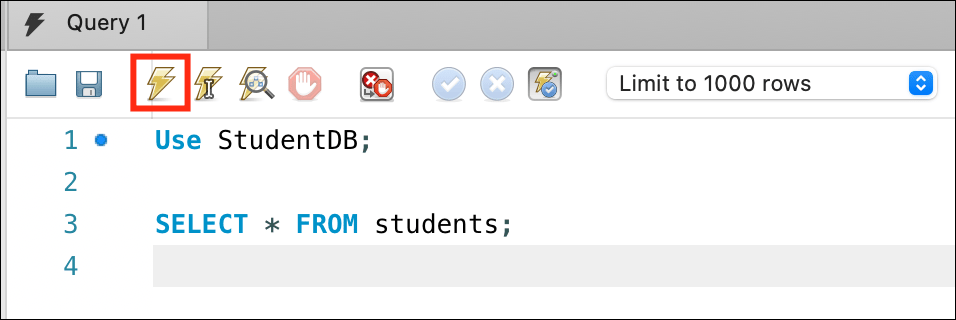 18. Now Click on the **Execute** icon to start the execution and wait for a few minutes.
> **Note** : Since the MySQL workbench was not active for a long time, it will take a few minutes to complete the execution. if you find difficulty then please close the connection and reconnect to RDS again from MySQL Workbench.
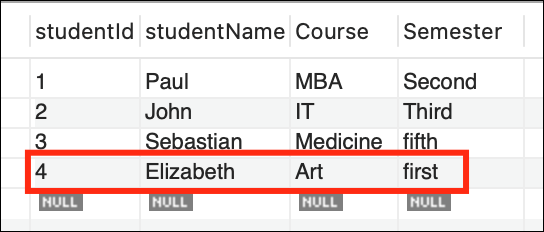
21. You will be able to see the new row that we just added to the table through the Lambda function.
18. Now Click on the **Execute** icon to start the execution and wait for a few minutes.
> **Note** : Since the MySQL workbench was not active for a long time, it will take a few minutes to complete the execution. if you find difficulty then please close the connection and reconnect to RDS again from MySQL Workbench.
21. You will be able to see the new row that we just added to the table through the Lambda function.
 > ##### DO you know?
>
> MySQL is a popular open-source relational database management system **(RDBMS)** that is widely used for managing structured data. MySQL in RDS refers to the MySQL database engine offered as a fully managed service within the **AWS ecosystem**. It allows you to run MySQL databases in the cloud without having to worry about the underlying infrastructure management tasks, such as **hardware provisioning, database setup, patching, backups, and automatic software updates.**
1. Once the lab steps are completed, please click on the **Validation** button on the left side panel.
#### Task 6: Delete AWS Resources
##### Delete Lambda Function
1. Make sure you are in the **US East (N. Virginia) us-east-1** Region.
2. Navigate to **Lambda** by clicking on the **Services** menu at the top, then click on **Lambda** in the **Compute** section.
3. Select the lambda function **MyRDSLambda** and click **Actions** and click **Delete** button.
> ##### DO you know?
>
> MySQL is a popular open-source relational database management system **(RDBMS)** that is widely used for managing structured data. MySQL in RDS refers to the MySQL database engine offered as a fully managed service within the **AWS ecosystem**. It allows you to run MySQL databases in the cloud without having to worry about the underlying infrastructure management tasks, such as **hardware provisioning, database setup, patching, backups, and automatic software updates.**
1. Once the lab steps are completed, please click on the **Validation** button on the left side panel.
#### Task 6: Delete AWS Resources
##### Delete Lambda Function
1. Make sure you are in the **US East (N. Virginia) us-east-1** Region.
2. Navigate to **Lambda** by clicking on the **Services** menu at the top, then click on **Lambda** in the **Compute** section.
3. Select the lambda function **MyRDSLambda** and click **Actions** and click **Delete** button.
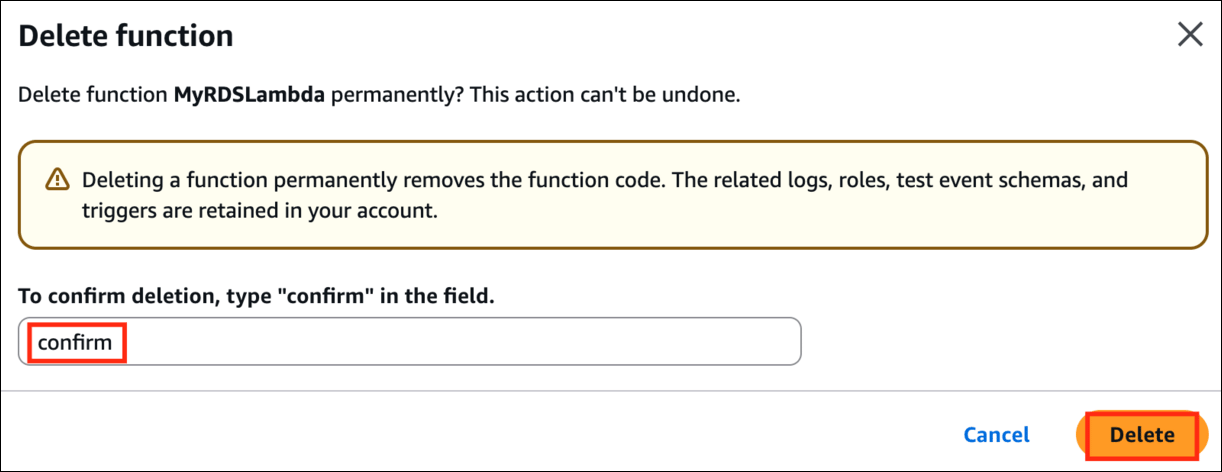
 4. Enter the **confirm** in the required field and click the **Delete** button to confirm deletion.
 ##### Delete RDS Instance
1. Make sure you are in the **US East (N. Virginia) us-east-1** Region.
2. Navigate to **RDS** by clicking on the **Services** menu available under the **Database** section.
3. Select **Databases** from the left side menu.
4. Select the RDS instance **mydatabaseinstance** and click on **Actions** and select **Delete**.
##### Delete RDS Instance
1. Make sure you are in the **US East (N. Virginia) us-east-1** Region.
2. Navigate to **RDS** by clicking on the **Services** menu available under the **Database** section.
3. Select **Databases** from the left side menu.
4. Select the RDS instance **mydatabaseinstance** and click on **Actions** and select **Delete**.
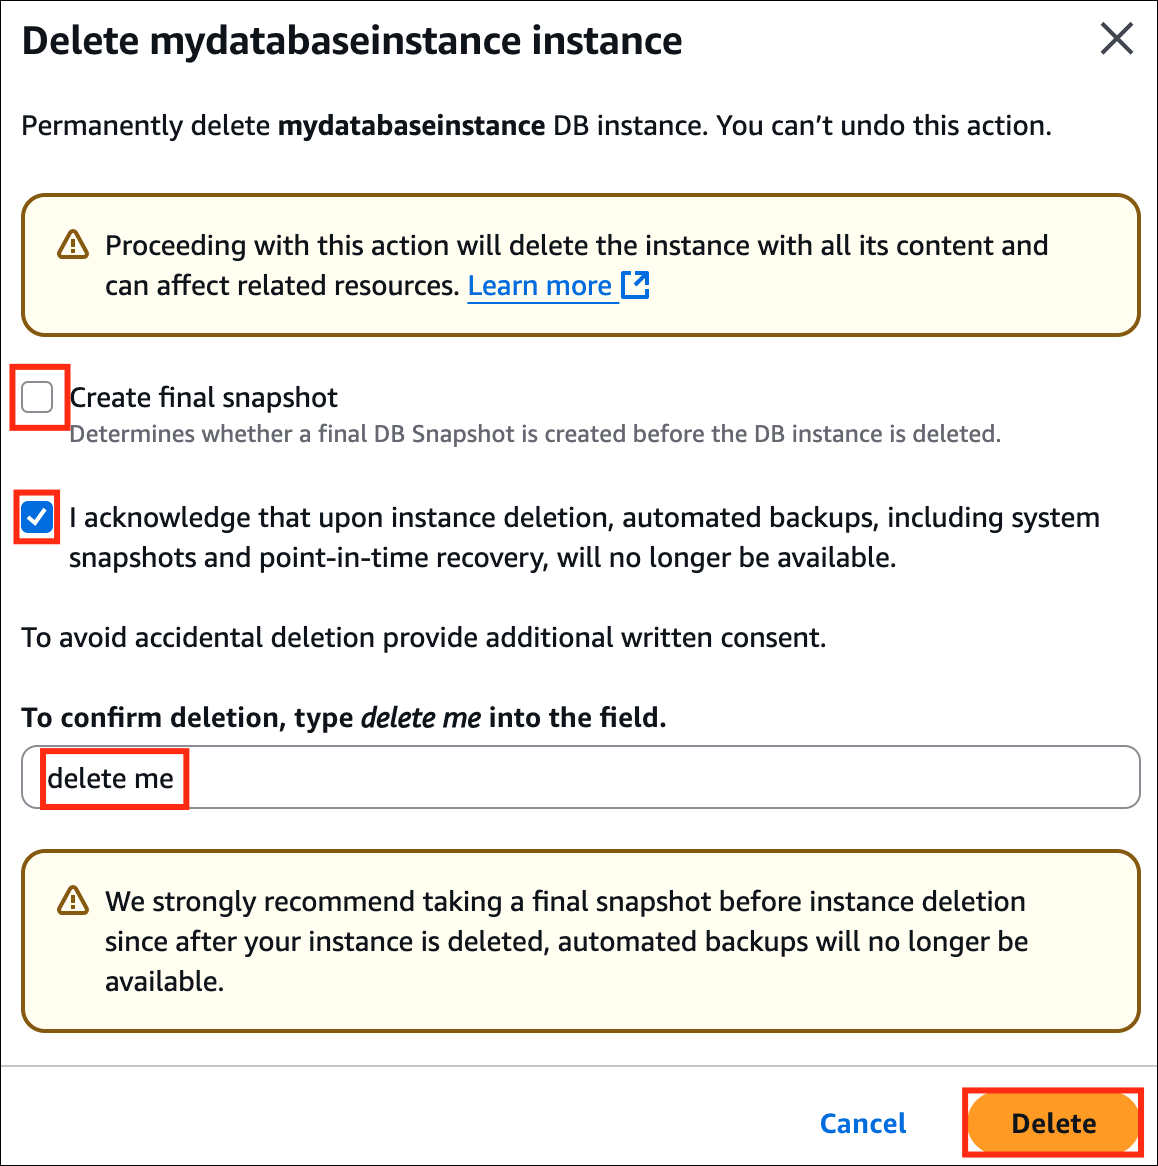
 5. Confirmation Prompt :
* Uncheck the option : **Create the final snapshot**
* Check the **I Acknowledge** option
* In textbox : Enter ***delete me***
* Now click on the **Delete** button.
5. Confirmation Prompt :
* Uncheck the option : **Create the final snapshot**
* Check the **I Acknowledge** option
* In textbox : Enter ***delete me***
* Now click on the **Delete** button.
 6. Now click on the refresh button and you will be able to see that the status of the RDS instance is **deleting**. It will take 10 to 20 Minutes to delete the instance.
### Completion and Conclusion
1. You have successfully logged into AWS management console.
2. You have successfully created a security group for RDS instance.
3. You have successfully created a RDS Instance.
4. You have successfully connected to RDS using MySQL workbench.
5. You have successfully created a Lambda function.
### End Lab
1. Sign out of AWS Account.
2. You have successfully completed the lab.
3. Once you have completed the steps, click on **End Lab** from the IP Lab Portal dashboard.
## What gets checked
When you press **Check my work**, the platform verifies each of these:
* **Create an AWS Lambda Function** — Check whether a Lambda Function is created or not
* **Check whether RDS database Engine type is mysql** — Check whether allowed database type mysql is deployed or not
This documentation is built and hosted on [Mintlify](https://mintlify.com), a developer documentation platform.
6. Now click on the refresh button and you will be able to see that the status of the RDS instance is **deleting**. It will take 10 to 20 Minutes to delete the instance.
### Completion and Conclusion
1. You have successfully logged into AWS management console.
2. You have successfully created a security group for RDS instance.
3. You have successfully created a RDS Instance.
4. You have successfully connected to RDS using MySQL workbench.
5. You have successfully created a Lambda function.
### End Lab
1. Sign out of AWS Account.
2. You have successfully completed the lab.
3. Once you have completed the steps, click on **End Lab** from the IP Lab Portal dashboard.
## What gets checked
When you press **Check my work**, the platform verifies each of these:
* **Create an AWS Lambda Function** — Check whether a Lambda Function is created or not
* **Check whether RDS database Engine type is mysql** — Check whether allowed database type mysql is deployed or not
This documentation is built and hosted on [Mintlify](https://mintlify.com), a developer documentation platform.