> ## Documentation Index
> Fetch the complete documentation index at: https://cloud-architect.ipoint-labs.com/llms.txt
> Use this file to discover all available pages before exploring further.
# Resizing Amazon EBS Volume
> Hands-on lab · 45m
Launch this lab in the IP Lab Portal, then follow the steps below in the AWS console.
Open IP Lab Portal
## Overview
### Lab Details
1. This lab walks you through the steps to launch an EC2 instance and resizing an Amazon EBS Volume in AWS.
2. Duration: **45 minutes**
3. AWS Region: **US East (N. Virginia) us-east-1.**
### Introduction
#### What is an Amazon EBS Volume?
##### Amazon EBS Volume
* Elastic Block Store volume is a **block level storage device** that can be associated with an EC2 instance
* EBS Volumes can be used as both **primary storage** and **secondary storage**
* The **primary EBS volume** acts as **root volume** and should be created and attached to the **instance at the time of instance launch.** Storage can be increased in the future if needed. This primary EBS volume cannot be detached from the instance.
* The **secondary volume** can be **attached, detached and modified at any time.**
* An **instance** can have **one primary EBS** volume and **n number of secondary volumes**
* **One Primary EBS Volume** can be only associated with one instance, and we can attach a **single secondary EBS Volume** to multiple Instances, provided they are in the **same Availability Zone**.
* There are 5 types of EBS volumes:
* **General Purpose SSD (gp2)**- Provides **balance of both price and performance** and is generally chosen by default
* **Provisioned IOPS SSD (io1)**-- Most expensive of the volume types with the **highest performance** and well-suited for tasks with **heavy workloads**
* **Throughput Optimized HDD (st1)**- A low-cost volume that focuses on optimizing throughput and is generally used for **large sequential workloads** dealing with big data warehouses. These volumes **cannot be used as root volumes** for EC2 instances.
* **Cold HDD (sc1)**- least expensive of the volume types and specifically designed for **workloads** which are **accessed less frequently.** These volumes also **cannot be used as root volumes** for EC2 instances.
* Magnetic (Standard) Previous generation magnetic volumes, which **cannot be used as root volumes** for EC2 instances
##### Resizing EBS Volumes
* In this digital world of **ever enlarging data**, it’s not enough to build solutions with hard-coded amount of storage that cannot scale.
* If the volume associated with the EC2 instance fills up, we have to increase the side of the volume.
##### Advantages of using EBS Volumes
* **High availability** and **flexibility**
* **Data** can be kept **persistently on a file system** even after shut downing the instance
* Enables **snapshots,** which capture the data stored at a point in time and can be restored at any time.
* The snapshots enable us to **create a volume and attach it** to another instance if needed.
* Can be **resized** at any time as and when required
* Comes equipped with encryption (and encryption-at-rest).
* EBS Volumes can be **attached, detached and associated** with other instances at any point in time (exception the primary volume)
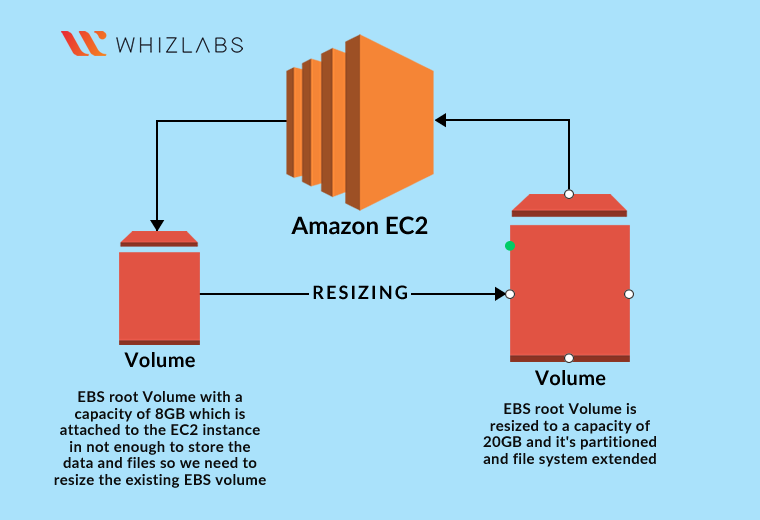
### Architecture Diagram
 ### Task Details
1. Sign into the AWS Management Console.
2. Launching Amazon EC2 instance
3. Resizing the EBS volume
### Launching Lab Environment
1. To launch the lab environment, click on the **Start Lab** button.
2. Please wait until the cloud environment is provisioned. It will take less than a minute to provision.
3. Once the Lab is started, you will be provided with **IAM username**, **Password**, **Access** **Key**, and **Secret** **Access** **Key**.
> **Note** : You can only start one lab at any given time
## Lab guide
### Lab Steps
#### Task 1: Sign in to AWS Management Console
1. Click on the **Open Console** button, and you will get redirected to AWS Console in a new browser tab.
2. On the AWS sign-in page,
* Leave the Account ID as default. Never edit/remove the 12-digit Account ID present in the AWS Console. Otherwise, you cannot proceed with the lab.
* Now copy your **Username** and **Password** in the Lab Console to the **IAM Username and Password** in AWS Console and click on the **Sign-in** button.
3. Once Signed In to the AWS Management Console, make the default AWS Region as **US East (N. Virginia) us-east-1.**
> **Note :** If you face any issues, please go through [**FAQs and Troubleshooting for Labs**](https://play.whizlabs.com/site/task_support/faqs-and-troubleshooting).
#### Task 2 : Launching Amazon EC2 instance
In this task, we are going to launch an EC2 Instance.
1. Make sure to choose the **US East (N. Virginia) us-east-1** region.
2. Navigate to **Services** menu in the top, then click on **EC2** in the **Compute** section.
3. Click on **Instances** from the left sidebar and then click on **Launch instances** button.
### Task Details
1. Sign into the AWS Management Console.
2. Launching Amazon EC2 instance
3. Resizing the EBS volume
### Launching Lab Environment
1. To launch the lab environment, click on the **Start Lab** button.
2. Please wait until the cloud environment is provisioned. It will take less than a minute to provision.
3. Once the Lab is started, you will be provided with **IAM username**, **Password**, **Access** **Key**, and **Secret** **Access** **Key**.
> **Note** : You can only start one lab at any given time
## Lab guide
### Lab Steps
#### Task 1: Sign in to AWS Management Console
1. Click on the **Open Console** button, and you will get redirected to AWS Console in a new browser tab.
2. On the AWS sign-in page,
* Leave the Account ID as default. Never edit/remove the 12-digit Account ID present in the AWS Console. Otherwise, you cannot proceed with the lab.
* Now copy your **Username** and **Password** in the Lab Console to the **IAM Username and Password** in AWS Console and click on the **Sign-in** button.
3. Once Signed In to the AWS Management Console, make the default AWS Region as **US East (N. Virginia) us-east-1.**
> **Note :** If you face any issues, please go through [**FAQs and Troubleshooting for Labs**](https://play.whizlabs.com/site/task_support/faqs-and-troubleshooting).
#### Task 2 : Launching Amazon EC2 instance
In this task, we are going to launch an EC2 Instance.
1. Make sure to choose the **US East (N. Virginia) us-east-1** region.
2. Navigate to **Services** menu in the top, then click on **EC2** in the **Compute** section.
3. Click on **Instances** from the left sidebar and then click on **Launch instances** button.
 4. Name : Enter **EC2 instance for Volume resize lab**
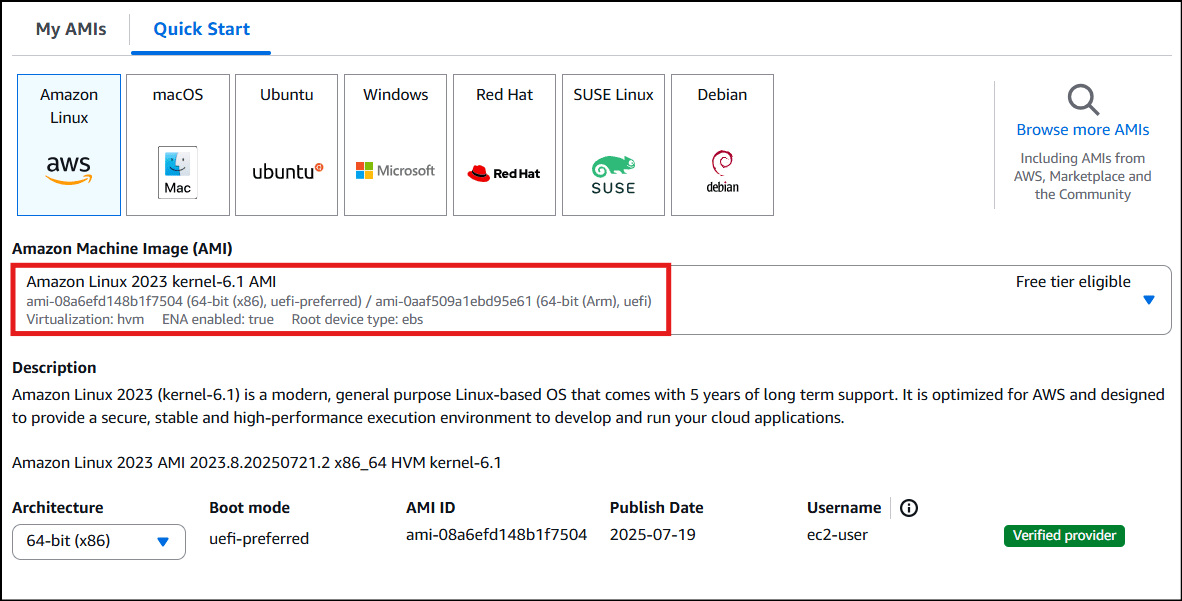
 5. **For Amazon Machine Image (AMI):** Search for **Amazon Linux 2023 kernel-6.1 AMI** in the Quick Start menu.
 6. **For Instance Type:** select **t2.micro**
 7. **For Key pair:** Select **Create a new key pair** Button
* Key pair name: **WhizKey**
* Key pair type: **RSA**
* Private key file format: **.pem**
8. Select **Create key pair** Button.
9. In Network Settings, click on **Edit**:
* Auto-assign public IP: **Enable**
* Select **Create new Security group**
* Security group name : Enter **MyEC2Server\_SG**
10. Check **Allow SSH from** and Select **Anywhere** from dropdown
* To add **SSH**,
* Choose Type: **SSH**
* Source: Select **Anywhere**
11. Keep rest thing Default and Click on **Launch Instance** Button.
12. Select **View all Instances** to View the Instance you Created
13. **Launch Status:** Your instances are now launching, Navigate to **Instances** page from left menu and wait the status of the EC2 Instance changes to running
7. **For Key pair:** Select **Create a new key pair** Button
* Key pair name: **WhizKey**
* Key pair type: **RSA**
* Private key file format: **.pem**
8. Select **Create key pair** Button.
9. In Network Settings, click on **Edit**:
* Auto-assign public IP: **Enable**
* Select **Create new Security group**
* Security group name : Enter **MyEC2Server\_SG**
10. Check **Allow SSH from** and Select **Anywhere** from dropdown
* To add **SSH**,
* Choose Type: **SSH**
* Source: Select **Anywhere**
11. Keep rest thing Default and Click on **Launch Instance** Button.
12. Select **View all Instances** to View the Instance you Created
13. **Launch Status:** Your instances are now launching, Navigate to **Instances** page from left menu and wait the status of the EC2 Instance changes to running
 #### Task 3 : Resizing the EBS Volumes
In this task, we are going to demonstrate how to resize an Amazon EBS volume associated with an EC2 instance.
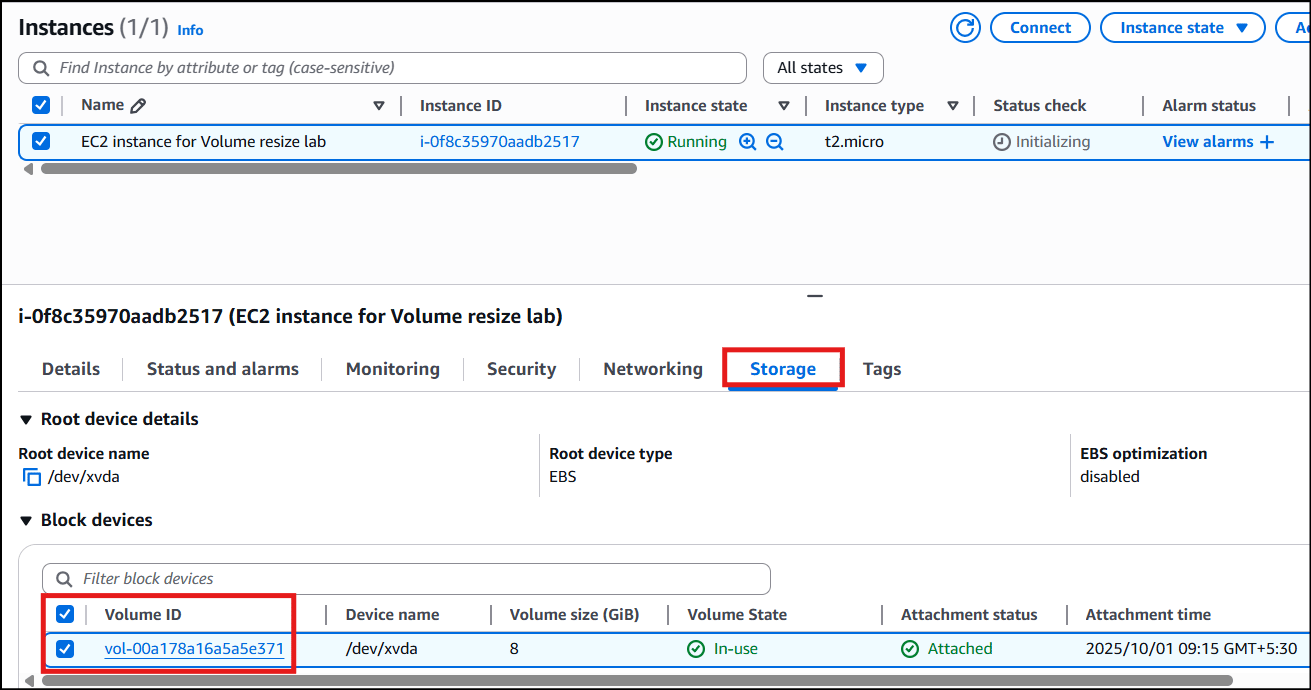
1. In the EC2 dashboard, select **EC2 instance for Volume resize lab** and navigate to the **Storage** tab and then click on **Volume ID** present.
#### Task 3 : Resizing the EBS Volumes
In this task, we are going to demonstrate how to resize an Amazon EBS volume associated with an EC2 instance.
1. In the EC2 dashboard, select **EC2 instance for Volume resize lab** and navigate to the **Storage** tab and then click on **Volume ID** present.
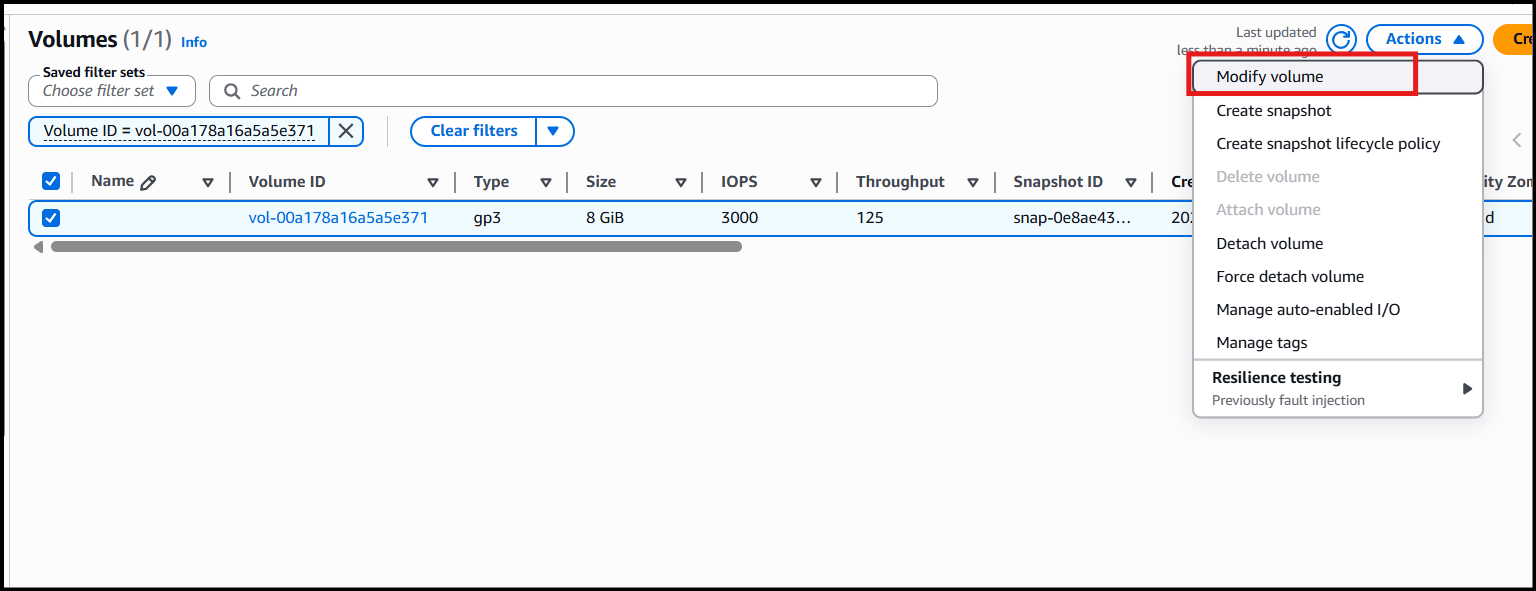
 2. Select the **Volume** and then go to the **Actions** menu dropdown. Click on **Modify Volume.**
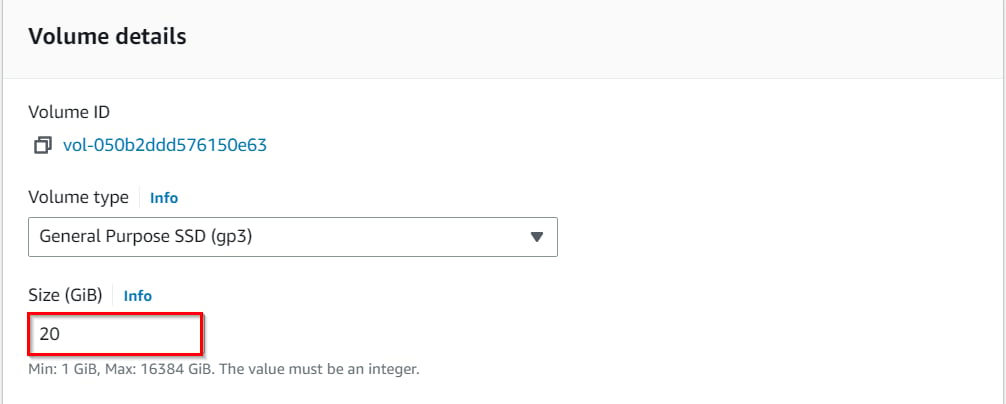
 3. Provide the **new Volume Size** you need to **increase** to, and also **note** that we are not able to **decrease the volume** size. In our case, I’m modifying from **8GiB to 20GiB** and then clicking on **Modify.**
 4. Now, after modifying the volume, we need to **increase the partition** and **file system.** To do so, we need to **SSH** into the server with the key we downloaded while launching the server.
5. To SSH into EC2 Instance. Follow the below steps.
* Once the instance is created. Select the instance **EC2 instance for Volume resize lab.** Click on connect button.
4. Now, after modifying the volume, we need to **increase the partition** and **file system.** To do so, we need to **SSH** into the server with the key we downloaded while launching the server.
5. To SSH into EC2 Instance. Follow the below steps.
* Once the instance is created. Select the instance **EC2 instance for Volume resize lab.** Click on connect button.
 * Now select the EC2 instance connect option. We can see there are four options for connecting to EC2. You can use any of the given options to get in the console but for our lab, we are using EC2 instance connect.
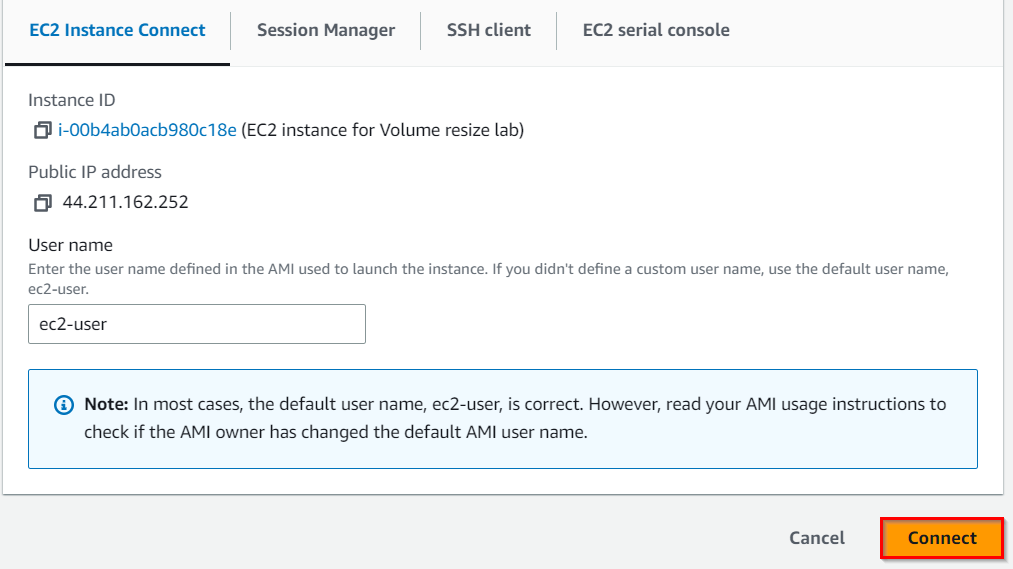 * A new tab would be opened in your browser where we can see the console.
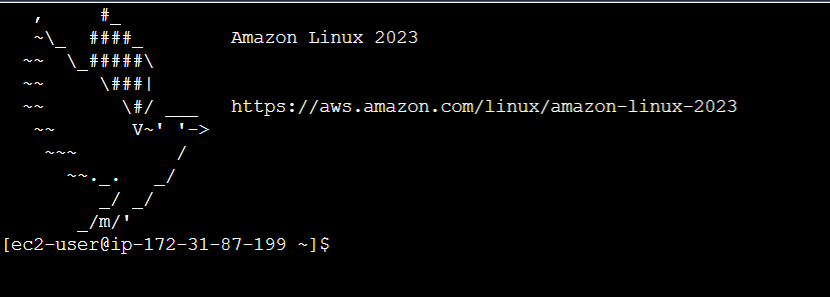 6. Enter the command
```
sudo su
```
7. Run the following commands.
```
df -h
```
6. Enter the command
```
sudo su
```
7. Run the following commands.
```
df -h
```
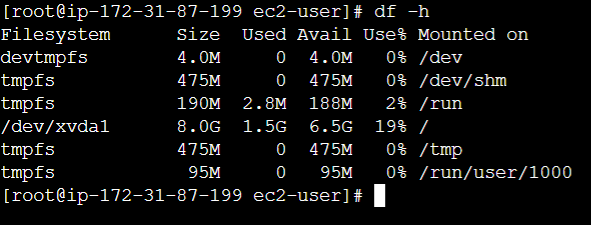 The above command will **list the amount of free disk space available** in the server. You can also see that the drive volume which we have increased will not be added to it.
8. Now run the following command to see the **list of all the block devices** that are associated with the instance (which will show the increased size of the partition volume):
```
lsblk
```
The above command will **list the amount of free disk space available** in the server. You can also see that the drive volume which we have increased will not be added to it.
8. Now run the following command to see the **list of all the block devices** that are associated with the instance (which will show the increased size of the partition volume):
```
lsblk
```
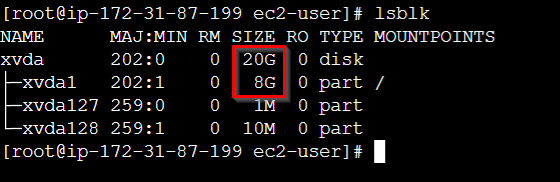 The root volume has a **partition /dev/xvda1** whereas the root volume (/dev/xvda) reflects the new size. This tells us the partition size needs to be extended.
9. Extend the size by using the following command:
```
growpart /dev/xvda 1
```
10. Find the **file system** of the block devices associated with the EC2 instance by entering the following command:
```
lsblk -f
```
The root volume has a **partition /dev/xvda1** whereas the root volume (/dev/xvda) reflects the new size. This tells us the partition size needs to be extended.
9. Extend the size by using the following command:
```
growpart /dev/xvda 1
```
10. Find the **file system** of the block devices associated with the EC2 instance by entering the following command:
```
lsblk -f
```
 11. The above command will provide us the **file system** of the block devices which will be one among the following types: **ext2,ext3,ext4 or XFS**
Our file system type is **ext4,** so for this file system, use the below command (also for ext2,ext4):
```
resize2fs /dev/xvda1
```
**Note:** **If the file system is** **XFS then run the below command**
```
xfs_growfs /dev/xvda1
```
11. The above command will provide us the **file system** of the block devices which will be one among the following types: **ext2,ext3,ext4 or XFS**
Our file system type is **ext4,** so for this file system, use the below command (also for ext2,ext4):
```
resize2fs /dev/xvda1
```
**Note:** **If the file system is** **XFS then run the below command**
```
xfs_growfs /dev/xvda1
```
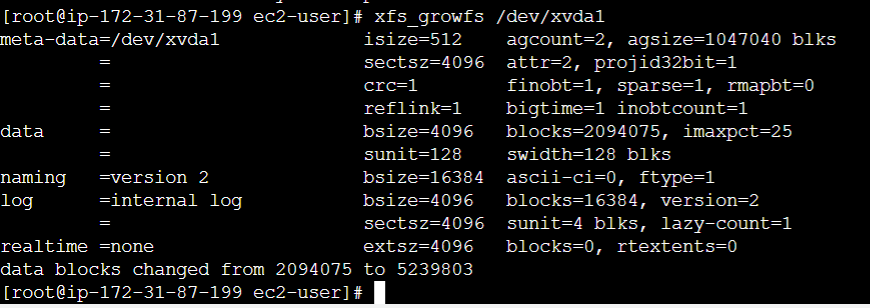 12. Now find the effective file system extended volume size,
```
df -h
```
12. Now find the effective file system extended volume size,
```
df -h
```
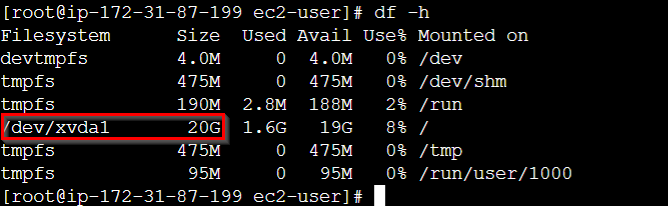 13. You have successfully launched an **EC2 instance and re-sized the root EBS volume** of the instance with **zero downtime**.
 14. Similarly, we can resize the secondary volume associated with the instance in the same way.
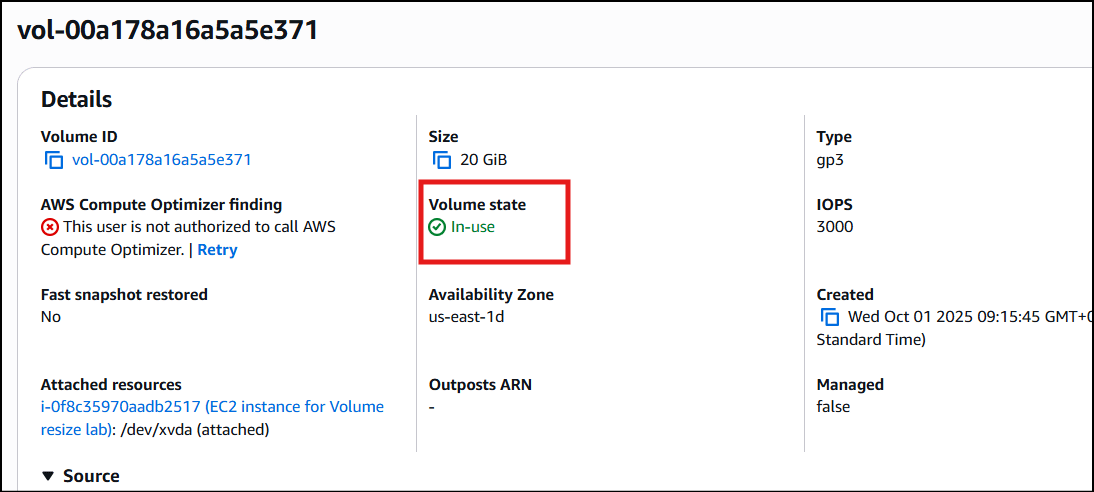
**Note: Make sure that the Volume state is In-Use before validating the lab.**
14. Similarly, we can resize the secondary volume associated with the instance in the same way.
**Note: Make sure that the Volume state is In-Use before validating the lab.**
 > ##### Do You Know?
>
> When you resize an EBS volume, the underlying data remains intact, and the volume retains all its existing data and configurations. The resize operation simply extends the capacity of the volume to accommodate the increased size.
1. Once the lab steps are completed, please click on the **Validation** button on the left side panel.
2. This will validate the resources in the AWS account and shows you whether you have completed this lab successfully or not.
### Completion and Conclusion
1. You have successfully used the AWS management console to launch an EC2 instance with 8GiB of root volume
2. You have modified the EBS Volume from 8GiB to 20GiB in the AWS Console
3. You have successfully accessed the EC2 instance using SSH via CLI.
4. You have extended the file system as well as the partition of the EBS volume.
### End Lab
1. Sign out of AWS Account.
2. You have successfully completed the lab.
3. Once you have completed the steps, click on **End Lab** from the IP Lab Portal dashboard.
## What gets checked
When you press **Check my work**, the platform verifies each of these:
* **Launch an EC2 Instance** — Check whether an EC2 Instance is launched or not.
* **Validate EC2 Instance Type t2.micro** — Check whether the EC2 instance type is t2.micro.
* **Launch EC2 AMI type Amazon Linux** — Check whether the EC2 instance is launched using an Amazon AMI.
* **Modify EBS Volume** — Check whether the EBS Volume is modified or not.
## Related help
* [FAQs and Troubleshooting](/aws-saa/support/faqs-and-troubleshooting)
* [SSH into EC2 Instance](/aws-saa/support/ssh-into-ec2-instance)
This documentation is built and hosted on [Mintlify](https://mintlify.com), a developer documentation platform.
> ##### Do You Know?
>
> When you resize an EBS volume, the underlying data remains intact, and the volume retains all its existing data and configurations. The resize operation simply extends the capacity of the volume to accommodate the increased size.
1. Once the lab steps are completed, please click on the **Validation** button on the left side panel.
2. This will validate the resources in the AWS account and shows you whether you have completed this lab successfully or not.
### Completion and Conclusion
1. You have successfully used the AWS management console to launch an EC2 instance with 8GiB of root volume
2. You have modified the EBS Volume from 8GiB to 20GiB in the AWS Console
3. You have successfully accessed the EC2 instance using SSH via CLI.
4. You have extended the file system as well as the partition of the EBS volume.
### End Lab
1. Sign out of AWS Account.
2. You have successfully completed the lab.
3. Once you have completed the steps, click on **End Lab** from the IP Lab Portal dashboard.
## What gets checked
When you press **Check my work**, the platform verifies each of these:
* **Launch an EC2 Instance** — Check whether an EC2 Instance is launched or not.
* **Validate EC2 Instance Type t2.micro** — Check whether the EC2 instance type is t2.micro.
* **Launch EC2 AMI type Amazon Linux** — Check whether the EC2 instance is launched using an Amazon AMI.
* **Modify EBS Volume** — Check whether the EBS Volume is modified or not.
## Related help
* [FAQs and Troubleshooting](/aws-saa/support/faqs-and-troubleshooting)
* [SSH into EC2 Instance](/aws-saa/support/ssh-into-ec2-instance)
This documentation is built and hosted on [Mintlify](https://mintlify.com), a developer documentation platform.