> ## Documentation Index
> Fetch the complete documentation index at: https://cloud-architect.ipoint-labs.com/llms.txt
> Use this file to discover all available pages before exploring further.
# Query VPC Flow log using Amazon Athena
> Hands-on lab · 45m
Launch this lab in the IP Lab Portal, then follow the steps below in the AWS console.
Open IP Lab Portal
## Overview
### Project Details
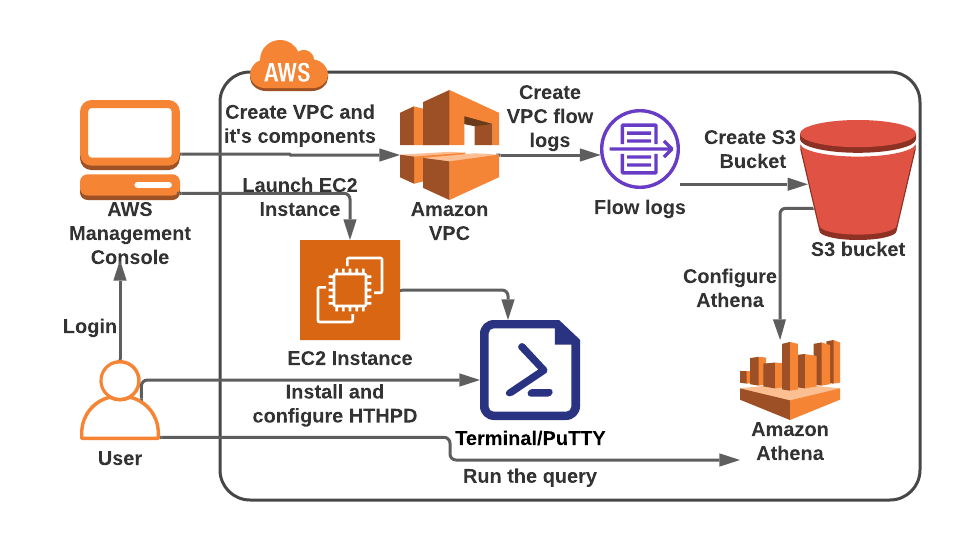
1. This project walks you through the steps to create S3 Bucket, VPC with its components, and VPC flow logs.
2. You will practice using EC2 Instance by running the commands to install HTTPD to generate traffic. You will also, send the logs to the S3 bucket and query them using Amazon Athena.
3. Duration: **1 hour**
4. AWS Region: **US East (N. Virginia) us-east-1**
### Architecture Diagram
 ### Task Details
1. Sign into the AWS Management Console
2. Create S3 Bucket and add a bucket policy
3. Create a VPC
4. Create and attach an Internet Gateway with custom VPC
5. Create a Public Subnet
6. Configure the Public subnet to enable auto-assign public IPv4 addresses
7. Create a Public Route Table
8. Create a VPC Flow log
9. Launching an EC2 Instance to generate traffic
10. SSH into EC2 Instance
11. Generate logs that will be sent to S3 Bucket
12. Setup Amazon Athena to query the log data
13. Run SQL query against the table
### Launching Project Environment
1. To launch the project environment, Click on the **Start Project** button.
2. Please wait until the cloud environment is provisioned. It will take less than a minute to provision.
3. Once the project is started, you will be provided with **IAM user name**, **Password**, **Access** **Key**, and **Secret** **Access** **Key**.
> **Note** : You can only start one project at any given time
## Lab guide
### Project Steps
#### Task 1: Sign in to AWS Management Console
1. Click on the **Open Console** button, and you will get redirected to AWS Console in a new browser tab.
2. On the AWS sign-in page,
* Leave the Account ID as default. Never edit/remove the 12 digit Account ID present in the AWS Console. otherwise, you cannot proceed with the project.
* Now copy your **User Name** and **Password** in the Project Console to the **IAM Username and Password** in AWS Console and click on the **Sign in** button.
3. Once Signed In to the AWS Management Console, Make the default AWS Region as **US East (N. Virginia) us-east-1.**
#### Task 2: Create S3 Bucket and add a bucket policy
1. Make sure you are in **US East (N. Virginia) us-east-1** Region.
2. Navigate to S3 by clicking on the **Services** menu in the top, then click on **S3** in the **Storage** section.
3. On the S3 Page, click on **Create Bucket** and fill in the bucket details.
* Bucket name: Enter ***athena-whizlabs***
* **Note:** S3 bucket name is globally unique, choose a name that is available.
* Region: Select **US East (N. Virginia) us-east-1**
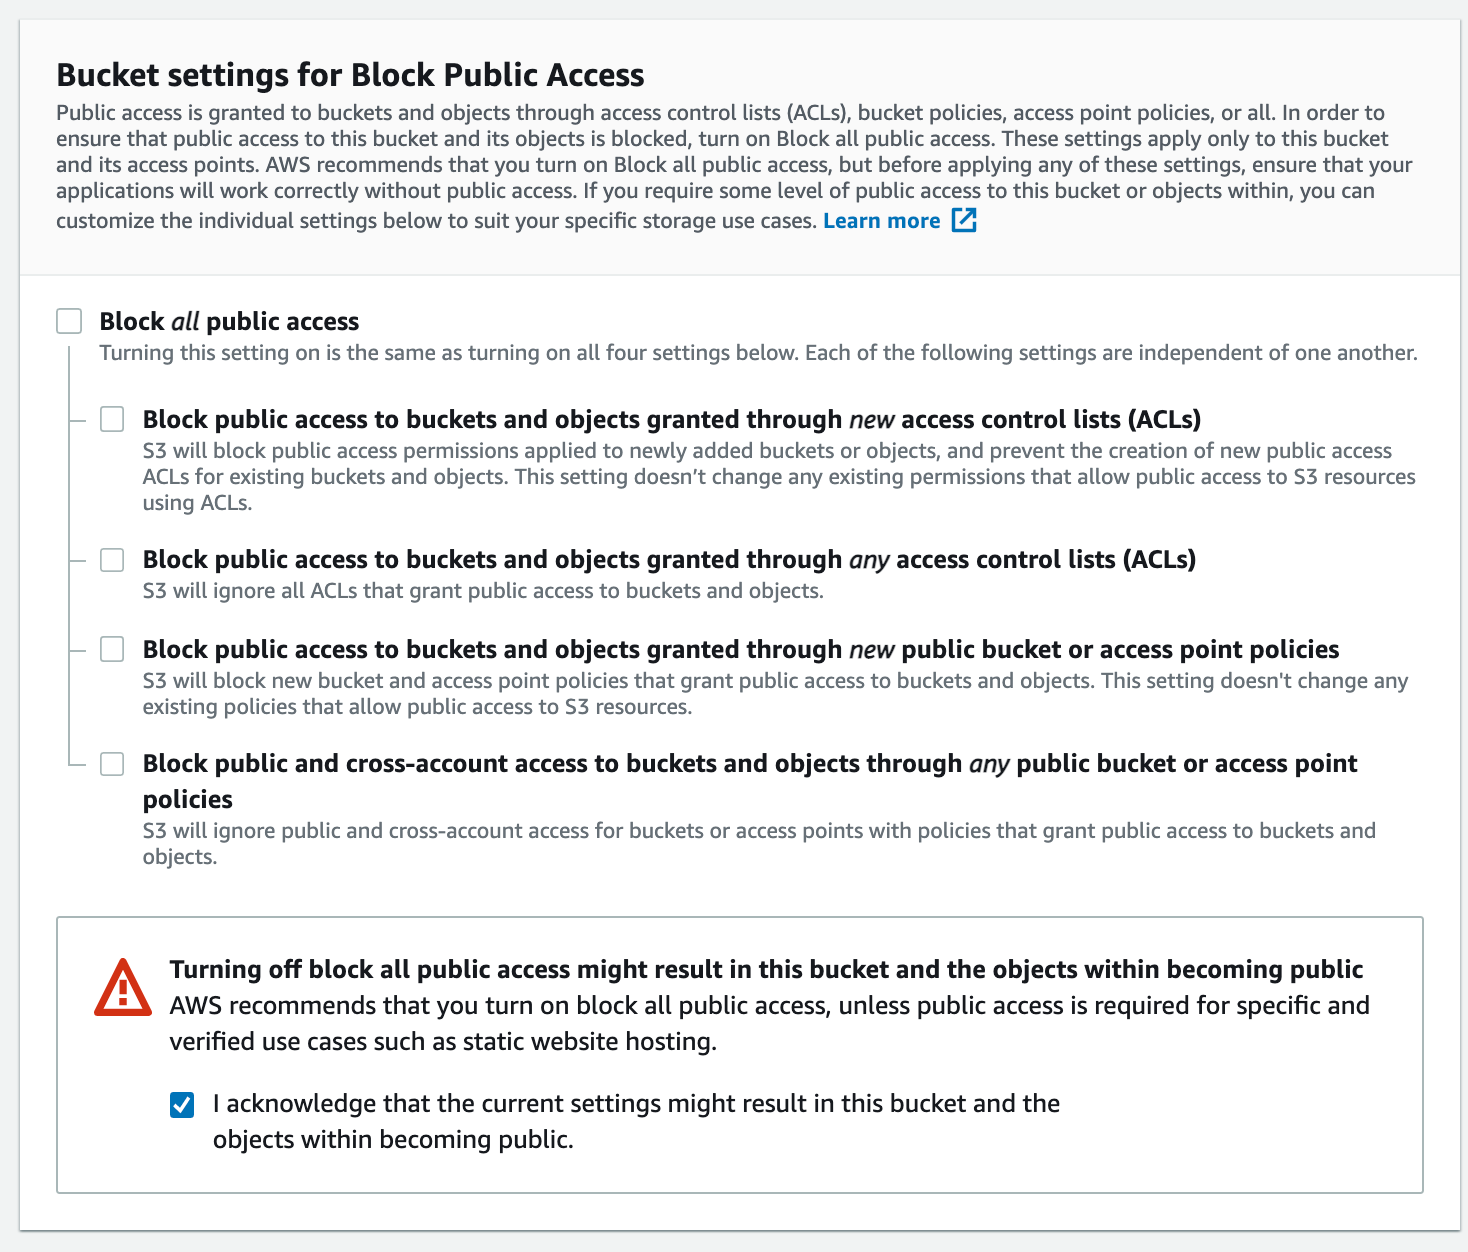
* **Uncheck** the option\*\*, Block all public access,\*\* and check the **acknowledge** option.
### Task Details
1. Sign into the AWS Management Console
2. Create S3 Bucket and add a bucket policy
3. Create a VPC
4. Create and attach an Internet Gateway with custom VPC
5. Create a Public Subnet
6. Configure the Public subnet to enable auto-assign public IPv4 addresses
7. Create a Public Route Table
8. Create a VPC Flow log
9. Launching an EC2 Instance to generate traffic
10. SSH into EC2 Instance
11. Generate logs that will be sent to S3 Bucket
12. Setup Amazon Athena to query the log data
13. Run SQL query against the table
### Launching Project Environment
1. To launch the project environment, Click on the **Start Project** button.
2. Please wait until the cloud environment is provisioned. It will take less than a minute to provision.
3. Once the project is started, you will be provided with **IAM user name**, **Password**, **Access** **Key**, and **Secret** **Access** **Key**.
> **Note** : You can only start one project at any given time
## Lab guide
### Project Steps
#### Task 1: Sign in to AWS Management Console
1. Click on the **Open Console** button, and you will get redirected to AWS Console in a new browser tab.
2. On the AWS sign-in page,
* Leave the Account ID as default. Never edit/remove the 12 digit Account ID present in the AWS Console. otherwise, you cannot proceed with the project.
* Now copy your **User Name** and **Password** in the Project Console to the **IAM Username and Password** in AWS Console and click on the **Sign in** button.
3. Once Signed In to the AWS Management Console, Make the default AWS Region as **US East (N. Virginia) us-east-1.**
#### Task 2: Create S3 Bucket and add a bucket policy
1. Make sure you are in **US East (N. Virginia) us-east-1** Region.
2. Navigate to S3 by clicking on the **Services** menu in the top, then click on **S3** in the **Storage** section.
3. On the S3 Page, click on **Create Bucket** and fill in the bucket details.
* Bucket name: Enter ***athena-whizlabs***
* **Note:** S3 bucket name is globally unique, choose a name that is available.
* Region: Select **US East (N. Virginia) us-east-1**
* **Uncheck** the option\*\*, Block all public access,\*\* and check the **acknowledge** option.
 * Leave other settings as default.
* Click on **Create Bucket**.
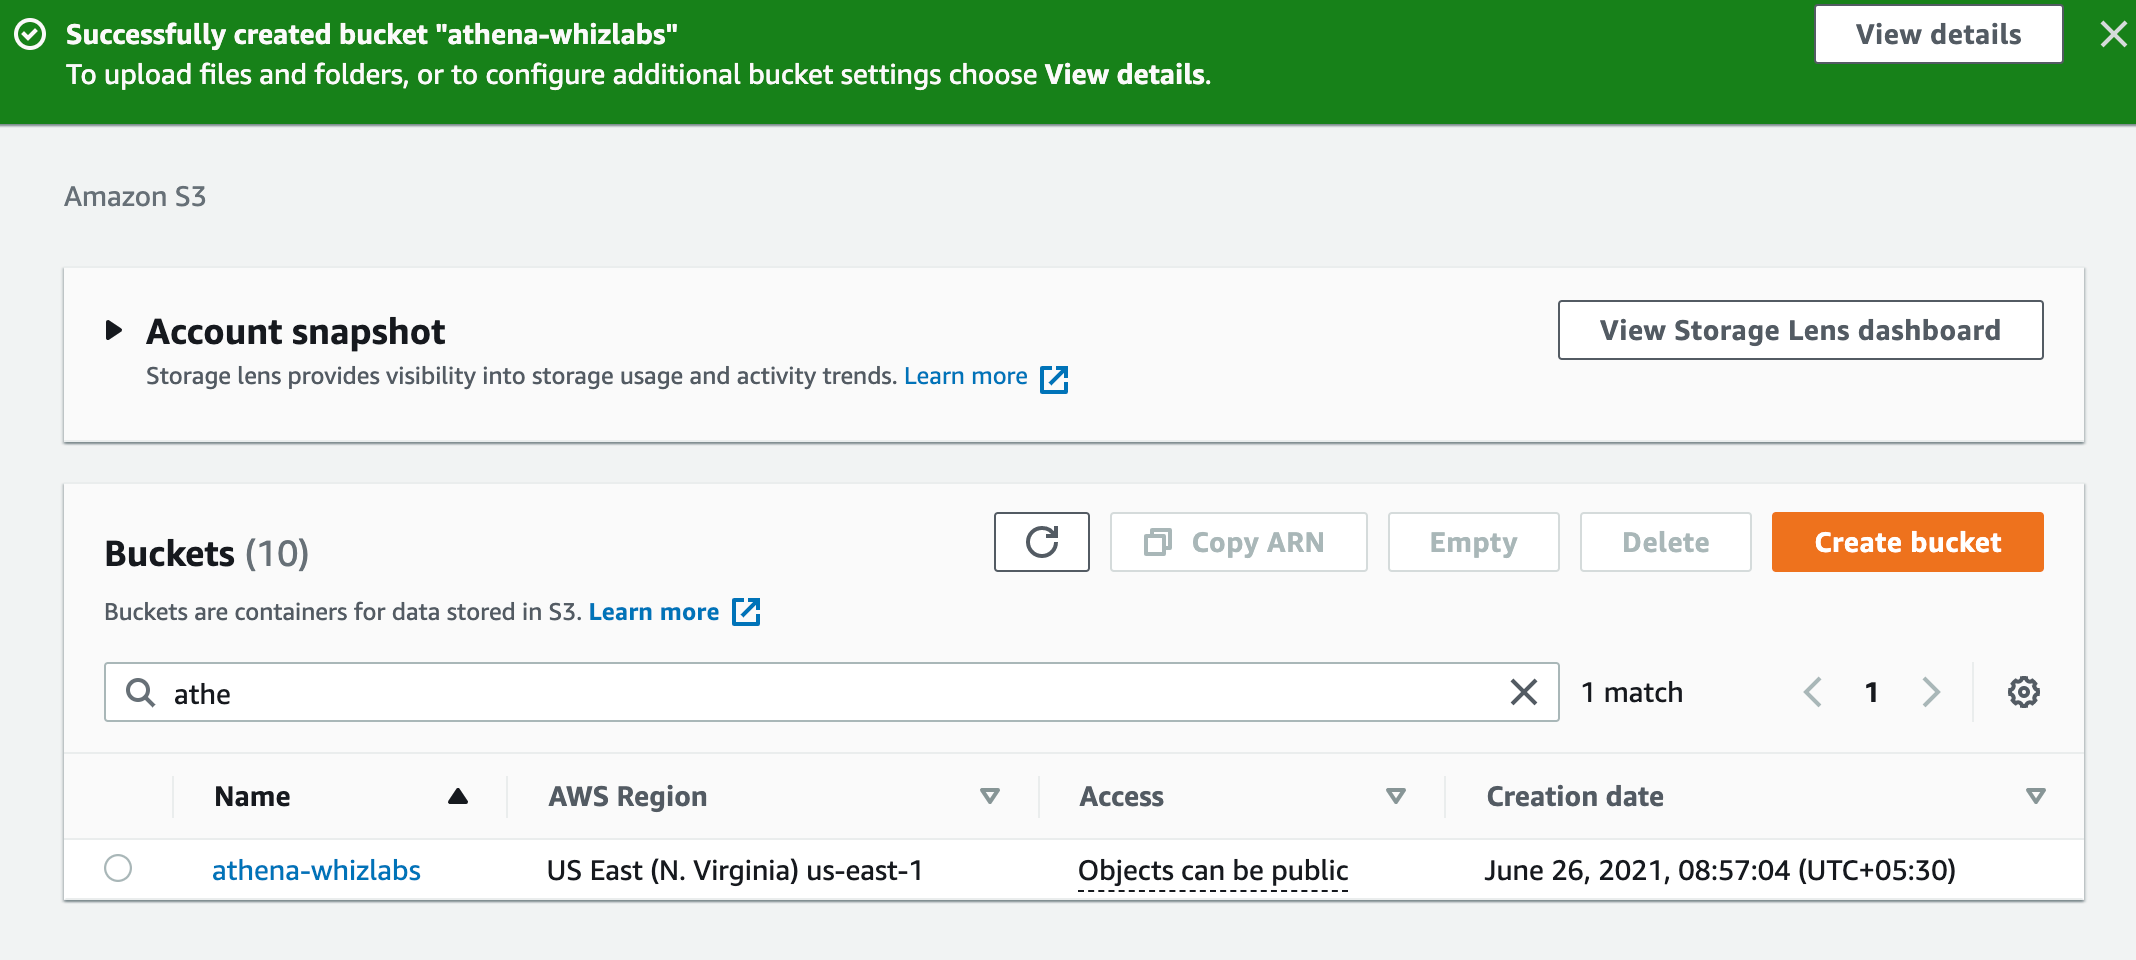
4. The S3 bucket is created.
* Leave other settings as default.
* Click on **Create Bucket**.
4. The S3 bucket is created.
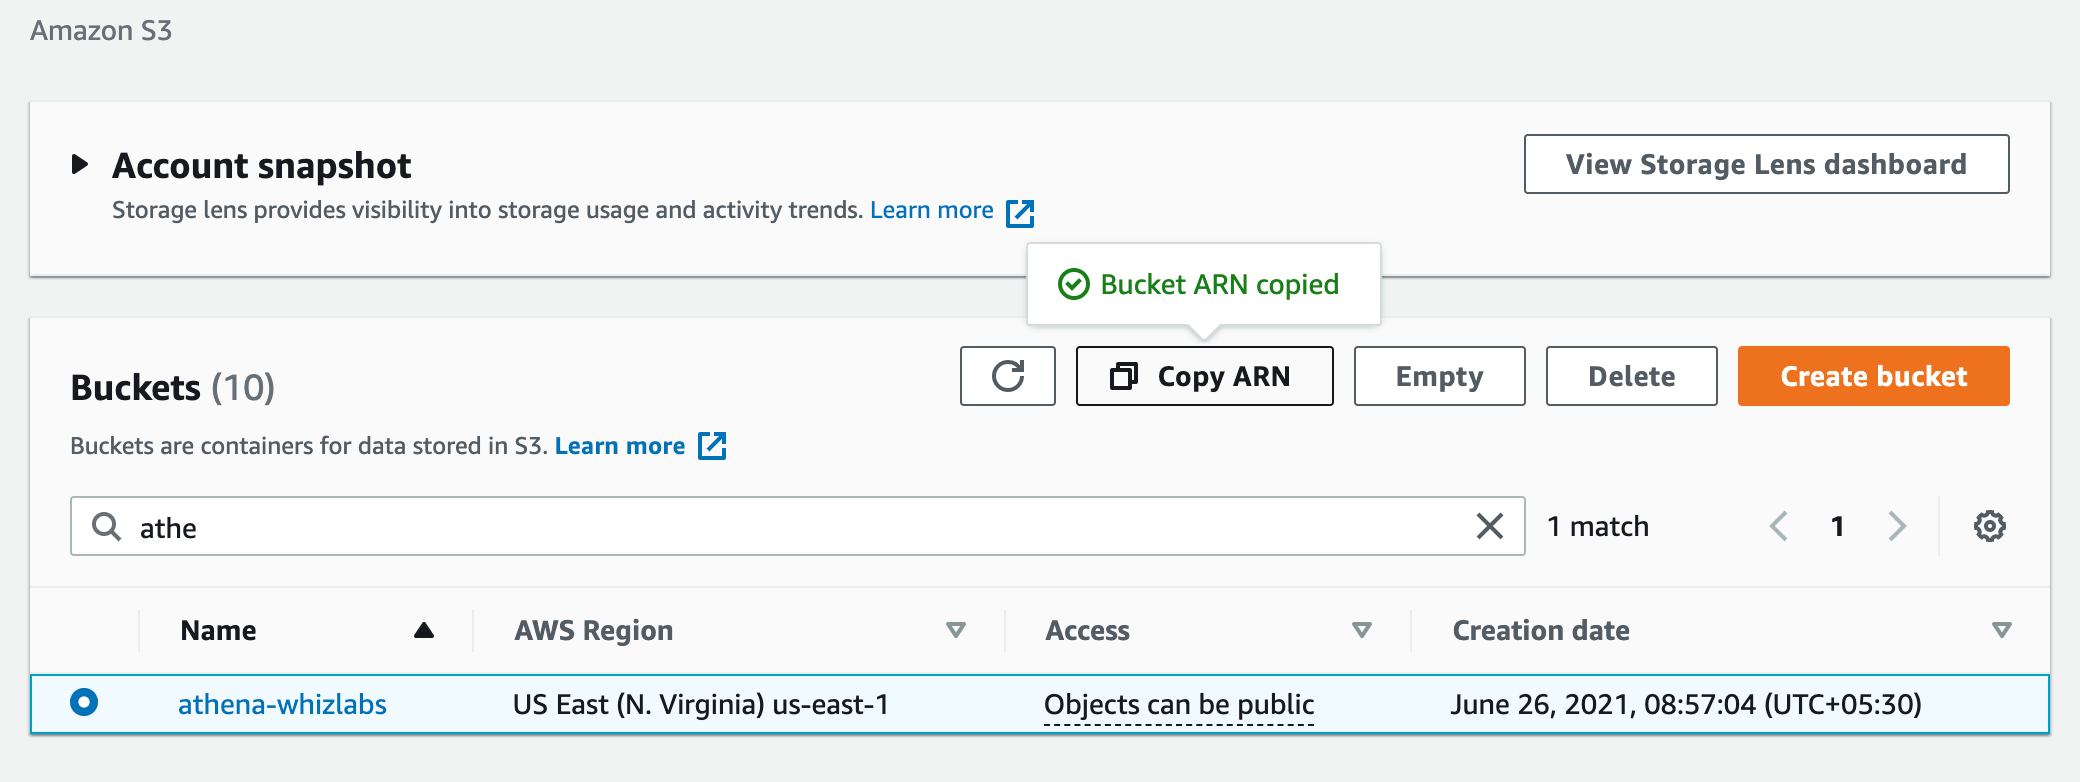
 5. Select the Bucket and click on the **Copy ARN** Button, save it to notepad. You will need this for future steps.
 6. **Modify the S3 Bucket policy to allow incoming logs from VPC flow logs.**
7. Click on the **Bucket name** and switch to the **Permissions** tab.
8. Scroll to the **Bucket policy** section and click on the **Edit** button.
9. Paste the below policy. and replace the **bucket ARN** in the **Resource section** below and click on **Save changes** button.
\{
"Version": "2012-10-17",
"Statement": \[
\{
"Sid": "AWSLogDeliveryWrite",
"Effect": "Allow",
"Principal": \{
"Service": "delivery.logs.amazonaws.com"
},
"Action": "s3:PutObject",
"Resource": "\/AWSLogs/\*",
"Condition": \{
"StringEquals": \{
"s3:x-amz-acl": "bucket-owner-full-control"
}
}
},
\{
"Sid": "AWSLogDeliveryCheck",
"Effect": "Allow",
"Principal": \{
"Service": "delivery.logs.amazonaws.com"
},
"Action": \[
"s3:GetBucketAcl",
"s3:ListBucket"
],
"Resource": "\"
}
]
}
#### Task 3: Create a VPC
1. Make sure you are in **US East (N. Virginia) us-east-1** Region.
2. Navigate to **VPC** by clicking on the **Services** menu at the top, then click on **VPC** in the **Networking & Content Delivery** section.
3. To create a **VPC** click on **Your VPCs** the present in the **VIRTUAL PRIVATE CLOUD** section on the left sidebar.
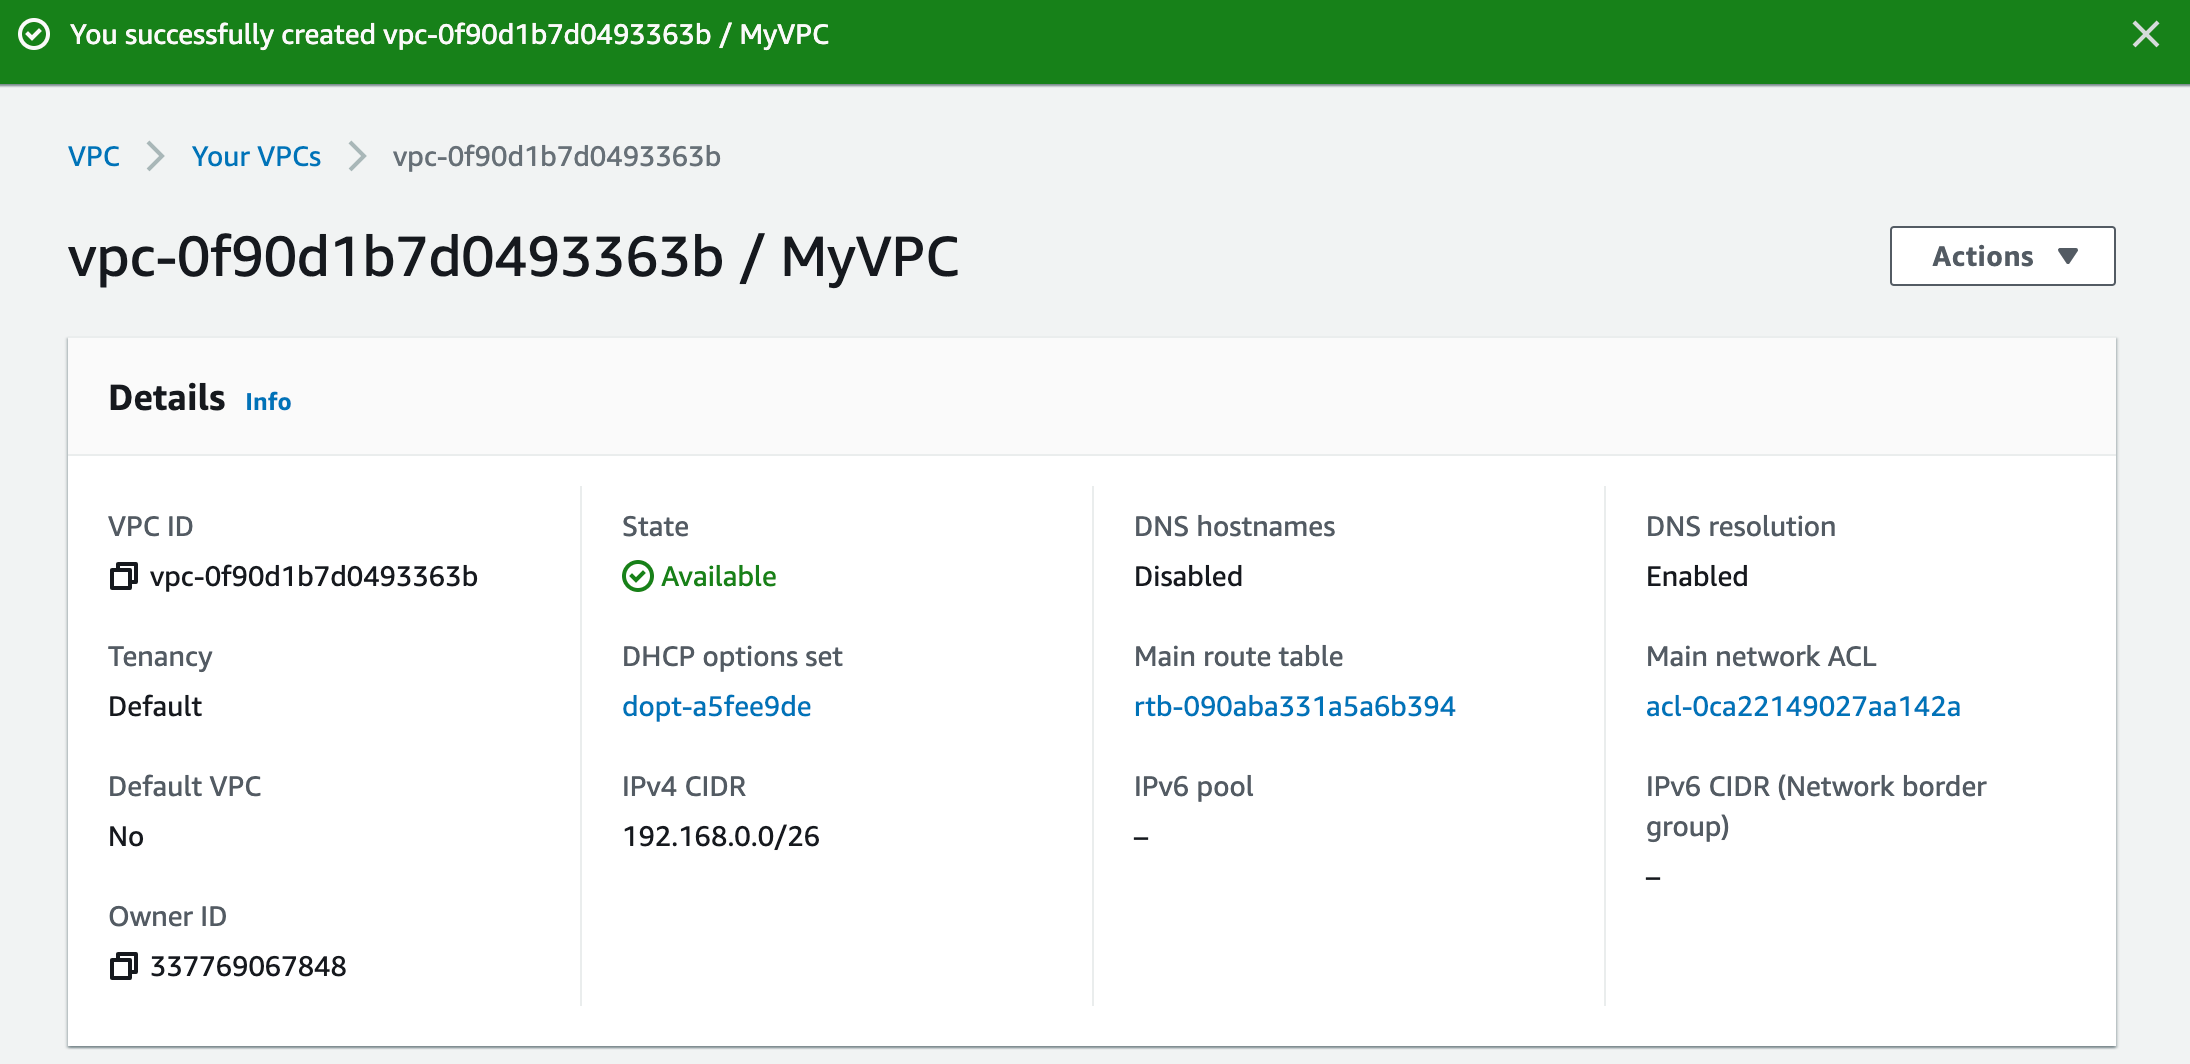
4. Create a new VPC by clicking on the **Create VPC**.
* Select **VPC only**
* Name tag - *optional*\_**:**\_ Enter ***MyVPC***
* IPv4 CIDR block: Enter ***192.168.0.0/26***
* IPv6 CIDR block: Select **No IPv6 CIDR block**
* Tenancy: **Default**
* Click on the **Create VPC** button to create the **MyVPC**.
5. **VPC is now created.**
6. **Modify the S3 Bucket policy to allow incoming logs from VPC flow logs.**
7. Click on the **Bucket name** and switch to the **Permissions** tab.
8. Scroll to the **Bucket policy** section and click on the **Edit** button.
9. Paste the below policy. and replace the **bucket ARN** in the **Resource section** below and click on **Save changes** button.
\{
"Version": "2012-10-17",
"Statement": \[
\{
"Sid": "AWSLogDeliveryWrite",
"Effect": "Allow",
"Principal": \{
"Service": "delivery.logs.amazonaws.com"
},
"Action": "s3:PutObject",
"Resource": "\/AWSLogs/\*",
"Condition": \{
"StringEquals": \{
"s3:x-amz-acl": "bucket-owner-full-control"
}
}
},
\{
"Sid": "AWSLogDeliveryCheck",
"Effect": "Allow",
"Principal": \{
"Service": "delivery.logs.amazonaws.com"
},
"Action": \[
"s3:GetBucketAcl",
"s3:ListBucket"
],
"Resource": "\"
}
]
}
#### Task 3: Create a VPC
1. Make sure you are in **US East (N. Virginia) us-east-1** Region.
2. Navigate to **VPC** by clicking on the **Services** menu at the top, then click on **VPC** in the **Networking & Content Delivery** section.
3. To create a **VPC** click on **Your VPCs** the present in the **VIRTUAL PRIVATE CLOUD** section on the left sidebar.
4. Create a new VPC by clicking on the **Create VPC**.
* Select **VPC only**
* Name tag - *optional*\_**:**\_ Enter ***MyVPC***
* IPv4 CIDR block: Enter ***192.168.0.0/26***
* IPv6 CIDR block: Select **No IPv6 CIDR block**
* Tenancy: **Default**
* Click on the **Create VPC** button to create the **MyVPC**.
5. **VPC is now created.**
 #### Task 4: Create and attach an Internet Gateway with custom VPC
1. By default, instances that are launched in a VPC cannot communicate with the Internet. To enable Internet access, an Internet gateway needed to be attached to the VPC.
2. Click on **Internet Gateways** from the left menu and click **Create Internet Gateway**.
* **Name Tag :** Enter ***MyInternetGateway***
* Click on **Create Internet Gateway**.
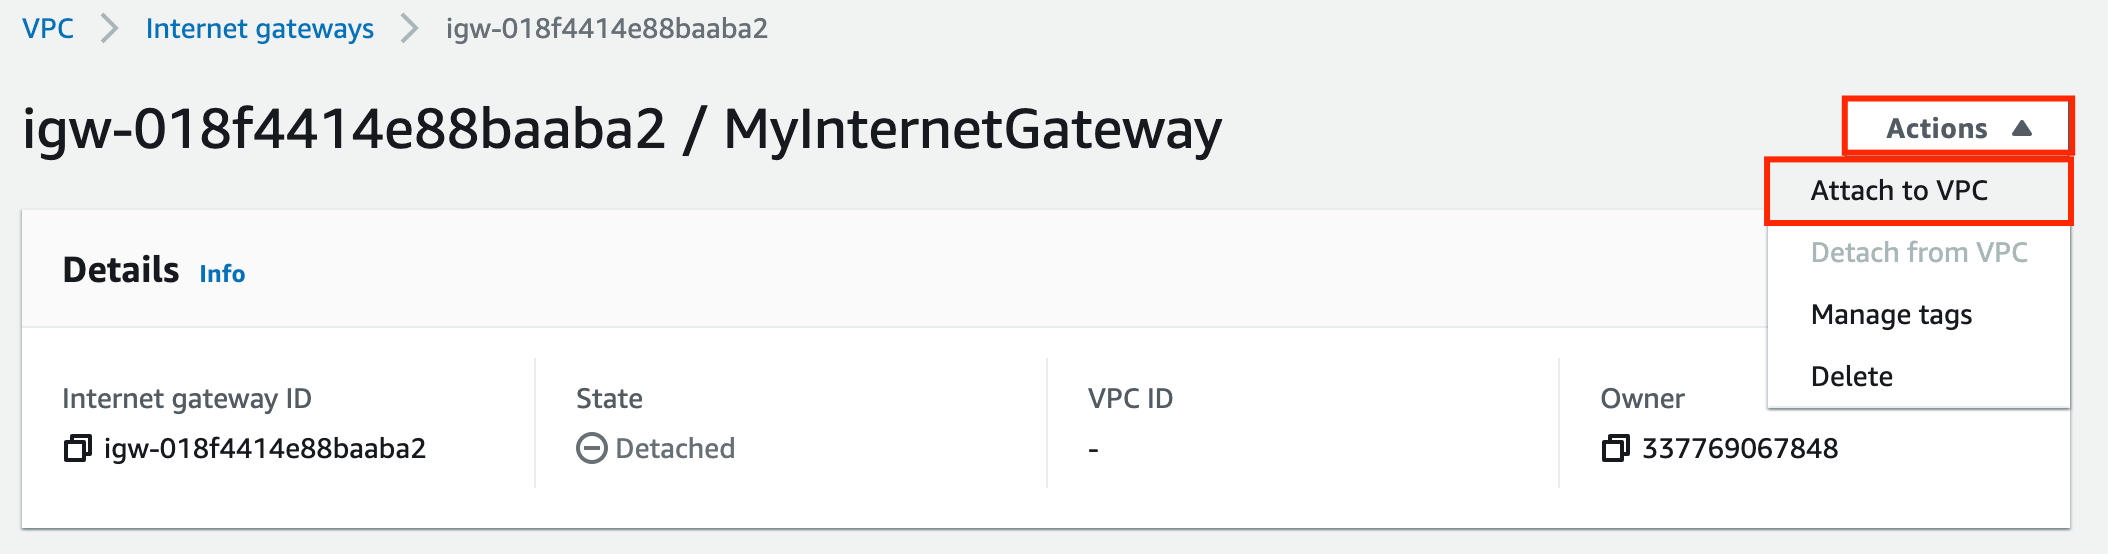
3. Select the Internet gateway you created from the list.
* Click on **Actions**.
* Select **Attach to VPC**.
#### Task 4: Create and attach an Internet Gateway with custom VPC
1. By default, instances that are launched in a VPC cannot communicate with the Internet. To enable Internet access, an Internet gateway needed to be attached to the VPC.
2. Click on **Internet Gateways** from the left menu and click **Create Internet Gateway**.
* **Name Tag :** Enter ***MyInternetGateway***
* Click on **Create Internet Gateway**.
3. Select the Internet gateway you created from the list.
* Click on **Actions**.
* Select **Attach to VPC**.
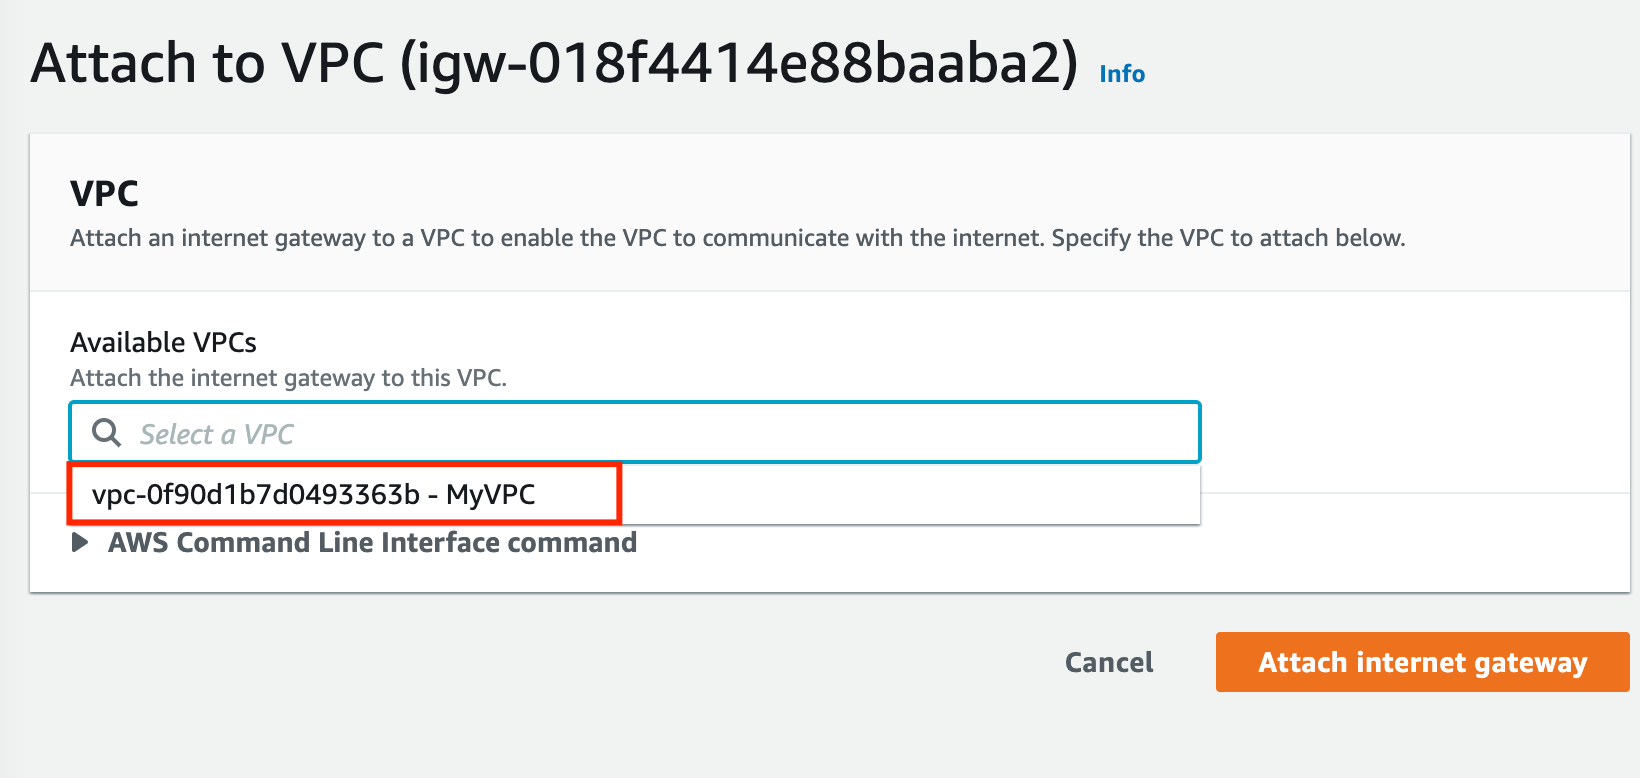
 4. Available VPCs: Select **MyVPC**
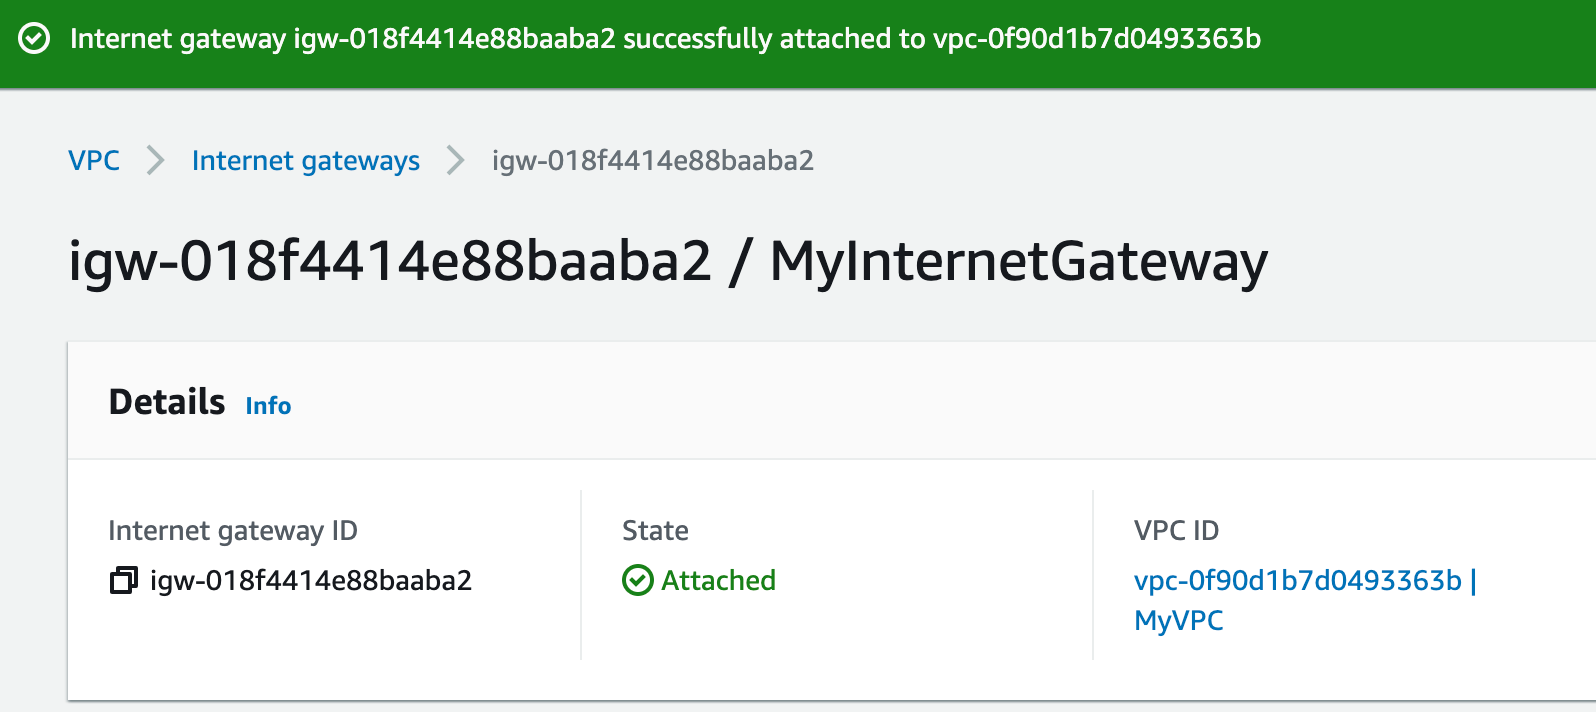
 5. And click on the **Attach internet gateway** button.
6. The **Internet gateway** is now attached with **MyVPC.**
5. And click on the **Attach internet gateway** button.
6. The **Internet gateway** is now attached with **MyVPC.**
 #### Task 5: Create a Public Subnet
1. To create a **subnet** click on **Subnets** the present in the **VIRTUAL PRIVATE CLOUD** section on the left sidebar.
2. Click on the **Create Subnet**.
3. In the VPC ID, select the **MyVPC**.
#### Task 5: Create a Public Subnet
1. To create a **subnet** click on **Subnets** the present in the **VIRTUAL PRIVATE CLOUD** section on the left sidebar.
2. Click on the **Create Subnet**.
3. In the VPC ID, select the **MyVPC**.
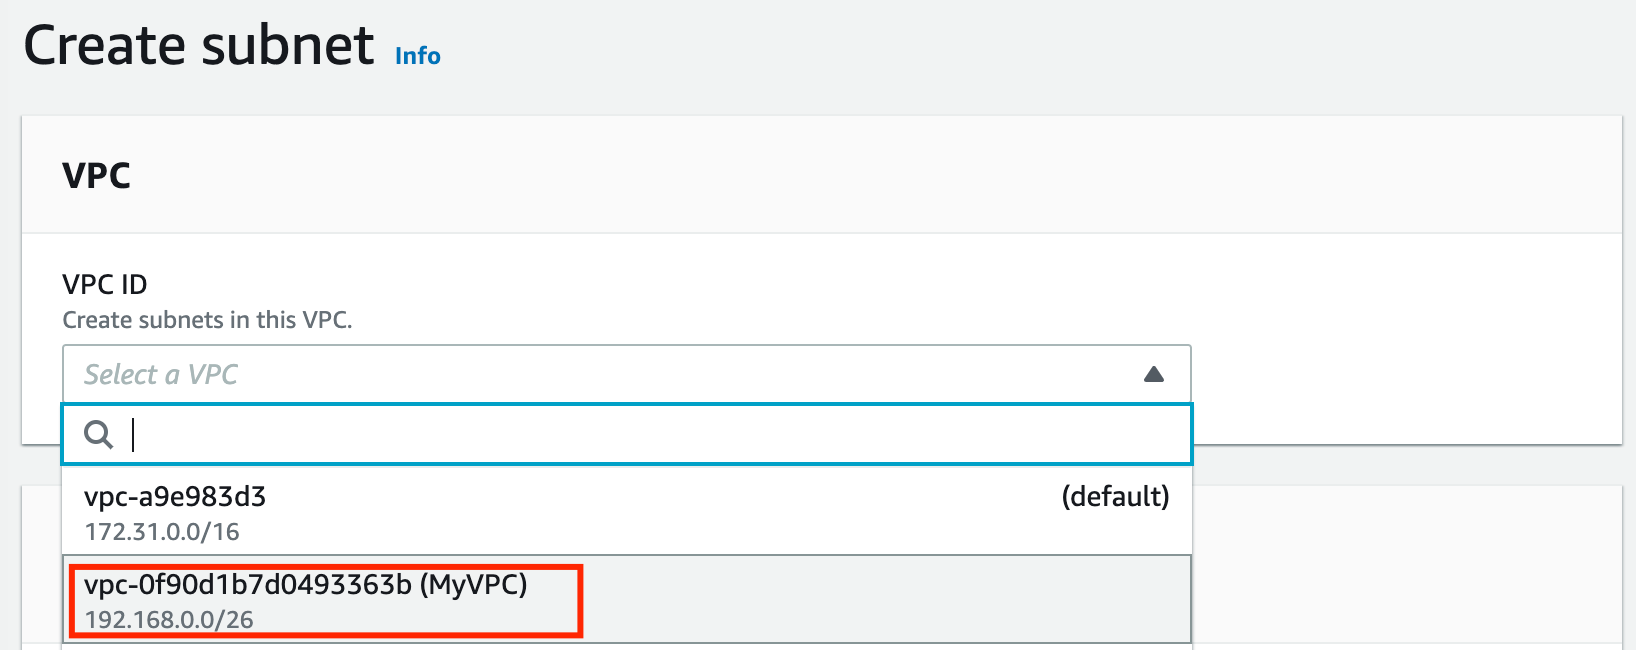 4. Create the first subnet, you will use this subnet to launch public instances, this subnet will be associated with the main route table of the VPC:
* Subnet name: Enter ***Public subnet***
* Availability Zone: Select **US East (N. Virginia) / us-east-1a**
* IPV4 CIDR block: Enter ***192.168.0.1/27***
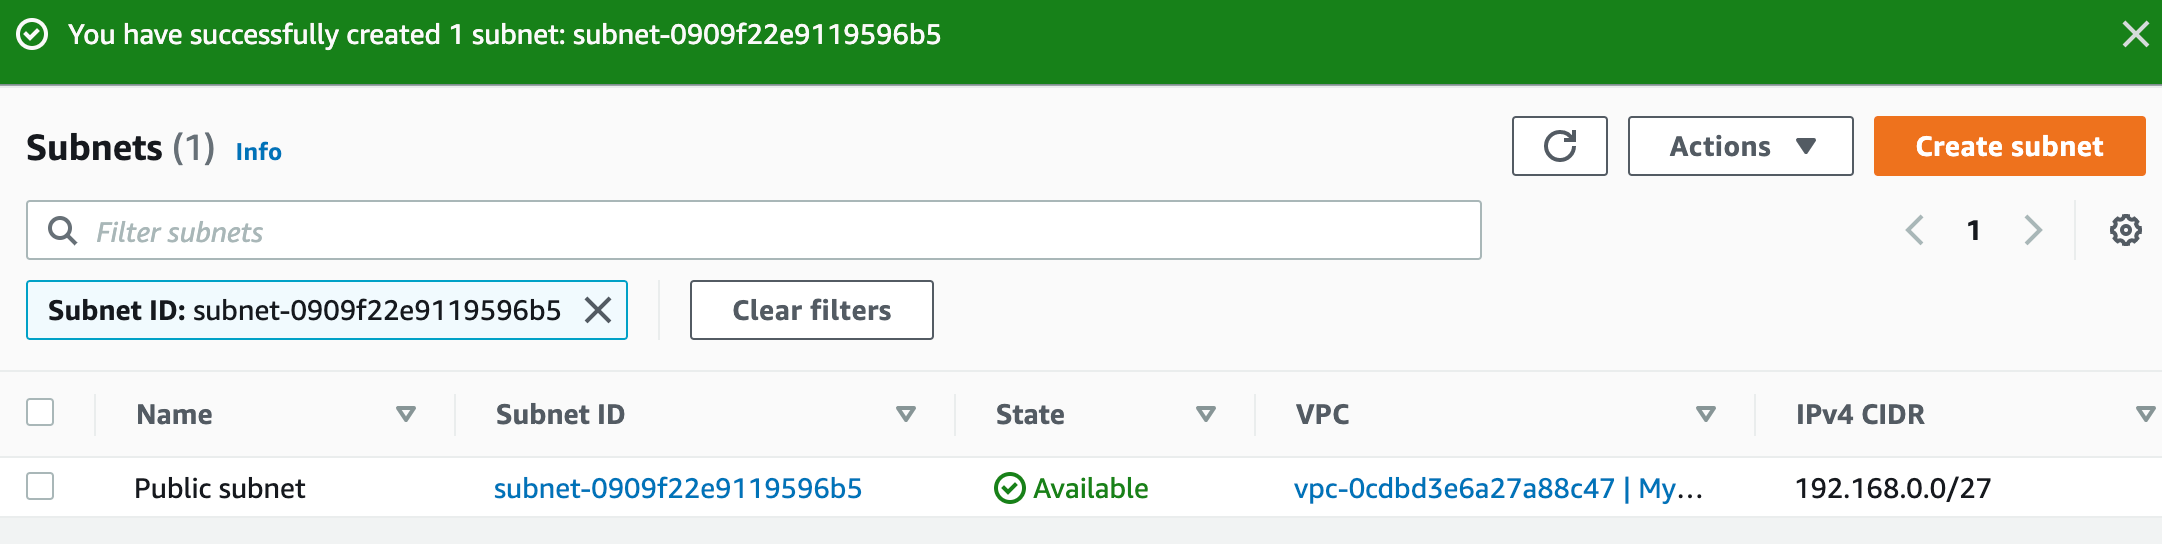
5. Finally, click on the **Create Subnet** to create a subnet.
6. A subnet is now created.
4. Create the first subnet, you will use this subnet to launch public instances, this subnet will be associated with the main route table of the VPC:
* Subnet name: Enter ***Public subnet***
* Availability Zone: Select **US East (N. Virginia) / us-east-1a**
* IPV4 CIDR block: Enter ***192.168.0.1/27***
5. Finally, click on the **Create Subnet** to create a subnet.
6. A subnet is now created.
 #### Task 6: Configure the Public subnet to enable auto-assign public IPv4 address
1. To modify the auto-assign IP settings for the Public subnet, do the following:
* Select the **Public subnet**
* Click on the **Actions** button
* Choose **Edit subnet settings** from the options.
2. Check the option **Enable auto-assign public IPv4 address** under **Auto-assign IP settings** and click on **Save** button.
#### Task 6: Configure the Public subnet to enable auto-assign public IPv4 address
1. To modify the auto-assign IP settings for the Public subnet, do the following:
* Select the **Public subnet**
* Click on the **Actions** button
* Choose **Edit subnet settings** from the options.
2. Check the option **Enable auto-assign public IPv4 address** under **Auto-assign IP settings** and click on **Save** button.
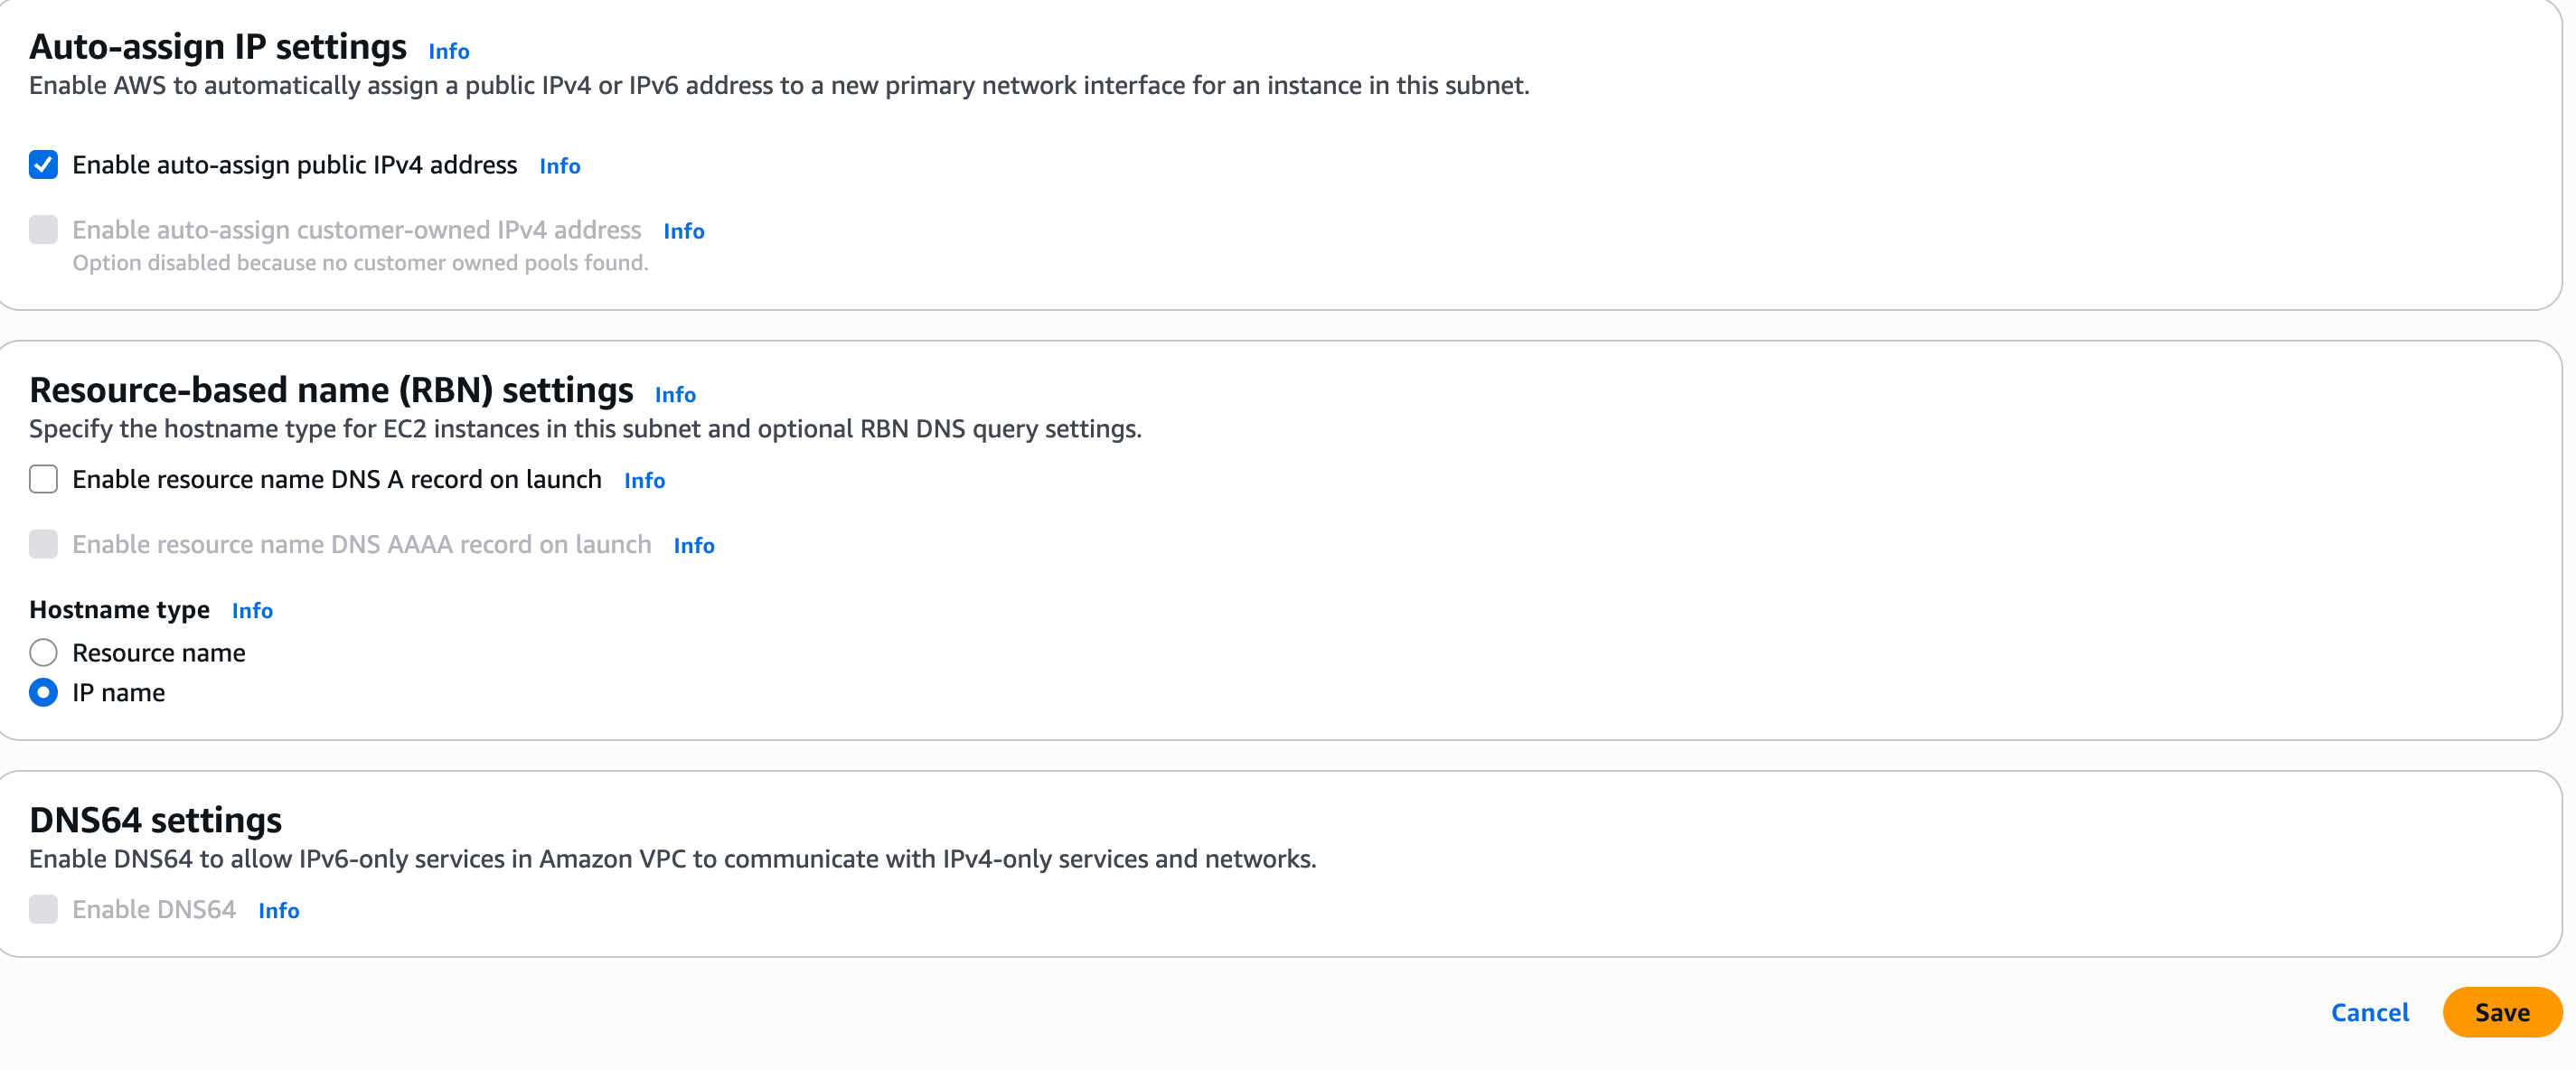 3. Modification is done now.
 #### Task 7: Create a Public Route Table
1. Go to **Route Tables** from the left menu and click on **Create route table** button.
* **Name:** Enter ***PublicRouteTable***
* **VPC:** Select **MyVPC** from the list.
* Click on **Create route table** button.
2. Select the **PublicRouteTable** and go to the **Subnet Associations** tab.
* Click on **Edit subnet associations.**
* Select **Public Subnet** from the list.
* Click on **Save associations** button.
3. Select the **PublicRouteTable** from the left panel.
4. On the Edit routes page, Click on the **Add route** button.
5. Add the Destinations as **0.0.0.0/0** and Select the **Internet gateway** present.
#### Task 7: Create a Public Route Table
1. Go to **Route Tables** from the left menu and click on **Create route table** button.
* **Name:** Enter ***PublicRouteTable***
* **VPC:** Select **MyVPC** from the list.
* Click on **Create route table** button.
2. Select the **PublicRouteTable** and go to the **Subnet Associations** tab.
* Click on **Edit subnet associations.**
* Select **Public Subnet** from the list.
* Click on **Save associations** button.
3. Select the **PublicRouteTable** from the left panel.
4. On the Edit routes page, Click on the **Add route** button.
5. Add the Destinations as **0.0.0.0/0** and Select the **Internet gateway** present.
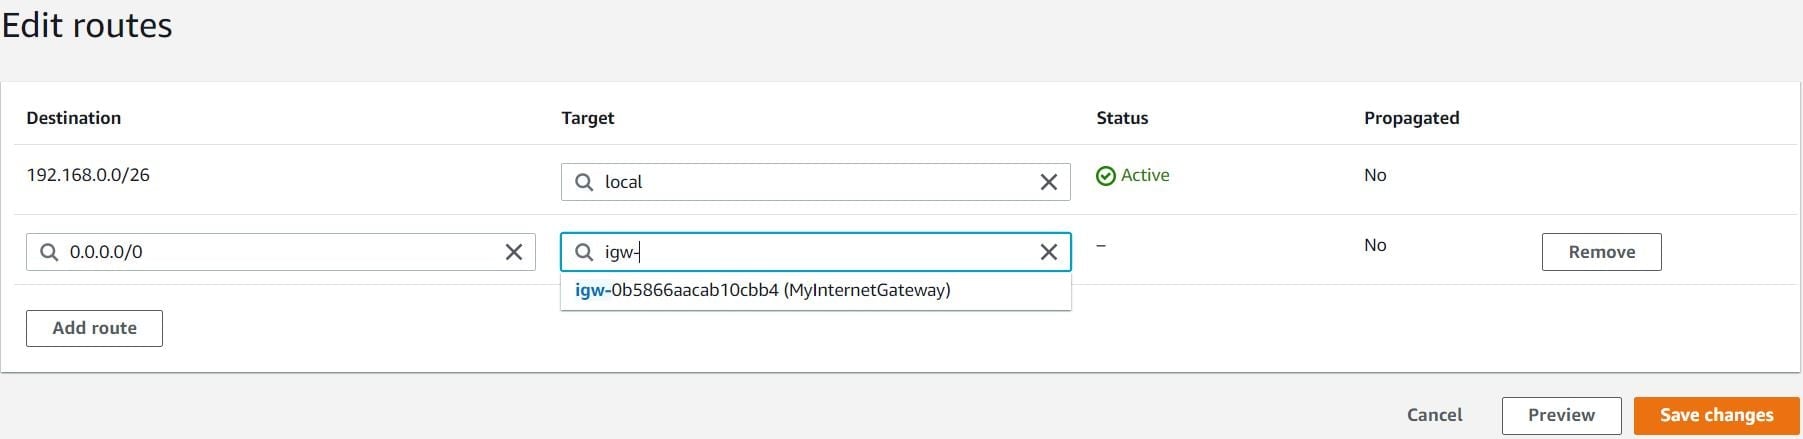 6. Click on the **Save changes** button.
#### Task 8: Create a VPC Flow log
1. Navigate to the VPC you just created, click on **Actions** then select **Create Flow Log.**
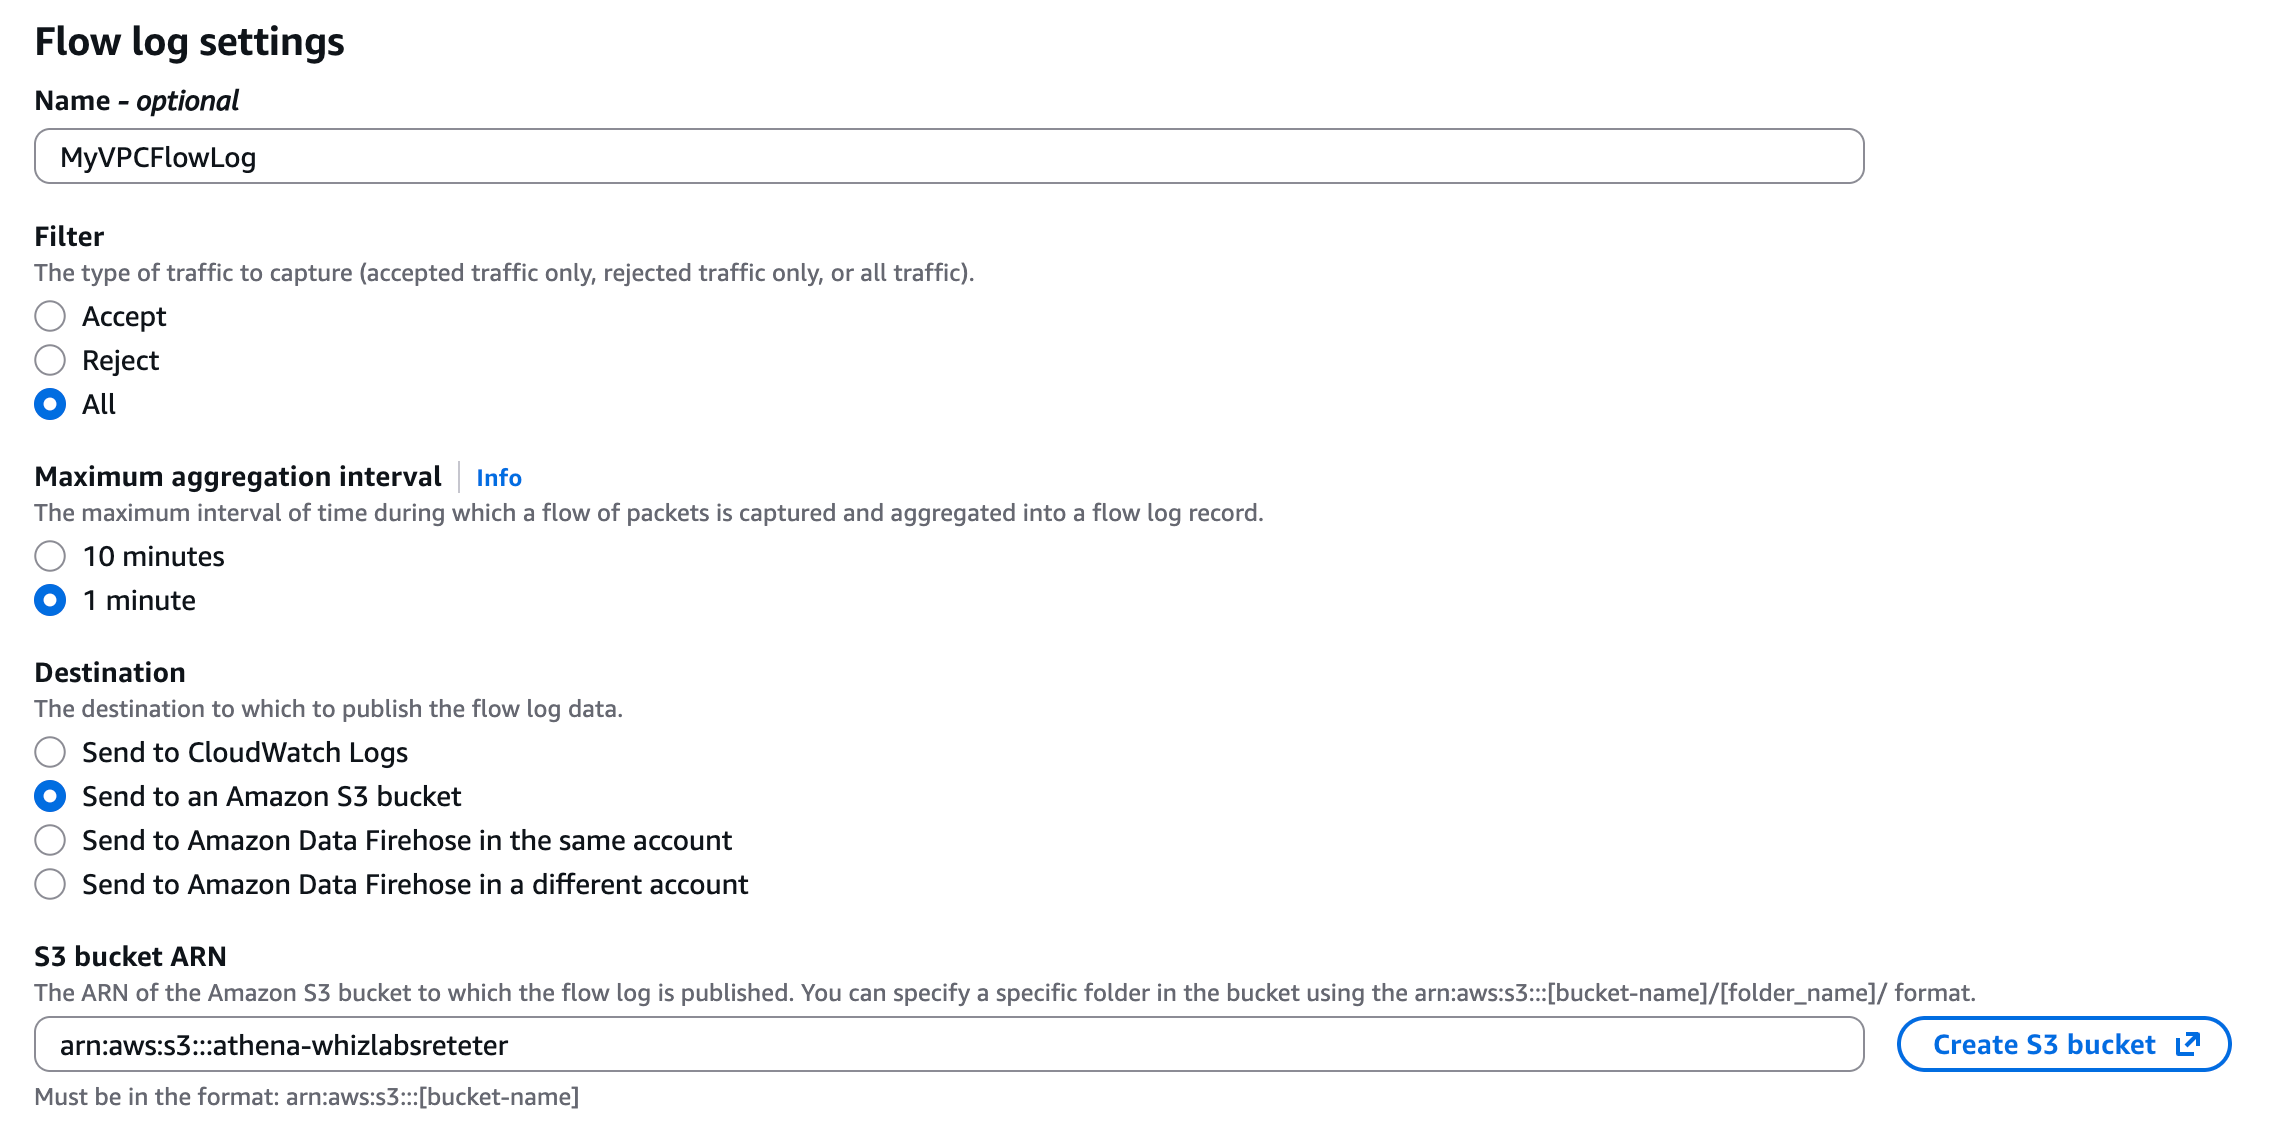
2. Enter the name as ***MyVPCFlowLog***\*\*,\*\*
3. Select **All** in filter options and then set the **Maximum Aggregation Interval** to **1 minute.**
4. Select as **Send to Amazon S3 Bucket** as the Destination.
5. Paste the copied **S3 Bucket's ARN** in the S3 Bucket ARN field.
6. Click on the **Save changes** button.
#### Task 8: Create a VPC Flow log
1. Navigate to the VPC you just created, click on **Actions** then select **Create Flow Log.**
2. Enter the name as ***MyVPCFlowLog***\*\*,\*\*
3. Select **All** in filter options and then set the **Maximum Aggregation Interval** to **1 minute.**
4. Select as **Send to Amazon S3 Bucket** as the Destination.
5. Paste the copied **S3 Bucket's ARN** in the S3 Bucket ARN field.
 6. Log record format: Select **AWS default format**
7. Tags: Keep it as default.
8. Click on the **Create flow log** button.
9. Once the flow logs are created, head back to the AWS VPC service, select it, and click on **Flow Logs**.
#### Task 9: Launching an EC2 Instance to generate traffic
1. Make sure you are in the **N. Virginia(us-east-1)** Region.
2. Navigate to **EC2** by clicking on the **Services** menu in the top left, then click on **EC2** in the **Compute** section.
3. Navigate to **Instances** from the left side menu and click on **Launch Instances** button.
4. Under the **Name and tags** section :
* Name : ***MyEC2Instance***
5. Under the **Application and OS Images (Amazon Machine Image)** section :
* Select **Quick Start** tab and **Amazon Linux** under it
* Amazon Machine Image (AMI) : select ***Amazon Linux 2023 AMI***
6. Log record format: Select **AWS default format**
7. Tags: Keep it as default.
8. Click on the **Create flow log** button.
9. Once the flow logs are created, head back to the AWS VPC service, select it, and click on **Flow Logs**.
#### Task 9: Launching an EC2 Instance to generate traffic
1. Make sure you are in the **N. Virginia(us-east-1)** Region.
2. Navigate to **EC2** by clicking on the **Services** menu in the top left, then click on **EC2** in the **Compute** section.
3. Navigate to **Instances** from the left side menu and click on **Launch Instances** button.
4. Under the **Name and tags** section :
* Name : ***MyEC2Instance***
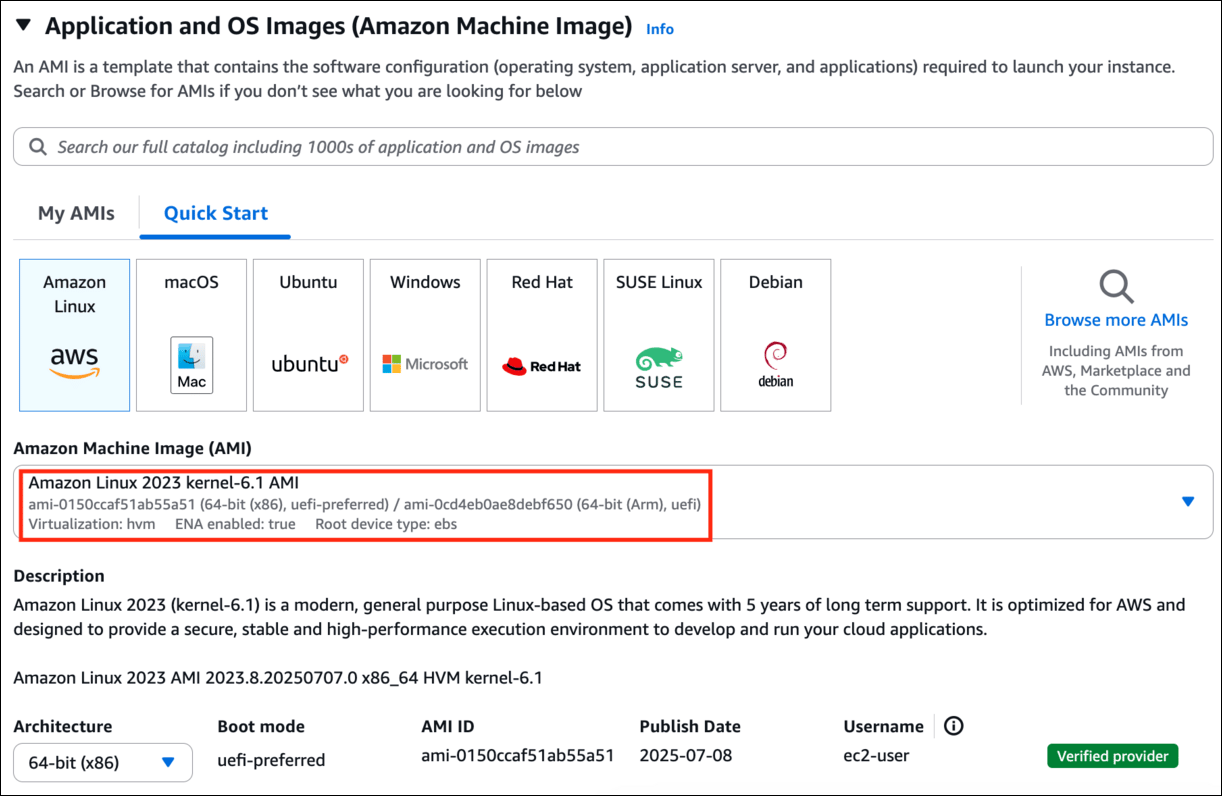
5. Under the **Application and OS Images (Amazon Machine Image)** section :
* Select **Quick Start** tab and **Amazon Linux** under it
* Amazon Machine Image (AMI) : select ***Amazon Linux 2023 AMI***
 6. Under the **Instance Type** section **:**
* Instance Type : Select **t2.micro**
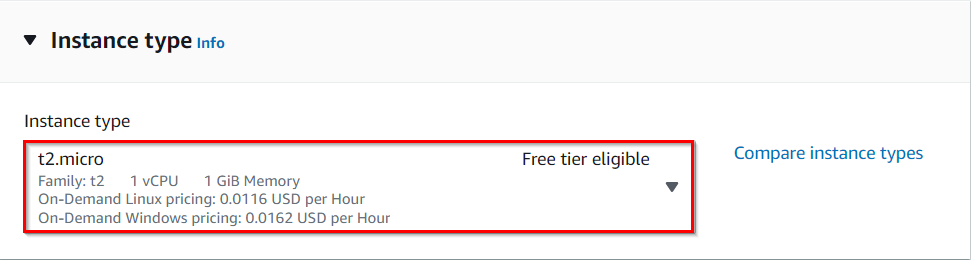
6. Under the **Instance Type** section **:**
* Instance Type : Select **t2.micro**
 7. Under the **Key Pair (login)** section **:**
* Click on **Create new key pair** hyperlink
* Key pair name: ***MyEC2FLowLogsKey***
* Key pair type: **RSA**
* Private key file format: **.pem** or **.ppk**
* Click on **Create key pair** and select the created key pair
8. Under the **Network Settings** section **:**
* Click on **Edit** button
* VPC : select **MyVPC**
* Subnet : select **Public Subnet**
* Auto-assign public IP: select ***Enable***
* Firewall (security groups) : Select **Create a new security group**
* Security group name : Enter ***FlowLog-SG***
* Description : Enter ***Security group for VPC Flow Logs***
* To add **SSH:**
* Choose Type: **SSH**
* Source: **Anywhere** (From ALL IP addresses accessible).
* For **HTTP**, click on **Add security group rule**,
* Choose Type: **HTTP**
* Source: **Anywhere** (From ALL IP addresses accessible).
9. Keep everything else as default and click on the **Launch instance** button.
10. **Launch Status:** Your instance is now launching, Navigate to **Instances** page from the left menu and wait until the status of the EC2 Instance changes to **running**.
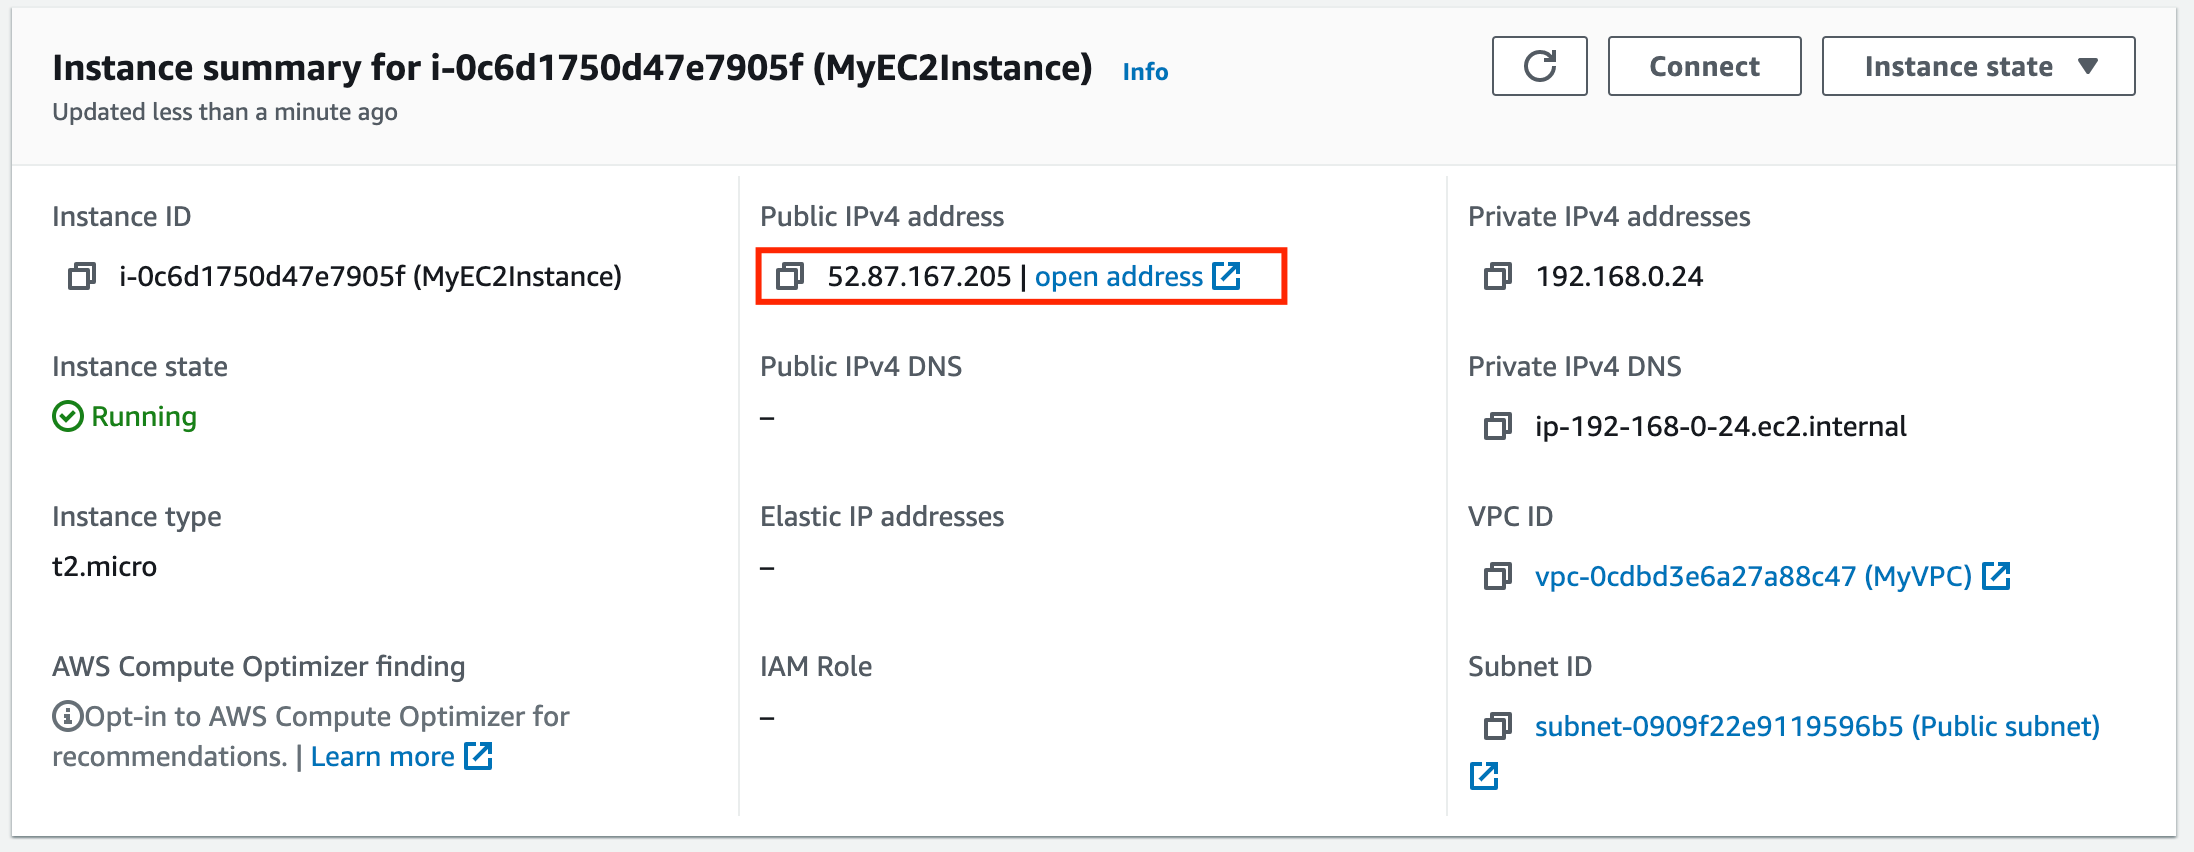
11. Note down the **IPv4 Public IP** Address of the EC2 instance. A sample is shown in the screenshot below.
7. Under the **Key Pair (login)** section **:**
* Click on **Create new key pair** hyperlink
* Key pair name: ***MyEC2FLowLogsKey***
* Key pair type: **RSA**
* Private key file format: **.pem** or **.ppk**
* Click on **Create key pair** and select the created key pair
8. Under the **Network Settings** section **:**
* Click on **Edit** button
* VPC : select **MyVPC**
* Subnet : select **Public Subnet**
* Auto-assign public IP: select ***Enable***
* Firewall (security groups) : Select **Create a new security group**
* Security group name : Enter ***FlowLog-SG***
* Description : Enter ***Security group for VPC Flow Logs***
* To add **SSH:**
* Choose Type: **SSH**
* Source: **Anywhere** (From ALL IP addresses accessible).
* For **HTTP**, click on **Add security group rule**,
* Choose Type: **HTTP**
* Source: **Anywhere** (From ALL IP addresses accessible).
9. Keep everything else as default and click on the **Launch instance** button.
10. **Launch Status:** Your instance is now launching, Navigate to **Instances** page from the left menu and wait until the status of the EC2 Instance changes to **running**.
11. Note down the **IPv4 Public IP** Address of the EC2 instance. A sample is shown in the screenshot below.
 #### Task 10: SSH into EC2 Instance
* Please follow the steps in [SSH into EC2 Instance](https://play.whizlabs.com/site/task_support/ssh-into-ec-instance).
#### Task 11: Generate logs that will be sent to S3 Bucket
1. Once you SSH into the instance, install an Apache Server. To install it, follow the below steps. Run these commands one-by-one.
sudo su
dnf -y update
dnf install -y httpd
cd /var/www/html
echo "Response coming from server" > /var/www/html/index.html
systemctl start httpd
systemctl enable httpd
systemctl status httpd
2. Copy your instance's **Public IP**, paste it into your browser, and hit enter.
#### Task 10: SSH into EC2 Instance
* Please follow the steps in [SSH into EC2 Instance](https://play.whizlabs.com/site/task_support/ssh-into-ec-instance).
#### Task 11: Generate logs that will be sent to S3 Bucket
1. Once you SSH into the instance, install an Apache Server. To install it, follow the below steps. Run these commands one-by-one.
sudo su
dnf -y update
dnf install -y httpd
cd /var/www/html
echo "Response coming from server" > /var/www/html/index.html
systemctl start httpd
systemctl enable httpd
systemctl status httpd
2. Copy your instance's **Public IP**, paste it into your browser, and hit enter.
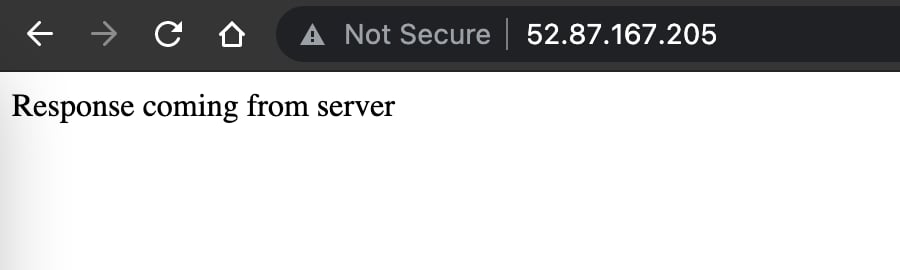 3. **By Running these commands manually and pasting the Public IP in the Browser, we have generated some traffic.**
4. **Logs will be stored in S3 Bucket at an Interval of 5 minutes.**
5. Refresh the S3 Bucket and go to the folder AWSLogs/\<12 Digit Account number>/vpcflowlogs/us-east-1/\/\/\/.
**Note: Wait for at least 5 minutes, if you don't see the folder or the logs inside the folders.**
6. Logs will be present. Click on the **Copy S3 URI** button.
3. **By Running these commands manually and pasting the Public IP in the Browser, we have generated some traffic.**
4. **Logs will be stored in S3 Bucket at an Interval of 5 minutes.**
5. Refresh the S3 Bucket and go to the folder AWSLogs/\<12 Digit Account number>/vpcflowlogs/us-east-1/\/\/\/.
**Note: Wait for at least 5 minutes, if you don't see the folder or the logs inside the folders.**
6. Logs will be present. Click on the **Copy S3 URI** button.
 7. To Copy the current location of the log file, click on the **Copy S3 URI** button.
#### Task 12 : Create Database from Amazon Glue
1. Make sure you are in the **US East (N. Virginia) us-east-1** Region.
2. Navigate to **Services** menu in the top, then search for **AWS Glue** and click on it.
3. From the left side panel under **Data Catalog** click on **Databases**.
7. To Copy the current location of the log file, click on the **Copy S3 URI** button.
#### Task 12 : Create Database from Amazon Glue
1. Make sure you are in the **US East (N. Virginia) us-east-1** Region.
2. Navigate to **Services** menu in the top, then search for **AWS Glue** and click on it.
3. From the left side panel under **Data Catalog** click on **Databases**.
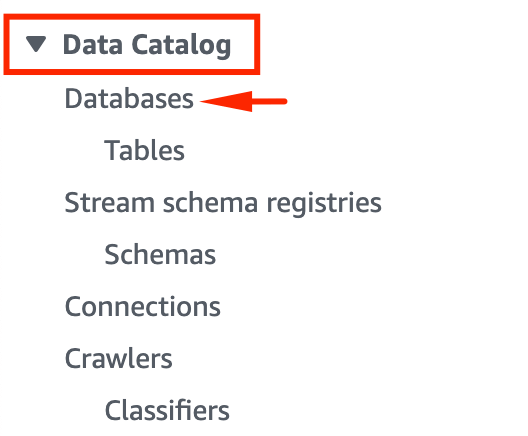 4. Click on **Add Database** button.
5. Under database details enter database name as : **whizdb**
4. Click on **Add Database** button.
5. Under database details enter database name as : **whizdb**
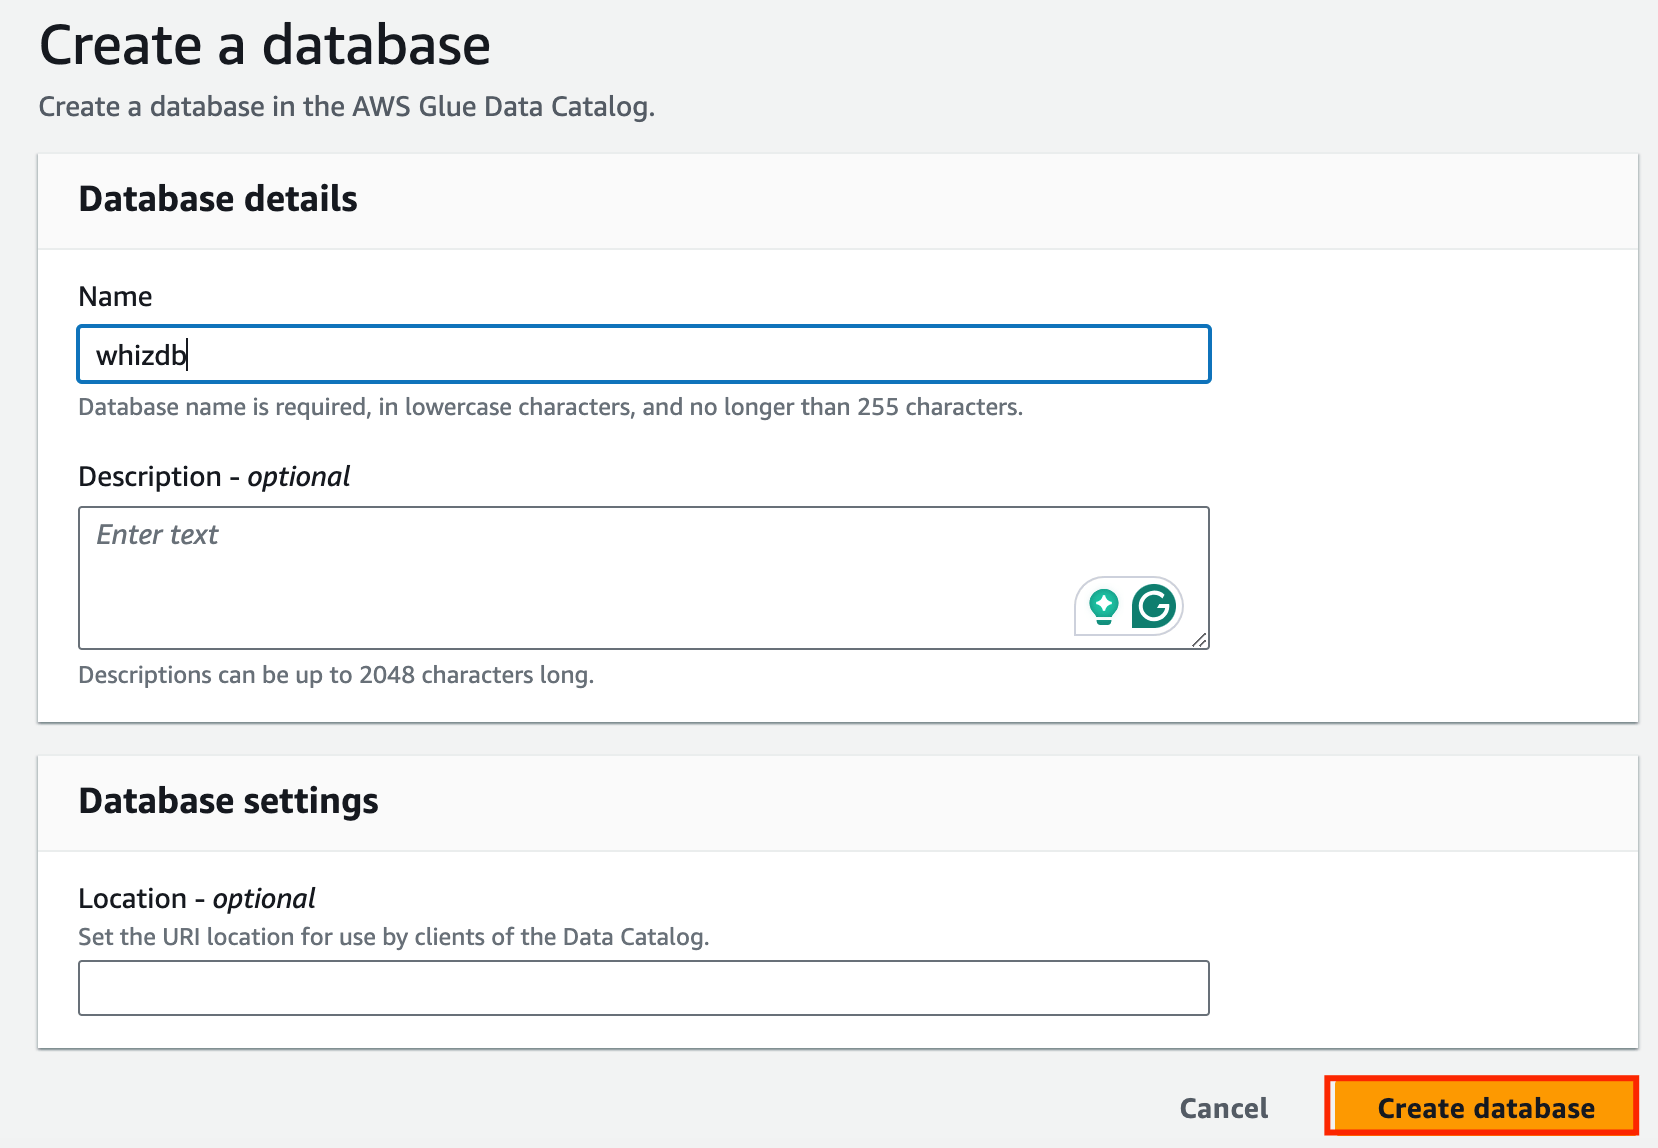 6. Now, click on **Create database** button.
 7. Now expand the left panel and click on Tables, you will be redirected to set tablet properties.
8. Under table details add :
* Name : **whiztable**
* Database : **whizdb**
7. Now expand the left panel and click on Tables, you will be redirected to set tablet properties.
8. Under table details add :
* Name : **whiztable**
* Database : **whizdb**
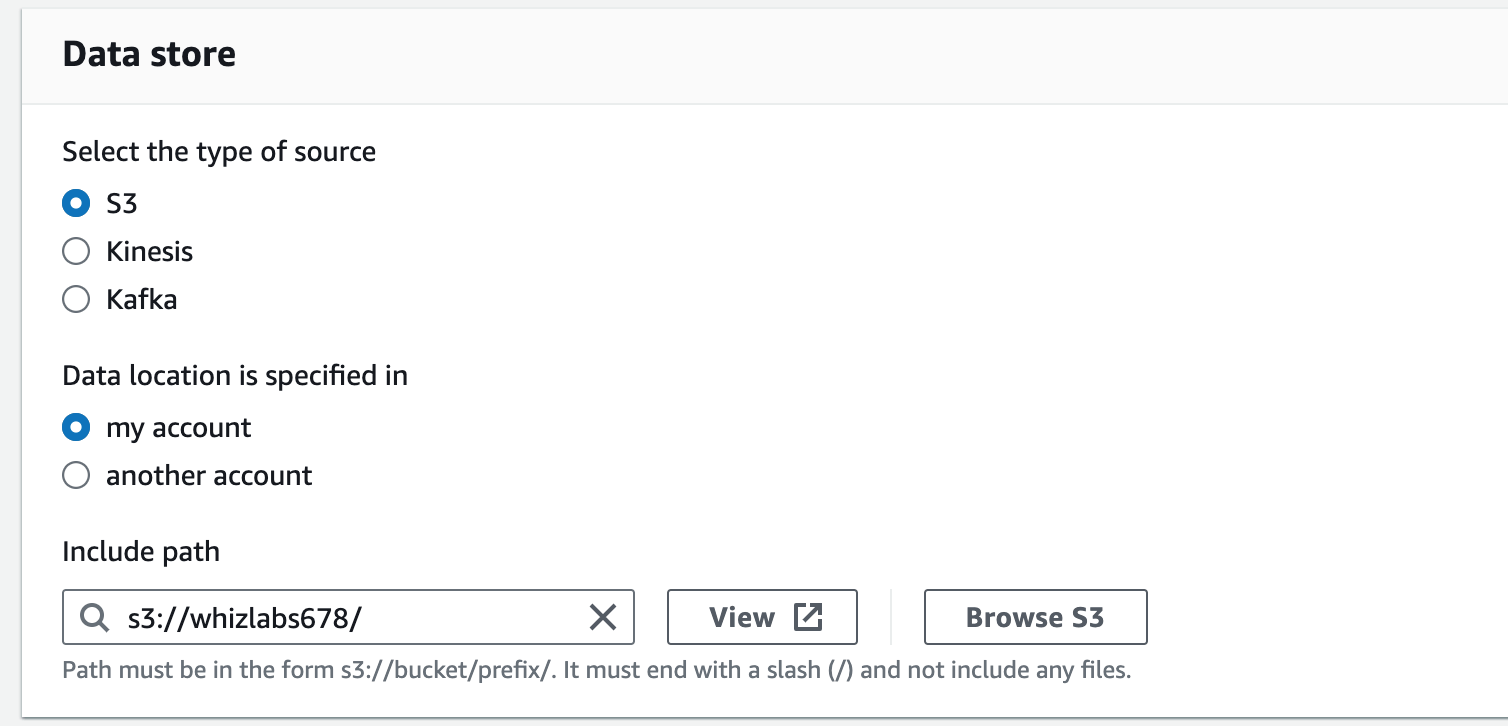
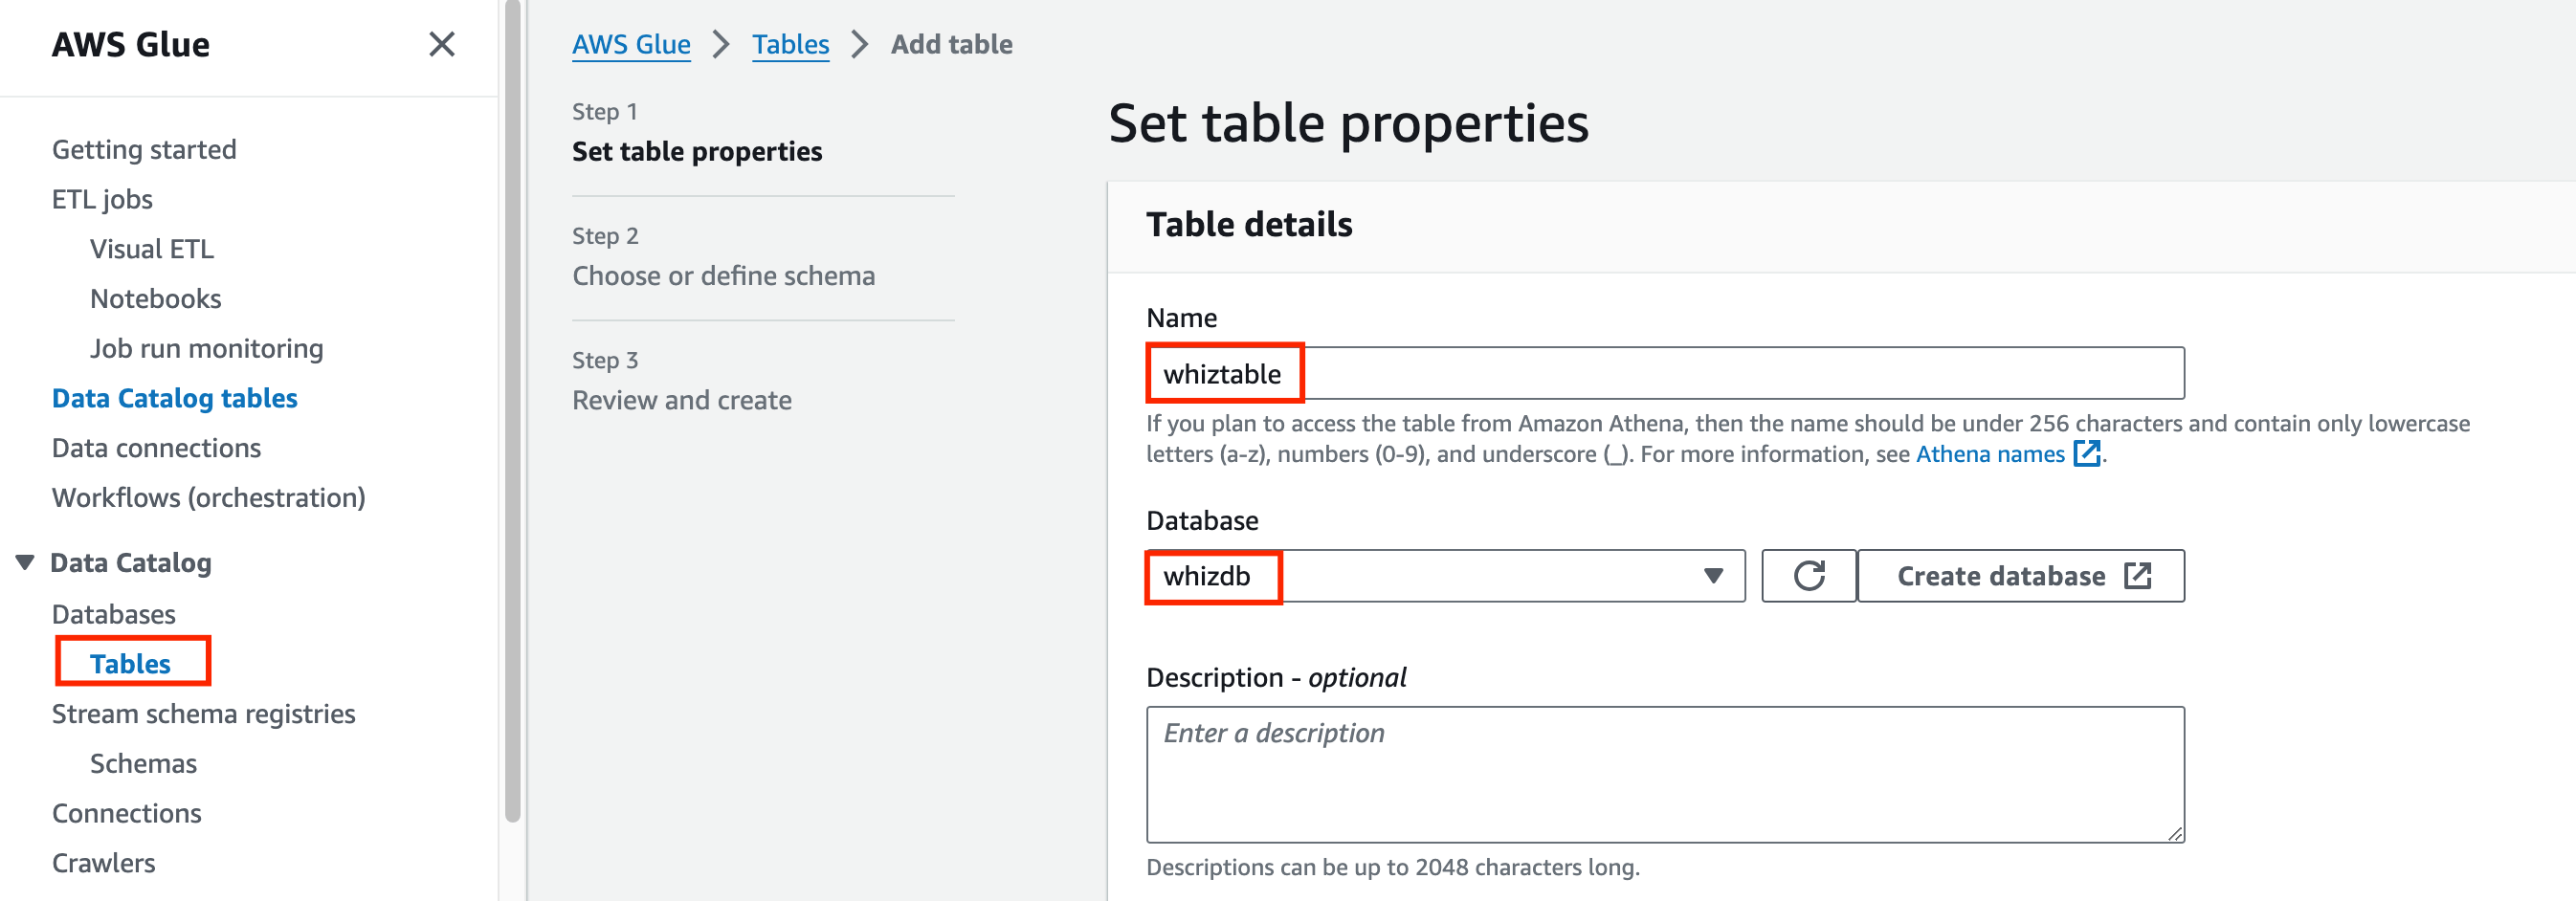 9. Inside Data store Include path of your created s3 bucket and leave other thing as default.
 10. Under Data format select **csv,** and click on the **Next** button\*\*.\*\*
11. Under choose of click on **Edit schema as JSON** button\*\*.\*\*
10. Under Data format select **csv,** and click on the **Next** button\*\*.\*\*
11. Under choose of click on **Edit schema as JSON** button\*\*.\*\*
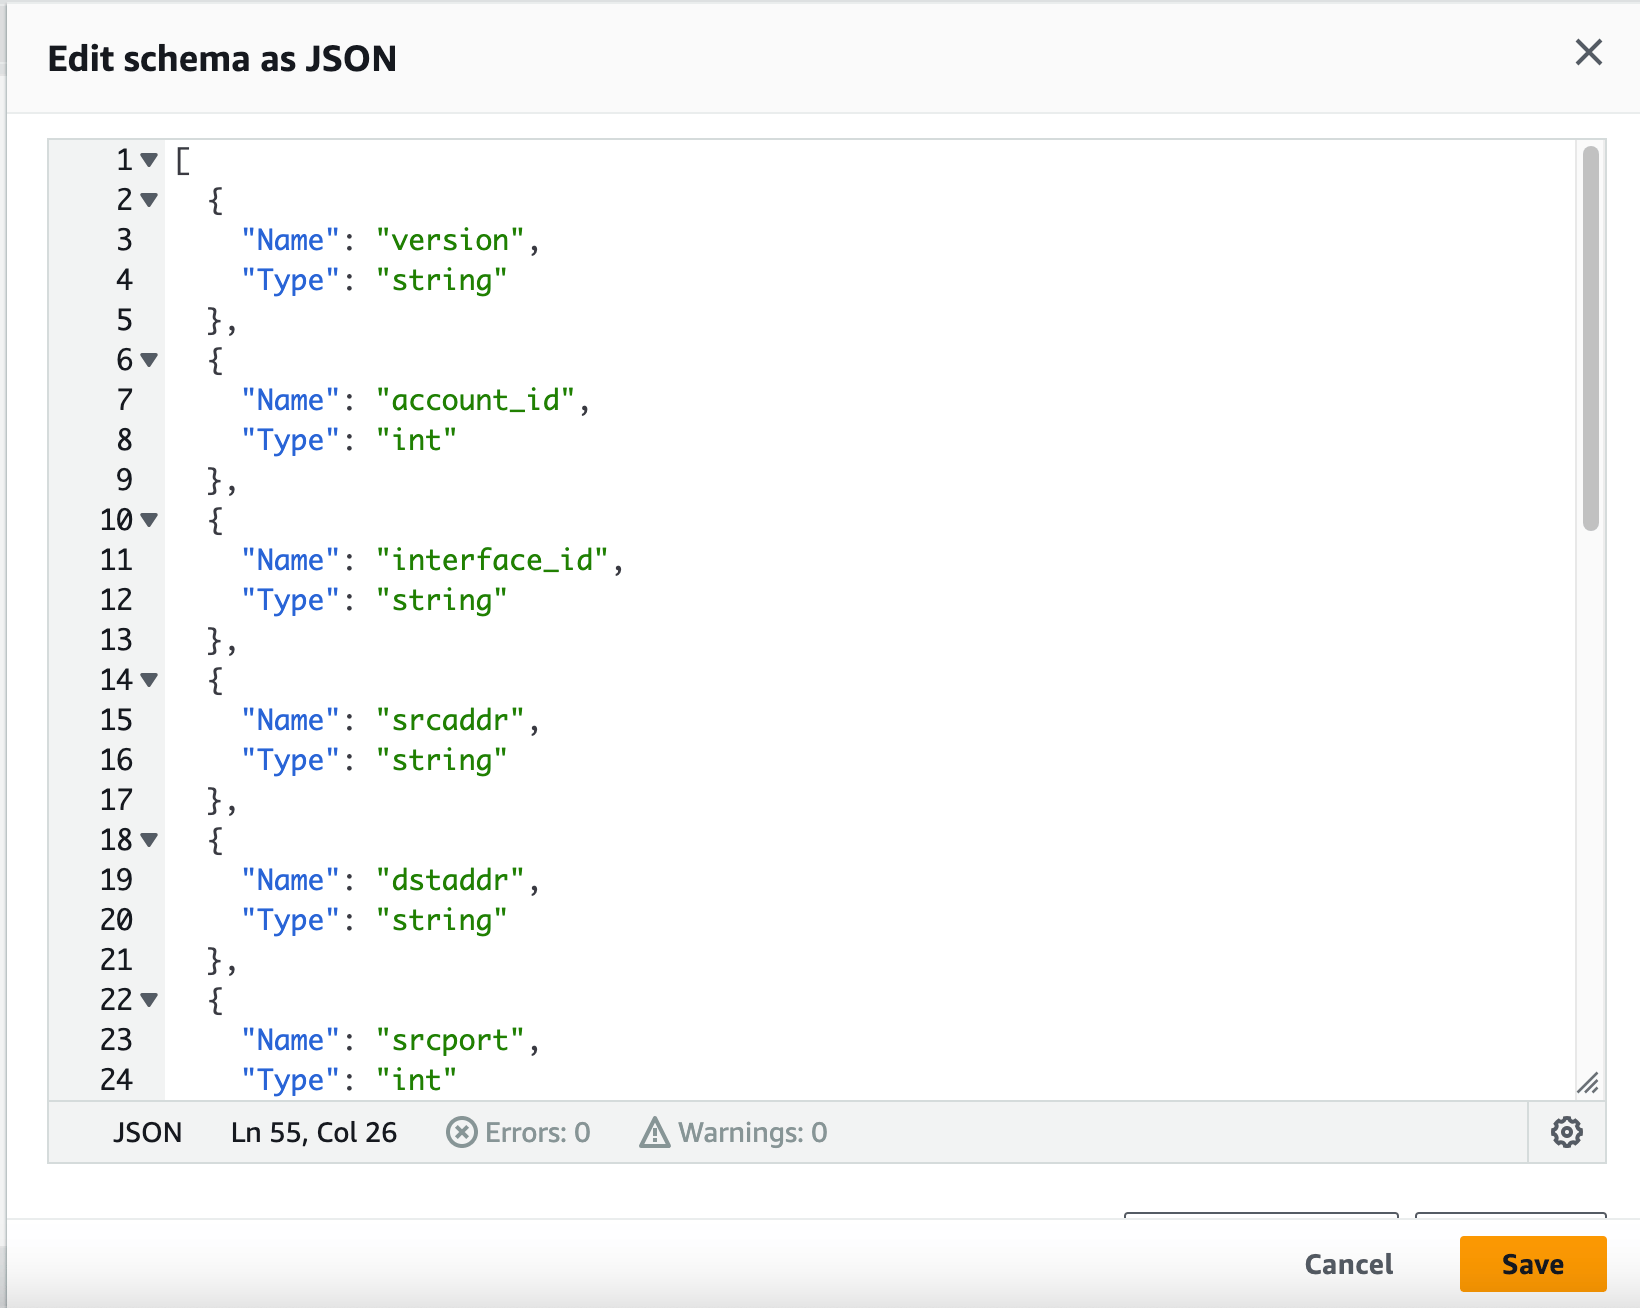
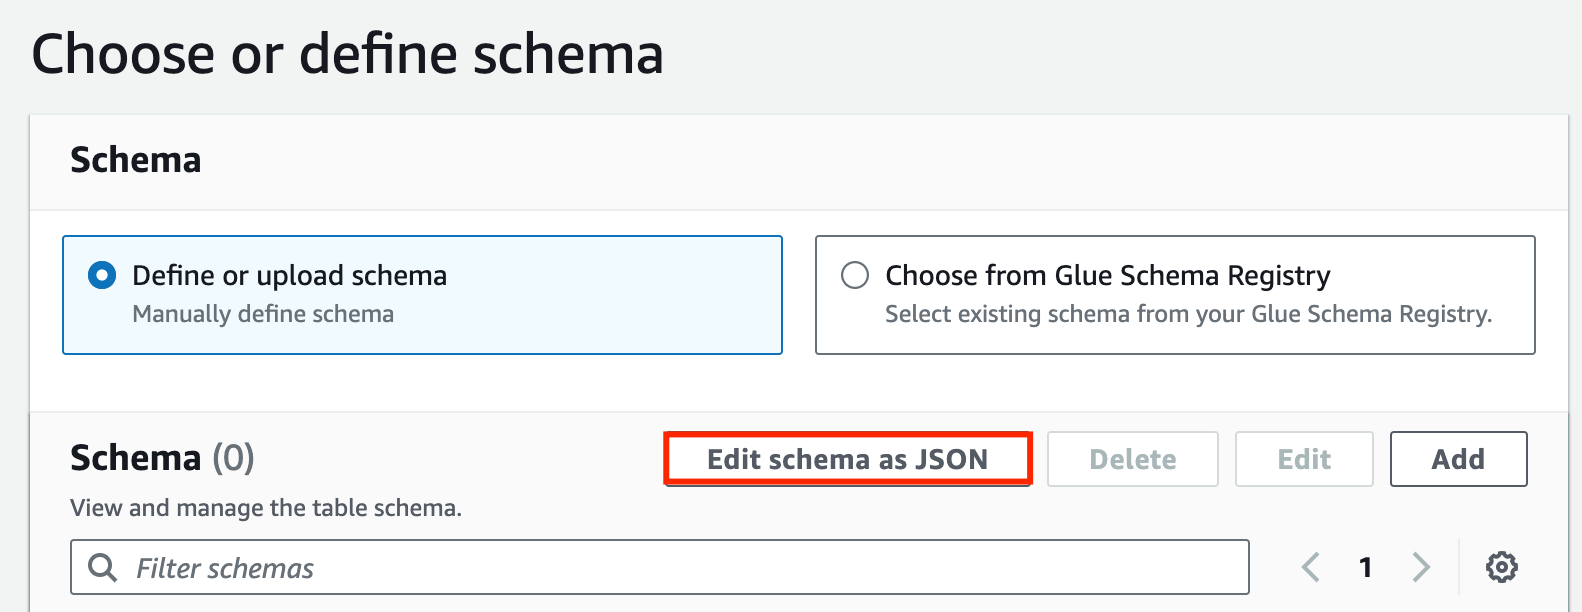 12. Paste the given json code to the editor, and click on **Save** button.
\[
\{
"Name": "version",
"Type": "string"
},
\{
"Name": "account\_id",
"Type": "int"
},
\{
"Name": "interface\_id",
"Type": "string"
},
\{
"Name": "srcaddr",
"Type": "string"
},
\{
"Name": "dstaddr",
"Type": "string"
},
\{
"Name": "srcport",
"Type": "int"
},
\{
"Name": "dstport",
"Type": "int"
},
\{
"Name": "protocol",
"Type": "int"
},
\{
"Name": "packets",
"Type": "int"
},
\{
"Name": "bytes",
"Type": "int"
},
\{
"Name": "start",
"Type": "int"
},
\{
"Name": "end",
"Type": "int"
},
\{
"Name": "action",
"Type": "string"
},
\{
"Name": "log\_status",
"Type": "string"
}
]
12. Paste the given json code to the editor, and click on **Save** button.
\[
\{
"Name": "version",
"Type": "string"
},
\{
"Name": "account\_id",
"Type": "int"
},
\{
"Name": "interface\_id",
"Type": "string"
},
\{
"Name": "srcaddr",
"Type": "string"
},
\{
"Name": "dstaddr",
"Type": "string"
},
\{
"Name": "srcport",
"Type": "int"
},
\{
"Name": "dstport",
"Type": "int"
},
\{
"Name": "protocol",
"Type": "int"
},
\{
"Name": "packets",
"Type": "int"
},
\{
"Name": "bytes",
"Type": "int"
},
\{
"Name": "start",
"Type": "int"
},
\{
"Name": "end",
"Type": "int"
},
\{
"Name": "action",
"Type": "string"
},
\{
"Name": "log\_status",
"Type": "string"
}
]
 13. Now, Click on the **Next** button.
14. Leave everything as default and click on the Create button.
13. Now, Click on the **Next** button.
14. Leave everything as default and click on the Create button.
 #### Task 13 : Setup Amazon Athena to query the log data
1. Make sure you are in the **US East (N. Virginia) us-east-1** Region.
2. Navigate to **Services** menu in the top, then search for **Athena** and click on it.
3. Go to the **Query Editor**.
4. Click on the **Query Settings** button and then click on **Manage** button.
#### Task 13 : Setup Amazon Athena to query the log data
1. Make sure you are in the **US East (N. Virginia) us-east-1** Region.
2. Navigate to **Services** menu in the top, then search for **Athena** and click on it.
3. Go to the **Query Editor**.
4. Click on the **Query Settings** button and then click on **Manage** button.
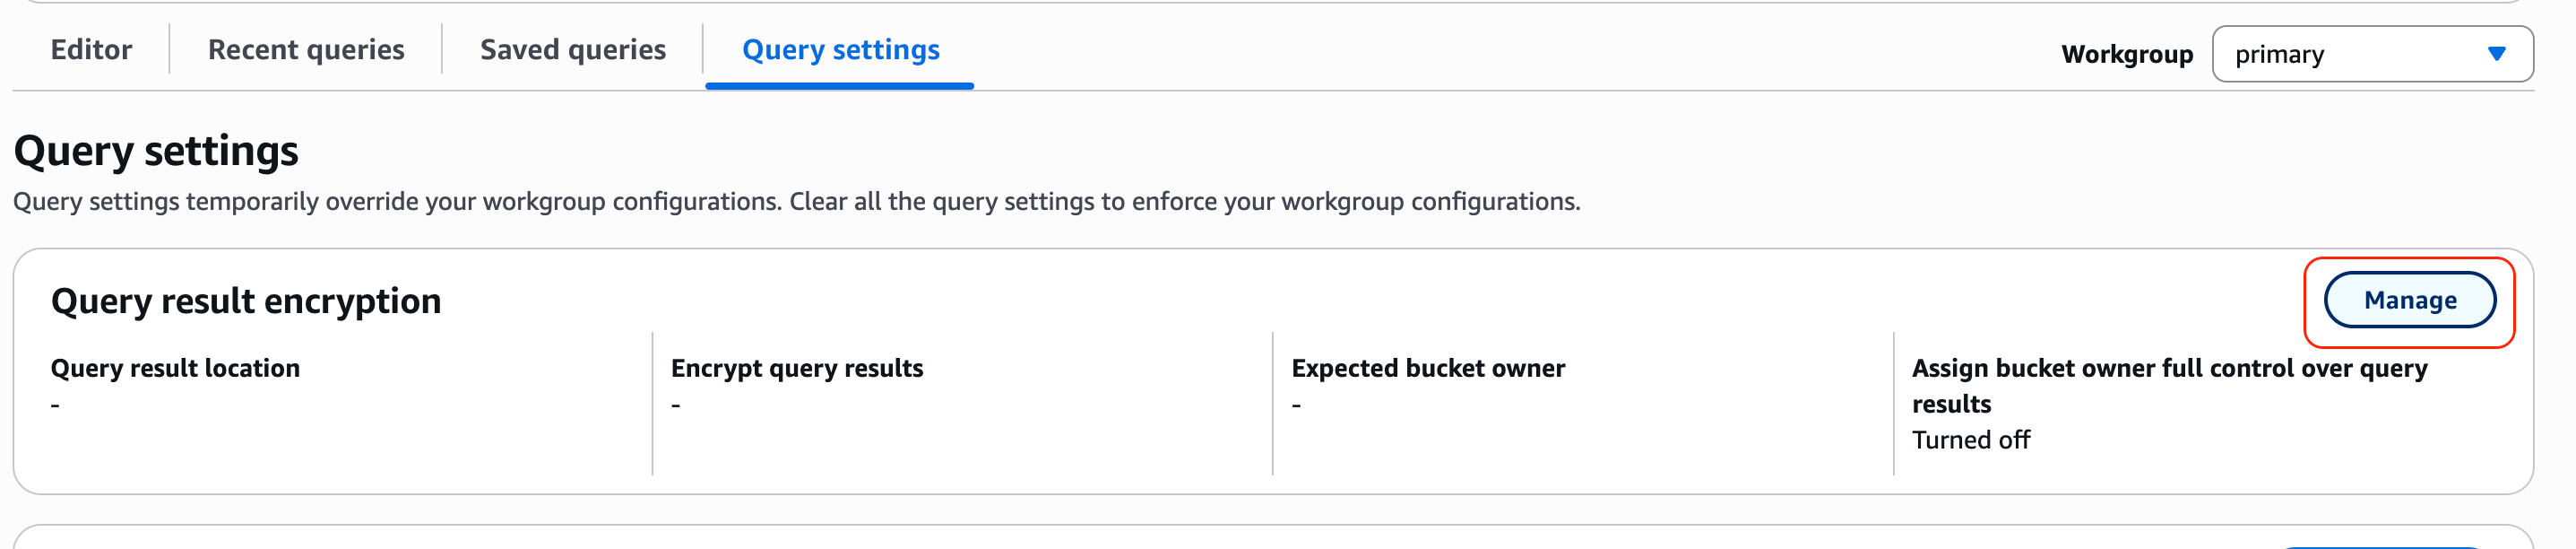 5. Now, click on **Browse S3** button, select the S3 Bucket created and click on **choose** button. In this bucket, you have stored the logs and you will run the SQL query.
6. Location of query result: Enter ***s3://athena-whizlabs/AWS logs/***
**Note:** This will same as the **S3 Bucket name** that we created.
**Note: If there is any other bucket selected, remove the entry and select the newly created bucket.**
7. Expected bucket owner: Enter *your account ID \[Similar to 9287085xxxxx]*
5. Now, click on **Browse S3** button, select the S3 Bucket created and click on **choose** button. In this bucket, you have stored the logs and you will run the SQL query.
6. Location of query result: Enter ***s3://athena-whizlabs/AWS logs/***
**Note:** This will same as the **S3 Bucket name** that we created.
**Note: If there is any other bucket selected, remove the entry and select the newly created bucket.**
7. Expected bucket owner: Enter *your account ID \[Similar to 9287085xxxxx]*
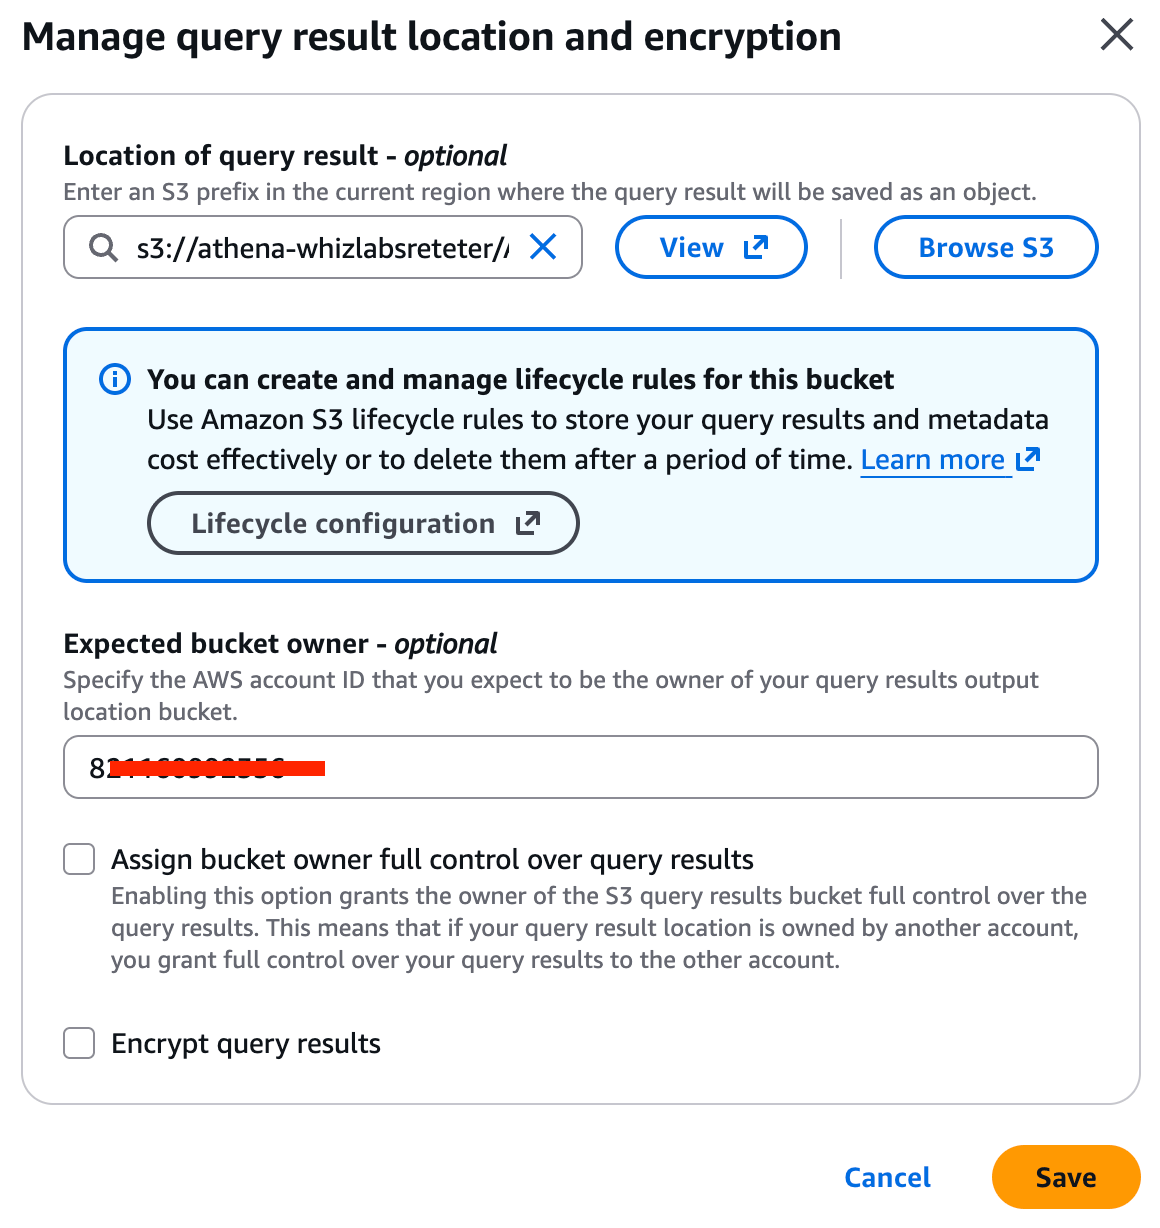 8. Now, Click on **Save** button.
#### Task 14: Run SQL queries against the table.
1. Come Back to Query Tab and Click on the **+** option to get a new and fresh query editor.
2. Paste the below query, to the editor:
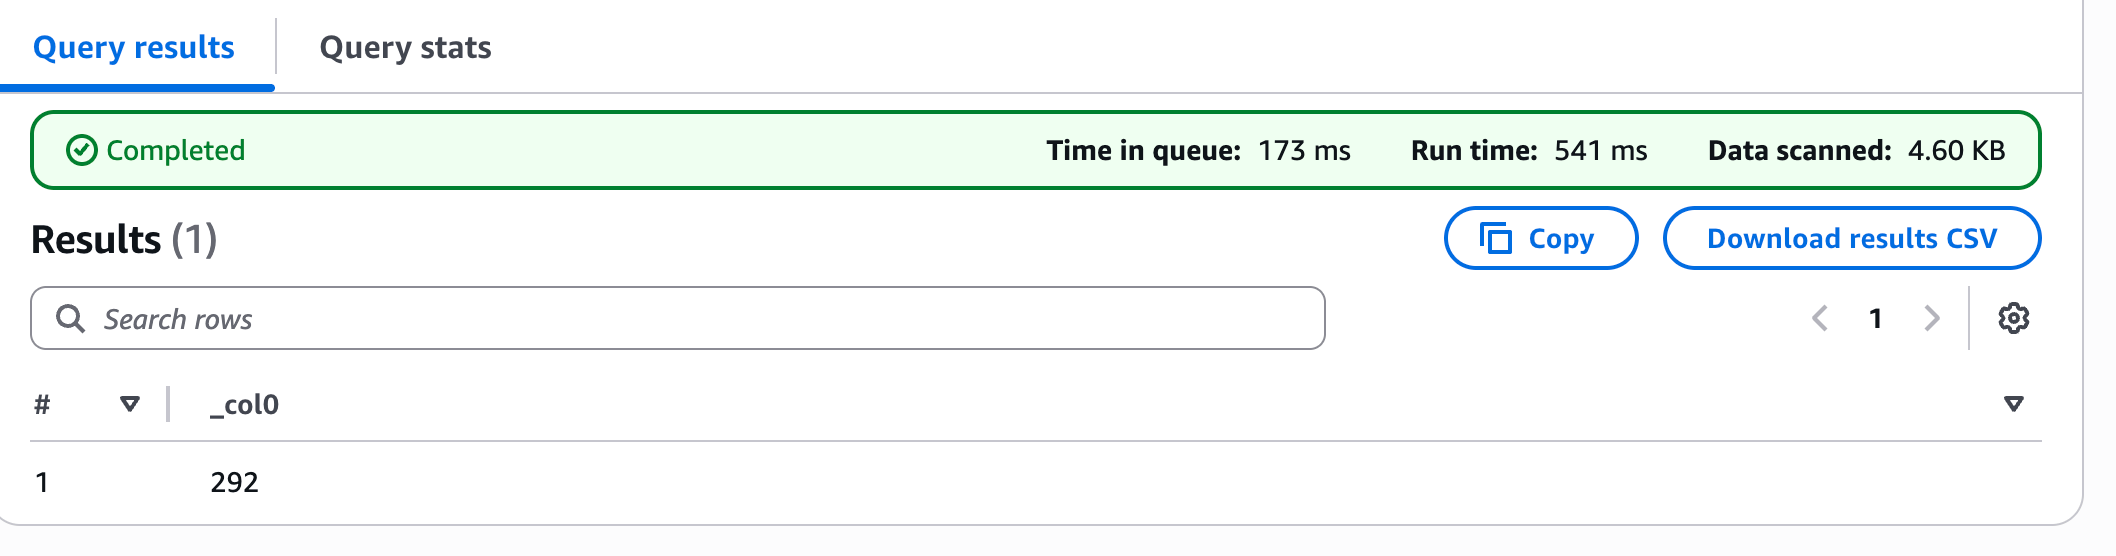
SELECT COUNT(\*) FROM "whizdb"."whiztable";
**Note:** Replace the database and table name if you have defined your own while creating the
3. Click on the **Run** button and the output will show the total number of records present in the **WhizTable**.
8. Now, Click on **Save** button.
#### Task 14: Run SQL queries against the table.
1. Come Back to Query Tab and Click on the **+** option to get a new and fresh query editor.
2. Paste the below query, to the editor:
SELECT COUNT(\*) FROM "whizdb"."whiztable";
**Note:** Replace the database and table name if you have defined your own while creating the
3. Click on the **Run** button and the output will show the total number of records present in the **WhizTable**.
 4. Click on the **+** option to get a new and fresh query editor.
5. Find the total number of columns present in the table.
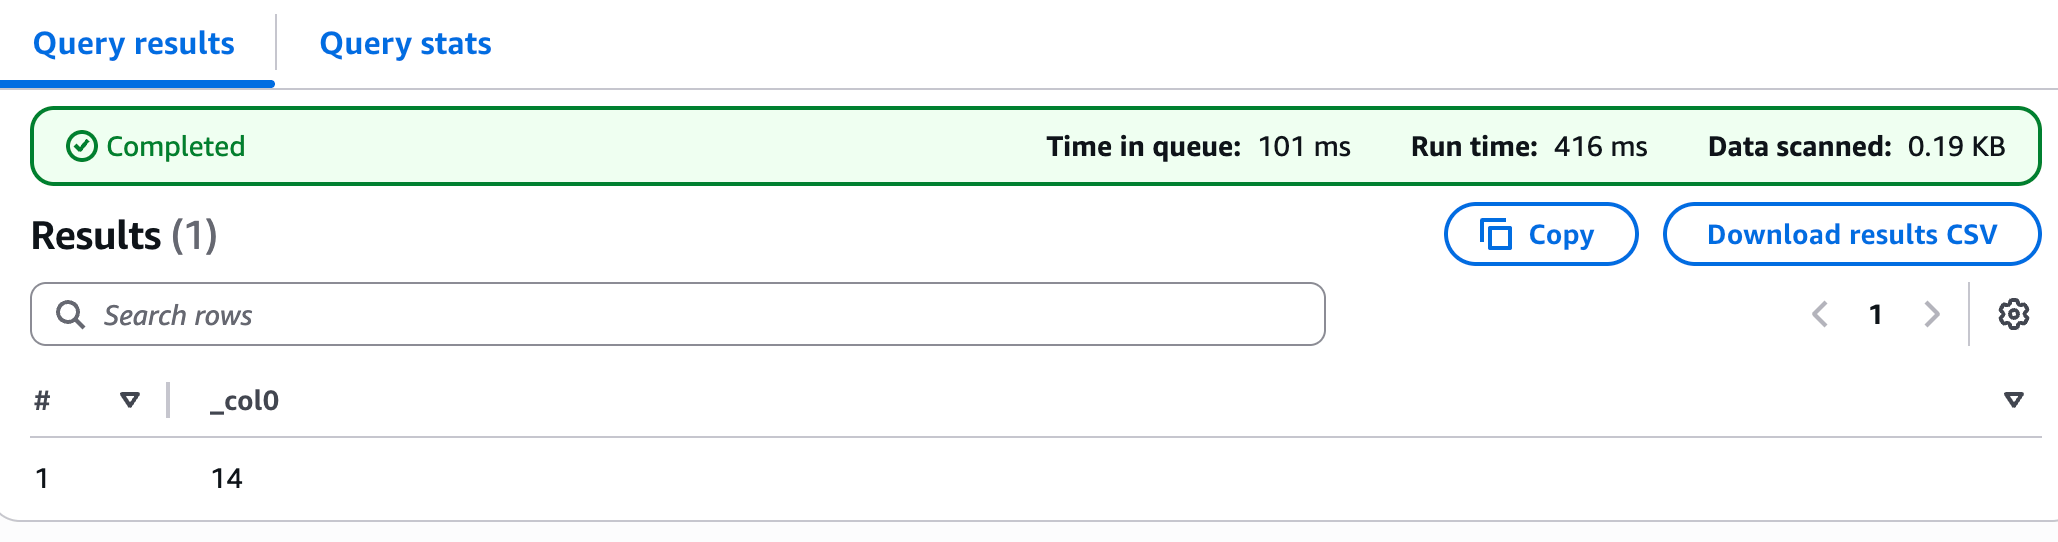
SELECT COUNT(\*) FROM INFORMATION\_SCHEMA.COLUMNS WHERE TABLE\_NAME = 'whiztable';
6. There is a total of 14 columns present in the table.
4. Click on the **+** option to get a new and fresh query editor.
5. Find the total number of columns present in the table.
SELECT COUNT(\*) FROM INFORMATION\_SCHEMA.COLUMNS WHERE TABLE\_NAME = 'whiztable';
6. There is a total of 14 columns present in the table.
 7. Once the project steps are completed, please click on the **Validation** button on the right side panel.
### Completion and Conclusion
1. You have successfully created S3 Bucket.
2. You have successfully created the VPC and its components.
3. You have successfully created the VPC Flow Logs.
4. You have successfully created an EC2 Instance.
5. You have successfully created Subnets that should be separate then generated some site traffic.
6. You have successfully analyzed the S3 Bucket's data using Amazon Athena.
### End Project
1. Sign out of AWS Account.
2. You have successfully completed the project.
3. Once you have completed the steps click on **End Project** from the IP Lab Portal dashboard.
## What gets checked
When you press **Check my work**, the platform verifies each of these:
* **Run Athena Query** — Check whether an Athena query is executed and status is success or not.
* **Create Public AWS S3 Bucket** — Check whether a Public S3 Bucket created or not
* **Create a Glue Database** — Check whether a Glue Database is created or not.
* **Create a Glue Table** — Check whether an AWS Glue Table exists in any database or not
## Related help
* [FAQs and Troubleshooting](/aws-saa/support/faqs-and-troubleshooting)
This documentation is built and hosted on [Mintlify](https://mintlify.com), a developer documentation platform.
7. Once the project steps are completed, please click on the **Validation** button on the right side panel.
### Completion and Conclusion
1. You have successfully created S3 Bucket.
2. You have successfully created the VPC and its components.
3. You have successfully created the VPC Flow Logs.
4. You have successfully created an EC2 Instance.
5. You have successfully created Subnets that should be separate then generated some site traffic.
6. You have successfully analyzed the S3 Bucket's data using Amazon Athena.
### End Project
1. Sign out of AWS Account.
2. You have successfully completed the project.
3. Once you have completed the steps click on **End Project** from the IP Lab Portal dashboard.
## What gets checked
When you press **Check my work**, the platform verifies each of these:
* **Run Athena Query** — Check whether an Athena query is executed and status is success or not.
* **Create Public AWS S3 Bucket** — Check whether a Public S3 Bucket created or not
* **Create a Glue Database** — Check whether a Glue Database is created or not.
* **Create a Glue Table** — Check whether an AWS Glue Table exists in any database or not
## Related help
* [FAQs and Troubleshooting](/aws-saa/support/faqs-and-troubleshooting)
This documentation is built and hosted on [Mintlify](https://mintlify.com), a developer documentation platform.