> ## Documentation Index
> Fetch the complete documentation index at: https://cloud-architect.ipoint-labs.com/llms.txt
> Use this file to discover all available pages before exploring further.
# Access Amazon SQS using Amazon VPC Interface Endpoint
> Hands-on lab · 45m
Launch this lab in the IP Lab Portal, then follow the steps below in the AWS console.
Open IP Lab Portal
## Overview
### Lab Details
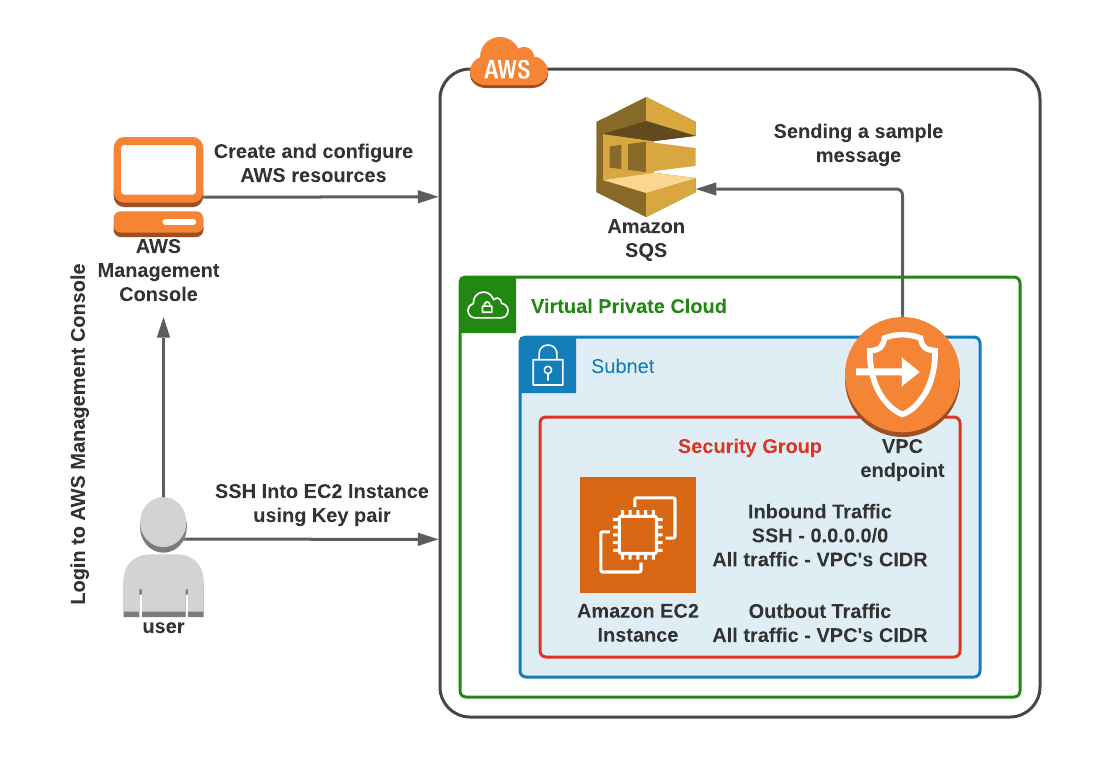
1. This lab walks you through the steps to create an interface endpoint for Amazon SQS to access with EC2 Instance.
2. Duration: **60 minutes**
3. AWS Region: **US East (N. Virginia) us-east-1**
### Introduction
#### VPC endpoint for SQS
* VPC Endpoint allows us to securely connect your VPC and supported AWS services powered by AWS PrivateLink. AWS PrivateLink is a service that allows you to access AWS services by using private IP addresses. In this case, traffic does not leave Amazon’s network.
* VPC endpoint does not require a NAT Gateway, NAT instance, Internet Gateway, or any VPN services to access AWS Services.
* There are two types of VPC endpoints: Gateway and Interface.
* VPC endpoint for SQS comes under Interface endpoint.
* When you create a VPC endpoint for SQS, it asks for the VPC, Subnet, Security group, and the option of enabling the DNS Endpoint.
### Architecture Diagram
 ### Task Details
1. Sign in to the AWS Management Console.
2. Create an SQS Queue and Copy the Queue URL
3. Create a VPC and Enable DNS Hostnames option
4. Create and attach an Internet Gateway with custom VPC
5. Create a Subnet
6. Configure the Subnet to enable auto-assign public IPv4 address
7. Add an entry to the Internet (0.0.0.0/0) in the Main Route table.
8. Create a Security Group for EC2 Instance
9. Launch an EC2 Instance
10. SSH into Endpoint instance
11. Create a VPC endpoint for SQS
12. Send the message to the SQS queue
13. Deleting AWS Resources.
### Launching Lab Environment
1. To launch the lab environment, Click on the **Start Lab** button.
2. Please wait until the cloud environment is provisioned. It will take less than a minute to provision.
3. Once the Lab is started, you will be provided with **IAM user name**, **Password**, **Access** **Key**, and **Secret** **Access** **Key**.
**Note** : You can only start one lab at any given time
## Lab guide
### Lab Steps
#### Task 1: Sign in to AWS Management Console
1. Click on the **Open Console** button, and you will get redirected to AWS Console in a new browser tab.
2. On the AWS sign-in page,
* Leave the Account ID as default. Never edit/remove the 12 digit Account ID present in the AWS Console. otherwise, you cannot proceed with the lab.
* Now copy your **User Name** and **Password** in the Lab Console to the **IAM Username and Password** in AWS Console and click on the **Sign in** button.
3. Once Signed In to the AWS Management Console, Make the default AWS Region as **US East (N. Virginia) us-east-1.**
> **Note:** If you face any issues, please go through [**FAQs and Troubleshooting for Labs**](https://play.whizlabs.com/site/task_support/faqs-and-troubleshooting).
#### Task 2: Create an SQS Queue and copy the Queue URL
1. Make sure you are in the **N.Virginia** Region.
2. Navigate to the **Services** menu at the top, search for **SQS** and select it. You’ll be redirected to the SQS console page.
3. Click on the **Create Queue** button.
4. Now, under **Details** select **Type** as a **Standard queue**\*\*\*.\*\*\*
5. Name: Enter ***MyWhizQueue***
6. Leave other settings as default and click on **Create queue** button.
7. A queue will be created and your screen will look similar to the screenshot below:
### Task Details
1. Sign in to the AWS Management Console.
2. Create an SQS Queue and Copy the Queue URL
3. Create a VPC and Enable DNS Hostnames option
4. Create and attach an Internet Gateway with custom VPC
5. Create a Subnet
6. Configure the Subnet to enable auto-assign public IPv4 address
7. Add an entry to the Internet (0.0.0.0/0) in the Main Route table.
8. Create a Security Group for EC2 Instance
9. Launch an EC2 Instance
10. SSH into Endpoint instance
11. Create a VPC endpoint for SQS
12. Send the message to the SQS queue
13. Deleting AWS Resources.
### Launching Lab Environment
1. To launch the lab environment, Click on the **Start Lab** button.
2. Please wait until the cloud environment is provisioned. It will take less than a minute to provision.
3. Once the Lab is started, you will be provided with **IAM user name**, **Password**, **Access** **Key**, and **Secret** **Access** **Key**.
**Note** : You can only start one lab at any given time
## Lab guide
### Lab Steps
#### Task 1: Sign in to AWS Management Console
1. Click on the **Open Console** button, and you will get redirected to AWS Console in a new browser tab.
2. On the AWS sign-in page,
* Leave the Account ID as default. Never edit/remove the 12 digit Account ID present in the AWS Console. otherwise, you cannot proceed with the lab.
* Now copy your **User Name** and **Password** in the Lab Console to the **IAM Username and Password** in AWS Console and click on the **Sign in** button.
3. Once Signed In to the AWS Management Console, Make the default AWS Region as **US East (N. Virginia) us-east-1.**
> **Note:** If you face any issues, please go through [**FAQs and Troubleshooting for Labs**](https://play.whizlabs.com/site/task_support/faqs-and-troubleshooting).
#### Task 2: Create an SQS Queue and copy the Queue URL
1. Make sure you are in the **N.Virginia** Region.
2. Navigate to the **Services** menu at the top, search for **SQS** and select it. You’ll be redirected to the SQS console page.
3. Click on the **Create Queue** button.
4. Now, under **Details** select **Type** as a **Standard queue**\*\*\*.\*\*\*
5. Name: Enter ***MyWhizQueue***
6. Leave other settings as default and click on **Create queue** button.
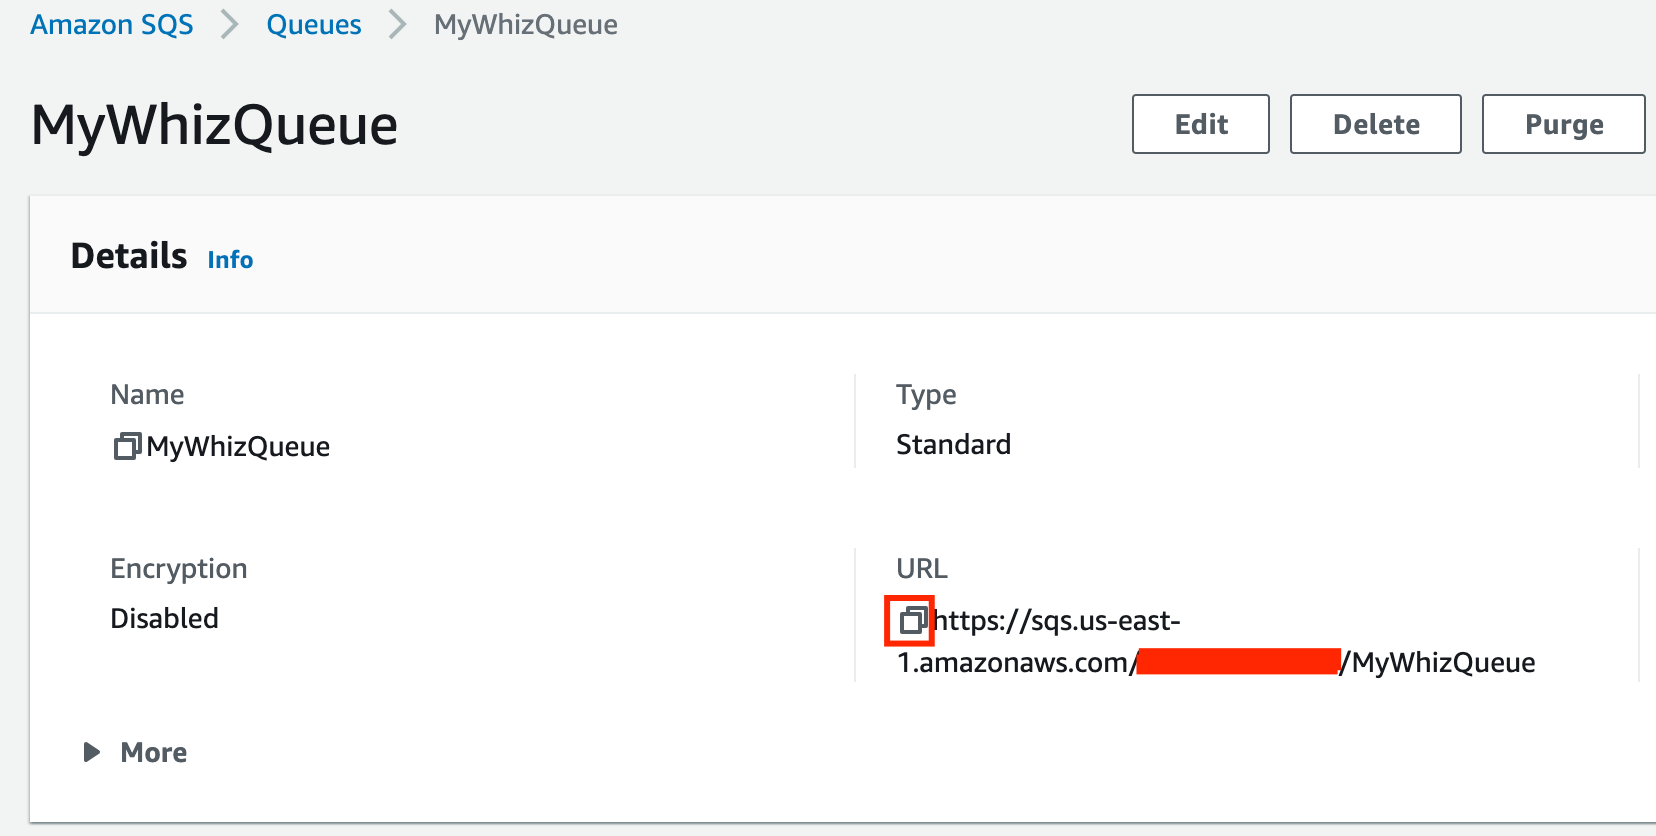
7. A queue will be created and your screen will look similar to the screenshot below:
 8. Click on the copy button to copy the Queue URL and save it to the notepad.
 9. Don't close this tab, perform the next tasks in the new tab.
#### Task 3: Create a VPC and Enable DNS Hostnames option
1. Make sure you are in the **N.Virginia** Region.
2. Navigate to **VPC** by clicking on the **Services** menu at the top, then click on in the **Networking & Content Delivery** section.
3. To create a **VPC** click on **Your VPCs** present in the **Virtual Private Cloud** section on the left sidebar.
4. Create a new VPC by clicking on the **Create VPC** button.
5. Select **VPC only** option.
* Name tag - optional: Enter ***MyVPC***
* IPv4 CIDR block: Enter ***192.168.0.0/26***
* IPv6 CIDR block: **No IPv6 CIDR block**
* Tenancy: **Default**
* Click on the **Create VPC** button to create the **MyVPC**.
9. Don't close this tab, perform the next tasks in the new tab.
#### Task 3: Create a VPC and Enable DNS Hostnames option
1. Make sure you are in the **N.Virginia** Region.
2. Navigate to **VPC** by clicking on the **Services** menu at the top, then click on in the **Networking & Content Delivery** section.
3. To create a **VPC** click on **Your VPCs** present in the **Virtual Private Cloud** section on the left sidebar.
4. Create a new VPC by clicking on the **Create VPC** button.
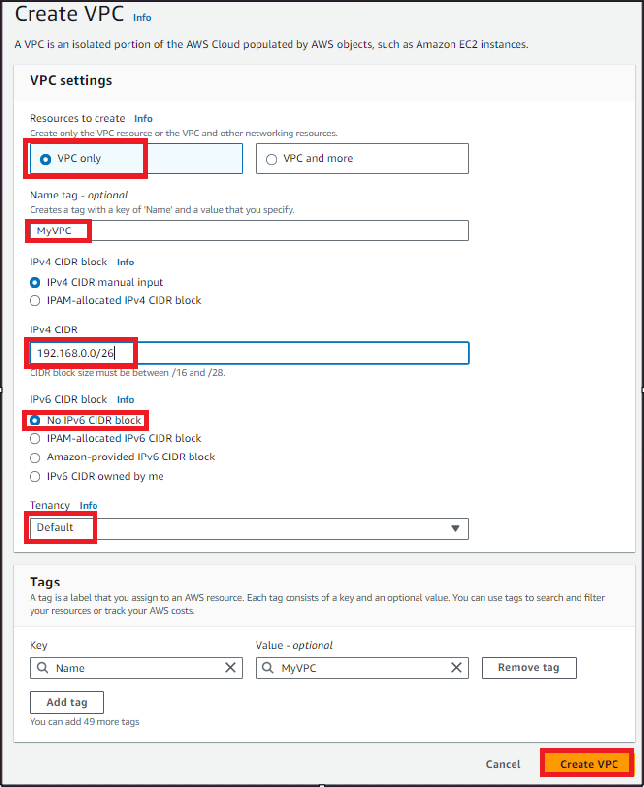
5. Select **VPC only** option.
* Name tag - optional: Enter ***MyVPC***
* IPv4 CIDR block: Enter ***192.168.0.0/26***
* IPv6 CIDR block: **No IPv6 CIDR block**
* Tenancy: **Default**
* Click on the **Create VPC** button to create the **MyVPC**.
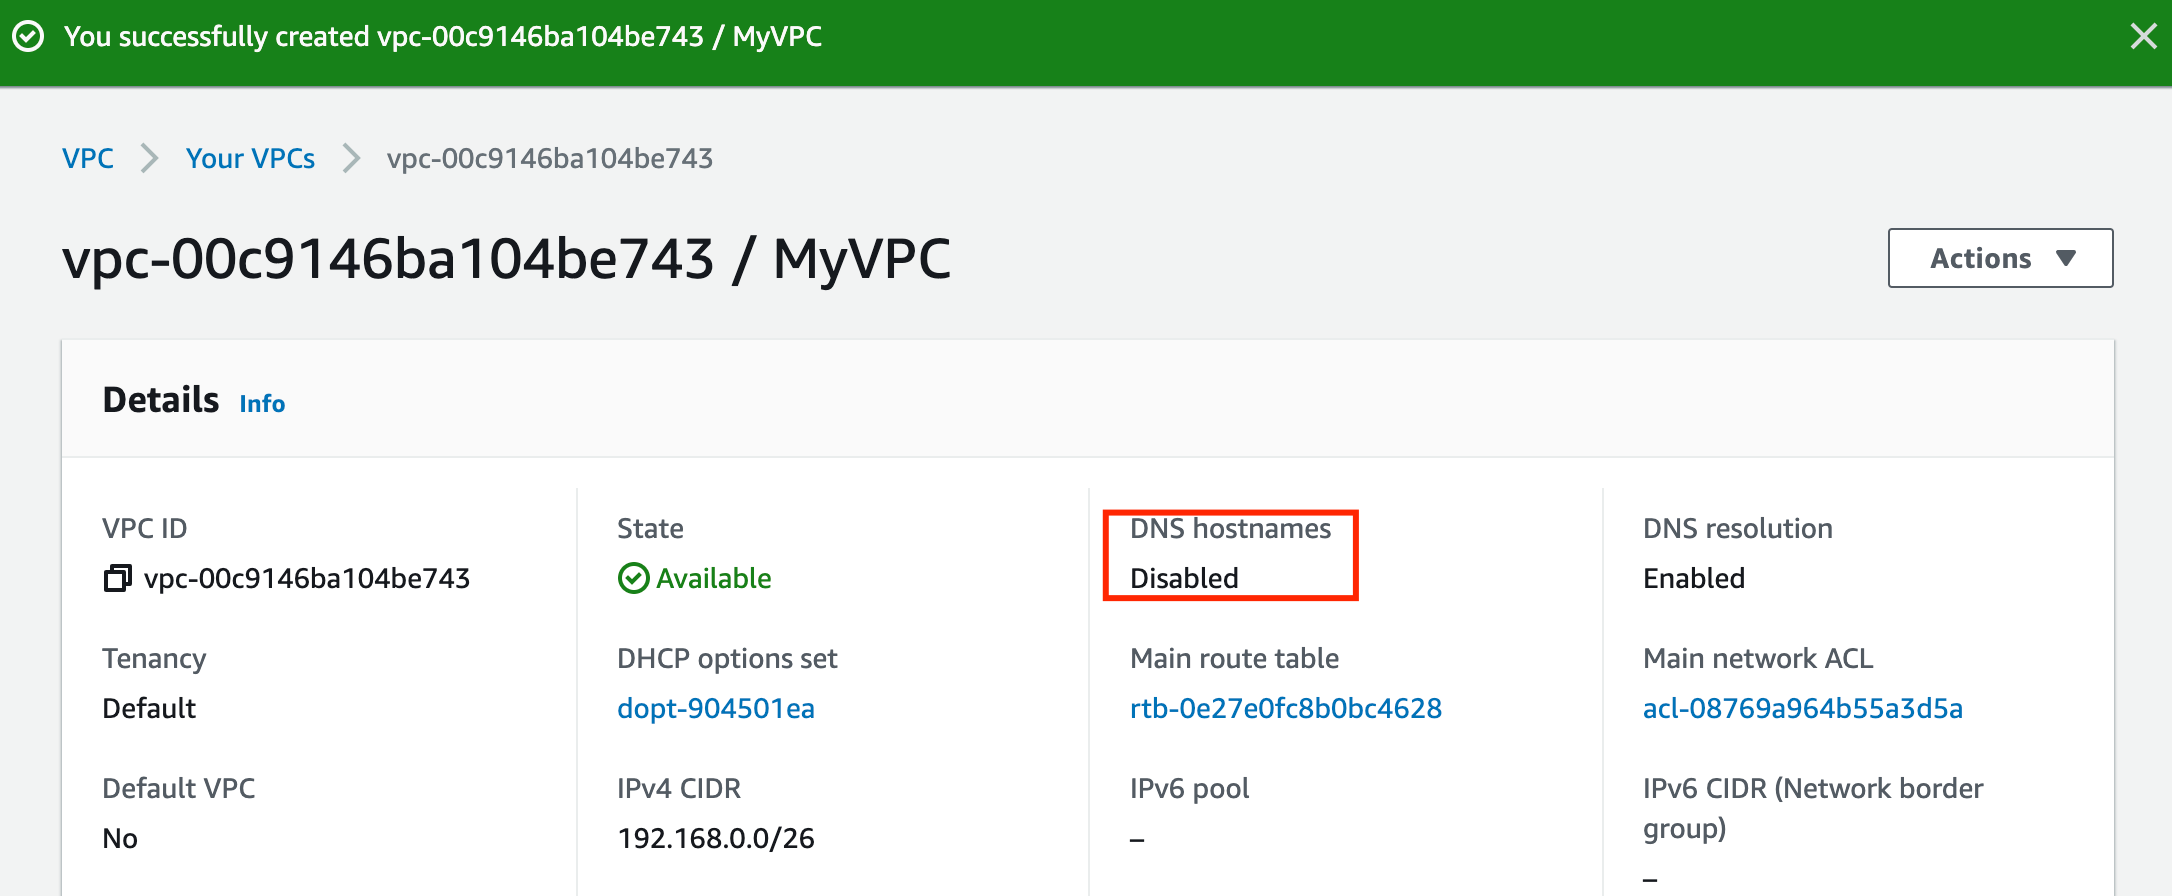
 6. VPC is now created and by default DNS hostnames option is not enabled.
* Note : Copy **VPC ID**, required in the next steps.
6. VPC is now created and by default DNS hostnames option is not enabled.
* Note : Copy **VPC ID**, required in the next steps.
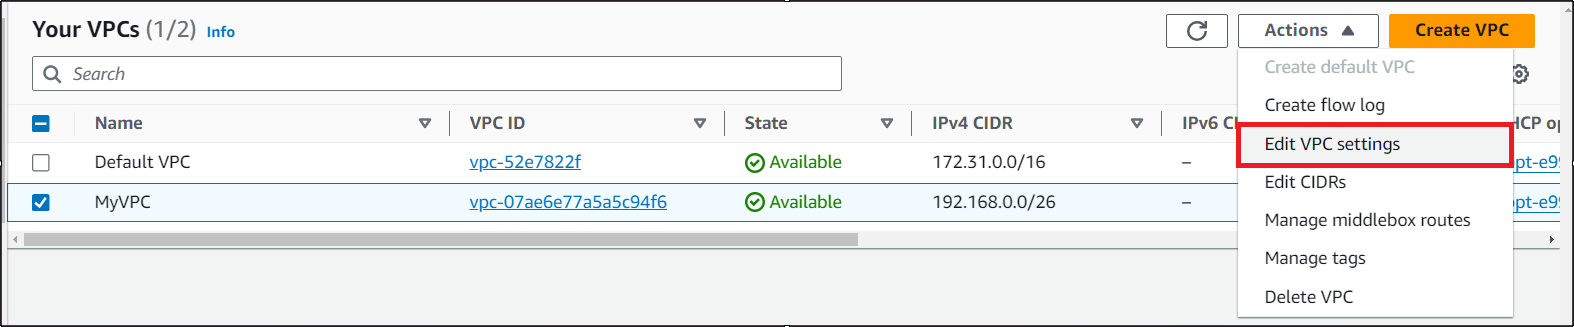
 7. To Enable the DNS hostnames option,
* Click on the **VPC** and click on the **Actions** button
* Select the **Edit VPC Settings** option.
7. To Enable the DNS hostnames option,
* Click on the **VPC** and click on the **Actions** button
* Select the **Edit VPC Settings** option.
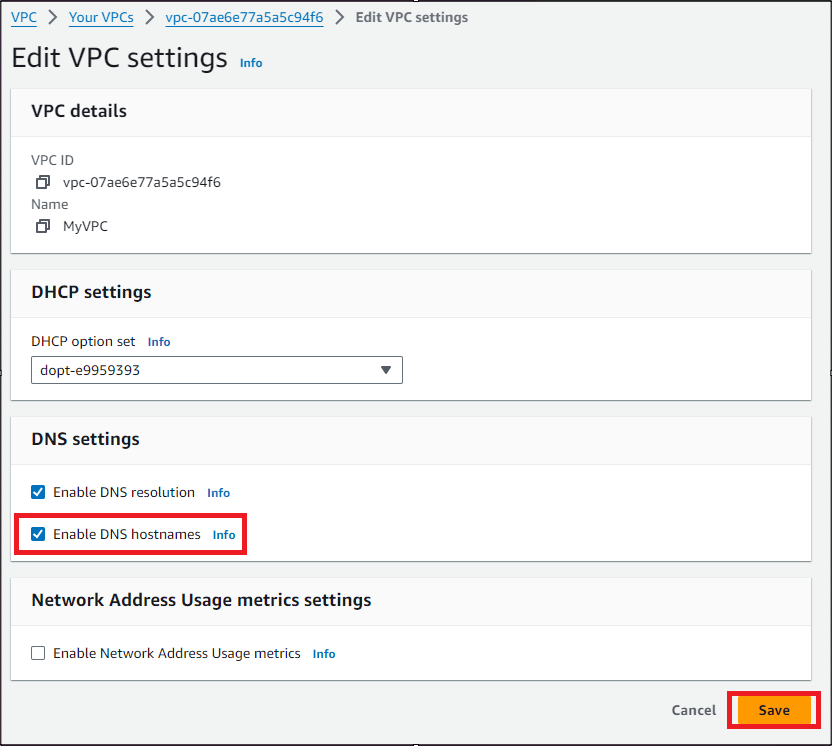
 8. Check the **Enable DNS hostnames** option and click on the **Save** button.
 9. DNS Hostnames option is enabled.
#### Task 4: Create and attach an Internet Gateway with custom VPC
1. By default, instances that are launched in a VPC cannot communicate with the Internet.
2. To enable Internet access, an Internet gateway needed to be attached to the VPC.
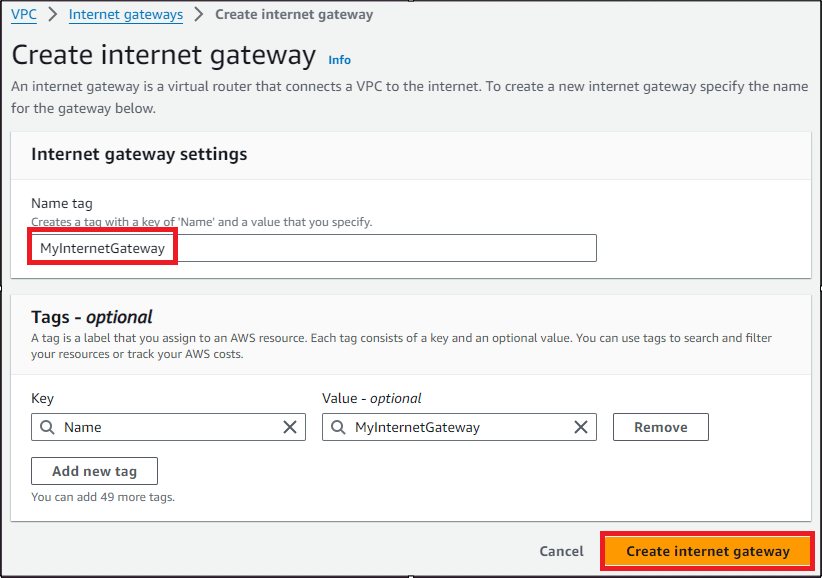
3. Click on **Internet Gateways** from the left menu and Click on **Create Internet Gateway** button.
* Name Tag: Enter ***MyInternetGateway***
* Click on **Create Internet gateway** button.
9. DNS Hostnames option is enabled.
#### Task 4: Create and attach an Internet Gateway with custom VPC
1. By default, instances that are launched in a VPC cannot communicate with the Internet.
2. To enable Internet access, an Internet gateway needed to be attached to the VPC.
3. Click on **Internet Gateways** from the left menu and Click on **Create Internet Gateway** button.
* Name Tag: Enter ***MyInternetGateway***
* Click on **Create Internet gateway** button.
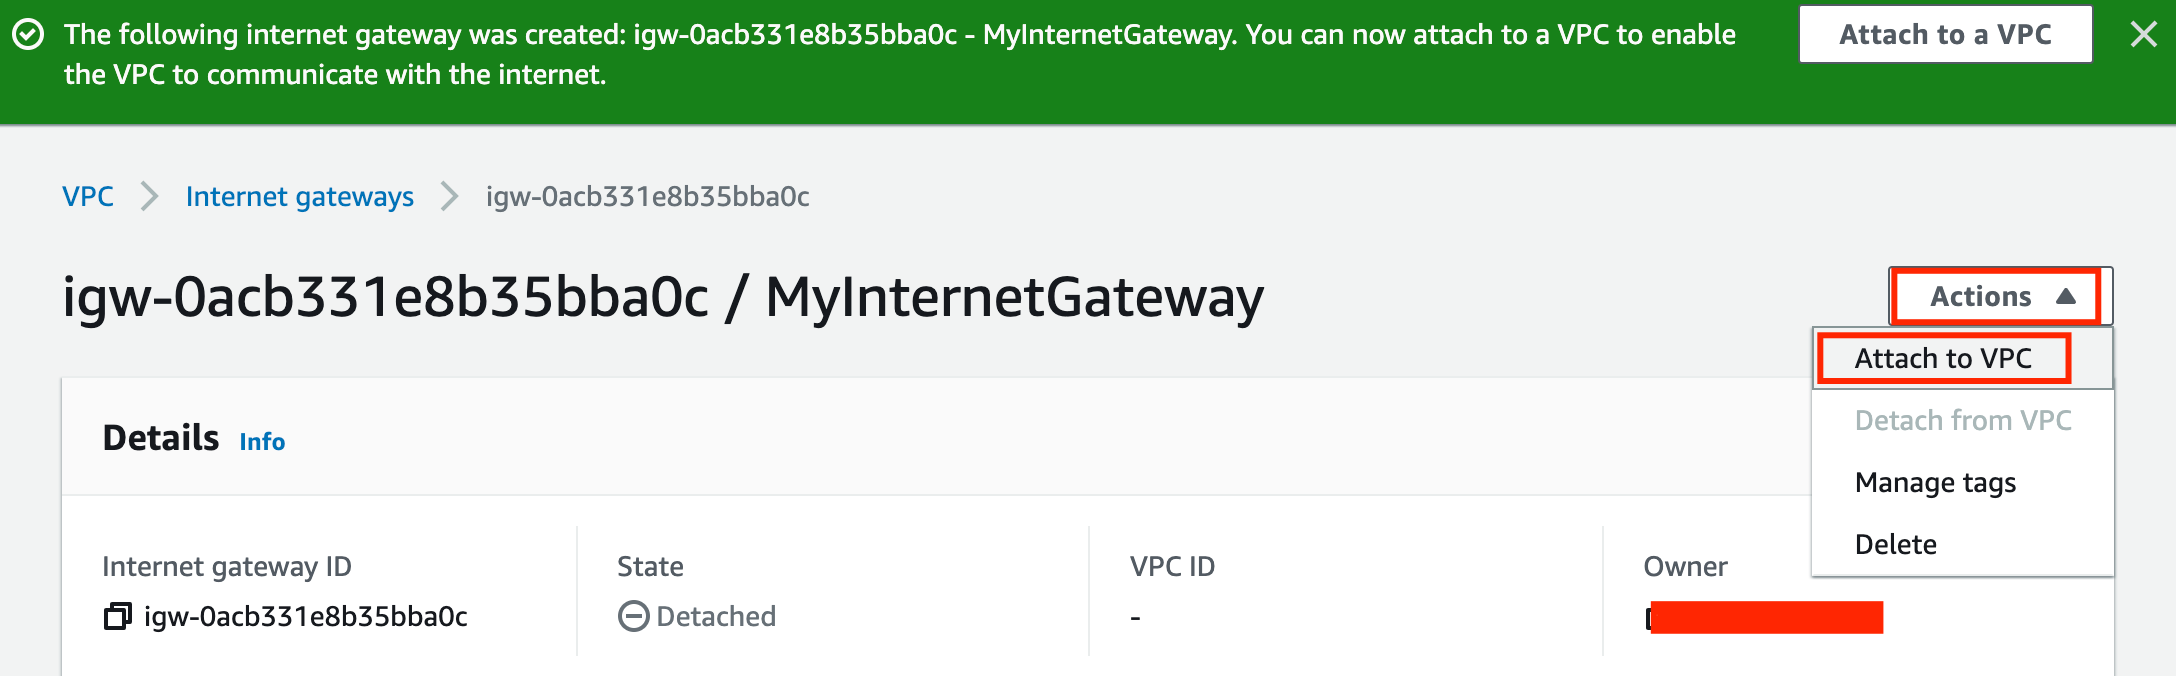
 4. Select the Internet gateway you created from the list.
* Click on **Actions**.
5. Select the **Attach to VPC**.
4. Select the Internet gateway you created from the list.
* Click on **Actions**.
5. Select the **Attach to VPC**.
 6. Available VPCs: Select the **MyVPC** And click on the **Attach internet gateway** button.
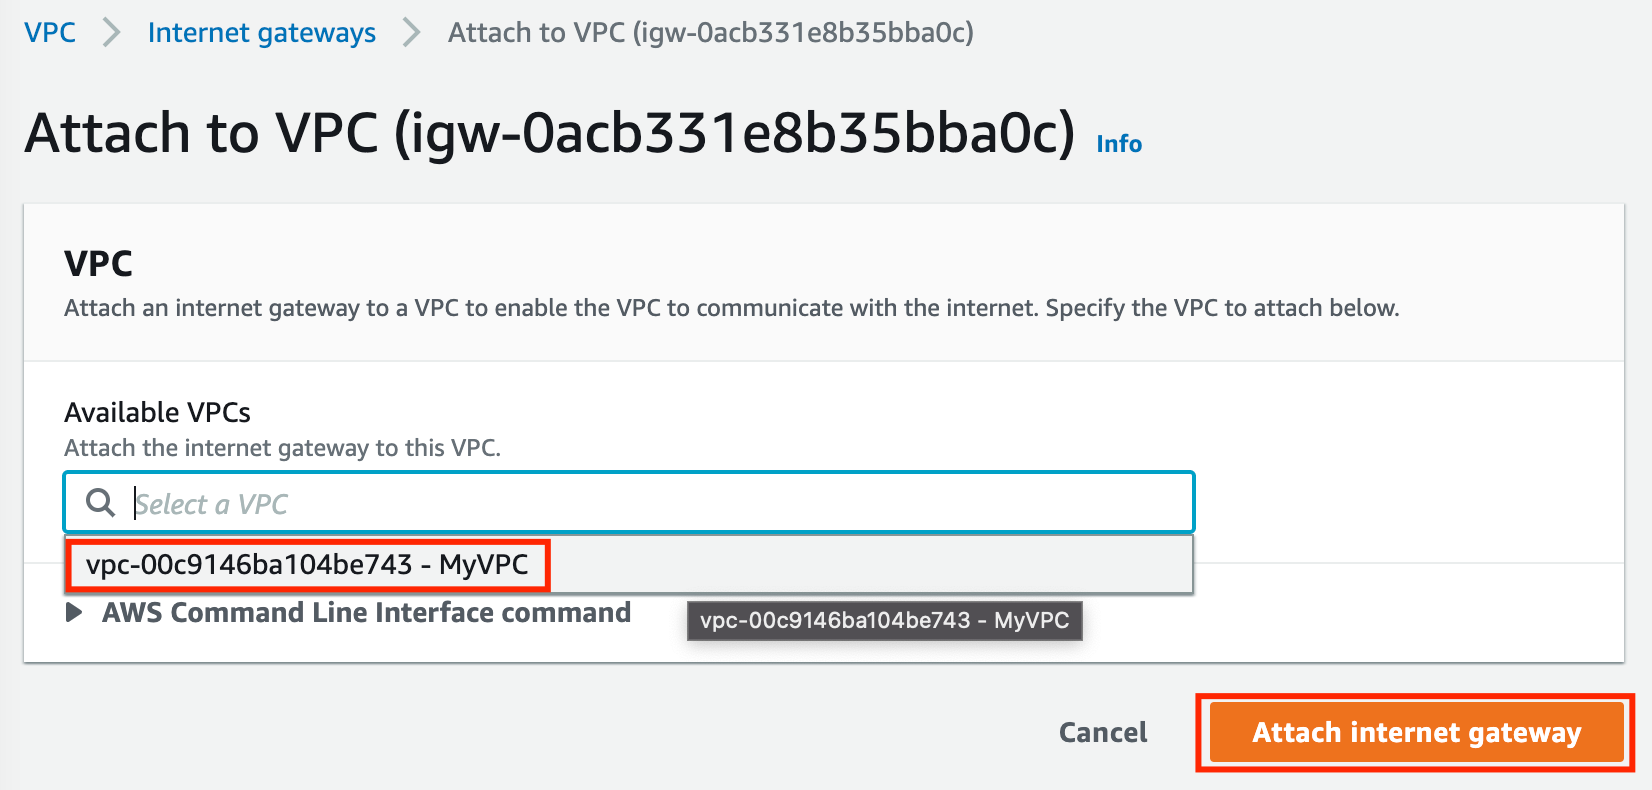 7. The Internet gateway is now attached with **MyVPC.**
 #### Task 5: Create a Subnet
1. To create a **subnet** click on **Subnet** the present in the **VIRTUAL PRIVATE CLOUD** section on the left sidebar.
2. Click on the **Create Subnet** button.
3. In the VPC ID, select **MyVPC**.
4. Create the first subnet, you will use this subnet to launch public instances, this subnet will be associated with the main route table of the VPC:
* Subnet name: Enter ***Subnet***
* Availability Zone: Select **US East (N. Virginia) / us-east-1a**
* IPv4 subnet CIDR block: Enter ***192.168.0.0/27***
#### Task 5: Create a Subnet
1. To create a **subnet** click on **Subnet** the present in the **VIRTUAL PRIVATE CLOUD** section on the left sidebar.
2. Click on the **Create Subnet** button.
3. In the VPC ID, select **MyVPC**.
4. Create the first subnet, you will use this subnet to launch public instances, this subnet will be associated with the main route table of the VPC:
* Subnet name: Enter ***Subnet***
* Availability Zone: Select **US East (N. Virginia) / us-east-1a**
* IPv4 subnet CIDR block: Enter ***192.168.0.0/27***
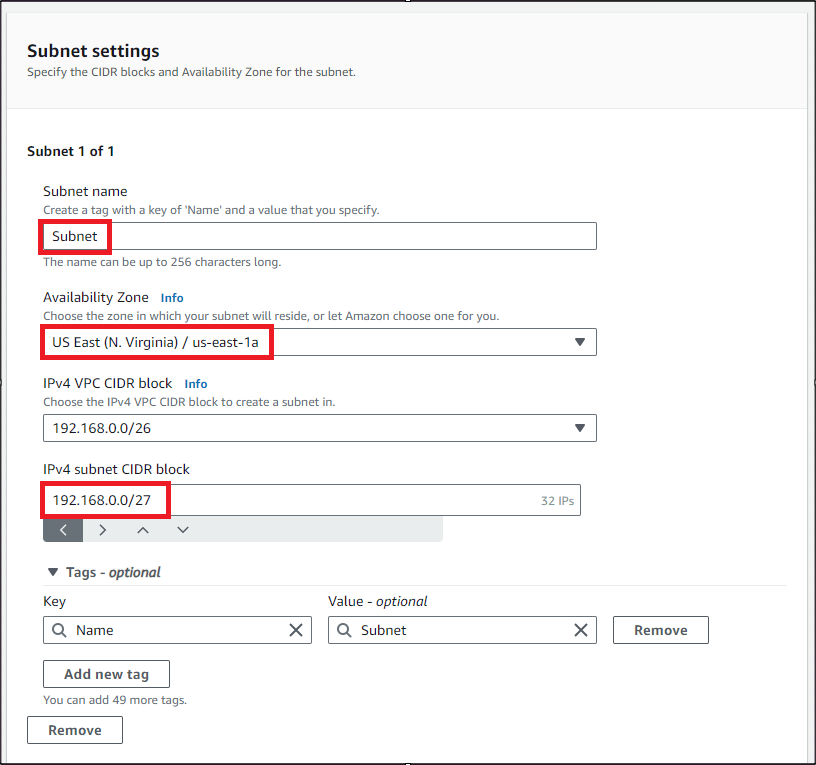 * Click on the **Create Subnet** button to create a subnet.
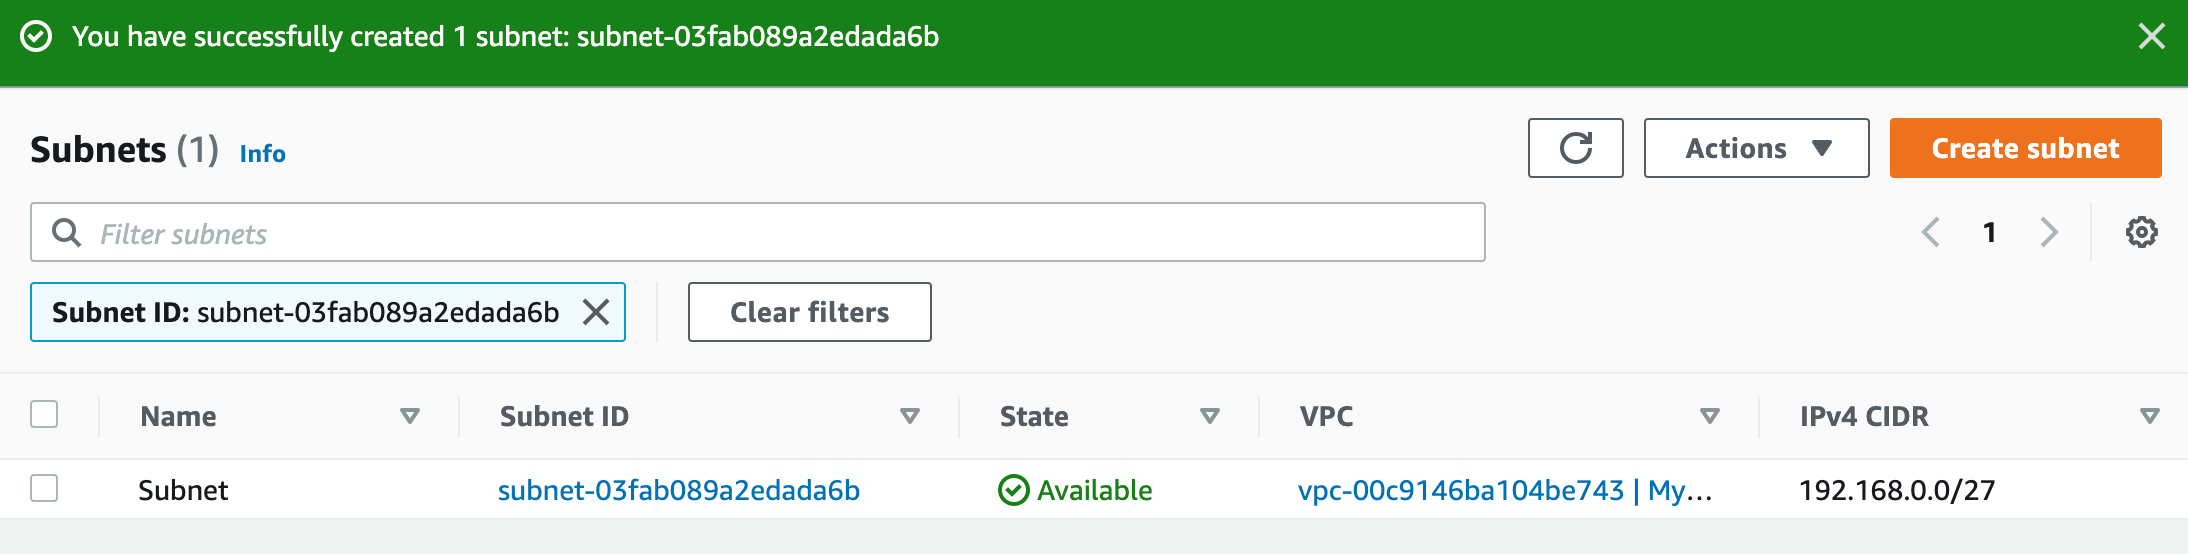
5. The subnet is now created.
* Click on the **Create Subnet** button to create a subnet.
5. The subnet is now created.
 #### Task 6: Configure the Subnet to enable auto-assign public IPv4 address
1. To modify the auto-assign IP settings for the Public subnet, do the following:
* Select the **Subnet**
* Click on the **Actions** button
2. Choose **Edit subnet settings** from the options.
#### Task 6: Configure the Subnet to enable auto-assign public IPv4 address
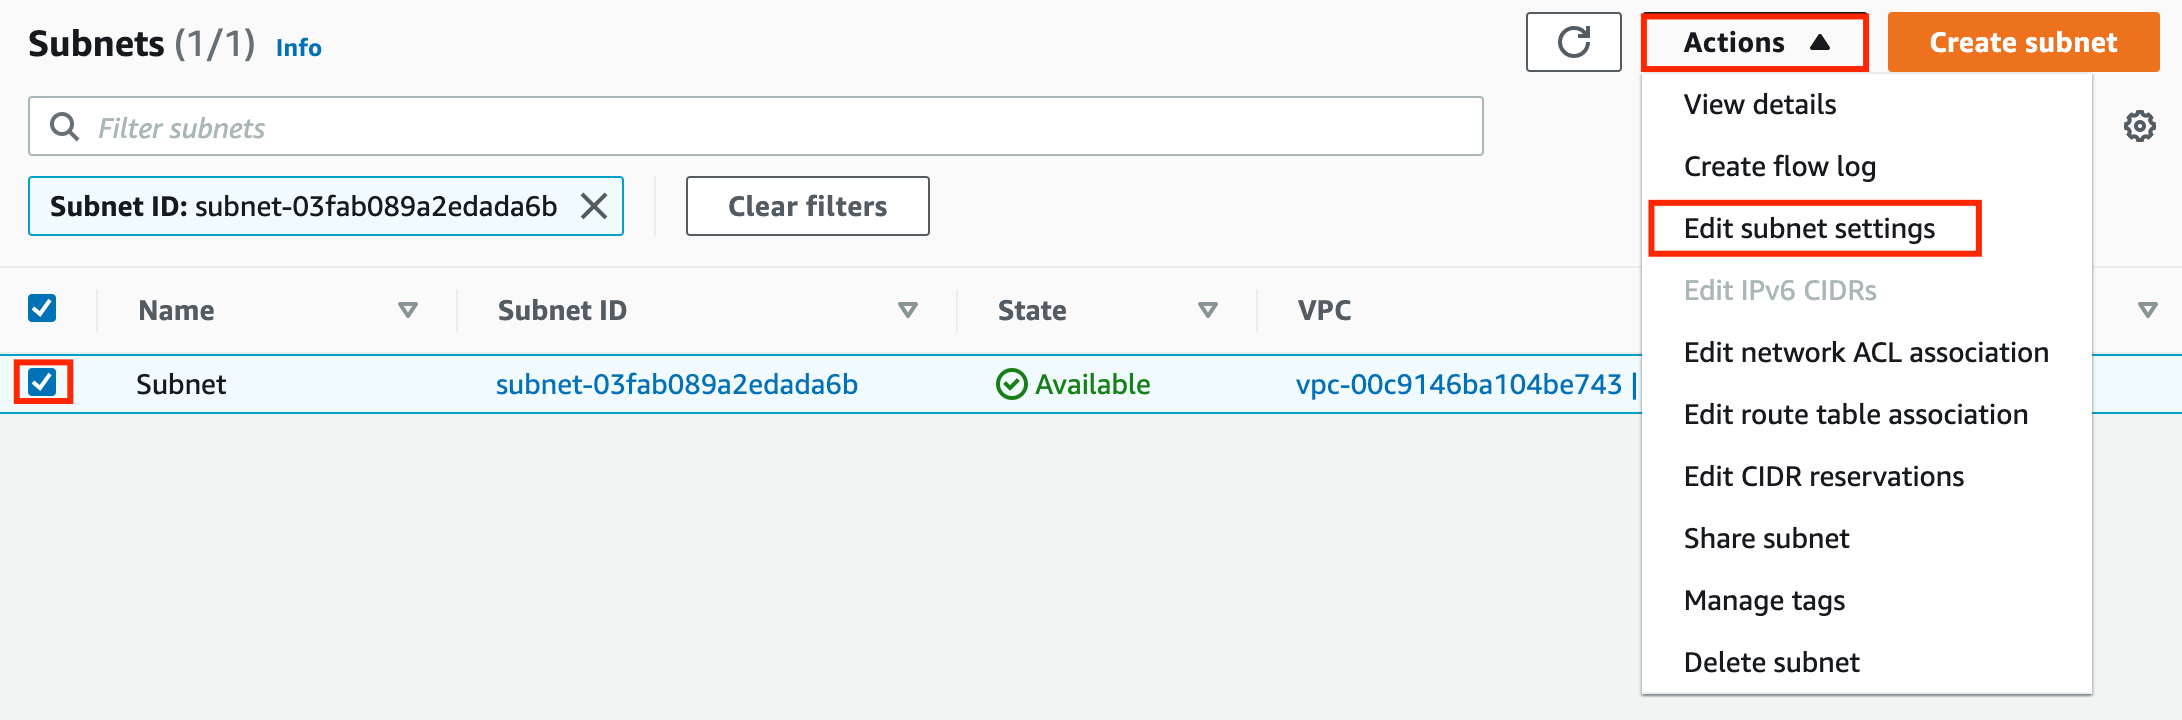
1. To modify the auto-assign IP settings for the Public subnet, do the following:
* Select the **Subnet**
* Click on the **Actions** button
2. Choose **Edit subnet settings** from the options.
 3. Check the option **Enable auto-assign public IPv4 address** under **Auto-assign IP settings**
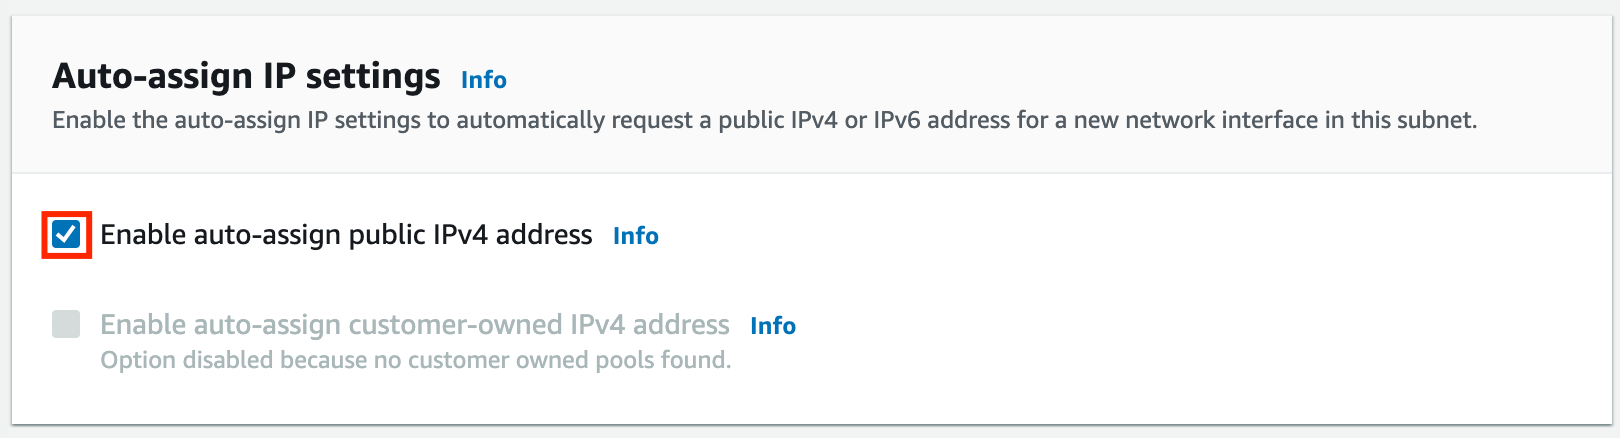 4. Scroll to the end of the page and click on the **Save** button.
#### Task 7: Add an entry to the Internet (0.0.0.0/0) in the Main Route Table
1. By default, custom VPC's main Route Table will have access to VPC's CIDR range only. For this lab, we need internet access.
2. Let's add the route of the internet gateway as destination and 0.0.0.0/0 as Target.
3. Select **Route tables** from the left panel.
4. Choose **MyVPC** (one having same VPC ID copied earlier)
4. Scroll to the end of the page and click on the **Save** button.
#### Task 7: Add an entry to the Internet (0.0.0.0/0) in the Main Route Table
1. By default, custom VPC's main Route Table will have access to VPC's CIDR range only. For this lab, we need internet access.
2. Let's add the route of the internet gateway as destination and 0.0.0.0/0 as Target.
3. Select **Route tables** from the left panel.
4. Choose **MyVPC** (one having same VPC ID copied earlier)
 5. To add the route entry of the internet gateway in the main route table of the custom VPC, do the following:
* **Select** the route table present
* Click on the **Routes** option in the menu bar.
6. Choose the **Edit routes** button.
5. To add the route entry of the internet gateway in the main route table of the custom VPC, do the following:
* **Select** the route table present
* Click on the **Routes** option in the menu bar.
6. Choose the **Edit routes** button.
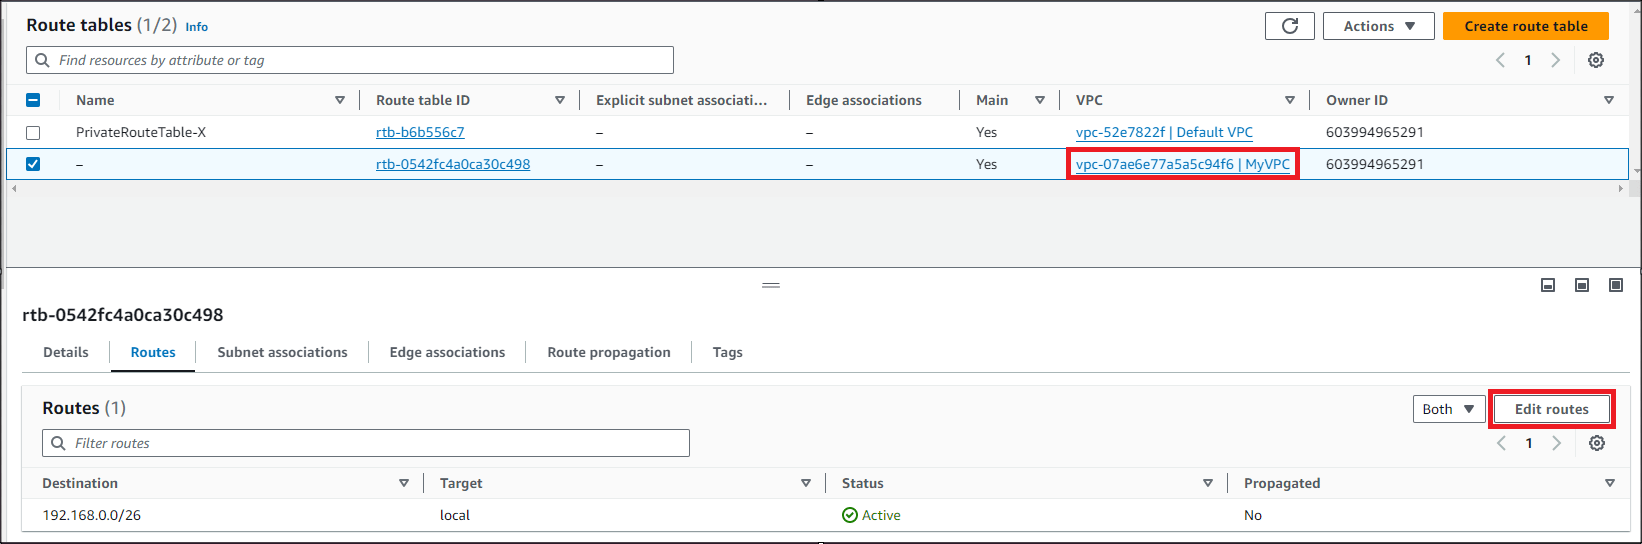 7. On the Edit routes page, Click on the **Add route** button.
8. Add the following:
* Destination : ***0.0.0.0/0***
* Target : **Internet gateway**
7. On the Edit routes page, Click on the **Add route** button.
8. Add the following:
* Destination : ***0.0.0.0/0***
* Target : **Internet gateway**
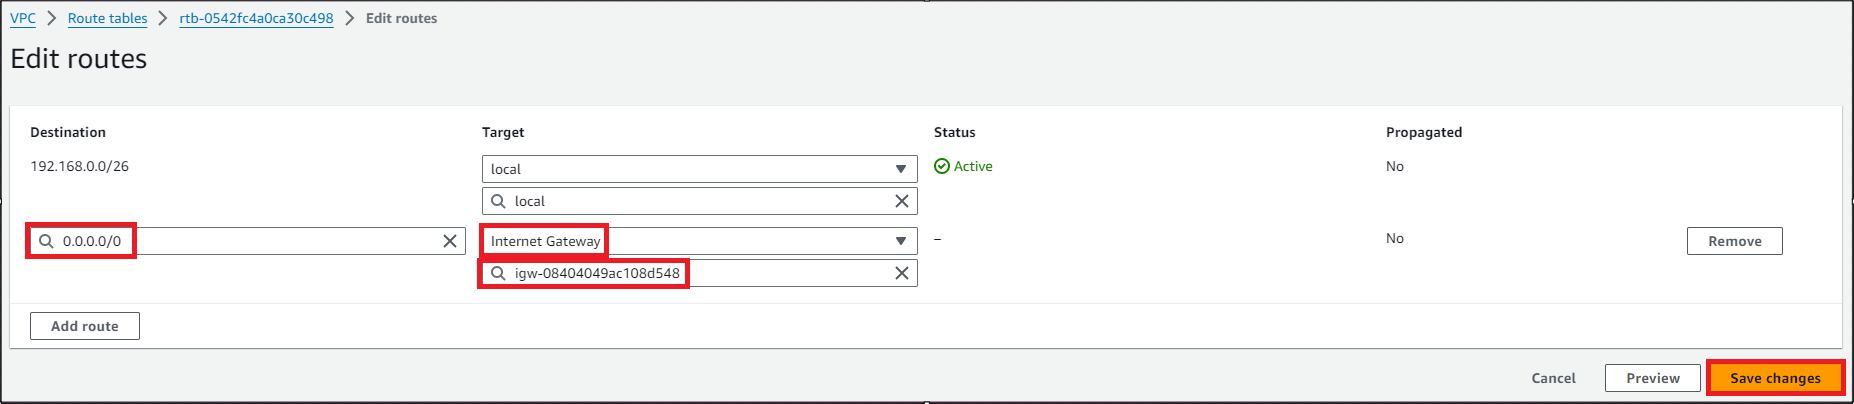 9. Click on the **Save changes** button.
10. Routes are now edited.
11. Close the pane, and Check the Routes of this Main Route Table. Entry to the Internet i.e. 0.0.0.0/0 via Internet gateway is present in the Routes.
9. Click on the **Save changes** button.
10. Routes are now edited.
11. Close the pane, and Check the Routes of this Main Route Table. Entry to the Internet i.e. 0.0.0.0/0 via Internet gateway is present in the Routes.
 #### Task 8: Create a Security Group for EC2 Instance
1. To get started with creating security groups, click on the **Security Groups** button, present in the **SECURITY** section in the left sidebar.
2. Click on the **Create Security Group** button.
3. Fill in the below details under **Basic details**:
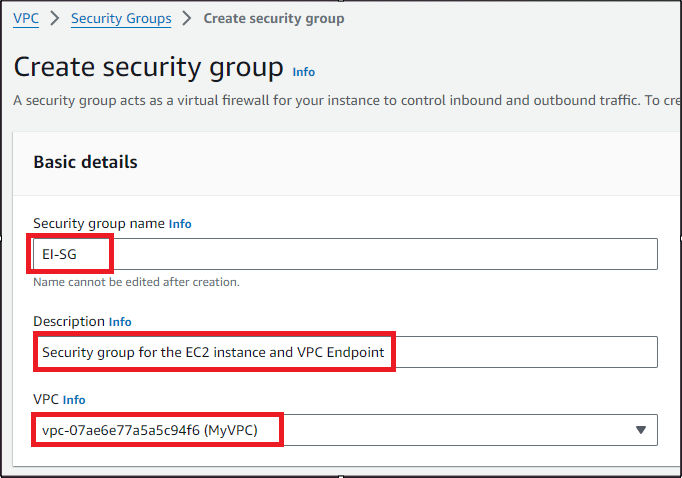
* Enter **Security group** name as ***EI-SG***
* Enter **Description** as ***Security group for the EC2 instance and VPC Endpoint***
* Remove the **Default Security Group** and Select the **MyVPC** under the **VPC** field.
#### Task 8: Create a Security Group for EC2 Instance
1. To get started with creating security groups, click on the **Security Groups** button, present in the **SECURITY** section in the left sidebar.
2. Click on the **Create Security Group** button.
3. Fill in the below details under **Basic details**:
* Enter **Security group** name as ***EI-SG***
* Enter **Description** as ***Security group for the EC2 instance and VPC Endpoint***
* Remove the **Default Security Group** and Select the **MyVPC** under the **VPC** field.
 4. By default, no inbound rule will be allowed, and when you check in the outbound rules, there is only one rule present that has a Type will **All traffic** because **Security groups are Stateful** in nature, **when inbound is allowed outbound is also allowed.**
5. To add the Inbound rules for the same.
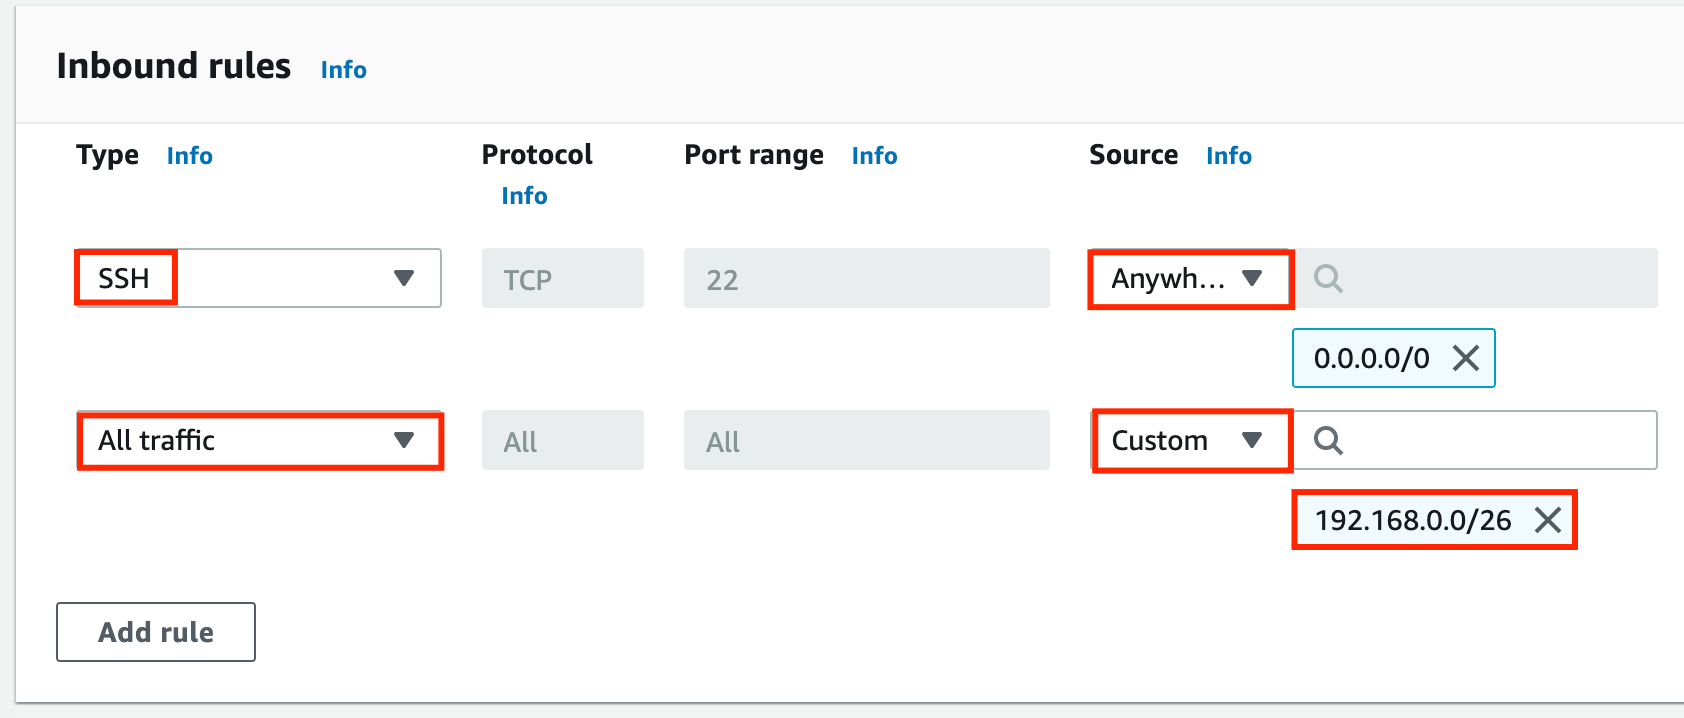
6. We will add **2 rules** for the Bastion host security group i.e. **SSH, All Traffic - Internal.**
* For the first rule, click on the **Add Rule** button.
* **Type** : Select **SSH**
* **Source** : Select **Anywhere- IPv4**
* For the second rule, click on the **Add Rule** button.
* **Type** : Select ***All traffic***,
* **Source** : Select **Custom,** and Enter ***192.168.0.0/26***
4. By default, no inbound rule will be allowed, and when you check in the outbound rules, there is only one rule present that has a Type will **All traffic** because **Security groups are Stateful** in nature, **when inbound is allowed outbound is also allowed.**
5. To add the Inbound rules for the same.
6. We will add **2 rules** for the Bastion host security group i.e. **SSH, All Traffic - Internal.**
* For the first rule, click on the **Add Rule** button.
* **Type** : Select **SSH**
* **Source** : Select **Anywhere- IPv4**
* For the second rule, click on the **Add Rule** button.
* **Type** : Select ***All traffic***,
* **Source** : Select **Custom,** and Enter ***192.168.0.0/26***
 7. Now, modify the outbound rule,
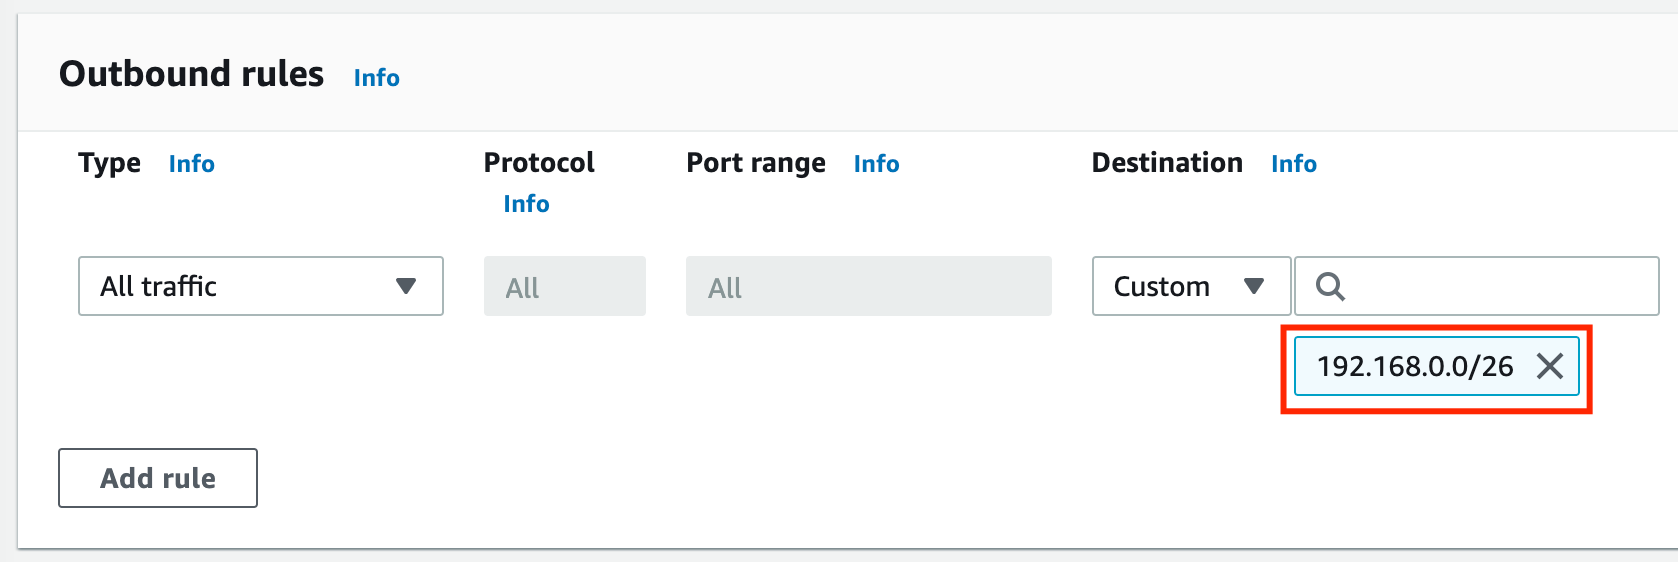
8. From the destination of the first rule, **remove 0.0.0.0/0** and add the CIDR of VPC i.e. **192.168.0.0/26**
7. Now, modify the outbound rule,
8. From the destination of the first rule, **remove 0.0.0.0/0** and add the CIDR of VPC i.e. **192.168.0.0/26**
 9. Finally, click on the **Create Security Group** button to create.
10. The security group is now created.
9. Finally, click on the **Create Security Group** button to create.
10. The security group is now created.
 #### Task 9: Launch an EC2 Instance
1. Navigate to **EC2** by clicking on the **Services** menu at the top, then click on in the **Compute** section.
2. Navigate to **Instances** from the left side menu and click on **Launch Instances**
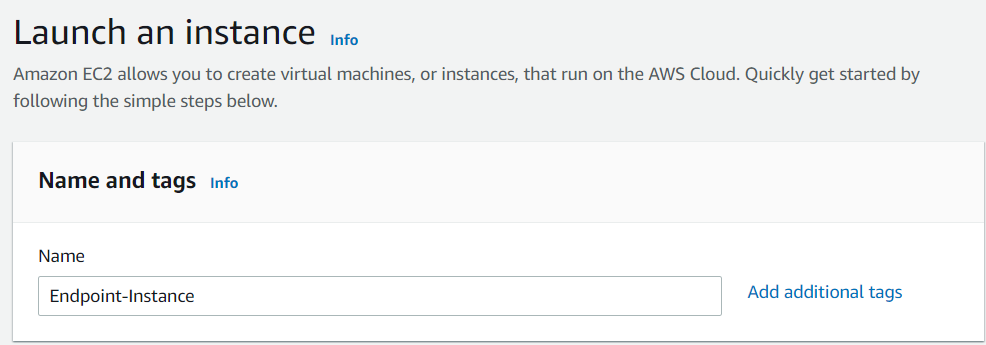
3. Under the **Name and tags** section : Name : ***Endpoint-Instance***
#### Task 9: Launch an EC2 Instance
1. Navigate to **EC2** by clicking on the **Services** menu at the top, then click on in the **Compute** section.
2. Navigate to **Instances** from the left side menu and click on **Launch Instances**
3. Under the **Name and tags** section : Name : ***Endpoint-Instance***
 4. Under the **Application and OS Images (Amazon Machine Image)** section :
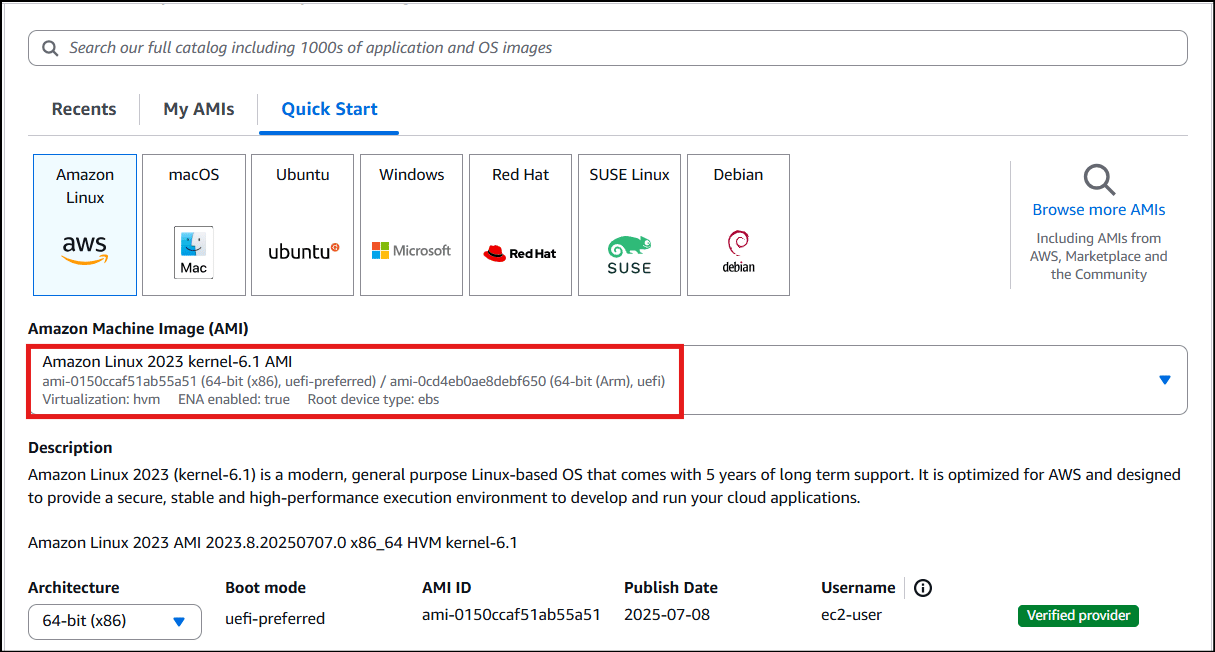
5. Select **Quick Start** tab and **Amazon Linux** under it
6. Amazon Machine Image (AMI) : Select ***Amazon Linux 2023 kernel AMI***
7. **Note: if there are two AMI's present for Amazon Linux 2023 AMI, choose kernel-6.1.**
4. Under the **Application and OS Images (Amazon Machine Image)** section :
5. Select **Quick Start** tab and **Amazon Linux** under it
6. Amazon Machine Image (AMI) : Select ***Amazon Linux 2023 kernel AMI***
7. **Note: if there are two AMI's present for Amazon Linux 2023 AMI, choose kernel-6.1.**
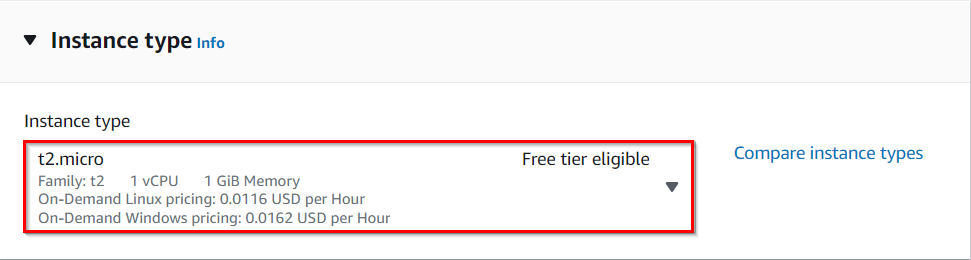
 8. Instance Type : **t2.micro**
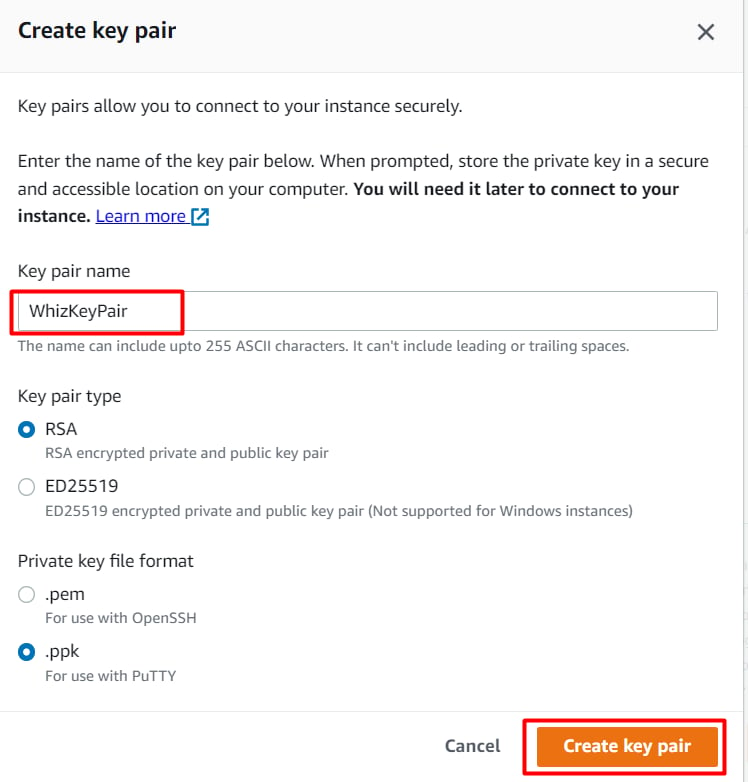
 9. Under the **Key Pair (login)** section **:**
* Click on Create new key pair hyperlink
* Key pair name: **WhizKeypair**
* Key pair type: **RSA**
* Private key file format: **.pem**
* Click on Create key pair and select the created key pair.
9. Under the **Key Pair (login)** section **:**
* Click on Create new key pair hyperlink
* Key pair name: **WhizKeypair**
* Key pair type: **RSA**
* Private key file format: **.pem**
* Click on Create key pair and select the created key pair.
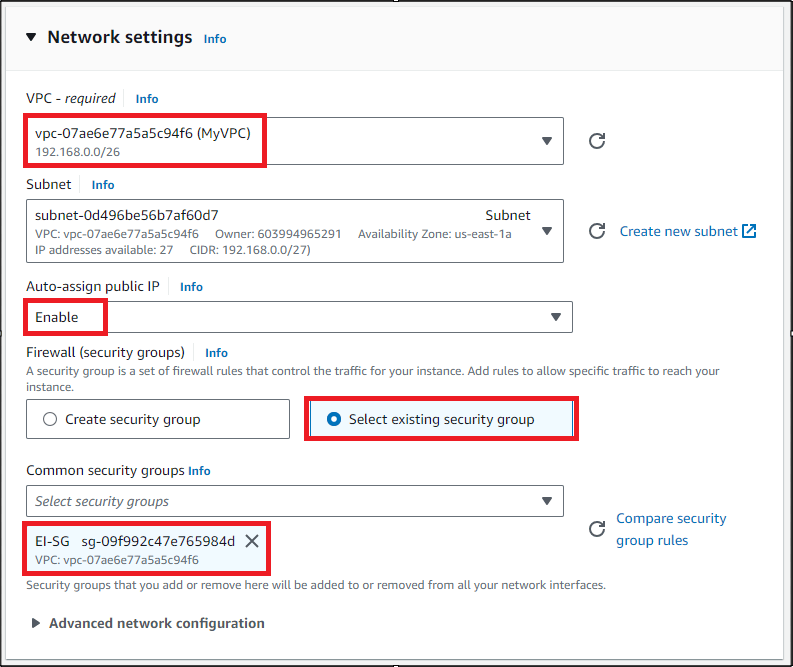
 10. Under the **Network Settings** section **:**
* Click on Edit Button.
* Remove the existing default VPC and add VPC with name **MyVPC**
* Auto-assign public IP: select ***Enable***
* Firewall (security groups) : Select **Select existing security group**
* Common security groups : Select Security group with name **EI\_SG.**
10. Under the **Network Settings** section **:**
* Click on Edit Button.
* Remove the existing default VPC and add VPC with name **MyVPC**
* Auto-assign public IP: select ***Enable***
* Firewall (security groups) : Select **Select existing security group**
* Common security groups : Select Security group with name **EI\_SG.**
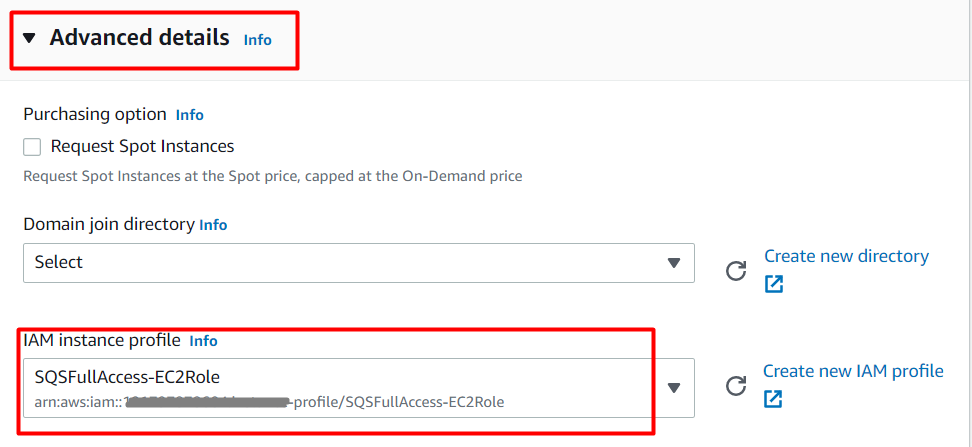
 11. **Click on the Advance Details tab, under this, select IAM role.**
 12. Click on the **Launch Instance** button.
13. Scroll below and click on the **View All Instances** button.
14. The instance state will be changed from Pending to **Running** and the Status check will be changed from Initializing to **2/2 checks passed**.
#### Task 10: SSH into the Endpoint instance
1. [SSH into the Endpoint instance](https://play.whizlabs.com/site/task_support/ssh-into-ec-instance) using the PEM key: **WhizKeyPair.pem**
2. Since EC2 Instance is having the IAM Role Attached, we can send a message to the SQS Queue.
3. To send a message to the SQS Queue, copy and paste the below command. **Replace the queue URL with the Queue URL you have copied before.**
aws sqs send-message --region us-east-1 --endpoint-url [https://sqs.us-east-1.amazonaws.com/](https://sqs.us-east-1.amazonaws.com/) --queue-url [https://sqs.us-east-1.amazonaws.com/123456789012/MyWhizQueue](https://sqs.us-east-1.amazonaws.com/123456789012/MyWhizQueue) --message-body "Hello from Amazon SQS."
4. Though the assigned IAM role is having full access for SQS, sending a message to the queue got failed, saying, connection timeout on SQS's endpoint.
12. Click on the **Launch Instance** button.
13. Scroll below and click on the **View All Instances** button.
14. The instance state will be changed from Pending to **Running** and the Status check will be changed from Initializing to **2/2 checks passed**.
#### Task 10: SSH into the Endpoint instance
1. [SSH into the Endpoint instance](https://play.whizlabs.com/site/task_support/ssh-into-ec-instance) using the PEM key: **WhizKeyPair.pem**
2. Since EC2 Instance is having the IAM Role Attached, we can send a message to the SQS Queue.
3. To send a message to the SQS Queue, copy and paste the below command. **Replace the queue URL with the Queue URL you have copied before.**
aws sqs send-message --region us-east-1 --endpoint-url [https://sqs.us-east-1.amazonaws.com/](https://sqs.us-east-1.amazonaws.com/) --queue-url [https://sqs.us-east-1.amazonaws.com/123456789012/MyWhizQueue](https://sqs.us-east-1.amazonaws.com/123456789012/MyWhizQueue) --message-body "Hello from Amazon SQS."
4. Though the assigned IAM role is having full access for SQS, sending a message to the queue got failed, saying, connection timeout on SQS's endpoint.
 5. As, this instance's security group is only allowed to do SSH, running any other command, will fail.
* **Note: If you are getting the error as not authorized, please attach the IAM role to the EC2 Instance, which you missed.**
6. Let's add the permission to access the SQS using the VPC Endpoint for SQS.
#### Task 11: Create a VPC Endpoint for SQS
1. Navigate to **VPC** by clicking on the **Services** menu at the top, then click on in the **Networking & Content Delivery** section
2. Click on **Endpoints** present in the **VIRTUAL PRIVATE CLOUD** section on the left sidebar.
3. Click on the **Create Endpoint** button.
* Endpoint settings
* Name tag - optional : Enter ***sqs-enpoint***
* Service category : Select **AWS Services**
* Services
* In the **Service name** search bar, type ***sqs***\*\*,\*\* and press **enter**
* Select **com.amazonaws.us-east-1.sqs** Service name of Type **Interface**.
* VPC
* Select the Custom VPC **MyVPC** from the dropdown list.
* Subnets
* Availability Zone : Check the checkbox of **us-east-1a**
* Subnet ID : Select the subnet that you created in the custom VPC i.e. **Subnet**
* **Note :** Make sure Enable DNS name option is checked for the Custom VPC that you created.
* Security groups
* Select **EI-SG** Security group from the list.
* **Note :** Remove the default security group if selected\*\*.\*\*
* Leave all other options as default
4. Finally, click on the **Create Endpoint** button.
5. An **endpoint** will be created.
6. Click on the **Close** button, and within a few moments, you will see the **endpoint** will be listed.
7. It may take up to 5 minutes for the endpoint to be in an **Available** state. Refresh the page every minute to see the updated status.
5. As, this instance's security group is only allowed to do SSH, running any other command, will fail.
* **Note: If you are getting the error as not authorized, please attach the IAM role to the EC2 Instance, which you missed.**
6. Let's add the permission to access the SQS using the VPC Endpoint for SQS.
#### Task 11: Create a VPC Endpoint for SQS
1. Navigate to **VPC** by clicking on the **Services** menu at the top, then click on in the **Networking & Content Delivery** section
2. Click on **Endpoints** present in the **VIRTUAL PRIVATE CLOUD** section on the left sidebar.
3. Click on the **Create Endpoint** button.
* Endpoint settings
* Name tag - optional : Enter ***sqs-enpoint***
* Service category : Select **AWS Services**
* Services
* In the **Service name** search bar, type ***sqs***\*\*,\*\* and press **enter**
* Select **com.amazonaws.us-east-1.sqs** Service name of Type **Interface**.
* VPC
* Select the Custom VPC **MyVPC** from the dropdown list.
* Subnets
* Availability Zone : Check the checkbox of **us-east-1a**
* Subnet ID : Select the subnet that you created in the custom VPC i.e. **Subnet**
* **Note :** Make sure Enable DNS name option is checked for the Custom VPC that you created.
* Security groups
* Select **EI-SG** Security group from the list.
* **Note :** Remove the default security group if selected\*\*.\*\*
* Leave all other options as default
4. Finally, click on the **Create Endpoint** button.
5. An **endpoint** will be created.
6. Click on the **Close** button, and within a few moments, you will see the **endpoint** will be listed.
7. It may take up to 5 minutes for the endpoint to be in an **Available** state. Refresh the page every minute to see the updated status.
 #### Task 12: Send the message to the SQS queue
1. To send a message to the queue, copy and paste the below command. **Make sure to replace the Queue URL with the Queue URL you have copied before.**
aws sqs send-message --region us-east-1 --endpoint-url [https://sqs.us-east-1.amazonaws.com/](https://sqs.us-east-1.amazonaws.com/) --queue-url [https://sqs.us-east-1.amazonaws.com/123456789012/MyWhizQueue](https://sqs.us-east-1.amazonaws.com/123456789012/MyWhizQueue) --message-body "Hello from Amazon SQS."
#### Task 12: Send the message to the SQS queue
1. To send a message to the queue, copy and paste the below command. **Make sure to replace the Queue URL with the Queue URL you have copied before.**
aws sqs send-message --region us-east-1 --endpoint-url [https://sqs.us-east-1.amazonaws.com/](https://sqs.us-east-1.amazonaws.com/) --queue-url [https://sqs.us-east-1.amazonaws.com/123456789012/MyWhizQueue](https://sqs.us-east-1.amazonaws.com/123456789012/MyWhizQueue) --message-body "Hello from Amazon SQS."
 2. The message is sent to the queue.
3. To check the message, follow the steps presented below:
4. Switch to the SQS Console page, if not close the other tab.
5. Else, Navigate to the **Services** menu at the top, search for **SQS** and select it. You’ll be redirected to the SQS console page.
6. Click on the queue present i.e. **MyWhizQueue**.
7. From the menu bar, click on **Send and receive messages**.
2. The message is sent to the queue.
3. To check the message, follow the steps presented below:
4. Switch to the SQS Console page, if not close the other tab.
5. Else, Navigate to the **Services** menu at the top, search for **SQS** and select it. You’ll be redirected to the SQS console page.
6. Click on the queue present i.e. **MyWhizQueue**.
7. From the menu bar, click on **Send and receive messages**.
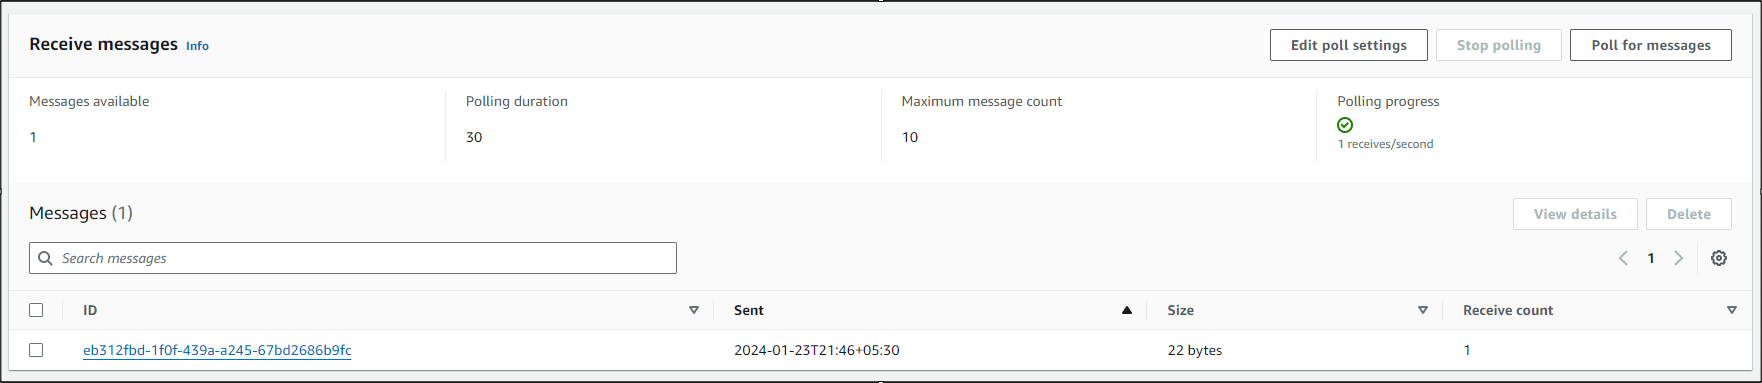
 8. Click on the **Poll for messages** option to see the message.
 > ##### Do You Know ?
>
> Amazon VPC Interface Endpoints allow you to connect to AWS services privately from within your VPC, without the need for public internet connectivity. This helps enhance security and reduces exposure to potential threats.
9. Once the lab steps are completed, please click on the **Validation** button on the right side panel.
#### Task 13: Delete AWS Resources
#### Delete VPC Endpoint
1. Navigate to **VPC** by clicking on the **Services** menu at the top, then click on in the **Networking & Content Delivery** section.
2. Click on **Endpoints** present in the **VIRTUAL PRIVATE CLOUD** section on the left sidebar.
3. VPC Endpoint will be listed here.
4. To delete the VPC endpoint, perform the following tasks:
* Select the Endpoint,
* Click on the **Actions** button,
* Choose the option of **Delete endpoint**
5. Confirm the deletion by clicking on the **Yes, Delete** button.
6. The endpoint will be deleted immediately.
#### EC2 Instance termination
1. Navigate to **EC2** by clicking on the **Services** menu at the top, then click on in the **Compute** section.
2. Click on **Instances** on the left panel.
3. EC2 Instance will be listed here.
4. To terminate the present instance, perform the following tasks:
* Select the **EC2 instances**
* Click on the **Instance state**
* Choose to **Terminate instance**
5. To confirm the termination of the selected EC2 instance, click on the **Terminate** button.
6. The instance will be terminated in a minute or so.
### Completion and Conclusion
1. You have successfully created the SQS Queue.
2. You have successfully created the VPC and its components.
3. You have launched the EC2 instance, and after SSH, you tried to send the message to the queue but it got failed.
4. We have created a VPC endpoint for SQS to securely access SQS Queue and messages without going to the internet i.e. within Amazon's network through the Endpoint instance.
5. We tested the VPC endpoint for SQS from the EC2 instance.
### End Lab
1. Sign out of the AWS Account.
2. You have successfully completed the lab.
3. Once you have completed the steps, click on **End Lab** from the IP Lab Portal dashboard.
## What gets checked
When you press **Check my work**, the platform verifies each of these:
* **Create Standard SQS Queue** — Check whether a Standard SQS Queue is created or not.
* **Create Amazon Custom VPC** — Check whether a Custom VPC is created or not.
* **Create Internet Gateway** — Check whether an Internet Gateway is created and attached to the Custom VPC or not.
* **Create Amazon Custom VPC Subnet** — Check whether a Subnet is created for the Custom VPC or not.
* **Create Amazon Custom VPC Public Route Table** — Check whether a Custom VPC Public Route Table is created and an Internet Gateway route is added or not.
* **Launch an EC2 Instance** — Check whether an EC2 Instance is launched or not.
* **Check EC2 Instance Running State** — Check whether the EC2 instance is in a running state.
* **Check EC2 Instance Public IP** — Check whether the EC2 instance has a public IP address assigned.
* **Validate EC2 Instance Type t2.micro** — Check whether the EC2 instance type is t2.micro.
* **Launch EC2 AMI type Amazon Linux** — Check whether the EC2 instance is launched using an Amazon AMI.
* **Create VPC Endpoint** — Check whether a VPC Endpoint is created for the Custom VPC or not.
## Related help
* [SSH into EC2 Instance](/aws-saa/support/ssh-into-ec2-instance)
This documentation is built and hosted on [Mintlify](https://mintlify.com), a developer documentation platform.
> ##### Do You Know ?
>
> Amazon VPC Interface Endpoints allow you to connect to AWS services privately from within your VPC, without the need for public internet connectivity. This helps enhance security and reduces exposure to potential threats.
9. Once the lab steps are completed, please click on the **Validation** button on the right side panel.
#### Task 13: Delete AWS Resources
#### Delete VPC Endpoint
1. Navigate to **VPC** by clicking on the **Services** menu at the top, then click on in the **Networking & Content Delivery** section.
2. Click on **Endpoints** present in the **VIRTUAL PRIVATE CLOUD** section on the left sidebar.
3. VPC Endpoint will be listed here.
4. To delete the VPC endpoint, perform the following tasks:
* Select the Endpoint,
* Click on the **Actions** button,
* Choose the option of **Delete endpoint**
5. Confirm the deletion by clicking on the **Yes, Delete** button.
6. The endpoint will be deleted immediately.
#### EC2 Instance termination
1. Navigate to **EC2** by clicking on the **Services** menu at the top, then click on in the **Compute** section.
2. Click on **Instances** on the left panel.
3. EC2 Instance will be listed here.
4. To terminate the present instance, perform the following tasks:
* Select the **EC2 instances**
* Click on the **Instance state**
* Choose to **Terminate instance**
5. To confirm the termination of the selected EC2 instance, click on the **Terminate** button.
6. The instance will be terminated in a minute or so.
### Completion and Conclusion
1. You have successfully created the SQS Queue.
2. You have successfully created the VPC and its components.
3. You have launched the EC2 instance, and after SSH, you tried to send the message to the queue but it got failed.
4. We have created a VPC endpoint for SQS to securely access SQS Queue and messages without going to the internet i.e. within Amazon's network through the Endpoint instance.
5. We tested the VPC endpoint for SQS from the EC2 instance.
### End Lab
1. Sign out of the AWS Account.
2. You have successfully completed the lab.
3. Once you have completed the steps, click on **End Lab** from the IP Lab Portal dashboard.
## What gets checked
When you press **Check my work**, the platform verifies each of these:
* **Create Standard SQS Queue** — Check whether a Standard SQS Queue is created or not.
* **Create Amazon Custom VPC** — Check whether a Custom VPC is created or not.
* **Create Internet Gateway** — Check whether an Internet Gateway is created and attached to the Custom VPC or not.
* **Create Amazon Custom VPC Subnet** — Check whether a Subnet is created for the Custom VPC or not.
* **Create Amazon Custom VPC Public Route Table** — Check whether a Custom VPC Public Route Table is created and an Internet Gateway route is added or not.
* **Launch an EC2 Instance** — Check whether an EC2 Instance is launched or not.
* **Check EC2 Instance Running State** — Check whether the EC2 instance is in a running state.
* **Check EC2 Instance Public IP** — Check whether the EC2 instance has a public IP address assigned.
* **Validate EC2 Instance Type t2.micro** — Check whether the EC2 instance type is t2.micro.
* **Launch EC2 AMI type Amazon Linux** — Check whether the EC2 instance is launched using an Amazon AMI.
* **Create VPC Endpoint** — Check whether a VPC Endpoint is created for the Custom VPC or not.
## Related help
* [SSH into EC2 Instance](/aws-saa/support/ssh-into-ec2-instance)
This documentation is built and hosted on [Mintlify](https://mintlify.com), a developer documentation platform.