> ## Documentation Index
> Fetch the complete documentation index at: https://cloud-architect.ipoint-labs.com/llms.txt
> Use this file to discover all available pages before exploring further.
# Configuring EBS Volume to ECS task
> Hands-on lab · 45m
Launch this lab in the IP Lab Portal, then follow the steps below in the AWS console.
Open IP Lab Portal
## Overview
#### Lab Details
1. In this lab you use Amazon ECS Task definition and Cluster to create a task and add EBS Volume Storage to it.
2. Duration: **60 minutes**
3. AWS Region: **US East (N. Virginia) us-east-1**
#### Introduction
#### Amazon ECS (Elastic Container Service):
* Amazon Elastic Container Service (Amazon ECS) is a comprehensive container orchestration solution designed to streamline the deployment, management, and scaling of containerized applications.
* As a fully managed service, Amazon ECS incorporates AWS configuration and operational best practices, ensuring optimal performance.
* It seamlessly integrates with both AWS and third-party tools, including Amazon Elastic Container Registry and Docker, allowing development teams to concentrate on application development rather than managing the underlying environment.
#### Lifecycle of ECS Application:
* **Task definition -** blueprint for the application, it is a text file in JSON format that describes the parameters and one or more containers that form the application.
* After we create a task definition, we deploy it as a service or a task on the cluster. **Cluster** is a logical group of **task or services** that runs on the capacity infrastructure that is registered to a cluster.
* **Task** is an instantiation of a task definition within a cluster.
* We can use an Amazon ECS service to run and maintain your desired number of tasks simultaneously in an Amazon ECS cluster.
* **Monitoring** can be done through:
* Cloudwatch
* Runtime Monitoring
#### What is EBS?
Amazon Elastic Block Store (Amazon EBS) provides reliable, cost-effective, and high-performance block storage for data-intensive workloads. EBS volumes are ideal for high throughput and transaction-heavy applications and can be attached to Amazon ECS tasks. When launching a standalone task or creating/updating a service, you can configure an EBS volume for each task. Managed by Amazon ECS, these volumes can be encrypted with AWS Key Management Service (AWS KMS) keys for data protection. You can attach new empty volumes or load data from existing snapshots.
#### Features of EBS:
* EBS volumes retain data even if the attached EC2 instance is stopped or terminated.
* EBS volumes can be scaled from 1 GiB to 16 TiB based on workload needs.
* EBS allows creation of point-in-time snapshots stored in Amazon S3 for backup and recovery.
* EBS volumes offer consistent, low-latency performance optimized by selecting the appropriate volume type.
* EBS volumes ensure high availability and durability with automatic data replication within an Availability Zone.
* EBS volumes can be easily attached, detached, and moved between EC2 instances within the same AZ.
* EBS provides cost-effective storage solutions with different volume types and resizing options.
* Volume types include General Purpose SSD (gp3, gp2), Provisioned IOPS SSD (io2, io1), Throughput Optimized HDD (st1), and Cold HDD (sc1).
#### Architecture Diagram
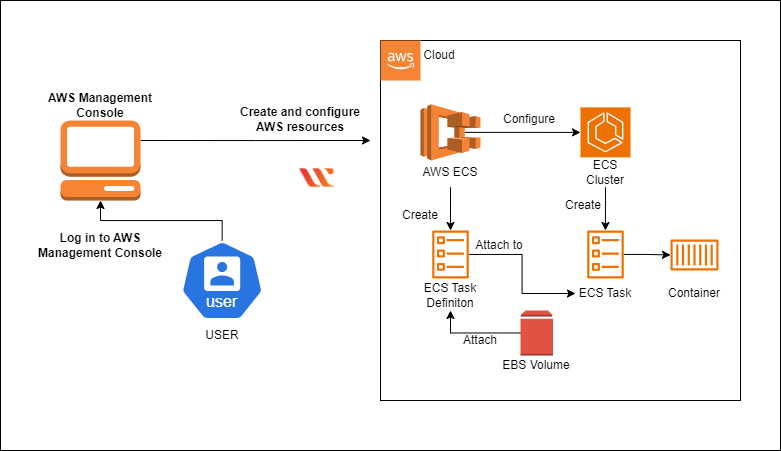 #### Task Details:
1. Sign in to AWS Management Console
2. Creating cluster in Amazon ECS.
3. Creating a Task Definition.
4. Run a Fargate task under cluster created.
5. Attaching EBS Volume to the Task Definition.
6. Running a new task to the associated new revision of task definition with the EBS volume attached.
#### Launching Lab Environment
1. To launch the lab environment, Click on the **Start Lab** button.
2. Please wait until the cloud environment is provisioned. It will take less than a minute to provision.
3. Once the Lab is started, you will be provided with **IAM user name, Password, Access Key, and Secret Access Key**.
> **Note :** You can only start one lab at any given time.
## Lab guide
#### Lab Steps
#### Task 1: Sign in to AWS Management Console
1. Click on the **Open Console** button, and you will get redirected to AWS Console in a new browser tab.
2. On the AWS sign-in page,
* Leave the Account ID as default. Never edit/remove the 12 digit Account ID present in the AWS Console. otherwise, you cannot proceed with the lab.
* Now copy your **User Name** and **Password** in the lab Console to the **IAM Username and Password** in AWS Console and click on the **Sign in** button.
3. Once Signed In to the AWS Management Console, Make the default AWS Region as **US East (N. Virginia) us-east-1**.
#### Task 2: Create cluster in Amazon ECS
1. Make sure you are in the **US East (N.Virginia) us-east-1** region.
2. Navigate to the **Elastic Container Services** by clicking on **Services** menu in the top, then click on **Elastic Container Services** in the **Containers** section.
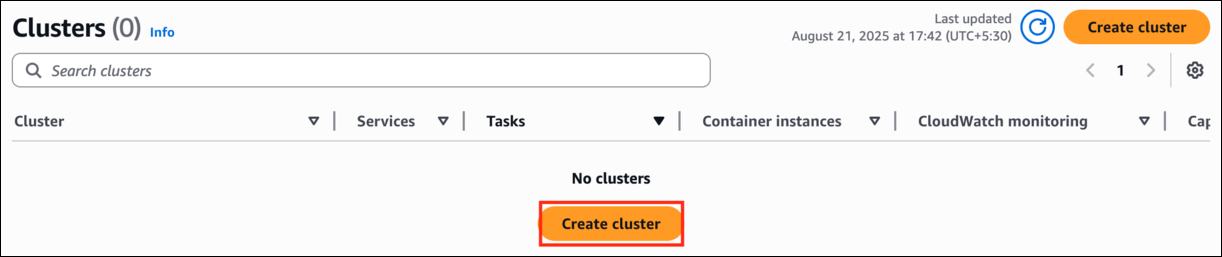
3. On the left sidebar, click on the Clusters option and click on **Create Cluster** button.
#### Task Details:
1. Sign in to AWS Management Console
2. Creating cluster in Amazon ECS.
3. Creating a Task Definition.
4. Run a Fargate task under cluster created.
5. Attaching EBS Volume to the Task Definition.
6. Running a new task to the associated new revision of task definition with the EBS volume attached.
#### Launching Lab Environment
1. To launch the lab environment, Click on the **Start Lab** button.
2. Please wait until the cloud environment is provisioned. It will take less than a minute to provision.
3. Once the Lab is started, you will be provided with **IAM user name, Password, Access Key, and Secret Access Key**.
> **Note :** You can only start one lab at any given time.
## Lab guide
#### Lab Steps
#### Task 1: Sign in to AWS Management Console
1. Click on the **Open Console** button, and you will get redirected to AWS Console in a new browser tab.
2. On the AWS sign-in page,
* Leave the Account ID as default. Never edit/remove the 12 digit Account ID present in the AWS Console. otherwise, you cannot proceed with the lab.
* Now copy your **User Name** and **Password** in the lab Console to the **IAM Username and Password** in AWS Console and click on the **Sign in** button.
3. Once Signed In to the AWS Management Console, Make the default AWS Region as **US East (N. Virginia) us-east-1**.
#### Task 2: Create cluster in Amazon ECS
1. Make sure you are in the **US East (N.Virginia) us-east-1** region.
2. Navigate to the **Elastic Container Services** by clicking on **Services** menu in the top, then click on **Elastic Container Services** in the **Containers** section.
3. On the left sidebar, click on the Clusters option and click on **Create Cluster** button.
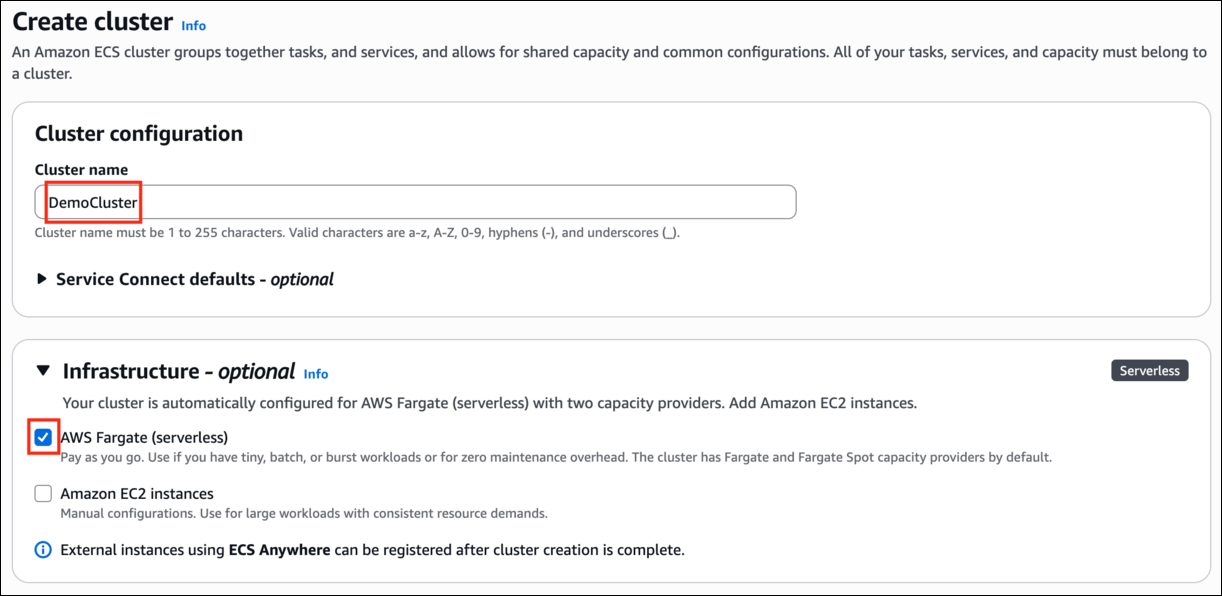
 4. Cluster name - enter **DemoCluster**
5. In the Infrastructure section, let the AWS Fargate option be selected for serverless Infrastructure.
6. Keep the rest as default and click on **Create**.
4. Cluster name - enter **DemoCluster**
5. In the Infrastructure section, let the AWS Fargate option be selected for serverless Infrastructure.
6. Keep the rest as default and click on **Create**.
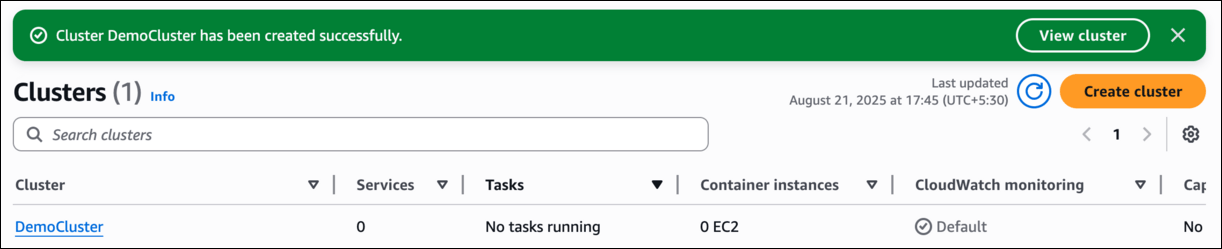
 7. Now you will be able to see the cluster being created, it may take 5 to 7 minutes to create.
8. Once created, you will be able to see your cluster appearing on the Cluster section, with no tasks running.
7. Now you will be able to see the cluster being created, it may take 5 to 7 minutes to create.
8. Once created, you will be able to see your cluster appearing on the Cluster section, with no tasks running.
 #### Task 3: Create a Task Definition
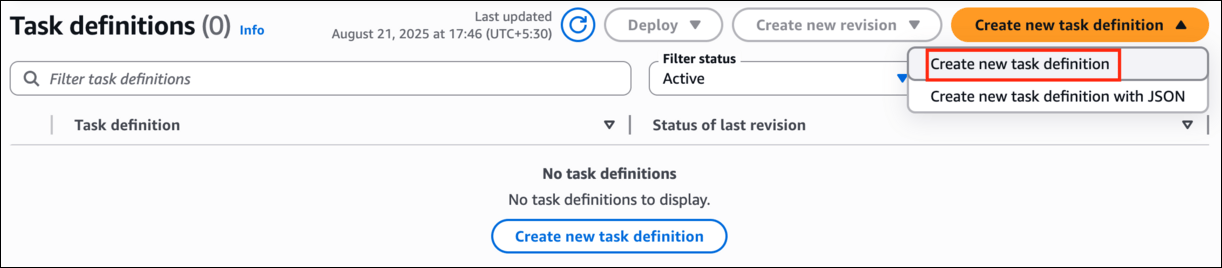
1. Click on Task Definitions present on the left panel.
2. Click on Create new task definition and select ‘**Create new task definition**’
#### Task 3: Create a Task Definition
1. Click on Task Definitions present on the left panel.
2. Click on Create new task definition and select ‘**Create new task definition**’
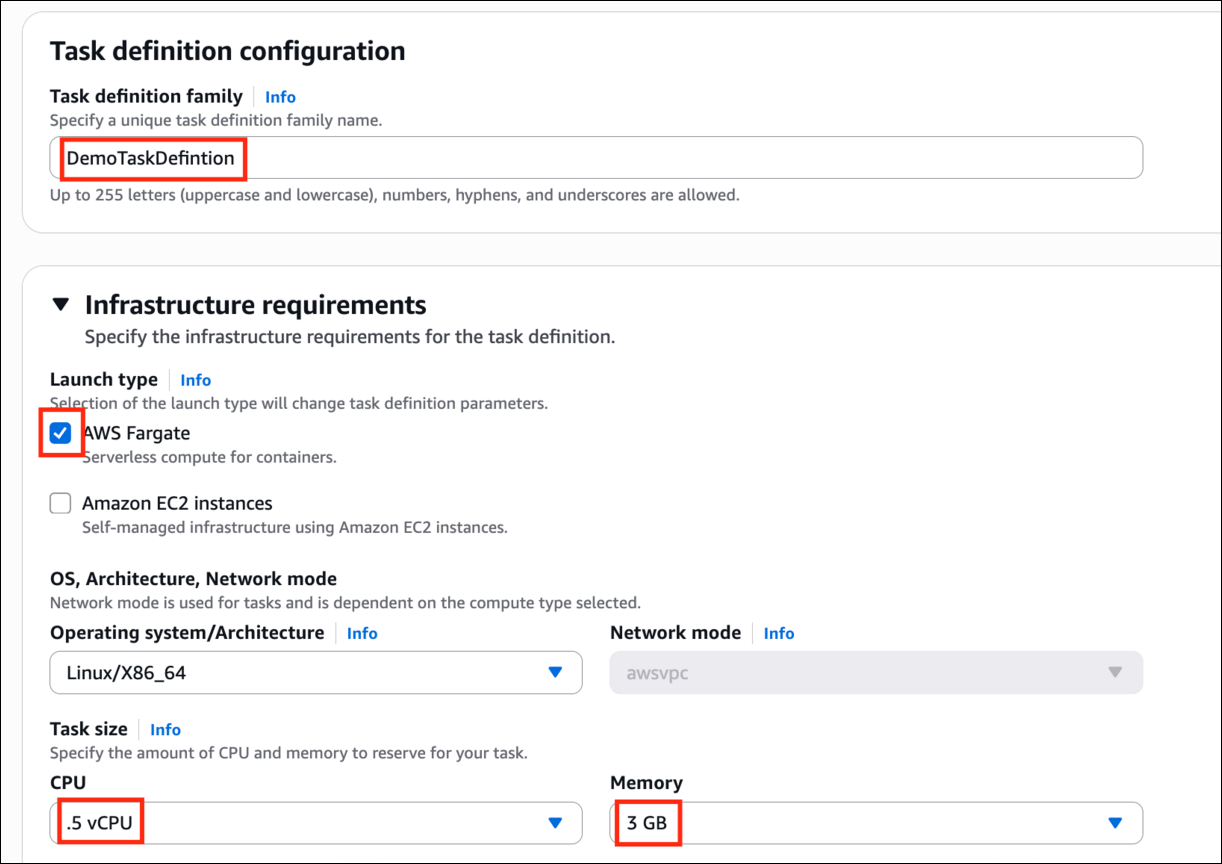
 3. Task definition family - enter **DemoTaskDefintion** in the Task definition configuration tab.
4. Under Infrastructure requirements, Launch type - select **AWS Fargate**, and let the OS be the same.
5. Under the task size, select **.5 vCPU** for the CPU amount and let the memory be **3 GB**.
3. Task definition family - enter **DemoTaskDefintion** in the Task definition configuration tab.
4. Under Infrastructure requirements, Launch type - select **AWS Fargate**, and let the OS be the same.
5. Under the task size, select **.5 vCPU** for the CPU amount and let the memory be **3 GB**.
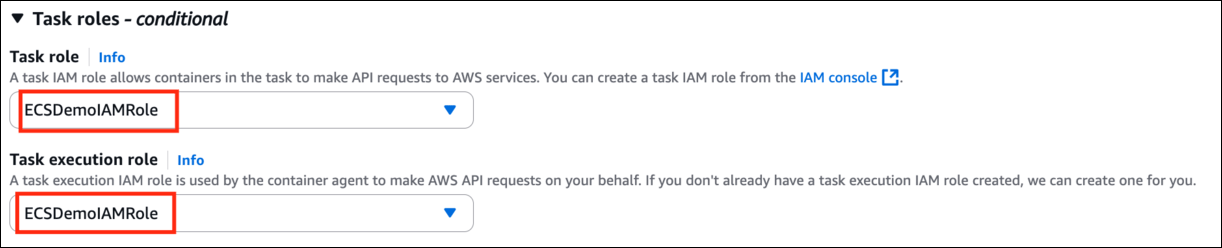
 6. Expand task role and Under Task execution role select **ECSDemoIAMRole** which is pre created for this lab.
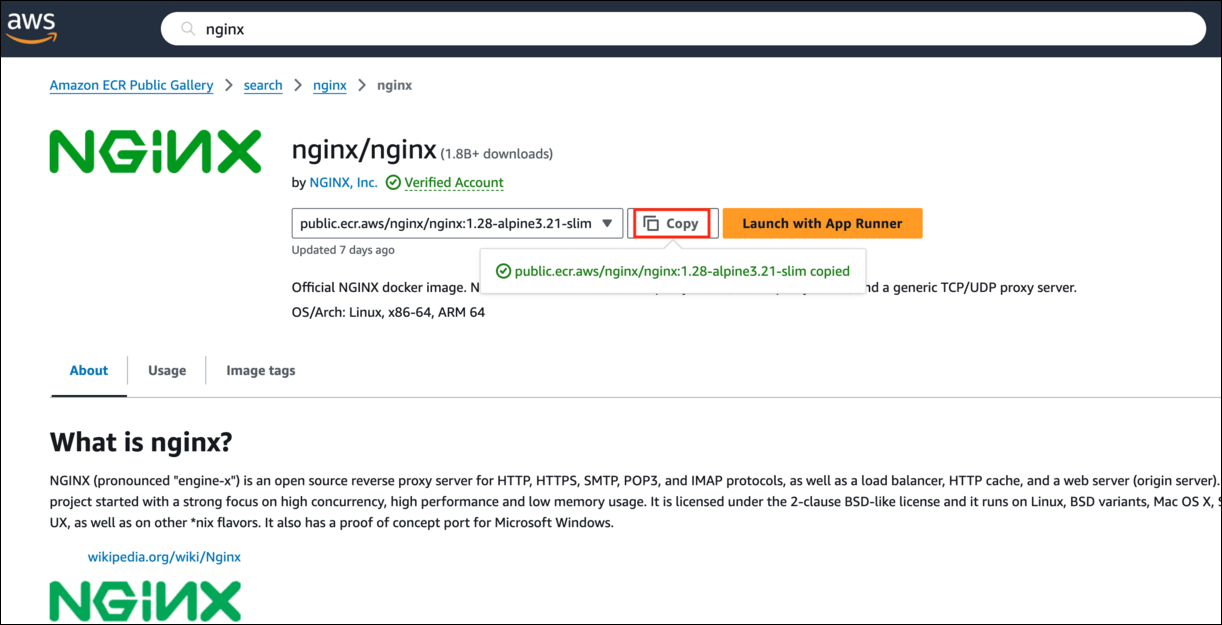
 7. Now go to [Link](https://gallery.ecr.aws/nginx/nginx) and search for **NGINX**, click on the first option, and copy the Image URL.
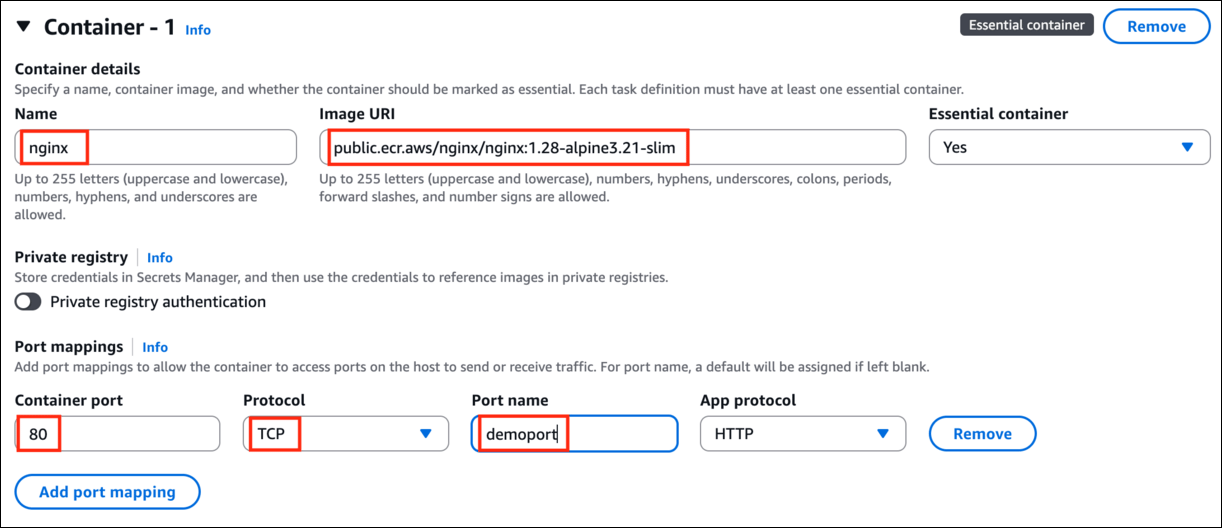
 8. Now under the Container section of the task definition, enter the name of the container as **nginx**, and paste the **Image URI** selected from the Amazon Public ECR Registry under the Image URI box.
9. Let the option of drop down under the Essential container be selected as ‘**Yes**’.
10. Under the port mappings section, let the Container port be **80**, protocol be **TCP**, enter the demo port name- **demoport** and ensure it to be in all small letters, otherwise it will give an error.
8. Now under the Container section of the task definition, enter the name of the container as **nginx**, and paste the **Image URI** selected from the Amazon Public ECR Registry under the Image URI box.
9. Let the option of drop down under the Essential container be selected as ‘**Yes**’.
10. Under the port mappings section, let the Container port be **80**, protocol be **TCP**, enter the demo port name- **demoport** and ensure it to be in all small letters, otherwise it will give an error.
 11. Leave everything as default and scroll down to the Storage section.
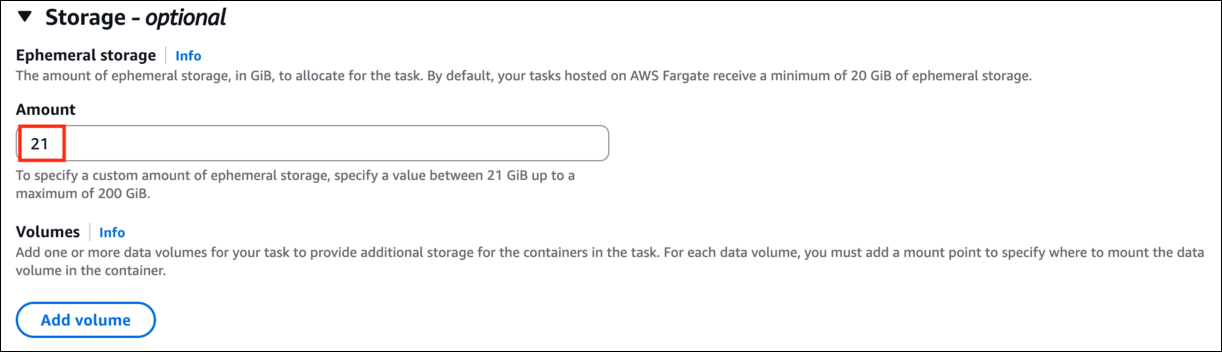
12. Under the **Amount option**, enter **21 GiB**. (which is the minimum amount of the volume which has to be allocated)
11. Leave everything as default and scroll down to the Storage section.
12. Under the **Amount option**, enter **21 GiB**. (which is the minimum amount of the volume which has to be allocated)
 13. Leave everything as default, and click on **Create** option.
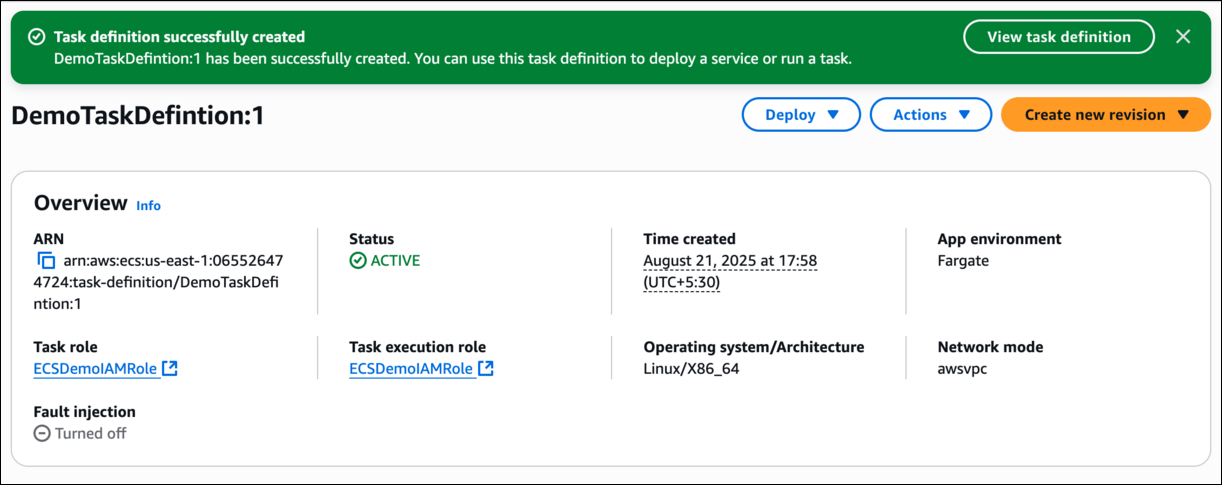
14. You will see a message of Task Definition being created and once it is created, go back to the cluster option.
13. Leave everything as default, and click on **Create** option.
14. You will see a message of Task Definition being created and once it is created, go back to the cluster option.
 #### Task 4: Run a Fargate task under cluster created
1. On the left sidebar, click on the **Clusters** option and select **DemoCluster.**
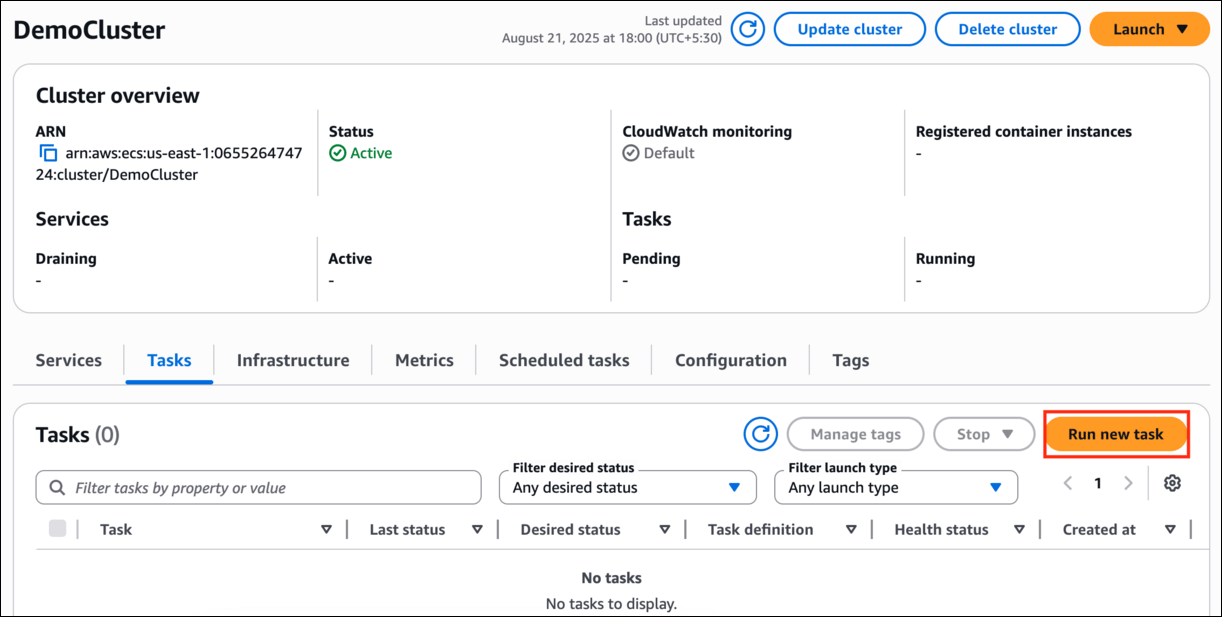
2. Click on the **Tasks** tab present below the Cluster Overview and click on **Run** a new Task
#### Task 4: Run a Fargate task under cluster created
1. On the left sidebar, click on the **Clusters** option and select **DemoCluster.**
2. Click on the **Tasks** tab present below the Cluster Overview and click on **Run** a new Task
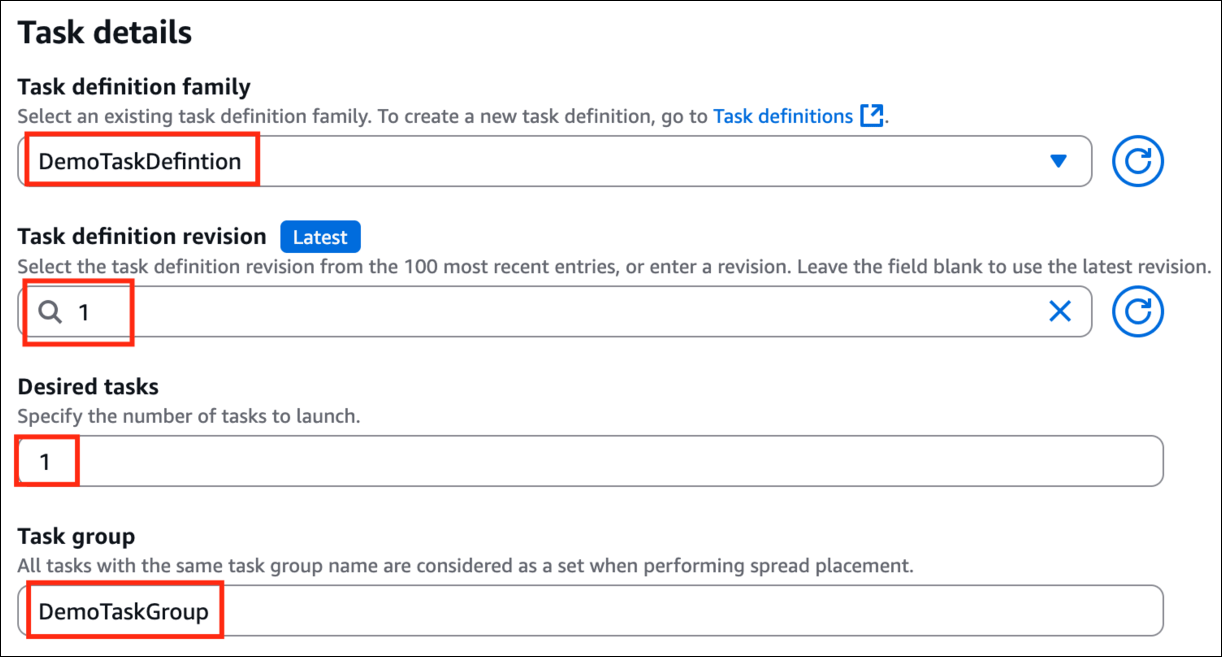
 3. Under Task details, Task definition family - enter **DemoTaskDefinition** and task definition revision, select **1 (LATEST)**.
4. Keep the desired task number to be **1**.
5. Task Group name - Enter **DemoTaskGroup**.
3. Under Task details, Task definition family - enter **DemoTaskDefinition** and task definition revision, select **1 (LATEST)**.
4. Keep the desired task number to be **1**.
5. Task Group name - Enter **DemoTaskGroup**.
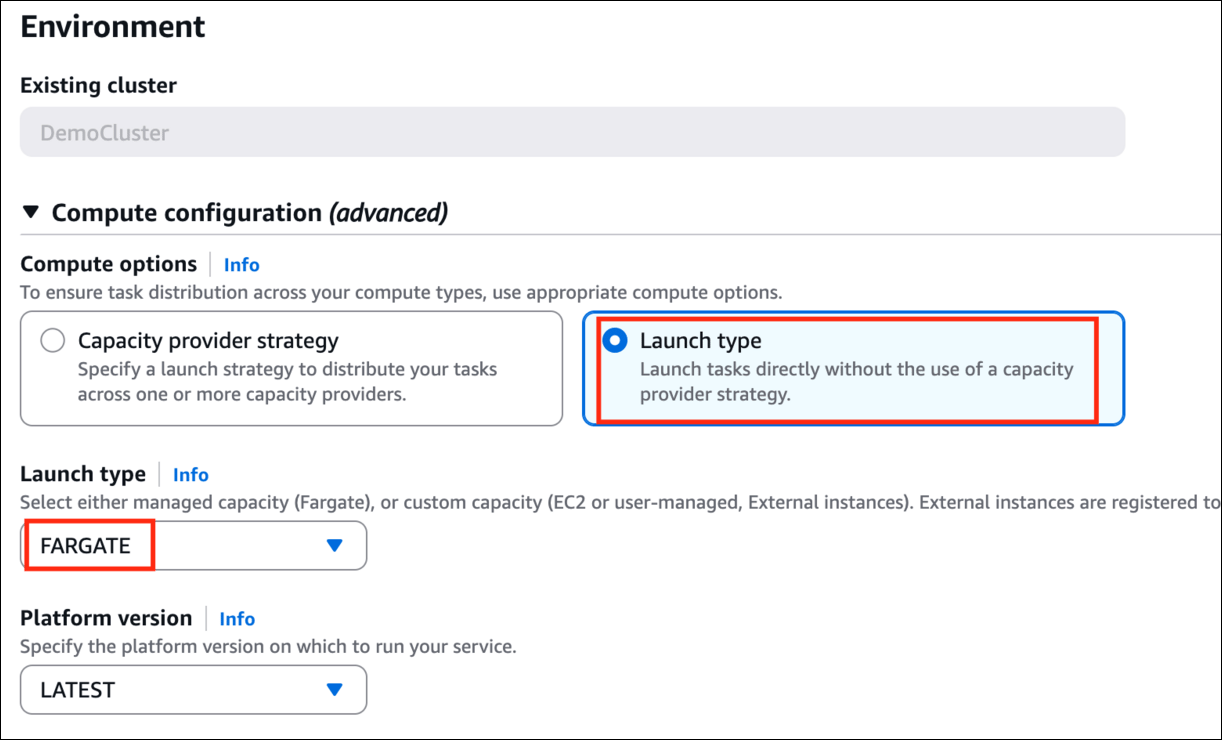
 6. Select Compute options as **Launch Type** and keep the Launch Type as **FARGATE**.
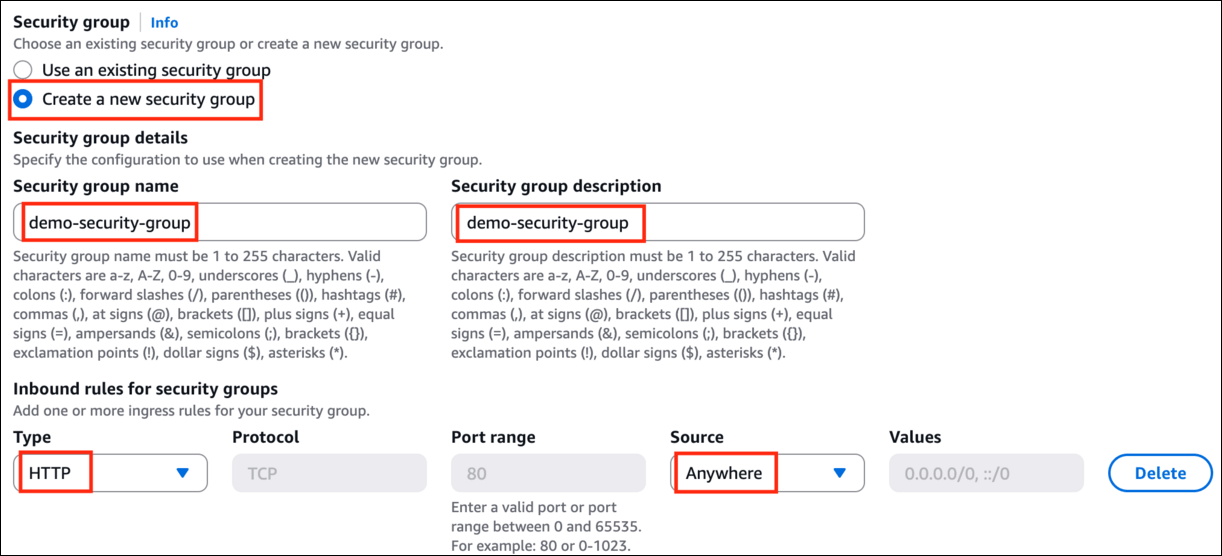
 7. Under **Networking** Section, select **new security group**. Enter the name as **demo-security-group** and the description as **demo-security-group**.
8. Select **HTTP as inbound rule** type and select the source as **Anywhere** from the drop-down menu.
7. Under **Networking** Section, select **new security group**. Enter the name as **demo-security-group** and the description as **demo-security-group**.
8. Select **HTTP as inbound rule** type and select the source as **Anywhere** from the drop-down menu.
 1
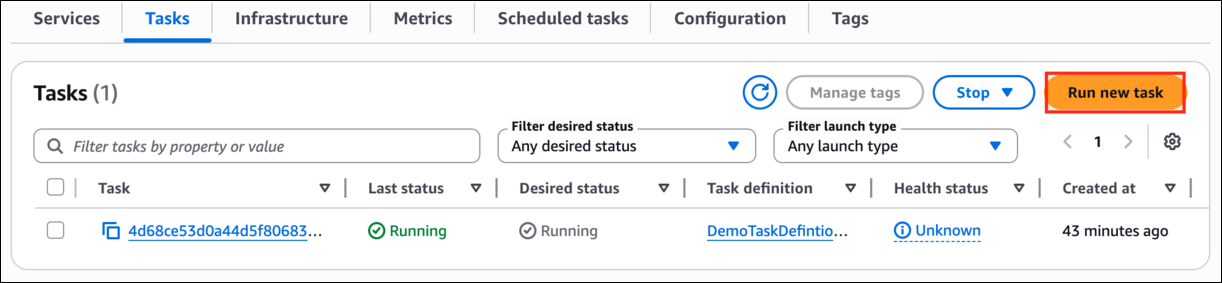
9. Leave everything as default and click on **Create**. You will be able to see the Task being launched and the status and desired state as running.
10. It will take **5 to 7 minutes** to reflect the Last Status as Running.
1
9. Leave everything as default and click on **Create**. You will be able to see the Task being launched and the status and desired state as running.
10. It will take **5 to 7 minutes** to reflect the Last Status as Running.
 #### Task 5: Attaching EBS Volume to the Task definition
1. Go to the **Task Definition** page.
2. Click on the Task Definition name, and select **Create a new revision**.
#### Task 5: Attaching EBS Volume to the Task definition
1. Go to the **Task Definition** page.
2. Click on the Task Definition name, and select **Create a new revision**.
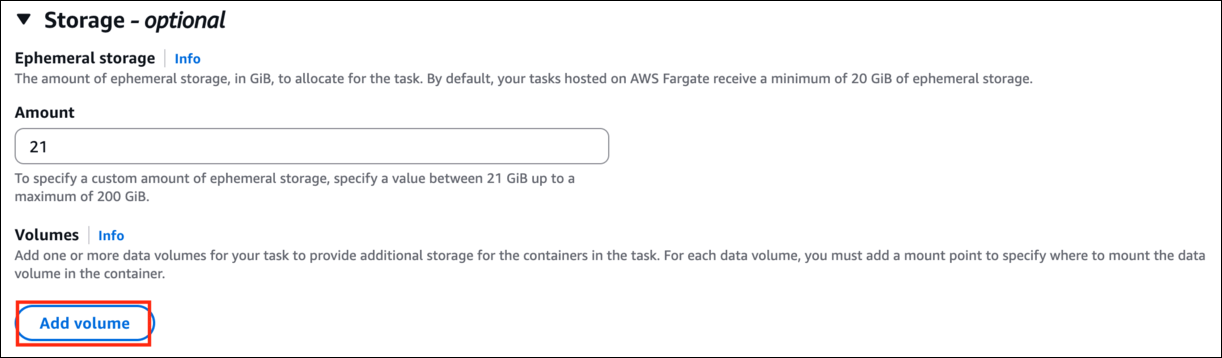
 3. Under the **Storage** section, click on **Add Volume** button.
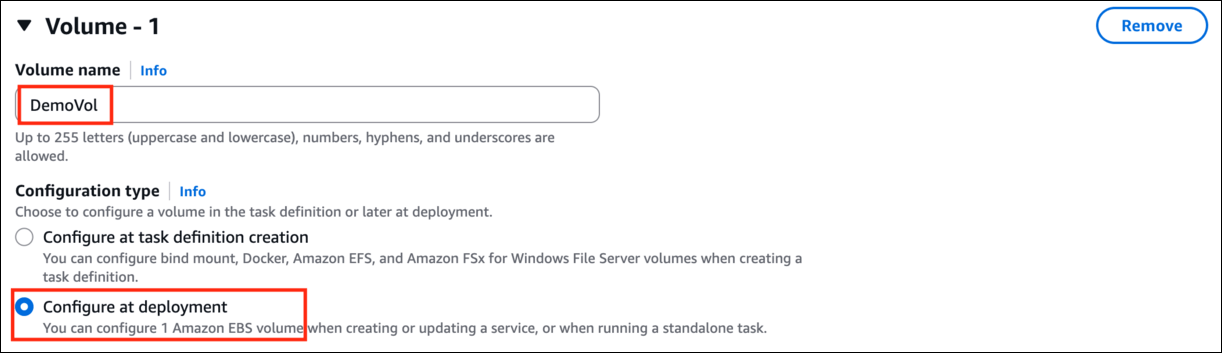
 4. Enter the name **DemoVol** in the Volume Name and select **Configure at deployment** option for configuration type, it configures **1 Amazon EBS volume** when creating or updating or running a standalone task.
 5. Under the **Container mount points**, click on **Add mount point**
* Container name: select **nginx**
* Source volume: select **DemoVol**
* Container path: enter **/data** as the container path where the mount will be added.
5. Under the **Container mount points**, click on **Add mount point**
* Container name: select **nginx**
* Source volume: select **DemoVol**
* Container path: enter **/data** as the container path where the mount will be added.
 6. Click on Create button to save the new revision of the task definition.
#### Task 6: Running a new task to the associated new revision of task definition with the EBS volume attached
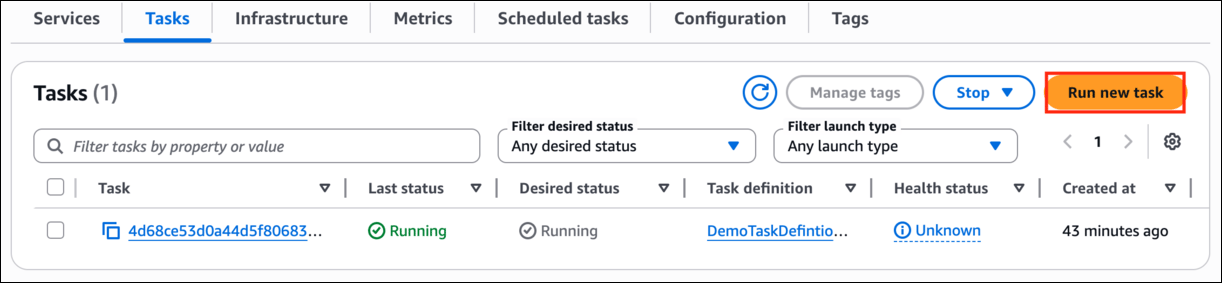
1. Navigate back to cluster and under the Task tab in the cluster, select the **Run new task** option.
6. Click on Create button to save the new revision of the task definition.
#### Task 6: Running a new task to the associated new revision of task definition with the EBS volume attached
1. Navigate back to cluster and under the Task tab in the cluster, select the **Run new task** option.
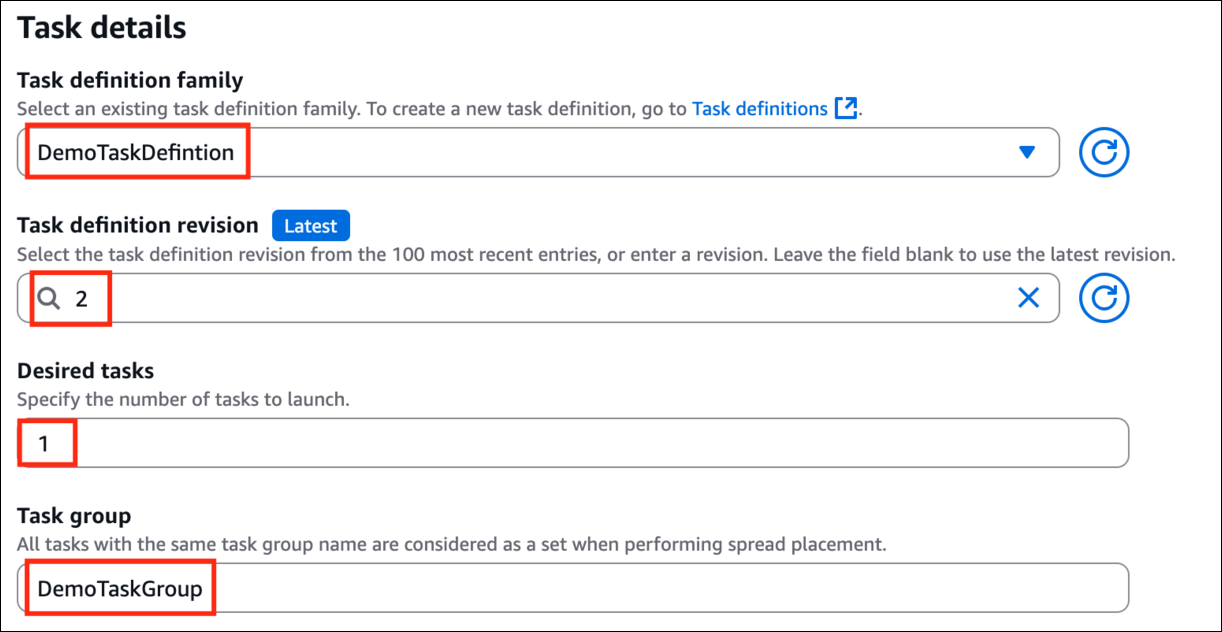
 2. Under Task details, Task definition family - enter **DemoTaskDefinition** and task definition revision, select **2(LATEST)**.
3. Keep the desired task number to be **1**.
4. Task Group name - Enter **DemoTaskGroup**.
2. Under Task details, Task definition family - enter **DemoTaskDefinition** and task definition revision, select **2(LATEST)**.
3. Keep the desired task number to be **1**.
4. Task Group name - Enter **DemoTaskGroup**.
 5. Select Compute options as **Launch Type** and keep the Launch Type as **FARGATE**.
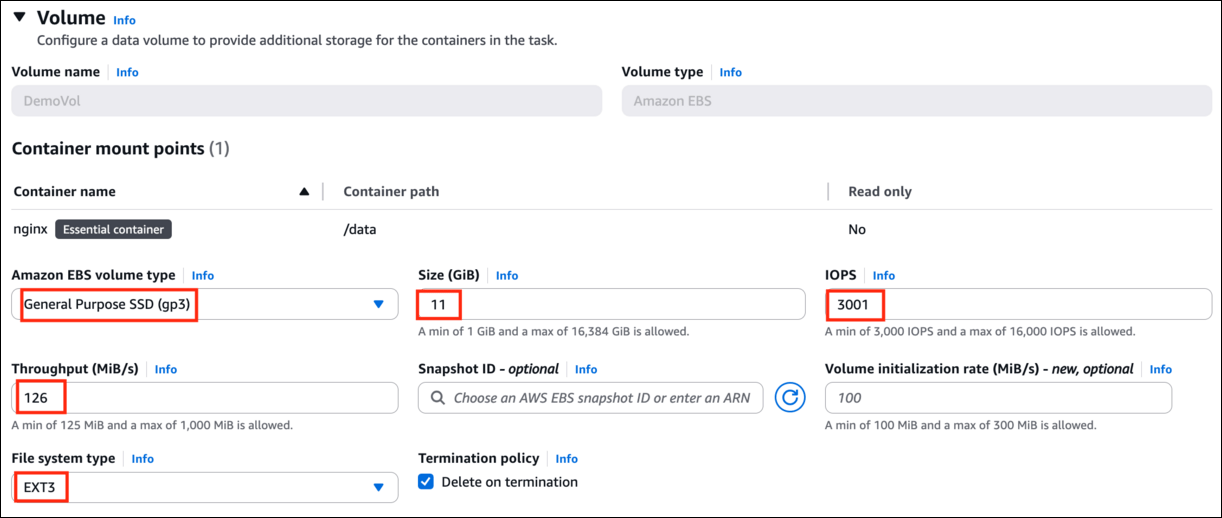
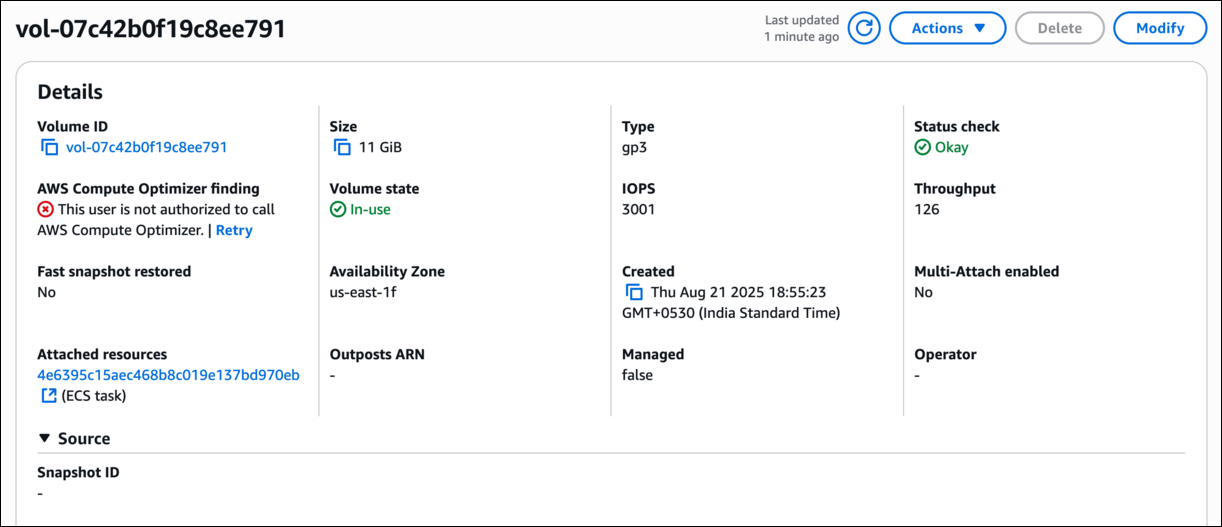
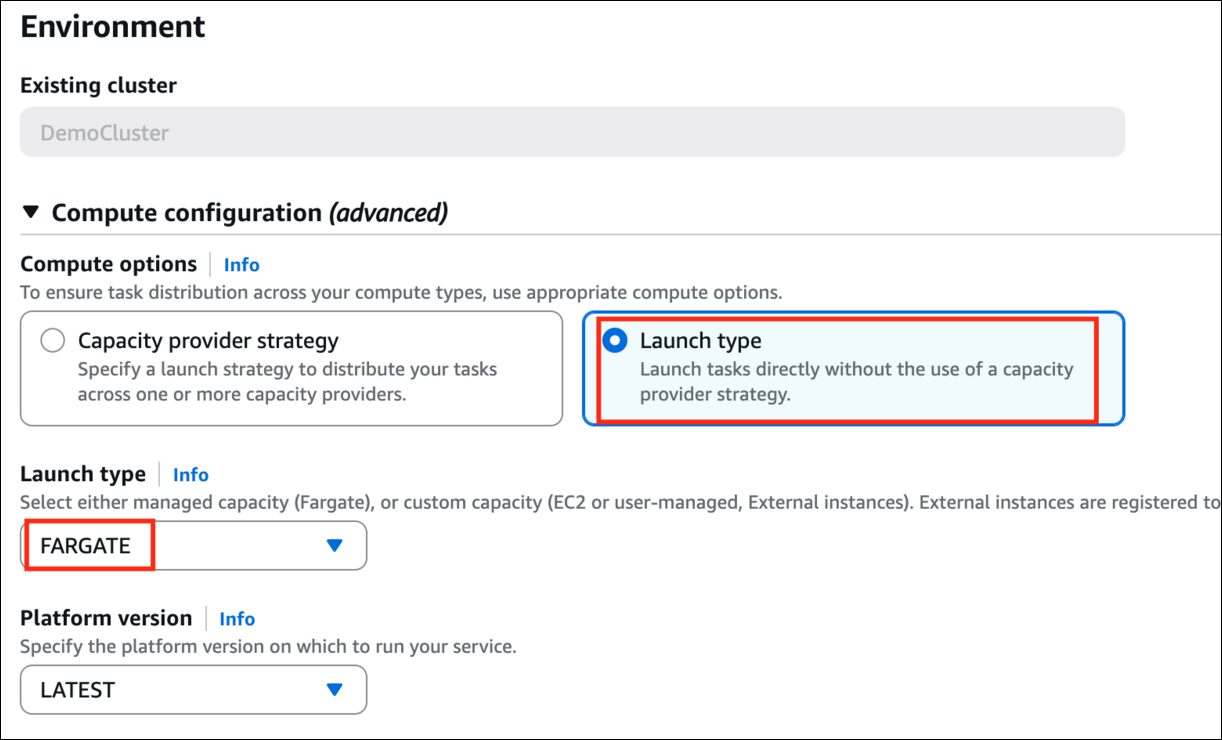 6. Open the **Volume section**, and choose **General Purpose SSD(gp3)** as the EBS Volume type, Size to be **11 GiB**, IOPS to be **3000 or above(choose 3001)**, Throughput to be **125 or above(choose 126)**, Choose File System type as **EXT3**.
 7. Choose the **Infrastructure role - ECSDemoIAMRole** already created for you.
 8. Leave everything as default and click on **Create**.
9. Now you will see the Task to be in the running stage after 5 to 7 minutes.
8. Leave everything as default and click on **Create**.
9. Now you will see the Task to be in the running stage after 5 to 7 minutes.
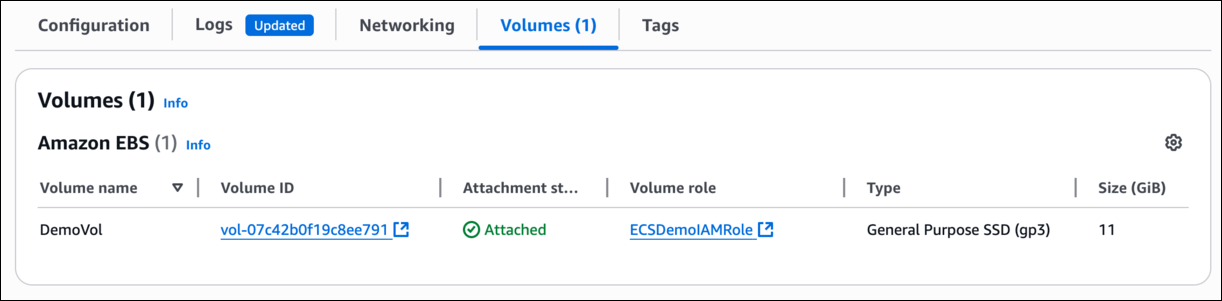
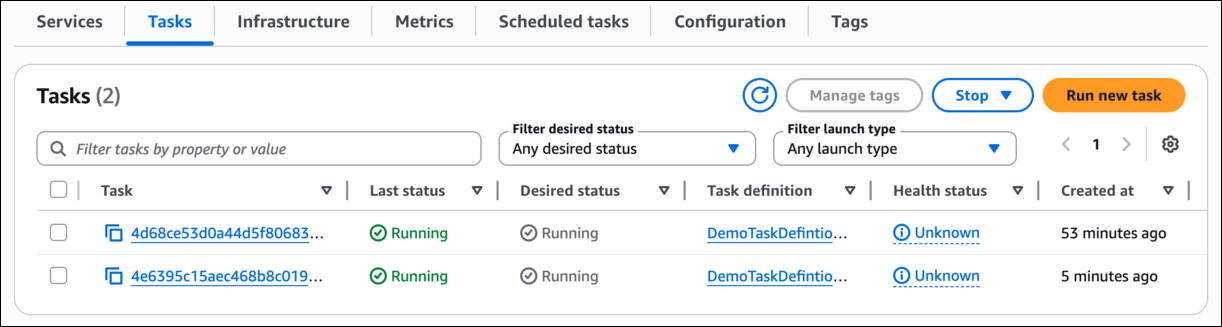 10. Select latest task and Click on the Volume tab and find the EBS Volume to be attached to the ECS Task.
 > **Do You Know:**
> Amazon ECS supports both Docker and Windows containers, allowing developers to run a wide range of applications in a unified environment while leveraging features like service discovery and load balancing for seamless scaling and management.
#### Completion and Conclusion
1. You have successfully created ECS Cluster.
2. You have successfully created ECS Task Definition.
3. You have successfully created an ECS Task.
4. You have successfully configured EBS Volume to the ECS Task.
#### End Lab
1. **Sign out** of AWS Account.
2. You have successfully completed the lab.
3. Once you have completed the steps, click on **End lab** from the IP Lab Portal dashboard.
## What gets checked
When you press **Check my work**, the platform verifies each of these:
* **Check ECS Cluster Exists** — Check ECS cluster is created or not
* **Check Fargate Cluster Active** — Check ECS cluster with Fargate launch type is active
* **Create ECS Task Definition** — Check whether ECS task definition created or not
## Related help
* [FAQs and Troubleshooting](/aws-saa/support/faqs-and-troubleshooting)
This documentation is built and hosted on [Mintlify](https://mintlify.com), a developer documentation platform.
> **Do You Know:**
> Amazon ECS supports both Docker and Windows containers, allowing developers to run a wide range of applications in a unified environment while leveraging features like service discovery and load balancing for seamless scaling and management.
#### Completion and Conclusion
1. You have successfully created ECS Cluster.
2. You have successfully created ECS Task Definition.
3. You have successfully created an ECS Task.
4. You have successfully configured EBS Volume to the ECS Task.
#### End Lab
1. **Sign out** of AWS Account.
2. You have successfully completed the lab.
3. Once you have completed the steps, click on **End lab** from the IP Lab Portal dashboard.
## What gets checked
When you press **Check my work**, the platform verifies each of these:
* **Check ECS Cluster Exists** — Check ECS cluster is created or not
* **Check Fargate Cluster Active** — Check ECS cluster with Fargate launch type is active
* **Create ECS Task Definition** — Check whether ECS task definition created or not
## Related help
* [FAQs and Troubleshooting](/aws-saa/support/faqs-and-troubleshooting)
This documentation is built and hosted on [Mintlify](https://mintlify.com), a developer documentation platform.