> ## Documentation Index
> Fetch the complete documentation index at: https://cloud-architect.ipoint-labs.com/llms.txt
> Use this file to discover all available pages before exploring further.
# Enable sticky sessions in Application Load balancer
> Hands-on lab · 30m
Launch this lab in the IP Lab Portal, then follow the steps below in the AWS console.
Open IP Lab Portal
## Overview
### Lab Details
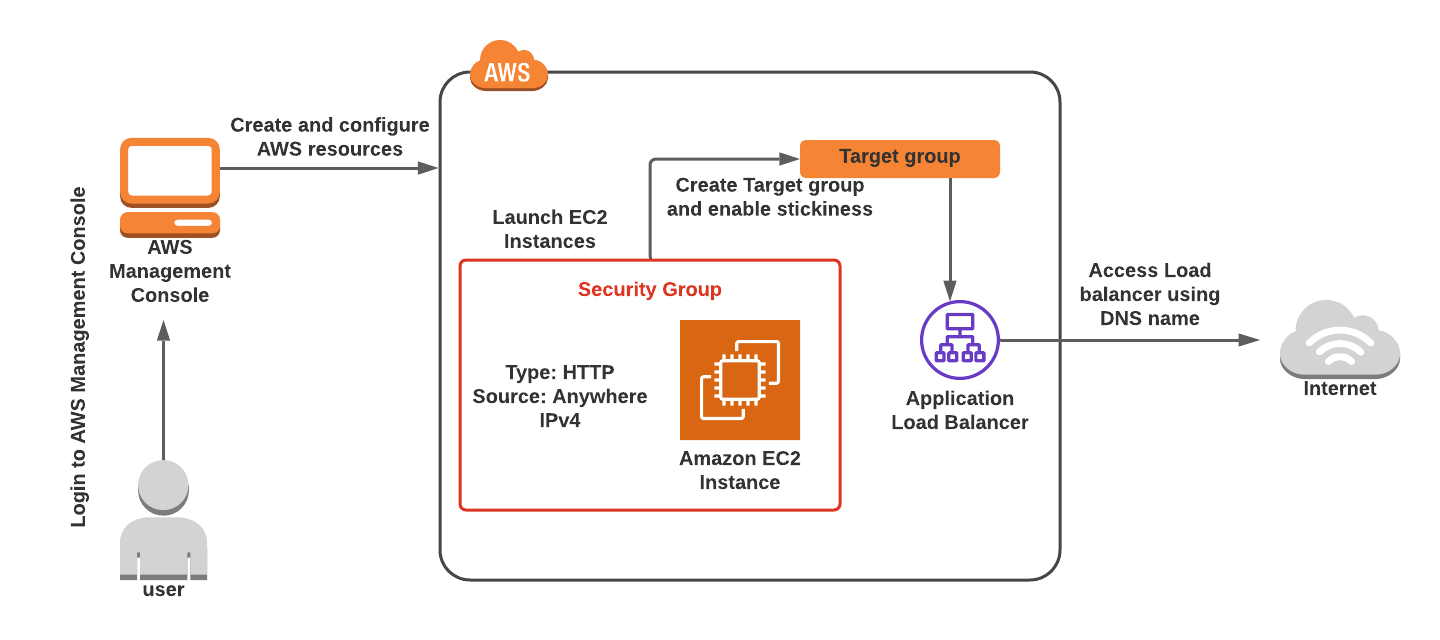
1. This lab walks you through the steps to create and configure a Stickiness in the Application load balancer's target group.
2. Duration: **90 minutes**
3. **AWS Region: US East (N. Virginia) us-east-1.**
### Introduction
#### What is Elastic Load Balancing?
* ELB is a service that automatically distributes incoming application traffic and scale resources to meet traffic demands.
* ELB helps in adjusting capacity according to incoming application and network traffic.
* ELB can be enabled within a single availability zone or across multiple availability zones to maintain consistent application performance.
* ELB offers features like:
* Detection of unhealthy EC2 instances.
* Spreading EC2 instances across healthy channels only.
* Centralized management of SSL certificates.
* Optional public key authentication.
* Support for both IPv4 and IPv6.
* ELB accepts incoming traffic from clients and routes requests to its registered targets.
* When an unhealthy target or instance is detected, ELB stops routing traffic to it and resumes only when the instance is healthy again.
* ELB monitors the health of its registered targets and ensures that the traffic is routed only to healthy instances.
* ELB's are configured to accept incoming traffic by specifying one or more **listeners**. A listener is a process that checks for connection requests.
**Architecture Diagram**
 ### Task Details
1. Sign in to the AWS management console
2. Create a Security Group for the load balancer and EC2 Instance
3. Launch 2 EC2 Instances
4. Create target group and application load balancer
5. Enable stickiness by modifying the Target Group attribute
6. Testing the stickiness
7. Delete AWS Resources
### Launching Lab Environment
1. To launch the lab environment, Click on the **Start lab** button.
2. Please wait until the cloud environment is provisioned. It will take less than a minute to provision.
3. Once the Lab is started, you will be provided with **IAM user name**, **Password**, **Access** **Key**, and **Secret** **Access** **Key**.
**Note** : You can only start one lab at any given time
## Lab guide
### Lab Steps
#### Task 1: Sign in to AWS Management Console
1. Click on the **Open Console** button, and you will get redirected to AWS Console in a new browser tab.
2. On the AWS sign-in page,
* Leave the Account ID as default. Never edit/remove the 12-digit Account ID present in the AWS Console. Otherwise, you cannot proceed with the lab.
* Now copy your **Username** and **Password** in the Lab Console to the **IAM Username and Password** in AWS Console and click on the **Sign-in** button.
3. Once Signed In to the AWS Management Console, make the default AWS Region as **US East (N. Virginia) us-east-1.**
> **Note:** If you face any issues, please go through [**FAQs and Troubleshooting for Labs**](https://play.whizlabs.com/site/task_support/faqs-and-troubleshooting).
#### Task 2: Create a Security Group for the Load balancer and EC2 Instance
In this task, we are going to create a Security Group that will control the inbound and outbound traffic for the load balancer and EC2 instances.
1. Make sure you are in the **N.Virginia** Region.
2. Navigate to **EC2** by clicking on the **Services** menu available under the **Compute** section.
3. On the left panel menu, select the **Security Groups** under the **Network & Security** section.
4. Click on the **Create security group** button.
5. We are going to create a Security group for the Launch template with port 80 number enabled.
* Security group name: Enter **ALB-EC2-SG**
* Description: Enter **Security group for the load balancer and EC2 Instance**
* VPC: Select **Default VPC**
* Click on the **Add rule** button under **Inbound rules.**
* Type : Select **HTTP**
* Source: Select **Anywhere- IPv4**
* **Note:** SSH port is not required.
6. Leave everything as default and click on the **Create security group** button.
#### Task 3: Launch 2 EC2 Instances
In this task, we are going to create the actual instances that will serve as the targets for the load balancer. This task also involves configuring the instances with Apache HTTP Server to serve a basic web page.
1. Make sure you are in the **US East (N. Virginia) us-east-1** Region.
2. Navigate to **EC2** by clicking on the **Services** menu in the top left, then click on **EC2** in the **Compute** section
3. Navigate to **Instances** on the left panel and click on **Launch Instances** button.
### Task Details
1. Sign in to the AWS management console
2. Create a Security Group for the load balancer and EC2 Instance
3. Launch 2 EC2 Instances
4. Create target group and application load balancer
5. Enable stickiness by modifying the Target Group attribute
6. Testing the stickiness
7. Delete AWS Resources
### Launching Lab Environment
1. To launch the lab environment, Click on the **Start lab** button.
2. Please wait until the cloud environment is provisioned. It will take less than a minute to provision.
3. Once the Lab is started, you will be provided with **IAM user name**, **Password**, **Access** **Key**, and **Secret** **Access** **Key**.
**Note** : You can only start one lab at any given time
## Lab guide
### Lab Steps
#### Task 1: Sign in to AWS Management Console
1. Click on the **Open Console** button, and you will get redirected to AWS Console in a new browser tab.
2. On the AWS sign-in page,
* Leave the Account ID as default. Never edit/remove the 12-digit Account ID present in the AWS Console. Otherwise, you cannot proceed with the lab.
* Now copy your **Username** and **Password** in the Lab Console to the **IAM Username and Password** in AWS Console and click on the **Sign-in** button.
3. Once Signed In to the AWS Management Console, make the default AWS Region as **US East (N. Virginia) us-east-1.**
> **Note:** If you face any issues, please go through [**FAQs and Troubleshooting for Labs**](https://play.whizlabs.com/site/task_support/faqs-and-troubleshooting).
#### Task 2: Create a Security Group for the Load balancer and EC2 Instance
In this task, we are going to create a Security Group that will control the inbound and outbound traffic for the load balancer and EC2 instances.
1. Make sure you are in the **N.Virginia** Region.
2. Navigate to **EC2** by clicking on the **Services** menu available under the **Compute** section.
3. On the left panel menu, select the **Security Groups** under the **Network & Security** section.
4. Click on the **Create security group** button.
5. We are going to create a Security group for the Launch template with port 80 number enabled.
* Security group name: Enter **ALB-EC2-SG**
* Description: Enter **Security group for the load balancer and EC2 Instance**
* VPC: Select **Default VPC**
* Click on the **Add rule** button under **Inbound rules.**
* Type : Select **HTTP**
* Source: Select **Anywhere- IPv4**
* **Note:** SSH port is not required.
6. Leave everything as default and click on the **Create security group** button.
#### Task 3: Launch 2 EC2 Instances
In this task, we are going to create the actual instances that will serve as the targets for the load balancer. This task also involves configuring the instances with Apache HTTP Server to serve a basic web page.
1. Make sure you are in the **US East (N. Virginia) us-east-1** Region.
2. Navigate to **EC2** by clicking on the **Services** menu in the top left, then click on **EC2** in the **Compute** section
3. Navigate to **Instances** on the left panel and click on **Launch Instances** button.
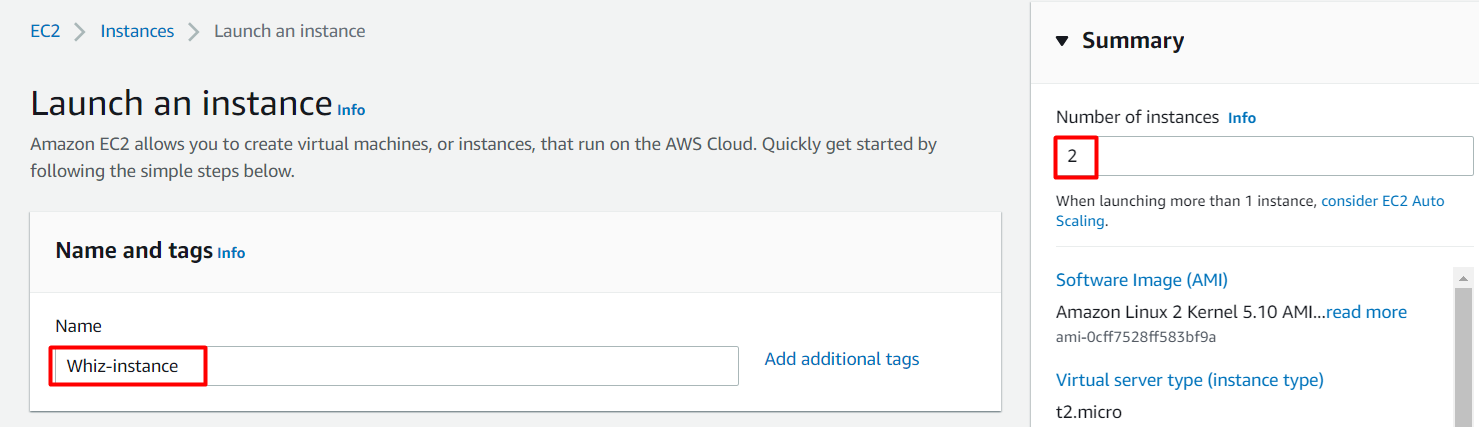
 4. Under the **Name and tags** section :
* Name : **Whiz-instance**
* **In Summary provide 2 instances.**
4. Under the **Name and tags** section :
* Name : **Whiz-instance**
* **In Summary provide 2 instances.**
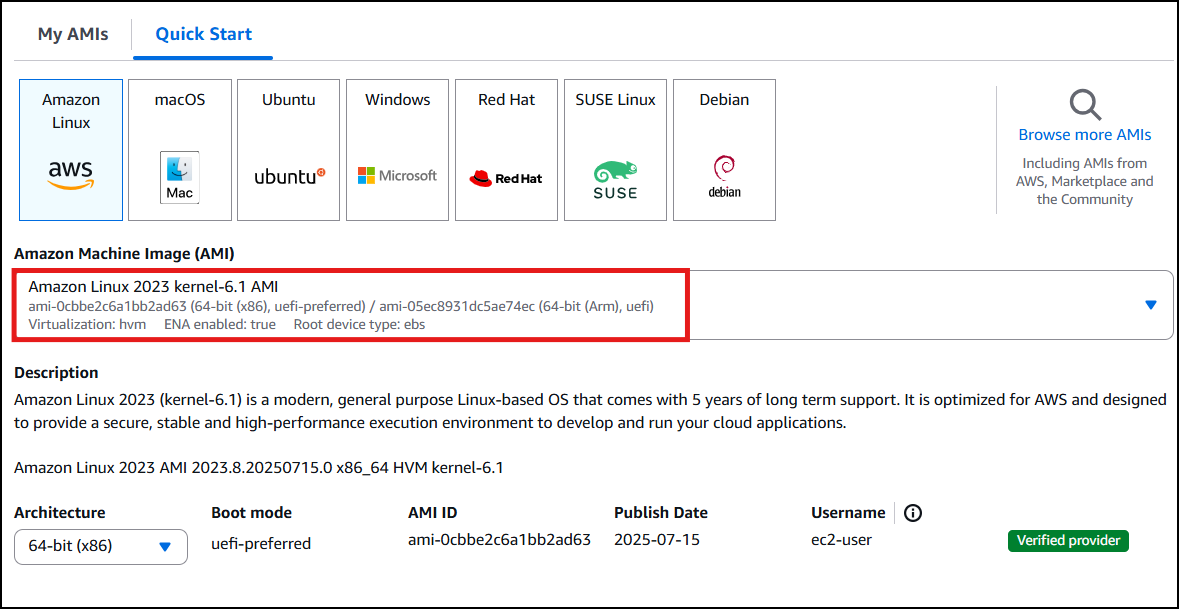
 5. Under the **Application and OS Images (Amazon Machine Image)** section :
* Select **Quick Start** tab and choose **Amazon Linux 2023 kernel-6.1** under it.
5. Under the **Application and OS Images (Amazon Machine Image)** section :
* Select **Quick Start** tab and choose **Amazon Linux 2023 kernel-6.1** under it.
 6. Under the **Instance Type** section **:**
* Instance Type : Select **t2.micro**
7. Under the **Key Pair (login)** section **:**
* No need to generate keypair: Select **Proceed without a KeyPair**
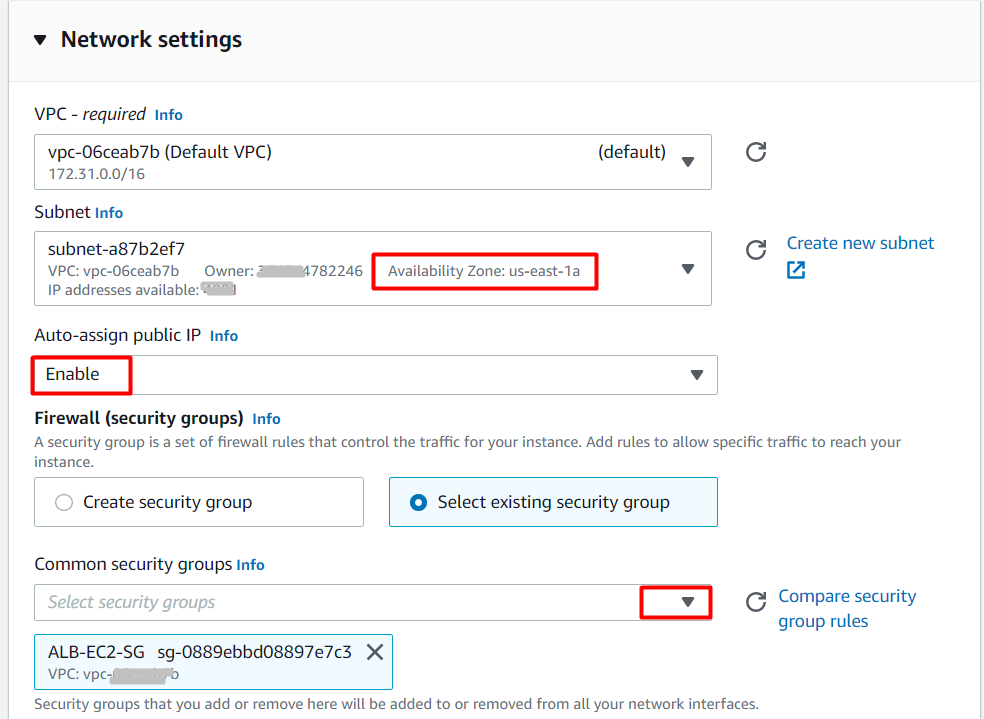
8. Under the **Network Settings** section **:**
* Click on **Edit** button
* Leave the default VPC as it is.
* Under subnets, select **us-east-1a**.
* Auto-assign public IP: select **Enable**
* Firewall (security groups) : Choose **Select existing security group**
* Common security groups : Select Security group with name **ALB-EC2-SG**
6. Under the **Instance Type** section **:**
* Instance Type : Select **t2.micro**
7. Under the **Key Pair (login)** section **:**
* No need to generate keypair: Select **Proceed without a KeyPair**
8. Under the **Network Settings** section **:**
* Click on **Edit** button
* Leave the default VPC as it is.
* Under subnets, select **us-east-1a**.
* Auto-assign public IP: select **Enable**
* Firewall (security groups) : Choose **Select existing security group**
* Common security groups : Select Security group with name **ALB-EC2-SG**
 9. Expand **Advanced Details** and under the **User data:** section, enter the following script to create an HTML page served by an Apache httpd web server
\#!/bin/bash
sudo su
yum update -y
yum install httpd -y
echo "Hello World from \$(hostname -f)" > /var/www/html/index.html
systemctl start httpd
systemctl enable http
10. Keep everything else as default and click on the **Launch instance** button.
11. **Launch Status:** Your instance is now launching, Navigate to **Instances** page from the left menu and wait until the status of the EC2 Instance changes to **running**.
9. Expand **Advanced Details** and under the **User data:** section, enter the following script to create an HTML page served by an Apache httpd web server
\#!/bin/bash
sudo su
yum update -y
yum install httpd -y
echo "Hello World from \$(hostname -f)" > /var/www/html/index.html
systemctl start httpd
systemctl enable http
10. Keep everything else as default and click on the **Launch instance** button.
11. **Launch Status:** Your instance is now launching, Navigate to **Instances** page from the left menu and wait until the status of the EC2 Instance changes to **running**.
 #### Task 4: Create target groups and application load balancer
In this task, we are going to create a target group, which is a logical grouping of the EC2 instances that will receive traffic from the load balancer. Additionally, we will create an Application Load Balancer (ALB) that will distribute the incoming traffic to the target group. This task sets up the core components of load balancing.
1. In the **EC2** Console, Navigate to **Target Groups**, present in the left panel under **Load Balancing**.
2. Click on the **Create target group** button.
#### Task 4: Create target groups and application load balancer
In this task, we are going to create a target group, which is a logical grouping of the EC2 instances that will receive traffic from the load balancer. Additionally, we will create an Application Load Balancer (ALB) that will distribute the incoming traffic to the target group. This task sets up the core components of load balancing.
1. In the **EC2** Console, Navigate to **Target Groups**, present in the left panel under **Load Balancing**.
2. Click on the **Create target group** button.
 3. For **Step 1, Specify group details**
* **Under Basic configurations**
* Choose a target group : Choose **Instances**
* Target group name : Enter **EC2-TG**
* **Keep all the settings as default.**
* Scroll to the end of the page and click on the **Next** button.
4. For **Step 2, Register targets**
* Select **both** the EC2 Instances and click on **Include as pending below** button
* Click on the **Create target group** button.
5. **The Target group is now created.**
6. In the EC2 console, navigate to **Load Balancers** in the left-side panel.
7. Click on **Create load balancer** at the top-left to create a new load balancer for our web servers.
3. For **Step 1, Specify group details**
* **Under Basic configurations**
* Choose a target group : Choose **Instances**
* Target group name : Enter **EC2-TG**
* **Keep all the settings as default.**
* Scroll to the end of the page and click on the **Next** button.
4. For **Step 2, Register targets**
* Select **both** the EC2 Instances and click on **Include as pending below** button
* Click on the **Create target group** button.
5. **The Target group is now created.**
6. In the EC2 console, navigate to **Load Balancers** in the left-side panel.
7. Click on **Create load balancer** at the top-left to create a new load balancer for our web servers.
 8. **Select Load Balancer Type**: Under the **Application Load Balancer**, click on **Create** Button.
9. For the **Basic configuration** section,
* Name: Enter **Web-server-LB**
* Scheme: Select **Internet-facing**
* IP address type: Choose **IPv4**
10. For the **Network mapping** section:
* VPC: Select **Default**
* Mappings: Choose **us-east-1a** and **us-east-1b**
* **Note:** we must specify the availability zones in which the load balancer needs to be enabled, making route traffic only to targets launched in those availability zones. You must include subnets from a minimum of two Availability zones to make our Load balancer Highly-Available.
* For the Security groups section, Select the **ALB-EC2-SG Security group** from the dropdown and **remove the default security group**.
* For the **Listeners and routing** section,
* The first listener is already present with Protocol **HTTP** and Port **80**.
* **Select the target group EC2-TG for the Default action forwards to option.**
11. Keep the tags as default and click on the **Create load balancer** button in the bottom right corner.
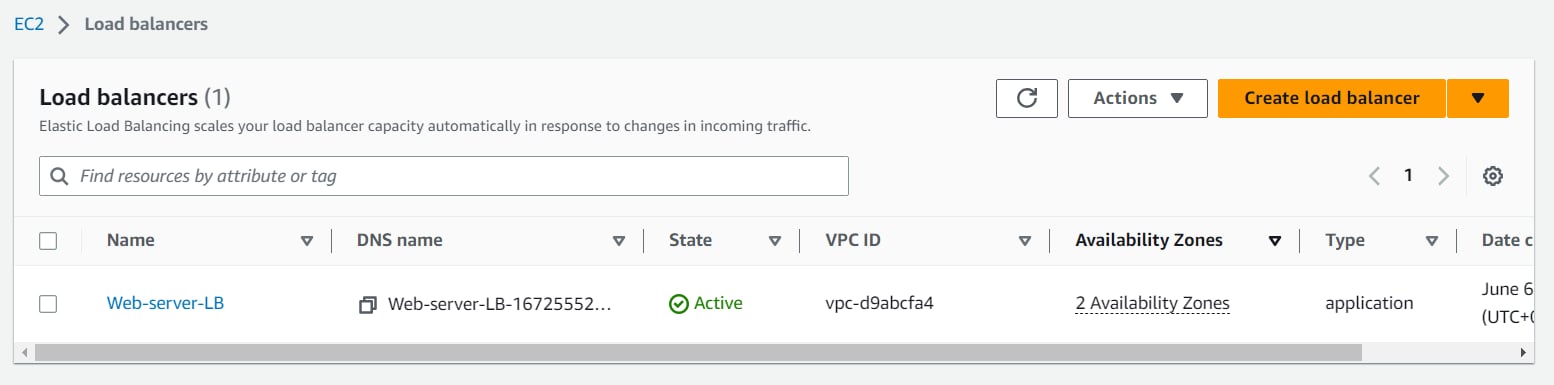
12. **You** **have successfully created the Application Load balancer.** Click on the **View load balancers button.**
13. Wait for 2 to 3 minutes for the load balancer to become **Active**.
8. **Select Load Balancer Type**: Under the **Application Load Balancer**, click on **Create** Button.
9. For the **Basic configuration** section,
* Name: Enter **Web-server-LB**
* Scheme: Select **Internet-facing**
* IP address type: Choose **IPv4**
10. For the **Network mapping** section:
* VPC: Select **Default**
* Mappings: Choose **us-east-1a** and **us-east-1b**
* **Note:** we must specify the availability zones in which the load balancer needs to be enabled, making route traffic only to targets launched in those availability zones. You must include subnets from a minimum of two Availability zones to make our Load balancer Highly-Available.
* For the Security groups section, Select the **ALB-EC2-SG Security group** from the dropdown and **remove the default security group**.
* For the **Listeners and routing** section,
* The first listener is already present with Protocol **HTTP** and Port **80**.
* **Select the target group EC2-TG for the Default action forwards to option.**
11. Keep the tags as default and click on the **Create load balancer** button in the bottom right corner.
12. **You** **have successfully created the Application Load balancer.** Click on the **View load balancers button.**
13. Wait for 2 to 3 minutes for the load balancer to become **Active**.
 #### Task 5: Enable stickiness by modifying the Target Group attribute
In this task, we are going to enable stickiness in the target group by modifying its attributes. Stickiness ensures that subsequent requests from the same client are routed to the same target instance for a specified duration. This can be useful in scenarios where maintaining session persistence or affinity is important.
1. In the **EC2** Console, Navigate to **Target Groups**, present in the left panel under **Load Balancing**.
2. Click on the name of the Target group created.
3. In the Targets tab, make sure the status is Healthy for both instances.
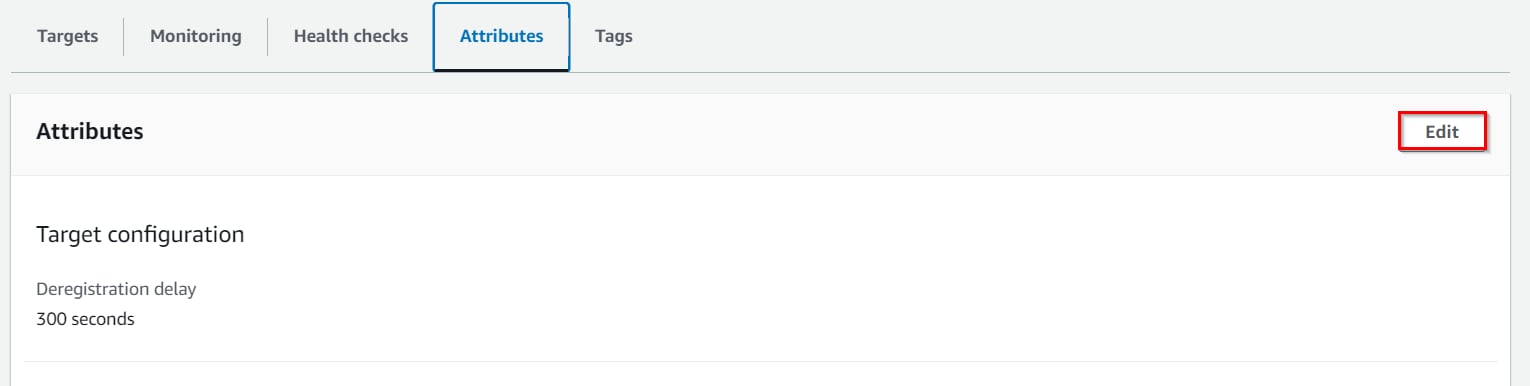
4. Now switch to the Attributes tab and click on the **Edit** button.
#### Task 5: Enable stickiness by modifying the Target Group attribute
In this task, we are going to enable stickiness in the target group by modifying its attributes. Stickiness ensures that subsequent requests from the same client are routed to the same target instance for a specified duration. This can be useful in scenarios where maintaining session persistence or affinity is important.
1. In the **EC2** Console, Navigate to **Target Groups**, present in the left panel under **Load Balancing**.
2. Click on the name of the Target group created.
3. In the Targets tab, make sure the status is Healthy for both instances.
4. Now switch to the Attributes tab and click on the **Edit** button.
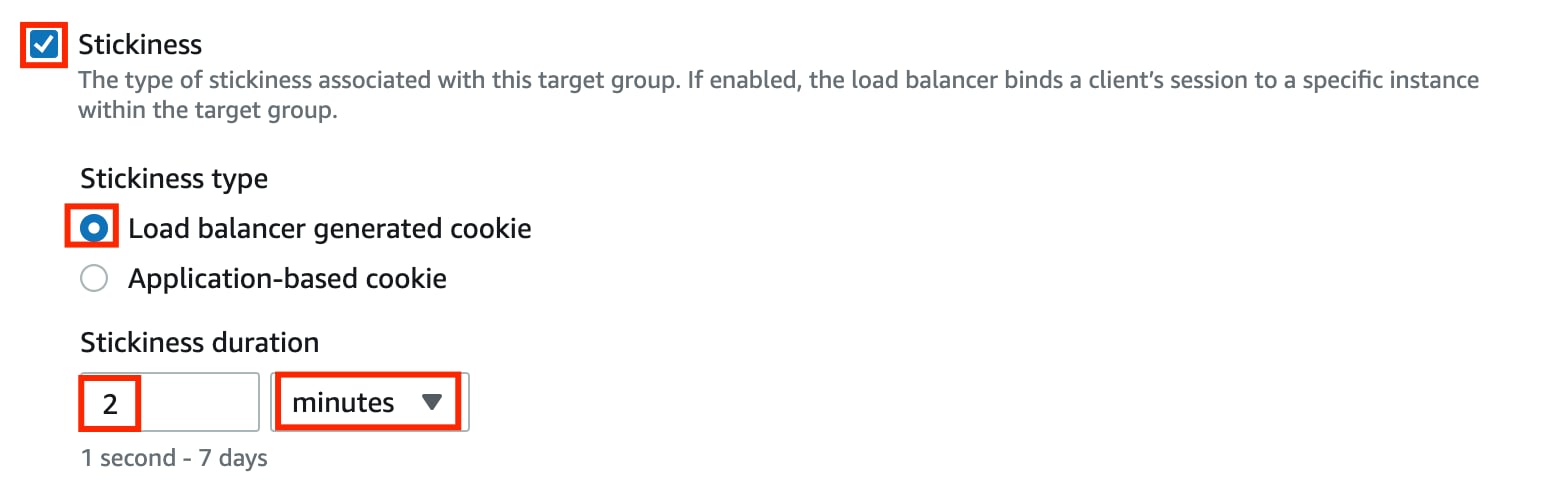
 5. On the Edit attributes page, **check the option** of Stickiness.
6. Keep the stickiness type as Load balancer generated cookie and update the stickiness duration to 2 minutes.
5. On the Edit attributes page, **check the option** of Stickiness.
6. Keep the stickiness type as Load balancer generated cookie and update the stickiness duration to 2 minutes.
 7. Once done, click on the **Save changes** button.
#### Task 6: Testing the stickiness
In this task, we are going to test the stickiness feature by accessing the ALB's DNS name and verifying that requests from the same client are consistently routed to the same target instance within the specified duration.
1. In the EC2 console, navigate to **Load Balancers** in the left-side panel.
2. Select the Load balancer present and copy the DNS name of your load balancer, and paste it into the browser.
3. The load balancer will stick to an instance for the duration of 2 minutes, keep refreshing and the instance will not change.
7. Once done, click on the **Save changes** button.
#### Task 6: Testing the stickiness
In this task, we are going to test the stickiness feature by accessing the ALB's DNS name and verifying that requests from the same client are consistently routed to the same target instance within the specified duration.
1. In the EC2 console, navigate to **Load Balancers** in the left-side panel.
2. Select the Load balancer present and copy the DNS name of your load balancer, and paste it into the browser.
3. The load balancer will stick to an instance for the duration of 2 minutes, keep refreshing and the instance will not change.
 4. After 2 minutes, it should be redirected to a new page.
 ####
#### Task 7: Delete AWS Resources
##### 8.1: Terminating EC2 Instanes:
1. In the EC2 console, navigate to **Instances**.
2. To terminate both instances at once, follow the steps presented below.
* **Select** both the Instances,
* Click on the **Instance state** option present in the menu,
* Choose the option of **Terminate instances**,
* In the pop-up menu, click on the **Terminate** button.
3. Instances will be terminated in a few minutes.
##### 8.2 Delete Load balancer
1. In the EC2 console, navigate to **Load Balancers** in the left-side panel.
2. **Web-server-LB** will be listed here.
3. To **delete** the load balancer, need to perform the following actions:
* **Select** the load balancer,
* Click on the **Actions** button,
* select the **Delete load balancer** option.
4. Confirm by entering **confirm** on the pop-up and click on Delete button
5. MyNetwork-LB will be deleted immediately.
##### 8.3 Delete Target group
1. In the EC2 console, navigate to **Target Groups** in the left-side panel.
2. **EC2-TG** will be listed here.
3. To **delete** the target group, need to perform the following actions:
* **Select** the target group,
* Click on the **Actions** button,
* select the **Delete** option.
4. Confirm by clicking on the **Yes, Delete** button when a pop-up is shown.
5. The target group will be deleted immediately.
> ##### Do You Know?
>
> When stickiness is enabled in an ALB, the ALB generates a cookie and includes it in the response to the client. The client then includes this cookie in subsequent requests to the ALB. The ALB uses this cookie to associate the client with a specific target instance and ensures that subsequent requests from the same client are routed to the same instance.
### Completion and Conclusion
1. You have successfully created a security group for EC2 and Load balancer
2. You have successfully launched 2 EC2 Instances.
3. You have successfully created a target group and Application load balancer.
4. You have successfully enabled the stickiness and tested using the load balancer DNS name.
### End Lab
1. Sign out of AWS Account.
2. You have successfully completed the lab.
3. Once you have completed the steps, click on **End lab** from your IP Lab Portal and wait till the process gets completed.
## What gets checked
When you press **Check my work**, the platform verifies each of these:
* **Launch an EC2 Instance** — Check whether an EC2 Instance is launched or not.
* **Create ELB Target Group** — Check if given type of Load Balancer is created or not.
* **Create a Application Load Balancer** — Check if given type of Load Balancer is created or not.
## Related help
* [FAQs and Troubleshooting](/aws-saa/support/faqs-and-troubleshooting)
This documentation is built and hosted on [Mintlify](https://mintlify.com), a developer documentation platform.
####
#### Task 7: Delete AWS Resources
##### 8.1: Terminating EC2 Instanes:
1. In the EC2 console, navigate to **Instances**.
2. To terminate both instances at once, follow the steps presented below.
* **Select** both the Instances,
* Click on the **Instance state** option present in the menu,
* Choose the option of **Terminate instances**,
* In the pop-up menu, click on the **Terminate** button.
3. Instances will be terminated in a few minutes.
##### 8.2 Delete Load balancer
1. In the EC2 console, navigate to **Load Balancers** in the left-side panel.
2. **Web-server-LB** will be listed here.
3. To **delete** the load balancer, need to perform the following actions:
* **Select** the load balancer,
* Click on the **Actions** button,
* select the **Delete load balancer** option.
4. Confirm by entering **confirm** on the pop-up and click on Delete button
5. MyNetwork-LB will be deleted immediately.
##### 8.3 Delete Target group
1. In the EC2 console, navigate to **Target Groups** in the left-side panel.
2. **EC2-TG** will be listed here.
3. To **delete** the target group, need to perform the following actions:
* **Select** the target group,
* Click on the **Actions** button,
* select the **Delete** option.
4. Confirm by clicking on the **Yes, Delete** button when a pop-up is shown.
5. The target group will be deleted immediately.
> ##### Do You Know?
>
> When stickiness is enabled in an ALB, the ALB generates a cookie and includes it in the response to the client. The client then includes this cookie in subsequent requests to the ALB. The ALB uses this cookie to associate the client with a specific target instance and ensures that subsequent requests from the same client are routed to the same instance.
### Completion and Conclusion
1. You have successfully created a security group for EC2 and Load balancer
2. You have successfully launched 2 EC2 Instances.
3. You have successfully created a target group and Application load balancer.
4. You have successfully enabled the stickiness and tested using the load balancer DNS name.
### End Lab
1. Sign out of AWS Account.
2. You have successfully completed the lab.
3. Once you have completed the steps, click on **End lab** from your IP Lab Portal and wait till the process gets completed.
## What gets checked
When you press **Check my work**, the platform verifies each of these:
* **Launch an EC2 Instance** — Check whether an EC2 Instance is launched or not.
* **Create ELB Target Group** — Check if given type of Load Balancer is created or not.
* **Create a Application Load Balancer** — Check if given type of Load Balancer is created or not.
## Related help
* [FAQs and Troubleshooting](/aws-saa/support/faqs-and-troubleshooting)
This documentation is built and hosted on [Mintlify](https://mintlify.com), a developer documentation platform.