> ## Documentation Index
> Fetch the complete documentation index at: https://cloud-architect.ipoint-labs.com/llms.txt
> Use this file to discover all available pages before exploring further.
# Introduction to Amazon API Gateway
> Hands-on lab · 15m
Launch this lab in the IP Lab Portal, then follow the steps below in the AWS console.
Open IP Lab Portal
## Overview
### Lab Details
1. This lab walks you through the steps to Create API Gateway.
2. You will practice using Amazon API Gateway.
3. Duration: **15 minutes**
4. AWS Region: **US East (N. Virginia) us-east-1**
### Introduction
#### Amazon API Gateway
* Amazon API Gateway is a **fully managed service** that makes it easy for developers to create, publish, maintain, monitor, and secure APIs at any scale.
* APIs act as the **front door** for applications to access data, business logic, or functionality from your backend services.
* API Gateway handles all the tasks involved in accepting and processing up to hundreds of thousands of concurrent API calls, including traffic management, CORS support, authorization and access control, throttling, monitoring, and API version management.
* Using API Gateway, you can create RESTful APIs and WebSocket APIs that enable real-time two-way communication applications. API Gateway supports containerized and serverless workloads, as well as web applications.
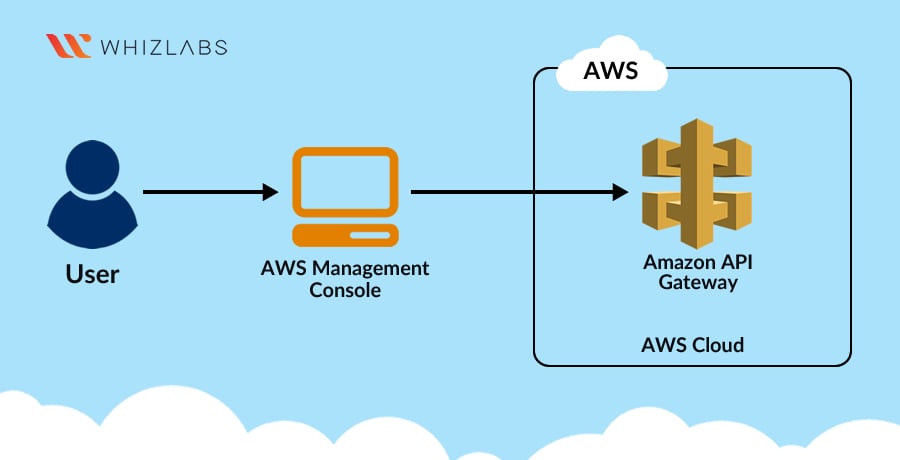
### Architecture Diagram
 ### Task Details
1. Sign into AWS Management Console.
2. Create a new API.
### Launching Lab Environment
1. To launch the lab environment, Click on the Start Lab button.
2. Please wait until the cloud environment is provisioned. It will take less than a minute to provision.
3. Once the Lab is started, you will be provided with **IAM user name**, **Password**, **Access** **Key**, and **Secret** **Access** **Key**.
> **Note** : You can only start one lab at any given time
## Lab guide
### Lab Steps
#### Task 1: Sign in to AWS Management Console
1. Click on the **Open Console** button, and you will get redirected to AWS Console in a new browser tab.
2. On the AWS sign-in page,
* Leave the Account ID as default. Never edit/remove the 12 digit Account ID present in the AWS Console. otherwise, you cannot proceed with the lab.
* Now copy your **User Name** and **Password** in the Lab Console to the **IAM Username and Password** in AWS Console and click on the **Sign in** button
3. Once Signed In to the AWS Management Console, Make the default AWS Region as **US East (N. Virginia) us-east-1.**
#### Task 2: Create an API
1. Navigate to **Services** menu in the top, then click on **API Gateway** in the **Network and Content Delivery** section.
2. Click on **Create an API**, then scroll down and click on **Build** in **REST API.**
### Task Details
1. Sign into AWS Management Console.
2. Create a new API.
### Launching Lab Environment
1. To launch the lab environment, Click on the Start Lab button.
2. Please wait until the cloud environment is provisioned. It will take less than a minute to provision.
3. Once the Lab is started, you will be provided with **IAM user name**, **Password**, **Access** **Key**, and **Secret** **Access** **Key**.
> **Note** : You can only start one lab at any given time
## Lab guide
### Lab Steps
#### Task 1: Sign in to AWS Management Console
1. Click on the **Open Console** button, and you will get redirected to AWS Console in a new browser tab.
2. On the AWS sign-in page,
* Leave the Account ID as default. Never edit/remove the 12 digit Account ID present in the AWS Console. otherwise, you cannot proceed with the lab.
* Now copy your **User Name** and **Password** in the Lab Console to the **IAM Username and Password** in AWS Console and click on the **Sign in** button
3. Once Signed In to the AWS Management Console, Make the default AWS Region as **US East (N. Virginia) us-east-1.**
#### Task 2: Create an API
1. Navigate to **Services** menu in the top, then click on **API Gateway** in the **Network and Content Delivery** section.
2. Click on **Create an API**, then scroll down and click on **Build** in **REST API.**
 3. Ignore the pop up **Create your first API.**
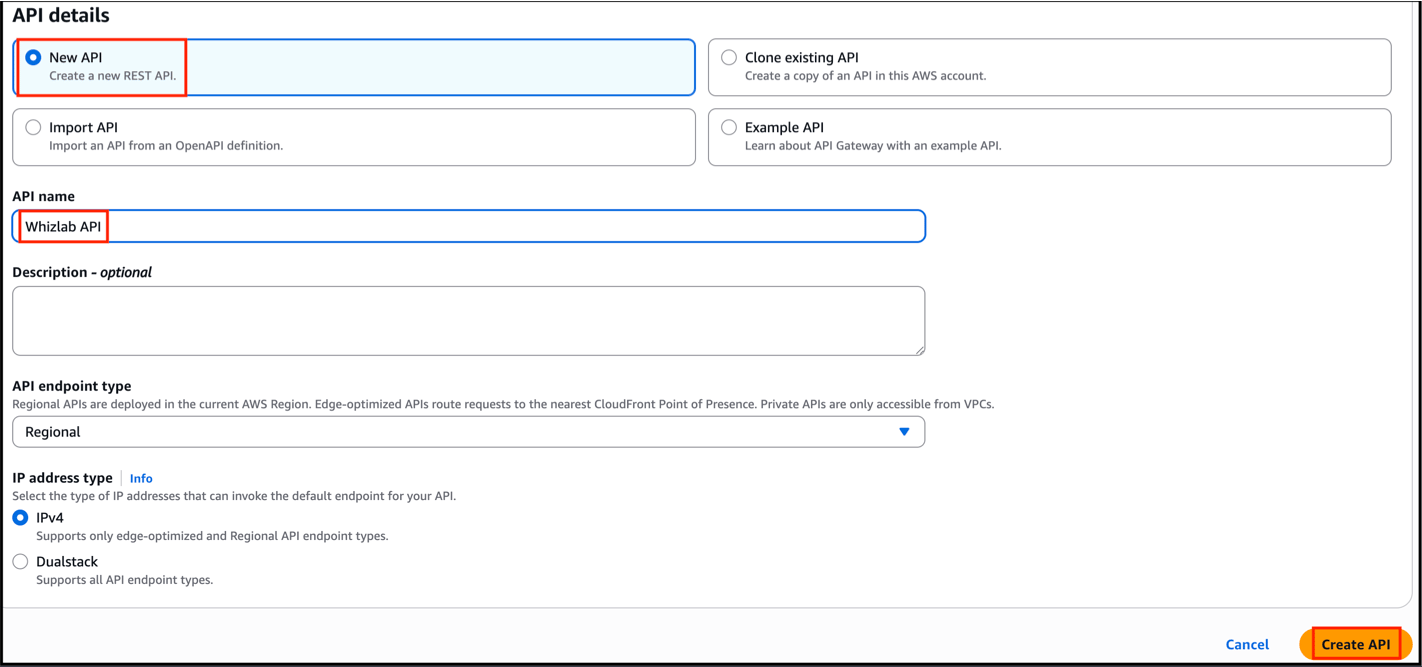
4. Then choose **New API** under settings. Enter API name as ***Whizlab API*** and click on **Create API**
3. Ignore the pop up **Create your first API.**
4. Then choose **New API** under settings. Enter API name as ***Whizlab API*** and click on **Create API**
 5. Click on API’s in the left panel to see the API you have created **Whizlab API**
 > **Note:** If any error pops up just ignore it.
> ##### Do You Know?
>
> * One of the key features that sets Amazon API Gateway apart is its versatility in supporting different types of APIs, such as RESTful APIs, WebSocket APIs, and HTTP APIs. This adaptability caters to a wide range of use cases, from building mobile and web applications to creating real-time communication solutions.
> * Another compelling aspect of Amazon API Gateway is its integration with other AWS services. It seamlessly works with services like AWS Lambda, allowing developers to create serverless APIs by directly connecting to Lambda functions without needing to manage servers. Additionally, it can integrate with AWS Identity and Access Management (IAM), enabling robust authentication and authorization mechanisms to secure APIs effectively.
### Completion and Conclusion
1. You have successfully created the API.
### End Lab
1. Sign out of the AWS Account.
2. You have successfully completed the lab.
3. Once you have completed the steps, click on **End Lab** from the IP Lab Portal dashboard.
## What gets checked
When you press **Check my work**, the platform verifies each of these:
* **Create a API Gateway** — Check whether a REST/HTTP?WEBSOCKET API gateway is created or not
## Related help
* [FAQs and Troubleshooting](/aws-saa/support/faqs-and-troubleshooting)
This documentation is built and hosted on [Mintlify](https://mintlify.com), a developer documentation platform.
> **Note:** If any error pops up just ignore it.
> ##### Do You Know?
>
> * One of the key features that sets Amazon API Gateway apart is its versatility in supporting different types of APIs, such as RESTful APIs, WebSocket APIs, and HTTP APIs. This adaptability caters to a wide range of use cases, from building mobile and web applications to creating real-time communication solutions.
> * Another compelling aspect of Amazon API Gateway is its integration with other AWS services. It seamlessly works with services like AWS Lambda, allowing developers to create serverless APIs by directly connecting to Lambda functions without needing to manage servers. Additionally, it can integrate with AWS Identity and Access Management (IAM), enabling robust authentication and authorization mechanisms to secure APIs effectively.
### Completion and Conclusion
1. You have successfully created the API.
### End Lab
1. Sign out of the AWS Account.
2. You have successfully completed the lab.
3. Once you have completed the steps, click on **End Lab** from the IP Lab Portal dashboard.
## What gets checked
When you press **Check my work**, the platform verifies each of these:
* **Create a API Gateway** — Check whether a REST/HTTP?WEBSOCKET API gateway is created or not
## Related help
* [FAQs and Troubleshooting](/aws-saa/support/faqs-and-troubleshooting)
This documentation is built and hosted on [Mintlify](https://mintlify.com), a developer documentation platform.