> ## Documentation Index
> Fetch the complete documentation index at: https://cloud-architect.ipoint-labs.com/llms.txt
> Use this file to discover all available pages before exploring further.
# Introduction to AWS Elastic Load Balancing
> Hands-on lab · 45m
Launch this lab in the IP Lab Portal, then follow the steps below in the AWS console.
Open IP Lab Portal
## Overview
### Lab Details
1. This lab walks you through AWS Elastic Load Balancing. Elastic Load Balancing automatically distributes incoming application traffic across multiple Amazon EC2 instances in the cloud. In this lab, we will demonstrate elastic load balancing with 2 EC2 Instances.
2. Duration: **60 minutes**
3. AWS Region: **US East (N. Virginia) us-east-1**
### Introduction
#### What is Elastic Load Balancing?
* ELB is a service that automatically distributes incoming application traffic and scale resources to meet traffic demands.
* ELB helps in adjusting capacity according to incoming application and network traffic.
* ELB can be enabled within a single availability zone or across multiple availability zones to maintain consistent application performance.
* ELB offers features like:
* Detection of unhealthy EC2 instances.
* Spreading EC2 instances across healthy channels only.
* Centralized management of SSL certificates.
* Optional public key authentication.
* Support for both IPv4 and IPv6.
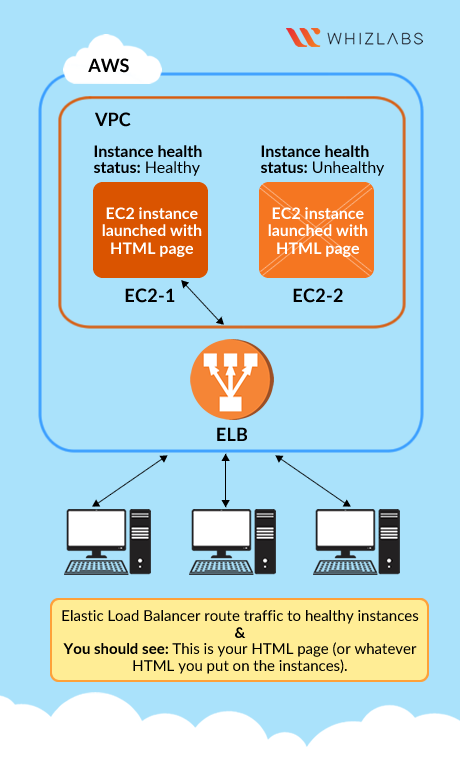
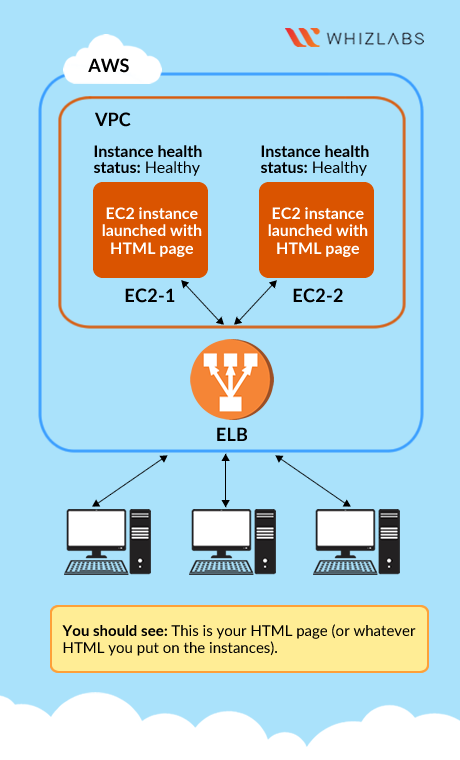
* ELB accepts incoming traffic from clients and routes requests to its registered targets.
* When an unhealthy target or instance is detected, ELB stops routing traffic to it and resumes only when the instance is healthy again.
* ELB monitors the health of its registered targets and ensures that the traffic is routed only to healthy instances.
* ELB's are configured to accept incoming traffic by specifying one or more **listeners**. A listener is a process that checks for connection requests.
* Listeners are configured with a protocol and port number from the client to the ELB and vice-versa i.e., back from ELB to the client.
* ELB supports 3 types of load balancers:
* Application Load Balancers
* Network Load Balancers
* Classic Load Balancers
* Each load balancer is configured differently.
* For Application and Network Load Balancers, you register targets in target groups and route traffic to target groups.
* For Classic Load Balancers, you register instances with the load balancer.
* AWS recommends users to work with Application Load Balancer to use multiple Availability Zones because if one availability zone fails, the load balancer can continue to route traffic to the next available one.
* We can have our load balancer be either internal or internet-facing.
* The nodes of an internet-facing load balancer have Public IP addresses, and the DNS name is publicly resolvable to the Public IP addresses of the nodes.
* Due to the point above, internet-facing load balancers can route requests from clients over the Internet.
* The nodes of an internal load balancer have only Private IP addresses, and the DNS name is publicly resolvable to the Private IP addresses of the nodes.
* Due to the point above, internal load balancers can only route requests from clients with access to the VPC for the load balancer.
* Both internet-facing and internal load balancers route requests to your targets using Private IP addresses.
* Your targets do not need Public IP addresses to receive requests from an internal or an internet-facing load balancer.
### Architecture Diagram
 ### Task Details
1. Sign in to AWS Management Console
2. Launching First EC2 Instance.
3. Launching Second EC2 Instance.
4. Creating the Load Balancer and Target Group.
5. Testing the Elastic Load Balancer.
6. Cleanup AWS Resources.
### Launching Lab Environment
1. To launch the lab environment, Click on the **Start Lab** button.
2. Please wait until the cloud environment is provisioned. It will take less than a minute to provision.
3. Once the Lab is started, you will be provided with **IAM user name**, **Password**, **Access** **Key**, and **Secret** **Access** **Key**.
> **Note** : You can only start one lab at any given time
## Lab guide
### Lab Steps
#### Task 1: Sign in to AWS Management Console
1. Click on the **Open Console** button, and you will get redirected to AWS Console in a new browser tab.
2. On the AWS sign-in page,
* Leave the Account ID as default. Never edit/remove the 12 digit Account ID present in the AWS Console. otherwise, you cannot proceed with the lab.
* Now copy your **User Name** and **Password** in the Lab Console to the **IAM Username and Password** in AWS Console and click on the **Sign in** button.
3. Once Signed In to the AWS Management Console, Make the default AWS Region as **US East (N. Virginia) us-east-1.**
#### Task 2: Provision Default VPC
1. Navigate to **VPC** by clicking on the **Services** menu in the top, then click on **VPC** or Open the Amazon VPC console via [https://console.aws.amazon.com/vpc/.](https://console.aws.amazon.com/vpc/)
2. Delete the **default VPC** by following the **below steps:**
* In the navigation pane, choose **Your VPCs.**
* Select the **VPC** with value as **yes** in **default VPC column.**
### Task Details
1. Sign in to AWS Management Console
2. Launching First EC2 Instance.
3. Launching Second EC2 Instance.
4. Creating the Load Balancer and Target Group.
5. Testing the Elastic Load Balancer.
6. Cleanup AWS Resources.
### Launching Lab Environment
1. To launch the lab environment, Click on the **Start Lab** button.
2. Please wait until the cloud environment is provisioned. It will take less than a minute to provision.
3. Once the Lab is started, you will be provided with **IAM user name**, **Password**, **Access** **Key**, and **Secret** **Access** **Key**.
> **Note** : You can only start one lab at any given time
## Lab guide
### Lab Steps
#### Task 1: Sign in to AWS Management Console
1. Click on the **Open Console** button, and you will get redirected to AWS Console in a new browser tab.
2. On the AWS sign-in page,
* Leave the Account ID as default. Never edit/remove the 12 digit Account ID present in the AWS Console. otherwise, you cannot proceed with the lab.
* Now copy your **User Name** and **Password** in the Lab Console to the **IAM Username and Password** in AWS Console and click on the **Sign in** button.
3. Once Signed In to the AWS Management Console, Make the default AWS Region as **US East (N. Virginia) us-east-1.**
#### Task 2: Provision Default VPC
1. Navigate to **VPC** by clicking on the **Services** menu in the top, then click on **VPC** or Open the Amazon VPC console via [https://console.aws.amazon.com/vpc/.](https://console.aws.amazon.com/vpc/)
2. Delete the **default VPC** by following the **below steps:**
* In the navigation pane, choose **Your VPCs.**
* Select the **VPC** with value as **yes** in **default VPC column.**
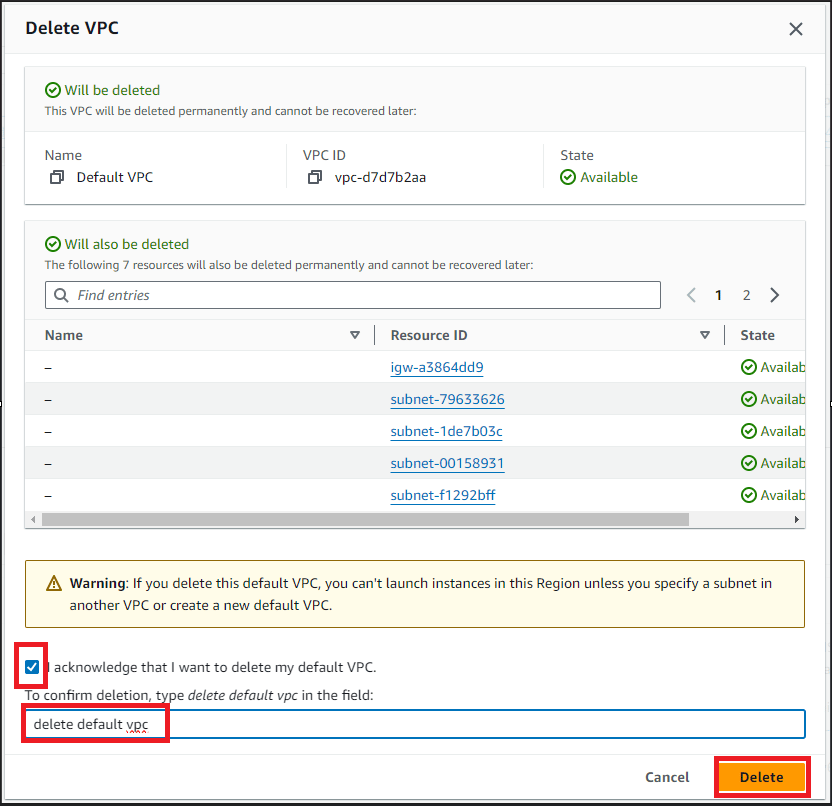
 * Go to **Actions button** and click on **delete VPC button**
 * Check **I acknowledge that I want to delete my default VPC** option.
* Type **delete default VPC** and click on **Delete button**
* Check **I acknowledge that I want to delete my default VPC** option.
* Type **delete default VPC** and click on **Delete button**
 3. Now to provision **Default VPC** again
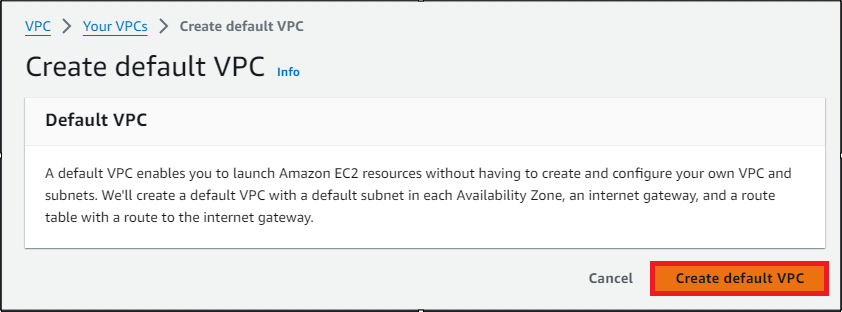
* Refresh your console go to **Actions** and click **Create default VPC**
3. Now to provision **Default VPC** again
* Refresh your console go to **Actions** and click **Create default VPC**
 * Click **Create default VPC button** and your default VPC will get created
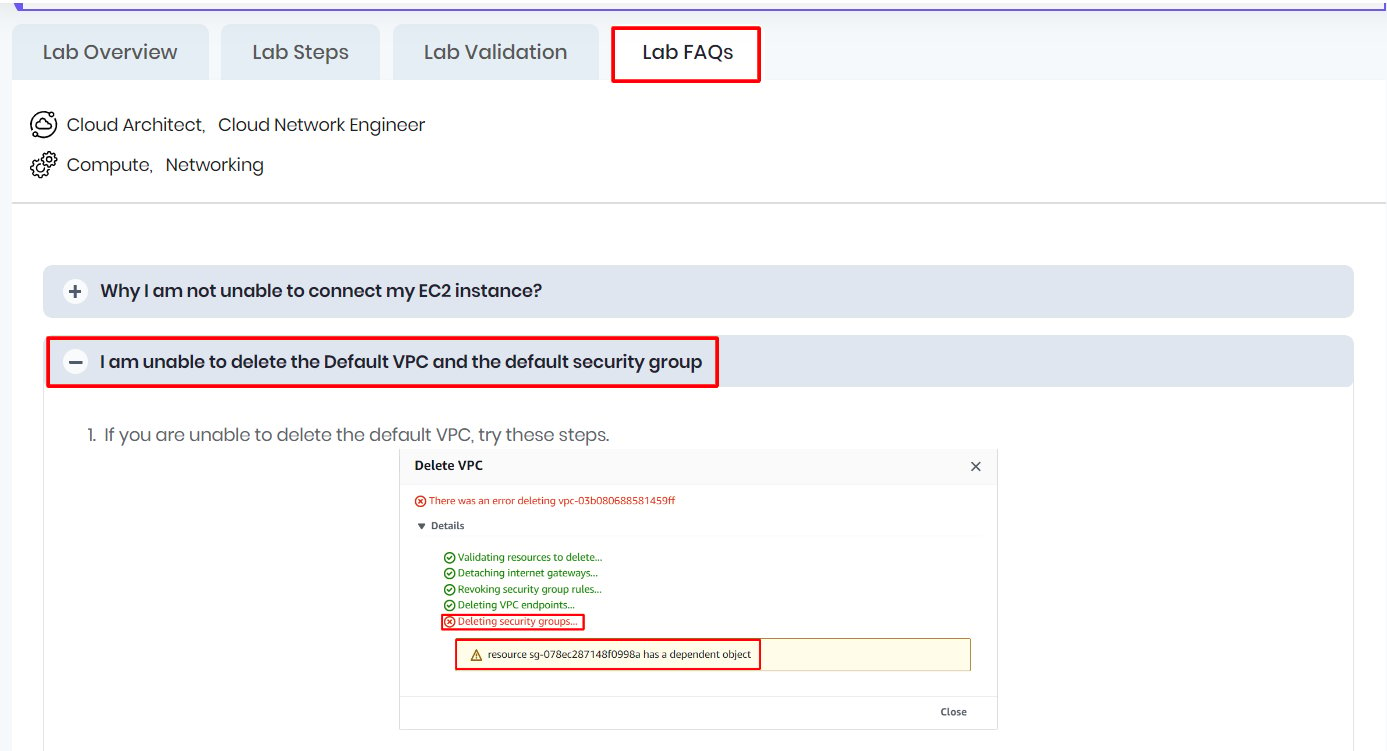
 > **Note:** If you are unable to delete the default VPC, please visit our Lab FAQ page for step-by-step instructions.
 #### Task 3: Launching First EC2 Instance
1. Make sure you are in the **US East (N. Virginia) us-east-1** Region.
2. Navigate to **EC2** by clicking on the **Services** menu in the top, then click on **EC2** in the **Compute** section.
3. Navigate to **Instances** on the left panel and click on **Launch Instances** button.
4. Name: Enter ***MyEC2Server***
#### Task 3: Launching First EC2 Instance
1. Make sure you are in the **US East (N. Virginia) us-east-1** Region.
2. Navigate to **EC2** by clicking on the **Services** menu in the top, then click on **EC2** in the **Compute** section.
3. Navigate to **Instances** on the left panel and click on **Launch Instances** button.
4. Name: Enter ***MyEC2Server***
 5. **For Amazon Machine Image (AMI):** Search for **Amazon Linux 2023 AMI** in the search box and click on the **Select** button.
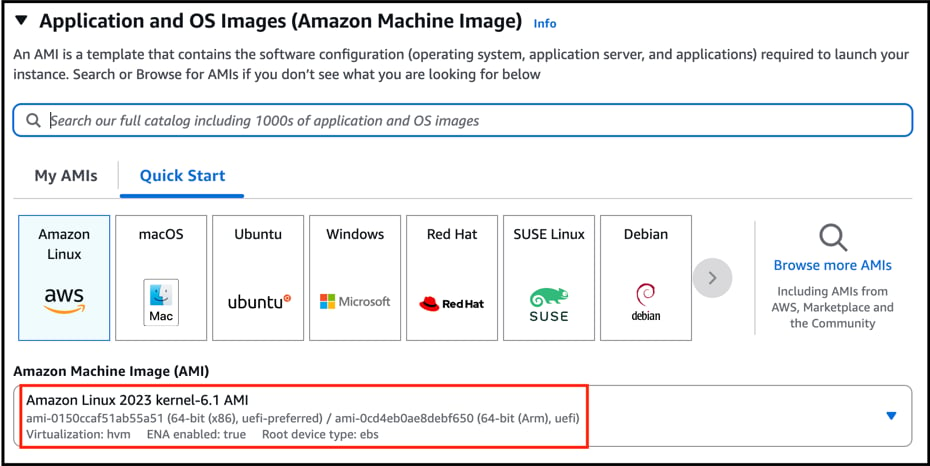 6. **Note: if there are two AMI's present for Amazon Linux 2023 AMI, choose kernel-6.1.**
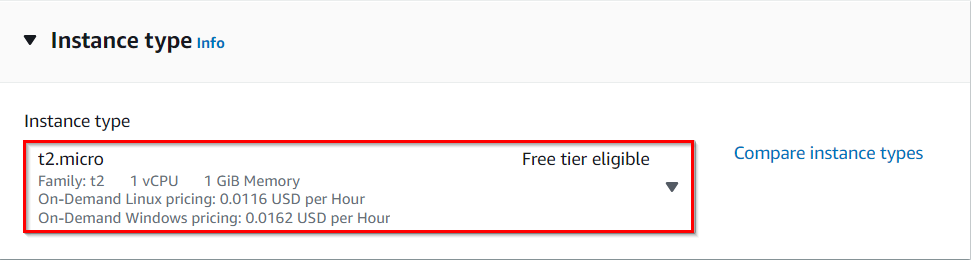
7. **For Instance Type:** Select **t2.micro**
6. **Note: if there are two AMI's present for Amazon Linux 2023 AMI, choose kernel-6.1.**
7. **For Instance Type:** Select **t2.micro**
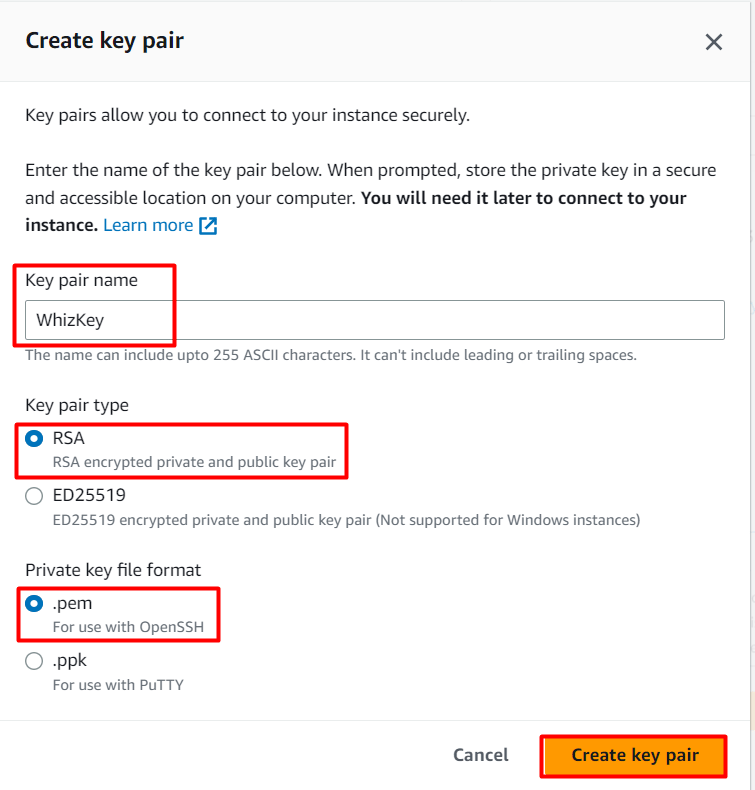
 8. **For Key pair:** Select **Create a new key pair** Button
* Key pair name: **WhizKey**
* Key pair type: **RSA**
* Private key file format: **.pem**
9. Select **Create key pair** Button.
8. **For Key pair:** Select **Create a new key pair** Button
* Key pair name: **WhizKey**
* Key pair type: **RSA**
* Private key file format: **.pem**
9. Select **Create key pair** Button.
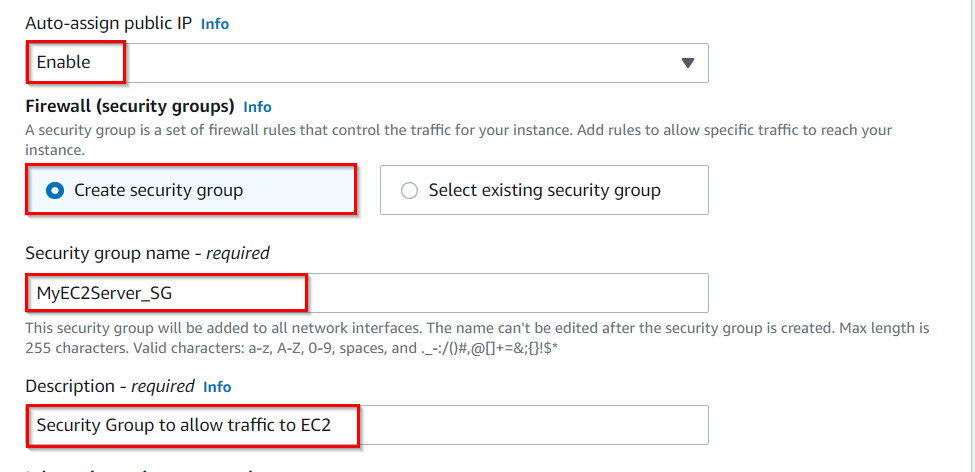
 10. In Network Settings Click on **Edit** button:
* Auto-assign public IP: **Enable**
* Select **Create new Security group**
* Security group name : Enter ***MyEC2Server\_SG***
* Description : Enter ***Security Group to allow traffic to EC2***
10. In Network Settings Click on **Edit** button:
* Auto-assign public IP: **Enable**
* Select **Create new Security group**
* Security group name : Enter ***MyEC2Server\_SG***
* Description : Enter ***Security Group to allow traffic to EC2***
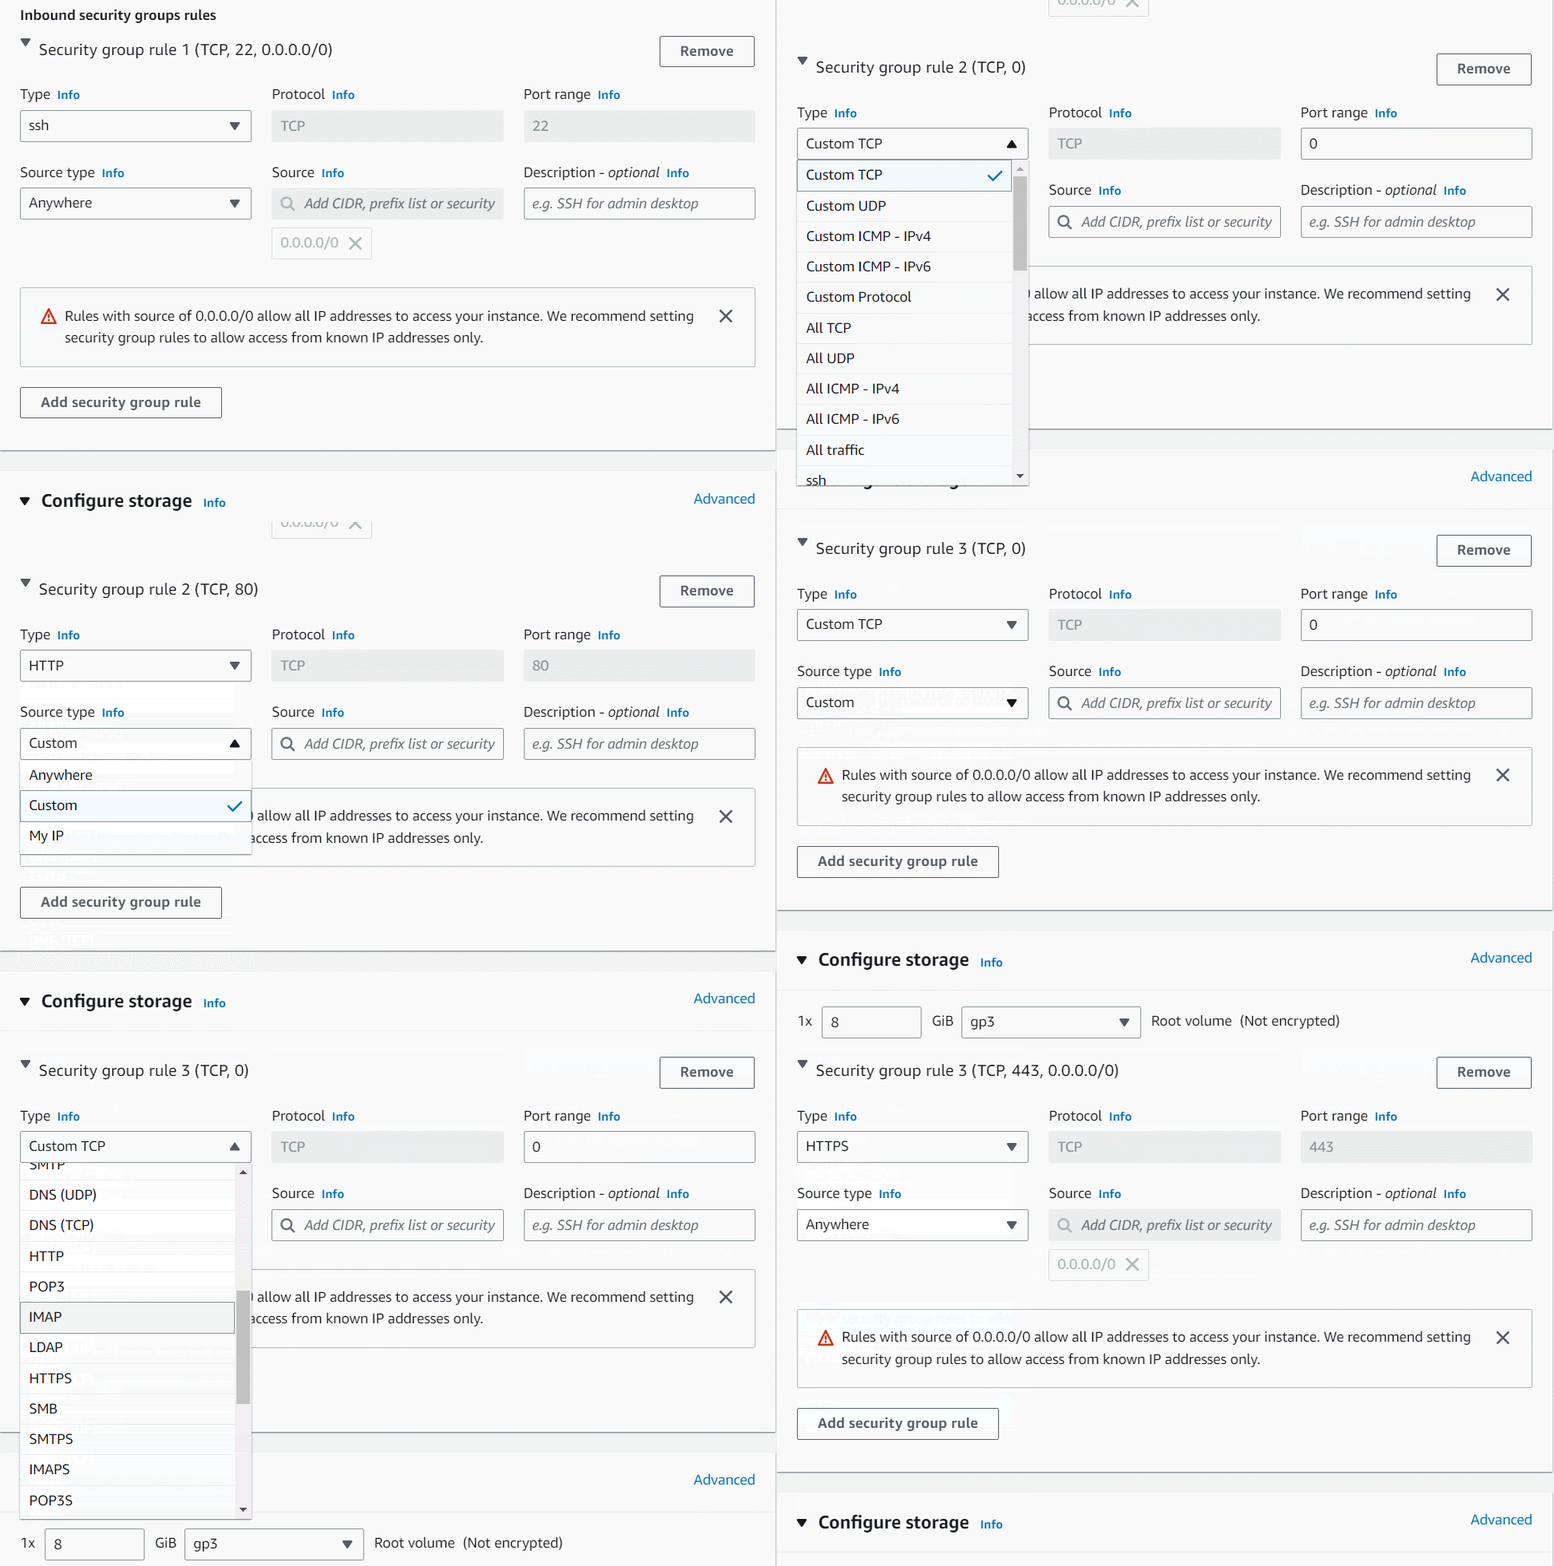
 11. Check **Allow SSH from** and Select **Anywhere** from dropdown
* To add **SSH**,
1. Choose Type: **SSH**
2. Source: Select **Anywhere**
* For **HTTP,** Click on **Add security group rule**
1. Choose Type: **HTTP**
2. Source: Select **Anywhere**
* For **HTTPS,** Click on **Add security group rule**
1. Choose Type: **HTTPs**
2. Source: Select **Anywhere**
11. Check **Allow SSH from** and Select **Anywhere** from dropdown
* To add **SSH**,
1. Choose Type: **SSH**
2. Source: Select **Anywhere**
* For **HTTP,** Click on **Add security group rule**
1. Choose Type: **HTTP**
2. Source: Select **Anywhere**
* For **HTTPS,** Click on **Add security group rule**
1. Choose Type: **HTTPs**
2. Source: Select **Anywhere**
 12. Click on **Advanced details** and under the **User data:** section, Enter the following script to create an HTML page served by an Apache httpd web server.
```
#!/bin/bash
sudo su
dnf update -y
dnf install httpd -y
echo "
12. Click on **Advanced details** and under the **User data:** section, Enter the following script to create an HTML page served by an Apache httpd web server.
```
#!/bin/bash
sudo su
dnf update -y
dnf install httpd -y
echo " Welcome to IP Lab Portal Server 1
" > /var/www/html/index.html
systemctl start httpd
systemctl enable httpd
```
13. Keep Rest thing Default and Click on **Launch Instance** Button.
14. Select **View all Instances** to View Instance you Created.
15. Launch Status: Your instance is now launching, Click on the instance ID and wait for complete initialization of the instance till status changes to Running.
#### Task 4 : Launching Second EC2 Instance
1. Make sure you are in the US East (N. Virginia) us-east-1 Region.
2. Navigate to EC2 by clicking on the Services menu in the top, then click on EC2 in the Compute section.
3. Navigate to Instances on the left panel and click on Launch Instances button.
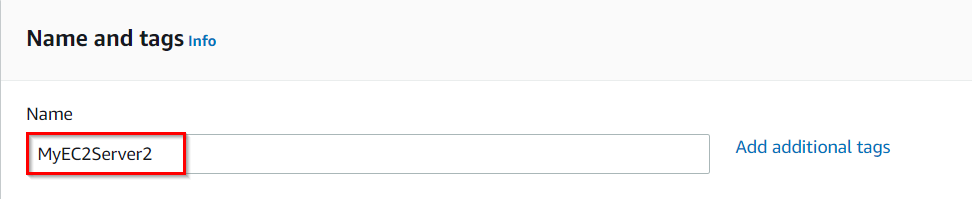
4. Name : Enter ***MyEC2Server2***
 5. For Amazon Machine Image (AMI): Search for **Amazon Linux 2023 AMI** in the search box and click on the Select button.
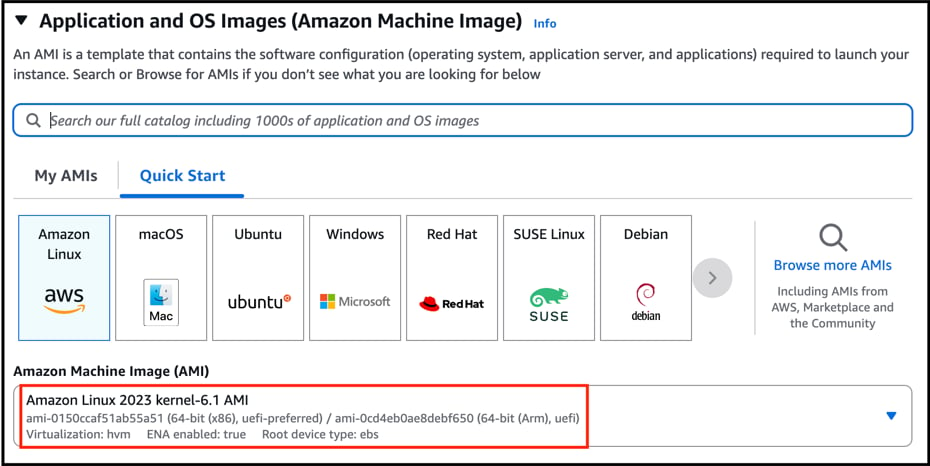 6. Note: if there are two AMI's present for Amazon Linux 2023 AMI, choose **kernel-6.1 AMI.**
7. For Instance Type: select **t2.micro**
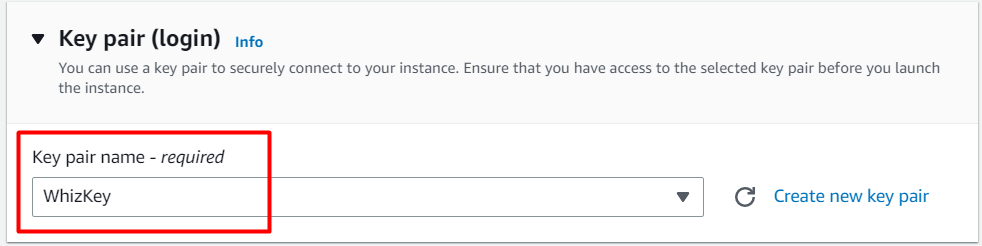
8. For Key pair: Select the key you created previously.
6. Note: if there are two AMI's present for Amazon Linux 2023 AMI, choose **kernel-6.1 AMI.**
7. For Instance Type: select **t2.micro**
8. For Key pair: Select the key you created previously.
 9. In Network Settings Click on Edit:
* Auto-assign public IP: **Enable**
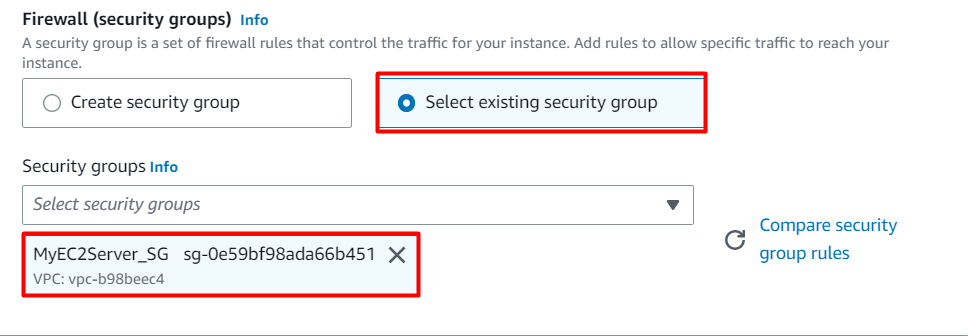
* Select Select existing security group and Select the group created earlier.
9. In Network Settings Click on Edit:
* Auto-assign public IP: **Enable**
* Select Select existing security group and Select the group created earlier.
 10. Click on Advanced details and under the User data: section, Enter the following script to create an HTML page served by Apache httpd web server:
```
#!/bin/bash
sudo su
dnf update -y
dnf install httpd -y
echo "
10. Click on Advanced details and under the User data: section, Enter the following script to create an HTML page served by Apache httpd web server:
```
#!/bin/bash
sudo su
dnf update -y
dnf install httpd -y
echo " Welcome to IP Lab Portal Server 2
" > /var/www/html/index.html
systemctl start httpd
systemctl enable httpd
```
11. Keep Rest thing Default and Click on Launch Instance Button.
12. Select View all Instances to View Instance you Created
13. Launch Status: Your instance is now launching. Click on View Instances. In the dashboard find your instance and wait for complete initialization of the instance until the instance state changes to running.
 #### Task 5: Creating the Target Group and Load Balancer
1. In the EC2 Console, Navigate to Target Groups, present in the left panel under Load Balancing.
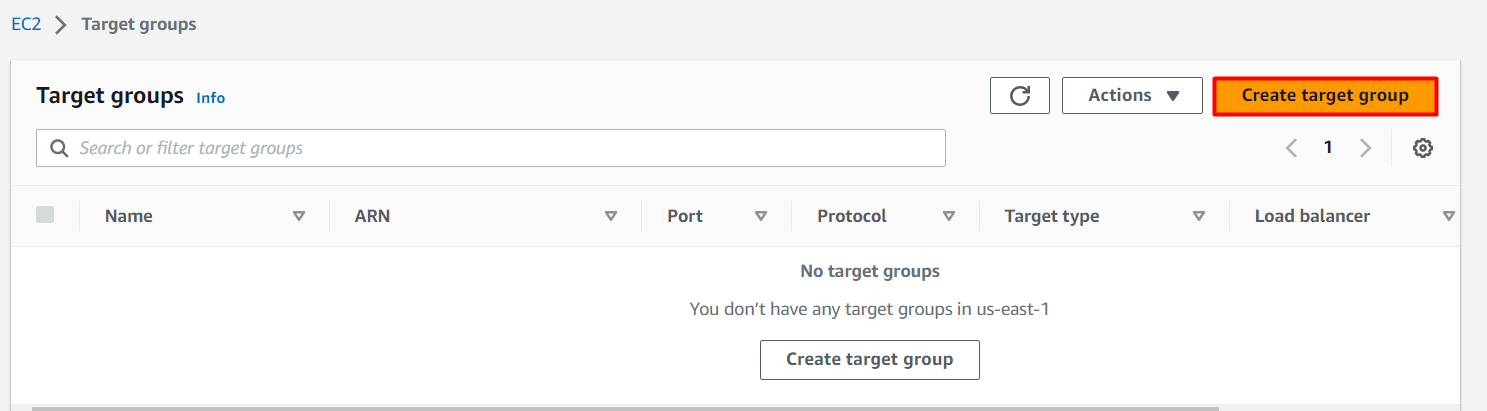
2. Click on the Create target group button.
#### Task 5: Creating the Target Group and Load Balancer
1. In the EC2 Console, Navigate to Target Groups, present in the left panel under Load Balancing.
2. Click on the Create target group button.
 3. For Step 1, Specify group details
* Under Settings,
* Choose a target type: Choose **Instances**
* Target group name: Enter ***MyTargetGroup***
* Keep all the settings as default.
* Scroll to the end of the page and click on the Next button.
4. For Step 2, Register targets
* Select both instances and click on the **Include as pending below** button.
3. For Step 1, Specify group details
* Under Settings,
* Choose a target type: Choose **Instances**
* Target group name: Enter ***MyTargetGroup***
* Keep all the settings as default.
* Scroll to the end of the page and click on the Next button.
4. For Step 2, Register targets
* Select both instances and click on the **Include as pending below** button.
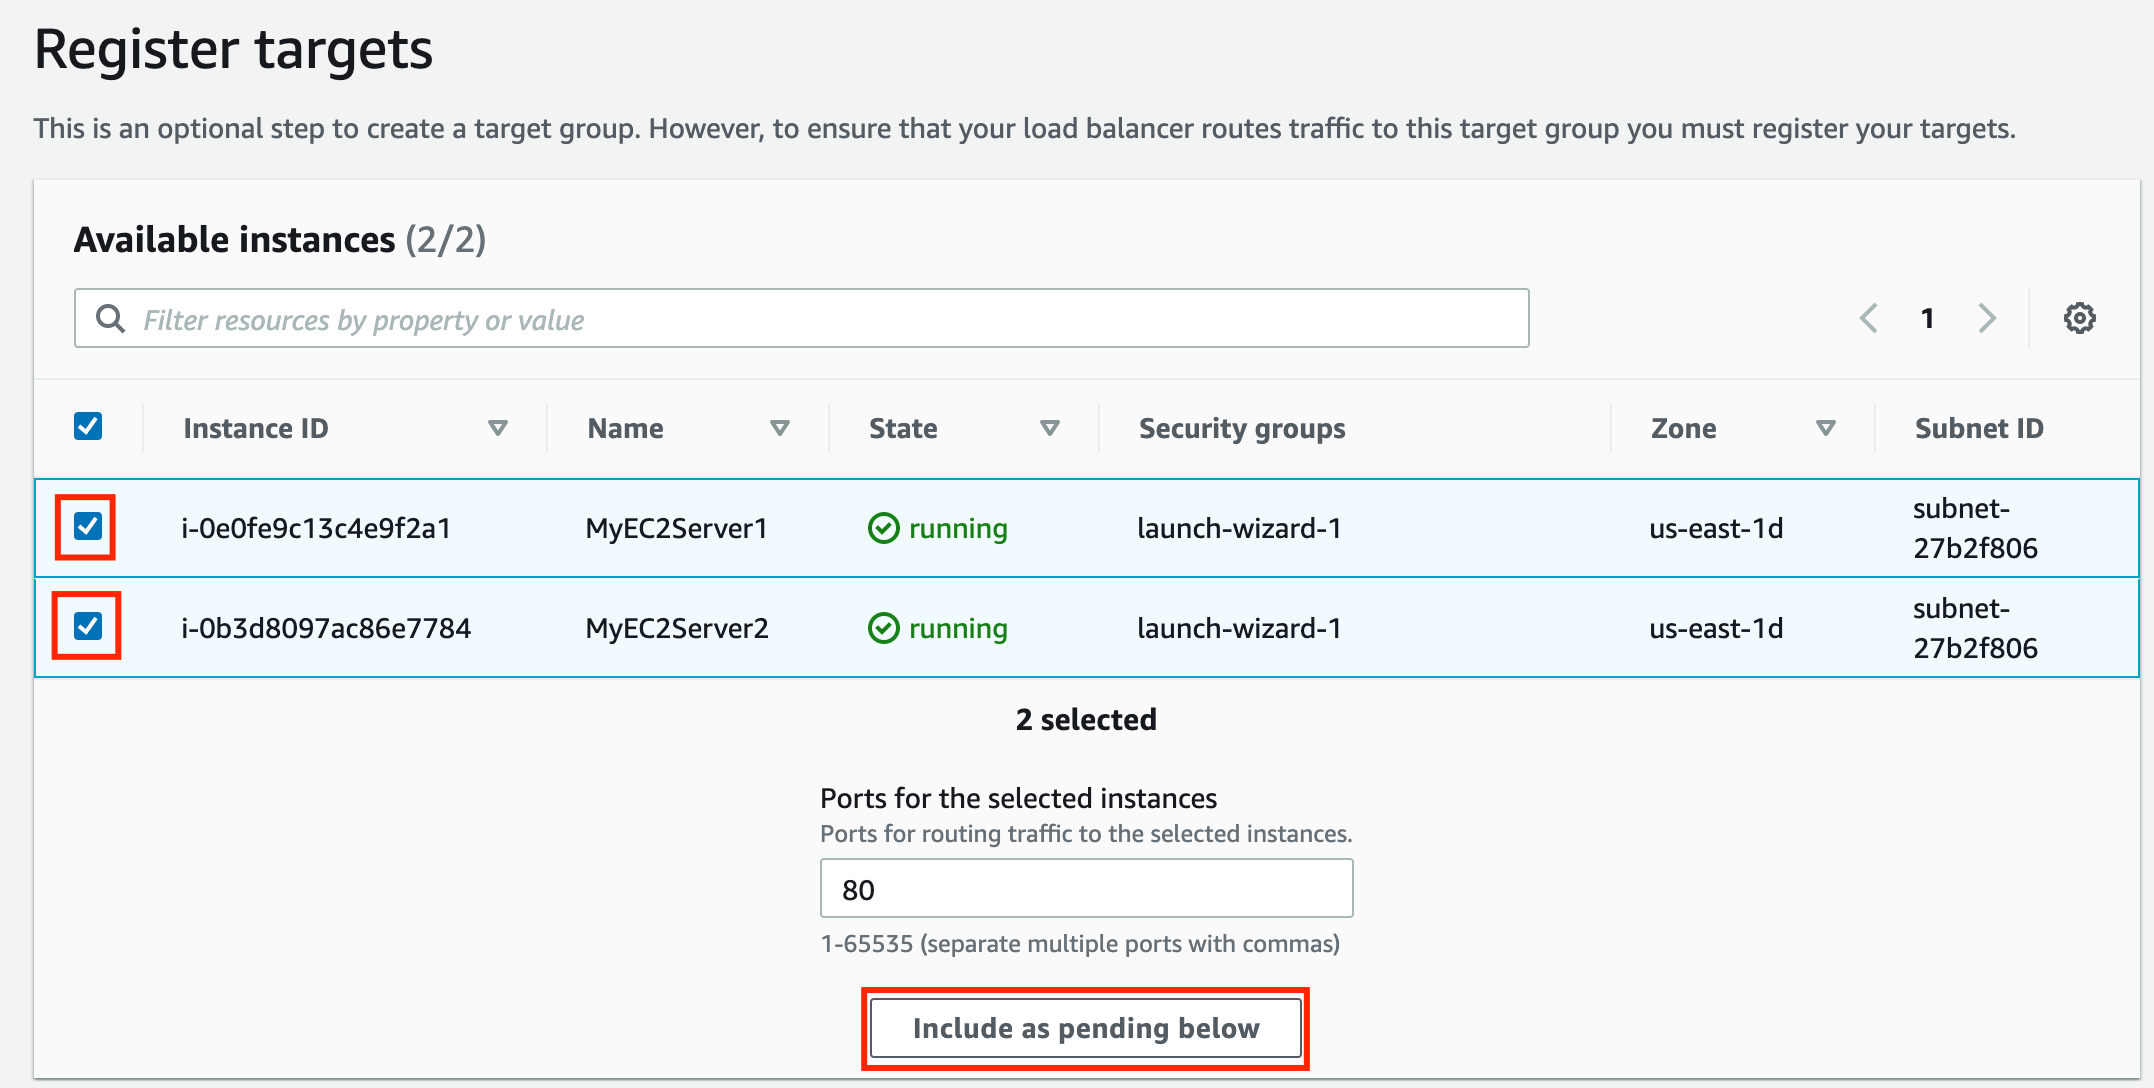 * Instances will be present in the Review targets part, having health status as Pending.
* Click on the **Create target group** button.
5. The Target group is now created.
6. In the EC2 console, navigate to **Load balancers** in the left-side panel.
7. Click on Create Load Balancer button at the top-left to create a new load balancer for our web servers.
8. Select Load Balancer Type: Under the **Application load balancer**, click on the **Create** button
9. To create an Application load balancer, configuring the load balancer as below
* For the Basic configuration section,
* Name: Enter ***MyLoadBalancer***
* Scheme: Select **Internet-facing**
* IP address type: Choose **IPv4**
* For the Network mapping section:
* VPC: Select Default
* Mappings: Select all the Availability zone present
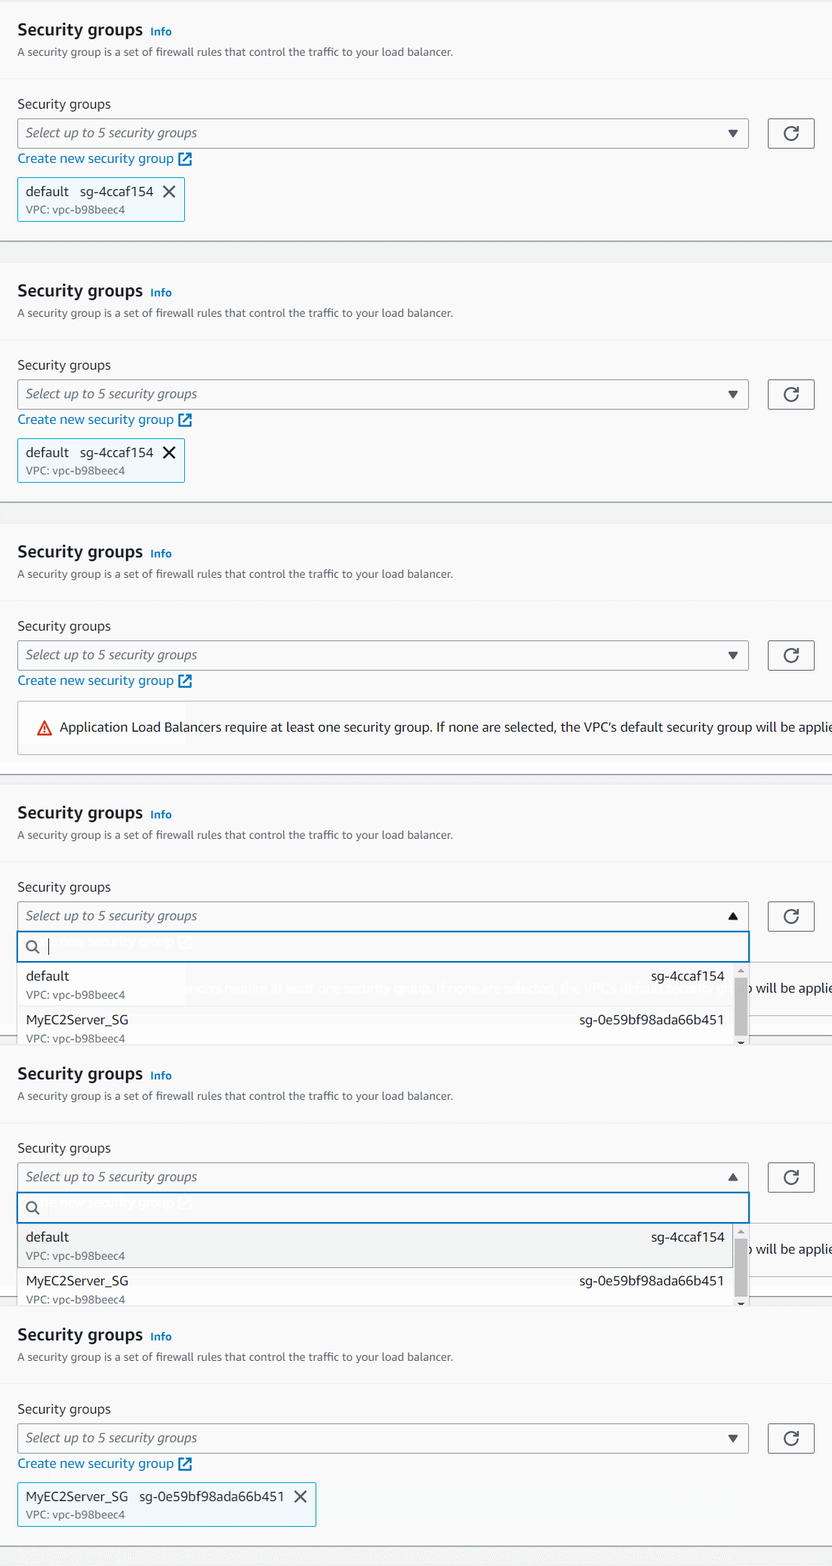
* For the Security groups section,
* Select the ***MyEC2Server\_SG*** Security group from the dropdown and remove the default security group.
* Instances will be present in the Review targets part, having health status as Pending.
* Click on the **Create target group** button.
5. The Target group is now created.
6. In the EC2 console, navigate to **Load balancers** in the left-side panel.
7. Click on Create Load Balancer button at the top-left to create a new load balancer for our web servers.
8. Select Load Balancer Type: Under the **Application load balancer**, click on the **Create** button
9. To create an Application load balancer, configuring the load balancer as below
* For the Basic configuration section,
* Name: Enter ***MyLoadBalancer***
* Scheme: Select **Internet-facing**
* IP address type: Choose **IPv4**
* For the Network mapping section:
* VPC: Select Default
* Mappings: Select all the Availability zone present
* For the Security groups section,
* Select the ***MyEC2Server\_SG*** Security group from the dropdown and remove the default security group.
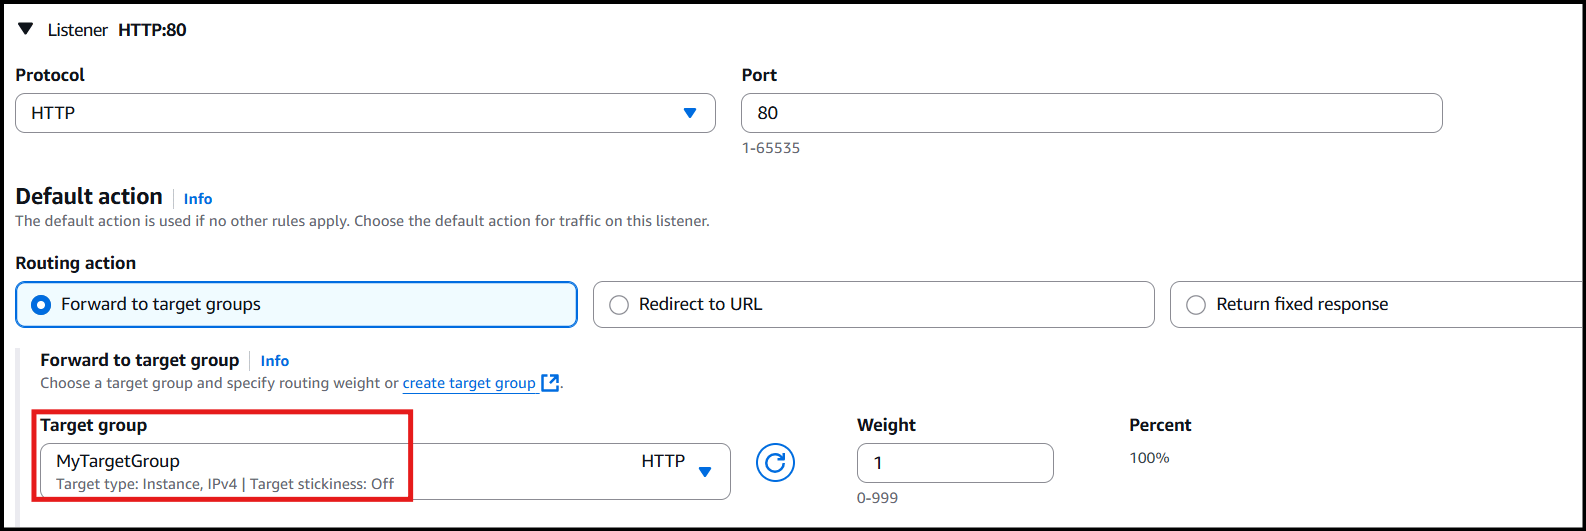
 * For the Listeners and routing section,
* The listener is already present with Protocol HTTP and Port 80.
* Select the target group **MyTargetGroup** for the Default action forwards to option.
* For the Listeners and routing section,
* The listener is already present with Protocol HTTP and Port 80.
* Select the target group **MyTargetGroup** for the Default action forwards to option.
 10. Keep the tags as default and click on the **Create load balancer** button.
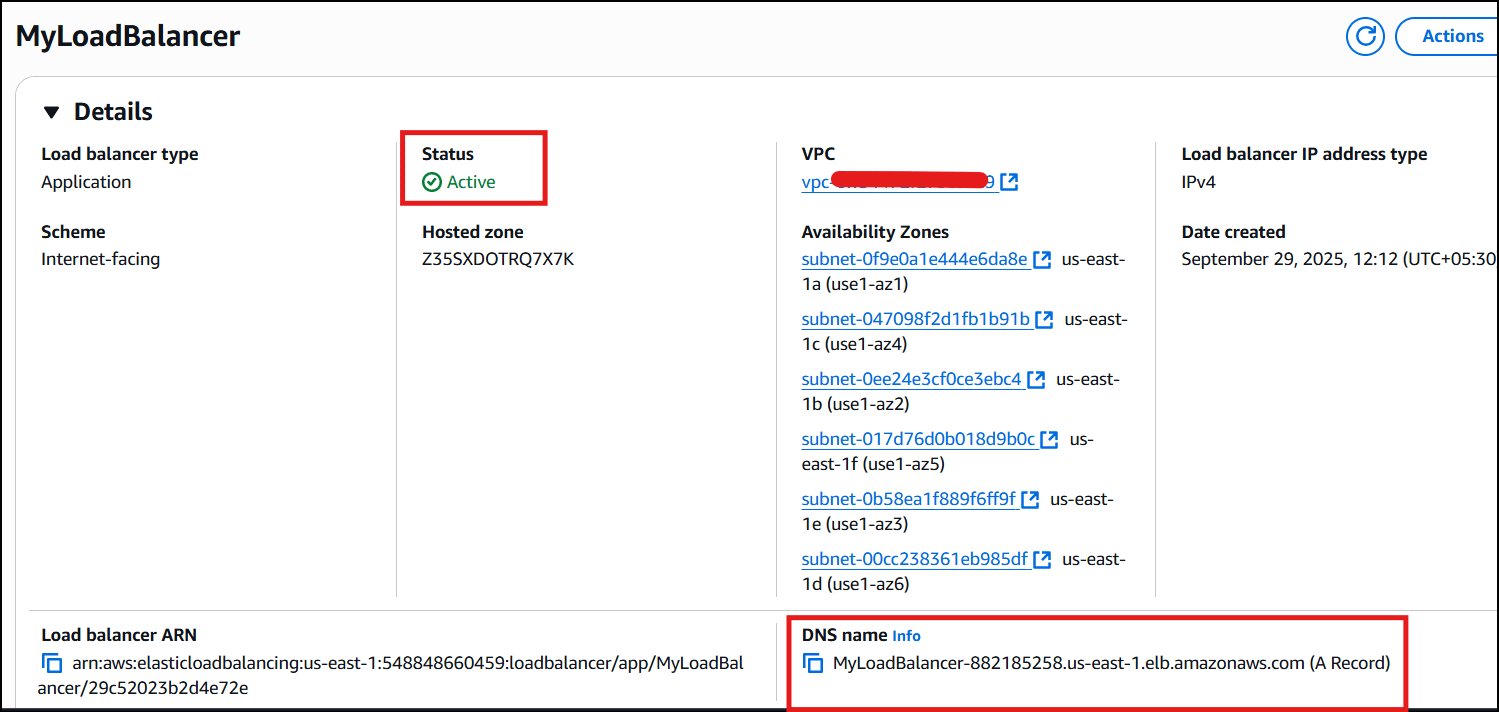
11. You have successfully created the Application Load Balancer. Click on the View load balancers button.
12. Wait for 2 to 3 minutes for the load balancer to become Active.
10. Keep the tags as default and click on the **Create load balancer** button.
11. You have successfully created the Application Load Balancer. Click on the View load balancers button.
12. Wait for 2 to 3 minutes for the load balancer to become Active.
 #### Task 6: Testing the Elastic Load Balancer
1. Click on **Target groups** from the left menu section.
2. Select **MyTargetGroup** and navigate to the Targets tab below.
3. Wait until the status column of the instances changes to healthy (this means both web servers have passed ELB health check)
#### Task 6: Testing the Elastic Load Balancer
1. Click on **Target groups** from the left menu section.
2. Select **MyTargetGroup** and navigate to the Targets tab below.
3. Wait until the status column of the instances changes to healthy (this means both web servers have passed ELB health check)
 4. Next, navigate to Load Balancers and notice the state of ELB is active.
5. Copy the DNS name of the ELB and enter the address in the browser.
* DNS Example: MyLoadBalancer-882185258.us-east-1.elb.amazonaws.com
6. You should see the index.html page content of Web Server 1 or Web Server 2
4. Next, navigate to Load Balancers and notice the state of ELB is active.
5. Copy the DNS name of the ELB and enter the address in the browser.
* DNS Example: MyLoadBalancer-882185258.us-east-1.elb.amazonaws.com
6. You should see the index.html page content of Web Server 1 or Web Server 2
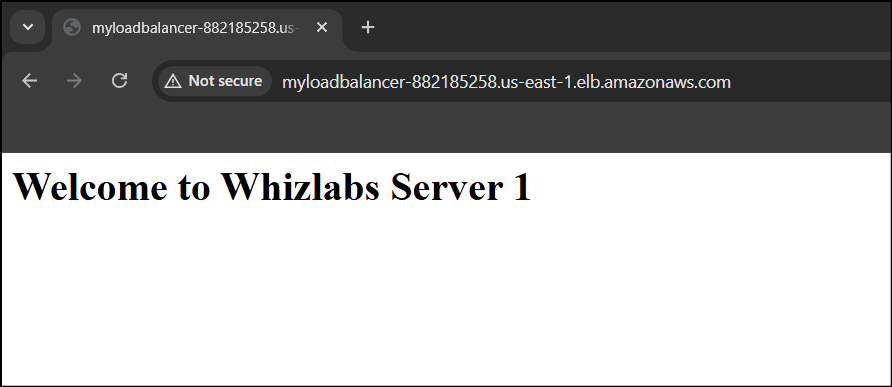 7. Now Refresh the page a few times. You will observe that the index pages change each time you refresh.
* Note: The ELB is equally dividing the incoming traffic to both servers in a Round Robin manner.
8. For testing, if ELB is working properly,
* In the left side menu, scroll up and navigate back to the Instances page.
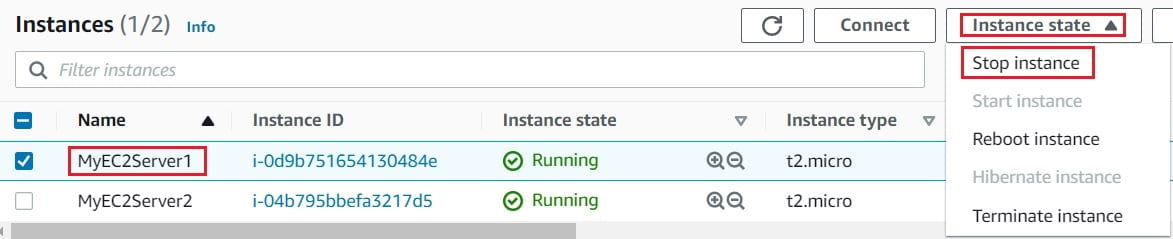
* Select **MyEC2Server1**, click on Instance State and click on Stop instance to stop the EC2 instance.
7. Now Refresh the page a few times. You will observe that the index pages change each time you refresh.
* Note: The ELB is equally dividing the incoming traffic to both servers in a Round Robin manner.
8. For testing, if ELB is working properly,
* In the left side menu, scroll up and navigate back to the Instances page.
* Select **MyEC2Server1**, click on Instance State and click on Stop instance to stop the EC2 instance.
 * Once MyEC2Server1 is stopped, navigate to Target Groups. Select the MyTargetGroup, Click on the Targets.
* It will say that the stopped instance **MyEC2Server1** is unused.
* Once MyEC2Server1 is stopped, navigate to Target Groups. Select the MyTargetGroup, Click on the Targets.
* It will say that the stopped instance **MyEC2Server1** is unused.
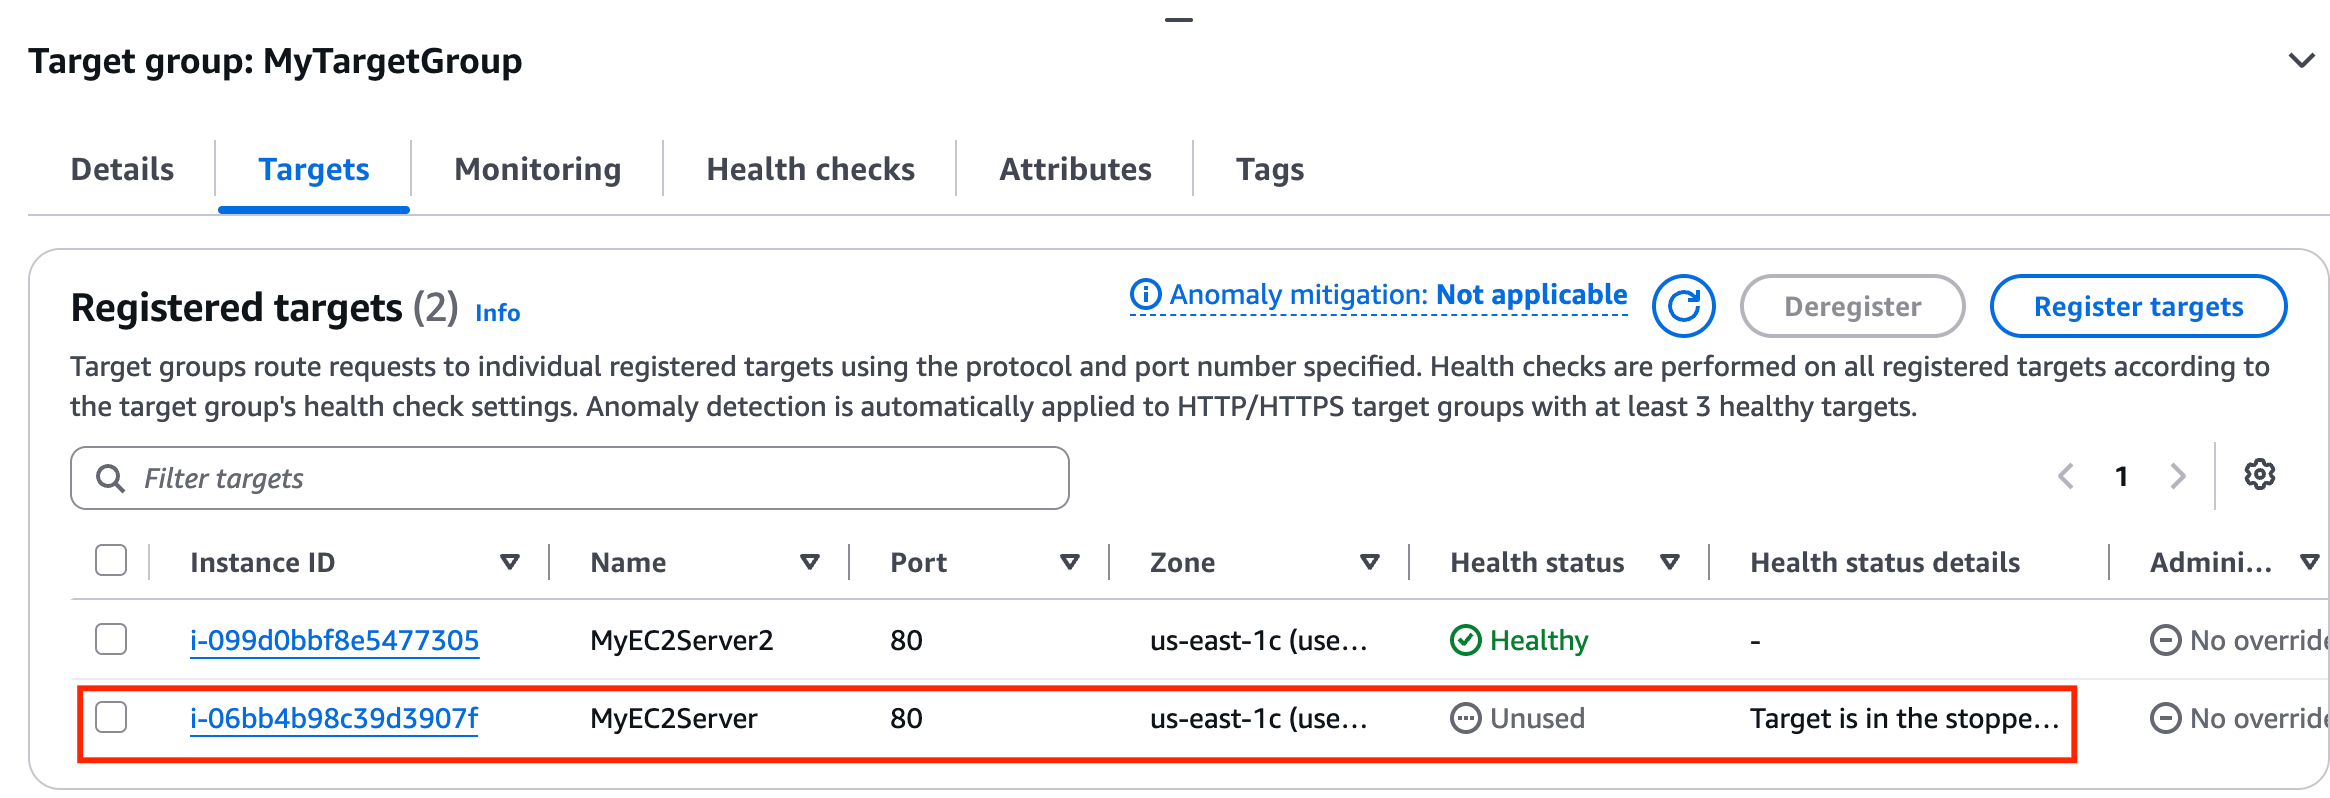 * Refresh the ELB domain name URL in Browser, and notice the HTML webpage remains visible. The ELB is only rendering the HTML page from the MyEC2Server2 instance.
 > ##### Do you know ?
>
> ELB supports multiple protocols, including HTTP, HTTPS, TCP, and SSL, and it can route traffic to targets based on different criteria such as IP addresses, ports, and protocols. ELB supports sticky sessions, which allows clients to maintain their connection to the same target across multiple requests, improving the user experience for stateful applications.
1. Once the lab steps are completed, please click on the Validation button on the Right side panel.
#### Task 7: Delete AWS Resources
##### Deleting Load balancer
1. In the EC2 console, navigate to Load Balancers in the left-side panel.
2. MyLoadBalancer will be listed here.
3. To delete the load balancer, you need to perform the following actions:
* Select the load balancer,
* Click on the Actions button,
* Select the Delete option.
> ##### Do you know ?
>
> ELB supports multiple protocols, including HTTP, HTTPS, TCP, and SSL, and it can route traffic to targets based on different criteria such as IP addresses, ports, and protocols. ELB supports sticky sessions, which allows clients to maintain their connection to the same target across multiple requests, improving the user experience for stateful applications.
1. Once the lab steps are completed, please click on the Validation button on the Right side panel.
#### Task 7: Delete AWS Resources
##### Deleting Load balancer
1. In the EC2 console, navigate to Load Balancers in the left-side panel.
2. MyLoadBalancer will be listed here.
3. To delete the load balancer, you need to perform the following actions:
* Select the load balancer,
* Click on the Actions button,
* Select the Delete option.
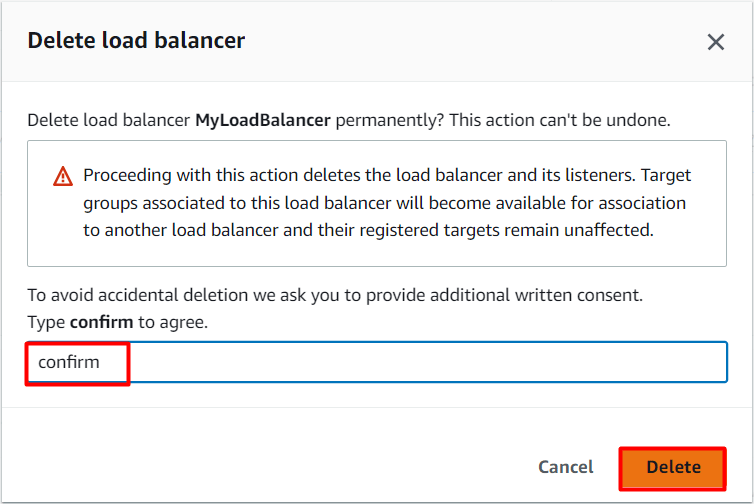
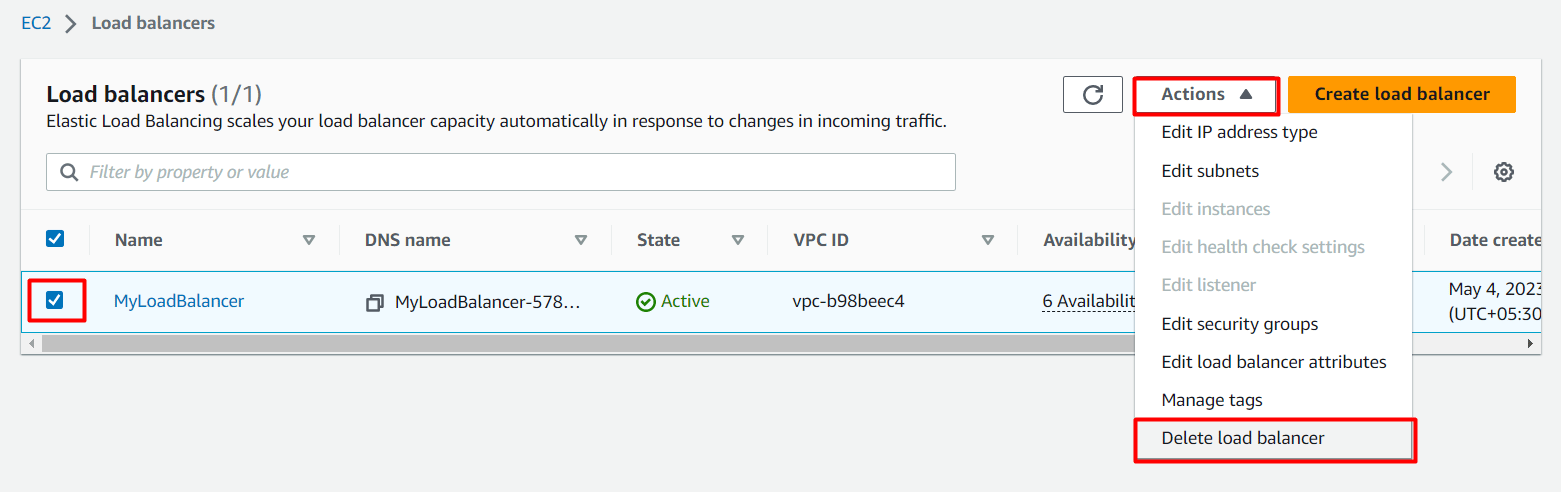 4. Confirm by typing confirm when a pop-up is shown. Click on Delete button.
 5. Web-server-LG will be deleted immediately.
##### Deleting Target groups
1. In the EC2 console, navigate to Target groups in the left-side panel.
2. MyTargetGroup will be listed here.
5. Web-server-LG will be deleted immediately.
##### Deleting Target groups
1. In the EC2 console, navigate to Target groups in the left-side panel.
2. MyTargetGroup will be listed here.
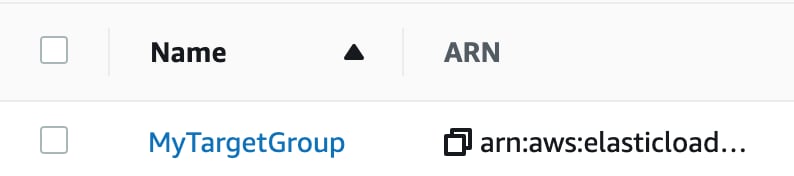 3. To delete the target group,you need to perform the following actions:
* Select the target group
* Click on the Actions button,
* Select the Delete option.
3. To delete the target group,you need to perform the following actions:
* Select the target group
* Click on the Actions button,
* Select the Delete option.
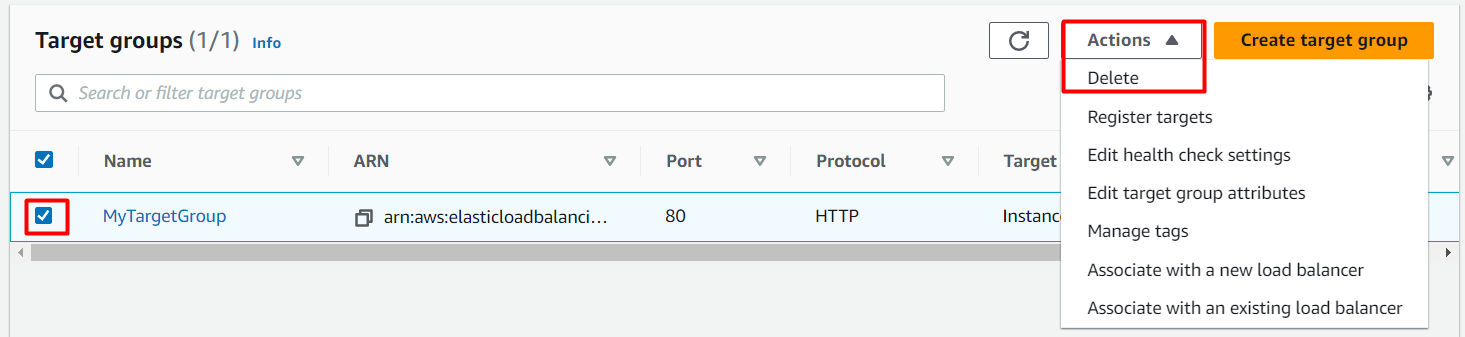 4. Confirm by clicking on the Yes, delete button when a pop-up is shown.
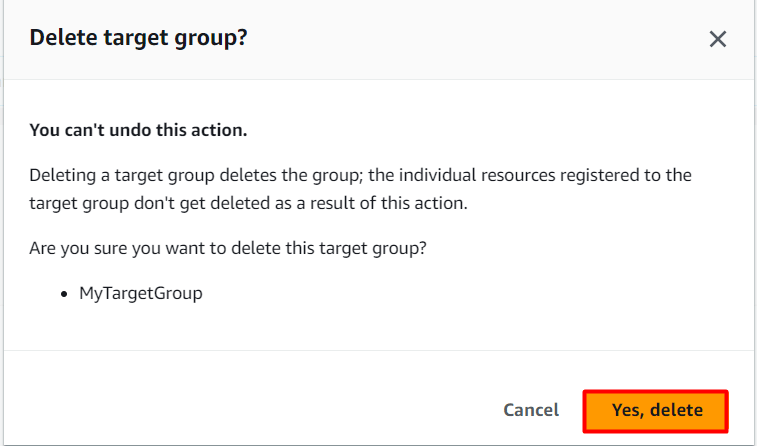 5. MyTargetGroup will be deleted immediately.
##### Deleting EC2 Instances
1. In the EC2 console, navigate to Instances in the left-side panel.
2. Two EC2 Instances MyEC2Server1 and MyEC2Server2 will be listed here.
5. MyTargetGroup will be deleted immediately.
##### Deleting EC2 Instances
1. In the EC2 console, navigate to Instances in the left-side panel.
2. Two EC2 Instances MyEC2Server1 and MyEC2Server2 will be listed here.
 3. To terminate the EC2 Instances, need to perform the following actions:
* Select the EC2 instance
* Click on the Instance state button,
* Select the Terminate instance option
3. To terminate the EC2 Instances, need to perform the following actions:
* Select the EC2 instance
* Click on the Instance state button,
* Select the Terminate instance option
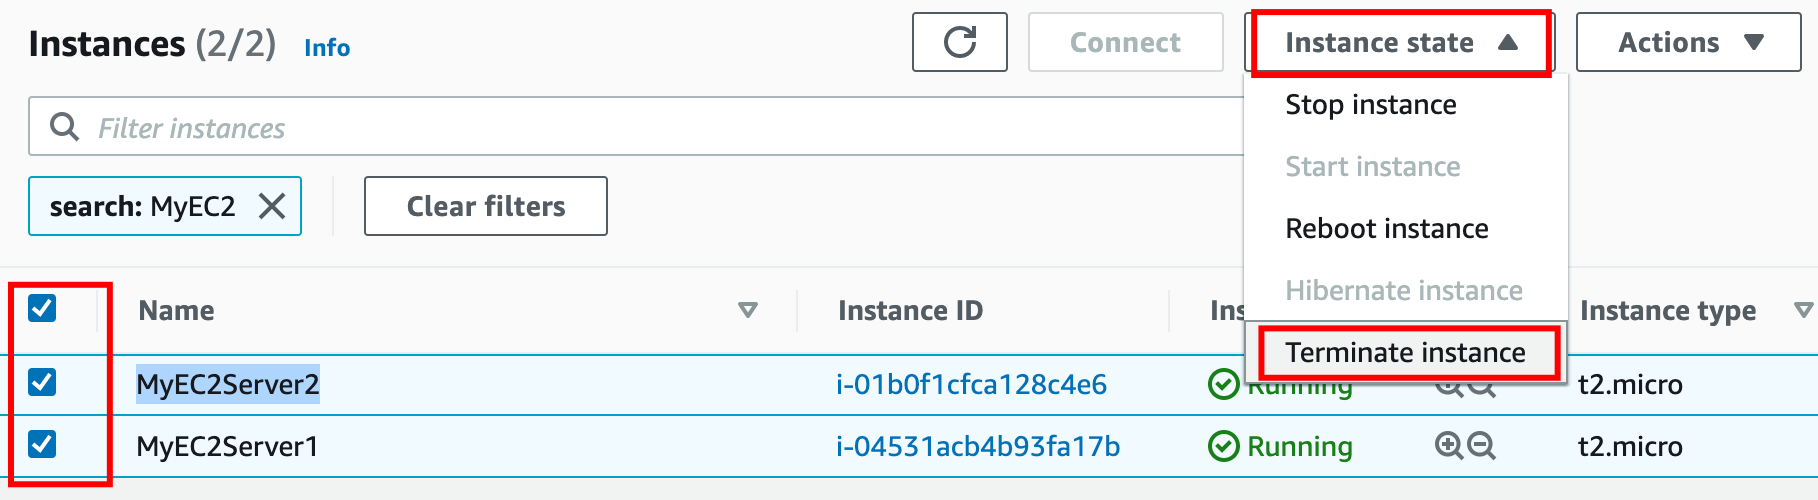 4. Confirm by clicking on the Terminate button when a pop-up is shown.
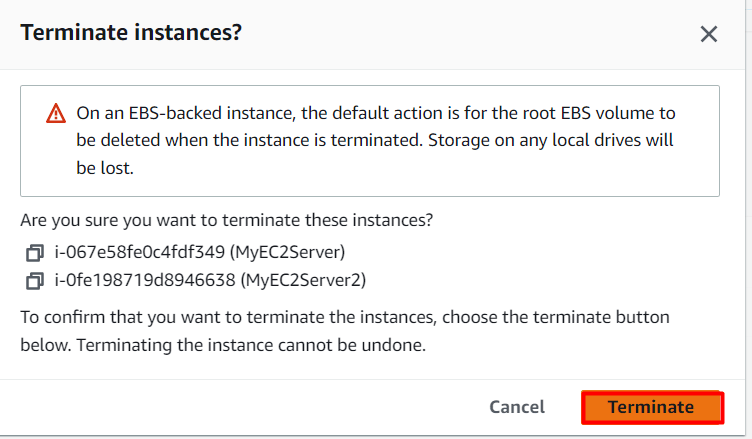 5. EC2 Instances will be terminated immediately.
### Completion and Conclusion
1. You have created two EC2 instances with a bash script that installed Apache servers and created sample HTML pages and published them.
2. You created a Load Balancer and Target group.
3. You added both EC2 instances in the load balancer Target group.
4. You have tested the Elastic Load Balancer by refreshing and simulating a shutdown of an EC2 Instance.
### End Lab
1. Sign out of the AWS Account
2. You have successfully completed the lab.
3. Once you have completed the steps, click on End Lab from the IP Lab Portal dashboard.
## What gets checked
When you press **Check my work**, the platform verifies each of these:
* **Launch an EC2 Instance** — Check whether an EC2 Instance is launched or not.
* **Launch EC2 AMI type Amazon Linux** — Check whether the EC2 instance is launched using an Amazon AMI.
* **Create a Application Load Balancer** — Check if given type of Load Balancer is created or not.
* **Invoke Load Balancer DNS** — Check whether the Elastic Load Balancer DNS URL is accessible from the internet or not.
## Related help
* [FAQs and Troubleshooting](/aws-saa/support/faqs-and-troubleshooting)
This documentation is built and hosted on [Mintlify](https://mintlify.com), a developer documentation platform.
5. EC2 Instances will be terminated immediately.
### Completion and Conclusion
1. You have created two EC2 instances with a bash script that installed Apache servers and created sample HTML pages and published them.
2. You created a Load Balancer and Target group.
3. You added both EC2 instances in the load balancer Target group.
4. You have tested the Elastic Load Balancer by refreshing and simulating a shutdown of an EC2 Instance.
### End Lab
1. Sign out of the AWS Account
2. You have successfully completed the lab.
3. Once you have completed the steps, click on End Lab from the IP Lab Portal dashboard.
## What gets checked
When you press **Check my work**, the platform verifies each of these:
* **Launch an EC2 Instance** — Check whether an EC2 Instance is launched or not.
* **Launch EC2 AMI type Amazon Linux** — Check whether the EC2 instance is launched using an Amazon AMI.
* **Create a Application Load Balancer** — Check if given type of Load Balancer is created or not.
* **Invoke Load Balancer DNS** — Check whether the Elastic Load Balancer DNS URL is accessible from the internet or not.
## Related help
* [FAQs and Troubleshooting](/aws-saa/support/faqs-and-troubleshooting)
This documentation is built and hosted on [Mintlify](https://mintlify.com), a developer documentation platform.