> ## Documentation Index
> Fetch the complete documentation index at: https://cloud-architect.ipoint-labs.com/llms.txt
> Use this file to discover all available pages before exploring further.
# Introduction to Simple Queuing Service (SQS)
> Hands-on lab · 45m
Launch this lab in the IP Lab Portal, then follow the steps below in the AWS console.
Open IP Lab Portal
## Overview
### Lab Details
1. This lab will walk you through the steps to create and manage queues by explaining all the basics needed.
2. Duration: **45 minutes**
3. AWS Region: **US East (N. Virginia) us-east-1.**
### Introduction
#### SQS (Simple Queue Service)
**Fun Fact: This was the first-ever AWS service offering made publicly available.**
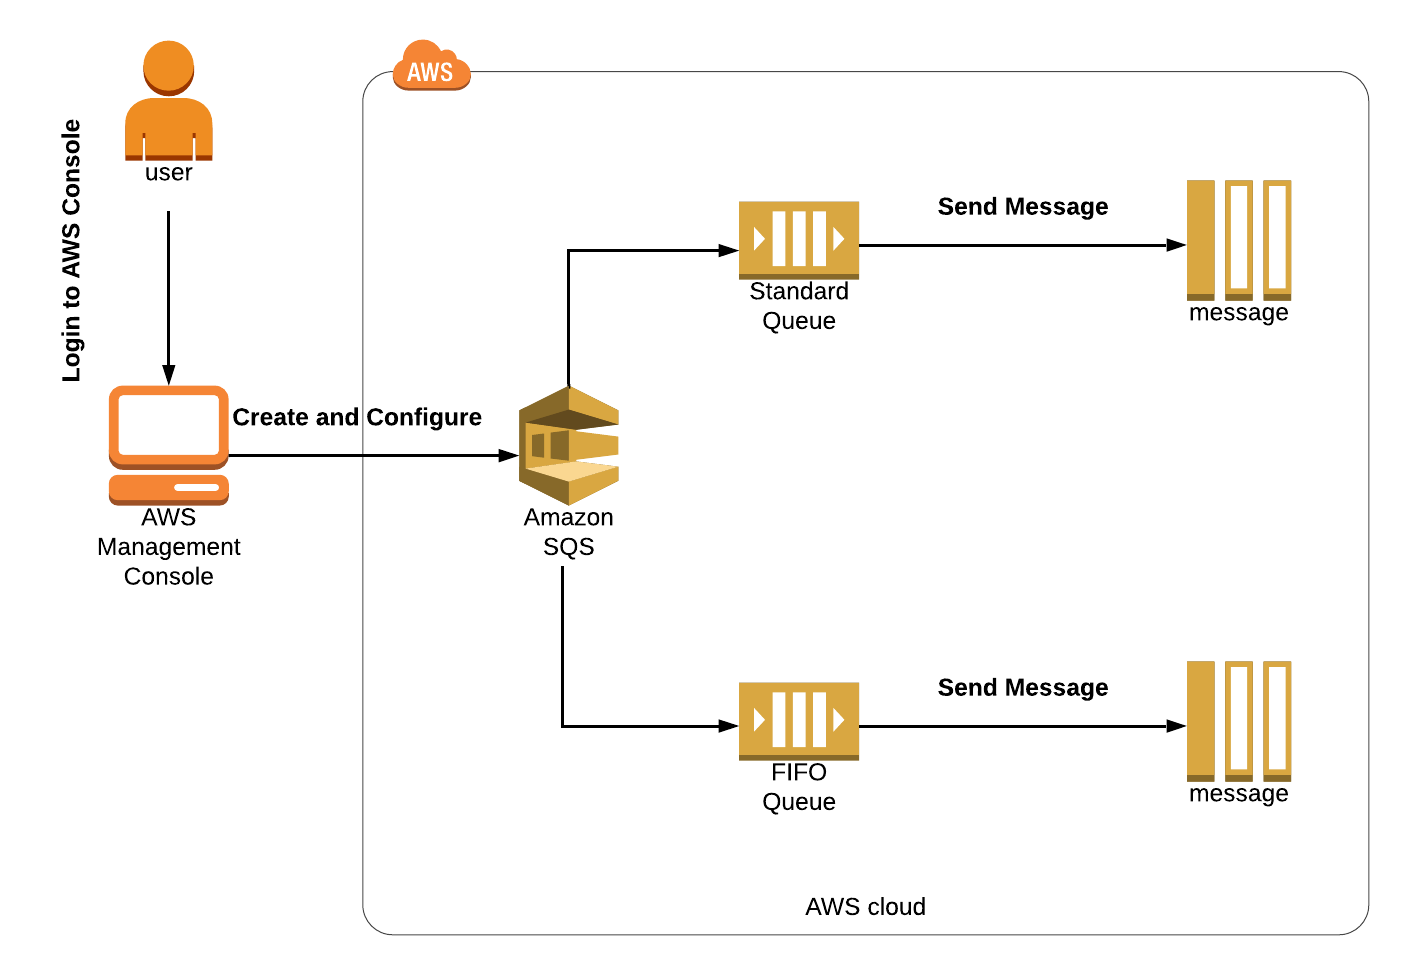
1. Amazon SQS is a reliable, easy to manage, scalable queuing service. SQS is a simple and cost-effective cloud application.
2. AWS SQS can be used to transmit any amount of data, at any level of throughput, without losing messages. It doesn’t interrupt other services when run continuously.
3. SQS helps to reduce administrative tasks by scaling high-available messaging clusters. While we pay only for what we use. AWS SQS helps us to save important data which could be lost if an entire application goes down or if any component becomes unavailable.
4. SQS queue acts as a buffer between the application components that receive the data and the other parts that process the data in the system.
5. SQS is used for message-oriented architecture. If the processing server cannot process the work fast enough (for whatever reason) the work is queued so that the processing servers can work on it when they have available resources to process the request. This means that work is not lost due to insufficient resources.
6. The default Amazon SQS ensures that each message is delivered at least once.
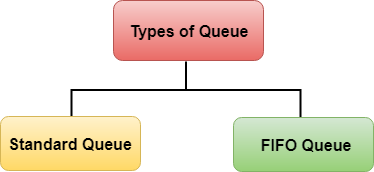
7. There are two types of Queues:
 ### Architecture Diagram
###
### Architecture Diagram
###
 ### Case Study:
1. Consider an example of a major flash sale on an e-commerce website where people buy and sell a wide range of products. The requirement is all the requests, with respect to the buyer and seller, should be processed in the order they are received by the queue. To fulfill this requirement, we’ll be using the FIFO queue.
### Case Study:
1. Consider an example of a major flash sale on an e-commerce website where people buy and sell a wide range of products. The requirement is all the requests, with respect to the buyer and seller, should be processed in the order they are received by the queue. To fulfill this requirement, we’ll be using the FIFO queue.
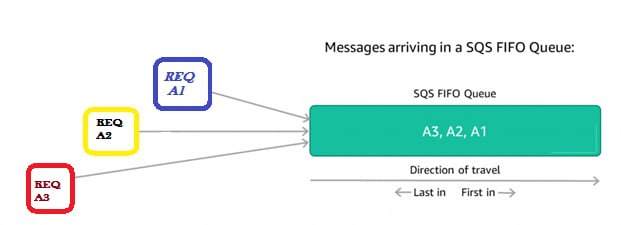 2. A mobile company is holding a flash sale for their new model with great features at the best price. It is expected that a huge number of buyers will place orders. The company is holding stock for a limited period, so it’s important to track the order that arrives first. Your flash sale receives a huge response and it is now forecasted that only the buyers who place the order first will receive the product.
3. Let’s understand how messages get in and out of our FIFO queue. Assume the consuming application requests a batch of up to 300 messages, AWS SQS starts filling the batch with the oldest message (REQ A1) and keeps filling the queue until the batch is full. In our case, assume the batch contains only three requests and now the queue is empty. Once the message batch has left the queue, SQS considers the batch to be **In-flight** until the batch gets processed completely or the visibility timeout gets expires.
2. A mobile company is holding a flash sale for their new model with great features at the best price. It is expected that a huge number of buyers will place orders. The company is holding stock for a limited period, so it’s important to track the order that arrives first. Your flash sale receives a huge response and it is now forecasted that only the buyers who place the order first will receive the product.
3. Let’s understand how messages get in and out of our FIFO queue. Assume the consuming application requests a batch of up to 300 messages, AWS SQS starts filling the batch with the oldest message (REQ A1) and keeps filling the queue until the batch is full. In our case, assume the batch contains only three requests and now the queue is empty. Once the message batch has left the queue, SQS considers the batch to be **In-flight** until the batch gets processed completely or the visibility timeout gets expires.
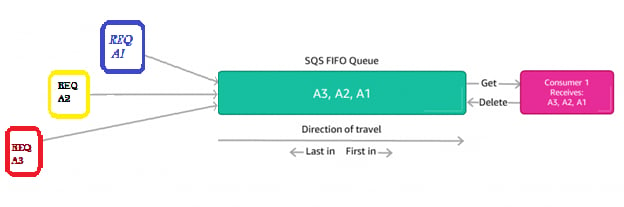 4. When you have a single consuming application for the queue's output, this is easy to process. It will receive the messages, do its processing and deletes the messages. Now the consuming application is ready to process the next batch of the messages. You can also add an autoscaling group to scale your processing power depending upon the requirements.
**Note:** SQS won’t release the next batch of messages until the first batch has been deleted.
### Task Details
1. Sign in to the AWS Management Console.
2. Create FIFO and Standard Queue using the Console.
3. What is Long Polling and configuring Long Polling for the queue.
4. What is Visibility Timeout and configuring Visibility Timeout.
5. What is Delay Queue and configuring Delay Queue.
6. Purge Queue and verify the same.
7. SQS points to remember.
### Launching Lab Environment
1. To launch the lab environment, Click on the **Start lab** button.
2. Please wait until the cloud environment is provisioned. It will take less than a minute to provision.
3. Once the Lab is started, you will be provided with **IAM username**, **Password**, **Access** **Key**, and **Secret** **Access** **Key**.
**Note** : You can only start one lab at any given time
## Lab guide
### Lab Steps
#### Task 1: Sign in to AWS Management Console
1. Click on the **Open console** button, and you will get redirected to AWS Console in a new browser tab.
2. On the AWS sign-in page,
* Leave the Account ID as default. Never edit/remove the 12-digit Account ID present in the AWS Console. Otherwise, you cannot proceed with the lab.
* Now copy your **User Name** and **Password** in the Lab Console to the **IAM Username and Password** in AWS Console and click on the **Sign in** button.
3. Once Signed In to the AWS Management Console, make the default AWS Region as **US East (N. Virginia) us-east-1.**
> **Note :** If you face any issues, please go through [**FAQs and Troubleshooting for Labs**](https://play.whizlabs.com/site/task_support/faqs-and-troubleshooting).
#### Task 2 : Create FIFO and Standard Queue using the Console
In this task, we are going to create two types of queues: FIFO (First-In-First-Out) and Standard. By creating these queues, the user can understand and experience the differences between them.
1. Make sure you are in the **N. Virginia** region.
2. Navigate to the Services menu on the top, search for **SQS** and select it.
3. Click on the **Create queue** button.
4. **Details :**
* Type : Select **FIFO**
* Name : Enter **MyWhizQueue.fifo**
* **Note:** The name of a FIFO queue must end with the **.fifo** suffix.
5. Leave everything as **default** and click on **Create queue** button
4. When you have a single consuming application for the queue's output, this is easy to process. It will receive the messages, do its processing and deletes the messages. Now the consuming application is ready to process the next batch of the messages. You can also add an autoscaling group to scale your processing power depending upon the requirements.
**Note:** SQS won’t release the next batch of messages until the first batch has been deleted.
### Task Details
1. Sign in to the AWS Management Console.
2. Create FIFO and Standard Queue using the Console.
3. What is Long Polling and configuring Long Polling for the queue.
4. What is Visibility Timeout and configuring Visibility Timeout.
5. What is Delay Queue and configuring Delay Queue.
6. Purge Queue and verify the same.
7. SQS points to remember.
### Launching Lab Environment
1. To launch the lab environment, Click on the **Start lab** button.
2. Please wait until the cloud environment is provisioned. It will take less than a minute to provision.
3. Once the Lab is started, you will be provided with **IAM username**, **Password**, **Access** **Key**, and **Secret** **Access** **Key**.
**Note** : You can only start one lab at any given time
## Lab guide
### Lab Steps
#### Task 1: Sign in to AWS Management Console
1. Click on the **Open console** button, and you will get redirected to AWS Console in a new browser tab.
2. On the AWS sign-in page,
* Leave the Account ID as default. Never edit/remove the 12-digit Account ID present in the AWS Console. Otherwise, you cannot proceed with the lab.
* Now copy your **User Name** and **Password** in the Lab Console to the **IAM Username and Password** in AWS Console and click on the **Sign in** button.
3. Once Signed In to the AWS Management Console, make the default AWS Region as **US East (N. Virginia) us-east-1.**
> **Note :** If you face any issues, please go through [**FAQs and Troubleshooting for Labs**](https://play.whizlabs.com/site/task_support/faqs-and-troubleshooting).
#### Task 2 : Create FIFO and Standard Queue using the Console
In this task, we are going to create two types of queues: FIFO (First-In-First-Out) and Standard. By creating these queues, the user can understand and experience the differences between them.
1. Make sure you are in the **N. Virginia** region.
2. Navigate to the Services menu on the top, search for **SQS** and select it.
3. Click on the **Create queue** button.
4. **Details :**
* Type : Select **FIFO**
* Name : Enter **MyWhizQueue.fifo**
* **Note:** The name of a FIFO queue must end with the **.fifo** suffix.
5. Leave everything as **default** and click on **Create queue** button
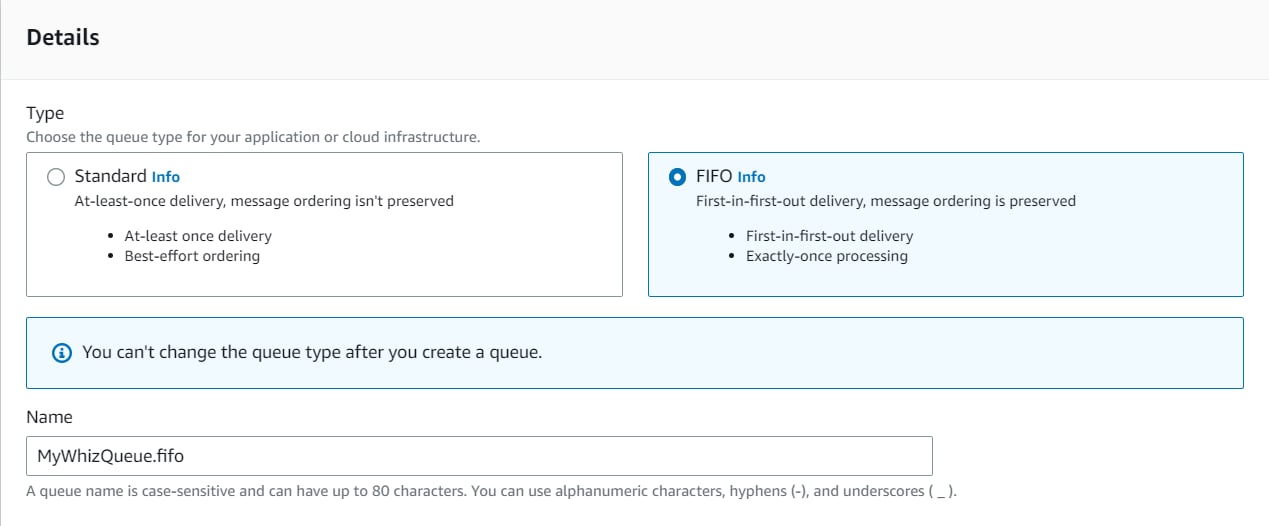 6. Once you click on **Create Queue** you will get a success message. Go back to the queues dashboard, a FIFO queue gets created as given in the image below.
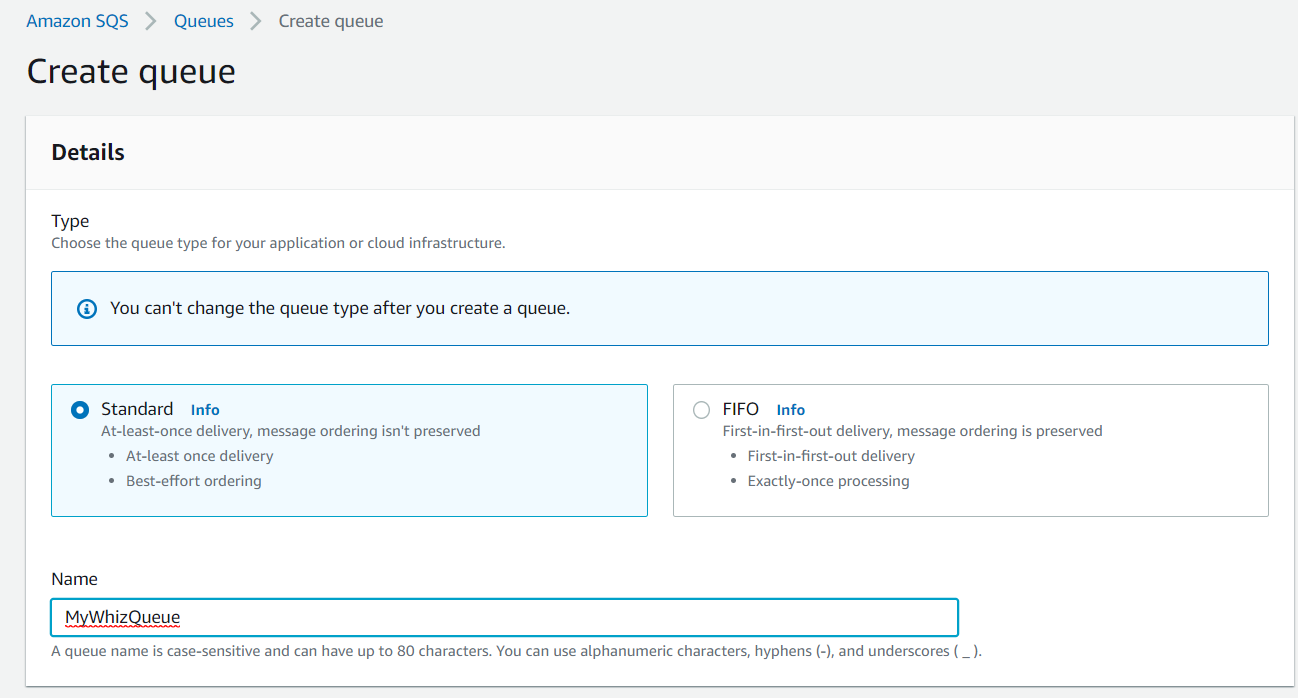
 7. Now, We’ll create a **Standard Queue**, with all the default options. The only difference is we don't provide the suffix **.fifo** while creating the queue.
8. Click on **Create queue** button.
9. **Details :**
* Type : Select **Standard**
* Name : Enter **MyWhizQueue**
7. Now, We’ll create a **Standard Queue**, with all the default options. The only difference is we don't provide the suffix **.fifo** while creating the queue.
8. Click on **Create queue** button.
9. **Details :**
* Type : Select **Standard**
* Name : Enter **MyWhizQueue**
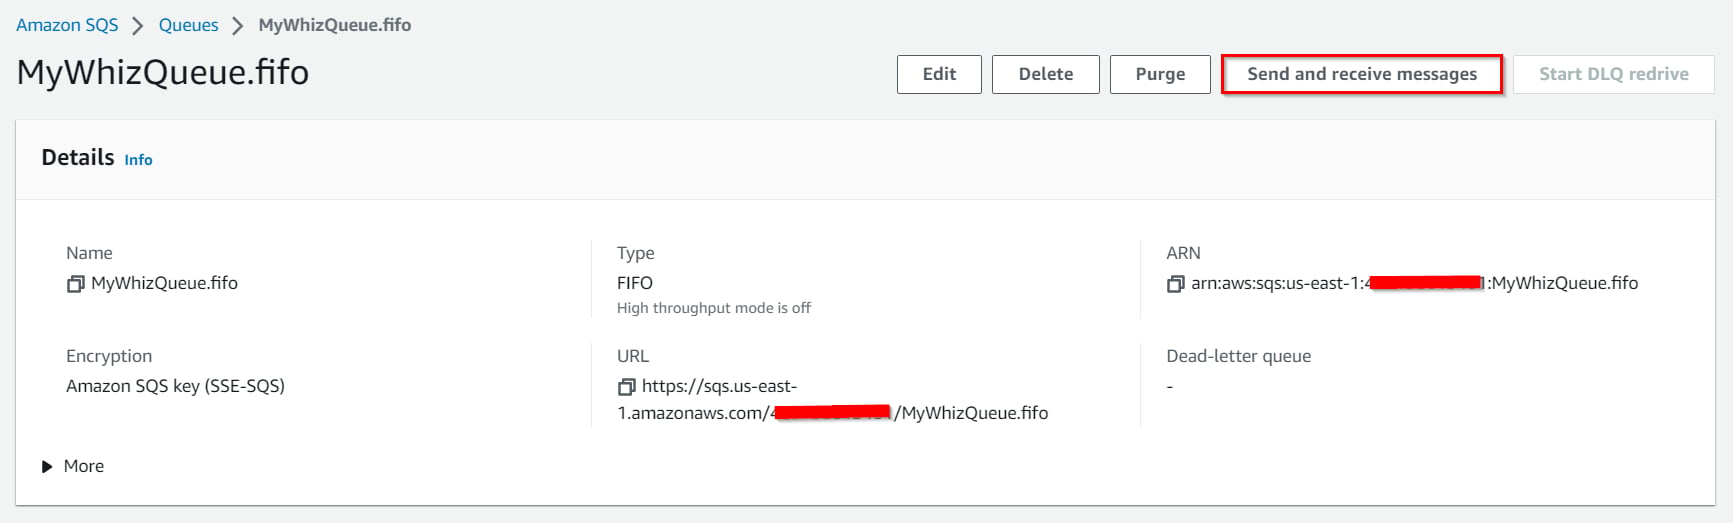
 10. The **Type** column helps you distinguish the Standard queue from the FIFO queue at a glance. For a FIFO queue, the **Content-Based deduplication** column displays whether **each of your messages has a unique body** enabled or not.
11. Click on the **MyWhizQueue.fifo** to get detailed information about all the important parameters including **ARN, Name and URL** of the queue.
12. We’ll be now sending a message from our FIFO queue.
13. Click on **Send and receive messages**.
10. The **Type** column helps you distinguish the Standard queue from the FIFO queue at a glance. For a FIFO queue, the **Content-Based deduplication** column displays whether **each of your messages has a unique body** enabled or not.
11. Click on the **MyWhizQueue.fifo** to get detailed information about all the important parameters including **ARN, Name and URL** of the queue.
12. We’ll be now sending a message from our FIFO queue.
13. Click on **Send and receive messages**.
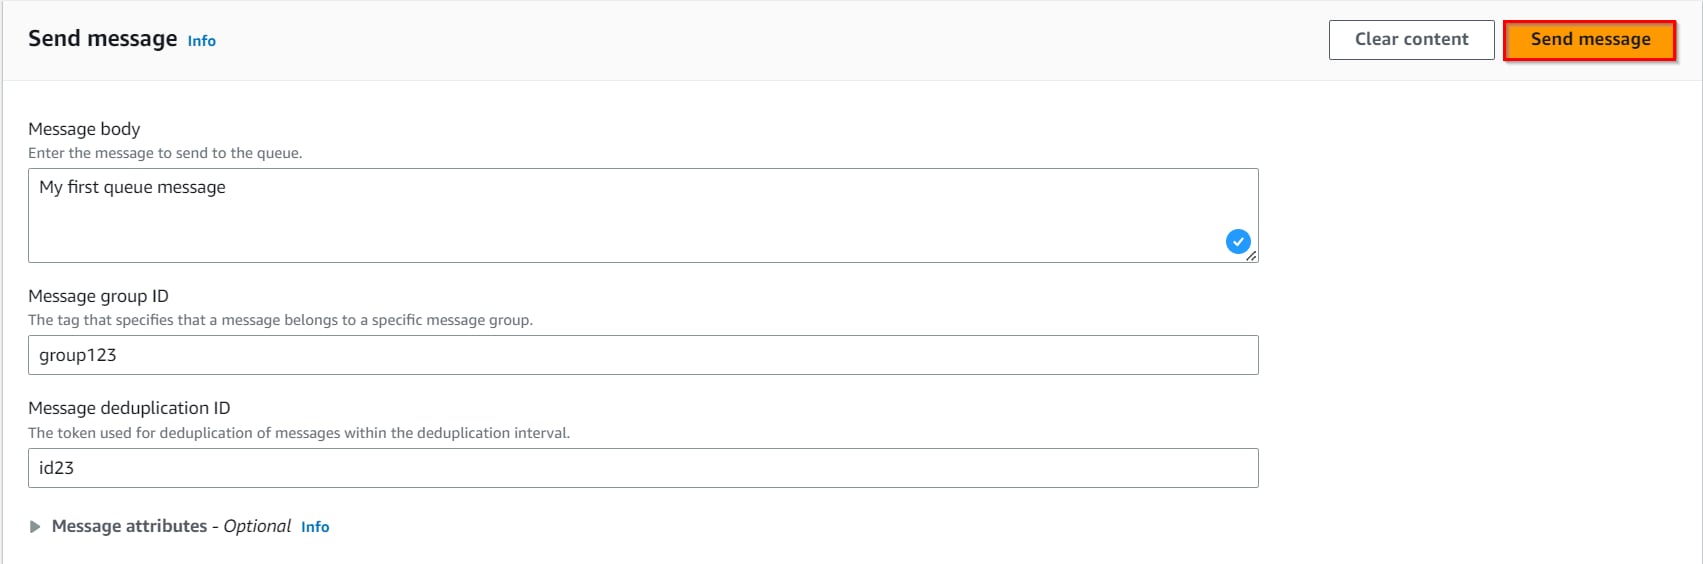
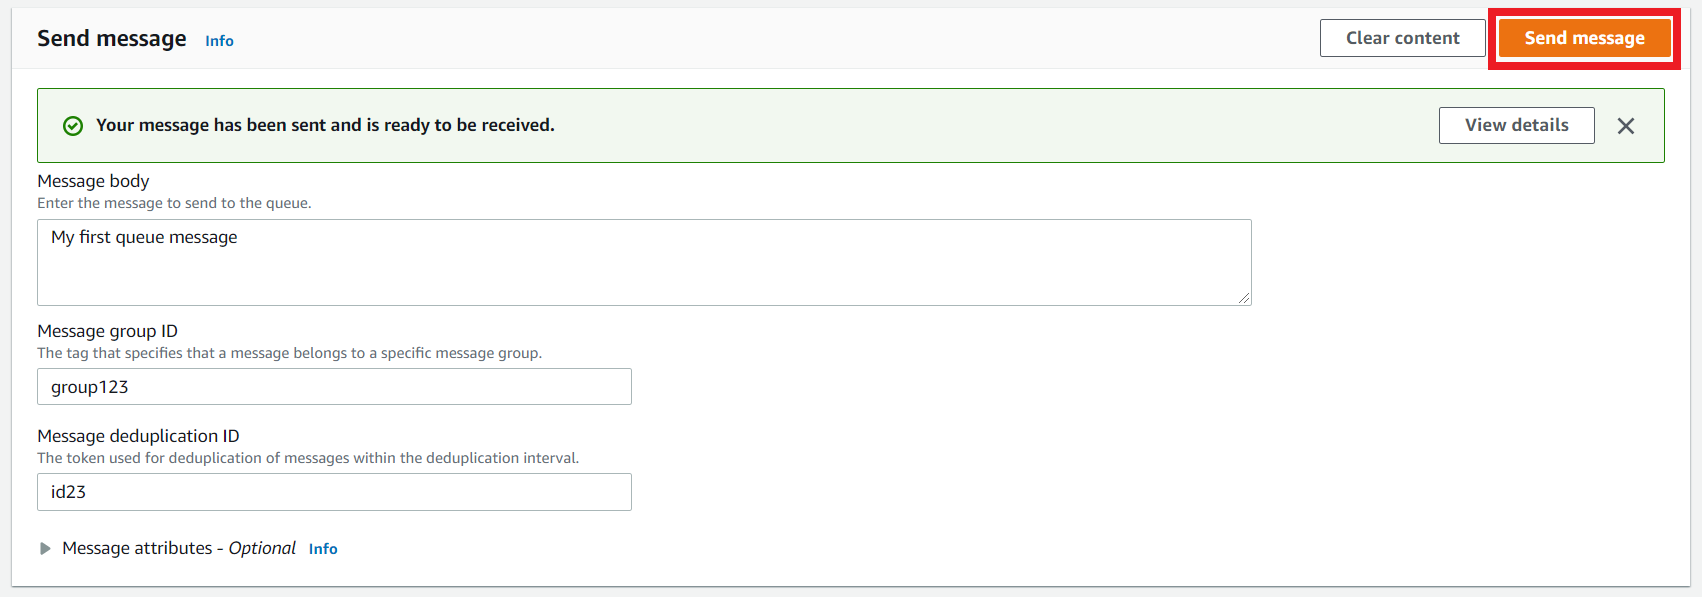
 14. Send message
* Message body : Enter **My first queue message**
* Message group ID : Enter **group123**
* Message deduplication ID : Enter **id23**
15. Now click on **Send message** button
14. Send message
* Message body : Enter **My first queue message**
* Message group ID : Enter **group123**
* Message deduplication ID : Enter **id23**
15. Now click on **Send message** button
 16. Once you have sent a message, you get an acknowledgment.
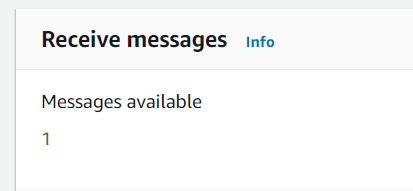
 17. After sending the message, we can see that **Message available** changes to 1.
 18. Similarly, send few more messages with **different** **Message body**, **Message group ID** and **Message deduplication**.
Click on **Clear content** button and type new message.
18. Similarly, send few more messages with **different** **Message body**, **Message group ID** and **Message deduplication**.
Click on **Clear content** button and type new message.
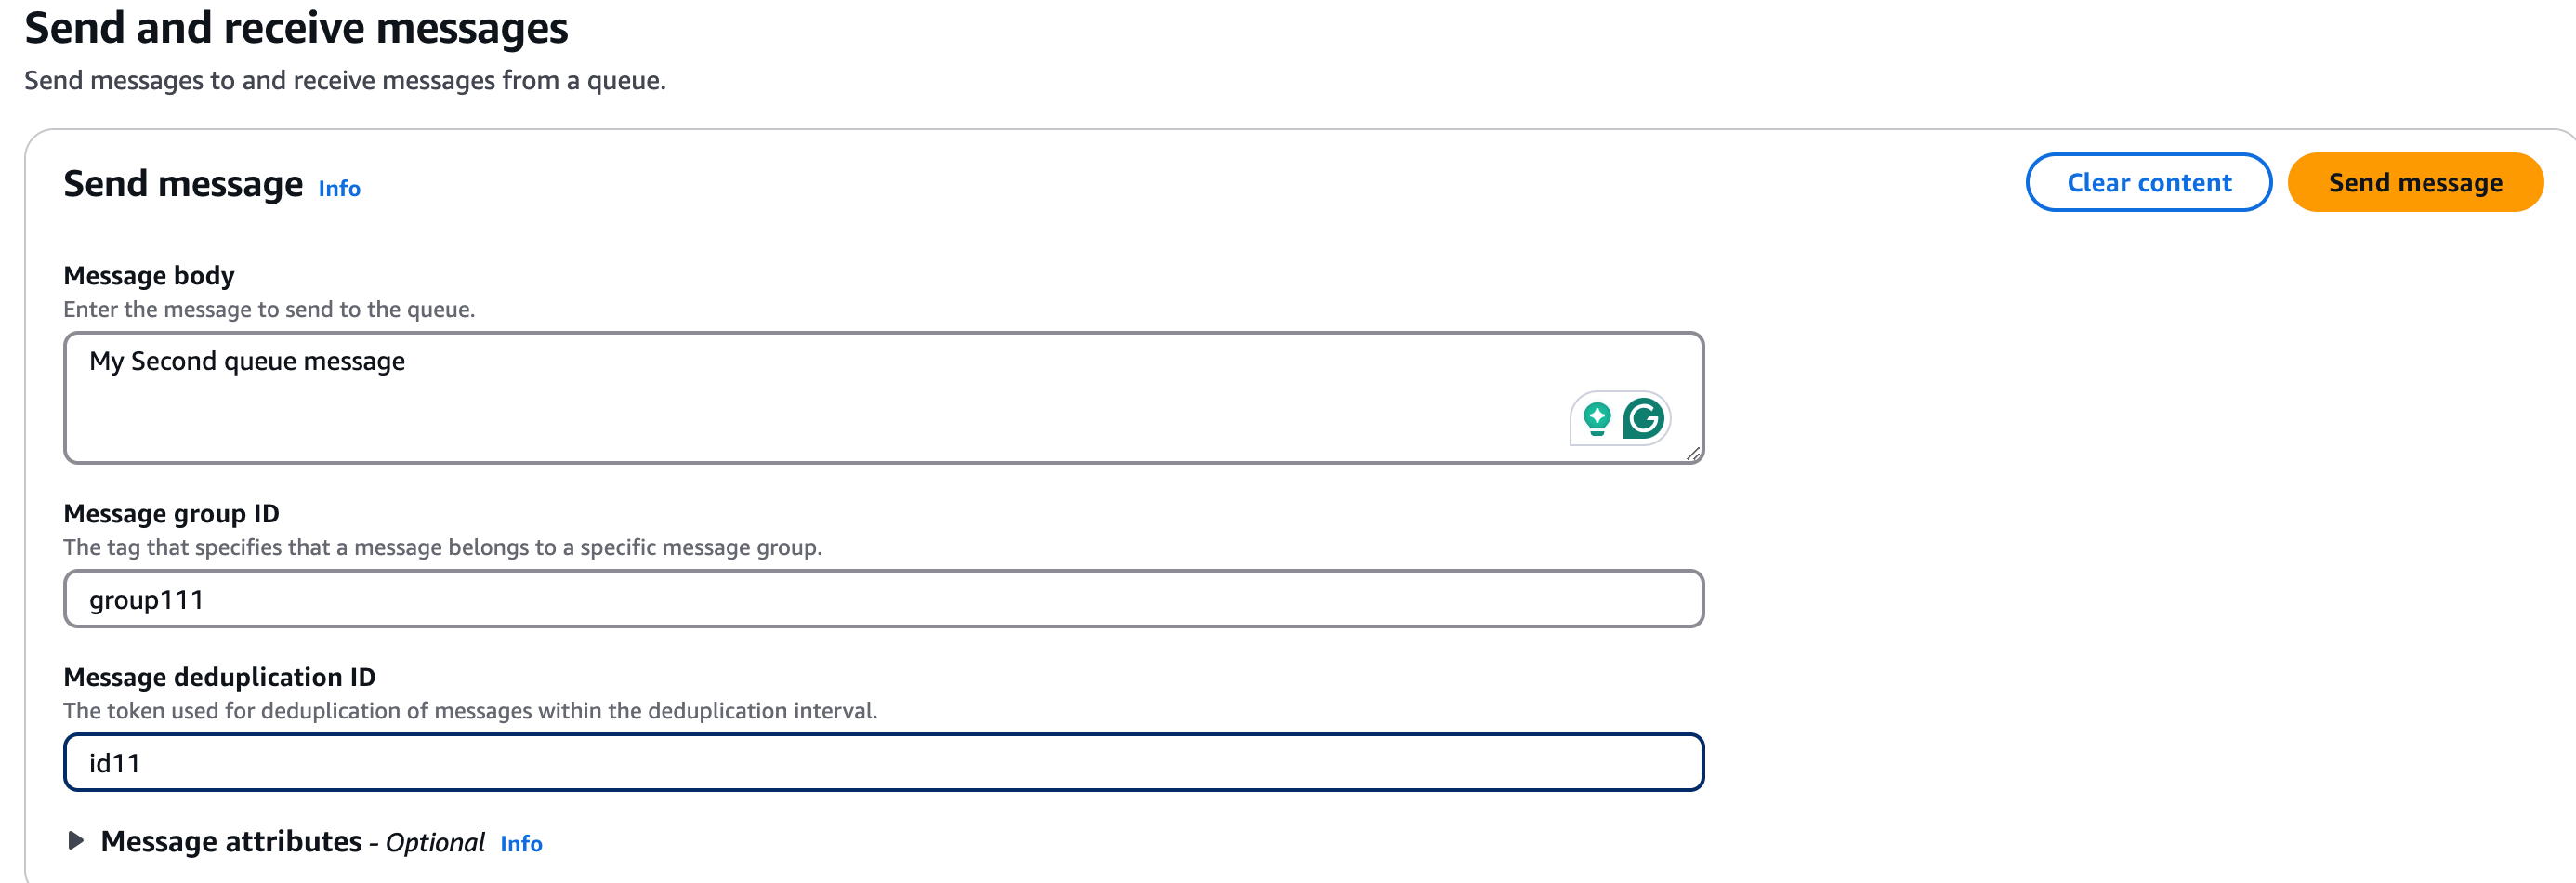 19. After sending the messages, **Message available** changes to the number of messages sent.
20. Now, to get all the messages we have sent, click on **Poll for messages** in the **Receive messages section**.
21. We can now see the message column has been filled with the messages.
22. Then click on the message to see its body.
19. After sending the messages, **Message available** changes to the number of messages sent.
20. Now, to get all the messages we have sent, click on **Poll for messages** in the **Receive messages section**.
21. We can now see the message column has been filled with the messages.
22. Then click on the message to see its body.
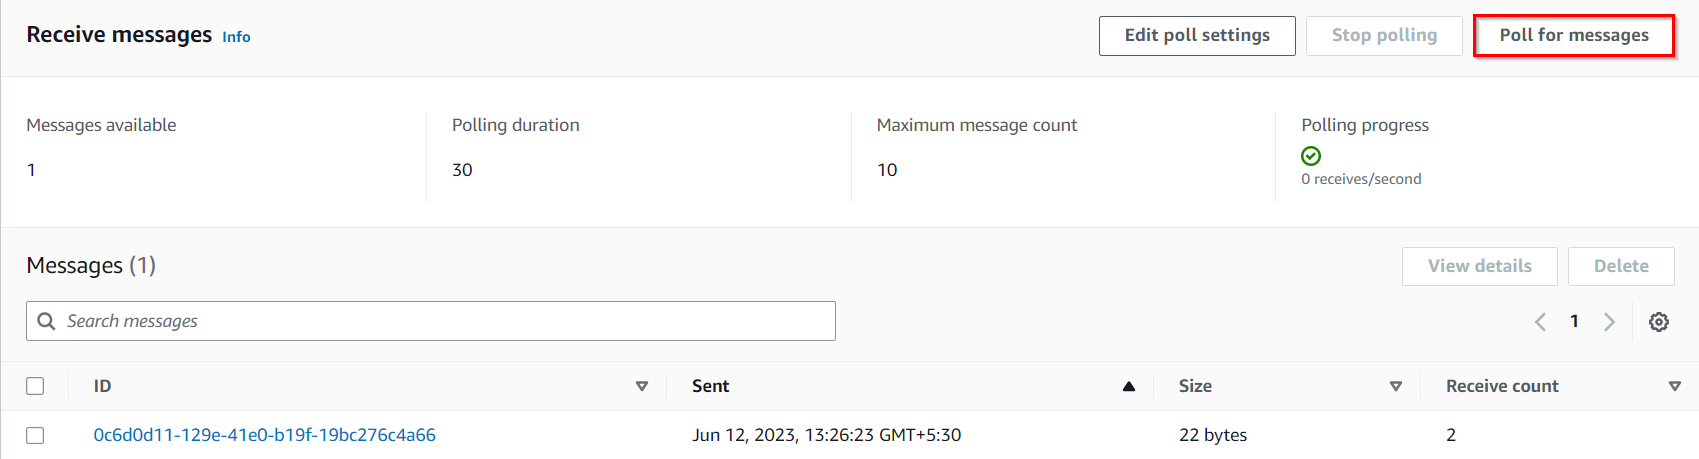
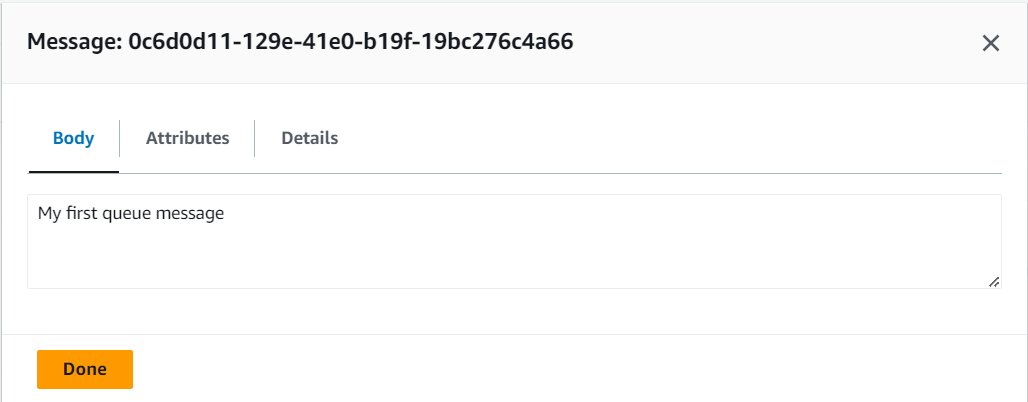 23. **Hence, we have successfully sent and received messages in the console.**
24. Similarly, we’ll try with the **Standard** queue for sending the message.
25. Click on **Send and receive messages**.
23. **Hence, we have successfully sent and received messages in the console.**
24. Similarly, we’ll try with the **Standard** queue for sending the message.
25. Click on **Send and receive messages**.
 26. Send message:
* Message body : Enter **My first standard message queue**
* Now click on **Send message** button.
27. Once the message is delivered, you’ll receive an acknowledgment for successful delivery.
26. Send message:
* Message body : Enter **My first standard message queue**
* Now click on **Send message** button.
27. Once the message is delivered, you’ll receive an acknowledgment for successful delivery.
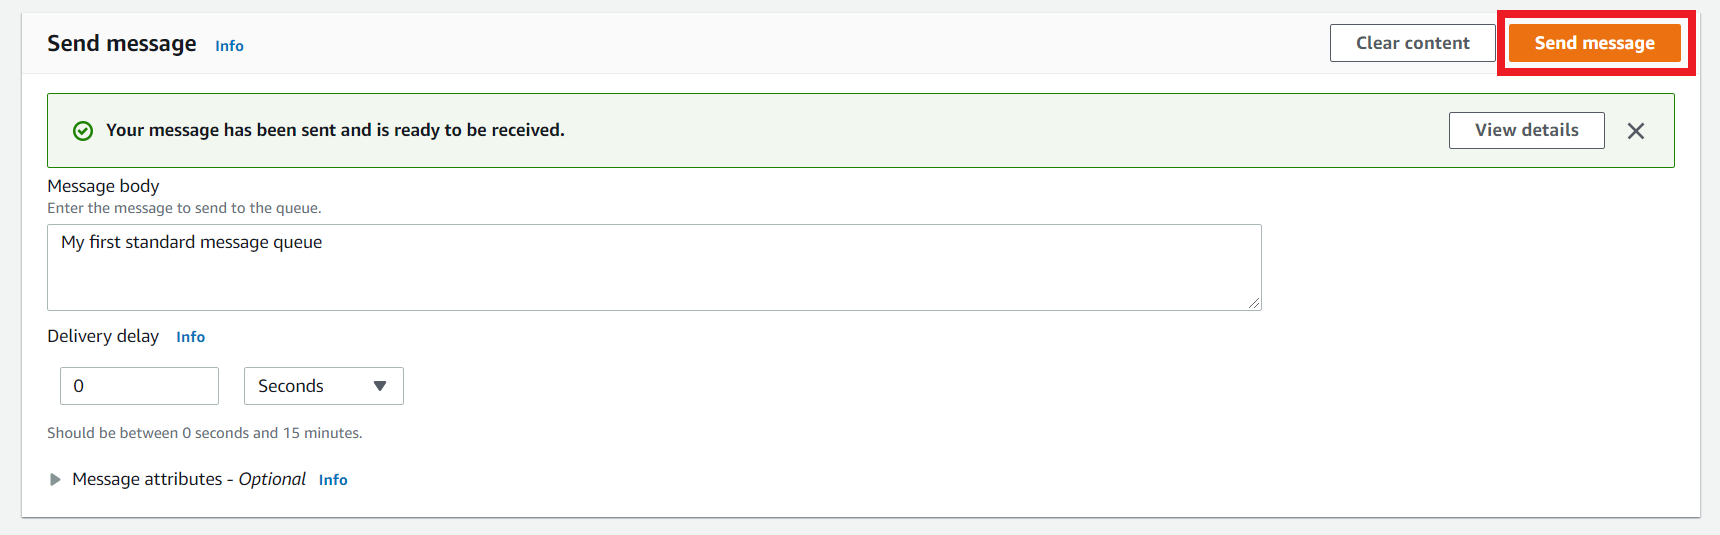 28. After sending the message, we can see that **Message available** changes to 1.
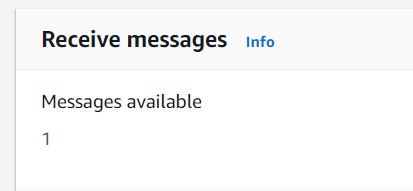 29. Similarly, send few more messages with different **Message body**.
30. After sending the messages, **Message available** changes to the number of messages sent.
31. Now, to get all the messages we have sent, click on **Poll for messages** in the **Receive messages** section.
32. Then click on the messages to see its body.
29. Similarly, send few more messages with different **Message body**.
30. After sending the messages, **Message available** changes to the number of messages sent.
31. Now, to get all the messages we have sent, click on **Poll for messages** in the **Receive messages** section.
32. Then click on the messages to see its body.
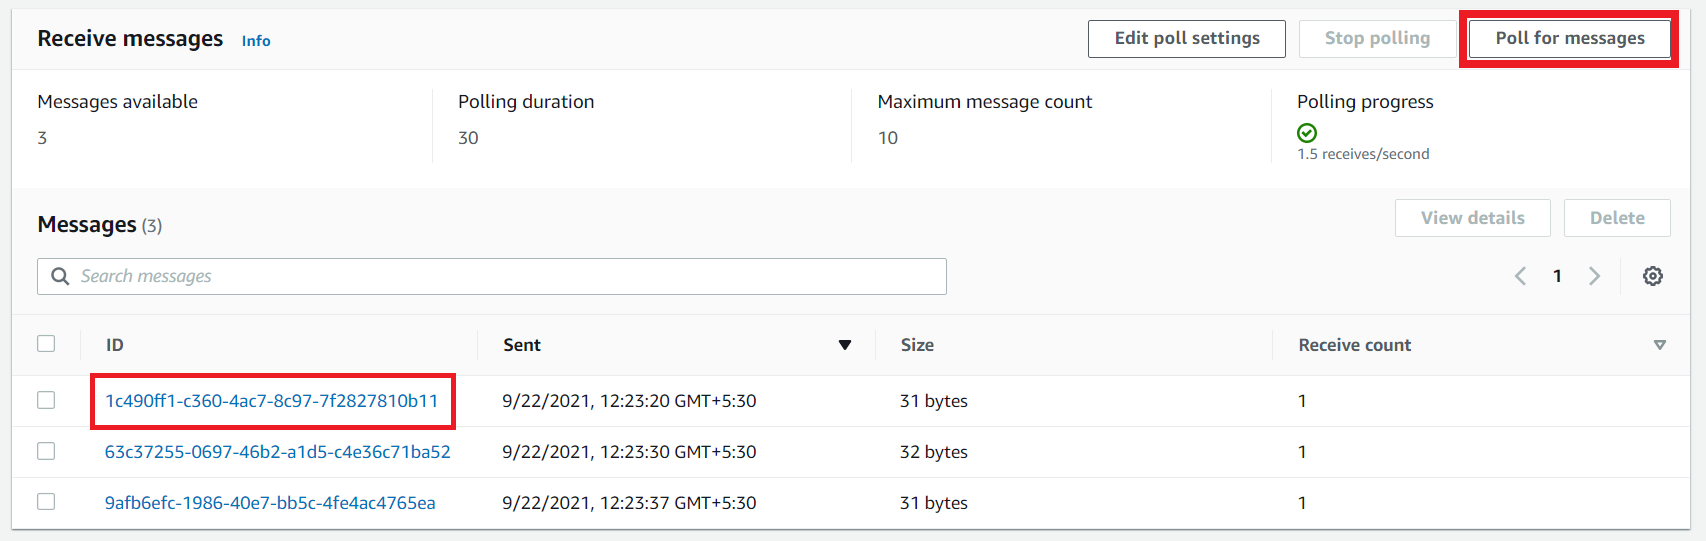
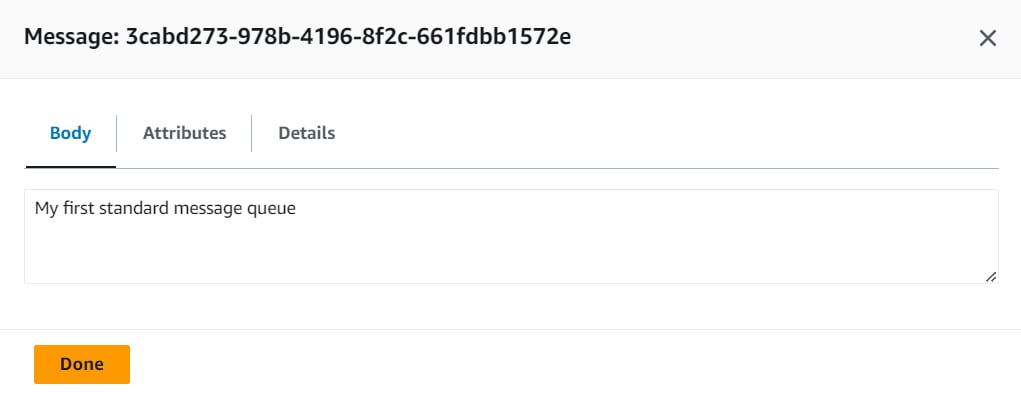 33. **Hence, we have successfully sent and received messages in the console.**
34. Let's try to understand the other parameters like **Long Polling** and how it works in SQS. Before moving to the lab, try to focus on what exactly the Long polling is and when it should be used.
#### Task 3 : What is Long Polling & Configuring Long Polling
In this task, we are going to introduce the concept of long polling and its benefits in Amazon SQS. Long polling is an alternative to short polling, where the client waits for a response from the server only when there are messages available in the queue. By configuring long polling, the user can reduce the number of empty responses and save computational resources, resulting in cost savings.
1. **Long Polling:** Let's try to understand how long polling works and why we should use it.
* For example, if our application requires SQS messages, it will call the **RecieveMessage** function in the background. **ReceiveMessage** will check the presence of any messages in the queue and return immediately, with or without messages.
* Calling a **ReceiveMessage** function in our application is fine as per the requirement, but what if the SQS client repeatedly checks for the message in the queue for any new messages. This is a problem, as continuous calls for the **ReceiveMessage** function will require lots of CPU cycles and tie up a thread. In this situation, we'll be using long polling. The only modification that we have to make is to update our **WaitTimeSeconds** argument to 1-20 seconds.
* Now, if the queue is empty, the call will wait up to **WaitTimeSeconds** for a message to come in the queue before returning. If messages come in before the timeout, the call will return the message right away.
2. Remember, if the wait time for the **ReceiveMessage** API action is greater than 0, long polling is in effect. Long polling is cost-effective because you're not constantly polling an empty queue.
3. By default, Amazon SQS uses short polling, querying only a subset of its servers (based on a weighted random distribution) to determine whether any messages are available for a response.
4. Let’s try to make this work in our existing queue by configuring Long Polling. Select any queue (standard or FIFO) from the list and click on **Edit** to make changes in our queue. We’ll be selecting the Standard queue as an example.
33. **Hence, we have successfully sent and received messages in the console.**
34. Let's try to understand the other parameters like **Long Polling** and how it works in SQS. Before moving to the lab, try to focus on what exactly the Long polling is and when it should be used.
#### Task 3 : What is Long Polling & Configuring Long Polling
In this task, we are going to introduce the concept of long polling and its benefits in Amazon SQS. Long polling is an alternative to short polling, where the client waits for a response from the server only when there are messages available in the queue. By configuring long polling, the user can reduce the number of empty responses and save computational resources, resulting in cost savings.
1. **Long Polling:** Let's try to understand how long polling works and why we should use it.
* For example, if our application requires SQS messages, it will call the **RecieveMessage** function in the background. **ReceiveMessage** will check the presence of any messages in the queue and return immediately, with or without messages.
* Calling a **ReceiveMessage** function in our application is fine as per the requirement, but what if the SQS client repeatedly checks for the message in the queue for any new messages. This is a problem, as continuous calls for the **ReceiveMessage** function will require lots of CPU cycles and tie up a thread. In this situation, we'll be using long polling. The only modification that we have to make is to update our **WaitTimeSeconds** argument to 1-20 seconds.
* Now, if the queue is empty, the call will wait up to **WaitTimeSeconds** for a message to come in the queue before returning. If messages come in before the timeout, the call will return the message right away.
2. Remember, if the wait time for the **ReceiveMessage** API action is greater than 0, long polling is in effect. Long polling is cost-effective because you're not constantly polling an empty queue.
3. By default, Amazon SQS uses short polling, querying only a subset of its servers (based on a weighted random distribution) to determine whether any messages are available for a response.
4. Let’s try to make this work in our existing queue by configuring Long Polling. Select any queue (standard or FIFO) from the list and click on **Edit** to make changes in our queue. We’ll be selecting the Standard queue as an example.
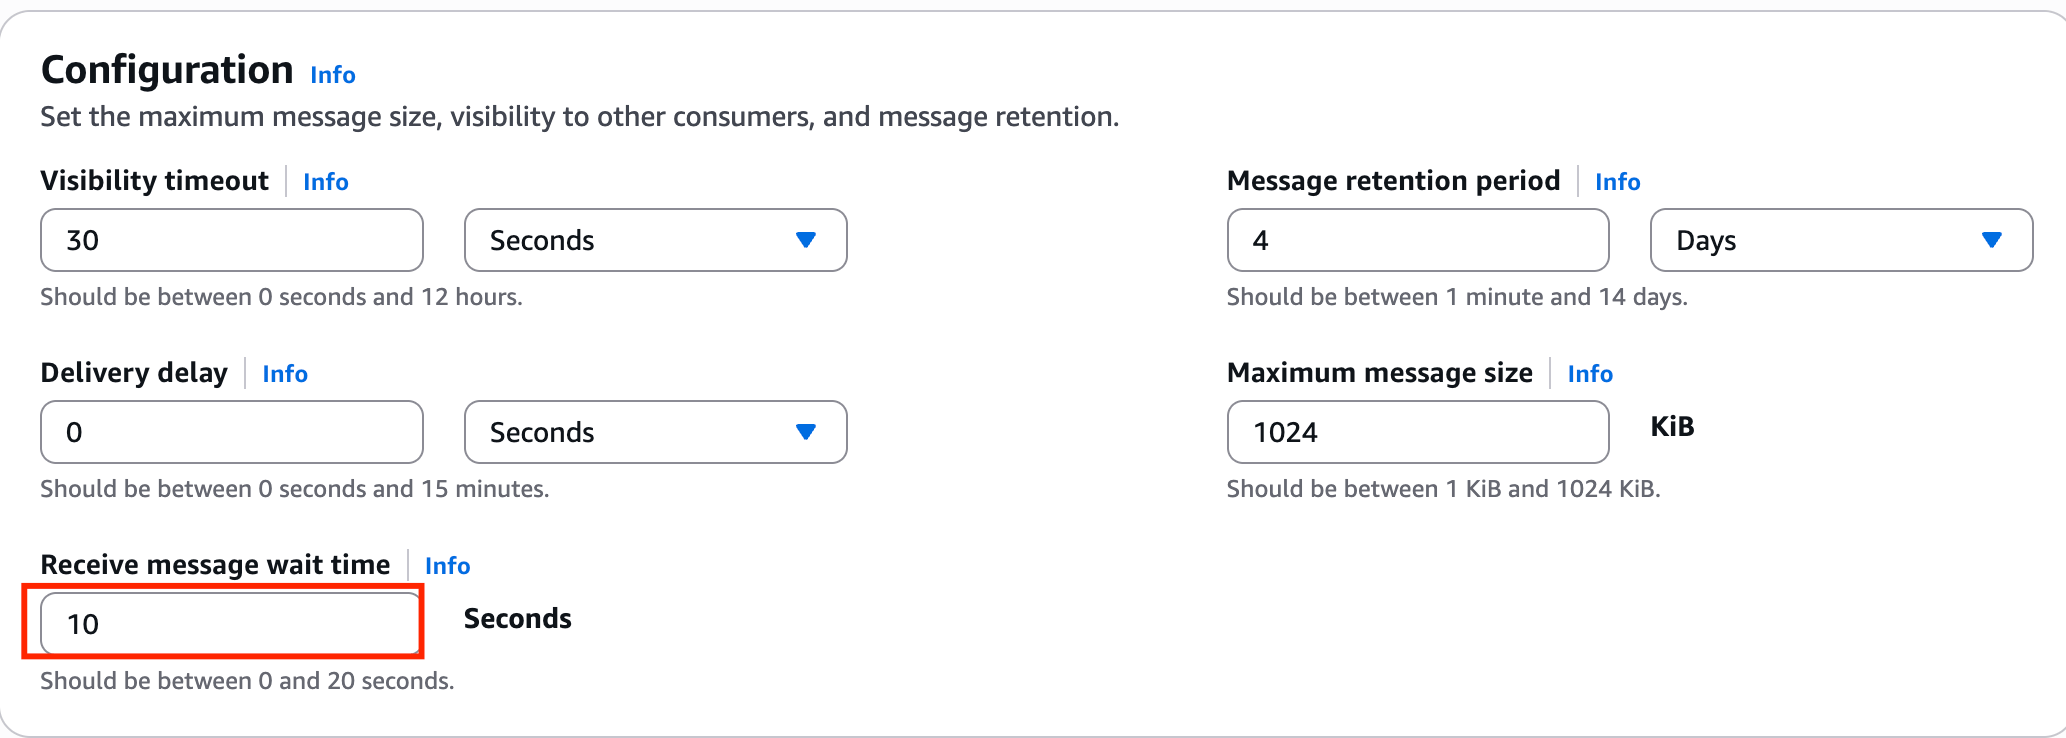
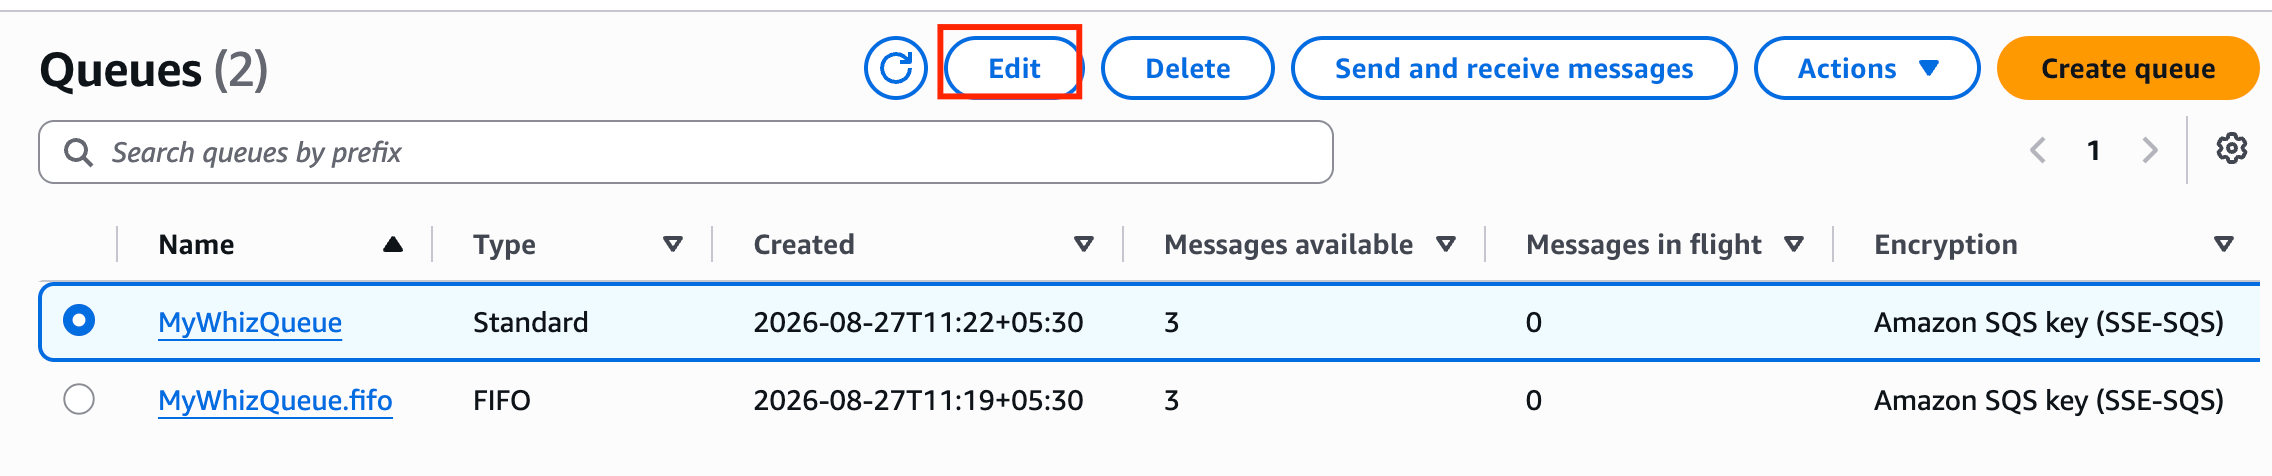 5. Once you have selected the **Edit Queue,** update the **Receive Message Wait Time** parameter. It can be any value between 0 to 20 seconds. In our example, we have changed it to **10 seconds**. This will make our long polling come into effect. If we keep the value as 0 or default, it is considered short polling. Once you have made the change, click on **Save** button.
 #### Task 4 : What is Visibility Timeout & Configuring Visibility TimeOut
In this task, we are going to explain the concept of visibility timeout in Amazon SQS. Visibility timeout is the duration during which a message remains invisible to other components after being retrieved by a consumer. By configuring the visibility timeout, the user can control how long a message remains hidden from other consumers, allowing sufficient time for processing without the risk of duplicate processing.
1. Visibility timeout is a time duration in which AWS SQS avoids the other components from receiving and processing the messages.
2. **Case Study:**
* Let's try to understand the definition by an example. So if you keep your visibility timeout to 1 minute for a big data job, what's going to happen is the message is going to come back into the queue because it's not going to complete in 1 minute.
* Let's say it takes five minutes to actually process a large amount of data. The message is going to become visible in the queue and then another EC2 instance will pick it up. Because of this, you could be delivering your messages multiple times because your visibility timeout is too low.
3. Default Visibility timeout is **30 seconds**.
4. Increase it if your task takes > **30 seconds**.
5. The Maximum it can go up to is **12 hours**.
6. Let’s try to make this work in our existing queue by configuring the visibility timeout. Select any queue (standard or FIFO) from the list and click on **Edit** to make changes in our queue. We’ll be selecting the Standard queue as an example.
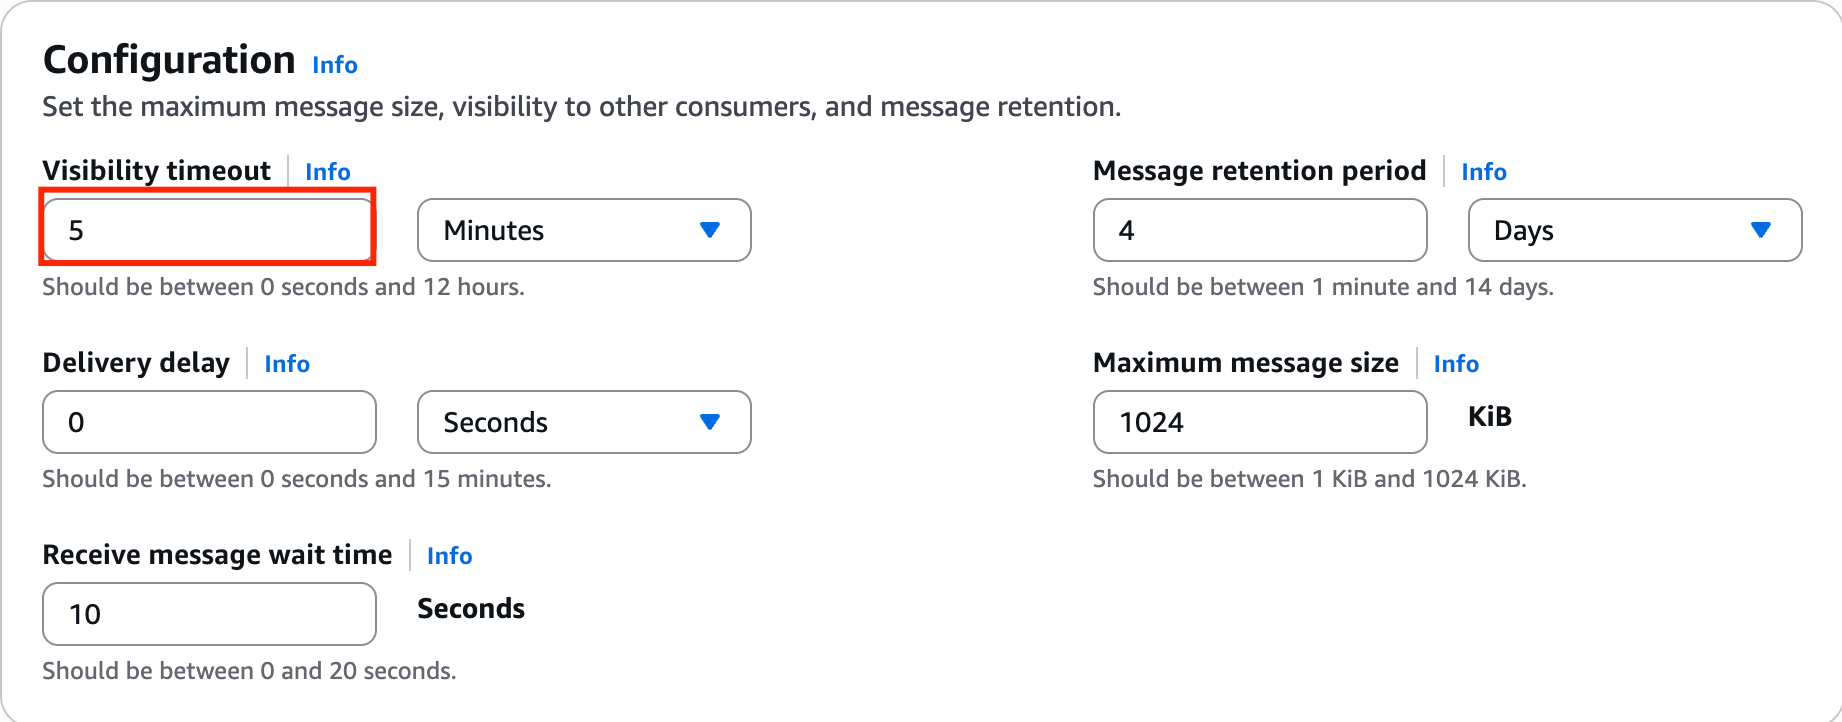
7. Once you have selected the **Edit,** update the **Default Visibility Timeout** parameter. It can be any value between 0 seconds to 12 hours. In our example, we have changed it to **5 mins**.
8. Once you have made the change click on **Save** at the bottom to bring changes in effect.
#### Task 4 : What is Visibility Timeout & Configuring Visibility TimeOut
In this task, we are going to explain the concept of visibility timeout in Amazon SQS. Visibility timeout is the duration during which a message remains invisible to other components after being retrieved by a consumer. By configuring the visibility timeout, the user can control how long a message remains hidden from other consumers, allowing sufficient time for processing without the risk of duplicate processing.
1. Visibility timeout is a time duration in which AWS SQS avoids the other components from receiving and processing the messages.
2. **Case Study:**
* Let's try to understand the definition by an example. So if you keep your visibility timeout to 1 minute for a big data job, what's going to happen is the message is going to come back into the queue because it's not going to complete in 1 minute.
* Let's say it takes five minutes to actually process a large amount of data. The message is going to become visible in the queue and then another EC2 instance will pick it up. Because of this, you could be delivering your messages multiple times because your visibility timeout is too low.
3. Default Visibility timeout is **30 seconds**.
4. Increase it if your task takes > **30 seconds**.
5. The Maximum it can go up to is **12 hours**.
6. Let’s try to make this work in our existing queue by configuring the visibility timeout. Select any queue (standard or FIFO) from the list and click on **Edit** to make changes in our queue. We’ll be selecting the Standard queue as an example.
7. Once you have selected the **Edit,** update the **Default Visibility Timeout** parameter. It can be any value between 0 seconds to 12 hours. In our example, we have changed it to **5 mins**.
8. Once you have made the change click on **Save** at the bottom to bring changes in effect.
 #### Task 5 : What is Delay Queue & Configuring Delay Queue
In this task, we are going to introduce the concept of a delay queue in Amazon SQS. A delay queue allows the user to postpone the delivery of messages for a specified duration. By configuring the delay queue, the user can simulate scenarios where messages need to be held back before being processed, ensuring proper sequencing and synchronization between different components.
1. Delay queue allows us to delay/postpone the delivery of a new message for a given period of time. We can easily turn any queue into a delay queue by configuring **SetQueueAttributes** to set the queue’s **DelaySeconds** attribute.
* If we create a delay queue, any message that has been sent to this queue will remain invisible to the consumer for the configured delay time.
* To create a delay queue set **DelaySeconds** attribute to a value between 0 to 900 seconds.
2. **Case Study:**
* Let's try to understand the definition by an example. Consider a case where an application is trying to insert millions of data into a database. The application will send a message about the availability of this new data that has been recently inserted to other subsystems, which in turn process this message and subsequently make updates to the same row. Now there is a dependency that until the first batch completes its job and commits after the updates the next batch should not get triggered. If the message gets triggered before the updates are complete, it would fail the next batch. In this case, delayed delivery helps.
3. Let’s try to make this work in our existing queue by configuring the **Delivery Delay**. Select any queue (standard or FIFO) from the list and click on **Edit** to make changes in our queue. We’ll be selecting the Standard queue as an example.
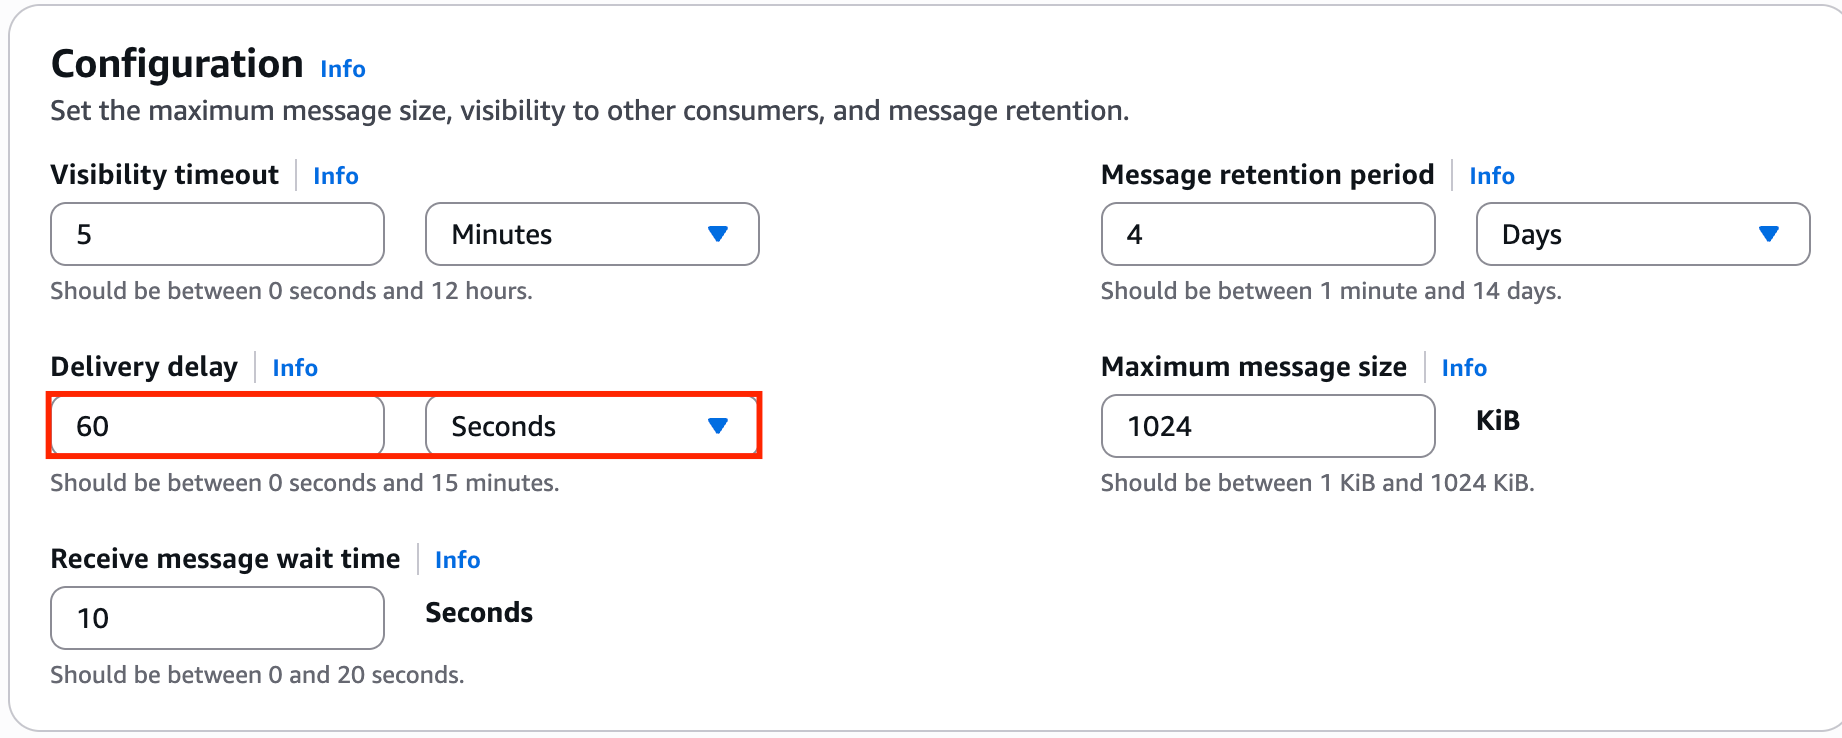
4. Once you have selected the **Edit,** update the **Delivery Delay** parameter. It can be any value between 0 seconds to 15 Mins. In our example, we have changed it to **60 secs**.
5. Once you have changed click on **Save** at the bottom to bring changes into effect.
#### Task 5 : What is Delay Queue & Configuring Delay Queue
In this task, we are going to introduce the concept of a delay queue in Amazon SQS. A delay queue allows the user to postpone the delivery of messages for a specified duration. By configuring the delay queue, the user can simulate scenarios where messages need to be held back before being processed, ensuring proper sequencing and synchronization between different components.
1. Delay queue allows us to delay/postpone the delivery of a new message for a given period of time. We can easily turn any queue into a delay queue by configuring **SetQueueAttributes** to set the queue’s **DelaySeconds** attribute.
* If we create a delay queue, any message that has been sent to this queue will remain invisible to the consumer for the configured delay time.
* To create a delay queue set **DelaySeconds** attribute to a value between 0 to 900 seconds.
2. **Case Study:**
* Let's try to understand the definition by an example. Consider a case where an application is trying to insert millions of data into a database. The application will send a message about the availability of this new data that has been recently inserted to other subsystems, which in turn process this message and subsequently make updates to the same row. Now there is a dependency that until the first batch completes its job and commits after the updates the next batch should not get triggered. If the message gets triggered before the updates are complete, it would fail the next batch. In this case, delayed delivery helps.
3. Let’s try to make this work in our existing queue by configuring the **Delivery Delay**. Select any queue (standard or FIFO) from the list and click on **Edit** to make changes in our queue. We’ll be selecting the Standard queue as an example.
4. Once you have selected the **Edit,** update the **Delivery Delay** parameter. It can be any value between 0 seconds to 15 Mins. In our example, we have changed it to **60 secs**.
5. Once you have changed click on **Save** at the bottom to bring changes into effect.
 #### Task 6 : Purge Queue and Verify the same
In this task, we are going to demonstrate the ability to purge a queue in Amazon SQS. Purging a queue means deleting all the messages in the queue. This task allows the user to understand the consequences of purging a queue and verify the successful deletion of messages. It also serves as a precautionary measure to ensure the queue is clean before performing further operations.
1. In this topic, we’ll try to purge the queue. Before we jump into purging, let's understand first what happens if we purge a queue.
* Purge Queue option allows us to delete the messages in the queue.
* The message deletion process can take up to 60 sec, depending upon the size of the queue.
* **Note**: Once you call the **Purge Queues** action, messages cannot be retrieved from the queue.
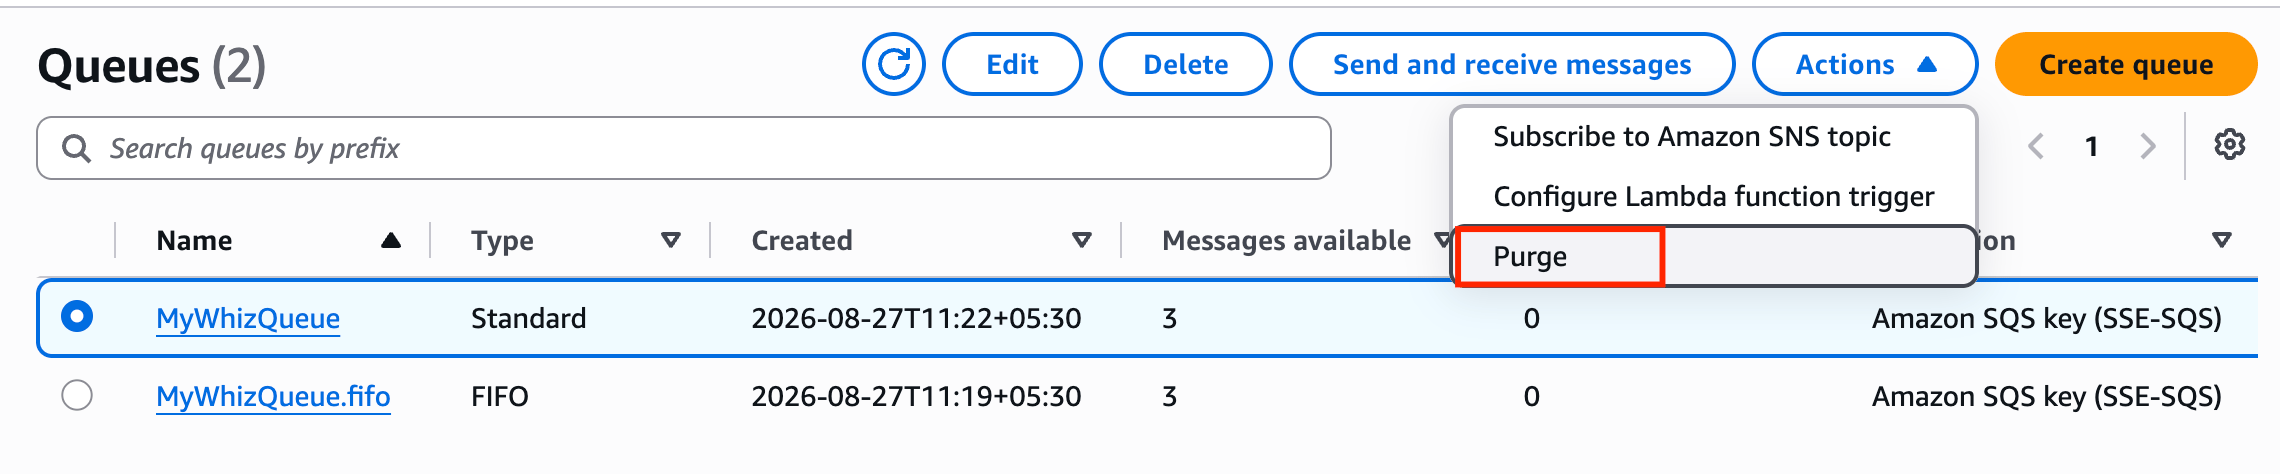
2. Let's try to make this change to our existing queue. Click on Queue Option and under **Actions** select **Purge**.
#### Task 6 : Purge Queue and Verify the same
In this task, we are going to demonstrate the ability to purge a queue in Amazon SQS. Purging a queue means deleting all the messages in the queue. This task allows the user to understand the consequences of purging a queue and verify the successful deletion of messages. It also serves as a precautionary measure to ensure the queue is clean before performing further operations.
1. In this topic, we’ll try to purge the queue. Before we jump into purging, let's understand first what happens if we purge a queue.
* Purge Queue option allows us to delete the messages in the queue.
* The message deletion process can take up to 60 sec, depending upon the size of the queue.
* **Note**: Once you call the **Purge Queues** action, messages cannot be retrieved from the queue.
2. Let's try to make this change to our existing queue. Click on Queue Option and under **Actions** select **Purge**.
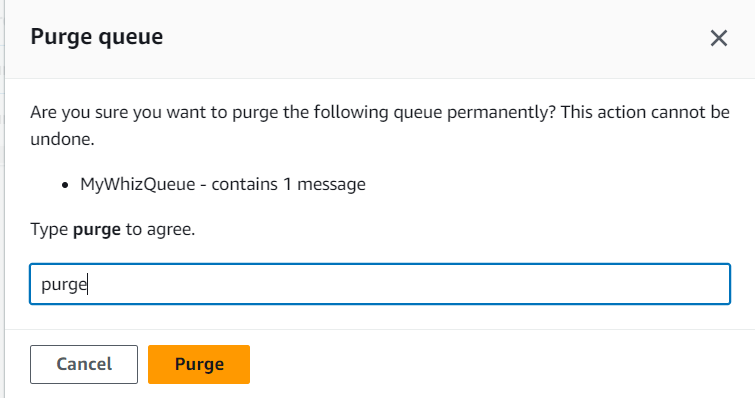
 3. Once you select the **purge** option it will ask for a confirmation. Enter the phrase **purge** and click on purge.
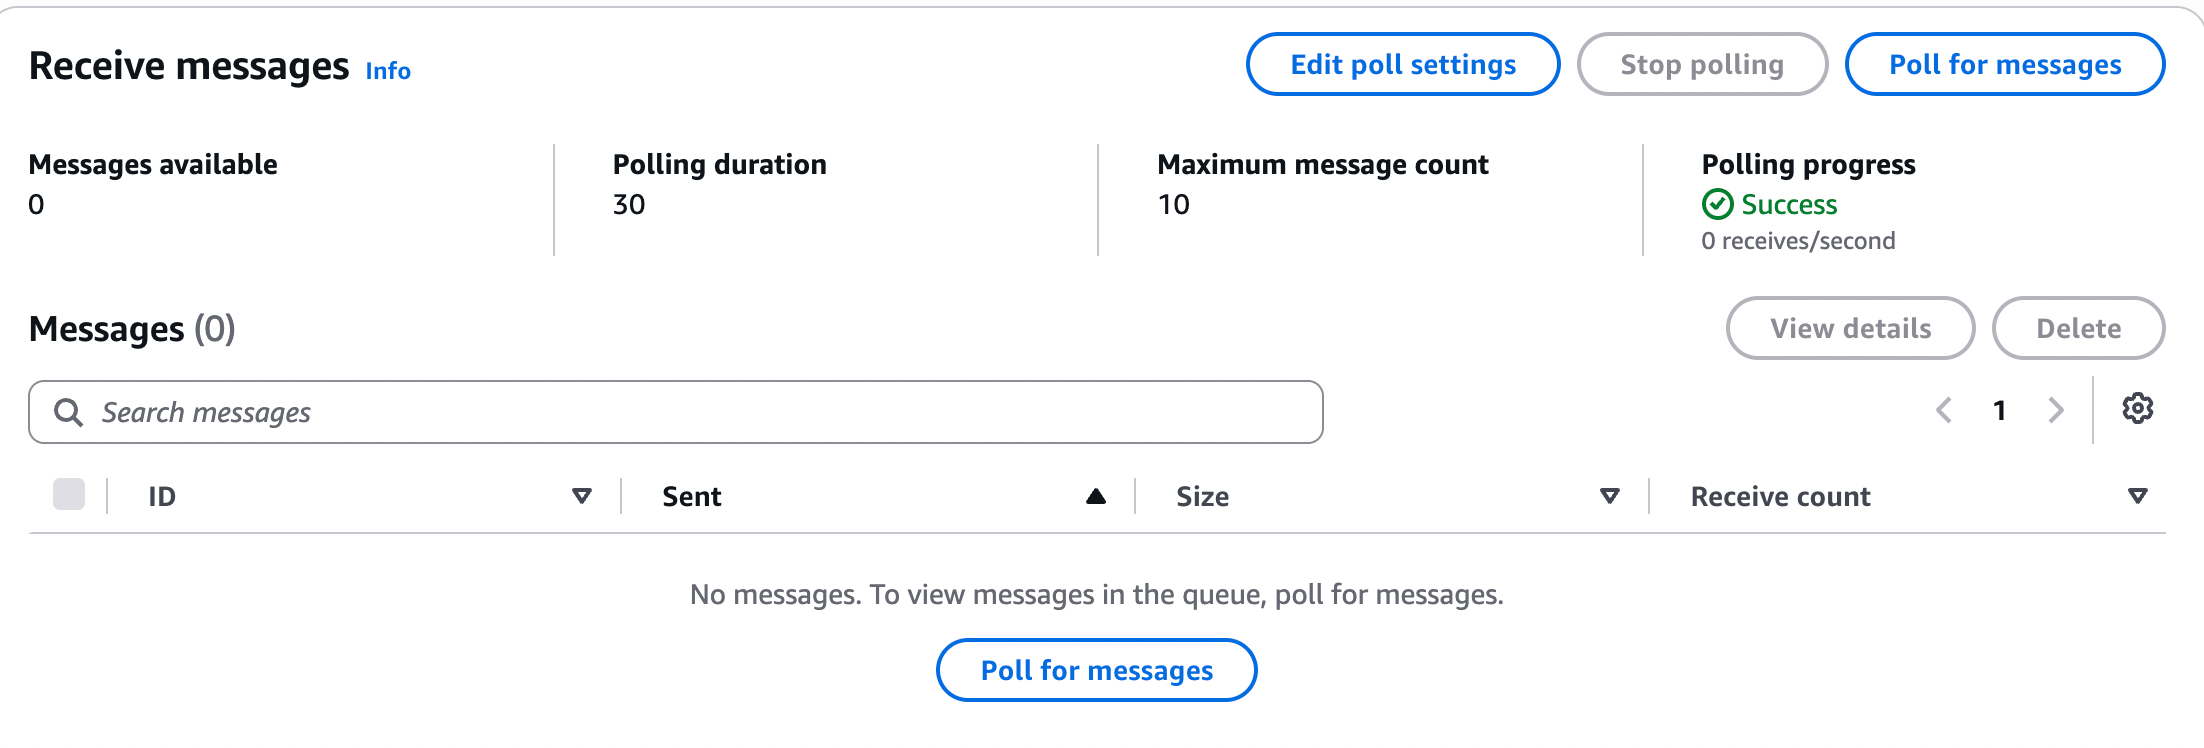
 4. To verify if purge has occurred on the standard queue, click on send and receive messages and then click on Poll for messages.
5. It will show no messages which verify that the purge is successful.
4. To verify if purge has occurred on the standard queue, click on send and receive messages and then click on Poll for messages.
5. It will show no messages which verify that the purge is successful.
 6. Similarly, repeat the purge on the standard queue and verify the same.
#### Task 7 : SQS points to remember
In this task, we are going to highlight and summarize important points about Amazon SQS that the user should remember. These points include details about inflight messages, maximum number of messages in a queue, message size limits, retention period, and the pull-based nature of SQS.
1. The basic difference between **Delay Queue** and **Visibility Timeout** is **Delay Queue** hides the message when it is first added in the queue whereas visibility timeout hides a message only after the message is retrieved from the queue.
2. **Inflight messages** are messages in SQS that have been received by a consumer but not yet deleted.
3. Max 120,000 messages can stay in the queue.
4. Message size is **1024 KiB**
5. It has a Default Retention period.
6. SQS is pull-based not push-based.
> ##### Do You Know?
>
> Amazon SQS (Simple Queue Service) is designed to be highly scalable and can handle an unlimited number of messages per second. SQS is built on a distributed infrastructure that can automatically scale based on the volume of messages being sent and received.
1. This will validate the resources in the AWS account and shows you whether you have completed this lab successfully or not.
### Completion and Conclusion
1. You have successfully logged into the AWS Management Console.
2. You have successfully created FIFO and standard queue using the console.
3. You have successfully understood Long Polling and configure it.
4. You have successfully understood Visibility Timeout and configure it.
5. You have successfully understood Delay Queue and configure it.
6. You have successfully purged the queue and verify the same.
7. You have successfully understood SQS.
### End Lab
1. Sign out of the AWS Account.
2. You have successfully completed the lab.
3. Once you have completed the steps, click on **End Lab** from your whizlab’s dashboard.
## What gets checked
When you press **Check my work**, the platform verifies each of these:
* **Create Standard SQS Queue** — Check whether a Standard SQS Queue is created or not.
* **Create FIFO SQS Queue** — Check whether a FIFO SQS Queue is created or not.
## Related help
* [FAQs and Troubleshooting](/aws-saa/support/faqs-and-troubleshooting)
This documentation is built and hosted on [Mintlify](https://mintlify.com), a developer documentation platform.
6. Similarly, repeat the purge on the standard queue and verify the same.
#### Task 7 : SQS points to remember
In this task, we are going to highlight and summarize important points about Amazon SQS that the user should remember. These points include details about inflight messages, maximum number of messages in a queue, message size limits, retention period, and the pull-based nature of SQS.
1. The basic difference between **Delay Queue** and **Visibility Timeout** is **Delay Queue** hides the message when it is first added in the queue whereas visibility timeout hides a message only after the message is retrieved from the queue.
2. **Inflight messages** are messages in SQS that have been received by a consumer but not yet deleted.
3. Max 120,000 messages can stay in the queue.
4. Message size is **1024 KiB**
5. It has a Default Retention period.
6. SQS is pull-based not push-based.
> ##### Do You Know?
>
> Amazon SQS (Simple Queue Service) is designed to be highly scalable and can handle an unlimited number of messages per second. SQS is built on a distributed infrastructure that can automatically scale based on the volume of messages being sent and received.
1. This will validate the resources in the AWS account and shows you whether you have completed this lab successfully or not.
### Completion and Conclusion
1. You have successfully logged into the AWS Management Console.
2. You have successfully created FIFO and standard queue using the console.
3. You have successfully understood Long Polling and configure it.
4. You have successfully understood Visibility Timeout and configure it.
5. You have successfully understood Delay Queue and configure it.
6. You have successfully purged the queue and verify the same.
7. You have successfully understood SQS.
### End Lab
1. Sign out of the AWS Account.
2. You have successfully completed the lab.
3. Once you have completed the steps, click on **End Lab** from your whizlab’s dashboard.
## What gets checked
When you press **Check my work**, the platform verifies each of these:
* **Create Standard SQS Queue** — Check whether a Standard SQS Queue is created or not.
* **Create FIFO SQS Queue** — Check whether a FIFO SQS Queue is created or not.
## Related help
* [FAQs and Troubleshooting](/aws-saa/support/faqs-and-troubleshooting)
This documentation is built and hosted on [Mintlify](https://mintlify.com), a developer documentation platform.