> ## Documentation Index
> Fetch the complete documentation index at: https://cloud-architect.ipoint-labs.com/llms.txt
> Use this file to discover all available pages before exploring further.
# Scaling EC2 with SQS
> Hands-on lab · 45m
Launch this lab in the IP Lab Portal, then follow the steps below in the AWS console.
Open IP Lab Portal
## Overview
### Lab Details
1. This lab focuses on the essential steps to set up auto-scaling of EC2 instances using the SQS
2. Duration : **1 Hour**
3. AWS Region: **US East (N. Virginia) us-east-1.**
### Introduction:
#### What is Amazon EC2 Auto Scaling
1. Amazon EC2 autoscaling is designed as a fully managed service that controls the number of running instances, in case your workload is higher, it will match by launching more instances instantaneously.
2. Unlike load balancer, you don’t provision EC2 Instances in advance and register as a target but you define the whole configuration in the Launch template which will scale out or scale in based on the traffic.
3. In auto-scaling, you also define what will be minimum capacity, desired capacity, and maximum capacity. Autoscaling makes sure that the number of instances specified in desired capacity is always running when traffic is normal, it will scale in when traffic is lowest and scale-out when running there is a spike.
4. While creating auto-scaling, it requires a Launch template where you specify which AMI to choose, what will be instance type, security group associated, and all other options required to launch an EC2 Instance including key pair.
#### SQS (Simple Queue Service)
1. Amazon SQS is a reliable, easy to manage, scalable queuing service. SQS is a simple and cost-effective cloud application.
2. AWS SQS can be used to transmit any amount of data, at any level of throughput, without losing messages. It doesn’t interrupt other services when run continuously.
3. SQS helps to reduce administrative tasks by scaling high-available messaging clusters. While we pay only for what we use. AWS SQS helps us to save important data which could be lost if an entire application goes down or if any component becomes unavailable.
4. SQS queue acts as a buffer between the application components that receive the data and the other parts that process the data in the system.
5. SQS is used for message-oriented architecture. If the processing server cannot process the work fast enough (for whatever reason) the work is queued so that the processing servers can work on it when they have available resources to process the request. This means that work is not lost due to insufficient resources.
6. The default Amazon SQS ensures that each message is delivered at least once.
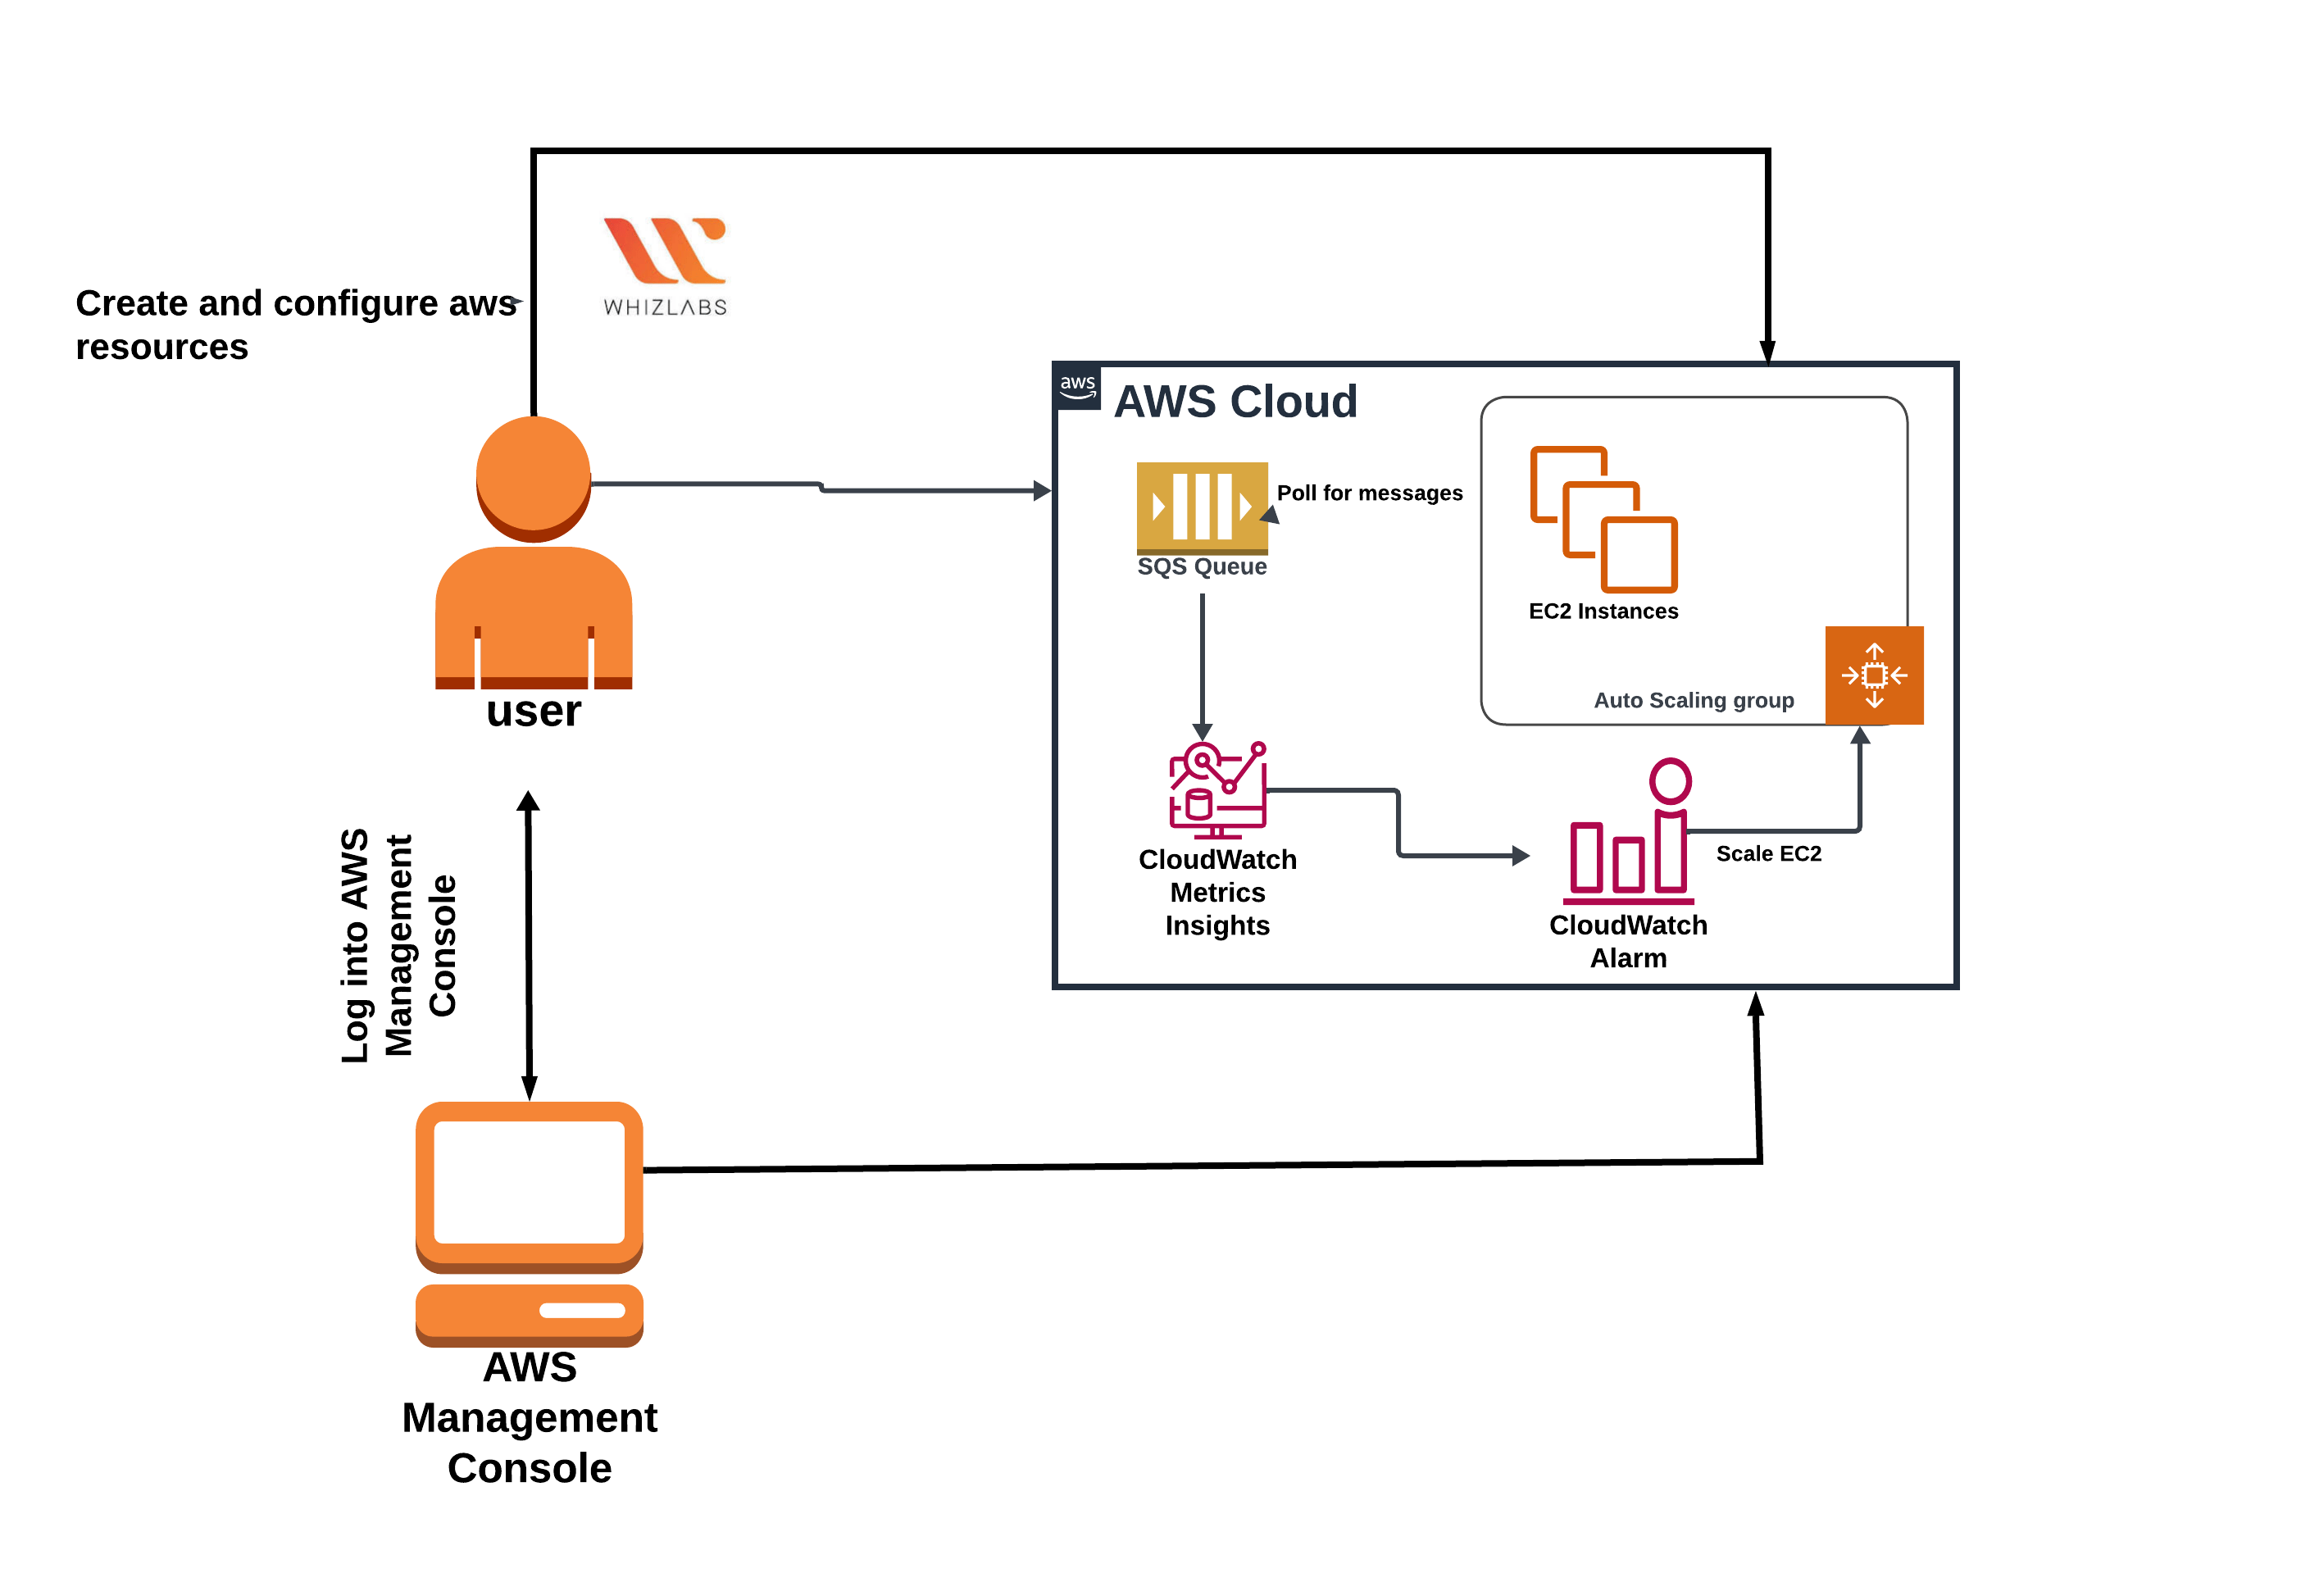
### Architecture Diagram
 ### Task Details
1. Sign into the AWS Management Console.
2. Create an S3 Bucket.
3. Create an SQS Queue
4. SSH into EC2 instance
5. Create CloudWatch Alarms
6. Create a Launch Template
7. Create an Auto Scaling Group
8. Verifications and Monitoring
### Launching Lab Environment
1. To launch the lab environment, Click on the **Start Lab** button.
2. Please wait until the cloud environment is provisioned. It will take less than a minute to provision.
3. Once the Lab is started, you will be provided with **IAM user name**, **Password**, **Access** **Key**, and **Secret** **Access** **Key**.
**Note** : You can only start one lab at any given time
## Lab guide
### Lab Steps
#### Task 1: Sign in to AWS Management Console
1. Click on the **Open Console** button, and you will get redirected to AWS Console in a new browser tab.
2. On the AWS sign-in page,
* Leave the Account ID as default. Never edit/remove the 12-digit Account ID present in the AWS Console. Otherwise, you cannot proceed with the lab.
* Now copy your **User Name** and **Password** in the Lab Console to the **IAM Username and Password** in the AWS Console and click on the **Sign-in** button.
3. Once Signed In to the AWS Management Console, make the default AWS Region as **US East (N. Virginia) us-east-1.**
If you face any issues, please go through [**FAQs and Troubleshooting for Labs**](https://play.whizlabs.com/site/task_support/faqs-and-troubleshooting).
#### Task 2: Create an S3 bucket
1. Navigate to **S3** in the **Services** menu under the **Storage** section.
2. In the left menu, choose **Buckets**, click **Create Bucket,** and fill in the bucket details.
* AWS Region: Select **US East (N. Virginia) us-east-1.**
* Bucket Name: Enter **whizlabs\**
**(Note: The Bucket Name must be unique across all existing bucket names in Amazon S3)**
### Task Details
1. Sign into the AWS Management Console.
2. Create an S3 Bucket.
3. Create an SQS Queue
4. SSH into EC2 instance
5. Create CloudWatch Alarms
6. Create a Launch Template
7. Create an Auto Scaling Group
8. Verifications and Monitoring
### Launching Lab Environment
1. To launch the lab environment, Click on the **Start Lab** button.
2. Please wait until the cloud environment is provisioned. It will take less than a minute to provision.
3. Once the Lab is started, you will be provided with **IAM user name**, **Password**, **Access** **Key**, and **Secret** **Access** **Key**.
**Note** : You can only start one lab at any given time
## Lab guide
### Lab Steps
#### Task 1: Sign in to AWS Management Console
1. Click on the **Open Console** button, and you will get redirected to AWS Console in a new browser tab.
2. On the AWS sign-in page,
* Leave the Account ID as default. Never edit/remove the 12-digit Account ID present in the AWS Console. Otherwise, you cannot proceed with the lab.
* Now copy your **User Name** and **Password** in the Lab Console to the **IAM Username and Password** in the AWS Console and click on the **Sign-in** button.
3. Once Signed In to the AWS Management Console, make the default AWS Region as **US East (N. Virginia) us-east-1.**
If you face any issues, please go through [**FAQs and Troubleshooting for Labs**](https://play.whizlabs.com/site/task_support/faqs-and-troubleshooting).
#### Task 2: Create an S3 bucket
1. Navigate to **S3** in the **Services** menu under the **Storage** section.
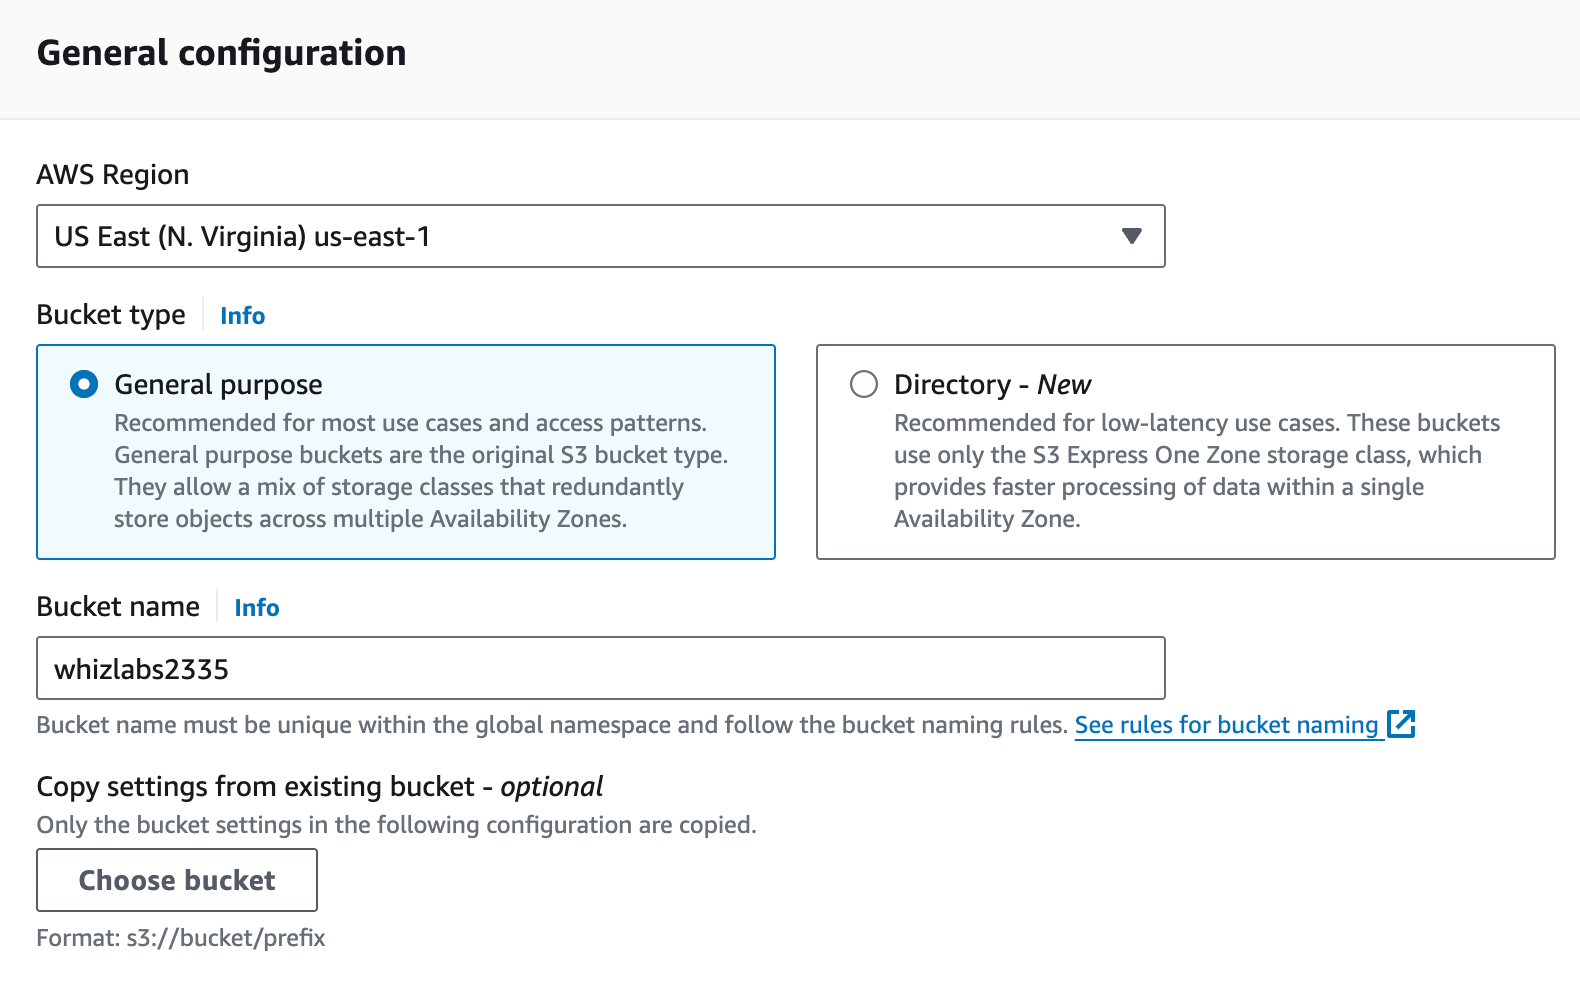
2. In the left menu, choose **Buckets**, click **Create Bucket,** and fill in the bucket details.
* AWS Region: Select **US East (N. Virginia) us-east-1.**
* Bucket Name: Enter **whizlabs\**
**(Note: The Bucket Name must be unique across all existing bucket names in Amazon S3)**
 3. Leave other settings as **default**.
4. Click on **Create bucket** button.
5. Your S3 Bucket is now created. Once it is created Click on your **bucket name**.
6. In the **Objects**, You can see the following message
* You don't have any objects in this bucket.
* Click on the **Add files**.
7. Download the Zip file from [here](https://labresources.whizlabs.com/da9c4019462d2d075f17cc4753c7773c/whiz.zip).
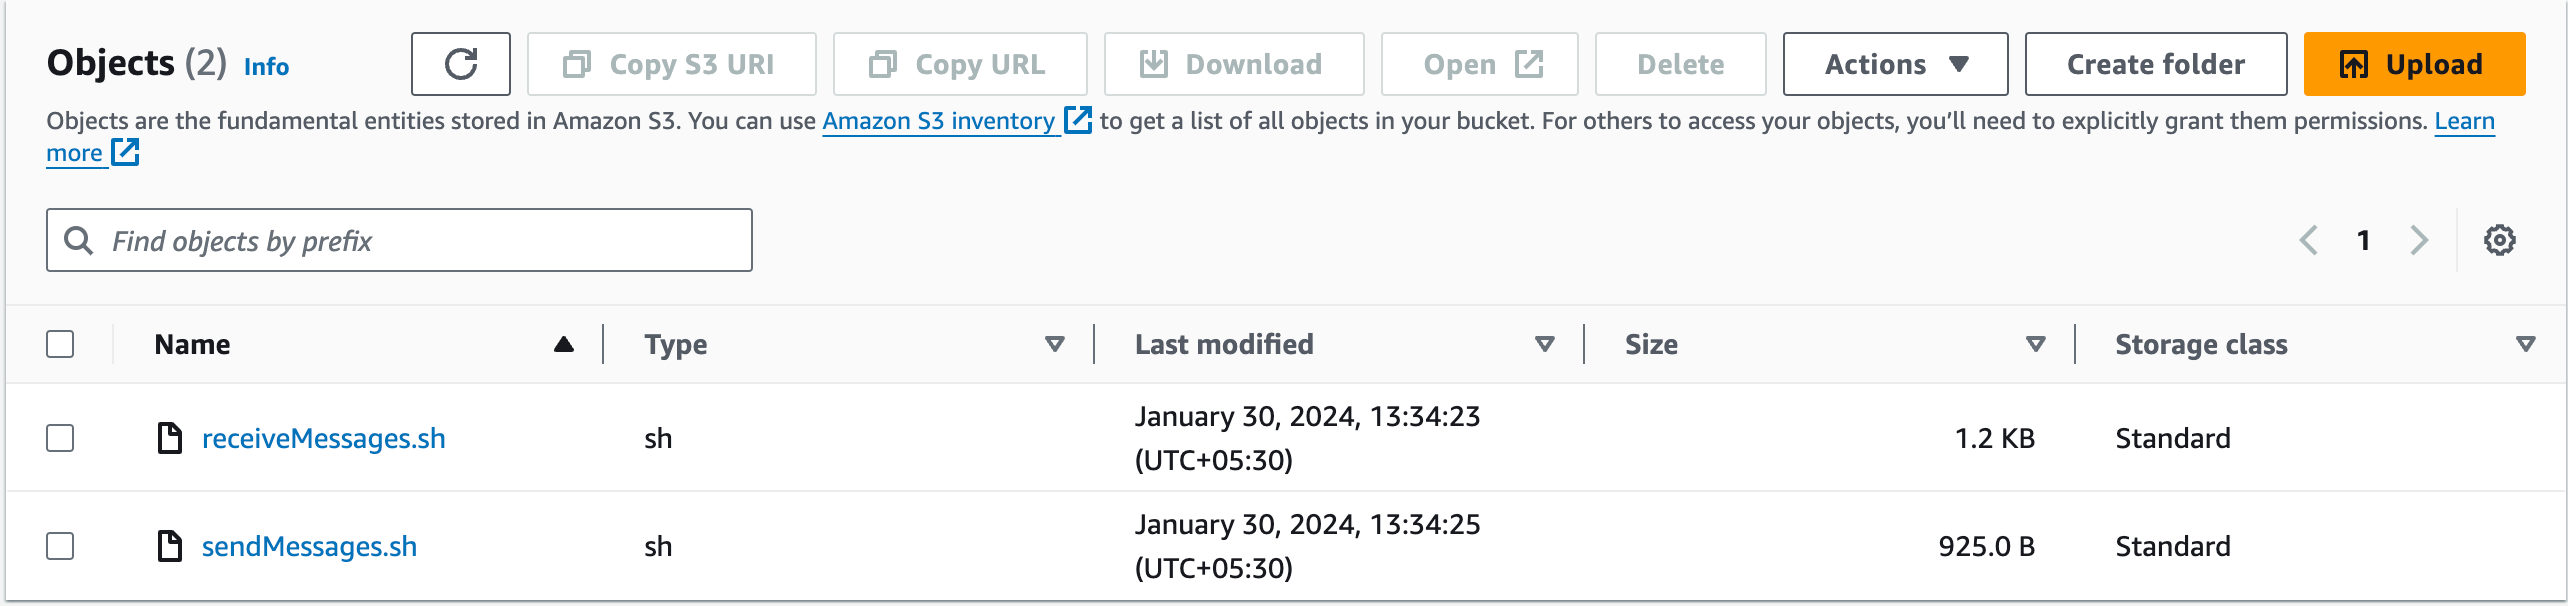
8. Unzip the file and upload **sendmessages** and **receivemessages** files into the bucket
9. Click on **Upload** button. Once your file has been uploaded, it will be displayed in the bucket.
3. Leave other settings as **default**.
4. Click on **Create bucket** button.
5. Your S3 Bucket is now created. Once it is created Click on your **bucket name**.
6. In the **Objects**, You can see the following message
* You don't have any objects in this bucket.
* Click on the **Add files**.
7. Download the Zip file from [here](https://labresources.whizlabs.com/da9c4019462d2d075f17cc4753c7773c/whiz.zip).
8. Unzip the file and upload **sendmessages** and **receivemessages** files into the bucket
9. Click on **Upload** button. Once your file has been uploaded, it will be displayed in the bucket.
 #### Task 3: Create an SQS Queue
In this task, we are going to create an sqs queue that will send and receive messages
1. Make sure you are in the **N. Virginia** region.
2. Navigate to the Services menu on the top, search for **SQS** and select it.
3. Now, We’ll create a **Queue**, with all the default options. Click on **Create queue** button.
4. **Details :**
* Type : Select **Standard**
* Name : Enter **MyMessages \{IMPORTANT : use same name}**
#### Task 3: Create an SQS Queue
In this task, we are going to create an sqs queue that will send and receive messages
1. Make sure you are in the **N. Virginia** region.
2. Navigate to the Services menu on the top, search for **SQS** and select it.
3. Now, We’ll create a **Queue**, with all the default options. Click on **Create queue** button.
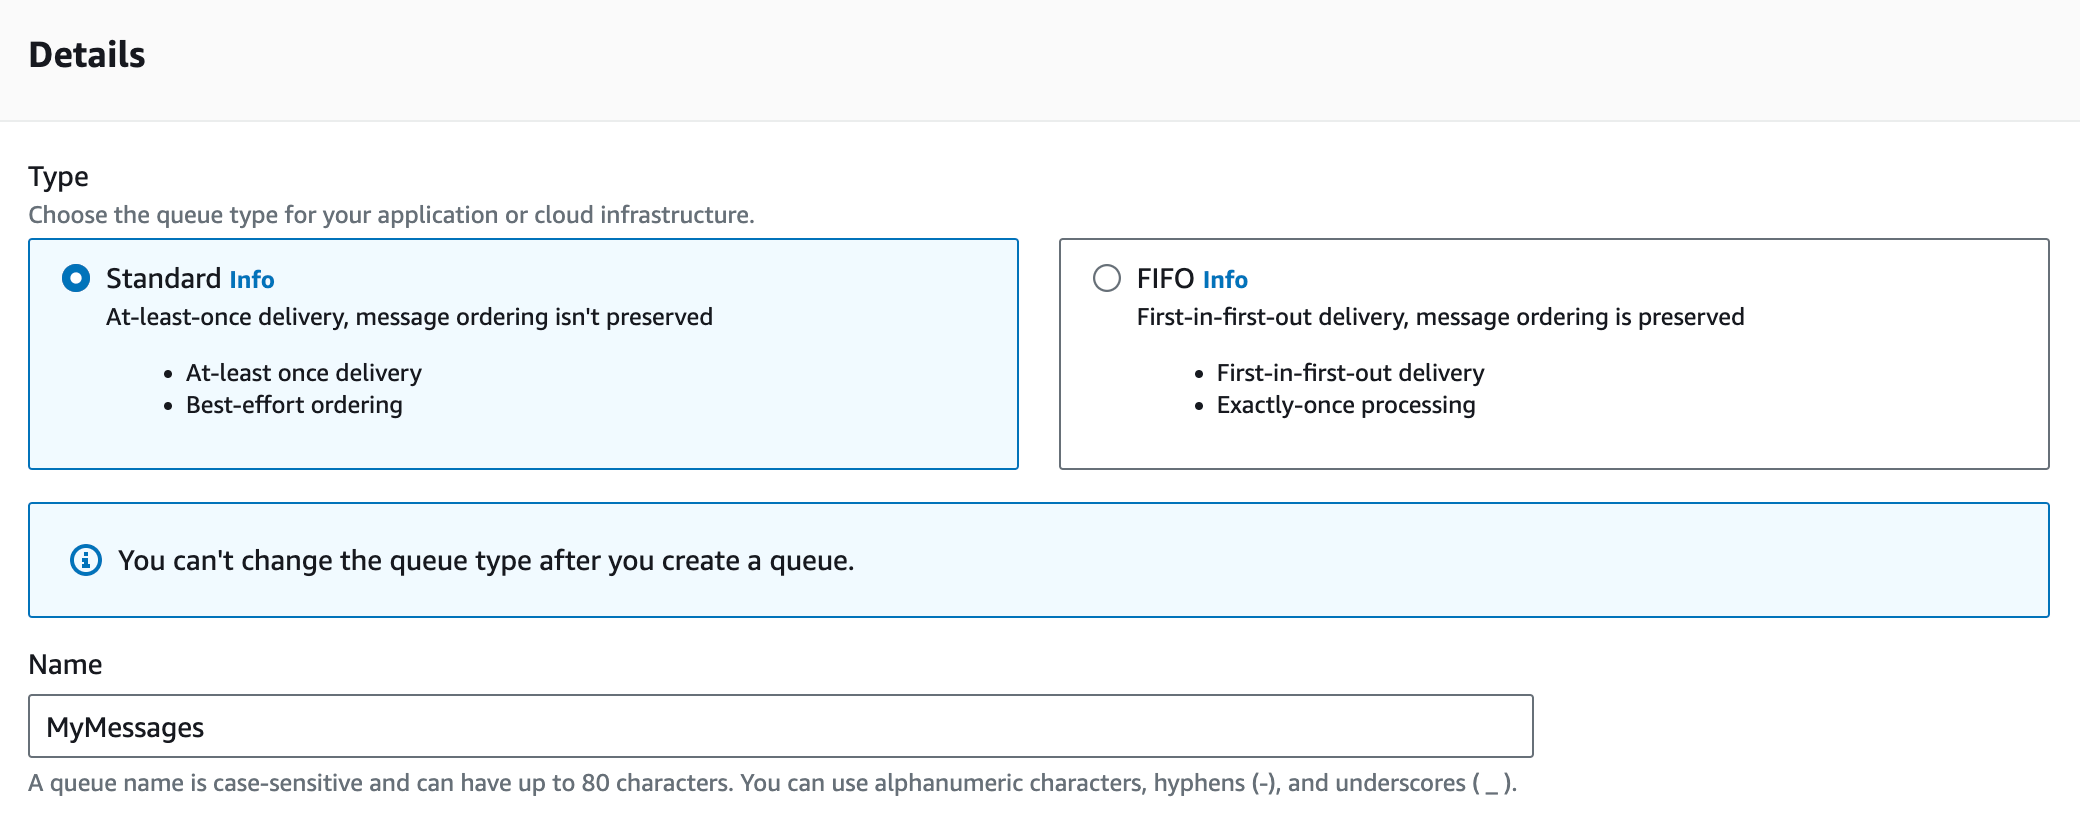
4. **Details :**
* Type : Select **Standard**
* Name : Enter **MyMessages \{IMPORTANT : use same name}**
 5. Once you click on **Create Queue** you will get a success message.
#### Task 4: SSH into EC2 instance
1. Make sure you are in the **US East (N. Virginia) us-east-1** Region before proceeding with the Lab.?
2. Navigate to **EC2** by clicking on the **Services** menu in the top, then click on **EC2** in the **Compute** section.
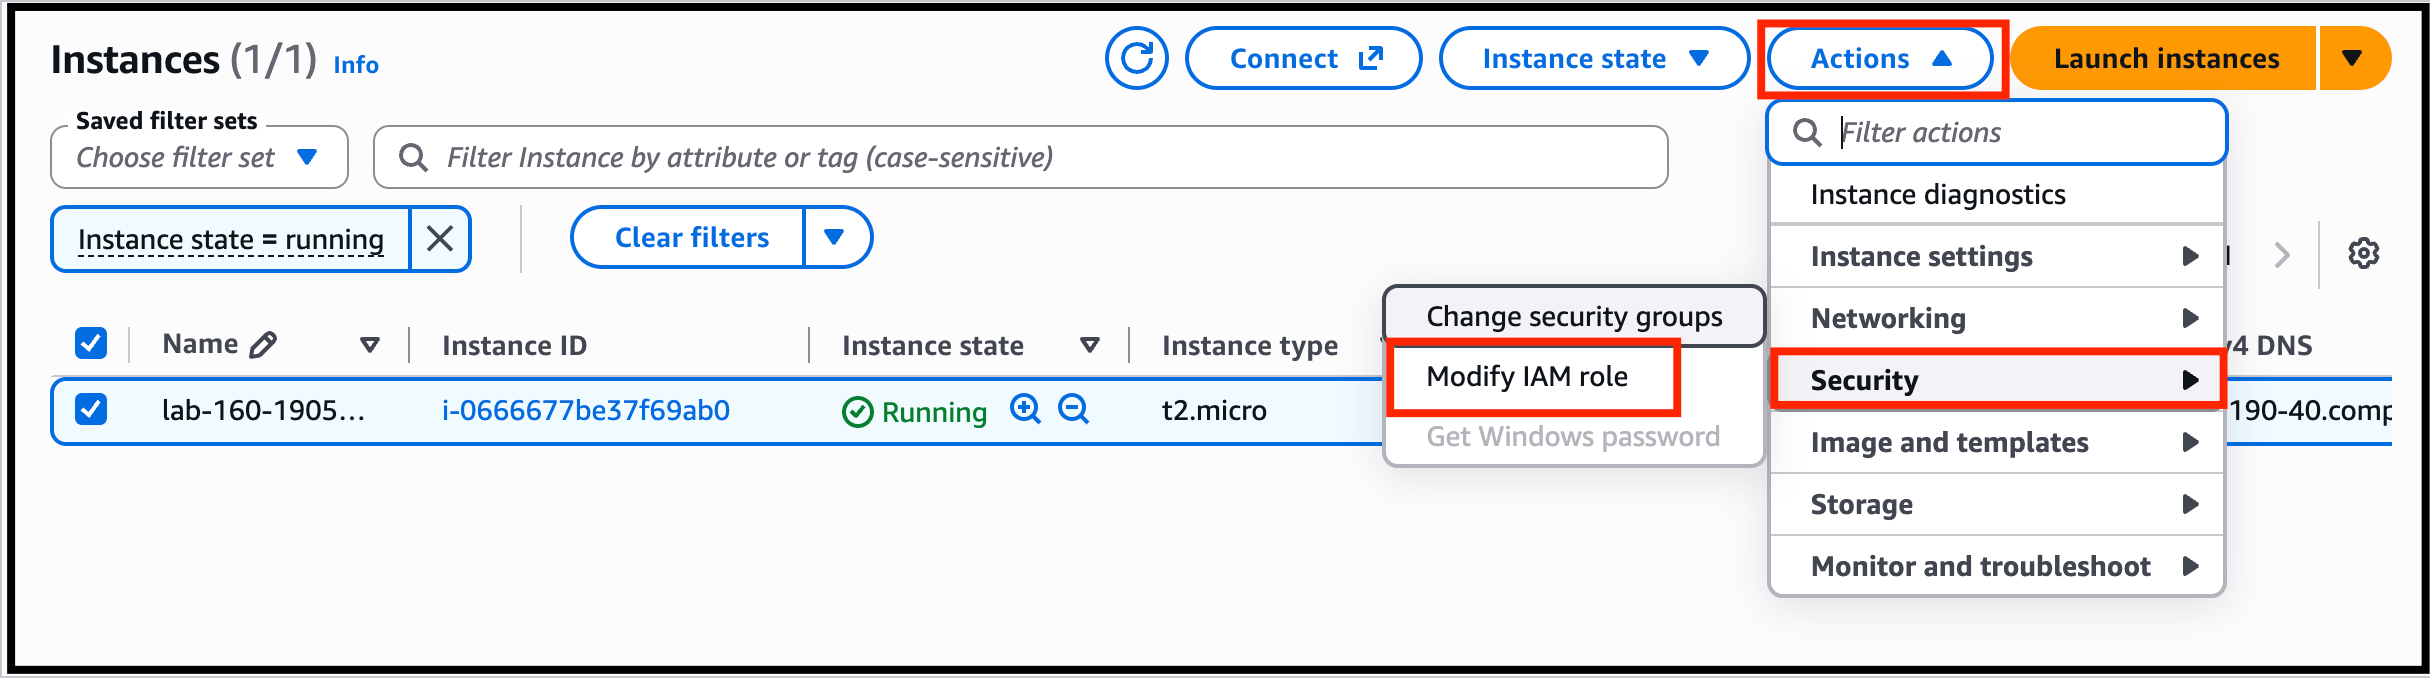
3. You will see a running instance named **lab-xxx-xxxxx.** Select the **Instance** and click on **Actions** Button.
4. From the dropdown select **Security** and Choose **Modify IAM Role** option.
5. Once you click on **Create Queue** you will get a success message.
#### Task 4: SSH into EC2 instance
1. Make sure you are in the **US East (N. Virginia) us-east-1** Region before proceeding with the Lab.?
2. Navigate to **EC2** by clicking on the **Services** menu in the top, then click on **EC2** in the **Compute** section.
3. You will see a running instance named **lab-xxx-xxxxx.** Select the **Instance** and click on **Actions** Button.
4. From the dropdown select **Security** and Choose **Modify IAM Role** option.
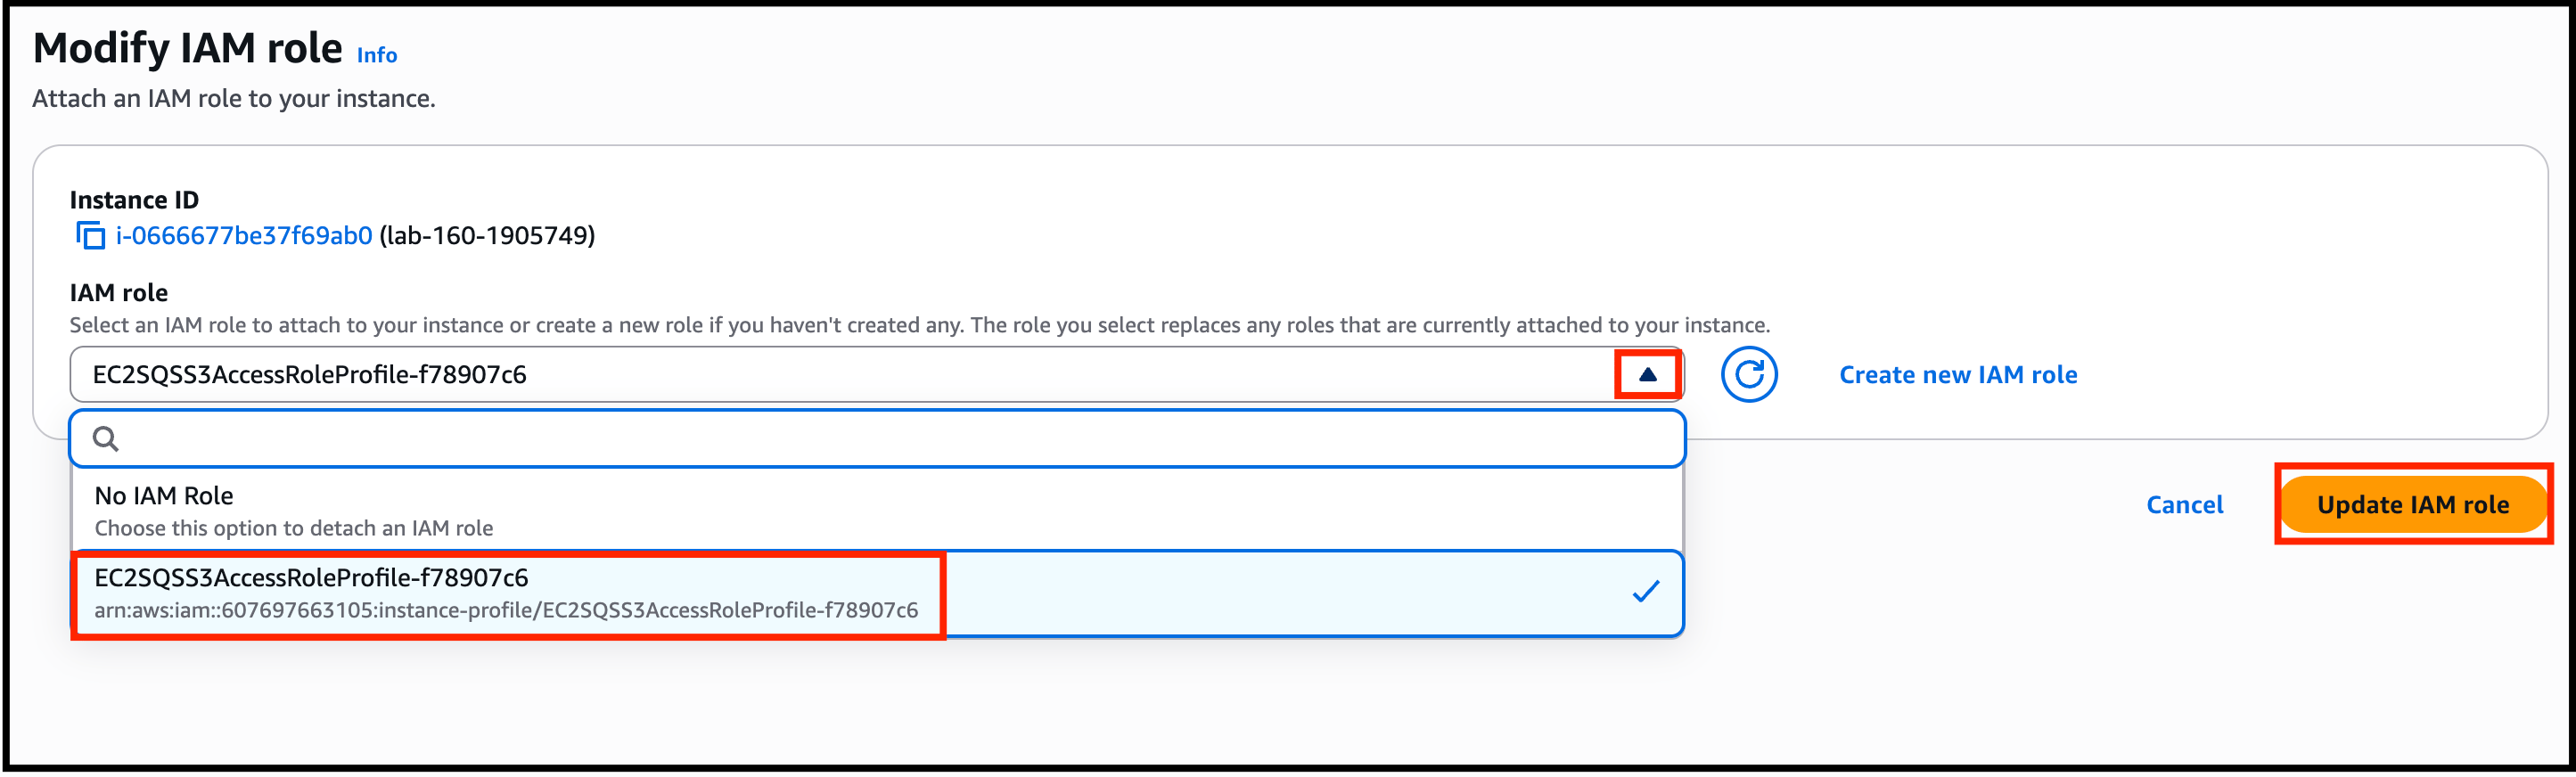
 5. Under IAM role, choose **EC2SQSS3AccessRoleProfile-xxxxxxxx.** Then click on **Update IAM role** option.
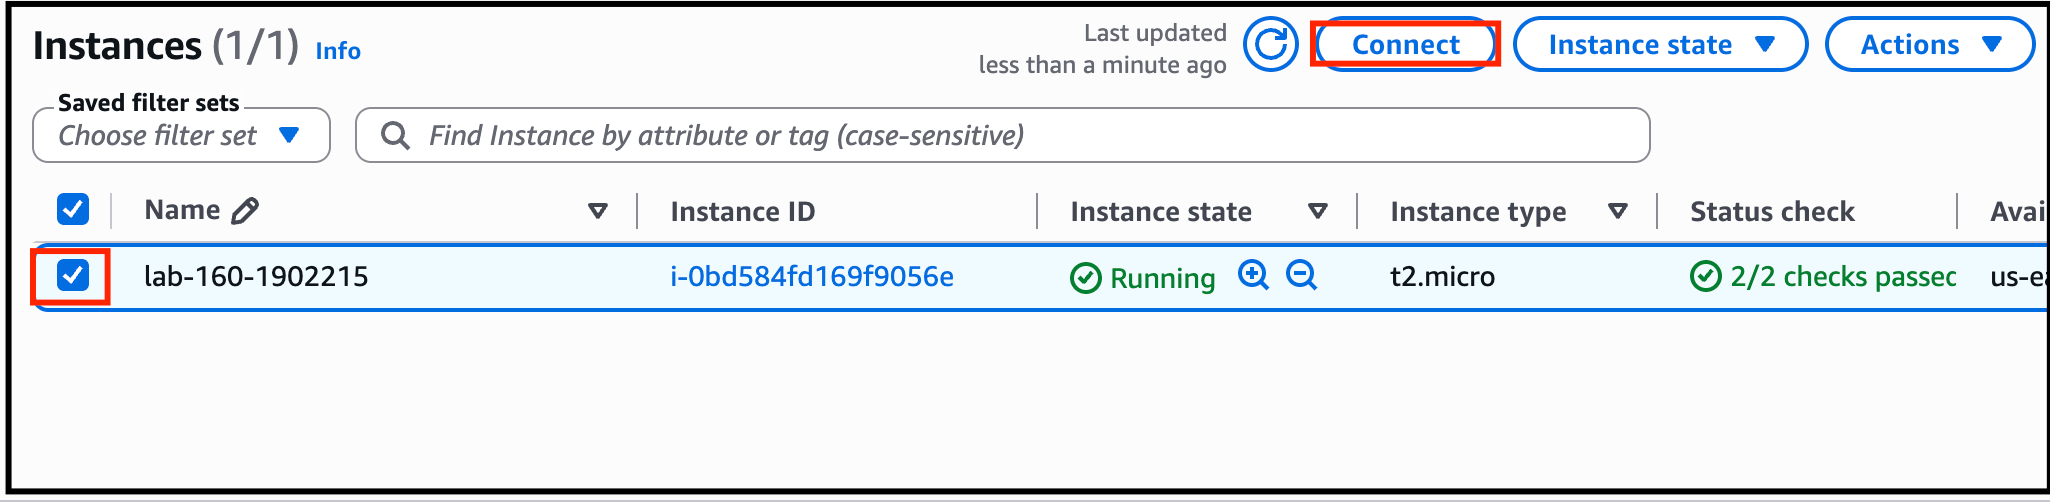
 6. Click on the instance and then click on the **Connect** button.
 7. Click on the **Connect** button again.
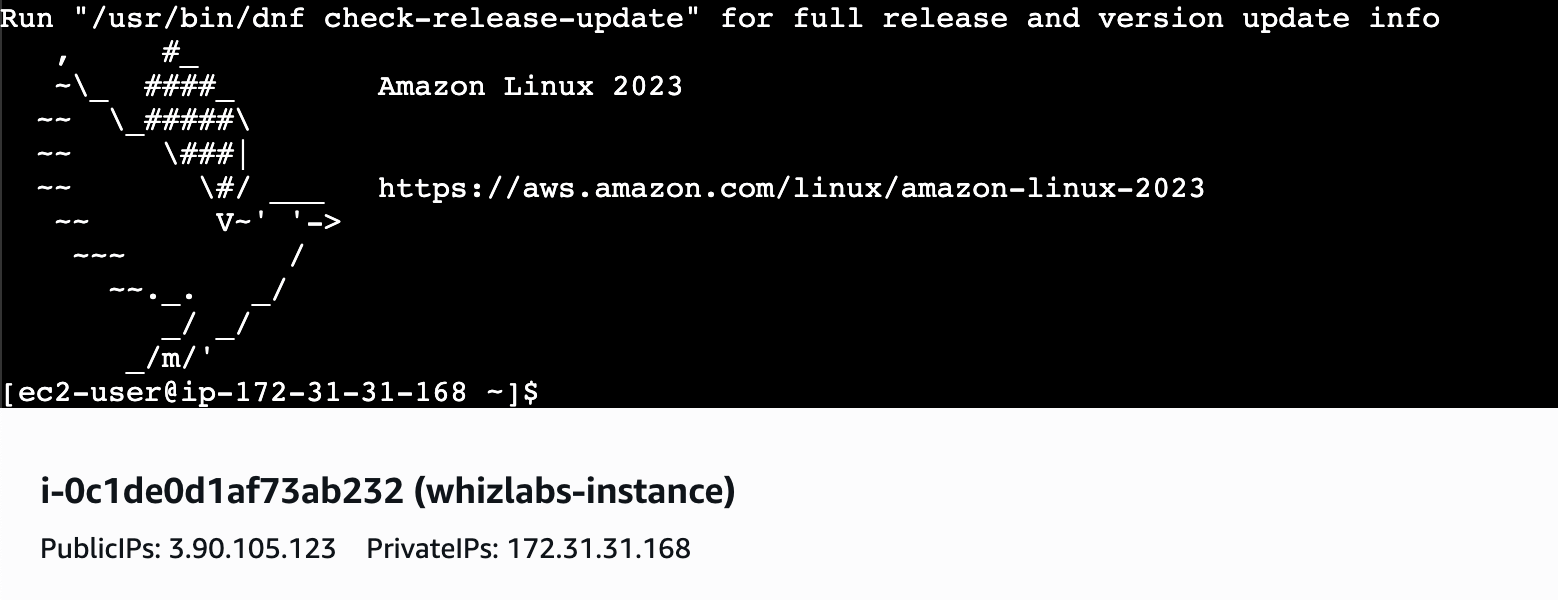 * Run the below commands.
* Lets create sendmessage file in the nano editor.
```
nano sendMessages.sh
```
* Paste the given code in the editor, and press **CTRL+X** to save the file and then enter **Y** and click **Enter** button.
```plaintext theme={null}
#!/bin/bash
# queueurl is required to send or receive messages from SQS
# Note: AWS CLI and boto3 need to use legacy endpoint
# If we use the AWS CLI or SDK for Python, we need to use the legacy endpoints from https://docs.aws.amazon.com/general/latest/gr/sqs-service.html.
# Otherwise, you will get the following error
# botocore.exceptions.ClientError: An error occurred (InvalidAddress) when calling the ReceiveMessage operation: The address https://eu-central-1.queue.amazonaws.com/ is not valid for this endpoint.
queueurl=$(aws sqs get-queue-url --queue-name "MyMessages"|jq ".QueueUrl"|sed "s/sqs.us-east-1.amazonaws.com/queue.amazonaws.com/g"|sed 's/"//g')
echo "queueurl:" $queueurl
echo "aws sqs send-message --queue-url $queueurl --message-body Message --region us-east-1"
for i in {1..2000} ;
do
aws sqs send-message --queue-url $queueurl --message-body "Message-$i" --region us-east-1 ;
done;
```
* Run the below command to download the dependencies
```
sudo yum install jq -y
```
* Execute below command to provide the execute permissions.
```
chmod +x sendMessages.sh
./sendMessages.sh
```
* It will run the script to send **2000** messages to MyMessages queue.
#### Task 5: Create CloudWatch Alarms
In this task we are going to create 2 alarms for scalein and scaleout ec2 instances.
1. Navigate to **CloudWatch** by clicking on the **Services** menu available under the **Management & Governance** section.
2. Click on **All alarms** under **Alarms** in the left panel of the CloudWatch dashboard.
3. Click on **Create alarm** button available on the top right corner.
4. In the **Specify metric and conditions** page:
* Click on **Select metric**. It will open the **Select Metrics** page.
* search for **SQS and** select **SQS > Queue Metrics**.
* Run the below commands.
* Lets create sendmessage file in the nano editor.
```
nano sendMessages.sh
```
* Paste the given code in the editor, and press **CTRL+X** to save the file and then enter **Y** and click **Enter** button.
```plaintext theme={null}
#!/bin/bash
# queueurl is required to send or receive messages from SQS
# Note: AWS CLI and boto3 need to use legacy endpoint
# If we use the AWS CLI or SDK for Python, we need to use the legacy endpoints from https://docs.aws.amazon.com/general/latest/gr/sqs-service.html.
# Otherwise, you will get the following error
# botocore.exceptions.ClientError: An error occurred (InvalidAddress) when calling the ReceiveMessage operation: The address https://eu-central-1.queue.amazonaws.com/ is not valid for this endpoint.
queueurl=$(aws sqs get-queue-url --queue-name "MyMessages"|jq ".QueueUrl"|sed "s/sqs.us-east-1.amazonaws.com/queue.amazonaws.com/g"|sed 's/"//g')
echo "queueurl:" $queueurl
echo "aws sqs send-message --queue-url $queueurl --message-body Message --region us-east-1"
for i in {1..2000} ;
do
aws sqs send-message --queue-url $queueurl --message-body "Message-$i" --region us-east-1 ;
done;
```
* Run the below command to download the dependencies
```
sudo yum install jq -y
```
* Execute below command to provide the execute permissions.
```
chmod +x sendMessages.sh
./sendMessages.sh
```
* It will run the script to send **2000** messages to MyMessages queue.
#### Task 5: Create CloudWatch Alarms
In this task we are going to create 2 alarms for scalein and scaleout ec2 instances.
1. Navigate to **CloudWatch** by clicking on the **Services** menu available under the **Management & Governance** section.
2. Click on **All alarms** under **Alarms** in the left panel of the CloudWatch dashboard.
3. Click on **Create alarm** button available on the top right corner.
4. In the **Specify metric and conditions** page:
* Click on **Select metric**. It will open the **Select Metrics** page.
* search for **SQS and** select **SQS > Queue Metrics**.
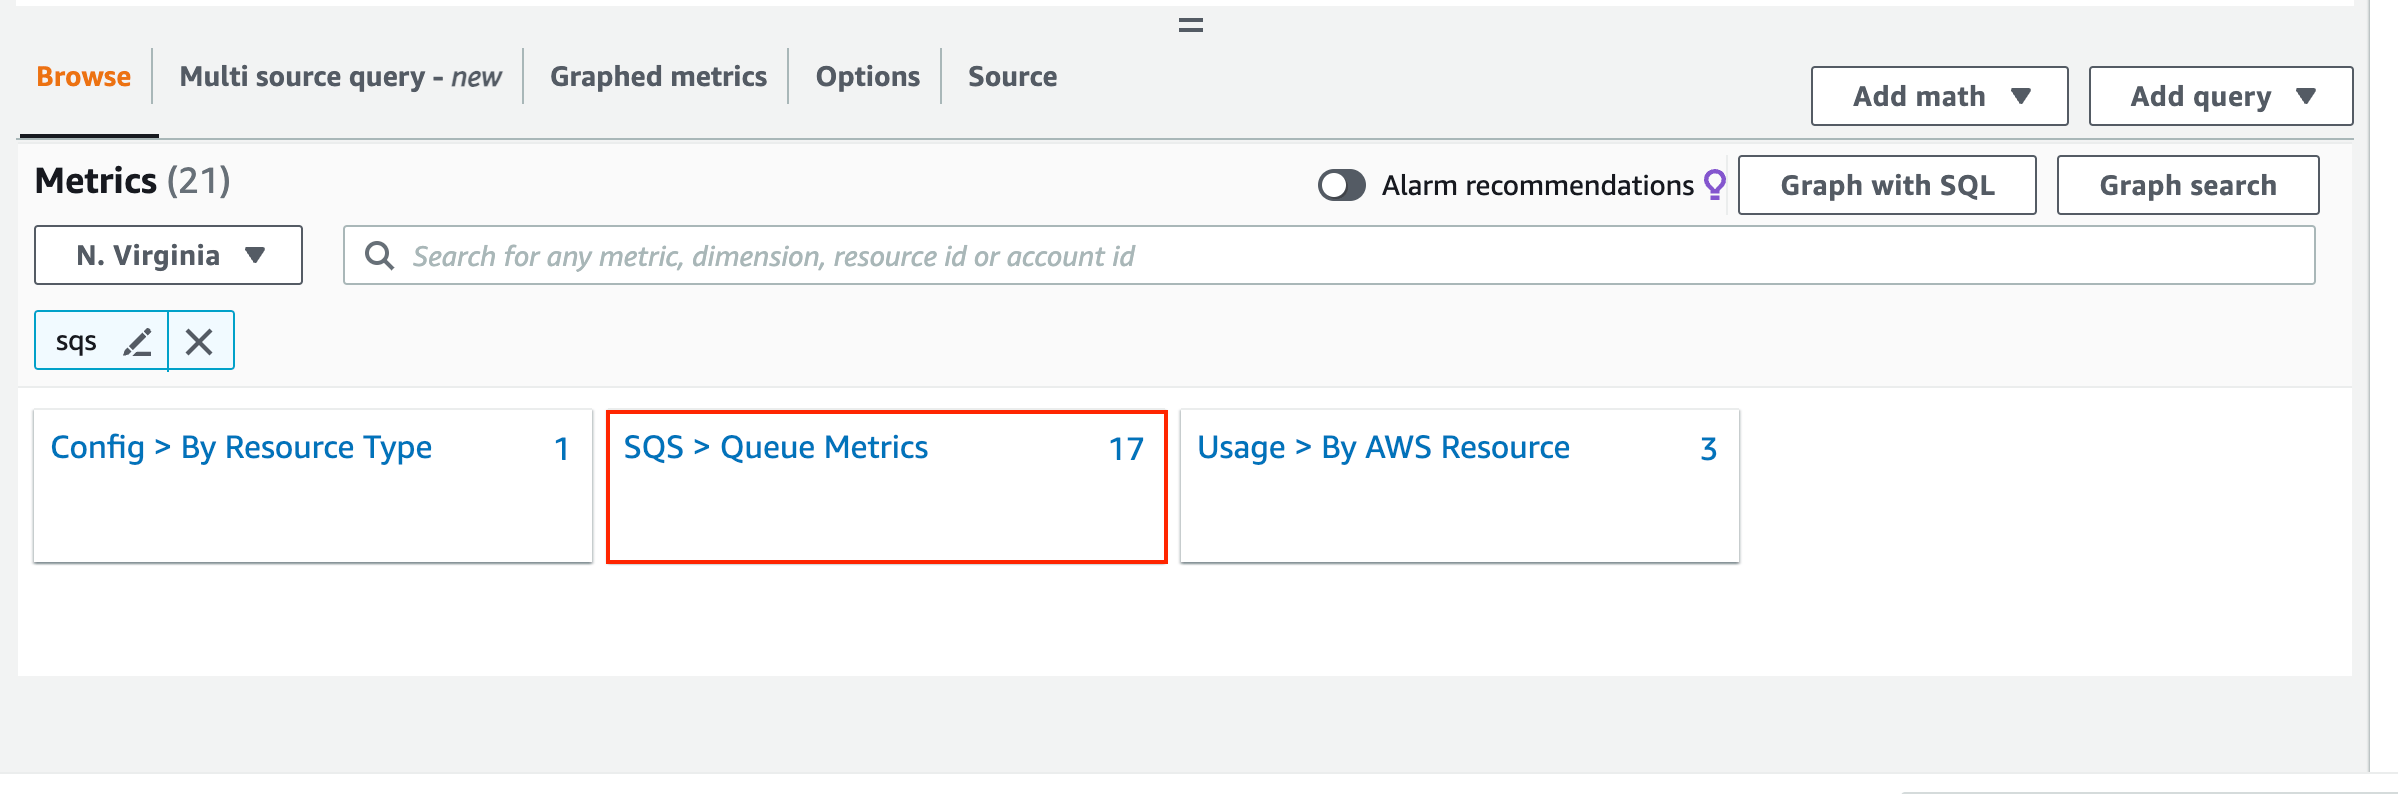 * Now, Select **MyMessages > ApproximateNumberOfMessagesVisible** and Click **Select Metric**. \{Wait for few minutes and refresh if matric not visible}
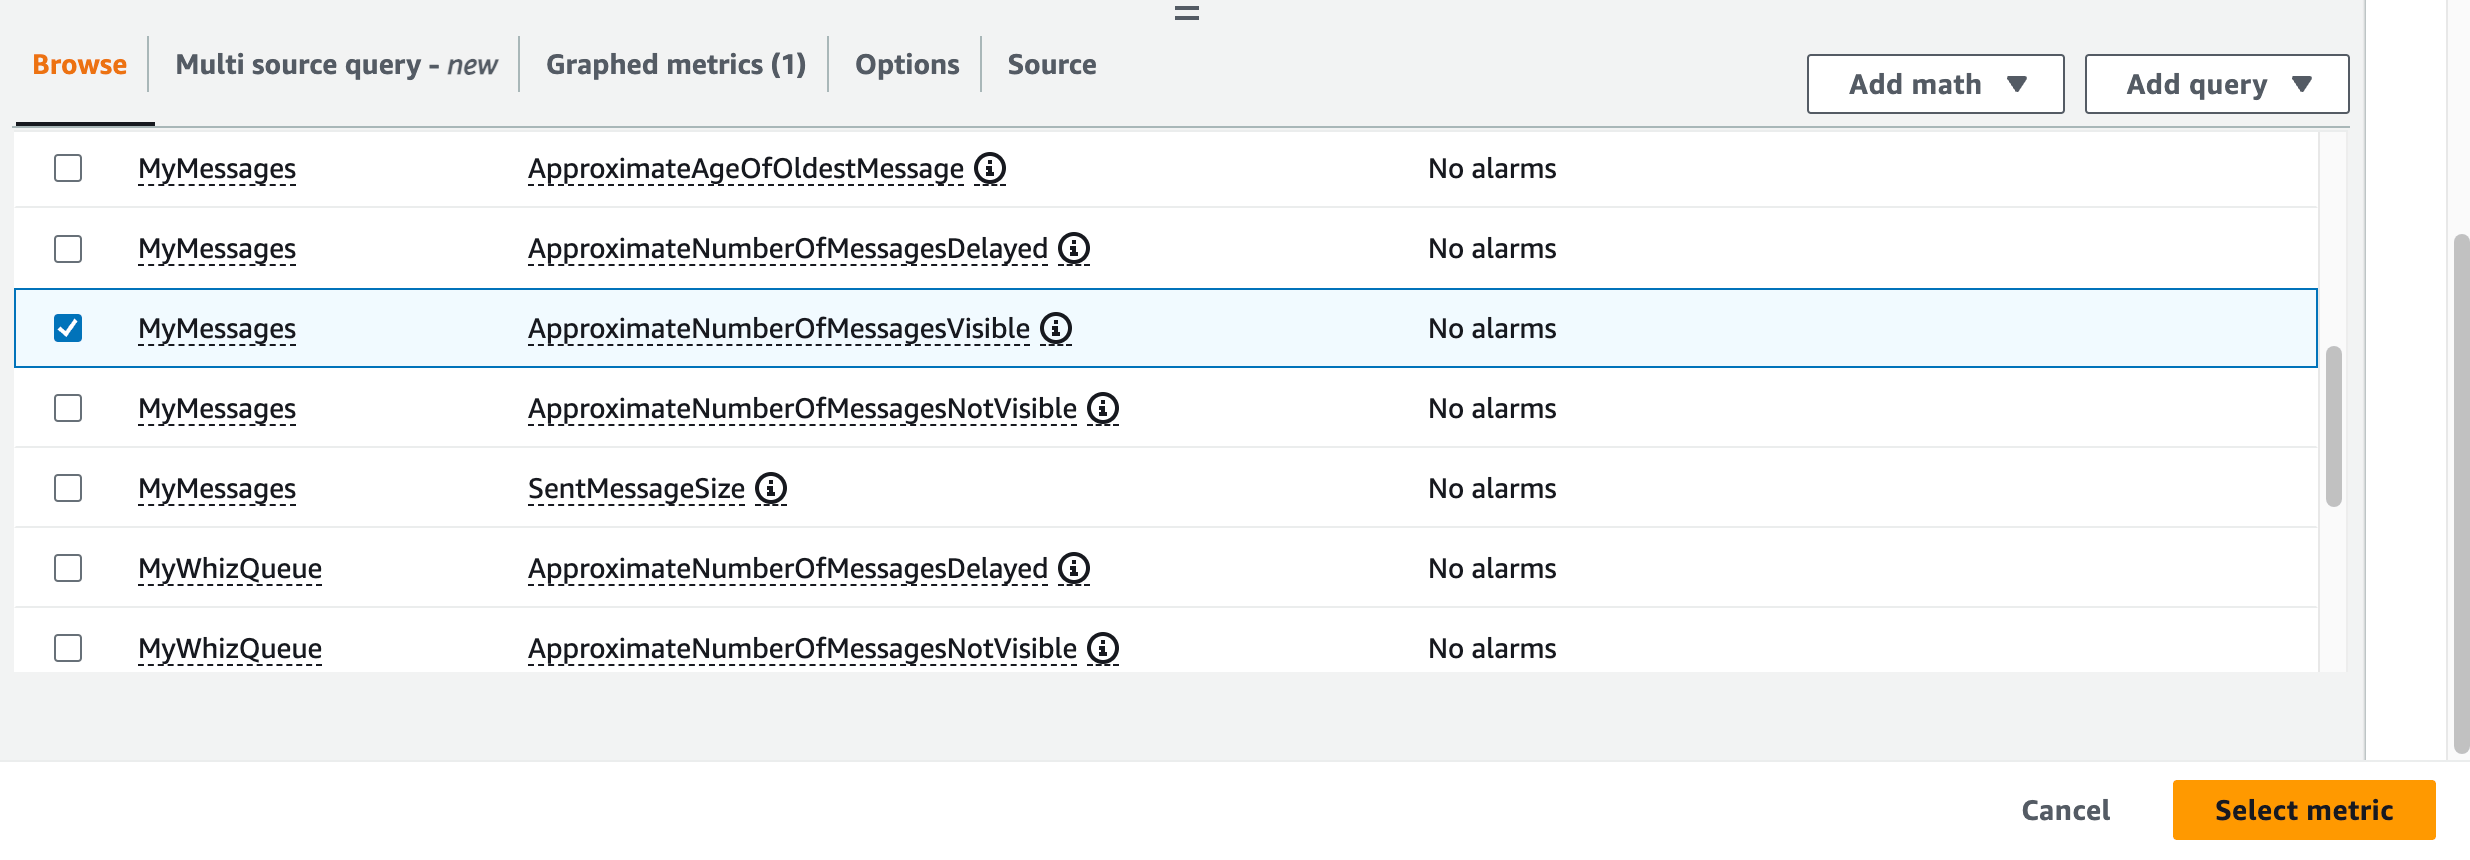 * Click on **Select metric** button.
5. Now, configure the alarm with the following details:
* Under **Metrics**
* Statistic : Select **Sum**
* Period: Select **1 Minute**
* Under **Conditions**
* Threshold type: Choose **Static**
* Whenever CPU Utilization is…: Choose **Greater**
* than: Enter **500**
* Click on **Select metric** button.
5. Now, configure the alarm with the following details:
* Under **Metrics**
* Statistic : Select **Sum**
* Period: Select **1 Minute**
* Under **Conditions**
* Threshold type: Choose **Static**
* Whenever CPU Utilization is…: Choose **Greater**
* than: Enter **500**
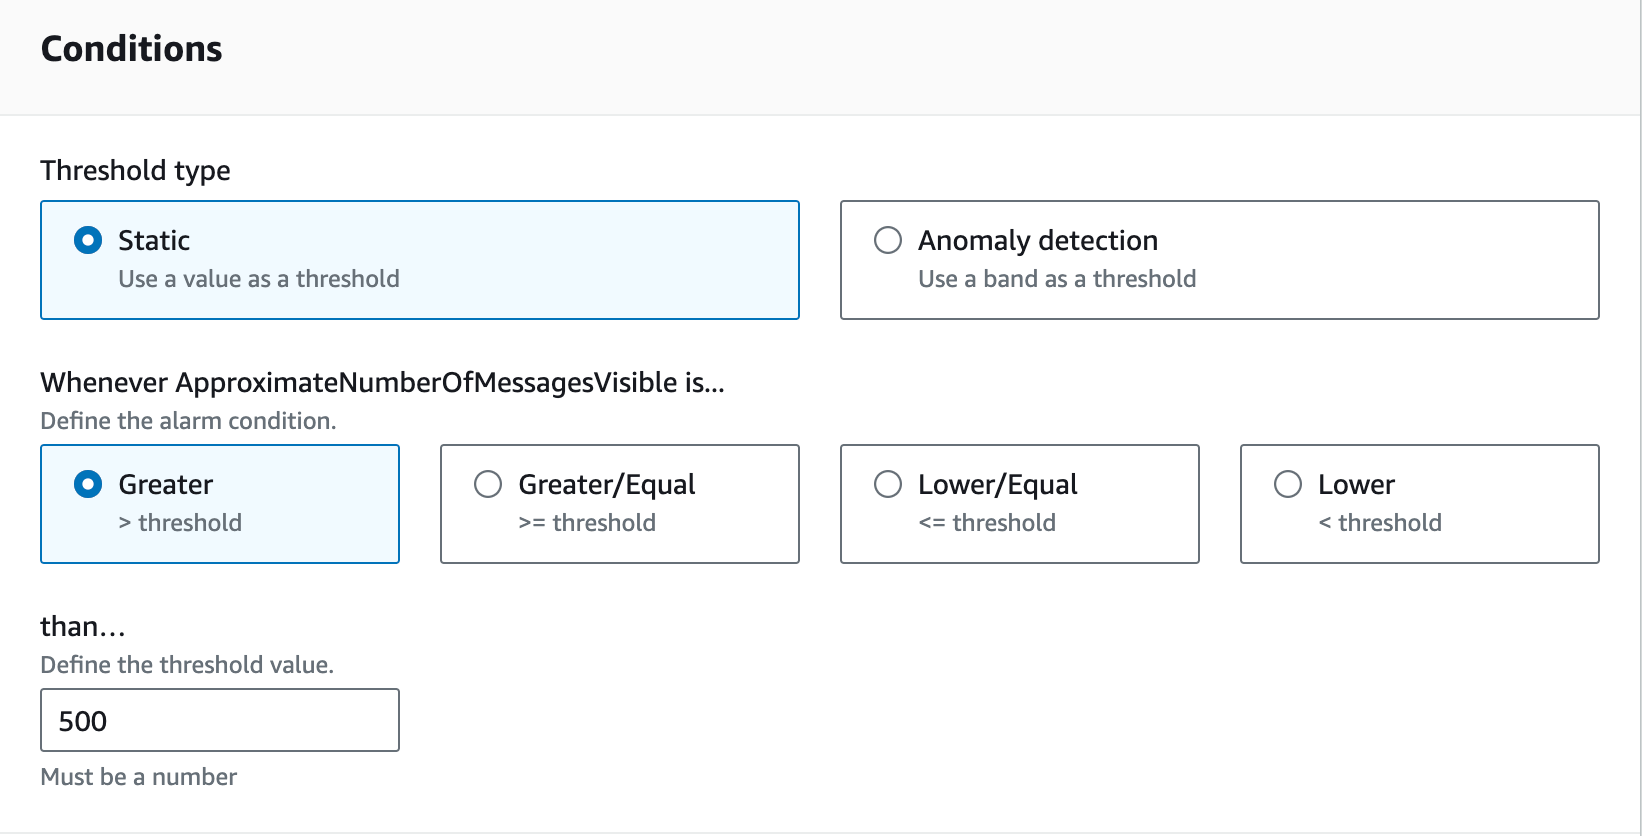 * Leave other values as **default** and click on **Next** button.
6. In **Configure actions** page:
* Under **Notification :** Click on **Remove** button and click on **Next** button. Click on **Proceed without actions** in pop-up appeared
7. **In the Add a description** page, (under Name and Description):
* Name: Enter the Name **ScaleOut**
* Click on **Next** button.
8. A preview of the Alarm will be shown. Scroll down and click on **Create alarm** button.
9. A new CloudWatch Alarm is now created.
10. Now, Similar to **ScaleOut**, we also need to create a **ScaleIn** Alarm to launch new instances when the **ApproximateNumberOfMessagesVisible** is lower than **300**.
11. Click on **ScaleOut** alarm and in Actions dropdown click on **Copy**
* Leave other values as **default** and click on **Next** button.
6. In **Configure actions** page:
* Under **Notification :** Click on **Remove** button and click on **Next** button. Click on **Proceed without actions** in pop-up appeared
7. **In the Add a description** page, (under Name and Description):
* Name: Enter the Name **ScaleOut**
* Click on **Next** button.
8. A preview of the Alarm will be shown. Scroll down and click on **Create alarm** button.
9. A new CloudWatch Alarm is now created.
10. Now, Similar to **ScaleOut**, we also need to create a **ScaleIn** Alarm to launch new instances when the **ApproximateNumberOfMessagesVisible** is lower than **300**.
11. Click on **ScaleOut** alarm and in Actions dropdown click on **Copy**
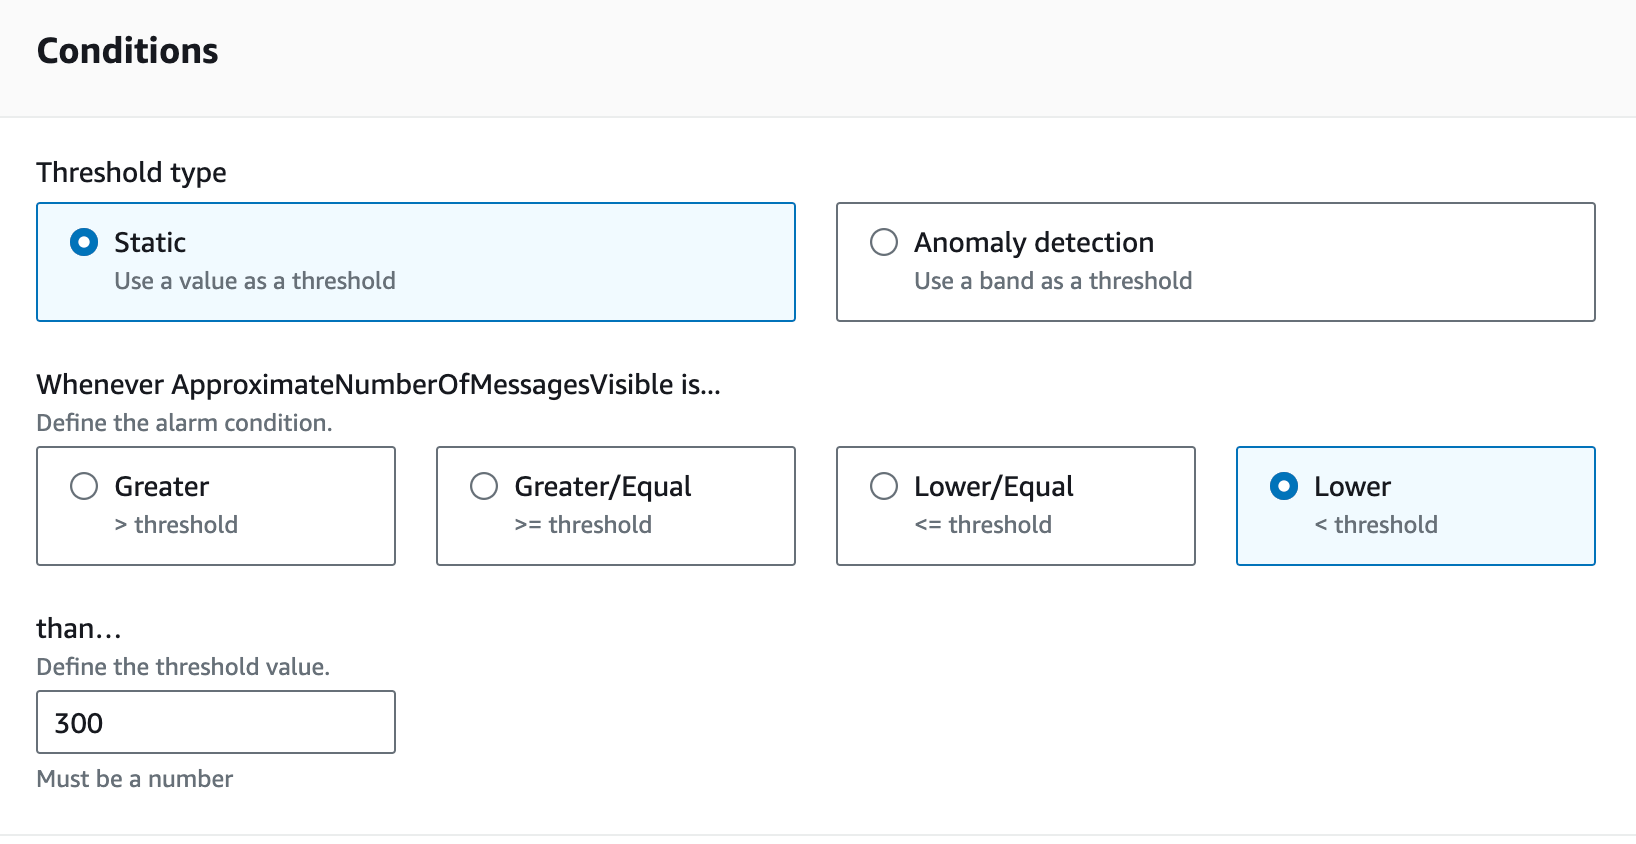
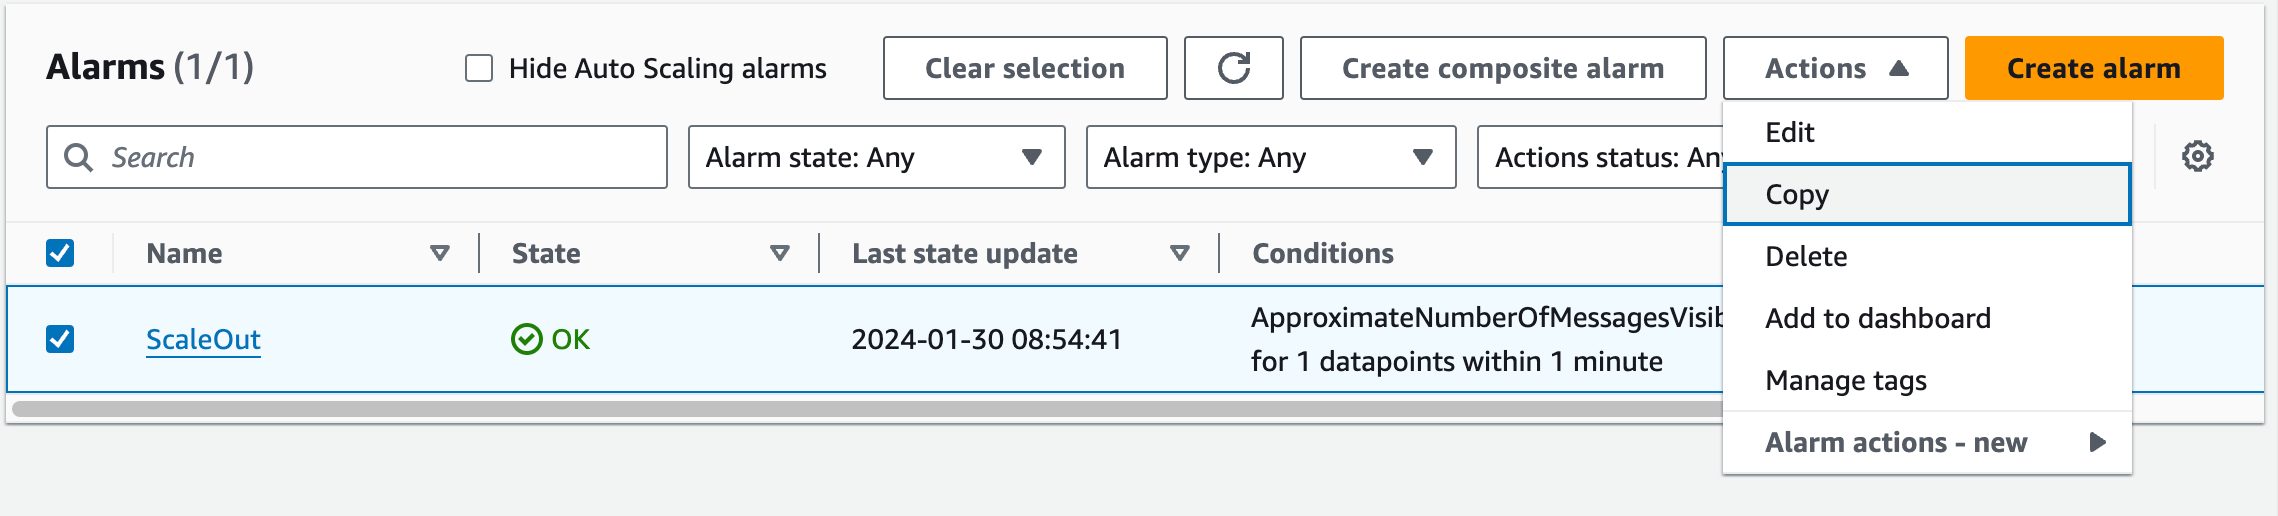 12. In conditions change the following :
* Threshold type: Choose **Static**
* Whenever CPU Utilization is…: Choose **Lower**
* than: Enter **300**
12. In conditions change the following :
* Threshold type: Choose **Static**
* Whenever CPU Utilization is…: Choose **Lower**
* than: Enter **300**
 13. Leave everything as **default** and click on **Next** buttons
14. No changes needed, click on **Next** button.
15. Name: Enter the Name **ScaleIn**
16. Click on **Next** button.
17. A preview of the Alarm will be shown. Scroll down and click on **Create alarm** button.
#### Task 6: Create a Launch Template
In this task, we are going to create a Launch Template.
1. Make sure you are in the **US East (N. Virginia) us-east-1** Region before proceeding with the Lab.
2. Navigate to **EC2** by clicking on the **Services** menu in the top, then click on **EC2** in the **Compute** section.
3. In the left navigation menu, scroll down to **Launch Templates** and click on **Create launch template** button.
4. Launch template name: Enter **whizlabsLT**
5. Template version description: Enter **Launch template version 1**
6. Launch template contents:
* Amazon machine image (AMI): Select **Amazon Linux kernel-6.1 AMI**
* Instance type: Select **t2.micro**
13. Leave everything as **default** and click on **Next** buttons
14. No changes needed, click on **Next** button.
15. Name: Enter the Name **ScaleIn**
16. Click on **Next** button.
17. A preview of the Alarm will be shown. Scroll down and click on **Create alarm** button.
#### Task 6: Create a Launch Template
In this task, we are going to create a Launch Template.
1. Make sure you are in the **US East (N. Virginia) us-east-1** Region before proceeding with the Lab.
2. Navigate to **EC2** by clicking on the **Services** menu in the top, then click on **EC2** in the **Compute** section.
3. In the left navigation menu, scroll down to **Launch Templates** and click on **Create launch template** button.
4. Launch template name: Enter **whizlabsLT**
5. Template version description: Enter **Launch template version 1**
6. Launch template contents:
* Amazon machine image (AMI): Select **Amazon Linux kernel-6.1 AMI**
* Instance type: Select **t2.micro**
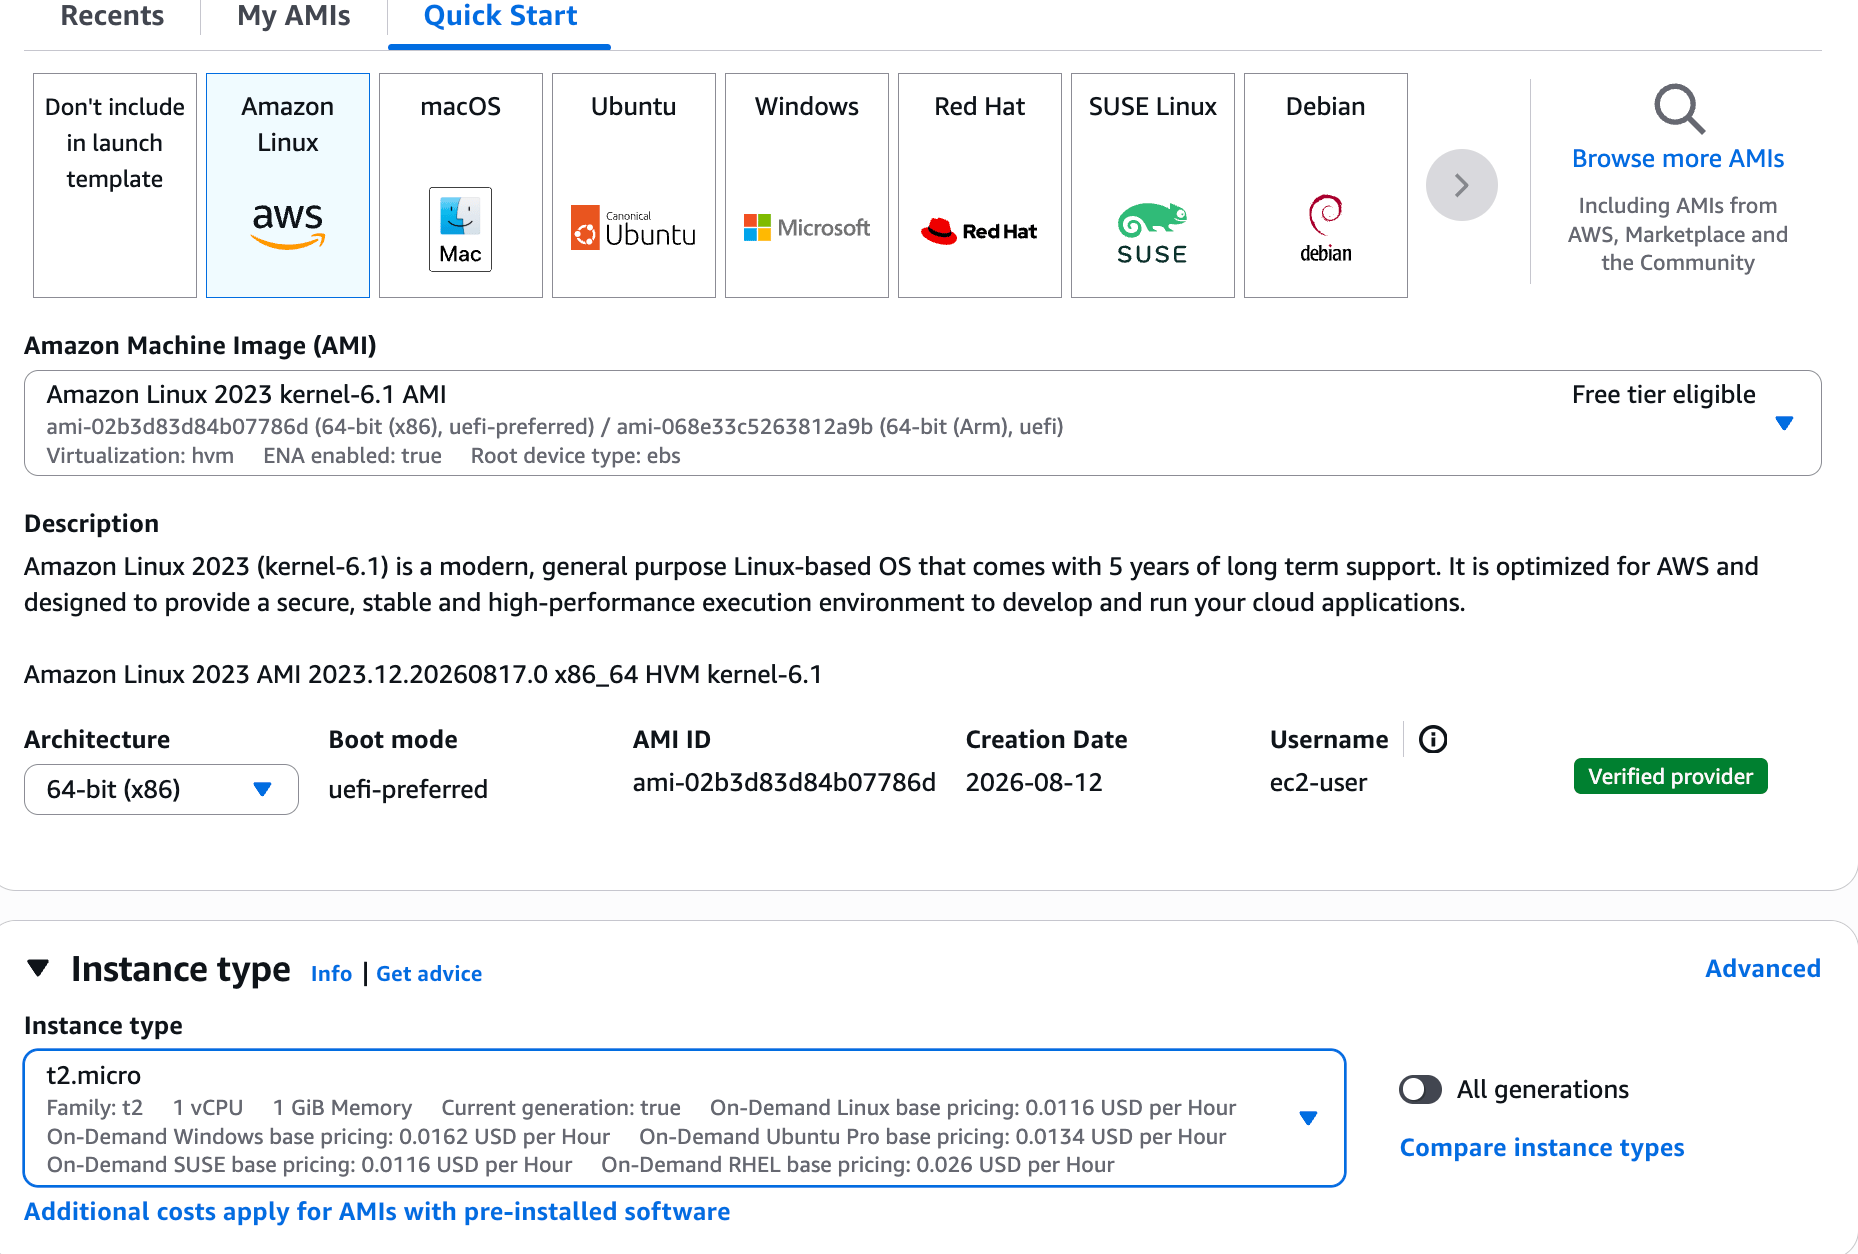 * Key pair (login):
* Key pair name: **Don't include in launch template**
7. Network settings:
* Security groups: Select the **Default security group of Default VPC**
8. Expand Advance details section;
* For IAM Instance profile : Select **EC2SQSS3AccessProfile\** Role which is pre-created for use.
* Scroll down to user-data section and copy paste the script.
* **Note** : **Update the bucket name in 14th line** with your bucket name
```python theme={null}
#!/bin/bash
# install jq
sudo yum install jq -y
# Update aws cli version
cd /home/ec2-user
curl "https://awscli.amazonaws.com/awscli-exe-linux-x86_64.zip" -o "awscliv2.zip"
unzip awscliv2.zip
sudo ./aws/install
sudo ./aws/install --bin-dir /usr/local/bin --install-dir /usr/local/aws-cli --update
which aws
ls -l /usr/local/bin/aws
aws --version
# copy sendMessages.sh and receiveMessages.sh from S3
aws s3 cp s3://whizlabs324356/ . --recursive --exclude "*" --include "*.sh"
sudo chmod +x /home/ec2-user/*.sh
nohup ./receiveMessages.sh
```
9. Now, click on **Create launch template** button
10. Launch template is now created.
11. Click on the **View launch template** button.
12. Launch template is now listed.
* Key pair (login):
* Key pair name: **Don't include in launch template**
7. Network settings:
* Security groups: Select the **Default security group of Default VPC**
8. Expand Advance details section;
* For IAM Instance profile : Select **EC2SQSS3AccessProfile\** Role which is pre-created for use.
* Scroll down to user-data section and copy paste the script.
* **Note** : **Update the bucket name in 14th line** with your bucket name
```python theme={null}
#!/bin/bash
# install jq
sudo yum install jq -y
# Update aws cli version
cd /home/ec2-user
curl "https://awscli.amazonaws.com/awscli-exe-linux-x86_64.zip" -o "awscliv2.zip"
unzip awscliv2.zip
sudo ./aws/install
sudo ./aws/install --bin-dir /usr/local/bin --install-dir /usr/local/aws-cli --update
which aws
ls -l /usr/local/bin/aws
aws --version
# copy sendMessages.sh and receiveMessages.sh from S3
aws s3 cp s3://whizlabs324356/ . --recursive --exclude "*" --include "*.sh"
sudo chmod +x /home/ec2-user/*.sh
nohup ./receiveMessages.sh
```
9. Now, click on **Create launch template** button
10. Launch template is now created.
11. Click on the **View launch template** button.
12. Launch template is now listed.
 #### Task 7: Create an Auto Scaling Group
In this task, we are going to create an Auto Scaling group.
1. Go to the left menu under **EC2** and choose **Auto Scaling Group** under **Auto Scaling**
2. Click on the **Create Auto Scaling group** button.
3. **Step 1: Choose launch template or configuration**
* Auto Scaling group name: Enter **whiz-ASG**
* Launch template: Select **whizlabsLT**
* Click on the **Next** button.
4. **Step 2: Configure settings**
* VPC: Select the **Default VPC** from the list.
* Subnet: Select subnet available in **us-east-1a** region.
* Click on the **Next** button.
#### Task 7: Create an Auto Scaling Group
In this task, we are going to create an Auto Scaling group.
1. Go to the left menu under **EC2** and choose **Auto Scaling Group** under **Auto Scaling**
2. Click on the **Create Auto Scaling group** button.
3. **Step 1: Choose launch template or configuration**
* Auto Scaling group name: Enter **whiz-ASG**
* Launch template: Select **whizlabsLT**
* Click on the **Next** button.
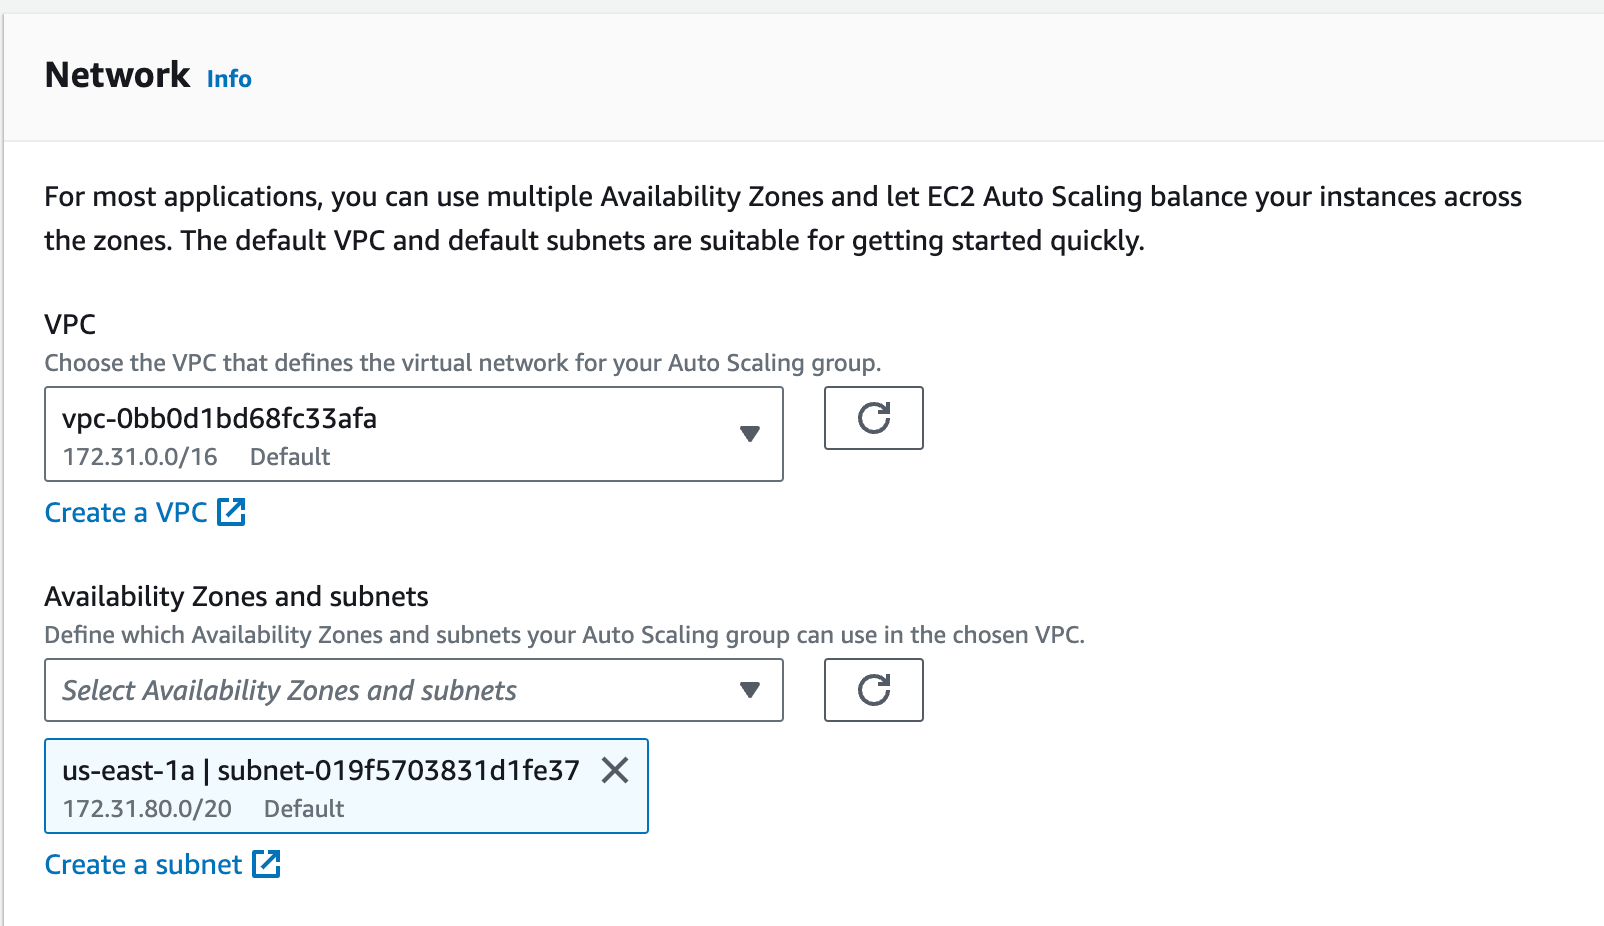
4. **Step 2: Configure settings**
* VPC: Select the **Default VPC** from the list.
* Subnet: Select subnet available in **us-east-1a** region.
* Click on the **Next** button.
 5. **Step 3: Configure advanced options**
* No changes are needed on this page, click on the **Next** button.
6. **Step 4: Configure group size and scaling policies**
* Under Group size – optional
* Desired capacity: Enter **1**
* Minimum capacity: Enter **1**
* Maximum capacity: Enter **4**
5. **Step 3: Configure advanced options**
* No changes are needed on this page, click on the **Next** button.
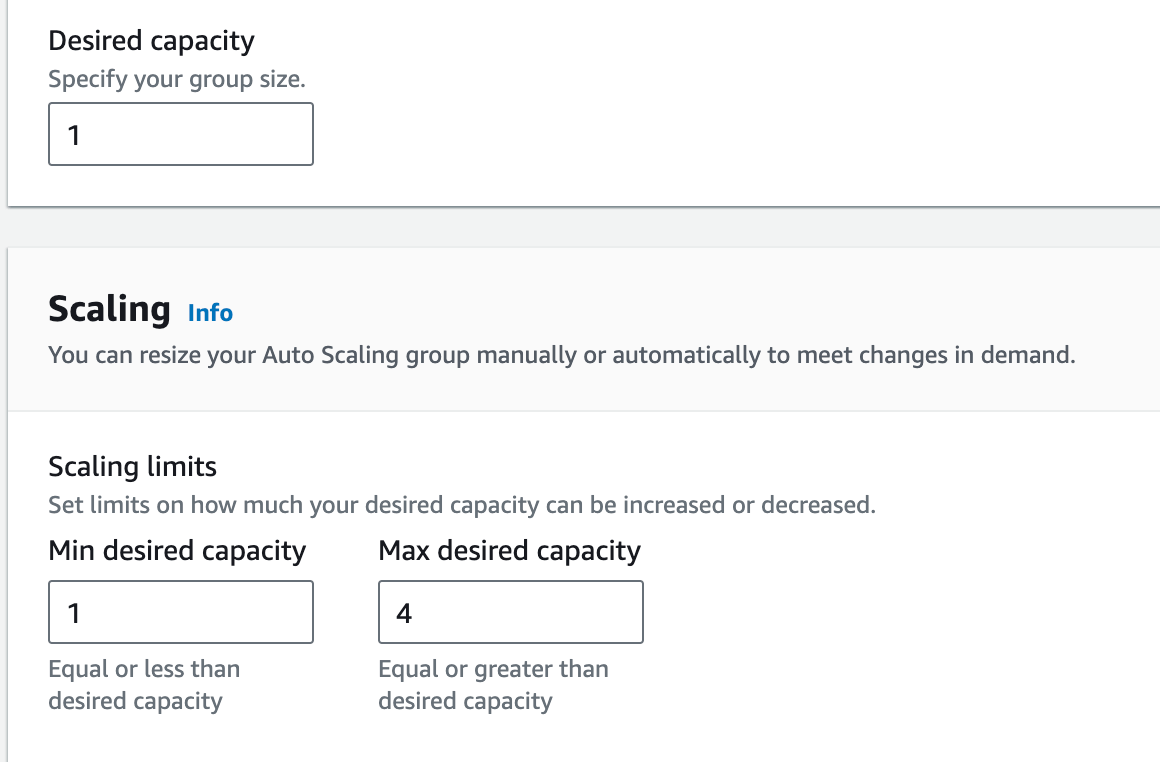
6. **Step 4: Configure group size and scaling policies**
* Under Group size – optional
* Desired capacity: Enter **1**
* Minimum capacity: Enter **1**
* Maximum capacity: Enter **4**
 * No changes are needed, click on the **Next** button
7. **Step 5: Add notifications**
* No changes are needed on this page, click on the **Next** button.
8. **Step 6: Add tags**
* No changes are needed on this page, click on the **Next** button.
* Click on the **Next** button
9. Now scroll down and click on the **Create Auto Scaling group** button.
10. Whiz-ASG Auto scaling is created successfully.
* No changes are needed, click on the **Next** button
7. **Step 5: Add notifications**
* No changes are needed on this page, click on the **Next** button.
8. **Step 6: Add tags**
* No changes are needed on this page, click on the **Next** button.
* Click on the **Next** button
9. Now scroll down and click on the **Create Auto Scaling group** button.
10. Whiz-ASG Auto scaling is created successfully.
 11. Now, to add scaling policies in auto scaling group
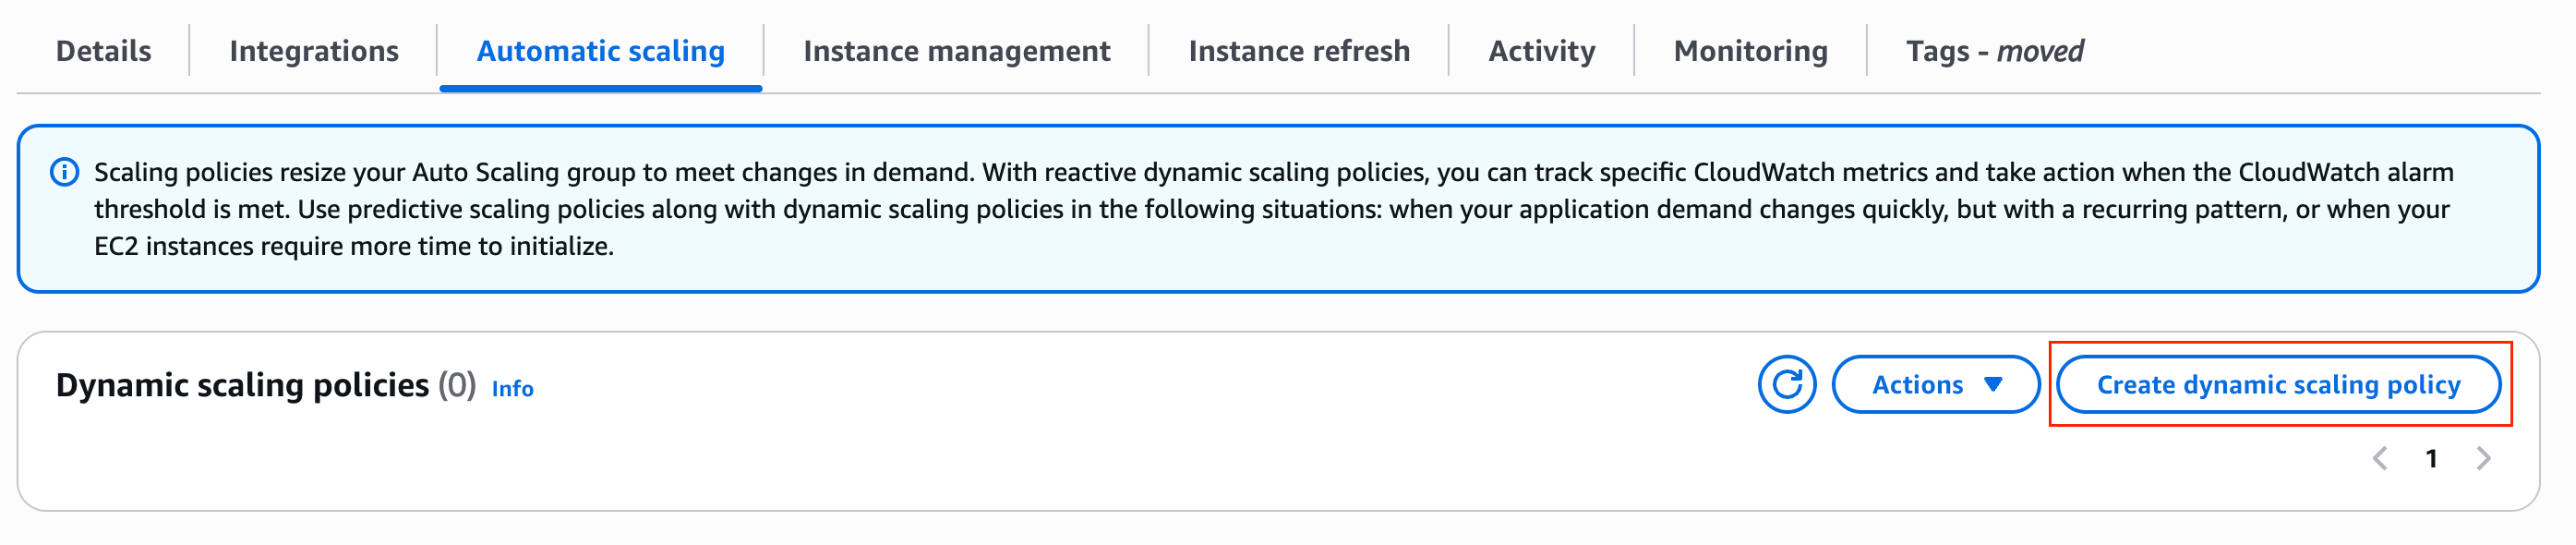
12. Click on autoscaling group and navigate to **Automatic scaling** tab and click on **Create dynamic scaling policy** button.
11. Now, to add scaling policies in auto scaling group
12. Click on autoscaling group and navigate to **Automatic scaling** tab and click on **Create dynamic scaling policy** button.
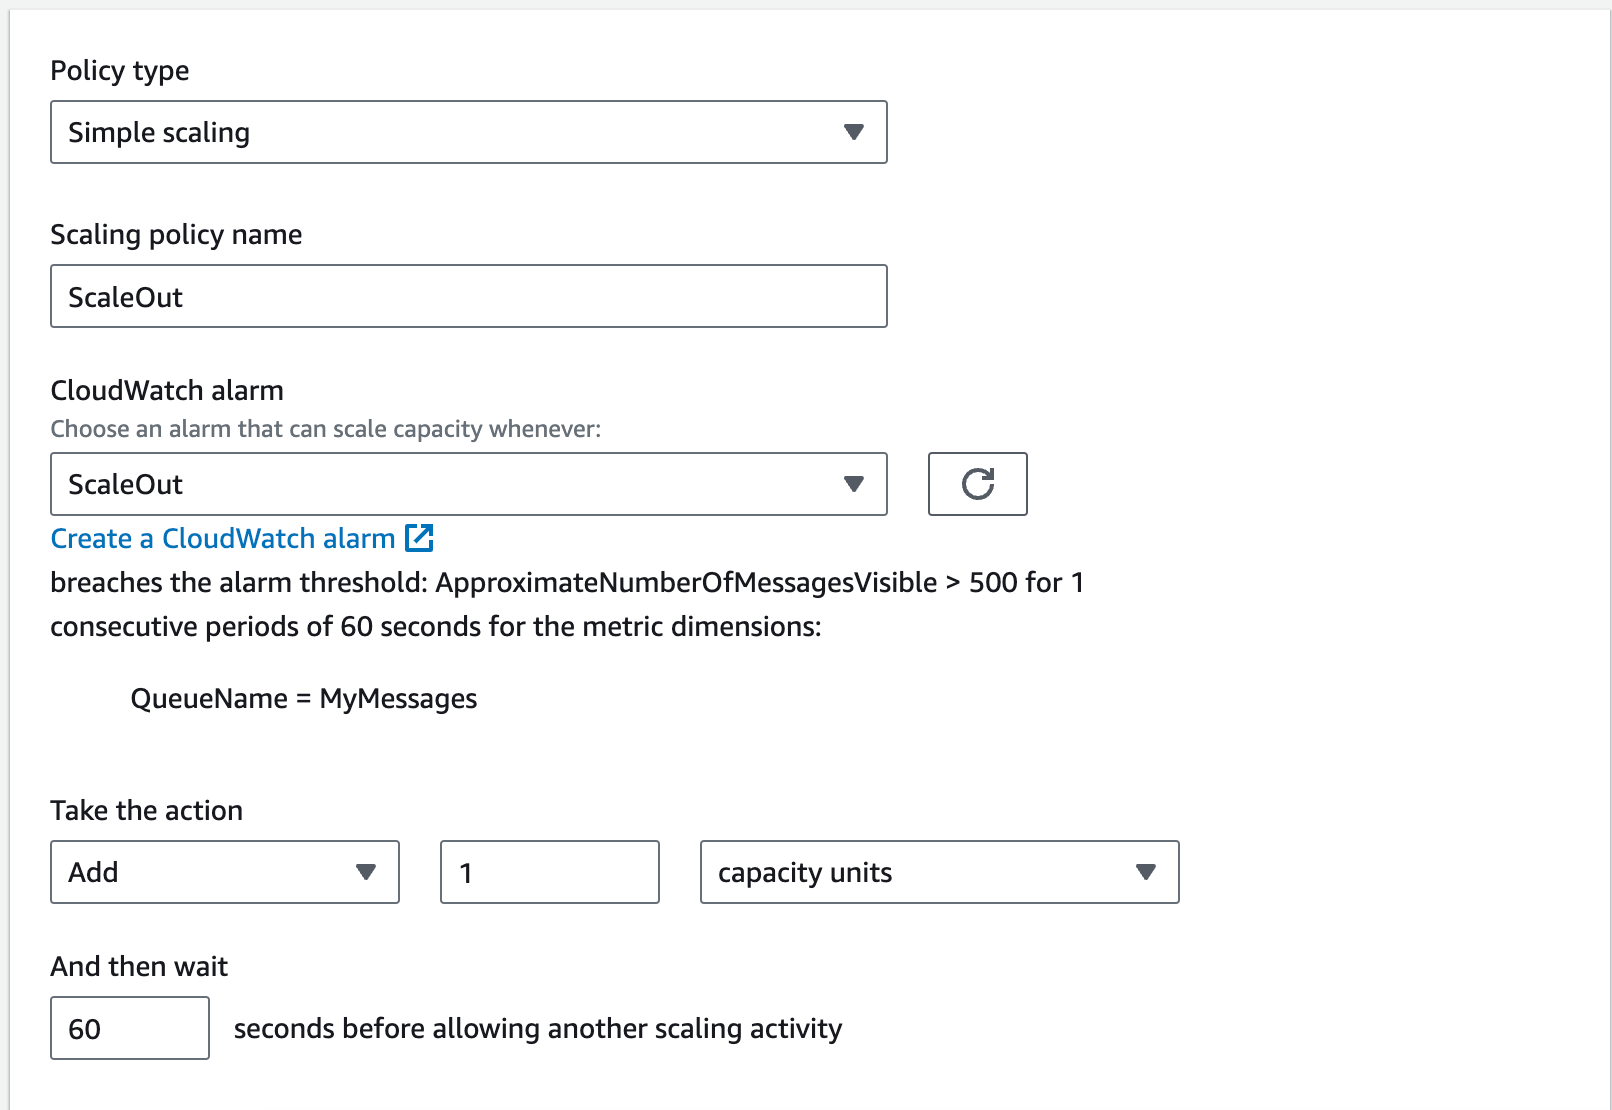
 13. Update the following details :
* Policy type : Select **Simple scaling**
* Scaling policy name: Enter **ScaleOut**
* CloudWatch alarm: Select **ScaleOut**
* Take the action: Add with **1** capacity units
* And then wait **60** seconds before allowing another scaling activity
13. Update the following details :
* Policy type : Select **Simple scaling**
* Scaling policy name: Enter **ScaleOut**
* CloudWatch alarm: Select **ScaleOut**
* Take the action: Add with **1** capacity units
* And then wait **60** seconds before allowing another scaling activity
 14. Click on **Create** button.
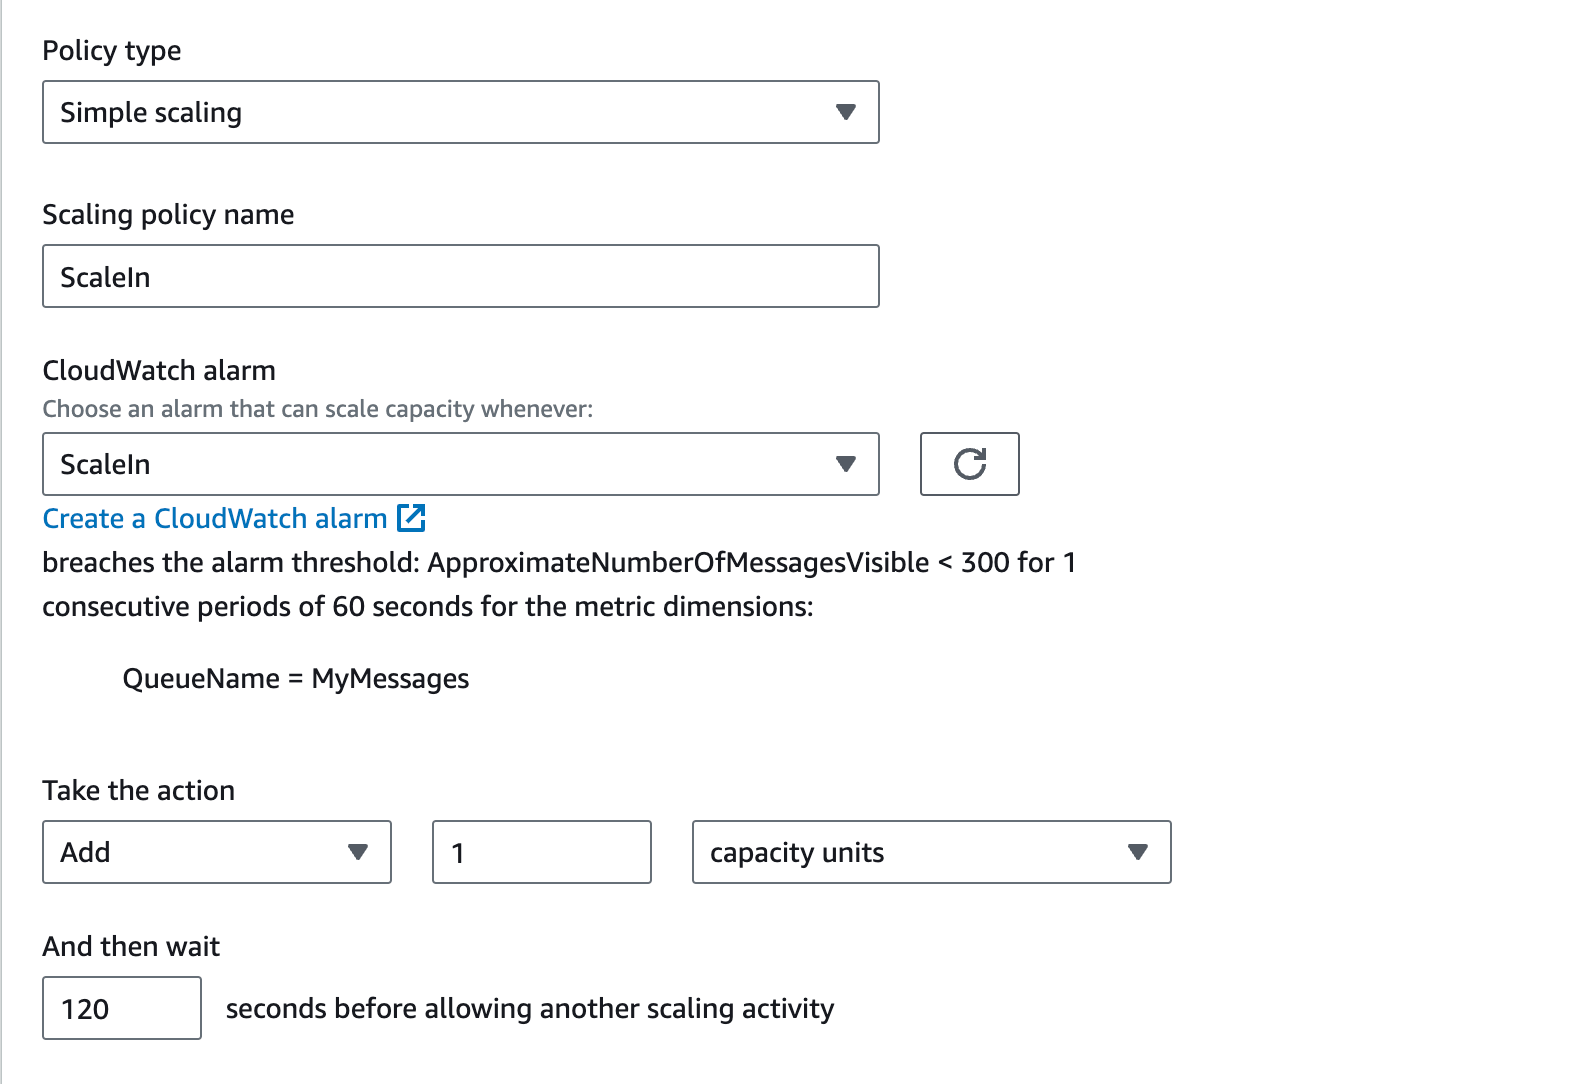
15. Similarly, **create another scaling policy** to for **ScaleIn** with following details:
* Policy type : Select **Simple scaling**
* Scaling policy name: Enter **ScaleIn**
* CloudWatch alarm: Select **ScaleIn**
* Take the action: Add with **1** capacity units
* And then wait **120** seconds before allowing another scaling activity
14. Click on **Create** button.
15. Similarly, **create another scaling policy** to for **ScaleIn** with following details:
* Policy type : Select **Simple scaling**
* Scaling policy name: Enter **ScaleIn**
* CloudWatch alarm: Select **ScaleIn**
* Take the action: Add with **1** capacity units
* And then wait **120** seconds before allowing another scaling activity
 16. Click on **Create** button.
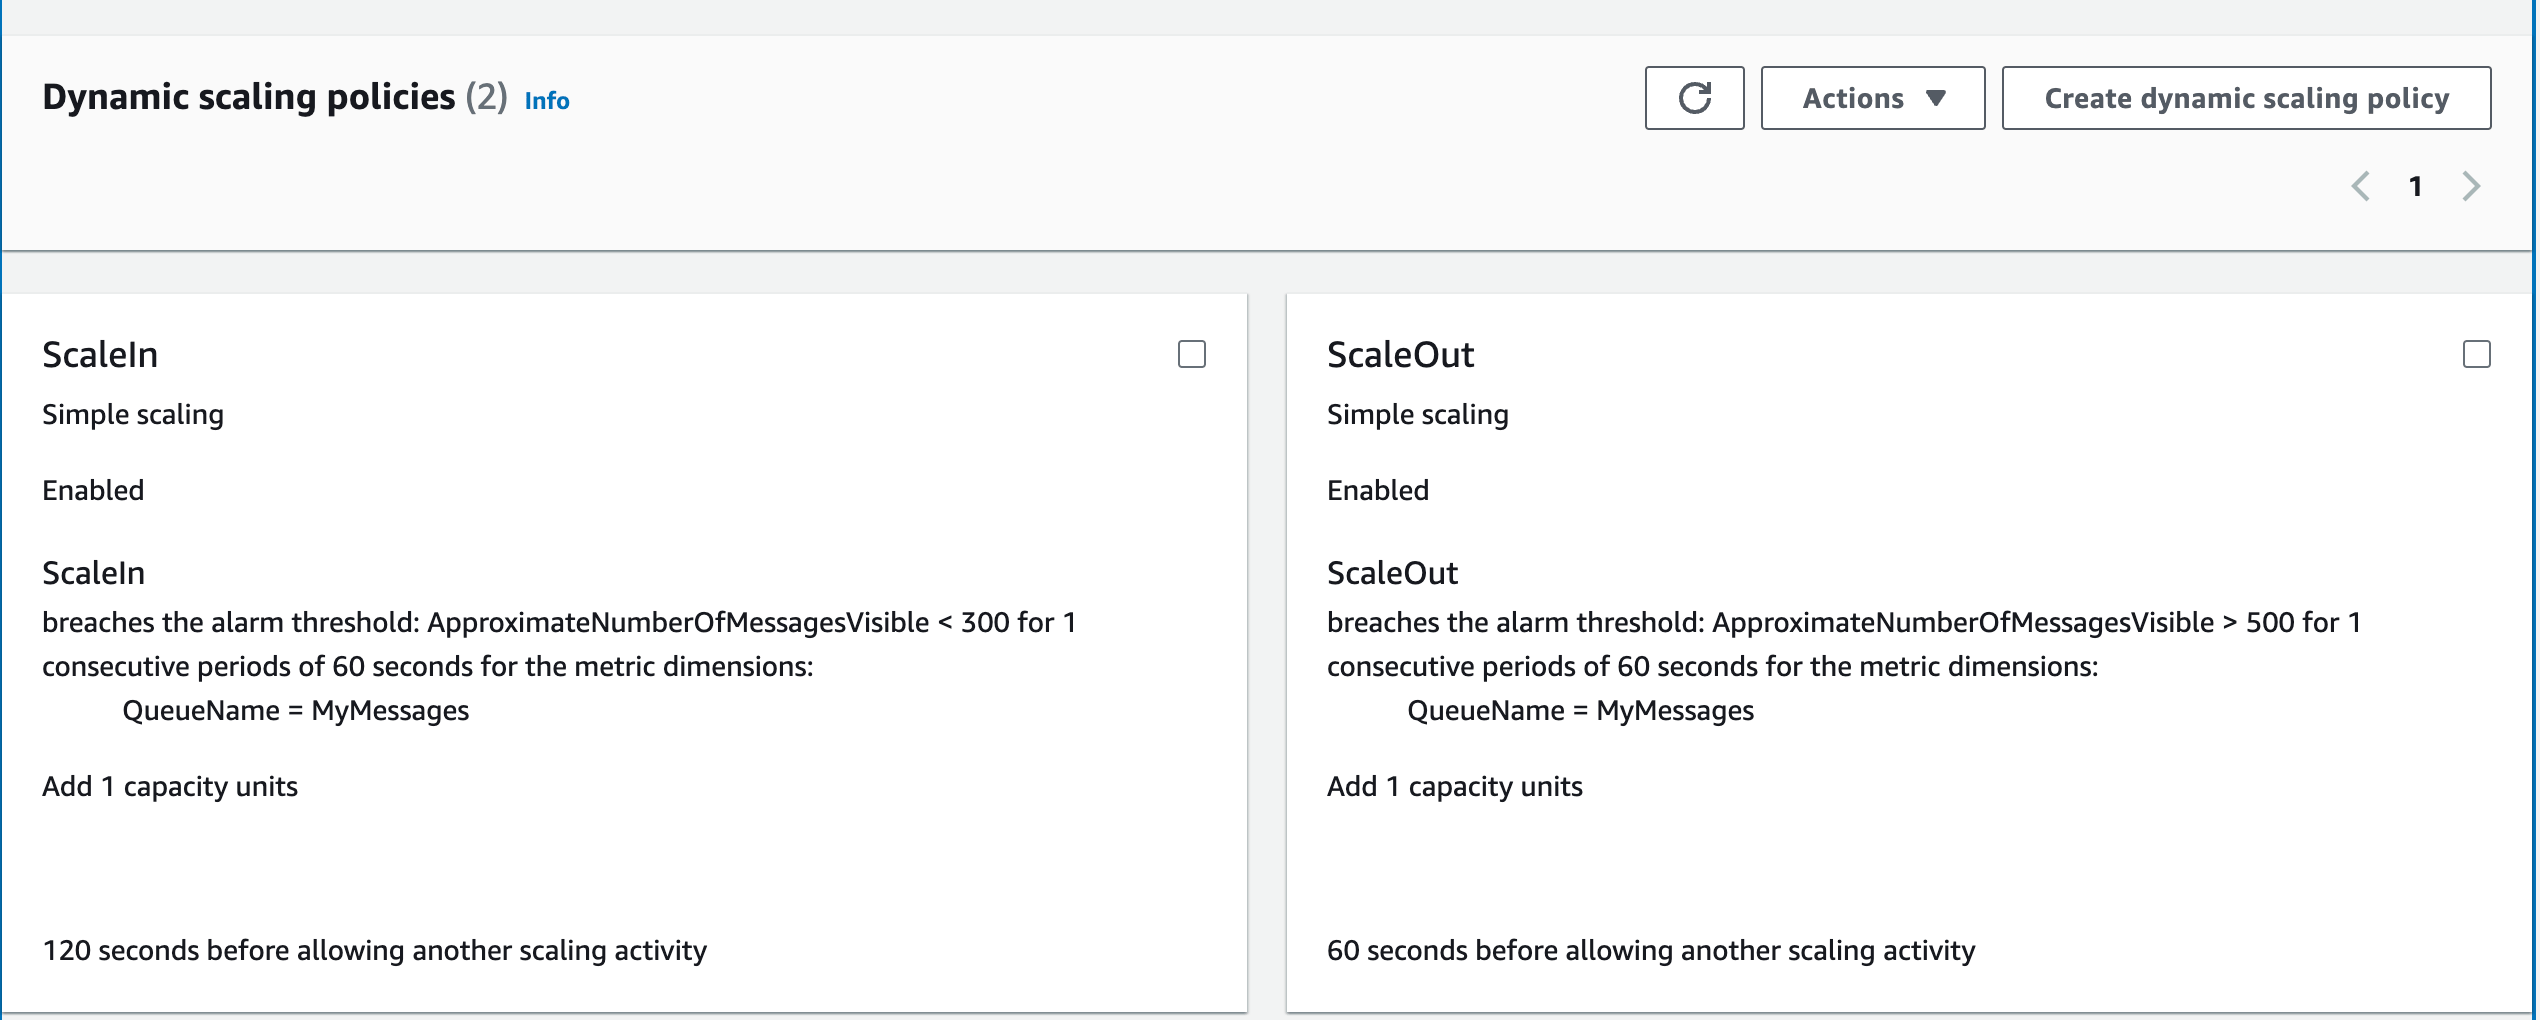
17. Now, you can see two policies added.
16. Click on **Create** button.
17. Now, you can see two policies added.
 #### Task 8: Verifications and Monitoring
We have populated the sqs queue with 2000 messages and have an auto scaling group launch with a maximum of 4 instances. We will now be verifying messages using Cloud Watch Alarms and Auto Scaling group's Activity.
1. Navigate to **CloudWatch > Alarms** , and check the state of Alarm status.
2. If ScaleIn alarm is in **InAlarm state** -> **New instance** will get created.
3. If ScaleOut alarm is in **InAlarm state** -> **Launched instances** will be terminated
> ##### Do you know?
>
> SQS acts as a buffer between the message producers and the EC2 instances. As messages are sent to the SQS queue, EC2 instances can retrieve messages from the queue at their own pace, allowing for smooth and balanced workload distribution.
### Completion and Conclusion
1. You have successfully created and uploaded object to an s3 bucket
2. You have successfully created an SQS Queue
3. You have successfully created CloudWatch alarms
4. You have successfully created Autoscaling Groups
5. You have successfully Verified and Monitored EC2 Instances
### End Lab
1. Sign out of AWS Account.
2. You have successfully completed the lab.
3. Once you have completed the steps, click on **End Lab** from the IP Lab Portal dashboard.
## What gets checked
When you press **Check my work**, the platform verifies each of these:
* **Create Amazon EC2 Auto Scaling Group** — Check whether an Auto Scaling Group is created or not.
* **Launch an EC2 Instance** — Check whether an EC2 Instance is launched or not.
* **Create Amazon EC2 Launch Template** — Check whether an EC2 Launch Template is created or not.
* **check s3 object** — Check whether an object is uploaded to the S3 bucket.
* **Create Private S3 bucket** — Check whether a private S3 bucket is created or not
* **Create Standard SQS Queue** — Check whether a Standard SQS Queue is created or not.
* **Check CloudWatch Alarm Creation** — Check whether at least one CloudWatch alarm exists or not.
## Related help
* [FAQs and Troubleshooting](/aws-saa/support/faqs-and-troubleshooting)
This documentation is built and hosted on [Mintlify](https://mintlify.com), a developer documentation platform.
#### Task 8: Verifications and Monitoring
We have populated the sqs queue with 2000 messages and have an auto scaling group launch with a maximum of 4 instances. We will now be verifying messages using Cloud Watch Alarms and Auto Scaling group's Activity.
1. Navigate to **CloudWatch > Alarms** , and check the state of Alarm status.
2. If ScaleIn alarm is in **InAlarm state** -> **New instance** will get created.
3. If ScaleOut alarm is in **InAlarm state** -> **Launched instances** will be terminated
> ##### Do you know?
>
> SQS acts as a buffer between the message producers and the EC2 instances. As messages are sent to the SQS queue, EC2 instances can retrieve messages from the queue at their own pace, allowing for smooth and balanced workload distribution.
### Completion and Conclusion
1. You have successfully created and uploaded object to an s3 bucket
2. You have successfully created an SQS Queue
3. You have successfully created CloudWatch alarms
4. You have successfully created Autoscaling Groups
5. You have successfully Verified and Monitored EC2 Instances
### End Lab
1. Sign out of AWS Account.
2. You have successfully completed the lab.
3. Once you have completed the steps, click on **End Lab** from the IP Lab Portal dashboard.
## What gets checked
When you press **Check my work**, the platform verifies each of these:
* **Create Amazon EC2 Auto Scaling Group** — Check whether an Auto Scaling Group is created or not.
* **Launch an EC2 Instance** — Check whether an EC2 Instance is launched or not.
* **Create Amazon EC2 Launch Template** — Check whether an EC2 Launch Template is created or not.
* **check s3 object** — Check whether an object is uploaded to the S3 bucket.
* **Create Private S3 bucket** — Check whether a private S3 bucket is created or not
* **Create Standard SQS Queue** — Check whether a Standard SQS Queue is created or not.
* **Check CloudWatch Alarm Creation** — Check whether at least one CloudWatch alarm exists or not.
## Related help
* [FAQs and Troubleshooting](/aws-saa/support/faqs-and-troubleshooting)
This documentation is built and hosted on [Mintlify](https://mintlify.com), a developer documentation platform.