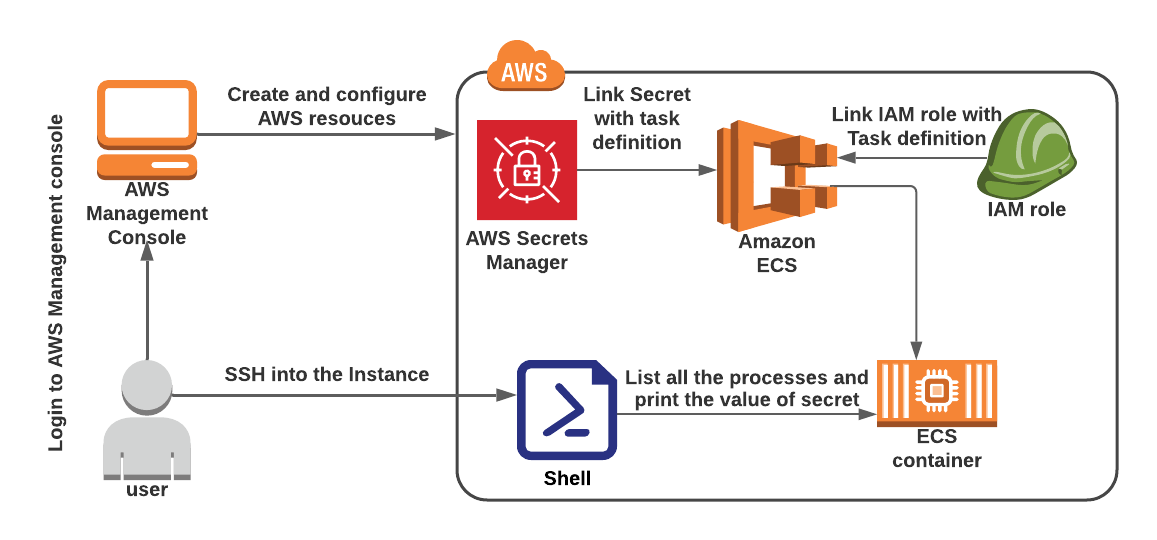
 ### Task Details
1. Sign in to AWS Management Console
2. Create a Secrets Manager secret
3. Copy the ARN of IAM role ecsTaskExecutionRole
4. Create a Security Group for the ECS Cluster
5. Create a Key Pair for the EC2 instance present inside ECS Cluster
6. Create an ECS Cluster
7. Create a task definition
8. Start the task
9. SSH into EC2 Instance
10. List all the processes and print the value of Secret
11. Deleting AWS Resources.
### Launching Lab Environment
1. To launch the lab environment, Click on the **Start Lab** button.
2. Please wait until the cloud environment is provisioned. It will take less than a minute to provision.
3. Once the Lab is started, you will be provided with **IAM user name**, **Password**, **Access** **Key**, and **Secret** **Access** **Key**.
> **Note** : You can only start one lab at any given time
## Lab guide
#### Lab Steps
#### Task 1: Sign in to AWS Management Console
1. Click on the **Open Console** button, and you will get redirected to AWS Console in a new browser tab.
2. On the AWS sign-in page,
* Leave the Account ID as default. Never edit/remove the 12 digit Account ID present in the AWS Console. otherwise, you cannot proceed with the lab.
* Now copy your **User Name** and **Password** in the Lab Console to the **IAM Username and Password** in AWS Console and click on the **Sign in** button.
3. Once Signed In to the AWS Management Console, Make the default AWS Region as **US East (N. Virginia) us-east-1.**
#### Task 2: Create a Secrets Manager secret
In this task, you will create a Secrets Manager secret and Store the sensitive data that will be accessed by SSHing into the running container.
1. Make sure you are in the **US East N.Virginia (us-east-1)** Region.
2. Navigate to **Secrets Manager** by clicking on the **Services** menu at the top and selecting **Secrets Manager** under the **Security, Identity & Compliance** section.
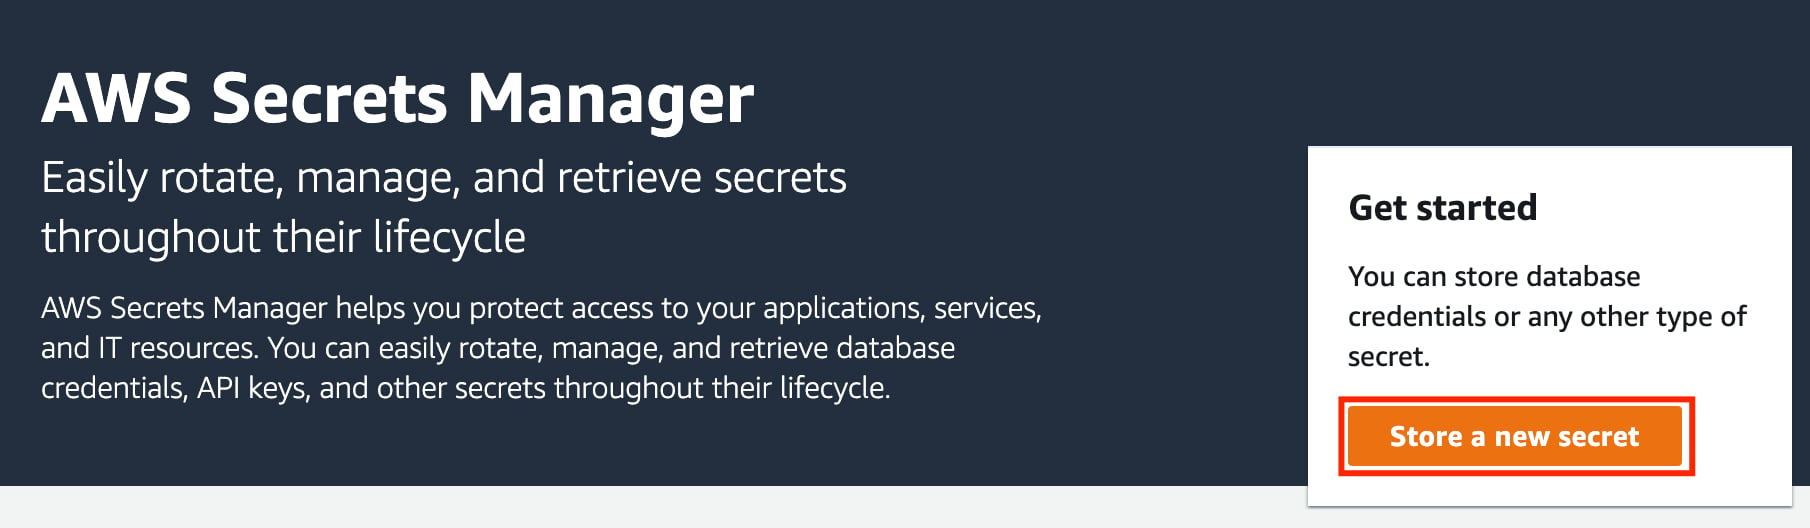
3. On the home page, click on **Store a new secret** button.
### Task Details
1. Sign in to AWS Management Console
2. Create a Secrets Manager secret
3. Copy the ARN of IAM role ecsTaskExecutionRole
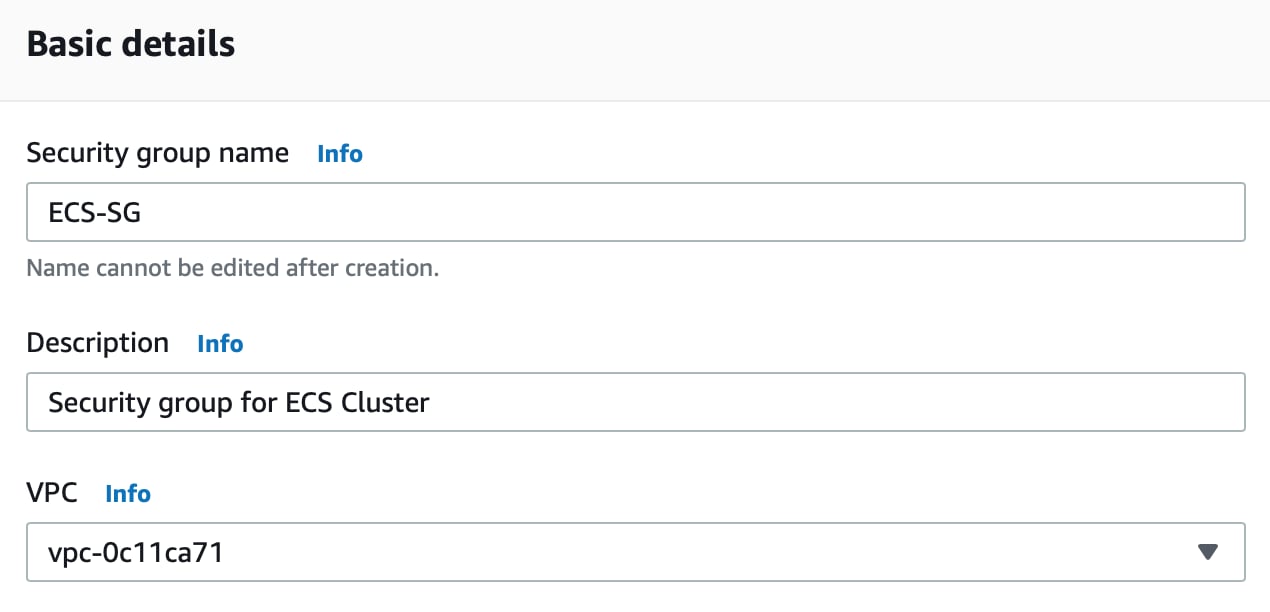
4. Create a Security Group for the ECS Cluster
5. Create a Key Pair for the EC2 instance present inside ECS Cluster
6. Create an ECS Cluster
7. Create a task definition
8. Start the task
9. SSH into EC2 Instance
10. List all the processes and print the value of Secret
11. Deleting AWS Resources.
### Launching Lab Environment
1. To launch the lab environment, Click on the **Start Lab** button.
2. Please wait until the cloud environment is provisioned. It will take less than a minute to provision.
3. Once the Lab is started, you will be provided with **IAM user name**, **Password**, **Access** **Key**, and **Secret** **Access** **Key**.
> **Note** : You can only start one lab at any given time
## Lab guide
#### Lab Steps
#### Task 1: Sign in to AWS Management Console
1. Click on the **Open Console** button, and you will get redirected to AWS Console in a new browser tab.
2. On the AWS sign-in page,
* Leave the Account ID as default. Never edit/remove the 12 digit Account ID present in the AWS Console. otherwise, you cannot proceed with the lab.
* Now copy your **User Name** and **Password** in the Lab Console to the **IAM Username and Password** in AWS Console and click on the **Sign in** button.
3. Once Signed In to the AWS Management Console, Make the default AWS Region as **US East (N. Virginia) us-east-1.**
#### Task 2: Create a Secrets Manager secret
In this task, you will create a Secrets Manager secret and Store the sensitive data that will be accessed by SSHing into the running container.
1. Make sure you are in the **US East N.Virginia (us-east-1)** Region.
2. Navigate to **Secrets Manager** by clicking on the **Services** menu at the top and selecting **Secrets Manager** under the **Security, Identity & Compliance** section.
3. On the home page, click on **Store a new secret** button.
 4. For **Step 1**, Choose secret type
* Secret type: Choose **Other type of secret**
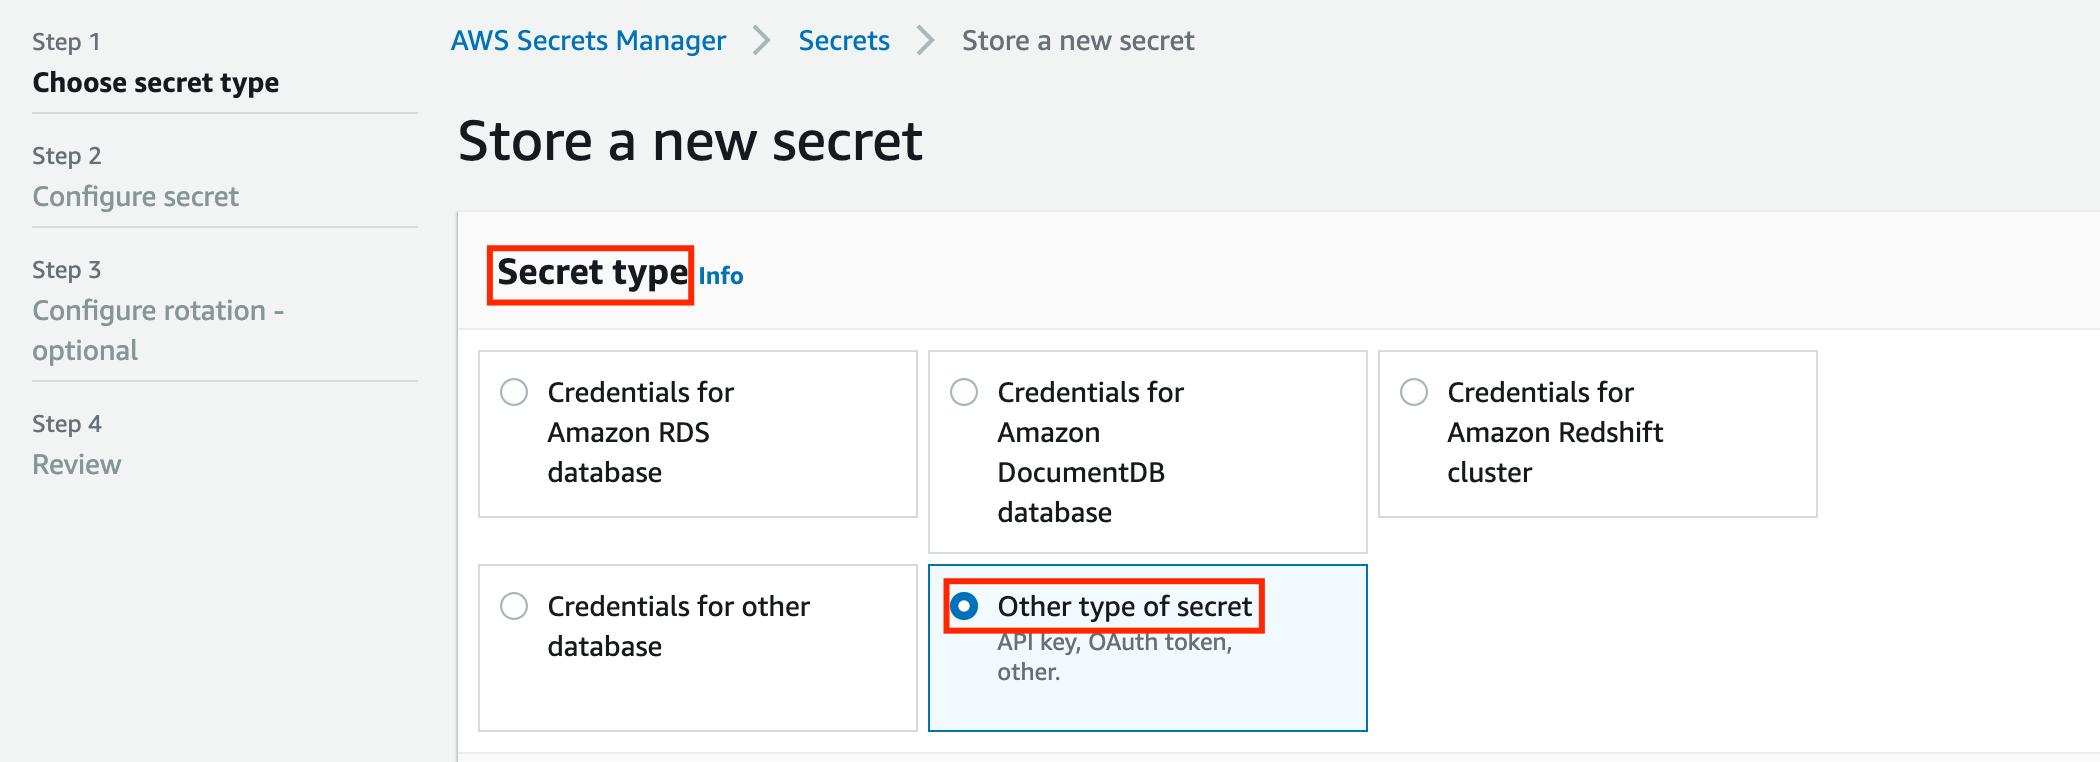
4. For **Step 1**, Choose secret type
* Secret type: Choose **Other type of secret**
 * Choose **PlainText**
* Replace the existing text and enter **password\_value**
* Encryption key: Leave it as default.
* Click on the **Next** button.
5. For **Step 2**, Configure secret
* Secret name: Enter **ProductionUserCredentials**
* Description: Enter **These credentials will be used in a production environment**
* Keep all the options as default.
* Click on the **Next** button.
6. For **Step 3**, Configure rotation
* Keep all the options as default.
* Click on the **Next** button.
7. For **Step 4**, Review
* Review everything and click on the **Store** button.
8. The secret is now created.
* Choose **PlainText**
* Replace the existing text and enter **password\_value**
* Encryption key: Leave it as default.
* Click on the **Next** button.
5. For **Step 2**, Configure secret
* Secret name: Enter **ProductionUserCredentials**
* Description: Enter **These credentials will be used in a production environment**
* Keep all the options as default.
* Click on the **Next** button.
6. For **Step 3**, Configure rotation
* Keep all the options as default.
* Click on the **Next** button.
7. For **Step 4**, Review
* Review everything and click on the **Store** button.
8. The secret is now created.
 9. Click on the **Refresh** button to see the Secret.
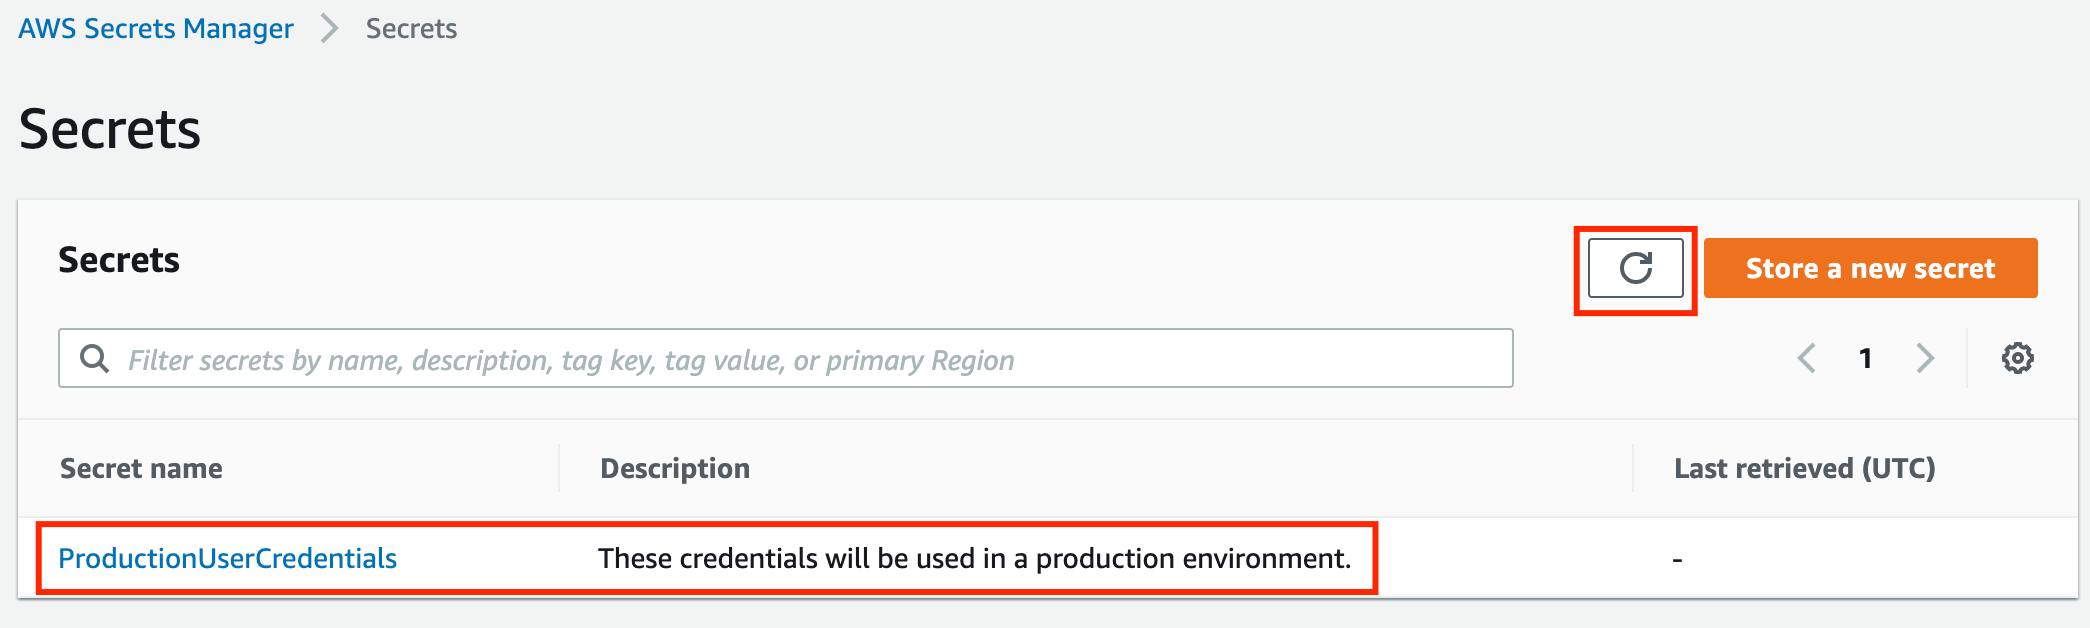 10. Click on the **Secret name** to open the secret.
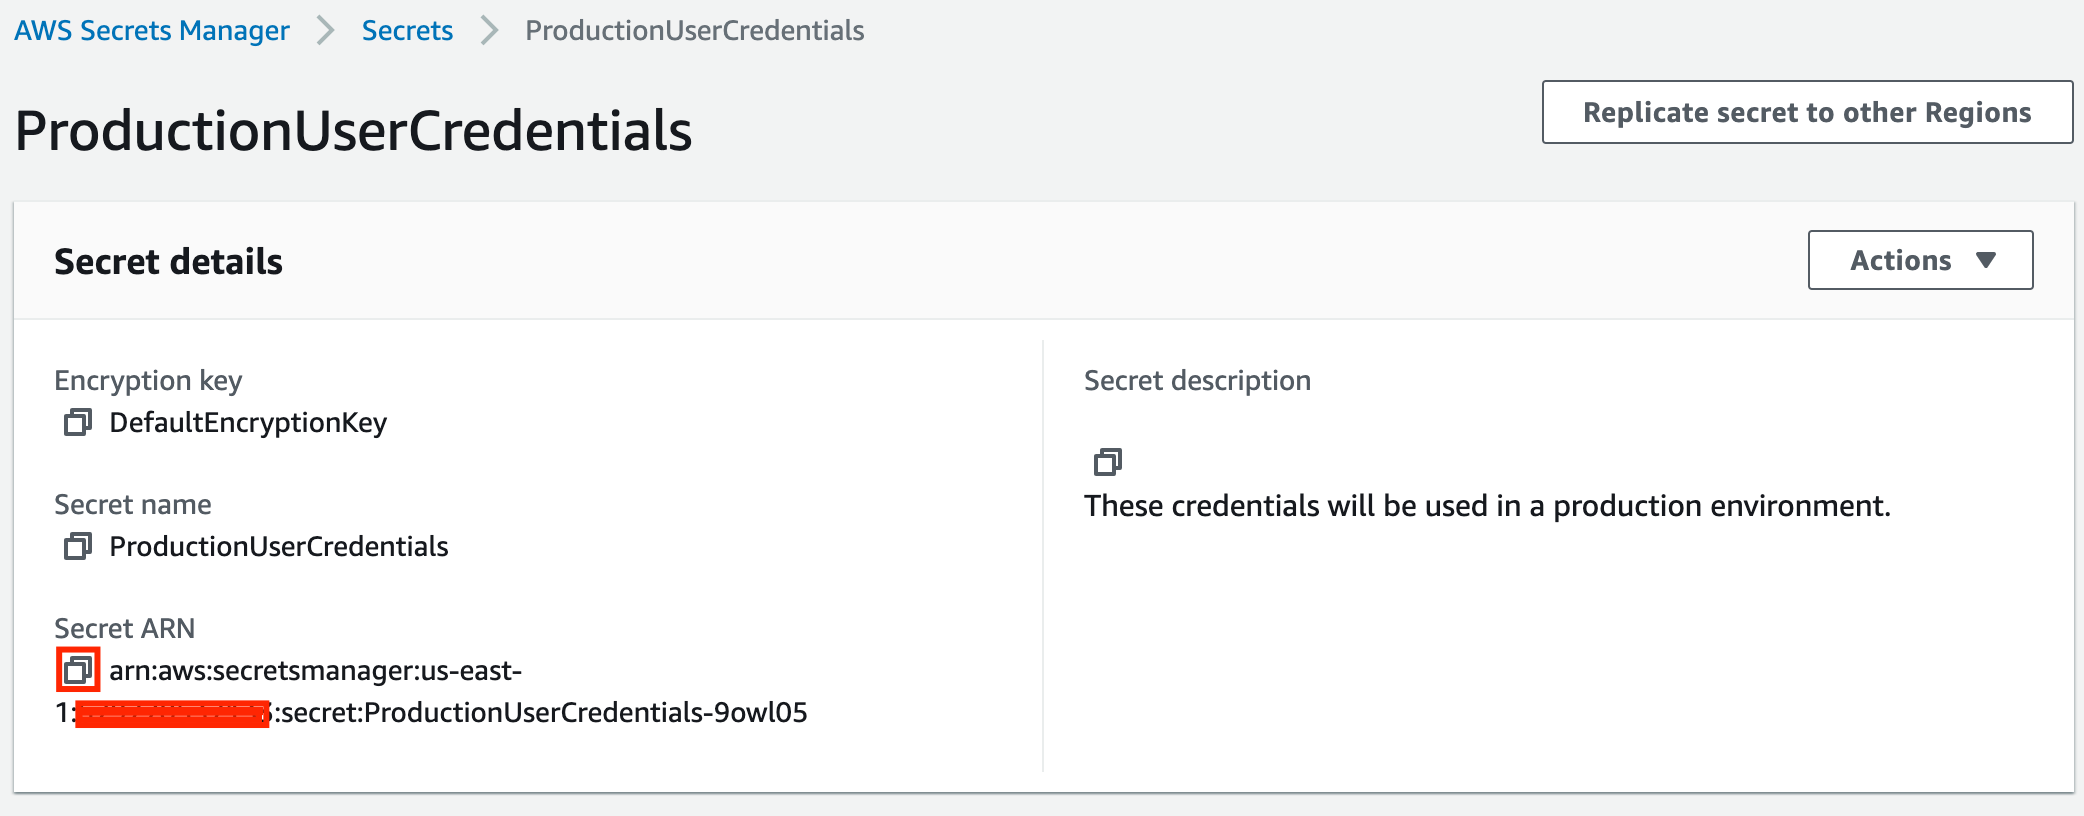
11. To copy, click the **copy** button for **Secret ARN**. Once copied, save it to your Notepad/Notes, it will be used in the next steps.
10. Click on the **Secret name** to open the secret.
11. To copy, click the **copy** button for **Secret ARN**. Once copied, save it to your Notepad/Notes, it will be used in the next steps.
 #### Task 3: Copy the ARN of IAM role ecsTaskExecutionRole
1. Navigate to **IAM** by clicking on the **Services** menu available under the **Identity and Management** section.
#### Task 3: Copy the ARN of IAM role ecsTaskExecutionRole
1. Navigate to **IAM** by clicking on the **Services** menu available under the **Identity and Management** section.
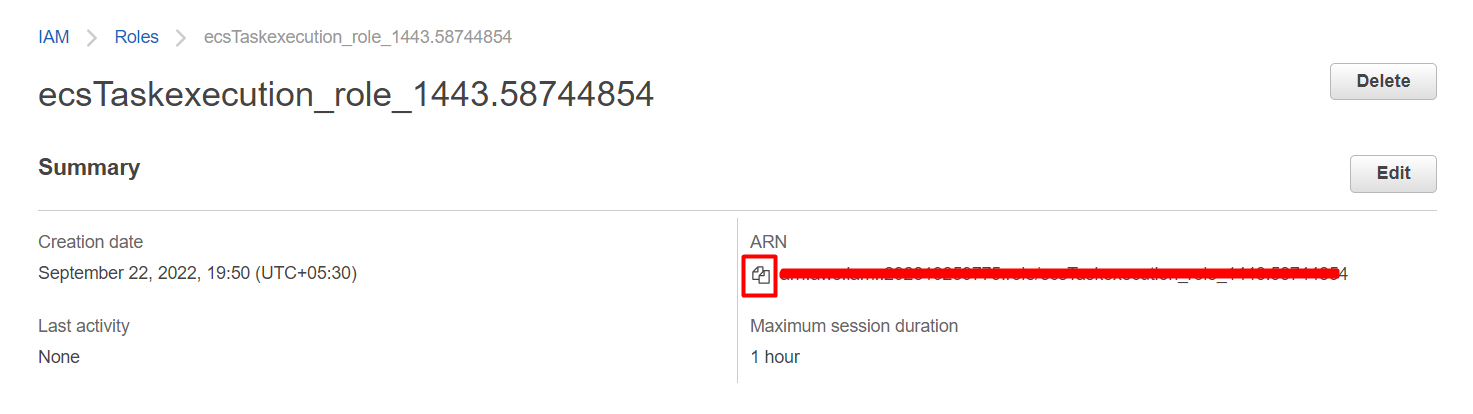 2. IAM Link: [**https://us-east-1.console.aws.amazon.com/iamv2/home?region=us-east-1#/roles**](https://us-east-1.console.aws.amazon.com/iamv2/home?region=us-east-1#/roles) and search for **ecsTaskexecution\_role\_\
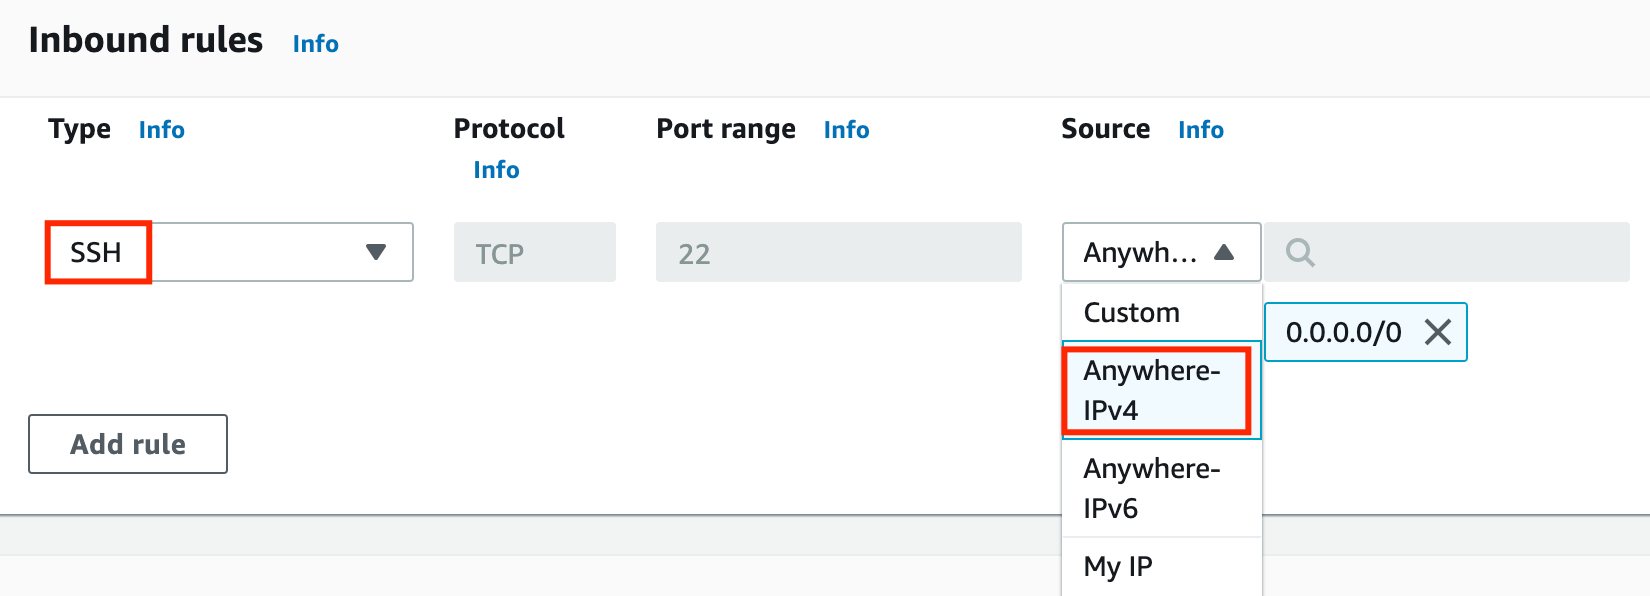
 * Click on the **Add Rule** under **Inbound rules.**
* Type : Select **SSH**
* Source : Select **Anywhere-IPv4**
* Click on the **Add Rule** under **Inbound rules.**
* Type : Select **SSH**
* Source : Select **Anywhere-IPv4**
 6. Leave everything as default and click on the **Create Security Group**
 #### Task 5: Create a Key Pair for the EC2 instance present inside ECS Cluster
1. In the left navigation pane (scroll down) within **Network & Security**, click on the **KeyPairs.**
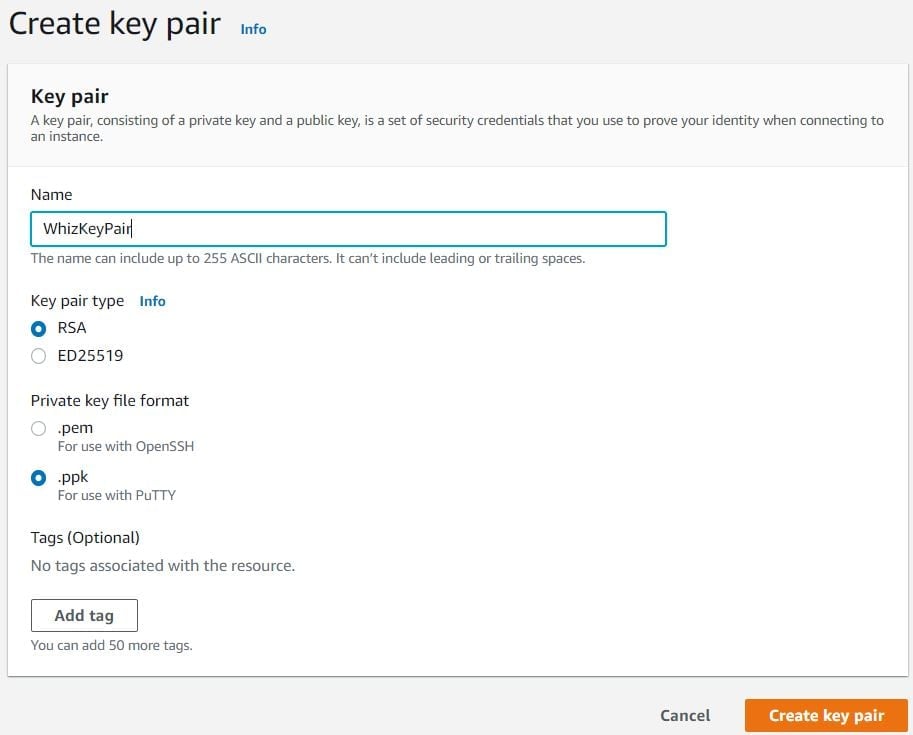
2. To create a new key pair, click on the **Create Key Pair**
3. Fill in the details below:
* Name: Enter **WhizKeyPair**
* Key pair type : **RSA**
* File format: **pem (Linux & Mac Users)** or **ppk (Windows users)**
* Leave other options as default.
* Click on the **Create Key pair**
#### Task 5: Create a Key Pair for the EC2 instance present inside ECS Cluster
1. In the left navigation pane (scroll down) within **Network & Security**, click on the **KeyPairs.**
2. To create a new key pair, click on the **Create Key Pair**
3. Fill in the details below:
* Name: Enter **WhizKeyPair**
* Key pair type : **RSA**
* File format: **pem (Linux & Mac Users)** or **ppk (Windows users)**
* Leave other options as default.
* Click on the **Create Key pair**
 4. Key pair will be created.
 5. Save the keys on the Desktop/Downloads folder.
#### Task 6: Launching an ECS Cluster
1. Make sure you are in the **N.Virginia** Region.
2. Navigate to **Elastic Container Service** by clicking on the **Services** menu in the top, then click on **Elastic Container Service** in the **Container** section.
3. On the left sidebar, click on the **Clusters** option present under the **Amazon ECS** section.
4. Click on the **Create Cluster**
* Cluster name: Enter **whiz (**or you can leave it as default**)**
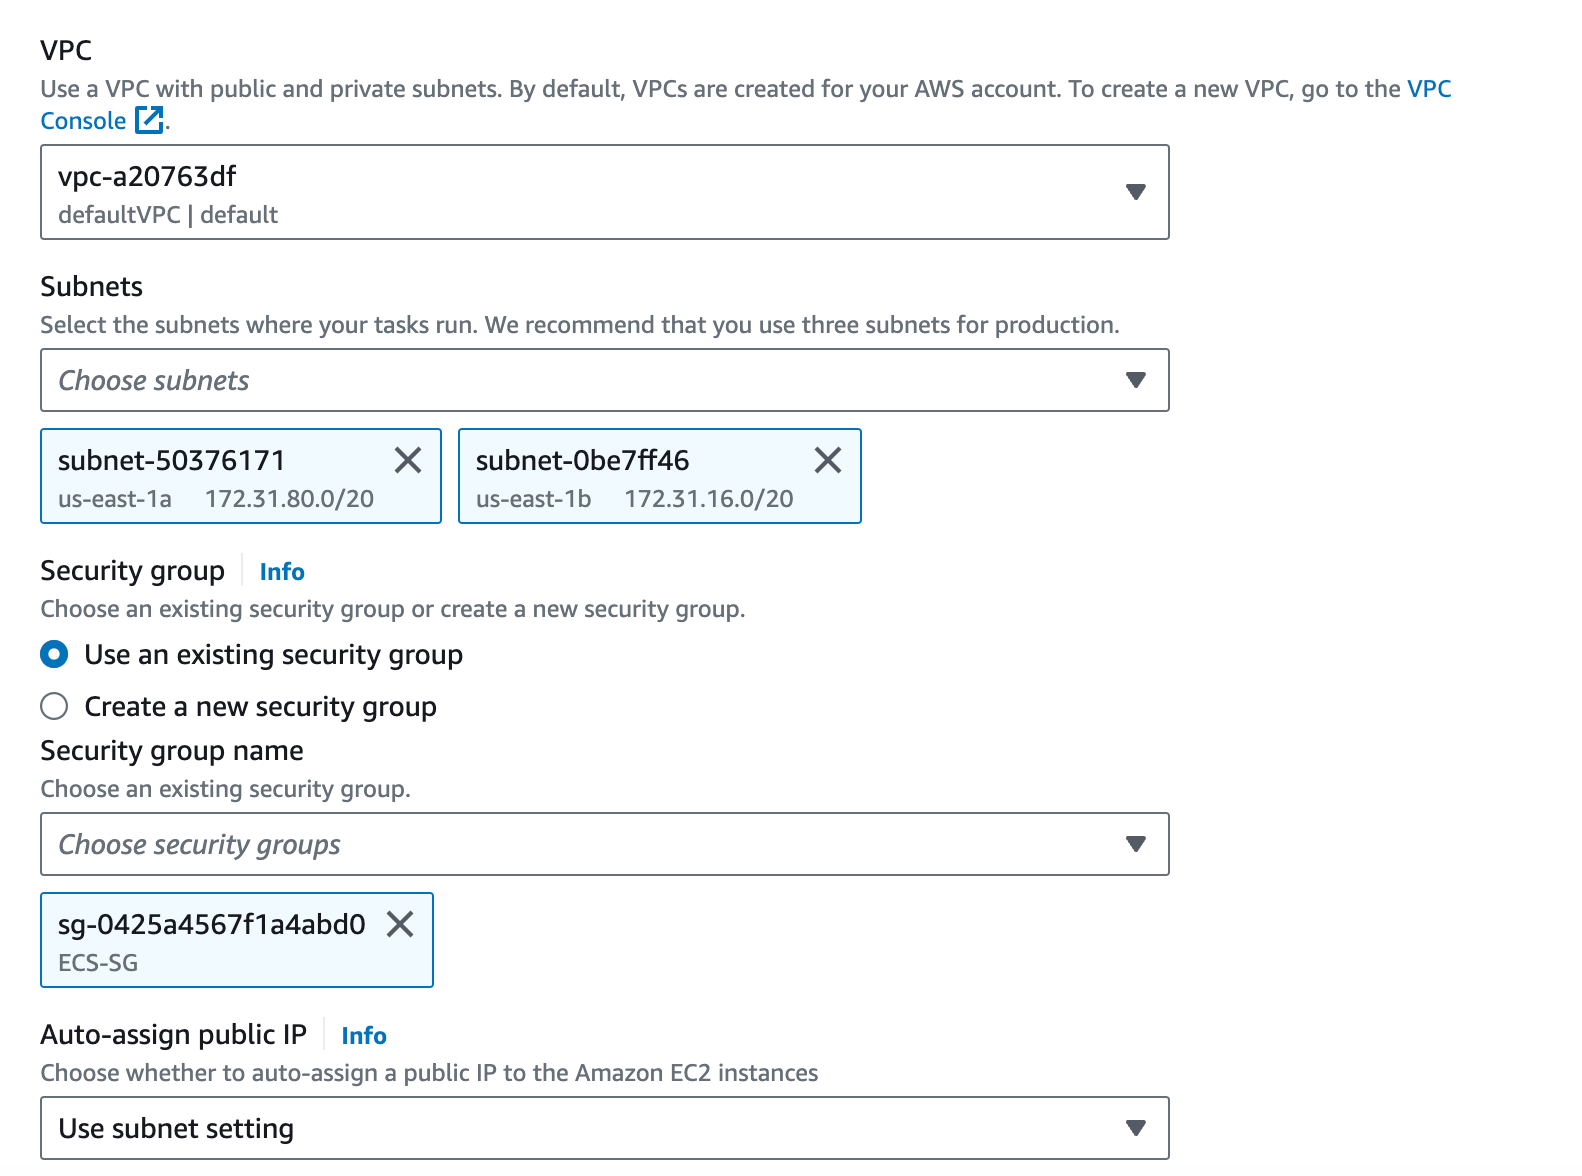
* For Infrastructure : Choose **Fargate and Self-managed instances**
* Auto Scaling group : Select **Create a new Auto Scaling group - advanced**
* Provisioning Model: Select **On-Demand**
5. Save the keys on the Desktop/Downloads folder.
#### Task 6: Launching an ECS Cluster
1. Make sure you are in the **N.Virginia** Region.
2. Navigate to **Elastic Container Service** by clicking on the **Services** menu in the top, then click on **Elastic Container Service** in the **Container** section.
3. On the left sidebar, click on the **Clusters** option present under the **Amazon ECS** section.
4. Click on the **Create Cluster**
* Cluster name: Enter **whiz (**or you can leave it as default**)**
* For Infrastructure : Choose **Fargate and Self-managed instances**
* Auto Scaling group : Select **Create a new Auto Scaling group - advanced**
* Provisioning Model: Select **On-Demand**
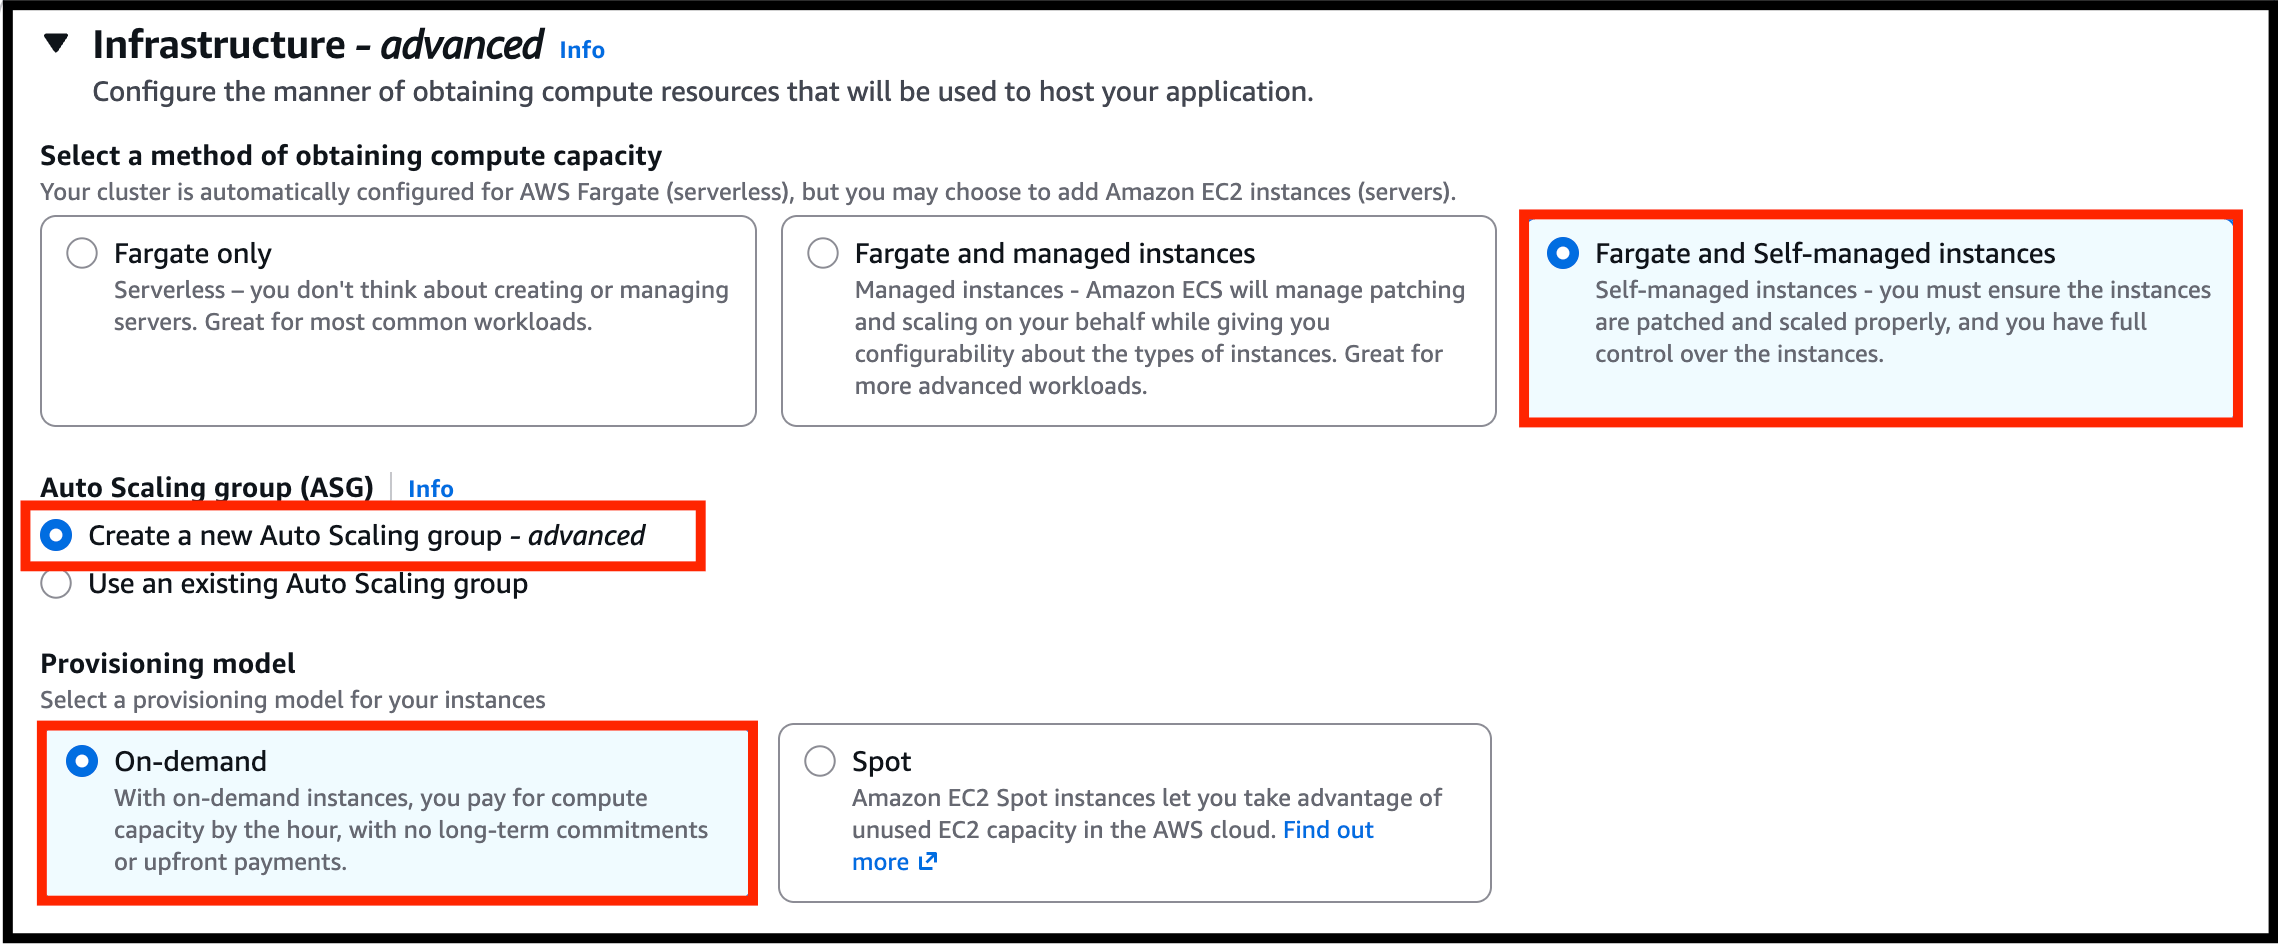 * Operating system/Architecture: Select **Amazon Linux 2023**
* EC2 instance type\*: Select **t2.micro**
* Desired Capacity : For **Minimum** Enter **1** and for **Maximum** Enter **2**
* SSH Key pair: Select **WhizKeyPair**
* Root EBS Volume Size (GiB): Enter **30**
* Operating system/Architecture: Select **Amazon Linux 2023**
* EC2 instance type\*: Select **t2.micro**
* Desired Capacity : For **Minimum** Enter **1** and for **Maximum** Enter **2**
* SSH Key pair: Select **WhizKeyPair**
* Root EBS Volume Size (GiB): Enter **30**
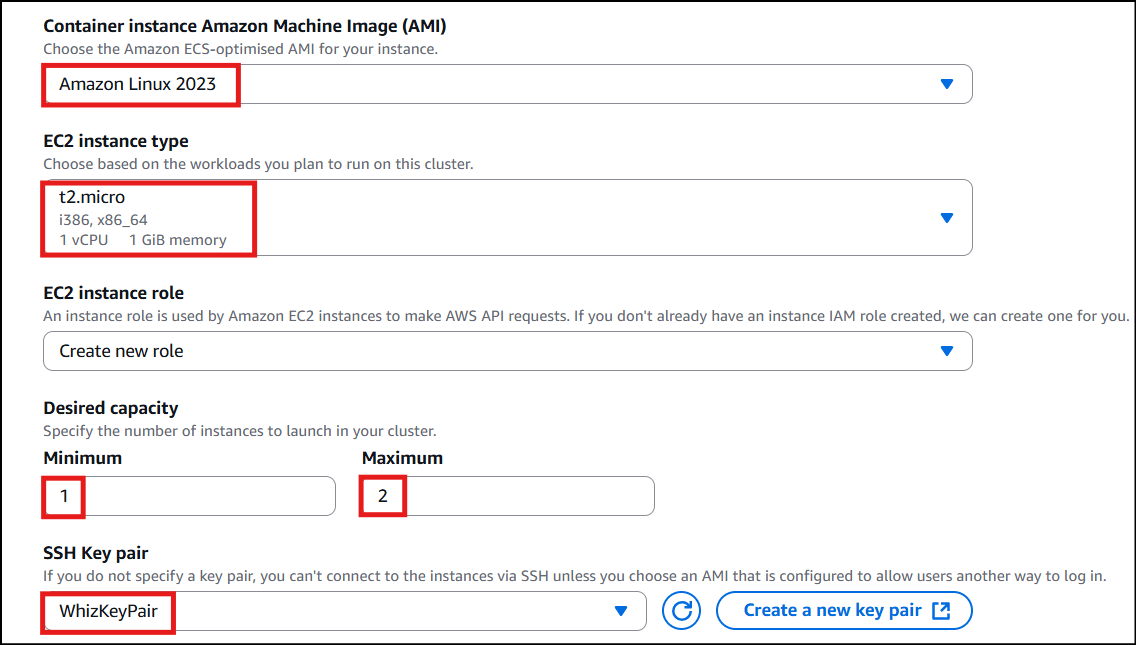 * Expand **Network settings for Amazon EC2 instances** Section:
* VPC: Select **Default VPC**
* Subnets: Select **us-east-1a** and **us-east-1b**
* Auto assign public IP: Select **Use subnet setting** (default)
* Security group: Select **ECS-SG** security group
* Expand **Network settings for Amazon EC2 instances** Section:
* VPC: Select **Default VPC**
* Subnets: Select **us-east-1a** and **us-east-1b**
* Auto assign public IP: Select **Use subnet setting** (default)
* Security group: Select **ECS-SG** security group
 5. Keep other options as default.
6. Click on the **Create** button to create the **whiz** ECS cluster
7. ECS cluster will be created in 2 minutes.
8. It will take a few minutes to provision the ECS Instance.
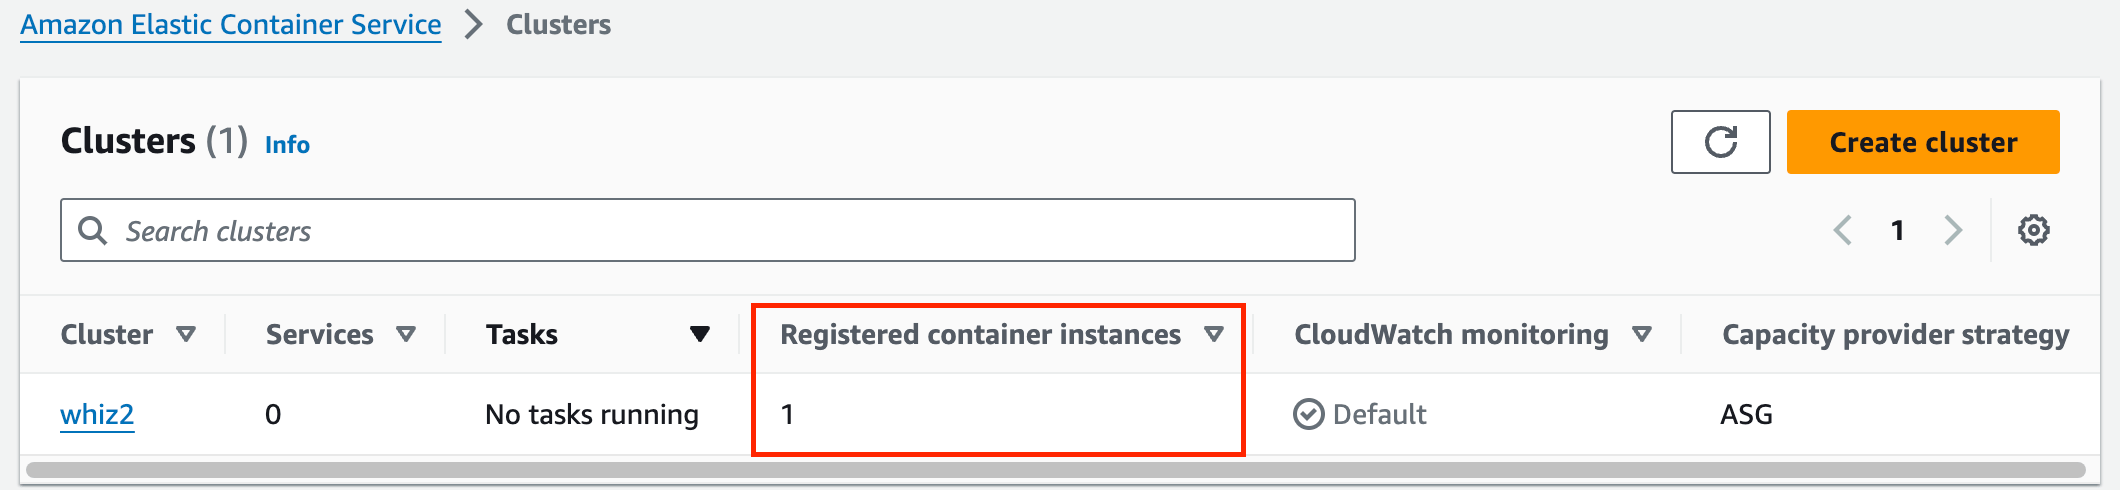
9. **whiz** ECS Cluster will be created with **1 Container instances**
5. Keep other options as default.
6. Click on the **Create** button to create the **whiz** ECS cluster
7. ECS cluster will be created in 2 minutes.
8. It will take a few minutes to provision the ECS Instance.
9. **whiz** ECS Cluster will be created with **1 Container instances**
 #### Task 7: Create Task Definitions
1. On the left sidebar, click on the **Task Definitions** option present under the **Amazon ECS** section.
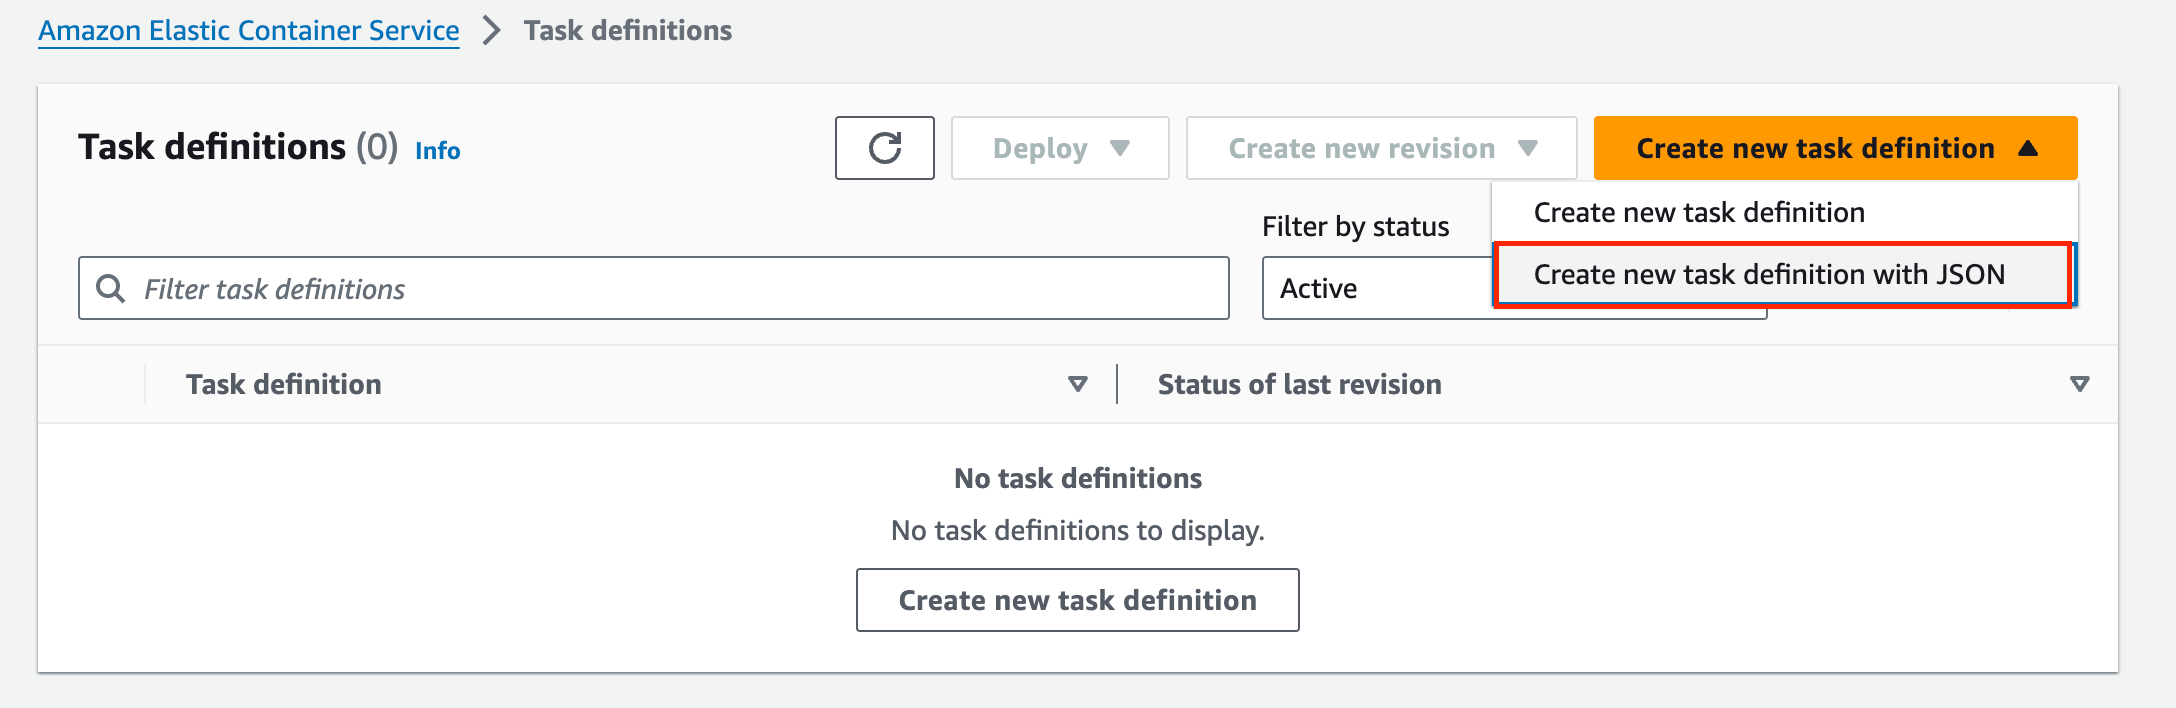
2. Click on the **Create New task defination with JSON**
#### Task 7: Create Task Definitions
1. On the left sidebar, click on the **Task Definitions** option present under the **Amazon ECS** section.
2. Click on the **Create New task defination with JSON**
 3. Copy and paste the below code in the JSON editor.
\{
"executionRoleArn": "arn:aws:iam::940696859768:role/ecsTaskexecution\_role\_50197.63374735",
"containerDefinitions": \[
\{
"entryPoint": \[
"sh",
"-c"
],
"portMappings": \[
\{
"hostPort": 80,
"protocol": "tcp",
"containerPort": 80
}
],
"command": \[
"/bin/sh -c \\\\"echo '\ \ \
3. Copy and paste the below code in the JSON editor.
\{
"executionRoleArn": "arn:aws:iam::940696859768:role/ecsTaskexecution\_role\_50197.63374735",
"containerDefinitions": \[
\{
"entryPoint": \[
"sh",
"-c"
],
"portMappings": \[
\{
"hostPort": 80,
"protocol": "tcp",
"containerPort": 80
}
],
"command": \[
"/bin/sh -c \\\\"echo '\ \ \ \
\\' > /usr/local/apache2/htdocs/index.html && httpd-foreground\\\\""
],
"cpu": 10,
"secrets": \[
\{
"valueFrom": "arn:aws:secretsmanager:us-east-1:940696859768:secret:ProductionUserCredentials-JNiMEf",
"name": "username\_value"
}
],
"memory": 300,
"image": "httpd:2.4",
"essential": true,
"name": "ecs-secrets-container"
}
],
"family": "ecs-secrets-tutorial"
}
4. In line no 2 replace the **IAM Role ARN** with the value of the IAM role ARN copied earlier.
5. In line no 22, replace the **value** with Secret ARN copied.
6. Click on the **Create** button.
7. Task Definition **ecs-secrets-container** is now created.
#### Task 8: Run the task
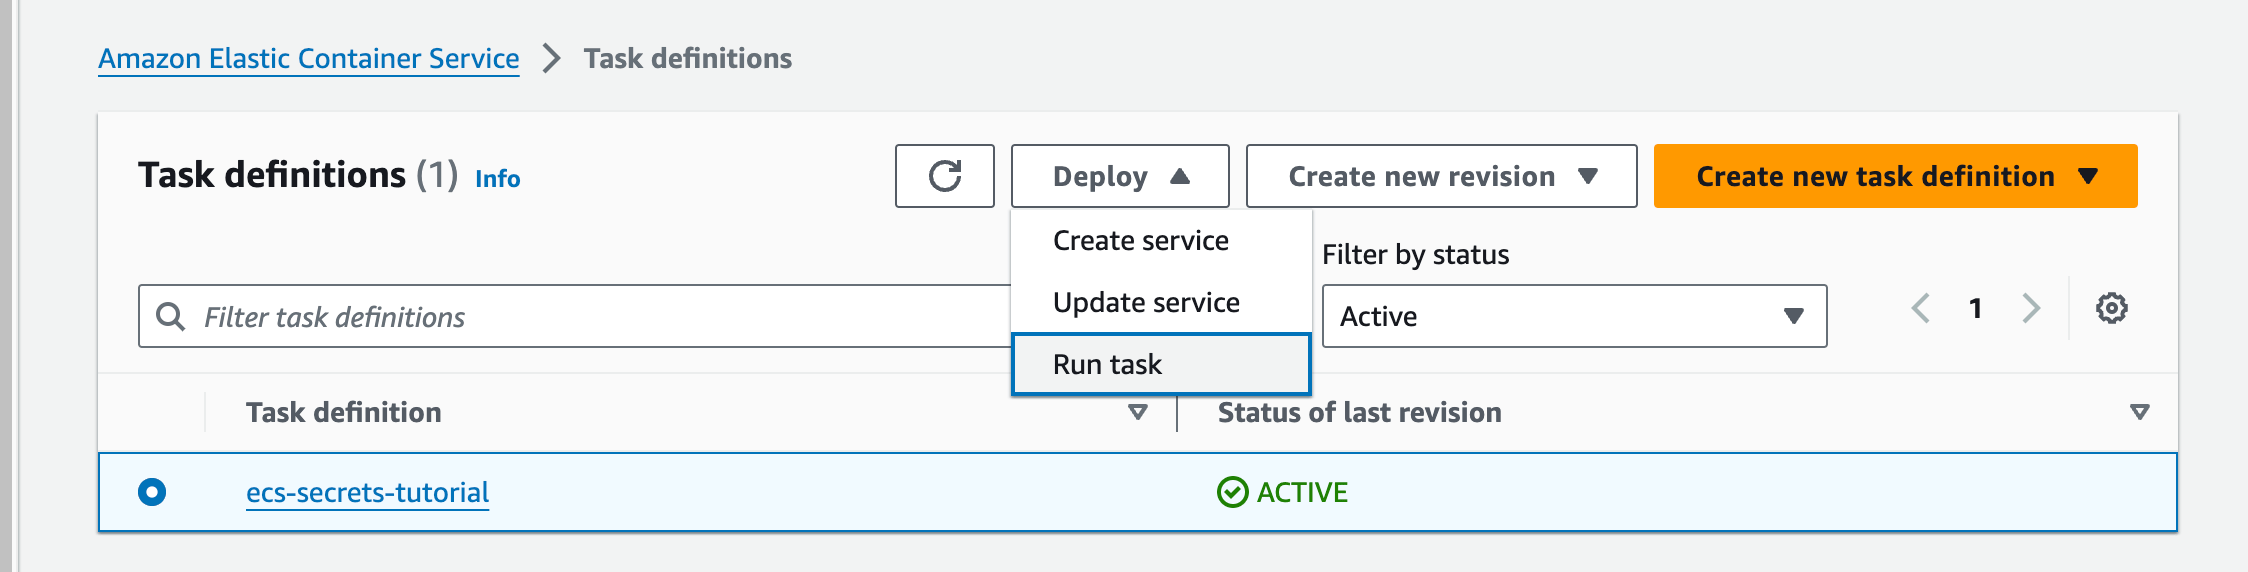
1. To run the task present, Click on the **Deploy** button and choose **Run Task.**
Amazon ECS Sample App\
\Congratulations!\
\Your application is now running on a container in Amazon ECS.\
\ 2. For Existing cluster : Choose the **cluster** created
3. For Compute options : select **Launch type** and Select the Launch type as **EC2.**
4. Keep all the options default until last.
5. Expand the **Tags** section and **Uncheck** the option to **Turn on Amazon ECS managed tags**
6. Finally, click on the **Create** to complete the process.
7. The task is now created.
8. Refresh the page after 2 minutes to see the running task.
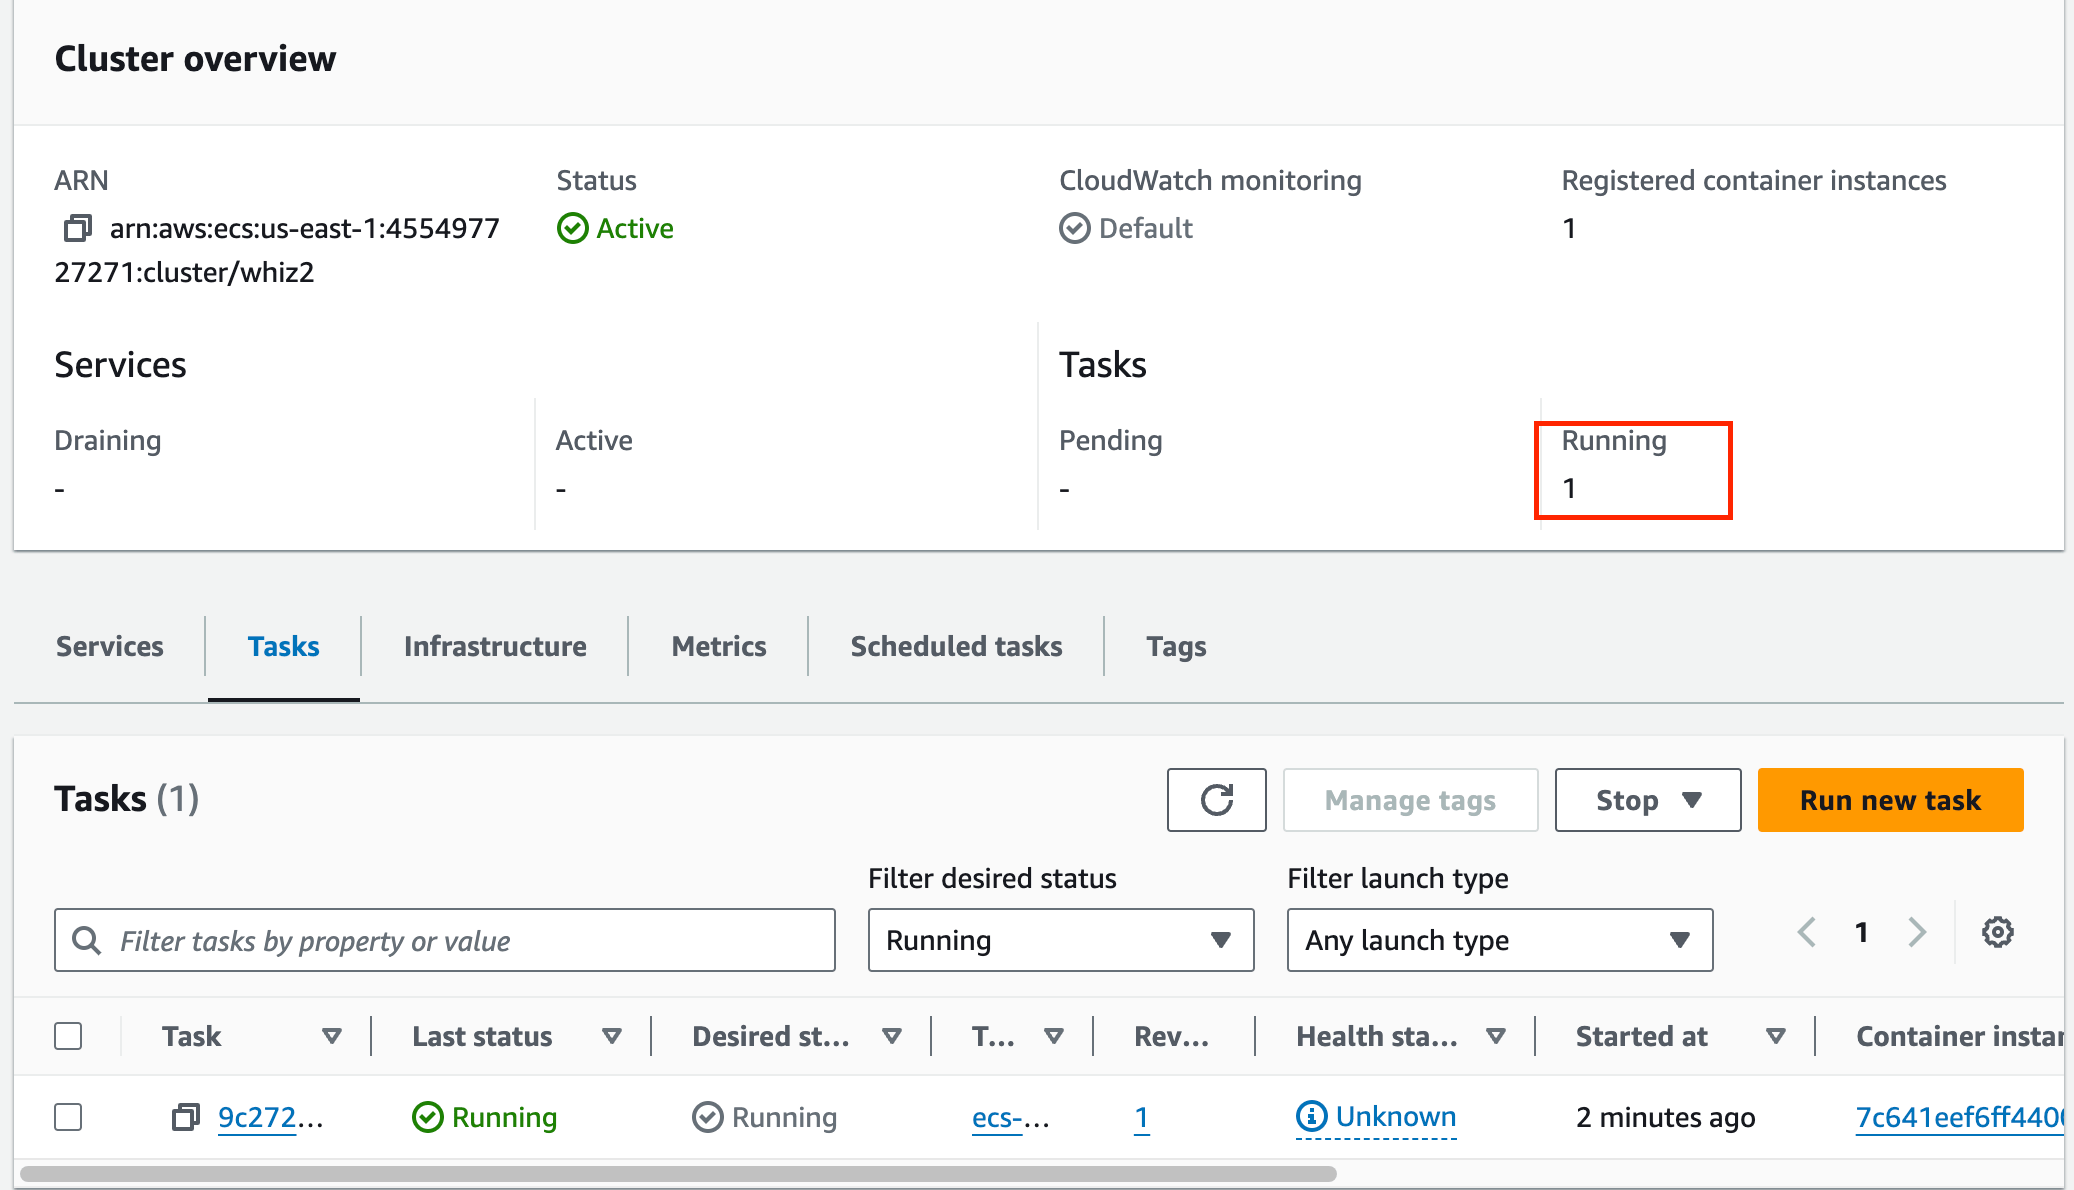
9. The task is running and you can see the Running tasks count has 1 in the EC2.
2. For Existing cluster : Choose the **cluster** created
3. For Compute options : select **Launch type** and Select the Launch type as **EC2.**
4. Keep all the options default until last.
5. Expand the **Tags** section and **Uncheck** the option to **Turn on Amazon ECS managed tags**
6. Finally, click on the **Create** to complete the process.
7. The task is now created.
8. Refresh the page after 2 minutes to see the running task.
9. The task is running and you can see the Running tasks count has 1 in the EC2.
 #### Task 9: SSH into EC2 Instance
1. Switch to the EC2 **Infrastructure** tab and scroll down to **container instances** and click on the **EC2 Instance ID.**
#### Task 9: SSH into EC2 Instance
1. Switch to the EC2 **Infrastructure** tab and scroll down to **container instances** and click on the **EC2 Instance ID.**
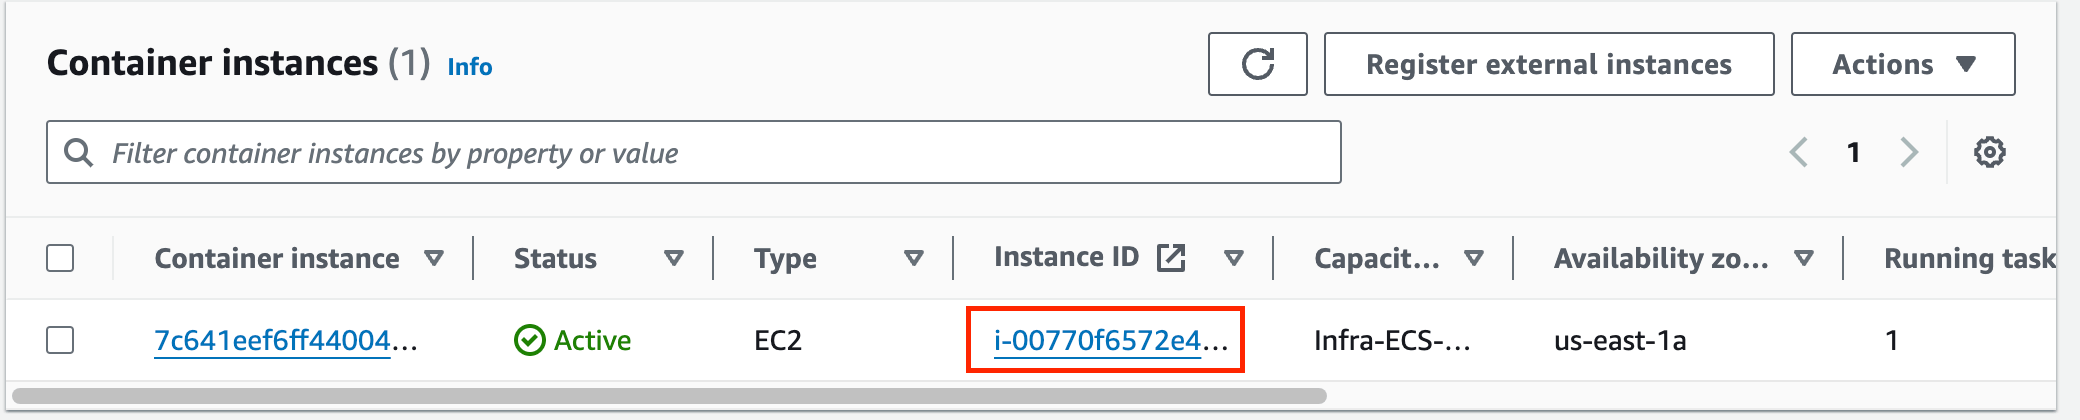 2. SSH into this Instance using [this](https://play.whizlabs.com/site/task_support/ssh-into-ec-instance) guide.
#### Task 10: List all the processes and print the value of secret
1. Run the below command to list the docker processes.
```
docker ps
```
2. SSH into this Instance using [this](https://play.whizlabs.com/site/task_support/ssh-into-ec-instance) guide.
#### Task 10: List all the processes and print the value of secret
1. Run the below command to list the docker processes.
```
docker ps
```
 2. Copy the container ID of the present container **ecs-secrets-container.**
3. Connect to the **ecs-secrets-tutorial** container using the container ID copied
* **Syntax:**
```
docker exec -it container_ID /bin/bash
```
* **Example:** **docker exec -it d5d61219371e /bin/bash**
4. Use the echo command to print the value of the environment variable.
```
echo $username_value
```
2. Copy the container ID of the present container **ecs-secrets-container.**
3. Connect to the **ecs-secrets-tutorial** container using the container ID copied
* **Syntax:**
```
docker exec -it container_ID /bin/bash
```
* **Example:** **docker exec -it d5d61219371e /bin/bash**
4. Use the echo command to print the value of the environment variable.
```
echo $username_value
```
 * If the output comes as **password\_value**, then the lab is successful.
> ##### Do You Know ?
>
> AWS Secrets Manager provides a built-in capability for automatic rotation of secrets. This means that you can configure AWS Secrets Manager to automatically change the values of your secrets on a predefined schedule or when certain events occur (e.g., based on time, on-demand, or when detected as compromised).
1. Once the lab steps are completed, please click on the **Validation** button on the left side panel.
##### Task 11: Delete the resources created
#### Delete the Secret Manager Secret
1. Make sure you are in the **N.Virginia** Region.
2. Navigate to **Systems Manager** by clicking on the **Service** menu at the top and under the **Management & Governance** section.
3. To open, click on the secret name.
4. To delete the secret, Select the **Actions** option and choose **Delete secret**.
* If the output comes as **password\_value**, then the lab is successful.
> ##### Do You Know ?
>
> AWS Secrets Manager provides a built-in capability for automatic rotation of secrets. This means that you can configure AWS Secrets Manager to automatically change the values of your secrets on a predefined schedule or when certain events occur (e.g., based on time, on-demand, or when detected as compromised).
1. Once the lab steps are completed, please click on the **Validation** button on the left side panel.
##### Task 11: Delete the resources created
#### Delete the Secret Manager Secret
1. Make sure you are in the **N.Virginia** Region.
2. Navigate to **Systems Manager** by clicking on the **Service** menu at the top and under the **Management & Governance** section.
3. To open, click on the secret name.
4. To delete the secret, Select the **Actions** option and choose **Delete secret**.
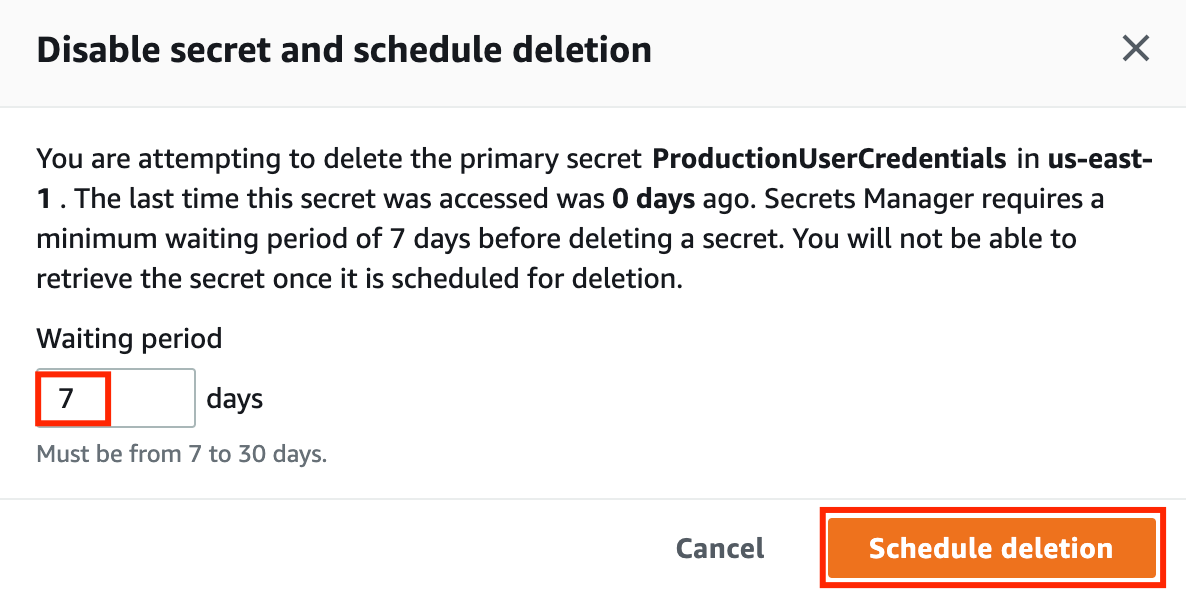
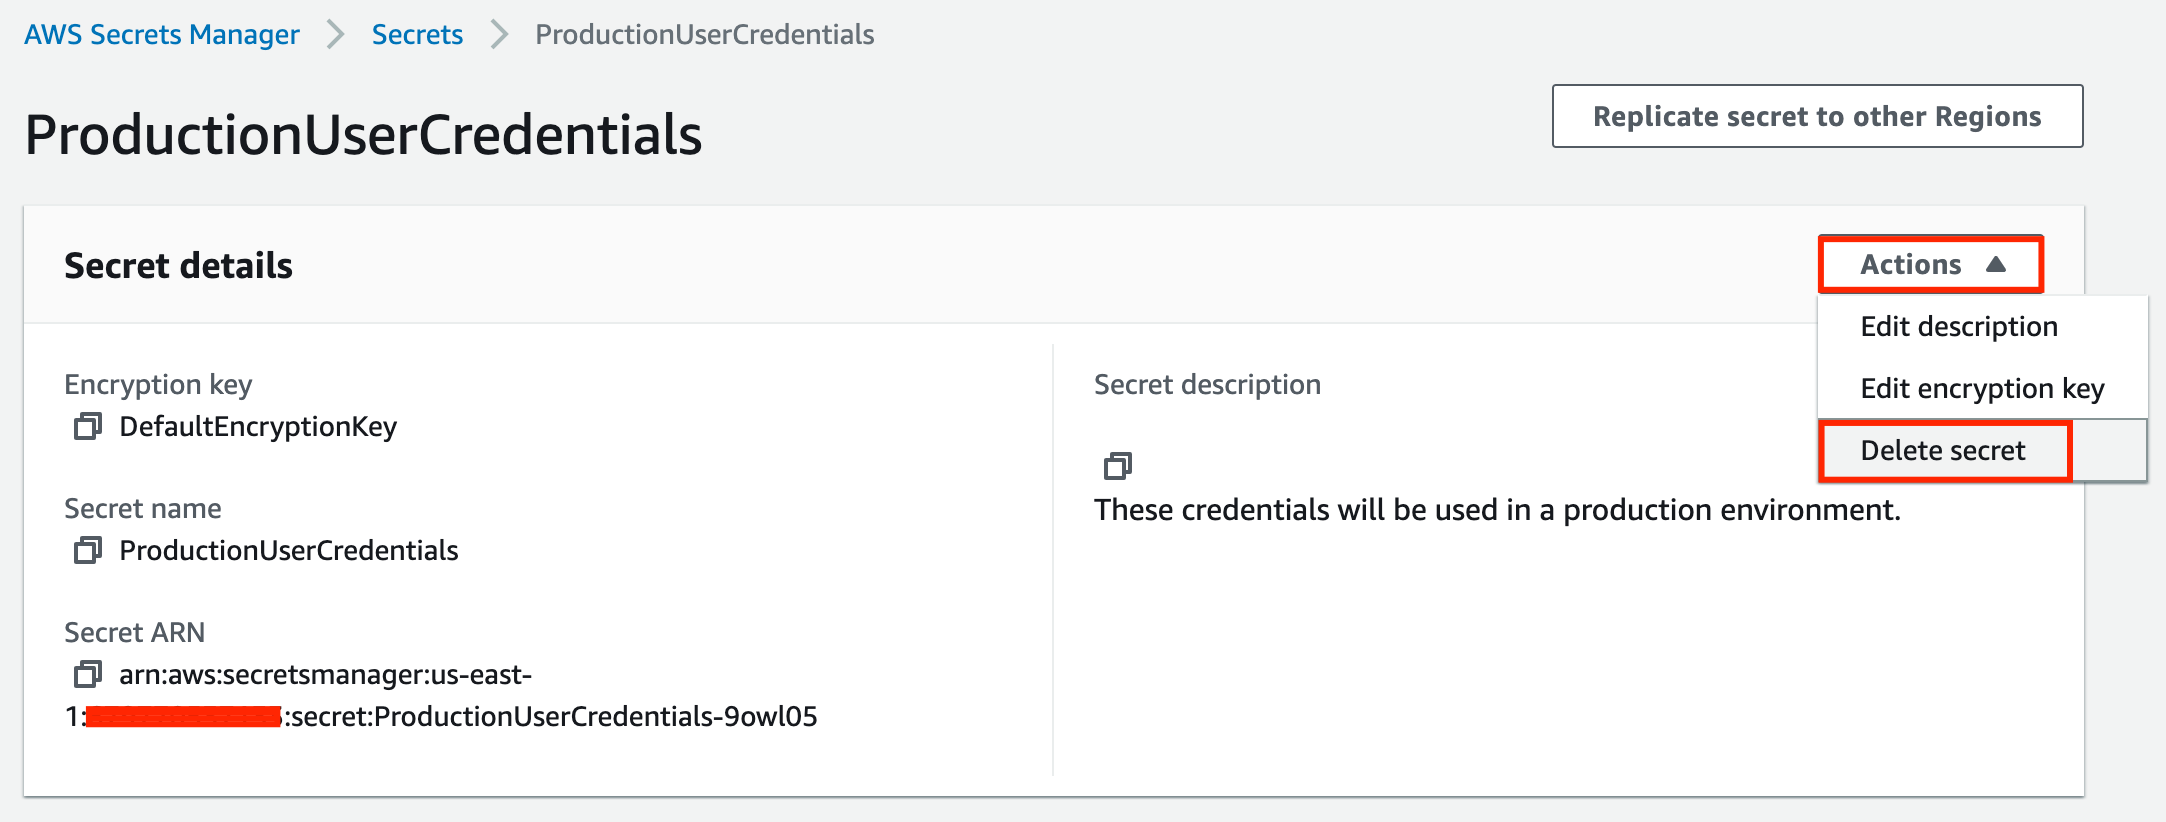 5. Enter the waiting period duration as **7 days** and click on the **Schedule deletion** option.
 ##### Deleting ECS Cluster
1. Make sure you are in the **N.Virginia** Region.
2. Navigate to **Elastic Container Service** by clicking on the **Services** menu in the top, then click on **Elastic Container Service** in the **Container** section.
3. On the left sidebar, click on the **Clusters** option present under the **Amazon ECS** section.
4. Click on the Cluster name **whiz**
5. Click on the **Delete Cluster** option.
6. Confirm the deletion by entering the phrase **delete whiz** in the pop-up window.
### Completion and Conclusion
1. You have created a Secrets Manager secret.
2. You have copied the ARN of IAM role ecsTaskExecutionRole.
3. You have created a Security group and key pair.
4. You have created an ECS Cluster.
5. You have created a task definition and started the task.
6. You have listed all the processes and printed the value of secret.
7. You have deleted all the resources.
### End Lab
1. Sign out of AWS Account.
2. You have successfully completed the lab.
3. Once you have completed the steps, click on **End Lab** from the IP Lab Portal dashboard.
## What gets checked
When you press **Check my work**, the platform verifies each of these:
* **Create Secret in Secret Manager** — Check if Secret created in Secret Manager
* **Create ECS Service** — Check whether ECS service created or not
* **Create ECS Task Definition** — Check whether ECS task definition created or not
* **Launch an EC2 Instance** — Check whether an EC2 Instance is launched or not.
* **Validate EC2 Instance Type t2.micro** — Check whether the EC2 instance type is t2.micro.
* **Launch EC2 AMI type Amazon Linux** — Check whether the EC2 instance is launched using an Amazon AMI.
## Related help
* [FAQs and Troubleshooting](/aws-saa/support/faqs-and-troubleshooting)
* [SSH into EC2 Instance](/aws-saa/support/ssh-into-ec2-instance)
This documentation is built and hosted on [Mintlify](https://mintlify.com), a developer documentation platform.
##### Deleting ECS Cluster
1. Make sure you are in the **N.Virginia** Region.
2. Navigate to **Elastic Container Service** by clicking on the **Services** menu in the top, then click on **Elastic Container Service** in the **Container** section.
3. On the left sidebar, click on the **Clusters** option present under the **Amazon ECS** section.
4. Click on the Cluster name **whiz**
5. Click on the **Delete Cluster** option.
6. Confirm the deletion by entering the phrase **delete whiz** in the pop-up window.
### Completion and Conclusion
1. You have created a Secrets Manager secret.
2. You have copied the ARN of IAM role ecsTaskExecutionRole.
3. You have created a Security group and key pair.
4. You have created an ECS Cluster.
5. You have created a task definition and started the task.
6. You have listed all the processes and printed the value of secret.
7. You have deleted all the resources.
### End Lab
1. Sign out of AWS Account.
2. You have successfully completed the lab.
3. Once you have completed the steps, click on **End Lab** from the IP Lab Portal dashboard.
## What gets checked
When you press **Check my work**, the platform verifies each of these:
* **Create Secret in Secret Manager** — Check if Secret created in Secret Manager
* **Create ECS Service** — Check whether ECS service created or not
* **Create ECS Task Definition** — Check whether ECS task definition created or not
* **Launch an EC2 Instance** — Check whether an EC2 Instance is launched or not.
* **Validate EC2 Instance Type t2.micro** — Check whether the EC2 instance type is t2.micro.
* **Launch EC2 AMI type Amazon Linux** — Check whether the EC2 instance is launched using an Amazon AMI.
## Related help
* [FAQs and Troubleshooting](/aws-saa/support/faqs-and-troubleshooting)
* [SSH into EC2 Instance](/aws-saa/support/ssh-into-ec2-instance)
This documentation is built and hosted on [Mintlify](https://mintlify.com), a developer documentation platform.