> ## Documentation Index
> Fetch the complete documentation index at: https://cloud-architect.ipoint-labs.com/llms.txt
> Use this file to discover all available pages before exploring further.
# How to Create Virtual Private Cloud (VPC) with AWS CloudFormation
> Hands-on lab · 55m
Launch this lab in the IP Lab Portal, then follow the steps below in the AWS console.
Open IP Lab Portal
## Overview
### Lab Details
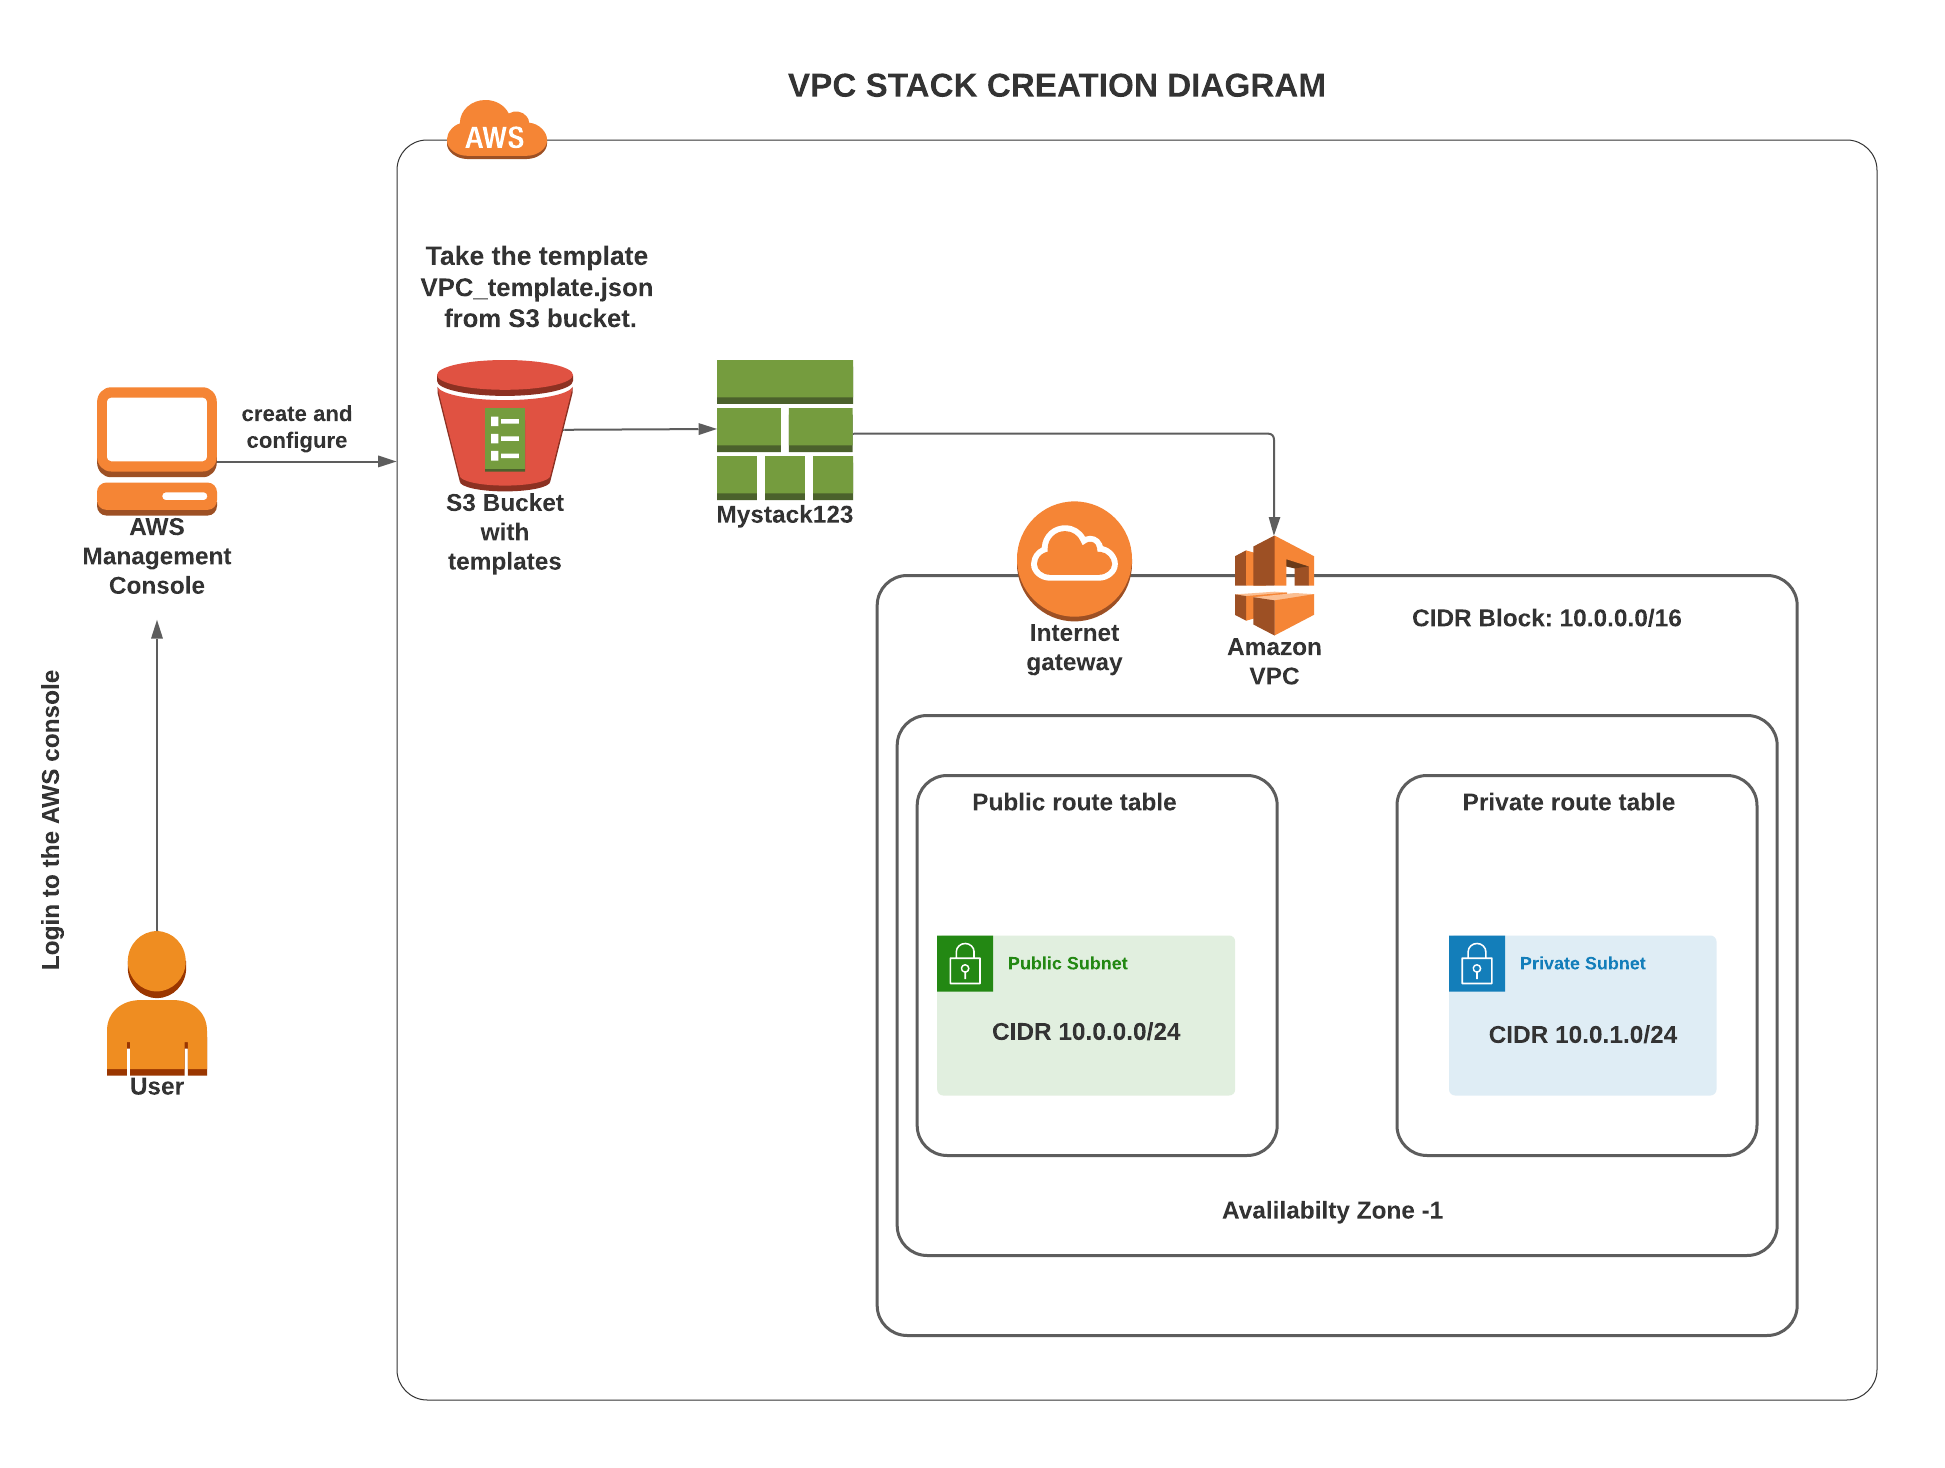
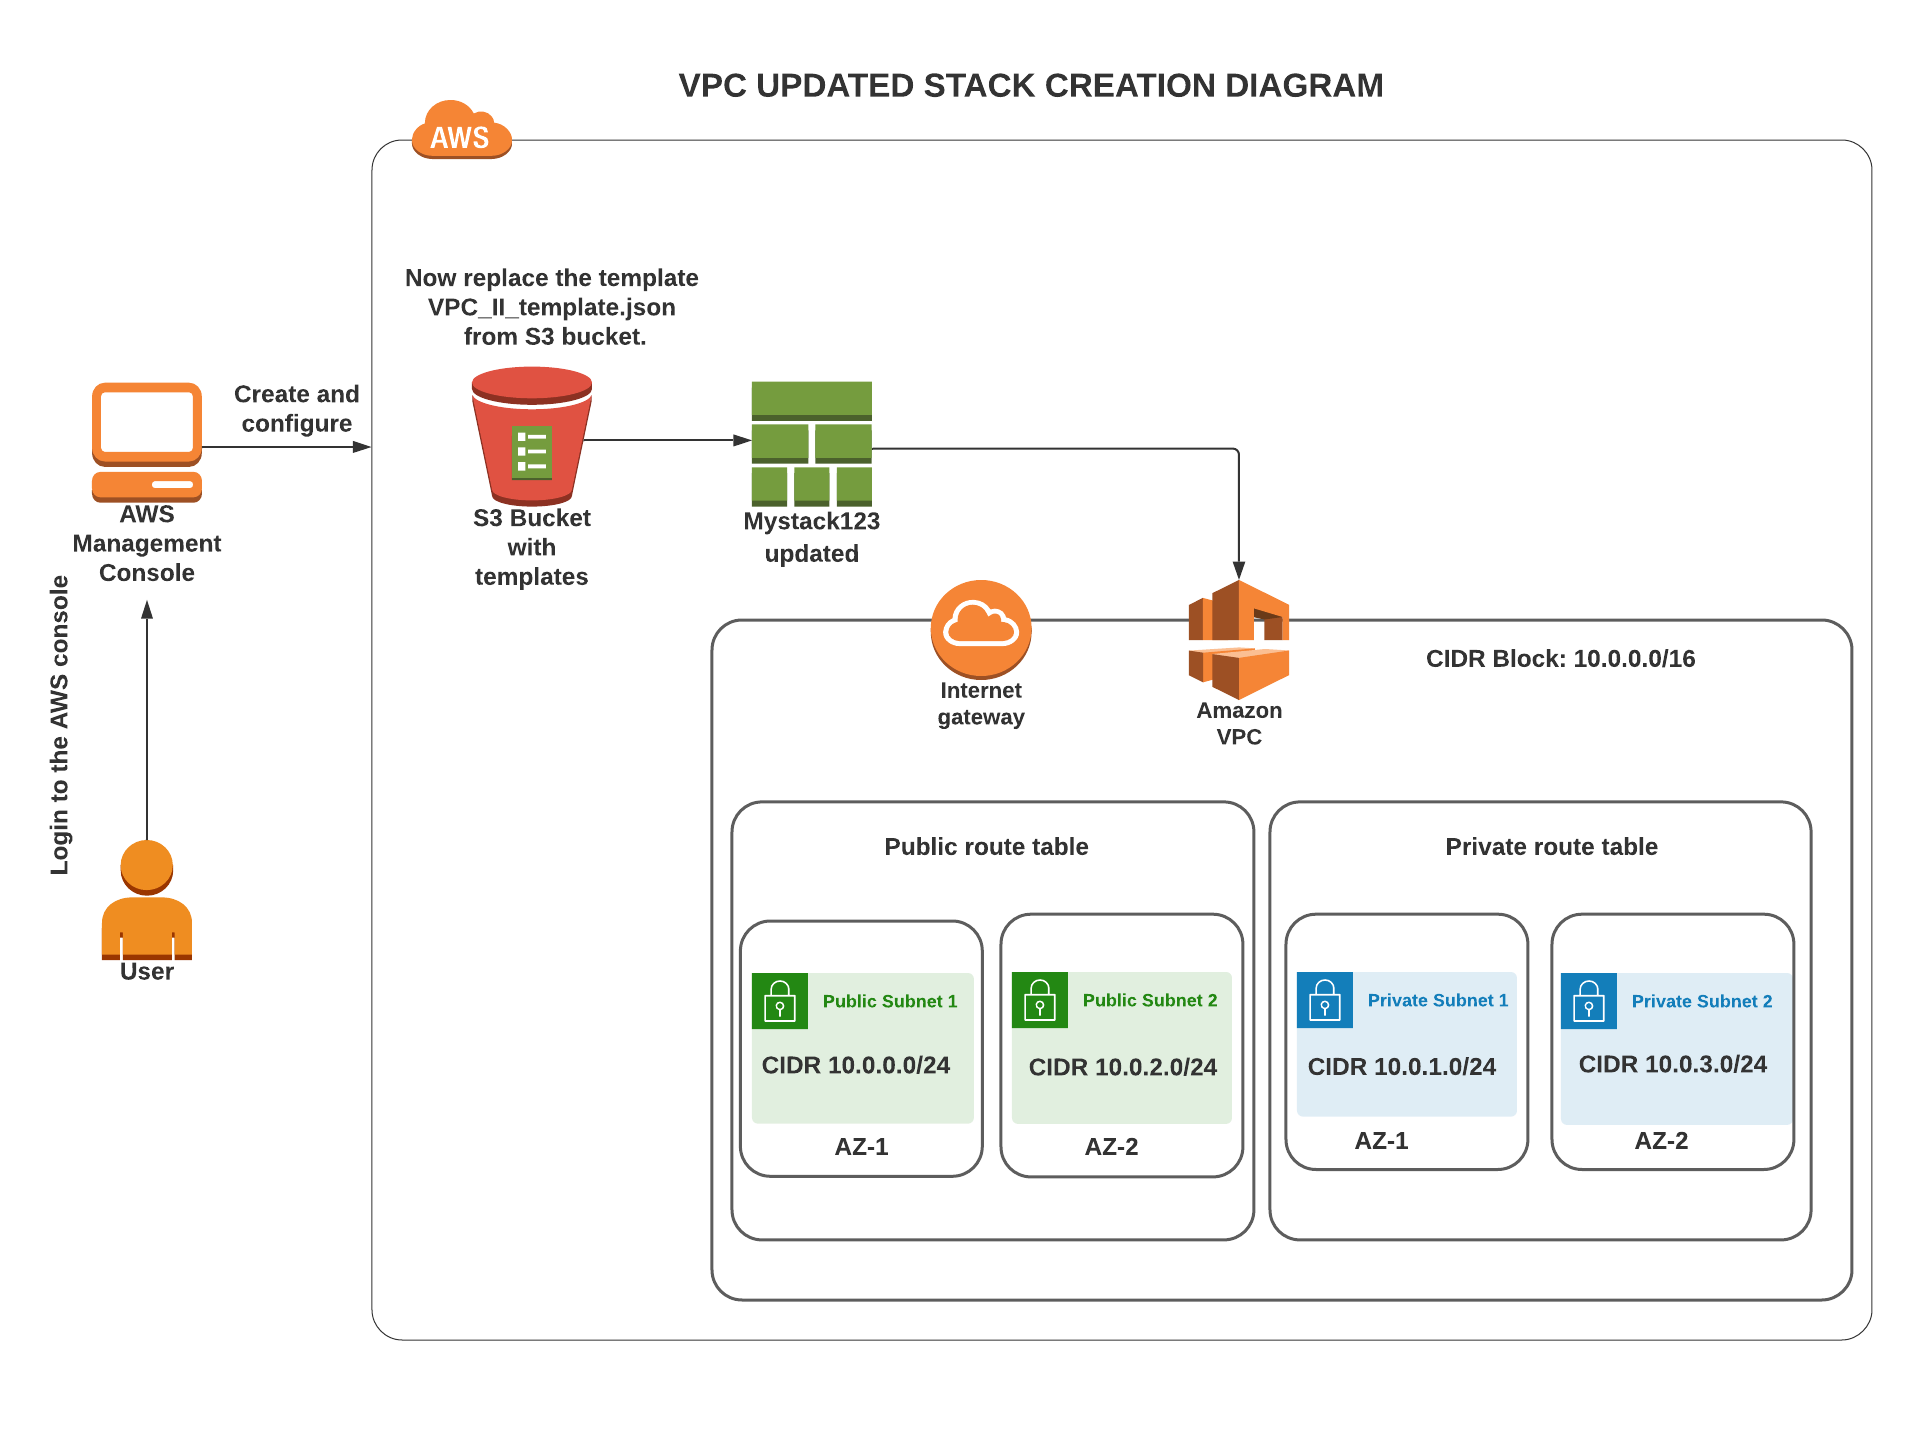
1. This lab walks you through how to create a VPC using an AWS CloudFormation Stack. In this lab, we will launch an AWS CloudFormation template to create a two subnets initially. Later we update to four-subnet Amazon VPC that spans two Availability Zones.
2. Duration: **55 minutes**
3. AWS Region: **US East (N. Virginia) us-east-1**
### Introduction
#### What is VPC?
1. A VPC is similar to a computer network that we can create in an on-premises data center. In the same way, as we create dedicated and private networks within an organization, where computers in a network share network devices such as routers, switches, and so on, we can create a VPC when we create a new account in AWS.
2. VPC makes it possible to shape similar network infrastructure as we can shape it in our own data center. The difference is, it is a virtual environment within a public cloud wherein the virtual network is logically isolated from other similar networks within the public cloud.
3. **Subnet:** Subnet is short for the subnetwork. As we saw at the beginning of this chapter, a network is subdivided into multiple logical parts for controlling access to individual logical subparts of the network.
#### AWS CloudFormation
1. CloudFormation is a service provided by AWS for designing our own infrastructure using code i.e infrastructure as code.
2. Currently, CloudFormation supports two languages **JSON and YAML.** You can write your code with one of the languages.
3. CloudFormation comes with great features being able to update your infrastructure whenever you want and also have the ability to delete the stack in case you don’t need it.
4. A fascinating feature of cloud formation is that it saves more time in building infrastructure and helps in focusing on development.
5. It is also possible to replicate our infrastructure in a short amount of time.
6. It eliminates human error and works according to the code you have written. It consists of two main components, **Stack and Templates.**
#### CloudFormation Template
1. It consists of various sections like
* AWS Template Format Version
* Description
* Metadata
* Parameters
* Mappings
* Conditions
* Resources **(Required Field)**
* Outputs
2. It is not mandatory that the template requires all the above-mentioned sections. By using only the **Resources** section, we will be able to create a template.
3. The resources section plays an important role in the template creation.
4. For example, to create an EC2 instance, a template shall consist of various parameters such as key name, image id, instance type.
5. It is also possible to create two resources in the same template and refer to one from another i.e. attaching an elastic IP with an EC2 instance.
#### CloudFormation Stack
1. A stack consists of a collection of resources.
2. In other words, the stack consists of one or more templates.
3. The advantage of the stack is that it is easy to create, delete or update the collection of resources.
4. The advanced stacks have a nested stack which holds a collection of stacks.
### Architecture Diagram
 ### Task Details
1. Sign in to AWS Management Console.
2. Create Subnets using the VPC\_Template cloud formation stack
3. Create Subnets using the VPC\_II\_Template cloud formation stack
4. Deep dive into the VPC\_Template and VPC\_II\_Template
### Launching Lab Environment
1. To launch the lab environment, Click on the **Start Lab** button.
2. Please wait until the cloud environment is provisioned. It will take less than a minute to provision.
3. Once the Lab is started, you will be provided with **IAM user name**, **Password**, **Access** **Key**, and **Secret** **Access** **Key**.
> **Note** : You can only start one lab at any given time
## Lab guide
### Lab Steps
#### Task 1: Sign in to AWS Management Console
1. Click on the **Open Console** button, and you will get redirected to AWS Console in a new browser tab.
2. On the AWS sign-in page,
* Leave the Account ID as default. Never edit/remove the 12 digit Account ID present in the AWS Console. otherwise, you cannot proceed with the lab.
* Now copy your **User Name** and **Password** in the Lab Console to the **IAM Username and Password** in AWS Console and click on the **Sign in** button.
3. Once Signed In to the AWS Management Console, Make the default AWS Region as **US East (N. Virginia) us-east-1.**
> **Note :** If you face any issues, please go through [**FAQs and Troubleshooting for Labs**](https://play.whizlabs.com/site/task_support/faqs-and-troubleshooting).
#### Task 2: Creating Subnets using the VPC Template cloudformation stack
In this task , we will be creating VPC stack using the pre-created cloudformation template in the S3 bucket.
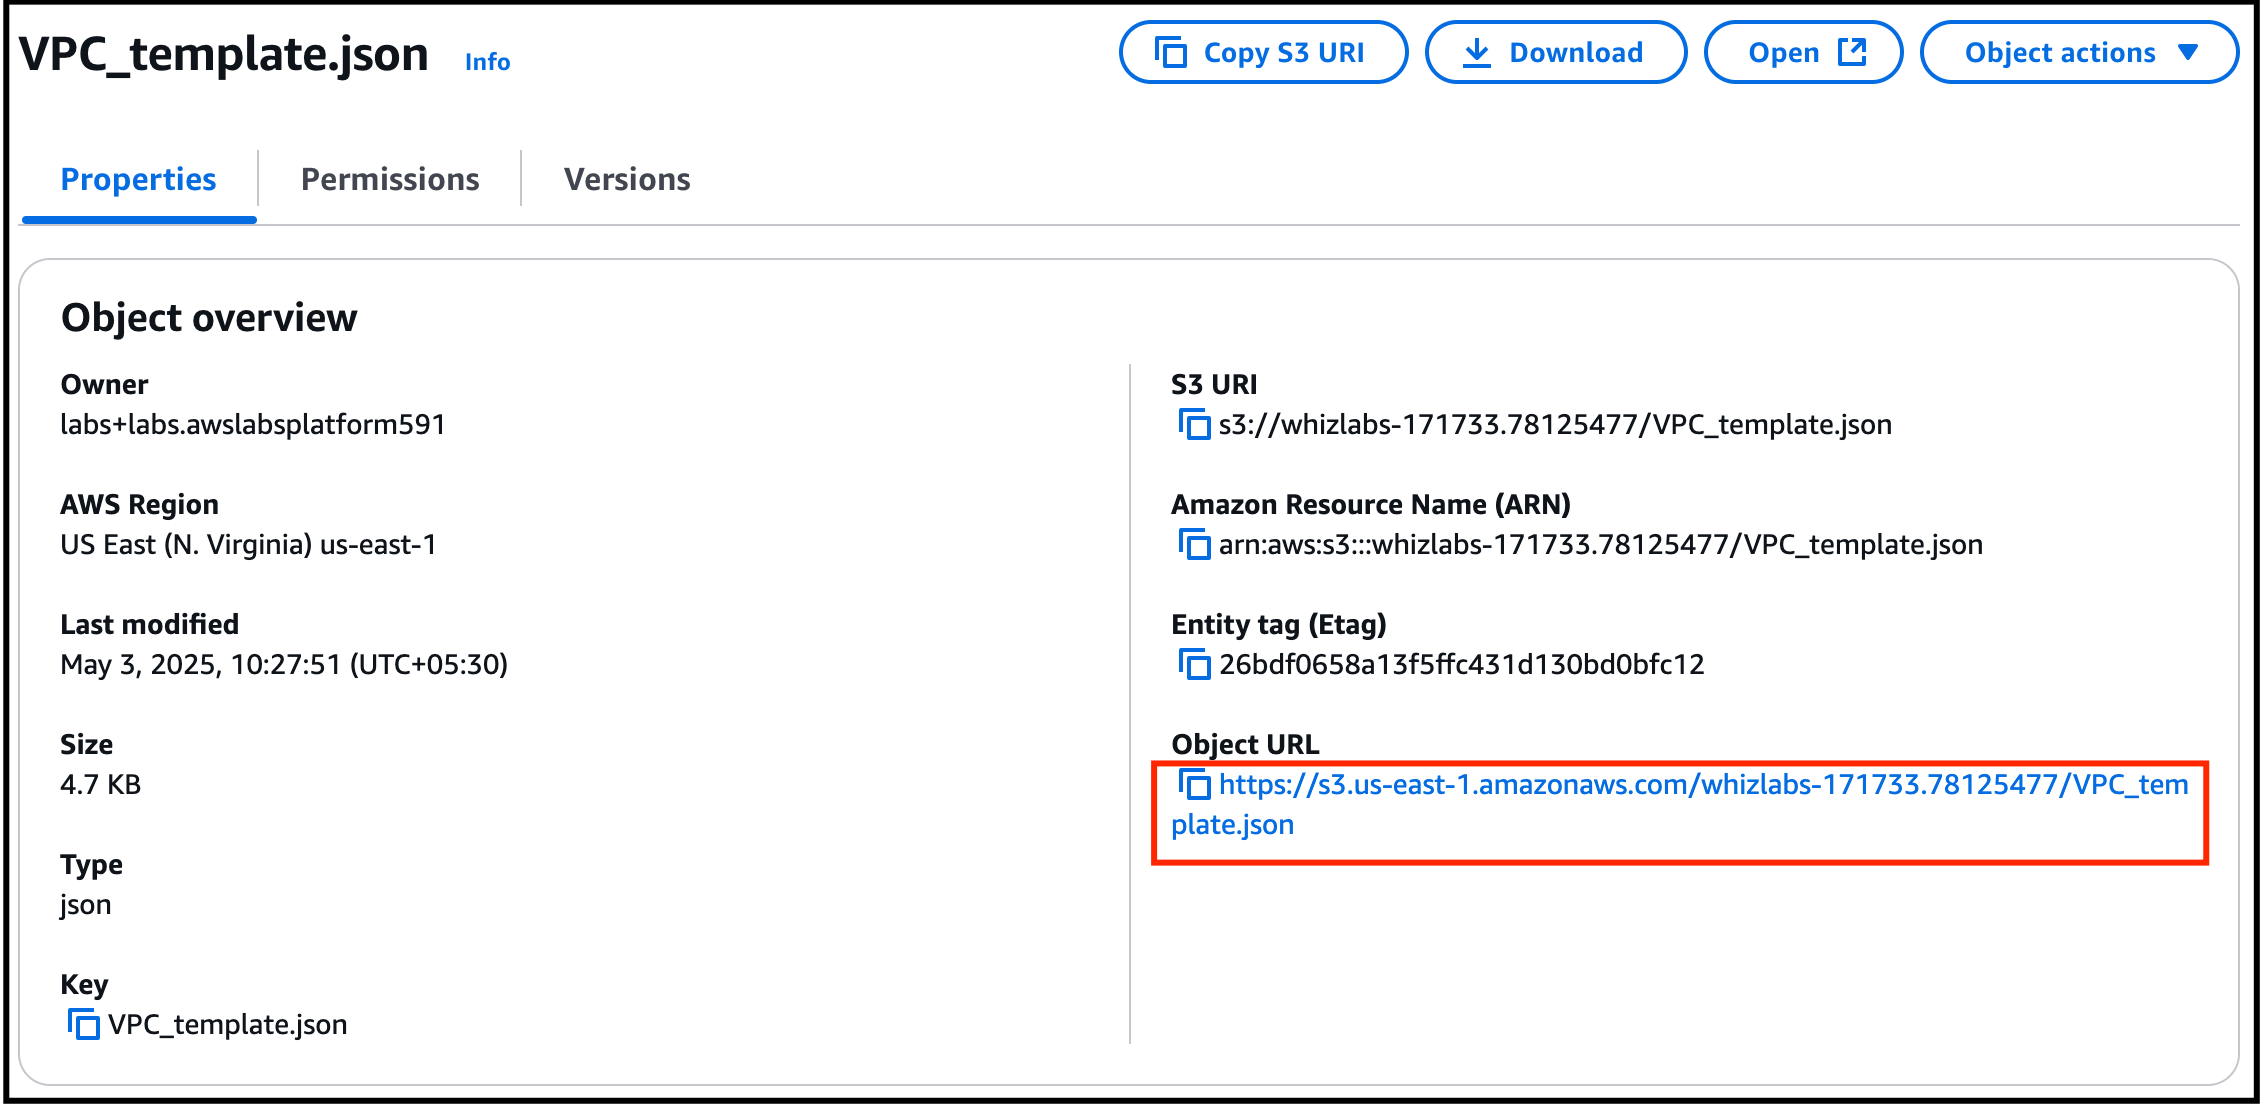
1. Search for **S3** by click on **Services** in the top menu, then click on **S3** in the **Storage** section.
* You will see a bucket name starting with "**whizlabs**" with numeric digits appended to the end, like **whizlab1234564543.**
* Open that bucket and click on the object named **VPC\_template.json**.
* Next, copy the **Object URL** to the clipboard for use in the CloudFormation template.
### Task Details
1. Sign in to AWS Management Console.
2. Create Subnets using the VPC\_Template cloud formation stack
3. Create Subnets using the VPC\_II\_Template cloud formation stack
4. Deep dive into the VPC\_Template and VPC\_II\_Template
### Launching Lab Environment
1. To launch the lab environment, Click on the **Start Lab** button.
2. Please wait until the cloud environment is provisioned. It will take less than a minute to provision.
3. Once the Lab is started, you will be provided with **IAM user name**, **Password**, **Access** **Key**, and **Secret** **Access** **Key**.
> **Note** : You can only start one lab at any given time
## Lab guide
### Lab Steps
#### Task 1: Sign in to AWS Management Console
1. Click on the **Open Console** button, and you will get redirected to AWS Console in a new browser tab.
2. On the AWS sign-in page,
* Leave the Account ID as default. Never edit/remove the 12 digit Account ID present in the AWS Console. otherwise, you cannot proceed with the lab.
* Now copy your **User Name** and **Password** in the Lab Console to the **IAM Username and Password** in AWS Console and click on the **Sign in** button.
3. Once Signed In to the AWS Management Console, Make the default AWS Region as **US East (N. Virginia) us-east-1.**
> **Note :** If you face any issues, please go through [**FAQs and Troubleshooting for Labs**](https://play.whizlabs.com/site/task_support/faqs-and-troubleshooting).
#### Task 2: Creating Subnets using the VPC Template cloudformation stack
In this task , we will be creating VPC stack using the pre-created cloudformation template in the S3 bucket.
1. Search for **S3** by click on **Services** in the top menu, then click on **S3** in the **Storage** section.
* You will see a bucket name starting with "**whizlabs**" with numeric digits appended to the end, like **whizlab1234564543.**
* Open that bucket and click on the object named **VPC\_template.json**.
* Next, copy the **Object URL** to the clipboard for use in the CloudFormation template.
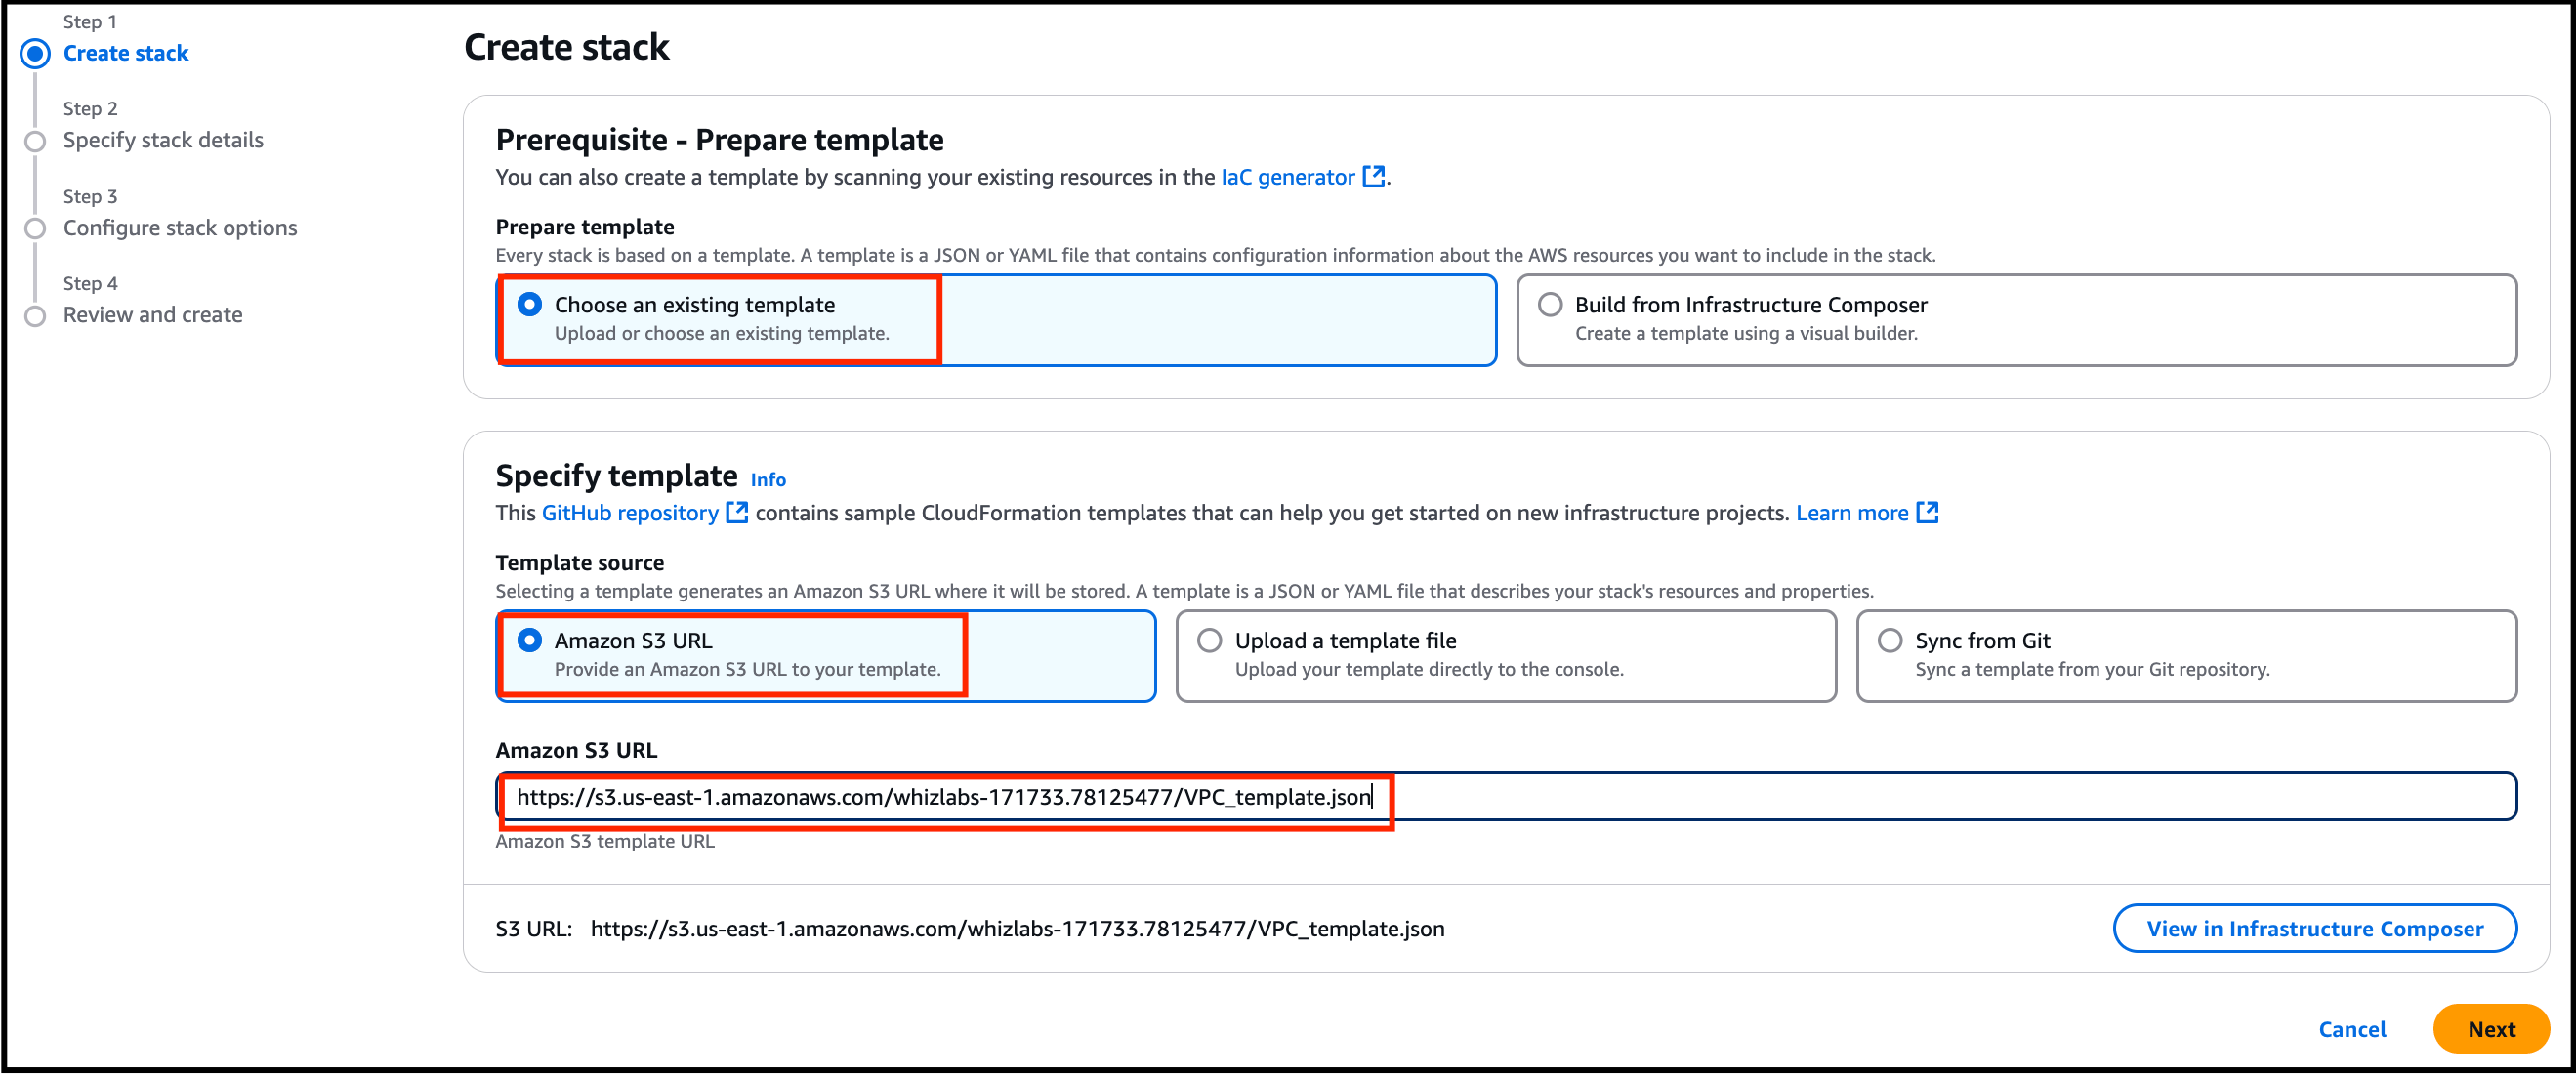
 2. Navigate to CloudFormation by clicking on **Services** in the top menu, click on **CloudFormation** in the **Management and Governance** section.
3. Then click on **Create Stack** and select **Choose an existing template**.
4. Choose **Amazon S3 URL** in Specify template. Then paste the Object URL below.
5. Click on **Next**
2. Navigate to CloudFormation by clicking on **Services** in the top menu, click on **CloudFormation** in the **Management and Governance** section.
3. Then click on **Create Stack** and select **Choose an existing template**.
4. Choose **Amazon S3 URL** in Specify template. Then paste the Object URL below.
5. Click on **Next**
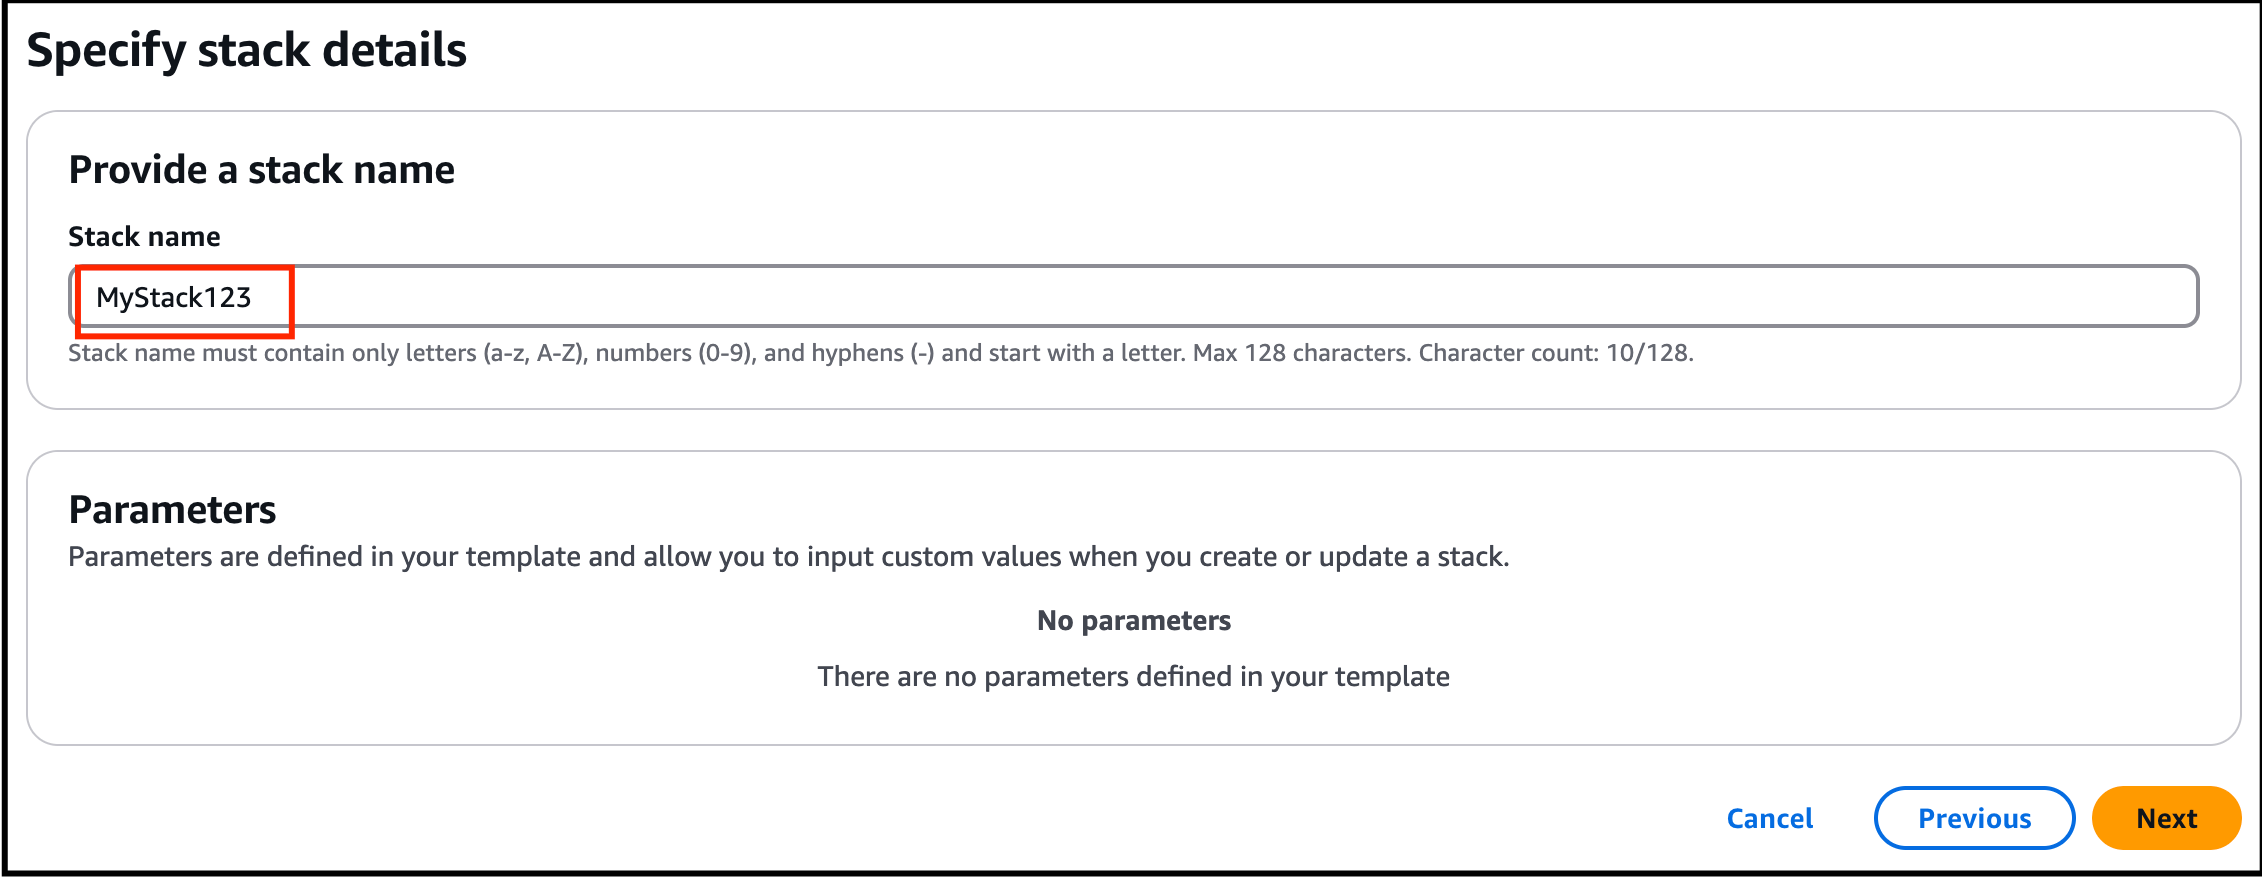
 6. Stack Name: Enter ***MyStack123*** and click on **Next**
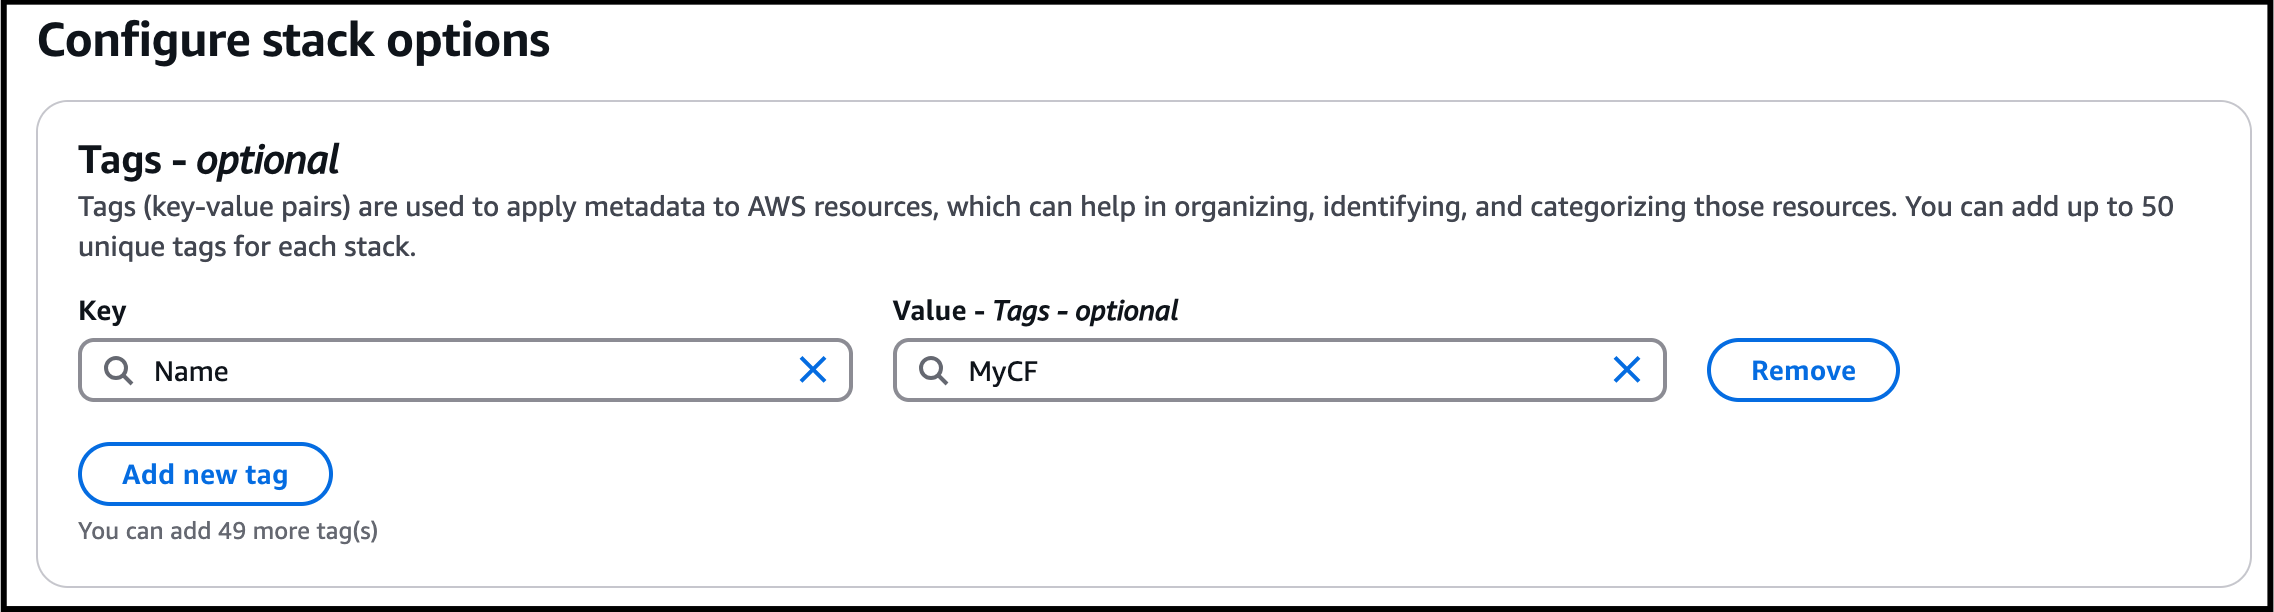
 7. On Tag option, click **Add new tag**.
* Key: Enter ***Name***
* Value: Enter ***MyCF***
7. On Tag option, click **Add new tag**.
* Key: Enter ***Name***
* Value: Enter ***MyCF***
 * Leave other options as default and click on **Next**
> **Note:** If you are getting an error pop up like **Failed to retrieve IAM roles** just ignore it.
9. Review the Stack details and click on **Submit**. Then you will be redirected to the CloudFormation Stack list.
> **Note:** You need to wait 5-10 minutes to complete the stack resource creation.
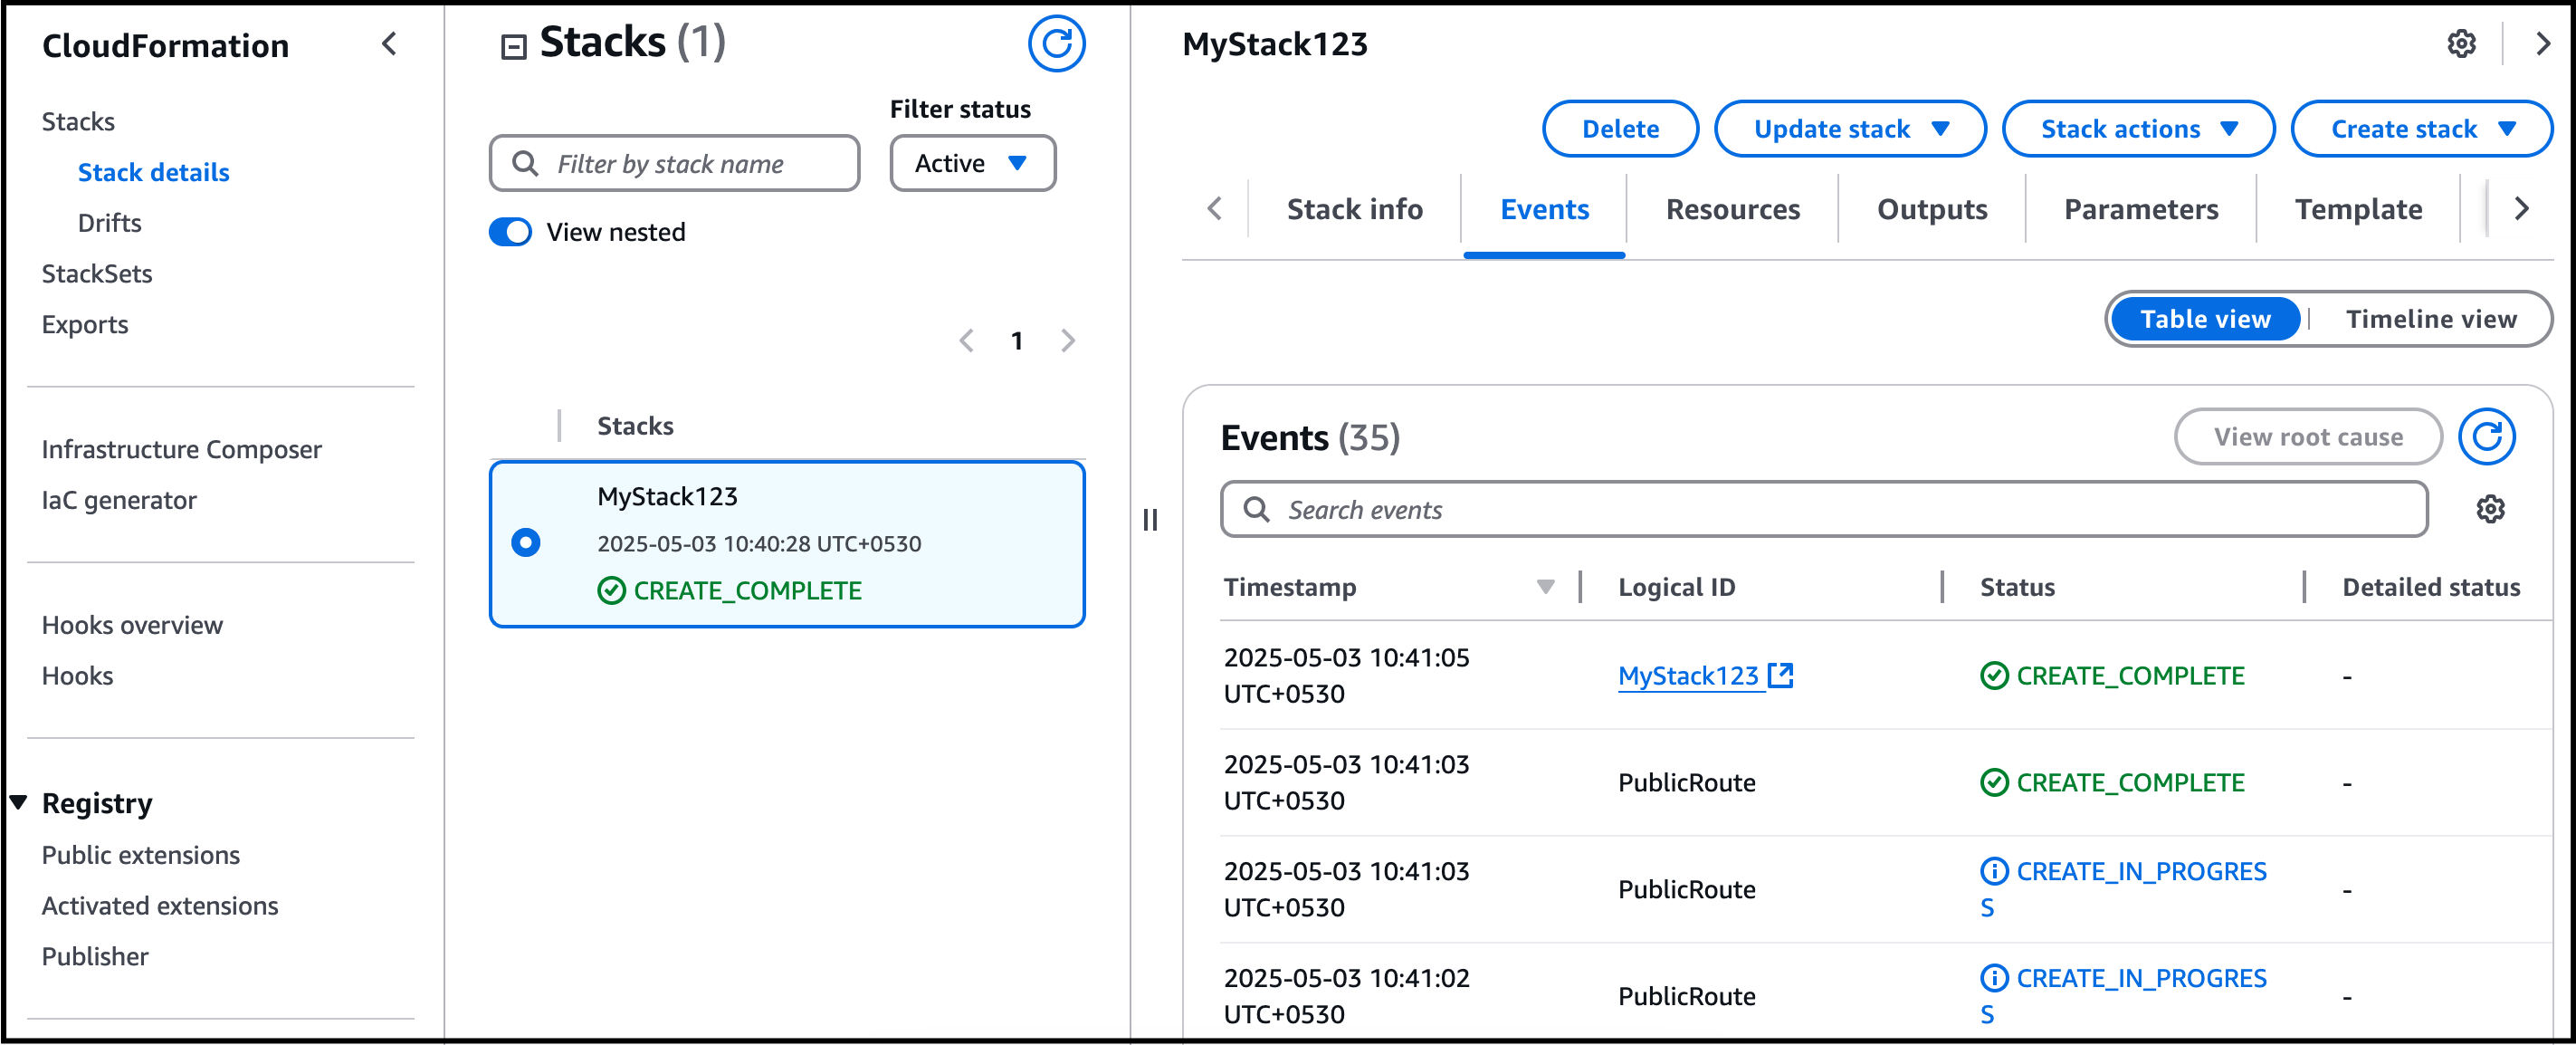
10. It will display **CREATE\_COMPLETE.**
* Leave other options as default and click on **Next**
> **Note:** If you are getting an error pop up like **Failed to retrieve IAM roles** just ignore it.
9. Review the Stack details and click on **Submit**. Then you will be redirected to the CloudFormation Stack list.
> **Note:** You need to wait 5-10 minutes to complete the stack resource creation.
10. It will display **CREATE\_COMPLETE.**
 11. Navigate to the **Services** menu in the top, click on **VPC** in the **Networking and Content Delivery** section.
12. You can see the vpc resources created by CloudFormation.
#### Task 3: Creating Subnets using the VPC II Template cloudformation stack
1. Search for **S3** by clicking on **Services** in the top menu, then click on **S3** in the **Storage** section.
* You will see a bucket name starting with whizlabs with numeric digits appended to the end, like **whizlab1234564543.**
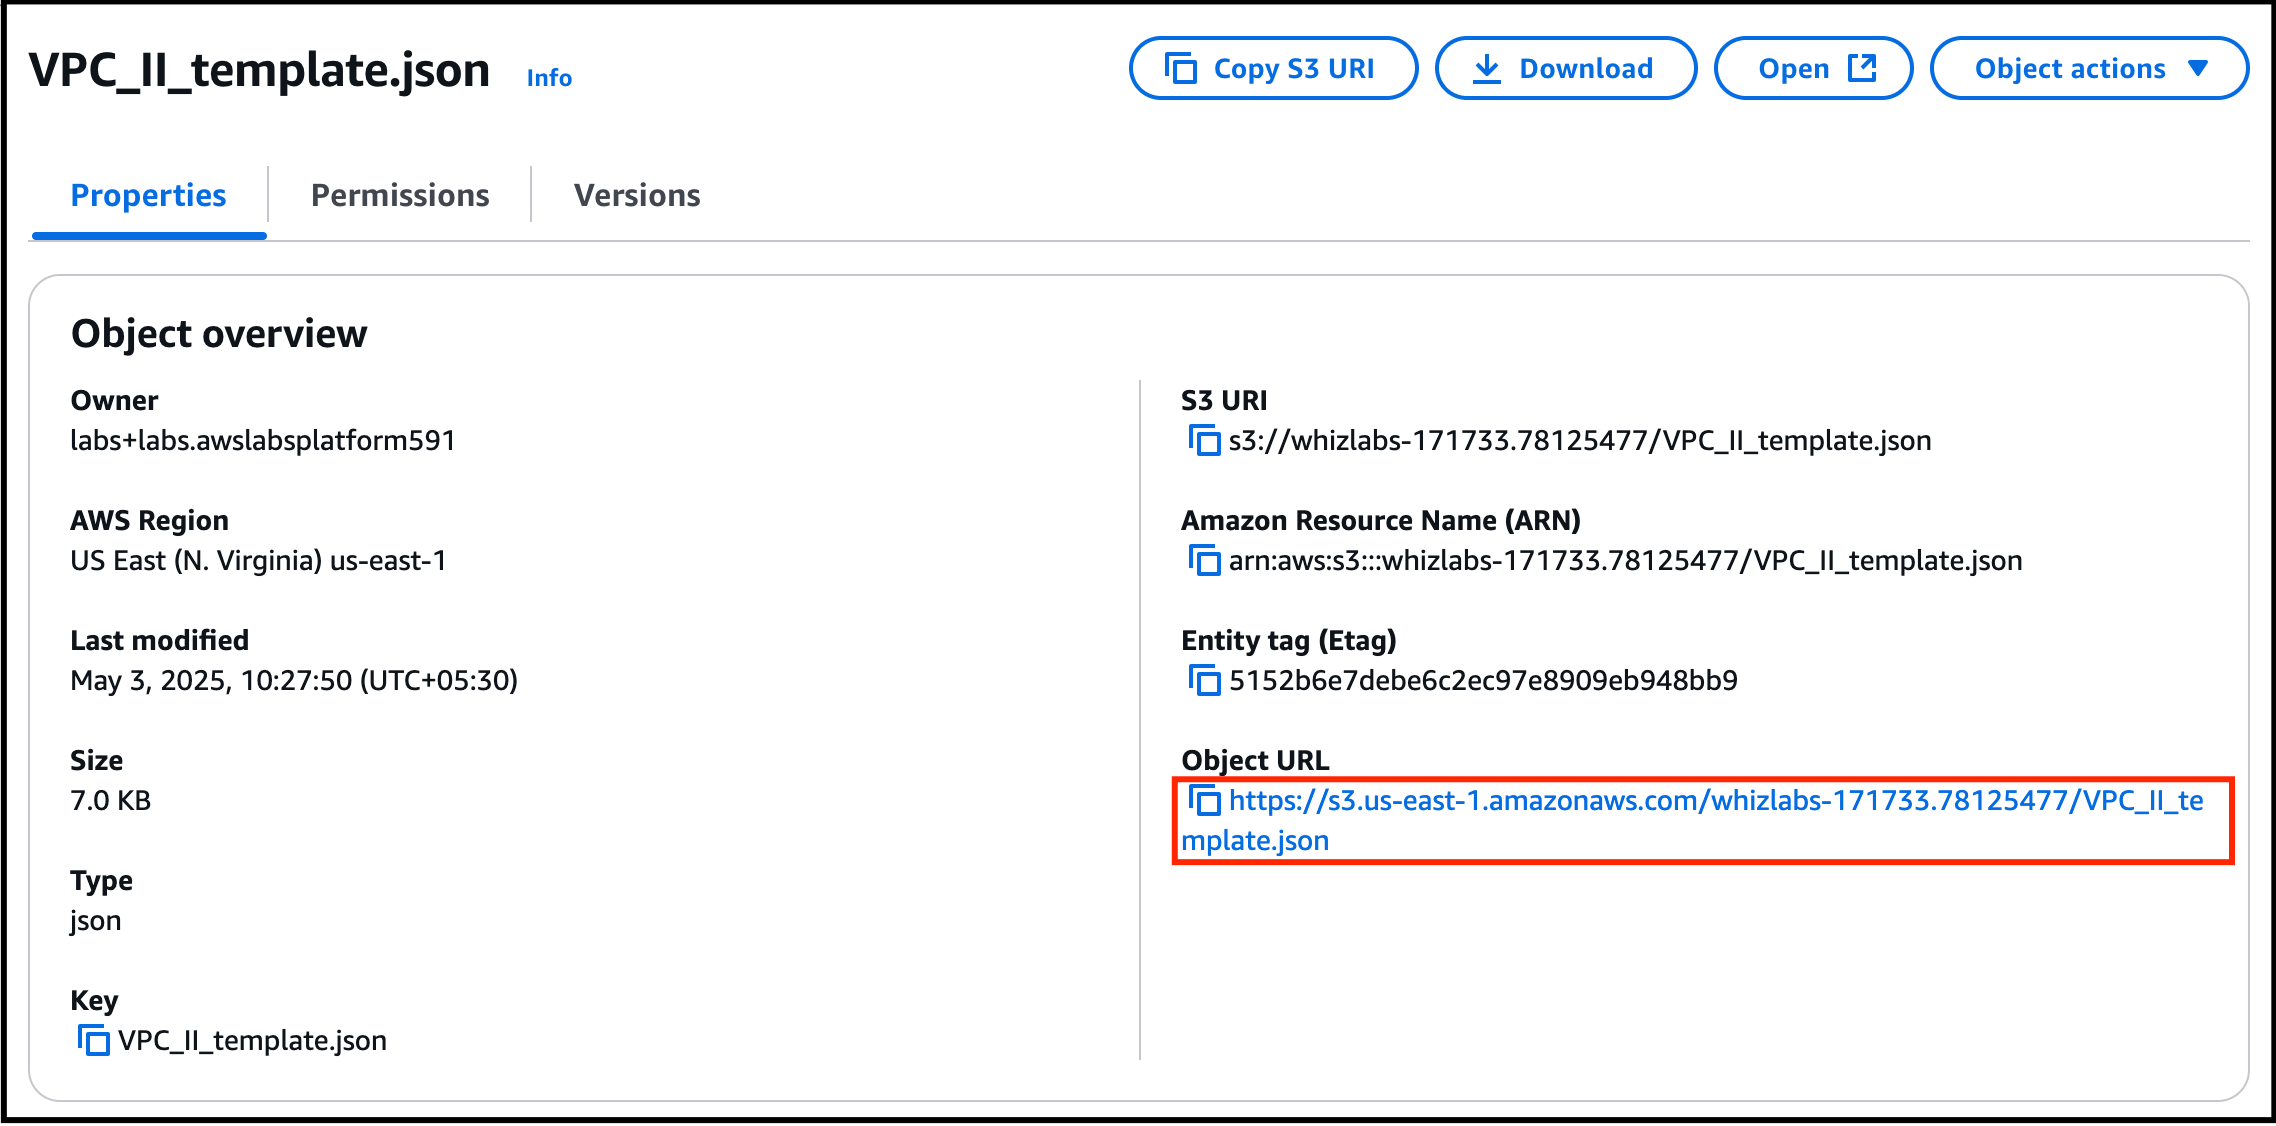
* Open that bucket and click on the object named **VPC\_II\_template.json**.
* Now, copy the **Object URL** to the clipboard for use in CloudFormation template.
11. Navigate to the **Services** menu in the top, click on **VPC** in the **Networking and Content Delivery** section.
12. You can see the vpc resources created by CloudFormation.
#### Task 3: Creating Subnets using the VPC II Template cloudformation stack
1. Search for **S3** by clicking on **Services** in the top menu, then click on **S3** in the **Storage** section.
* You will see a bucket name starting with whizlabs with numeric digits appended to the end, like **whizlab1234564543.**
* Open that bucket and click on the object named **VPC\_II\_template.json**.
* Now, copy the **Object URL** to the clipboard for use in CloudFormation template.
 2. Click on **Services** in the top menu, then click on **CloudFormation** in the **Management and Governance** section
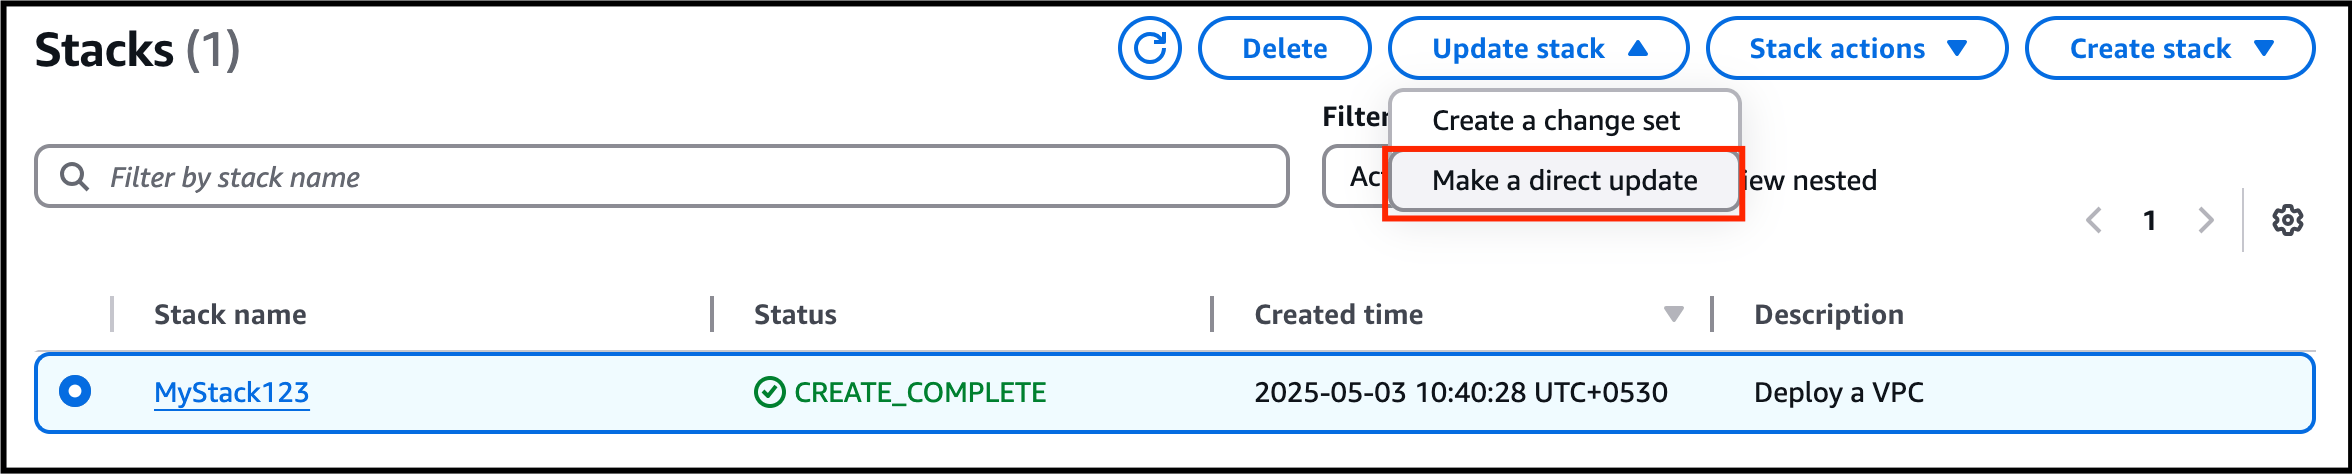
3. Select the stack **MyStack123** and click on **Update stack** and select **Make a direct update** from dropdown.
2. Click on **Services** in the top menu, then click on **CloudFormation** in the **Management and Governance** section
3. Select the stack **MyStack123** and click on **Update stack** and select **Make a direct update** from dropdown.
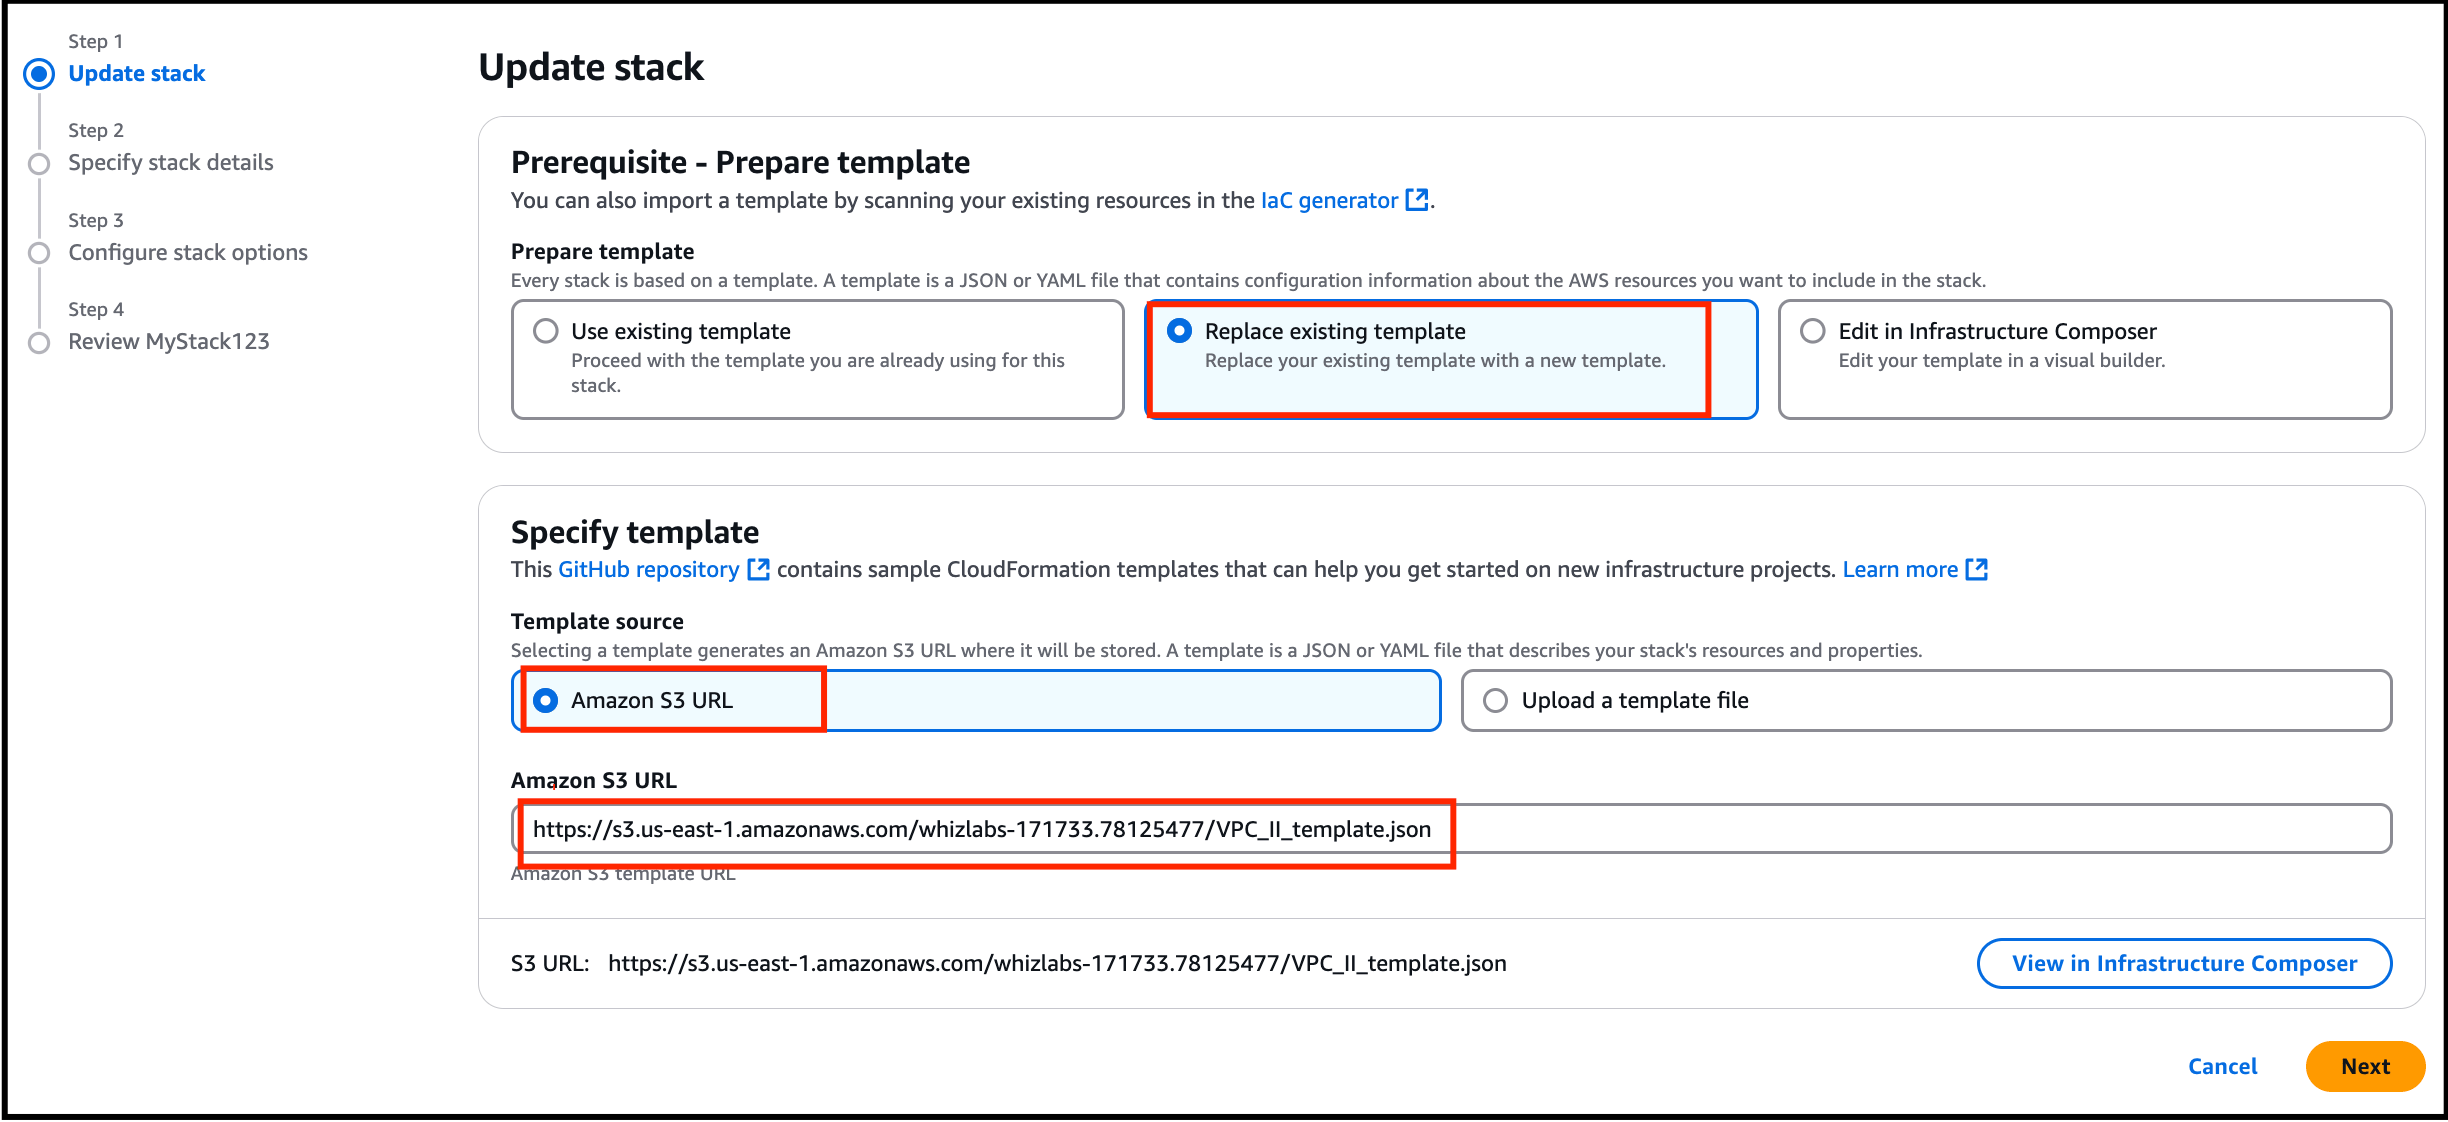
 4. Select **Replace existing template** and paste the URL below in the Amazon S3 URL.
 5. Click on **Next**. You should see **No Parameters** being displayed. Then, click on **Next.**
> **Note:** If you are getting an error pop-up like **Failed to retrieve IAM roles** just ignore it. Click on **Next**
6. Tags - No changes needed in this page, click on **Next** button.
7. Review the stack details and click on **Submit** .
8. Click on **Events** and it will display extra space **UPDATE\_IN\_PROGRESS.**
5. Click on **Next**. You should see **No Parameters** being displayed. Then, click on **Next.**
> **Note:** If you are getting an error pop-up like **Failed to retrieve IAM roles** just ignore it. Click on **Next**
6. Tags - No changes needed in this page, click on **Next** button.
7. Review the stack details and click on **Submit** .
8. Click on **Events** and it will display extra space **UPDATE\_IN\_PROGRESS.**
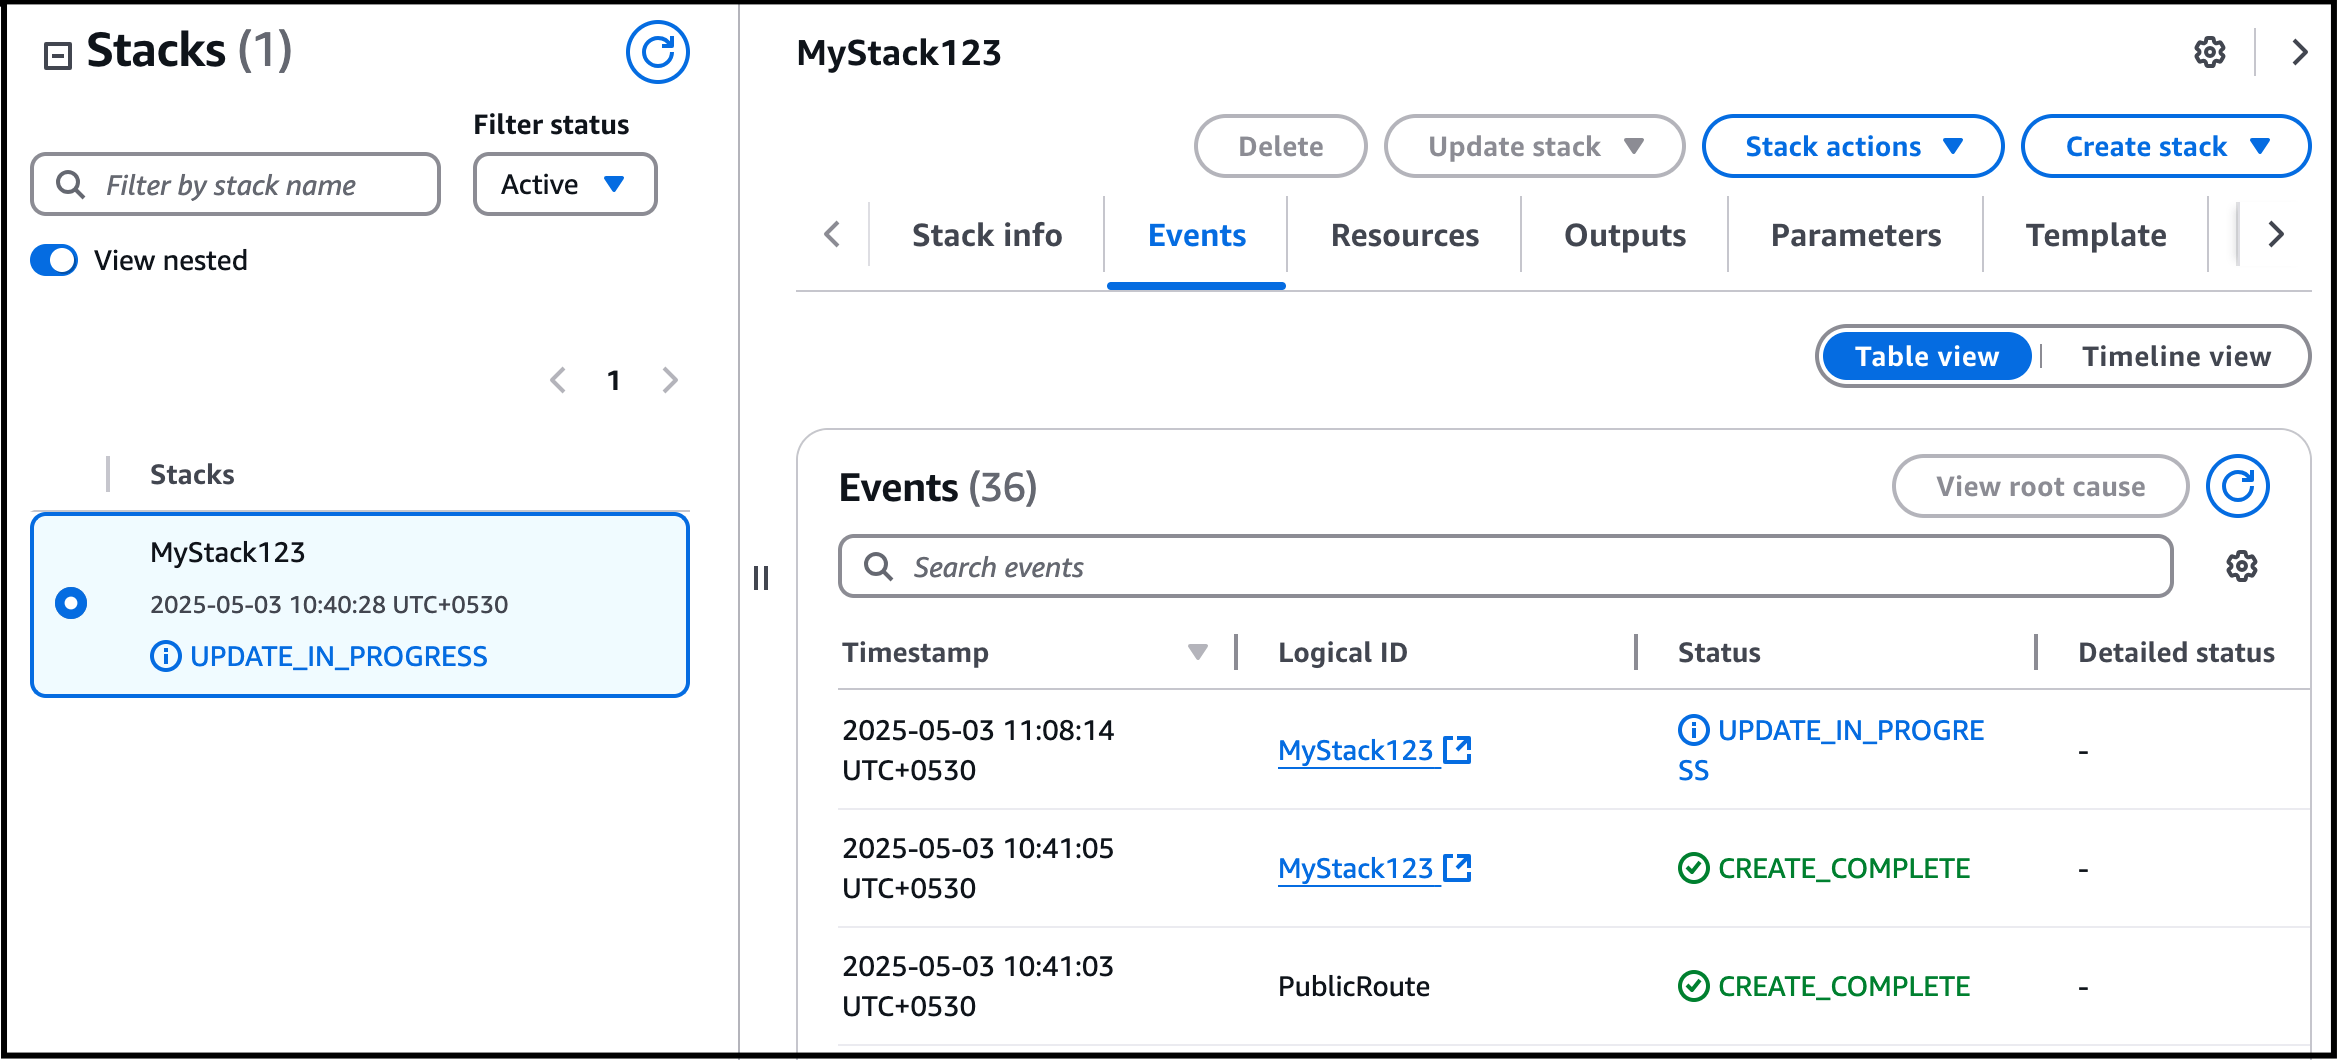 > **Note:** You need to wait 5-10 minutes to complete the stack resource creation.
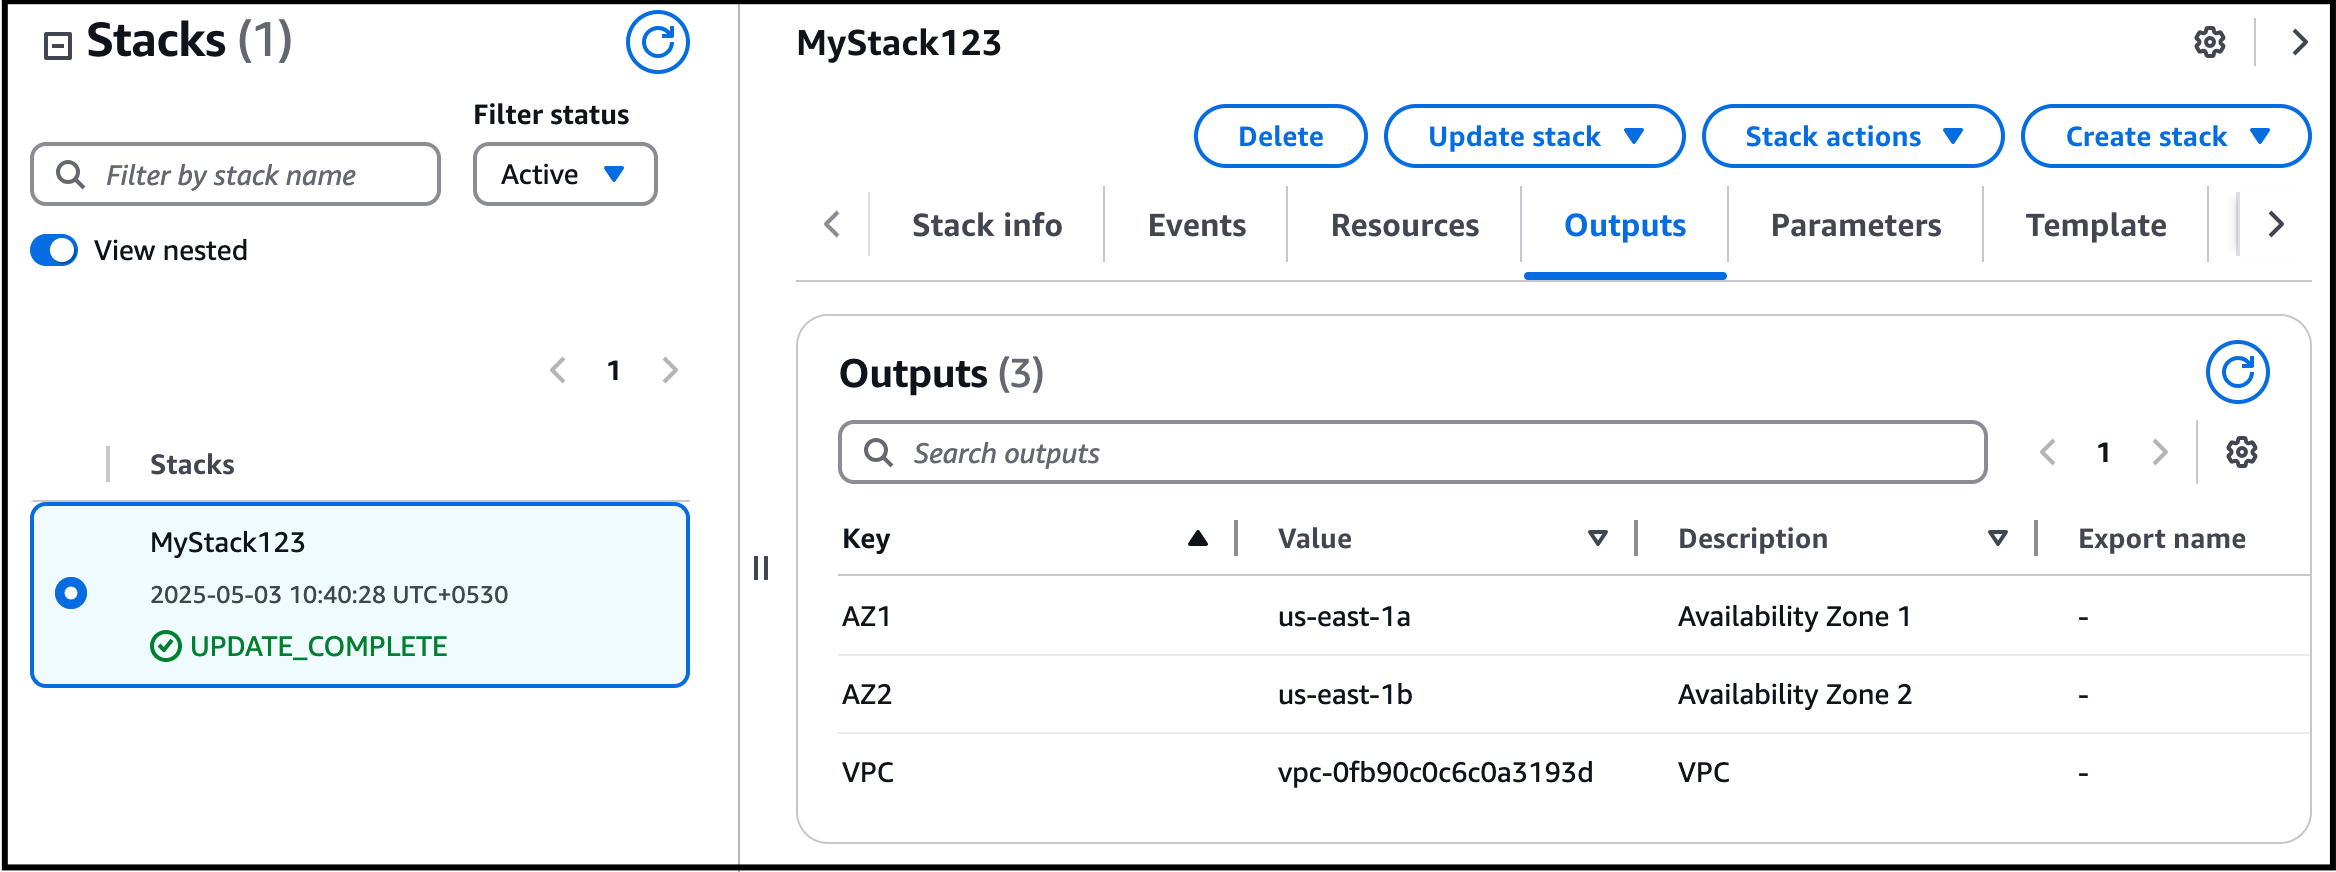
9. Once your stack status changes to **UPDATE\_COMPLETE**, we can proceed forward.
10. Click on the **Output** tab. You can see an additional Availability Zone displayed with a different value than the original Availability Zone.
> **Note:** You need to wait 5-10 minutes to complete the stack resource creation.
9. Once your stack status changes to **UPDATE\_COMPLETE**, we can proceed forward.
10. Click on the **Output** tab. You can see an additional Availability Zone displayed with a different value than the original Availability Zone.
 11. Click on **Services** in the top menu, click on **VPC** in the **Networking and Content Delivery** section.
12. Select the VPC named **Lab VPC** in the list and click on **Subnets** in the left panel.
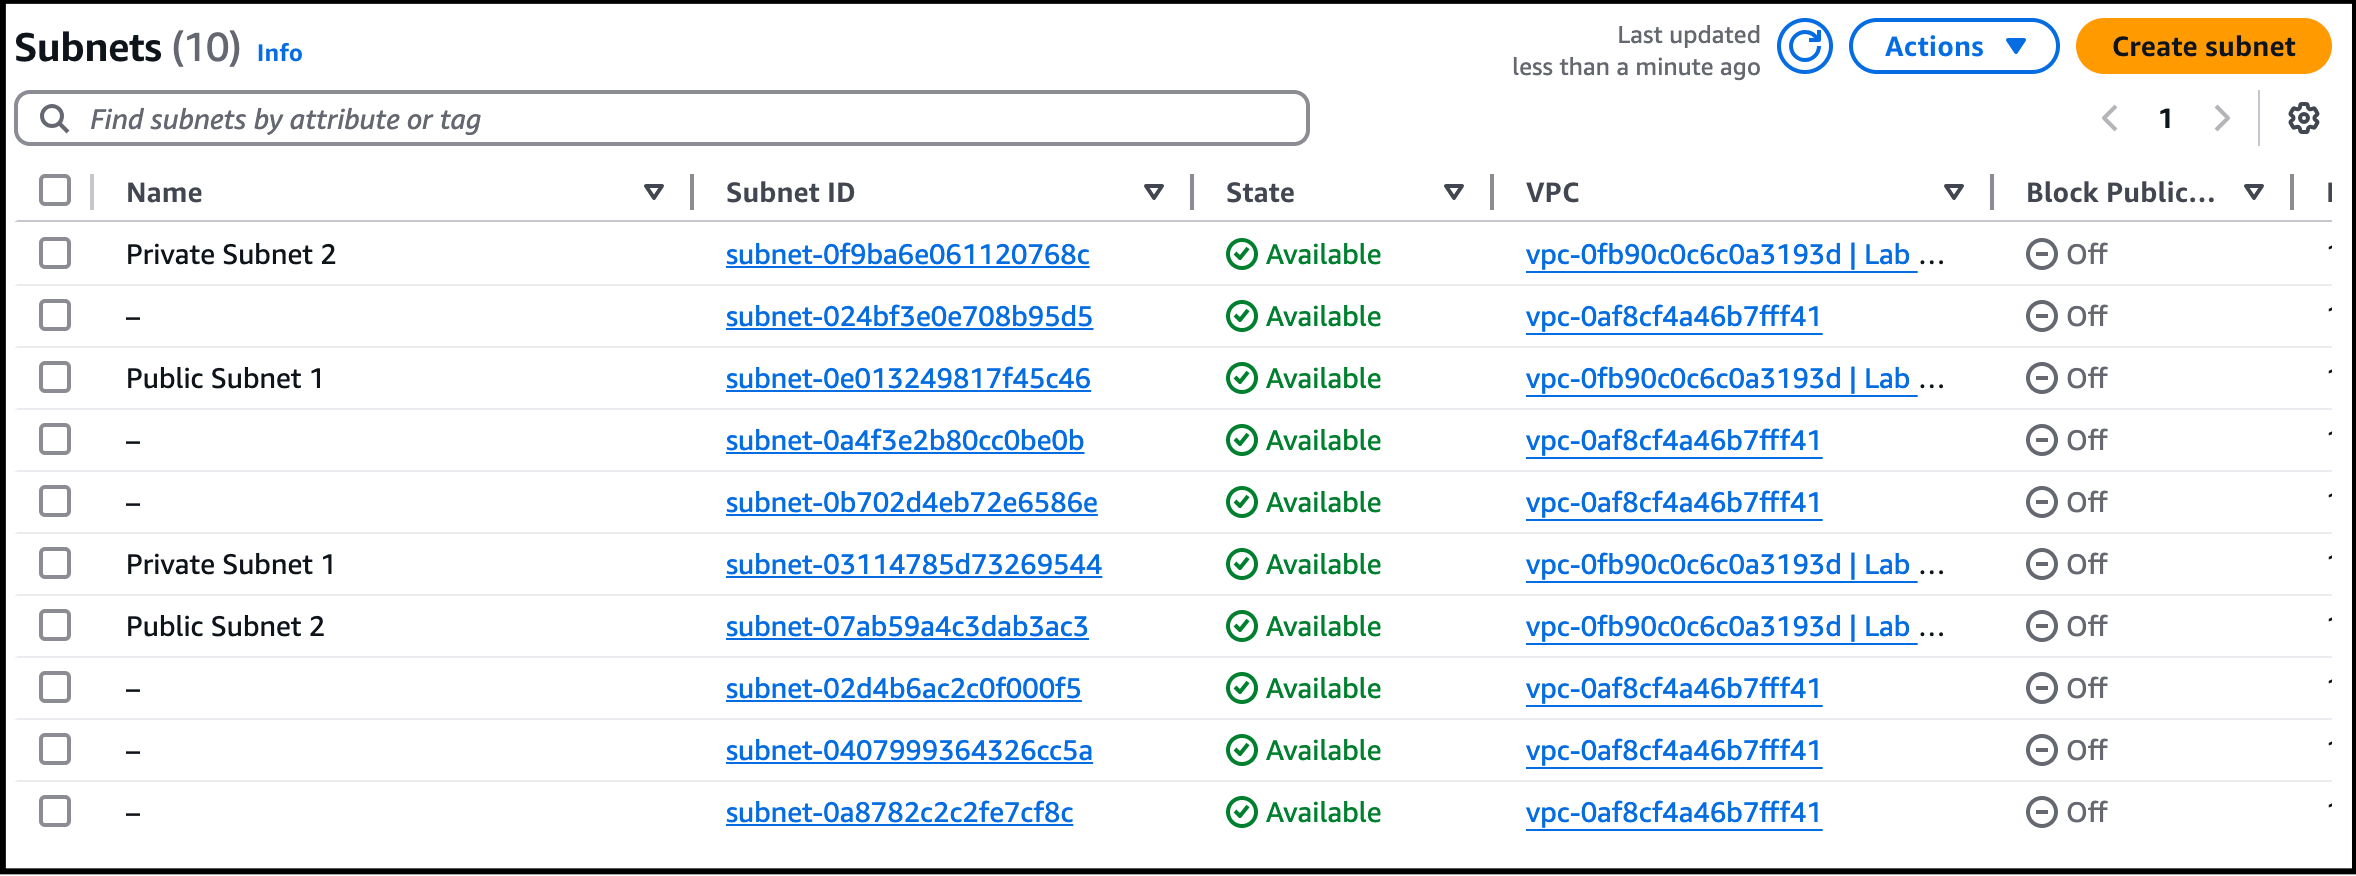
13. You will now see your subnets. The VPC has been updated with a new stack.
11. Click on **Services** in the top menu, click on **VPC** in the **Networking and Content Delivery** section.
12. Select the VPC named **Lab VPC** in the list and click on **Subnets** in the left panel.
13. You will now see your subnets. The VPC has been updated with a new stack.
 #### Task 4: Deep dive into the VPC\_Template and VPC\_II\_Template
1. In the present lab, we have used two templates for stack creation. They are **VPC\_Template and VPC\_II\_Template.**
2. When you download and open the template,here is how the **VPC\_template.json** looks like,
#### Task 4: Deep dive into the VPC\_Template and VPC\_II\_Template
1. In the present lab, we have used two templates for stack creation. They are **VPC\_Template and VPC\_II\_Template.**
2. When you download and open the template,here is how the **VPC\_template.json** looks like,
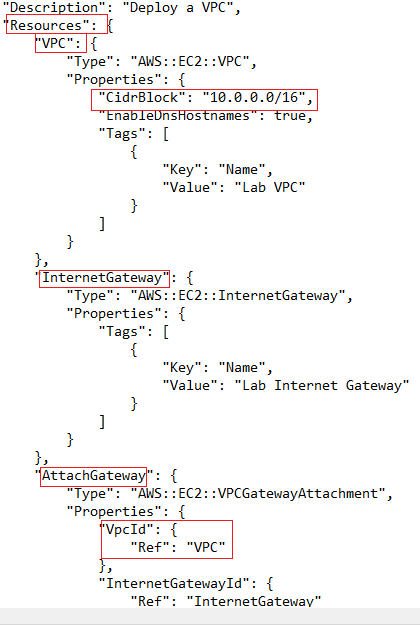 * In the above image\*\*,\*\* we are first creating a VPC with the name **Lab VPC**, CIDR block- 10.0.0.0/16. Then an internet gateway with the name **Lab Internet Gateway** is created. Lab VPC is then attached to the **Lab Internet Gateway.**
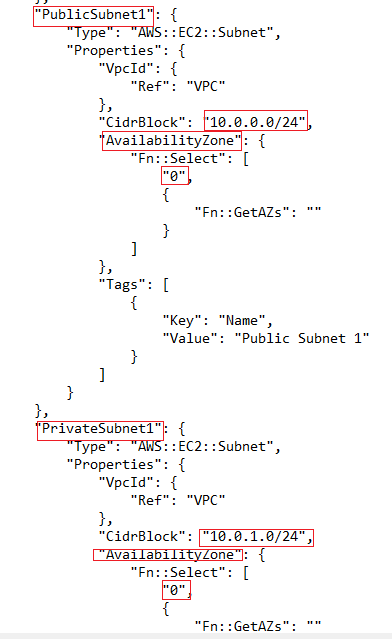 * We then are creating a public subnet named **public subnet 1** in availability zone 1 with the IP address **10.0.0.0/24**. The **private subnet** is created (named **private subnet 1**)with IP address **10.0.1.0/24** in the AZ-1.
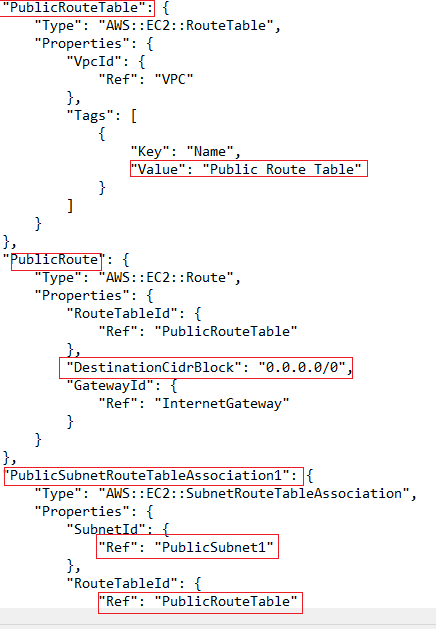 * After the subnets are created then a **public route table** is created. The **public subnet 1** is then associated with the public route table.
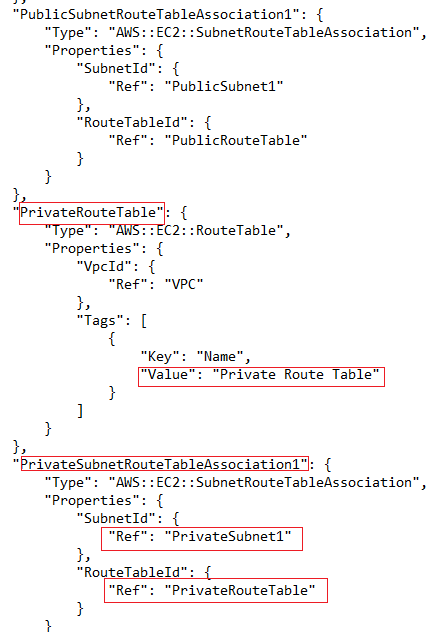 * A private route table then is created. The **private subnet1** is then associate with the private route table. (We can find the subnet associations option in route table and add the required subnet in the console).
3. Mystack123 is then created executing all the required resources. After that, you are updating the stack template with **VPC\_II\_Template.**
4. When you download and open the second template **VPC\_II\_template.json**. that is present in the s3 bucket. You are creating a VPC with 2 public subnets and 2 private subnets.VPC is named Lab VPC similar to the above-created stack. An internet gateway is attached to the VPC. The public subnets used here are public subnet 1 (10.0.0.0/24) and public subnet 2 (10.0.2.0/24). The private subnets are private subnet1 (10.0.1.0/24) and private subnet2 (10.0.3.0/24) respectively. The public subnets are associated with the public route table and private subnets are associated with the private route table. The main difference is public subnet 1 and private subnet 1 are created in the same availability zone ie; AZ-1 and private subnet and public subnet 2 are created in AZ-2.
5. New resources are created after the stack is updated.
> ##### Do You Know ?
>
> AWS CloudFormation provides a powerful feature called custom resources, which allows you to extend the capabilities of CloudFormation templates by adding your own resource types. These custom resources can be created and managed using AWS Lambda functions.
6. Once the lab steps are completed, please click on the **Validation** button on the left side panel.
#### Completion and Conclusion
1. You have successfully deployed an AWS CloudFormation template that creates an Amazon VPC
2. You have successfully examined the components in the template
3. You have successfully updated a CloudFormation stack
4. You have successfully examined a template with the AWS CloudFormation Designer.
5. You have successfully validated the lab.
#### End Lab
1. Sign out from the AWS Management Console.
2. Click on **End Lab** button from IP Lab Portal Labs console and wait till the process gets completed.
## What gets checked
When you press **Check my work**, the platform verifies each of these:
* **Update the CloudFormation Stack** — Check whether a CloudFormation stack is updated or not.
* **Create Amazon Custom VPC** — Check whether a Custom VPC is created or not.
* **Create Amazon Custom VPC Subnet** — Check whether a Subnet is created for the Custom VPC or not.
* **Create Amazon Custom VPC Public Route Table** — Check whether a Custom VPC Public Route Table is created and an Internet Gateway route is added or not.
* **Create Amazon Custom VPC Private Route Table** — Check whether a Custom VPC Private Route Table is created or not.
This documentation is built and hosted on [Mintlify](https://mintlify.com), a developer documentation platform.
* A private route table then is created. The **private subnet1** is then associate with the private route table. (We can find the subnet associations option in route table and add the required subnet in the console).
3. Mystack123 is then created executing all the required resources. After that, you are updating the stack template with **VPC\_II\_Template.**
4. When you download and open the second template **VPC\_II\_template.json**. that is present in the s3 bucket. You are creating a VPC with 2 public subnets and 2 private subnets.VPC is named Lab VPC similar to the above-created stack. An internet gateway is attached to the VPC. The public subnets used here are public subnet 1 (10.0.0.0/24) and public subnet 2 (10.0.2.0/24). The private subnets are private subnet1 (10.0.1.0/24) and private subnet2 (10.0.3.0/24) respectively. The public subnets are associated with the public route table and private subnets are associated with the private route table. The main difference is public subnet 1 and private subnet 1 are created in the same availability zone ie; AZ-1 and private subnet and public subnet 2 are created in AZ-2.
5. New resources are created after the stack is updated.
> ##### Do You Know ?
>
> AWS CloudFormation provides a powerful feature called custom resources, which allows you to extend the capabilities of CloudFormation templates by adding your own resource types. These custom resources can be created and managed using AWS Lambda functions.
6. Once the lab steps are completed, please click on the **Validation** button on the left side panel.
#### Completion and Conclusion
1. You have successfully deployed an AWS CloudFormation template that creates an Amazon VPC
2. You have successfully examined the components in the template
3. You have successfully updated a CloudFormation stack
4. You have successfully examined a template with the AWS CloudFormation Designer.
5. You have successfully validated the lab.
#### End Lab
1. Sign out from the AWS Management Console.
2. Click on **End Lab** button from IP Lab Portal Labs console and wait till the process gets completed.
## What gets checked
When you press **Check my work**, the platform verifies each of these:
* **Update the CloudFormation Stack** — Check whether a CloudFormation stack is updated or not.
* **Create Amazon Custom VPC** — Check whether a Custom VPC is created or not.
* **Create Amazon Custom VPC Subnet** — Check whether a Subnet is created for the Custom VPC or not.
* **Create Amazon Custom VPC Public Route Table** — Check whether a Custom VPC Public Route Table is created and an Internet Gateway route is added or not.
* **Create Amazon Custom VPC Private Route Table** — Check whether a Custom VPC Private Route Table is created or not.
This documentation is built and hosted on [Mintlify](https://mintlify.com), a developer documentation platform.