> ## Documentation Index
> Fetch the complete documentation index at: https://cloud-architect.ipoint-labs.com/llms.txt
> Use this file to discover all available pages before exploring further.
# How to Encrypt an Unencrypted RDS DB Instance
> Hands-on lab · 20m
Launch this lab in the IP Lab Portal, then follow the steps below in the AWS console.
Open IP Lab Portal
## Overview
### Lab Details
1. This lab walks you through the steps to create an unencrypted instance with the Encrypt option.
2. You will practice this lab by not enabling the encryption of DB Instance while creating.
3. Duration: **1 hour 20 minutes**
4. AWS Region: **US East (N. Virginia) us-east-1**
### Introduction
1. Amazon RDS can encrypt your Amazon RDS DB Instances.
2. When the encrypt option is enabled for the AWS RDS Resources, we are able to encrypt **DB Instances**, **Automated Backups**, **Read replicas**, **Snapshots** and **Logs**.
3. Amazon RDS encrypted DB instances use the AES-256 encryption algorithm to encrypt your data on the server that hosts your Amazon RDS DB instances.
4. The Encrypt option can be enabled only when you are launching the DB instance, it cannot be enabled after launch. However, copies of unencrypted snapshots can be encrypted.
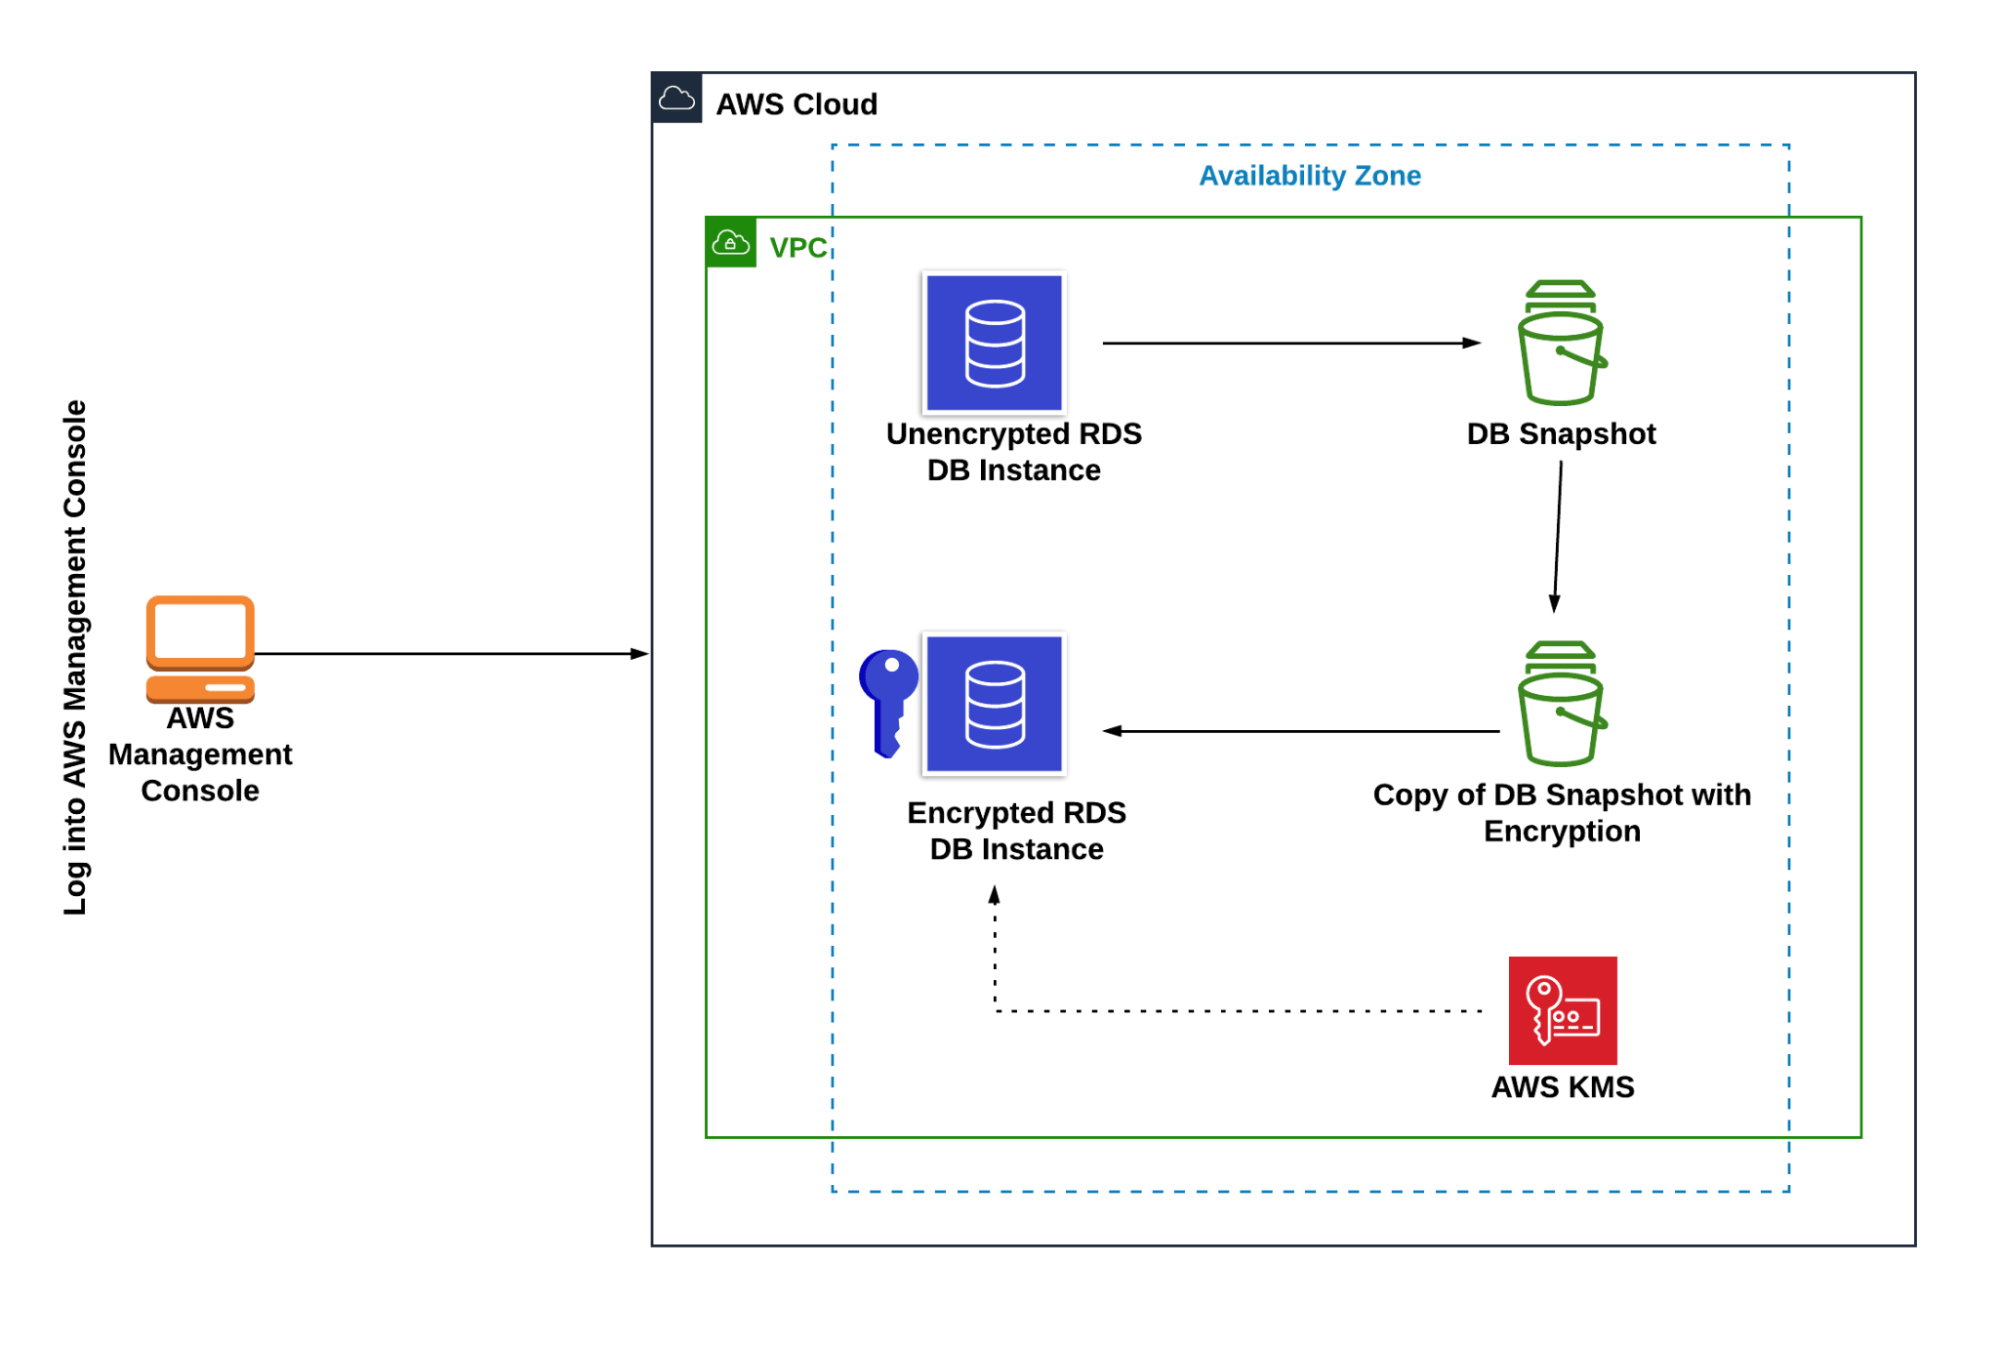
### Architecture Diagram
 ### Task Details
1. Sign in to AWS Management Console.
2. Create an Amazon RDS DB Instance (without enabling encrypt option).
3. Take a snapshot from an existing DB Instance.
4. Make a copy of the snapshot and encrypt it.
5. Restore DB Instance from the encrypted snapshot.
6. Change the name of the original DB Instance.
7. Change the name of the Restored DB Instance to the original DB Instance name.
8. Delete the original RDS Instance and snapshot.
9. Deleting AWS Resources
### Case Study
1. Suppose we have created an RDS DB Instance without enabling the encryption. As days passed by the project became bigger and began to store more sensitive data.
2. As you are quite aware of security issues, you wanted to check on the AWS console that your database was well encrypted.
3. Your database was totally **Unencrypted**. And when you check to encrypt the database, you have **no option** to encrypt the database.
### Launching Lab Environment
1. To launch the lab environment, Click on the **Start Lab** button.
2. Please wait until the cloud environment is provisioned. It will take less than a minute to provision.
3. Once the Lab is started, you will be provided with **IAM user name**, **Password**, **Access** **Key**, and **Secret** **Access** **Key**.
> **Note** : You can only start one lab at any given time
## Lab guide
### Lab Steps
#### Task 1: Sign in to AWS Management Console
1. Click on the **Open Console** button, and you will get redirected to AWS Console in a new browser tab.
2. On the AWS sign-in page,
* Leave the Account ID as default. Never edit/remove the 12 digit Account ID present in the AWS Console. otherwise, you cannot proceed with the lab.
* Now copy your **User Name** and **Password** in the Lab Console to the **IAM Username and Password** in AWS Console and click on the **Sign in** button.
3. Once Signed In to the AWS Management Console, Make the default AWS Region as **US East (N. Virginia) us-east-1.**
#### Task 2: Create an RDS DB Instance (without enabling the Encryption)
1. Navigate to the **Services** menu at the top left corner and click on **RDS** present under the **Database** section.
2. Select the **Database** from the left panel.
3. Click on **Create Database** and you are navigated to the page where you will provide all the required details to create a MySQL database.
### Task Details
1. Sign in to AWS Management Console.
2. Create an Amazon RDS DB Instance (without enabling encrypt option).
3. Take a snapshot from an existing DB Instance.
4. Make a copy of the snapshot and encrypt it.
5. Restore DB Instance from the encrypted snapshot.
6. Change the name of the original DB Instance.
7. Change the name of the Restored DB Instance to the original DB Instance name.
8. Delete the original RDS Instance and snapshot.
9. Deleting AWS Resources
### Case Study
1. Suppose we have created an RDS DB Instance without enabling the encryption. As days passed by the project became bigger and began to store more sensitive data.
2. As you are quite aware of security issues, you wanted to check on the AWS console that your database was well encrypted.
3. Your database was totally **Unencrypted**. And when you check to encrypt the database, you have **no option** to encrypt the database.
### Launching Lab Environment
1. To launch the lab environment, Click on the **Start Lab** button.
2. Please wait until the cloud environment is provisioned. It will take less than a minute to provision.
3. Once the Lab is started, you will be provided with **IAM user name**, **Password**, **Access** **Key**, and **Secret** **Access** **Key**.
> **Note** : You can only start one lab at any given time
## Lab guide
### Lab Steps
#### Task 1: Sign in to AWS Management Console
1. Click on the **Open Console** button, and you will get redirected to AWS Console in a new browser tab.
2. On the AWS sign-in page,
* Leave the Account ID as default. Never edit/remove the 12 digit Account ID present in the AWS Console. otherwise, you cannot proceed with the lab.
* Now copy your **User Name** and **Password** in the Lab Console to the **IAM Username and Password** in AWS Console and click on the **Sign in** button.
3. Once Signed In to the AWS Management Console, Make the default AWS Region as **US East (N. Virginia) us-east-1.**
#### Task 2: Create an RDS DB Instance (without enabling the Encryption)
1. Navigate to the **Services** menu at the top left corner and click on **RDS** present under the **Database** section.
2. Select the **Database** from the left panel.
3. Click on **Create Database** and you are navigated to the page where you will provide all the required details to create a MySQL database.
 4. On the page, click on the option **Standard create** a method for our lab requirement.
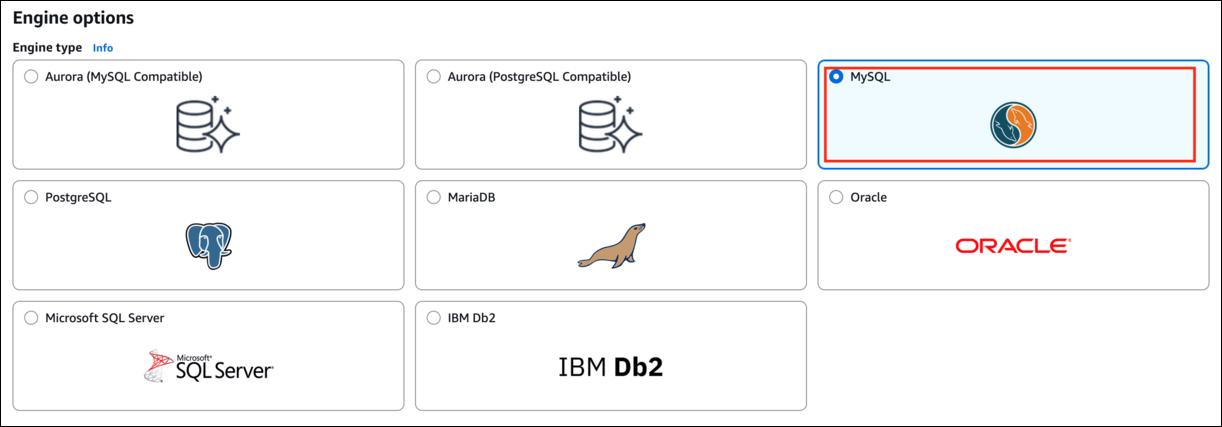
 5. In the **Engine options**, select MySQL engine type.
 6. **Edition**: Leave it as default
7. Under **Templates**, select the **Sandbox** option.
6. **Edition**: Leave it as default
7. Under **Templates**, select the **Sandbox** option.
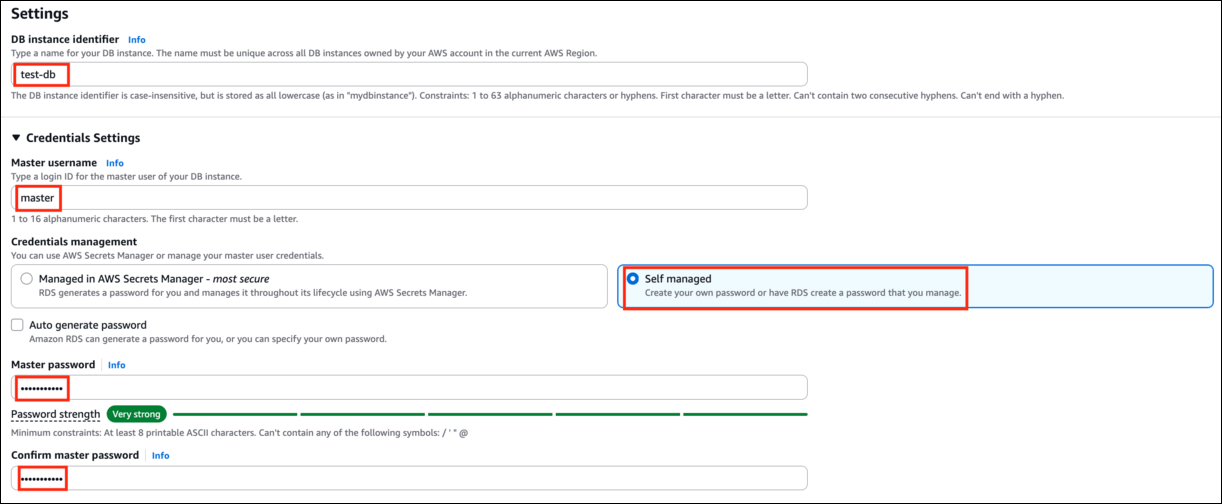
 8. Under Settings, provide the following details.
* DB cluster identifier: Enter ***test-db***
* ***Master username: Enter master***
* Credentials management: select **Self managed**
* Master password and Confirm master password: Enter ***Whizlabs123***
8. Under Settings, provide the following details.
* DB cluster identifier: Enter ***test-db***
* ***Master username: Enter master***
* Credentials management: select **Self managed**
* Master password and Confirm master password: Enter ***Whizlabs123***
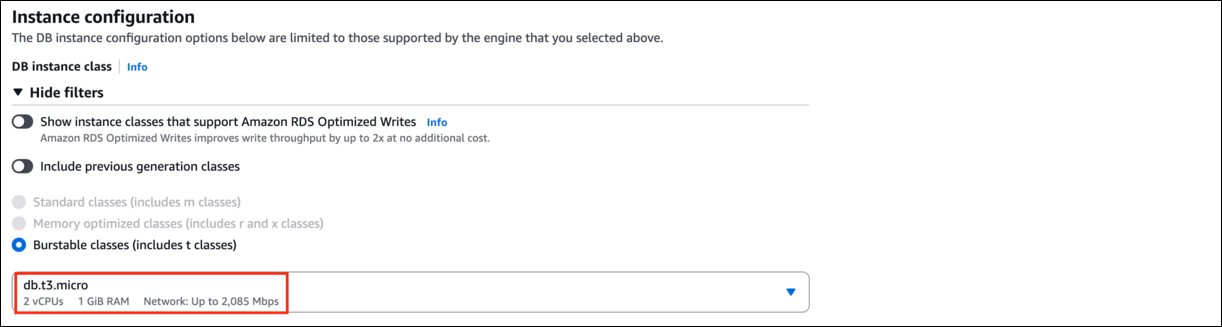
 9. Under **DB instance class**, select **Burstable classes (includes t classes)** and select **db.t3.micro**
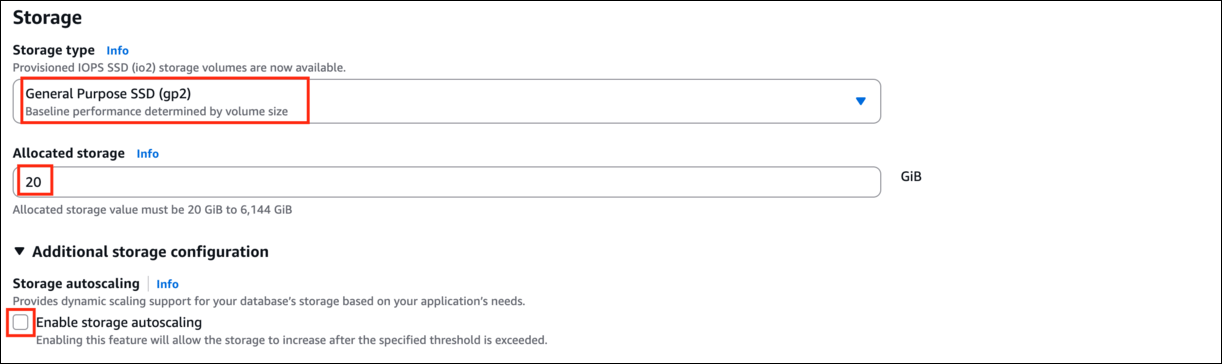
 10. Storage type : **General Purpose (SSD)**
* Allocated storage : **20**
* Uncheck **Enable storage autoscaling**.
10. Storage type : **General Purpose (SSD)**
* Allocated storage : **20**
* Uncheck **Enable storage autoscaling**.
 11. Leave the **Availability and durability** as default.
12. Under **Connectivity**, make sure that **Public access** is **No**. Leave everything else as default.
11. Leave the **Availability and durability** as default.
12. Under **Connectivity**, make sure that **Public access** is **No**. Leave everything else as default.
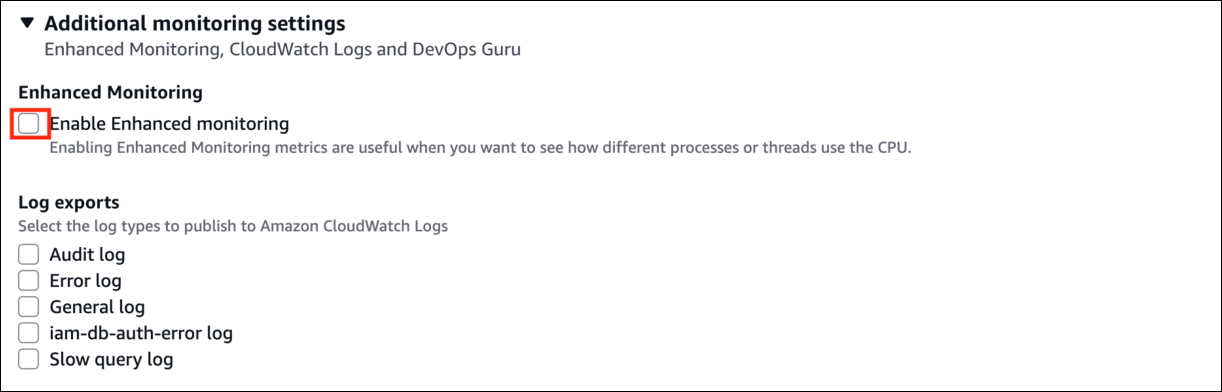
 13. Uncheck **Enhanced Monitoring** option.
 14. Expand the **Additional configuration**.
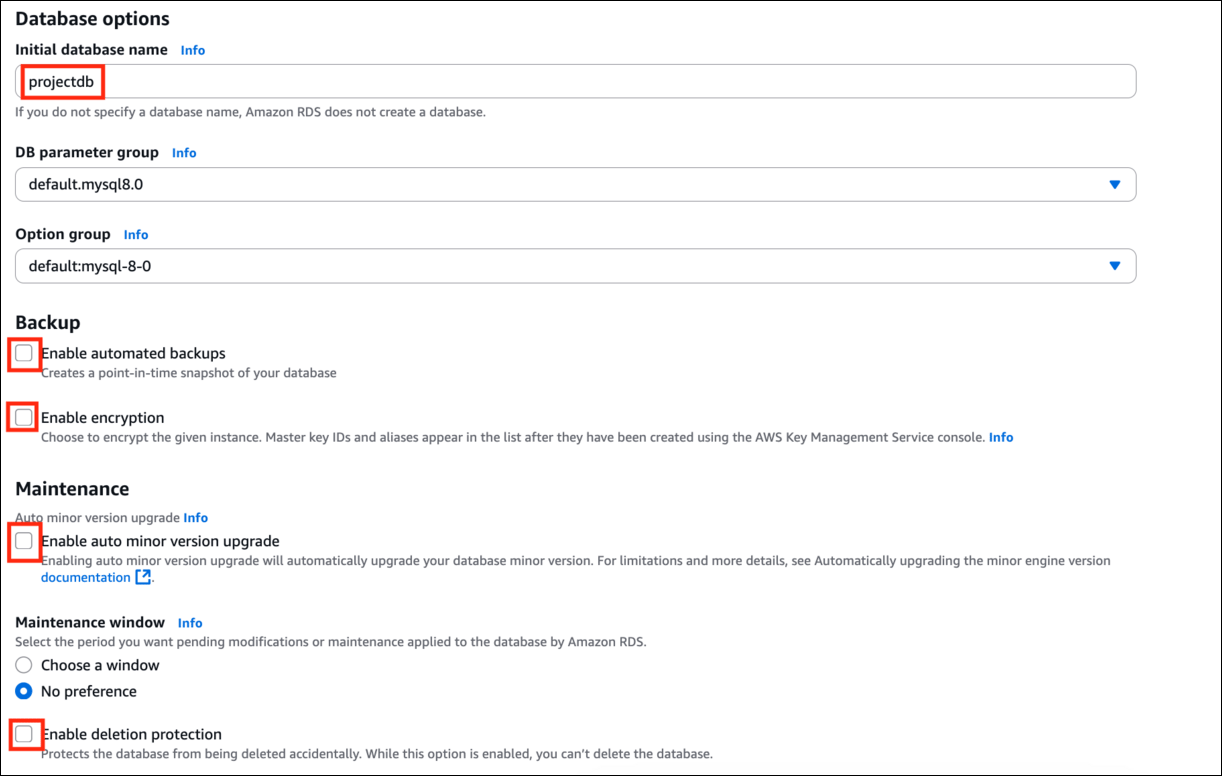
* Initial database name : Enter ***projectdb***
* Leave **DB parameter group** and **Option group** as default.
* Uncheck **Enable automatic backups**.
* Uncheck **Enable encryption** option.
* Uncheck **Deletion protection**.
14. Expand the **Additional configuration**.
* Initial database name : Enter ***projectdb***
* Leave **DB parameter group** and **Option group** as default.
* Uncheck **Enable automatic backups**.
* Uncheck **Enable encryption** option.
* Uncheck **Deletion protection**.
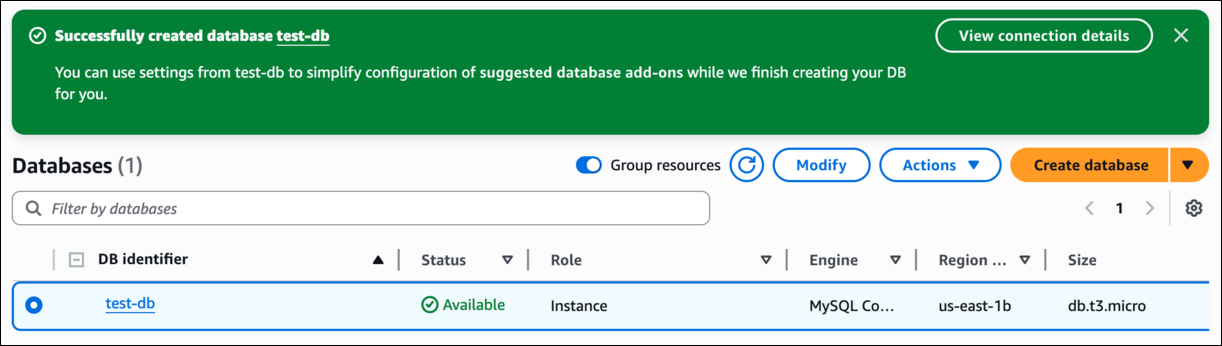
 15. Click on **Create Database** to create the database. This process does take time between 5-10 minutes.
16. Once the database is created the status changes to **Available**.
15. Click on **Create Database** to create the database. This process does take time between 5-10 minutes.
16. Once the database is created the status changes to **Available**.
 17. Click on the database and navigate to the **Configuration** tab. You can notice that the **Encryption** is **not enabled**, as we wanted it to be.
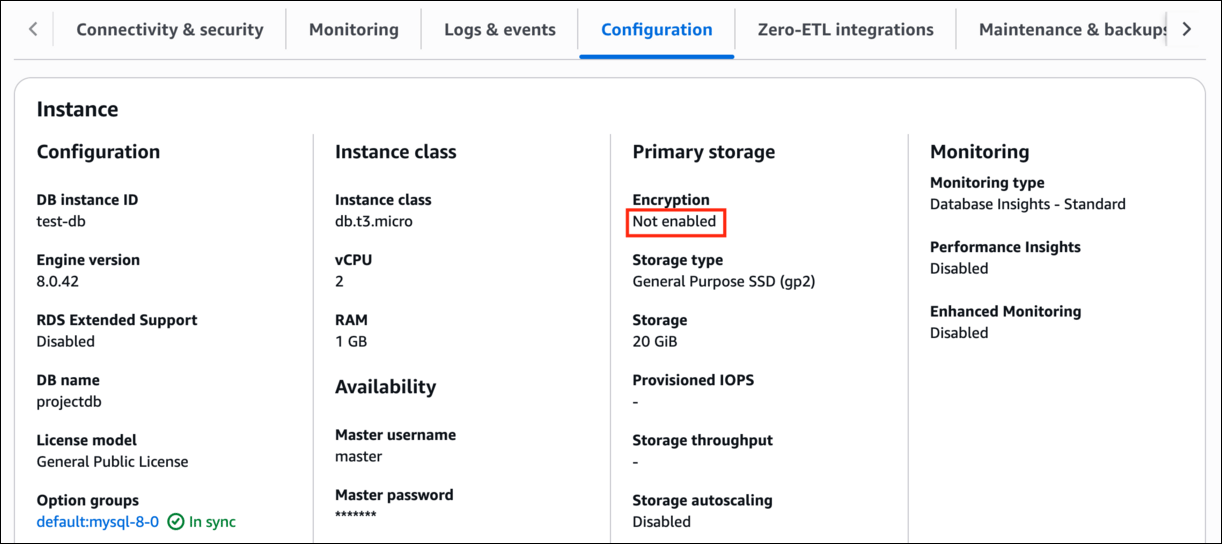 18. If we select the database and go to modify it, we will not find an option to Encrypt the database.
#### Task 3: Take a snapshot from the existing DB Instance
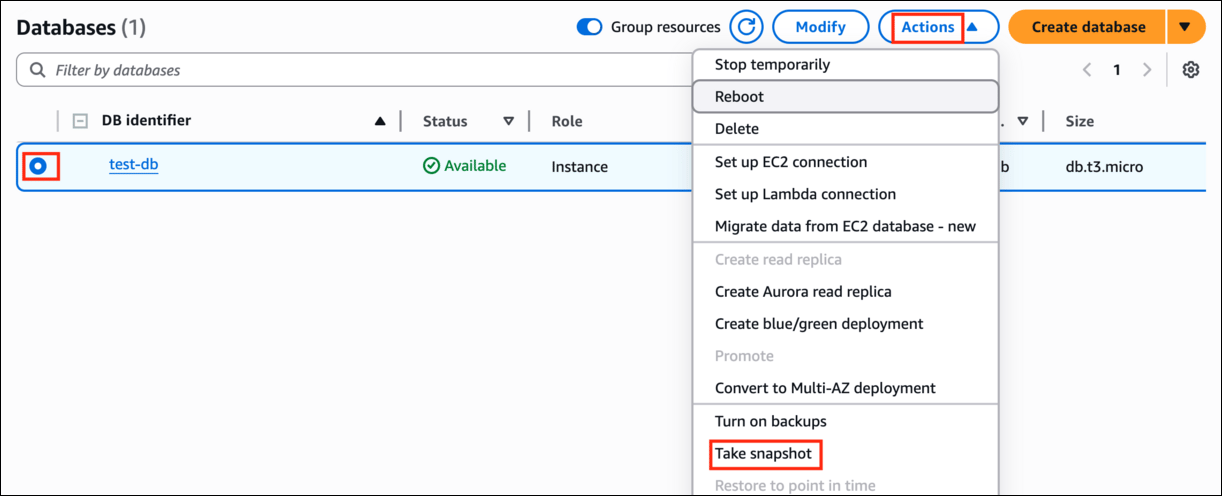
1. Select the created DB Instance and click on **Actions.**
2. Click **Take snapshot** from the options.
18. If we select the database and go to modify it, we will not find an option to Encrypt the database.
#### Task 3: Take a snapshot from the existing DB Instance
1. Select the created DB Instance and click on **Actions.**
2. Click **Take snapshot** from the options.
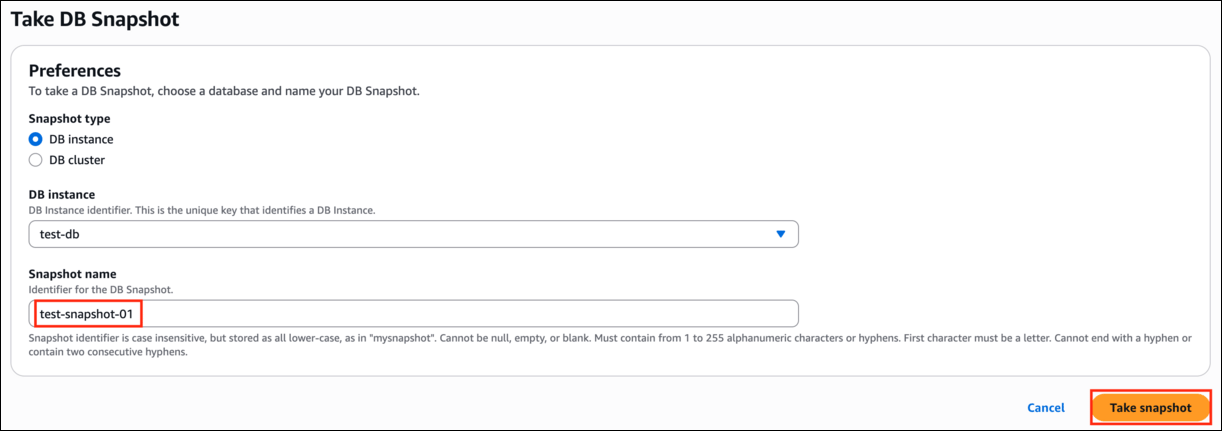
 3. Give a name to the snapshot, **test-snapshot-01** and click on the **Take snapshot** button.
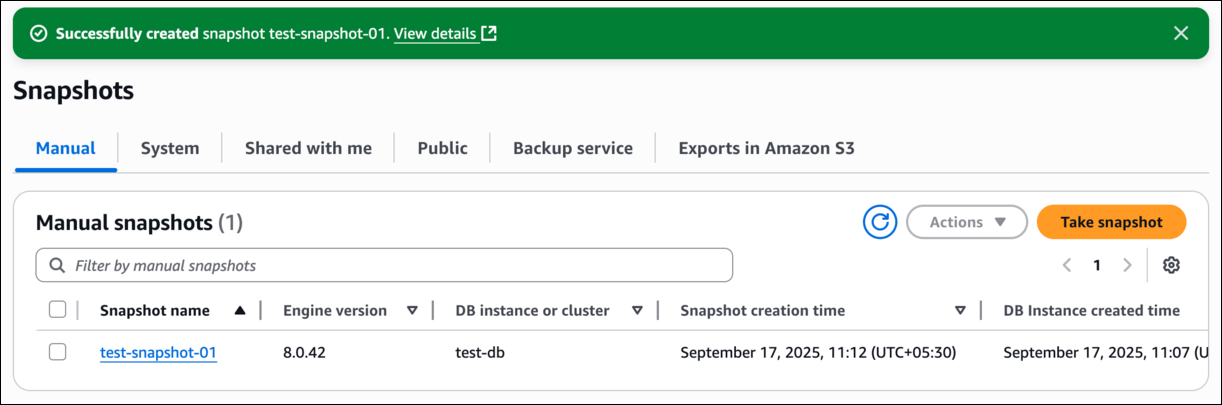
 4. The snapshot creation takes 3-5 minutes. Refresh after some time, the snapshot creation status will be **available**.
 #### Task 4: Make a copy of the snapshot and encrypt it
1. It is not possible to encrypt the snapshot in this stage. We need to encrypt the snapshot while taking a copy of it.
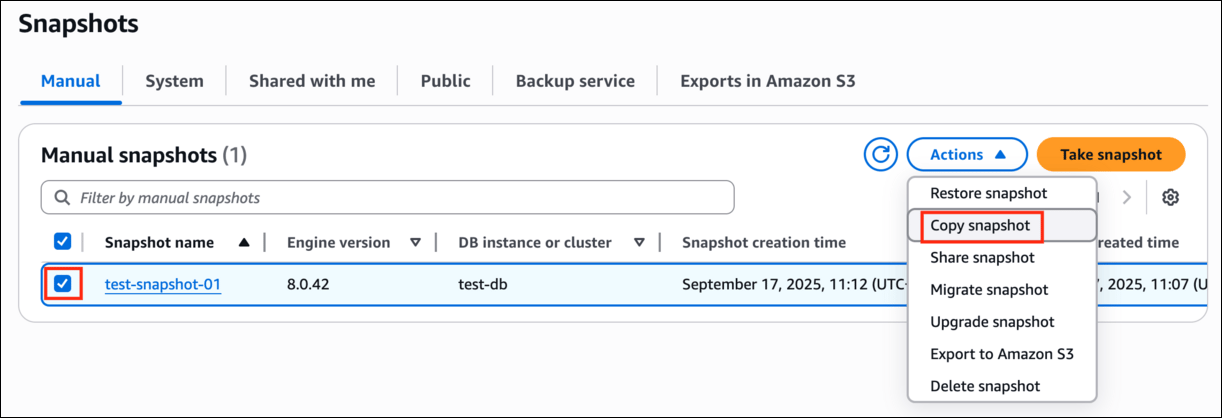
2. Under the **Manual snapshots**, select the created snapshot and click on **Actions**.
3. Click **Copy snapshot** from the options.
#### Task 4: Make a copy of the snapshot and encrypt it
1. It is not possible to encrypt the snapshot in this stage. We need to encrypt the snapshot while taking a copy of it.
2. Under the **Manual snapshots**, select the created snapshot and click on **Actions**.
3. Click **Copy snapshot** from the options.
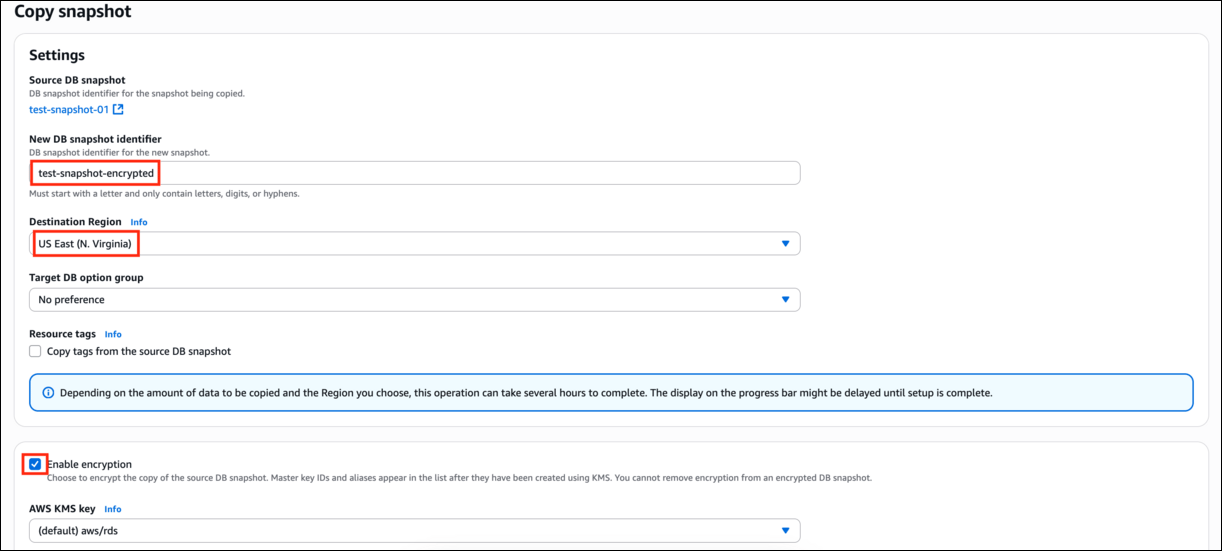
 4. Under settings, provide the following details.
* New DB Snapshot Identifier: Enter **test-snapshot-encrypted**
* Destination Region: Select **US East (N.Virginia)**
* Under **Encryption**, check **Enable Encryption**. Leave the master key as default.(**IMPORTANT**)
4. Under settings, provide the following details.
* New DB Snapshot Identifier: Enter **test-snapshot-encrypted**
* Destination Region: Select **US East (N.Virginia)**
* Under **Encryption**, check **Enable Encryption**. Leave the master key as default.(**IMPORTANT**)
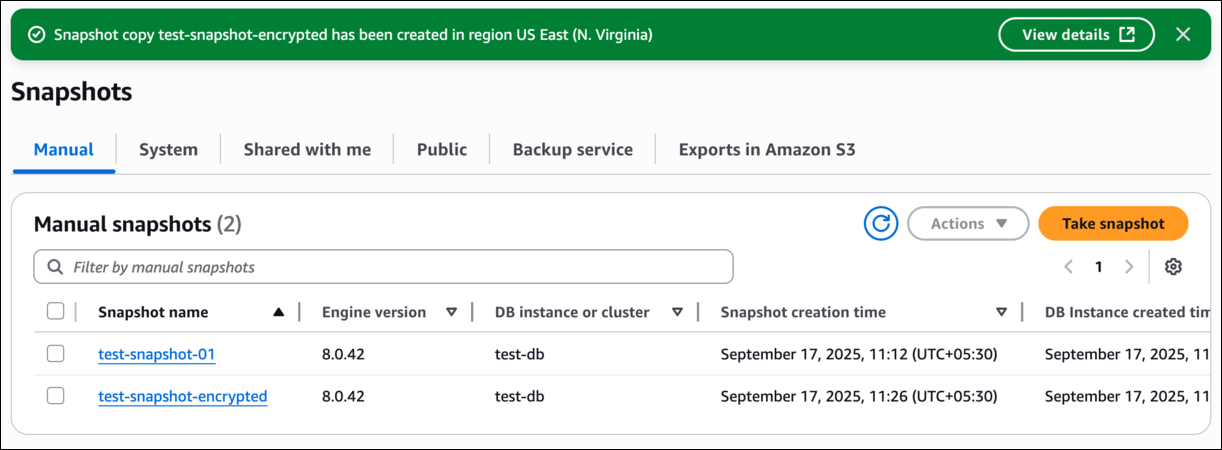
 5. Click on the **Copy snapshot** button. The snapshot will be created within 3 - 5 minutes.
 #### Task 5: Restore DB Instance from the encrypted snapshot
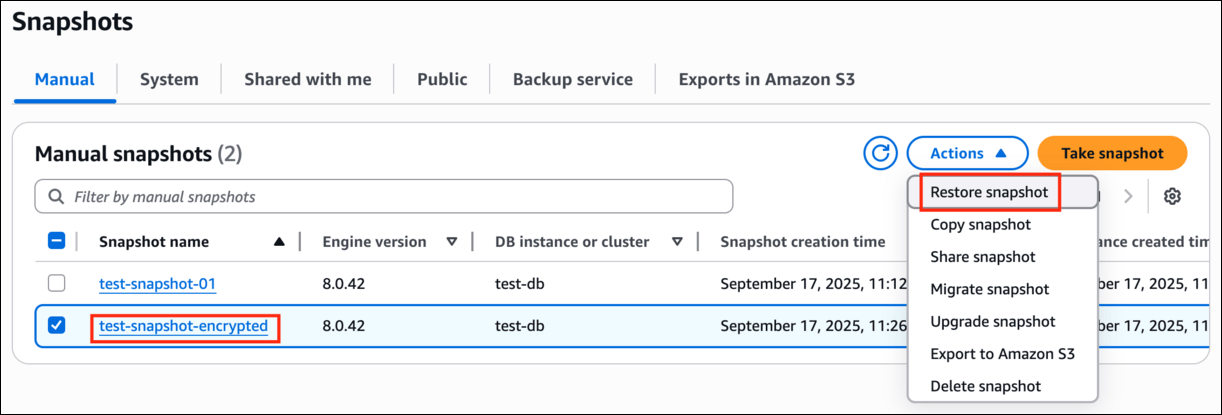
1. Click on the encrypted snapshot and click on **Actions**.
2. Click on **Restore snapshot** from the options.
#### Task 5: Restore DB Instance from the encrypted snapshot
1. Click on the encrypted snapshot and click on **Actions**.
2. Click on **Restore snapshot** from the options.
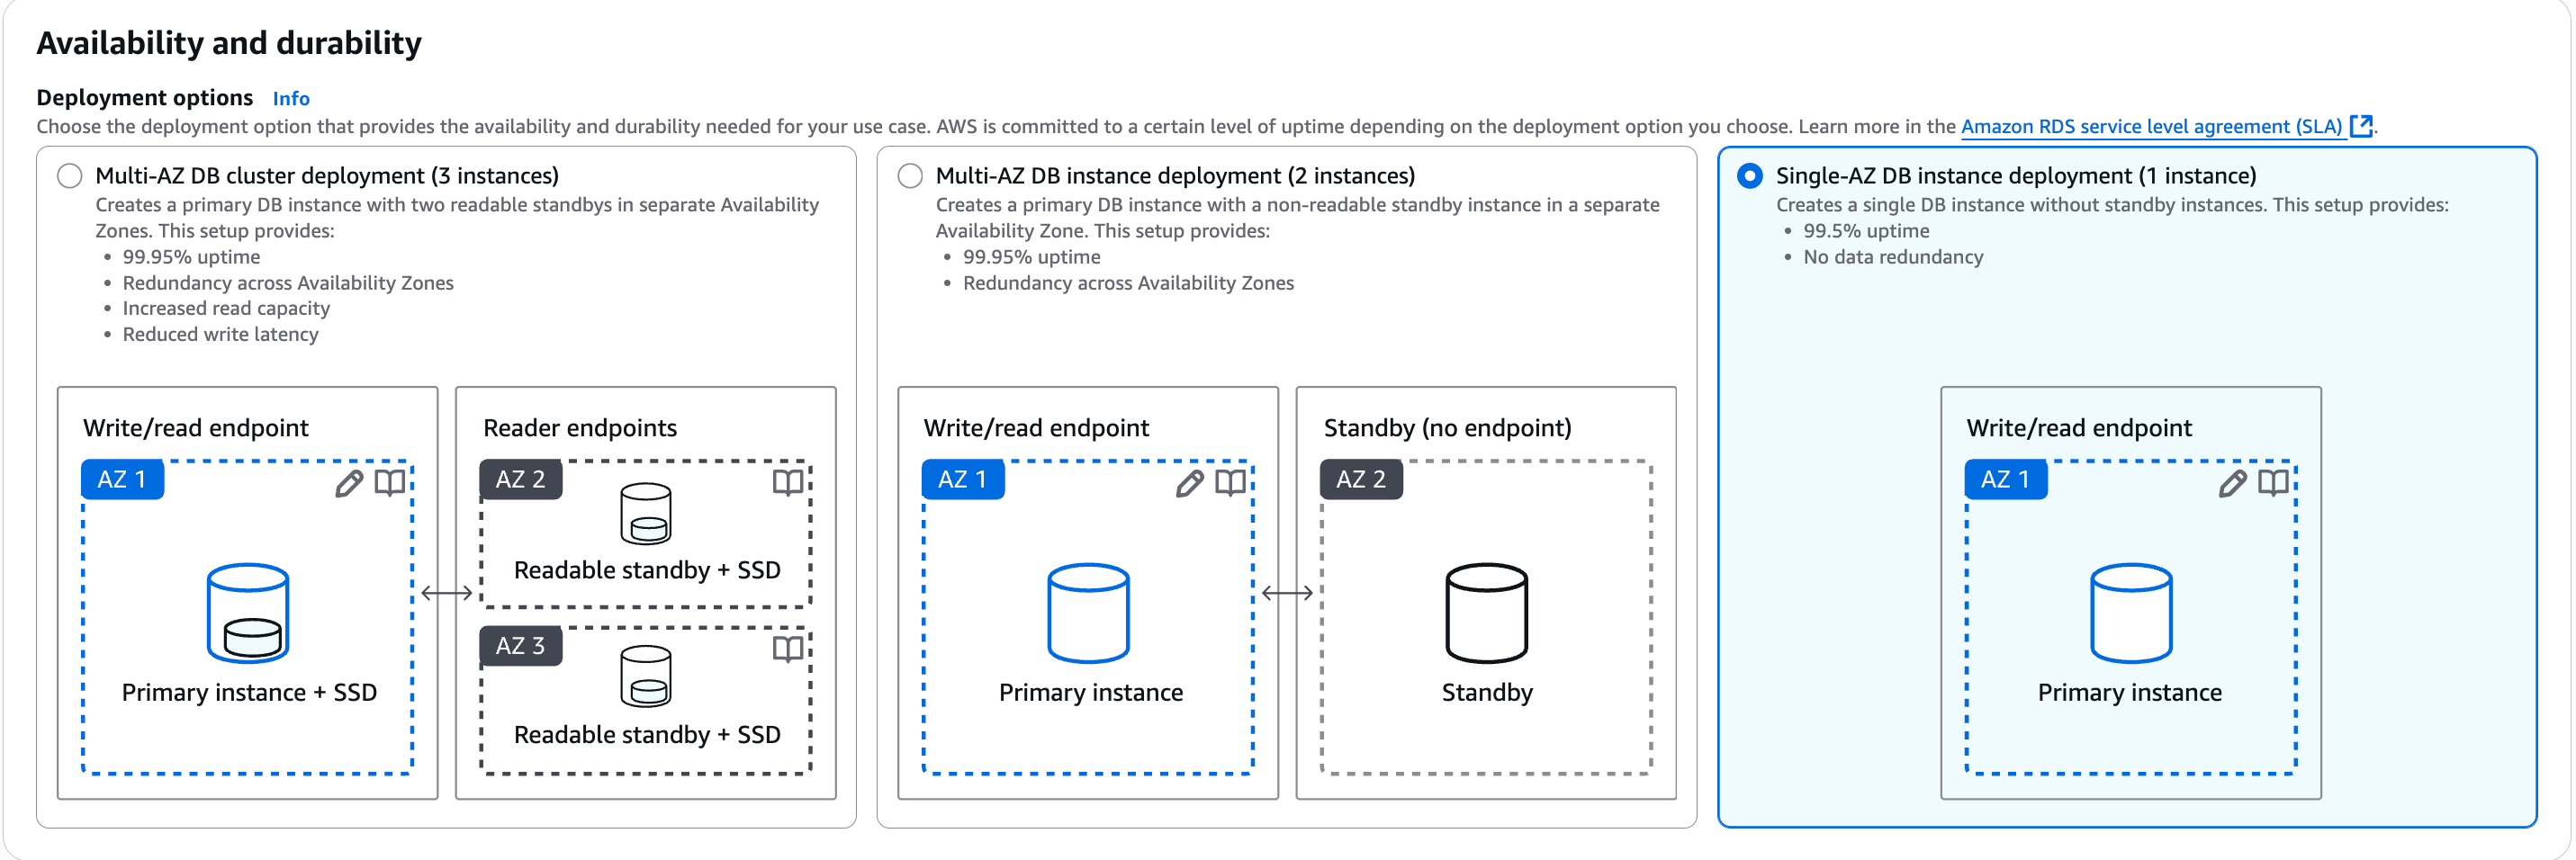
 3. Under **Availability and Durability** select Single DB Instance zone
 4. **Settings**, enter the name of DB Instance as **test-db-encrypted**.
5. Make the other settings exactly as the original DB Instance.
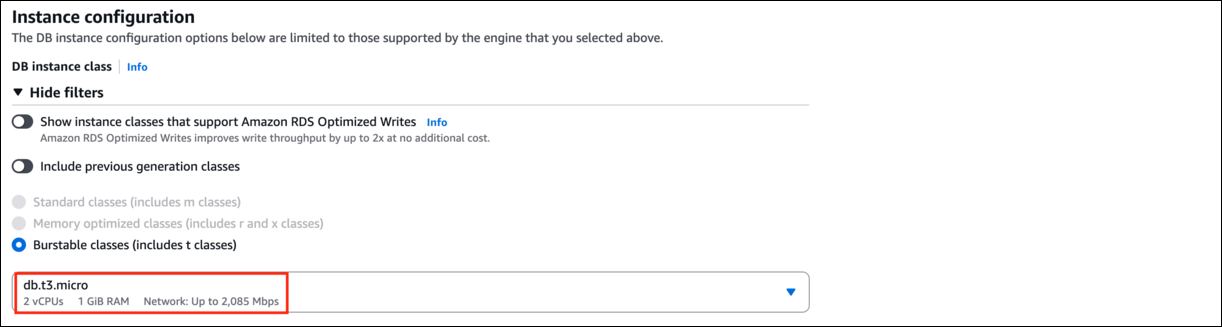
6. Under the **DB instance class**, select **Burstable classes (including t classes)** and select **db.t3.micro**
4. **Settings**, enter the name of DB Instance as **test-db-encrypted**.
5. Make the other settings exactly as the original DB Instance.
6. Under the **DB instance class**, select **Burstable classes (including t classes)** and select **db.t3.micro**
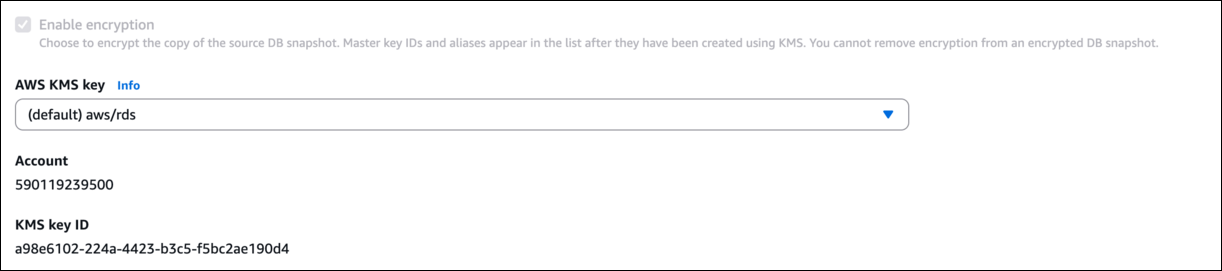
 7. Under **Encryption**, you can see the **Enable Encryption** is enabled and **cannot make changes since the snapshot is encrypted.**
 8. Leave **DB parameter group** and **Option group** as default.
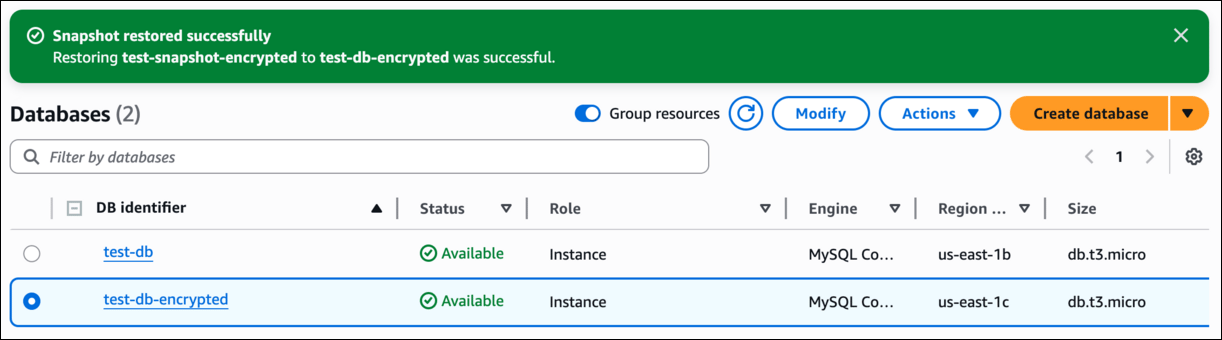
9. Click on **Restore DB Instance** button. The database creation takes around 5-10 minutes.
8. Leave **DB parameter group** and **Option group** as default.
9. Click on **Restore DB Instance** button. The database creation takes around 5-10 minutes.
 #### Task 6: Change the name of the original DB Instance
1. We have to make sure that the Endpoint of the restored DB Instance should be the same as the original DB Instance.
2. To do so, we have to change the names of the DB Instances as the names are unique.
3. Select the original DB Instance and click on **Modify**.
#### Task 6: Change the name of the original DB Instance
1. We have to make sure that the Endpoint of the restored DB Instance should be the same as the original DB Instance.
2. To do so, we have to change the names of the DB Instances as the names are unique.
3. Select the original DB Instance and click on **Modify**.
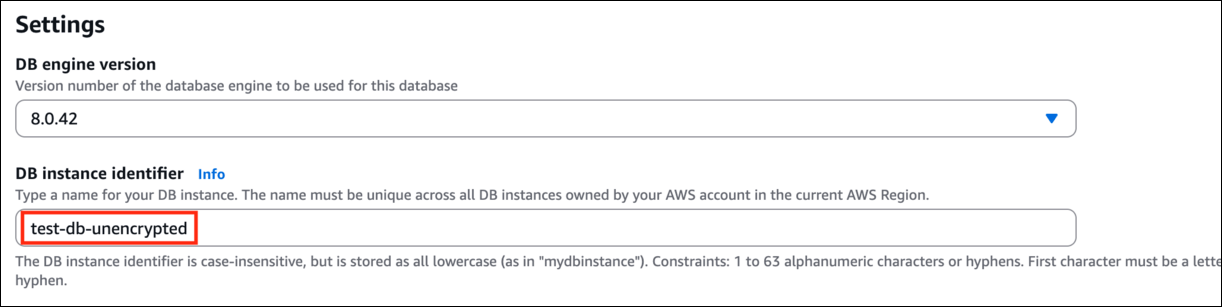
 4. Change the DB Instance Identifier to **test-db-unencrypted**.
 5. Leave everything as default and click on **Continue**.
6. Verify the new values of the DB Instance Identifier and the Endpoint.
7. Under **Scheduling of modifications**, select **Apply Immediately** and click on **Modify DB Instance** button.
5. Leave everything as default and click on **Continue**.
6. Verify the new values of the DB Instance Identifier and the Endpoint.
7. Under **Scheduling of modifications**, select **Apply Immediately** and click on **Modify DB Instance** button.
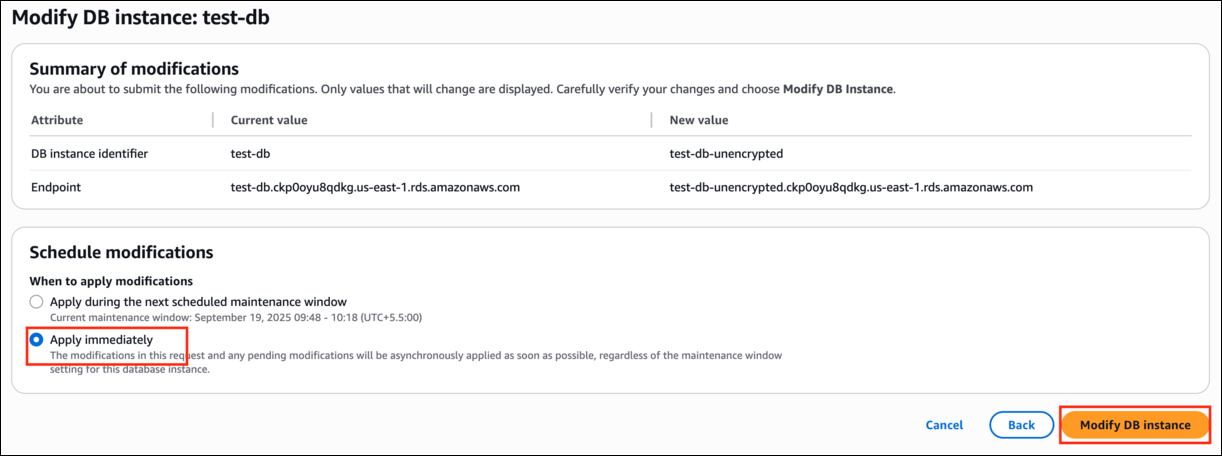 8. It might take some time to reboot the DB Instance. Press ctrl+R if you are not able to see the changes.
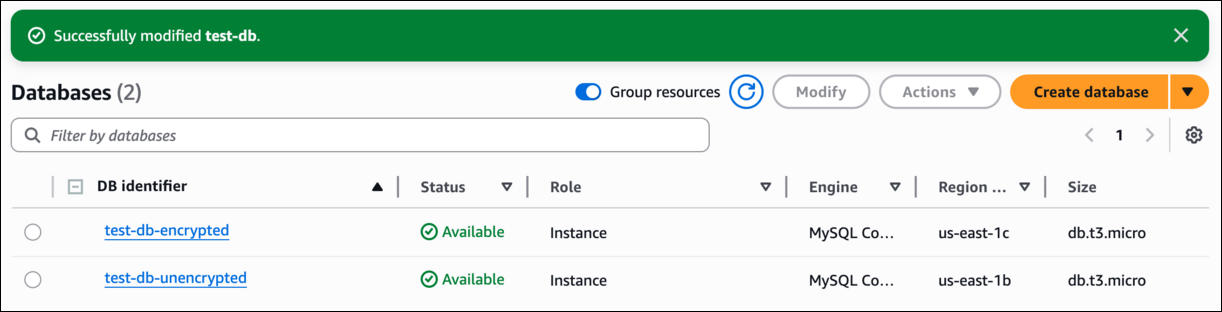 #### Task 7: Change the name of the Restored DB Instance to the original DB Instance name
1. Select on the restored database and click on **Modify**.
#### Task 7: Change the name of the Restored DB Instance to the original DB Instance name
1. Select on the restored database and click on **Modify**.
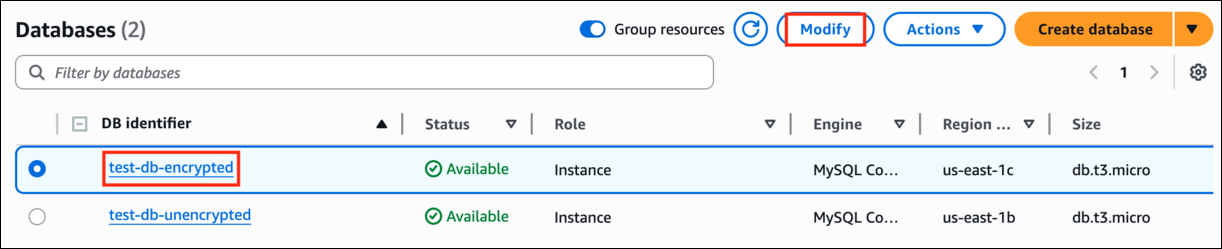 2. Change the DB Instance Identifier to **test-db**.
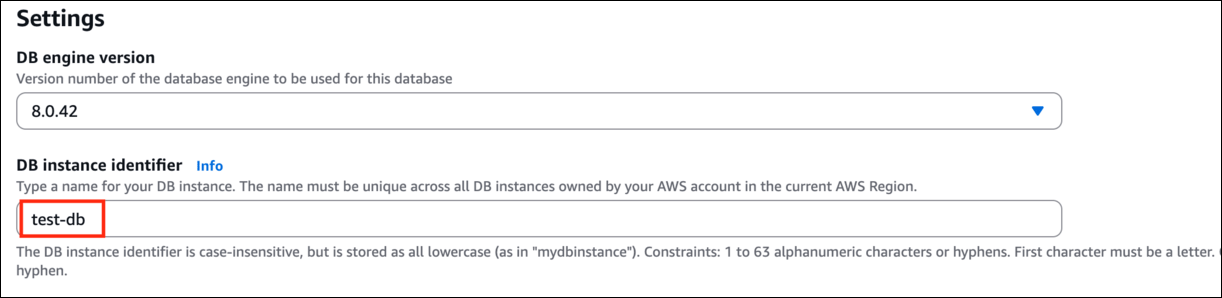 3. Leave everything as default and click on **Continue**.
4. Verify the new values of the DB Instance Identifier and the Endpoint.
5. Under **Scheduling of modifications**, select **Apply Immediately** and click on **Modify DB Instance** button.
3. Leave everything as default and click on **Continue**.
4. Verify the new values of the DB Instance Identifier and the Endpoint.
5. Under **Scheduling of modifications**, select **Apply Immediately** and click on **Modify DB Instance** button.
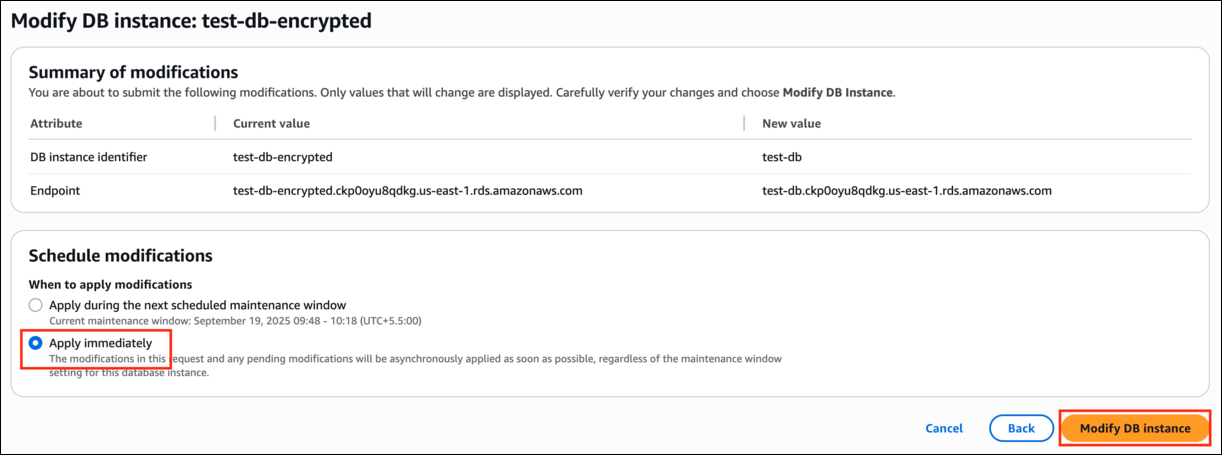 6. It might take some time to reboot the DB Instance. Press ctrl+R if you are not able to see the changes.
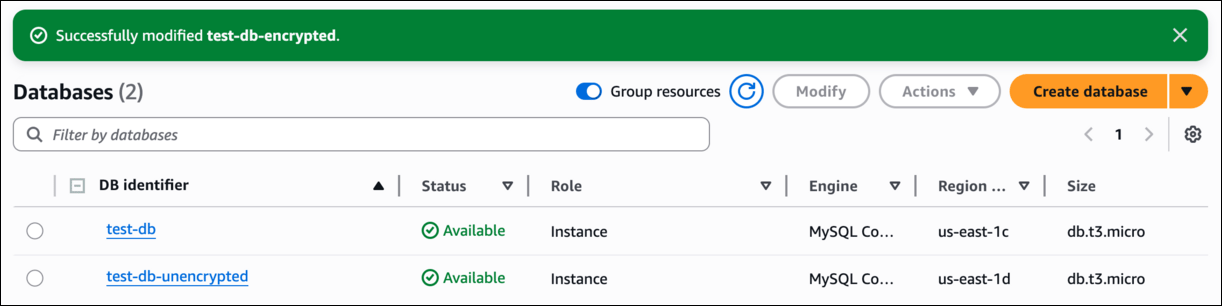 7. Once the database is modified, click and open **test-db** i.e, the encrypted DB Instance.
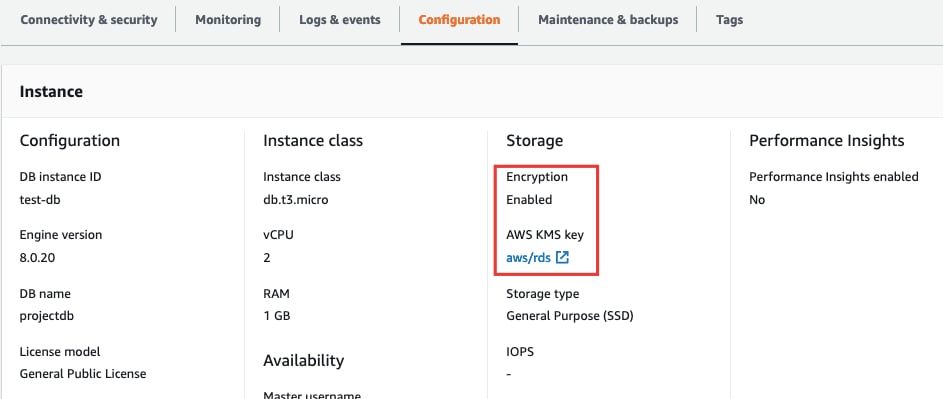
8. Click on the database and navigate to the **Configuration** tab. You can notice that the **Encryption** is **enabled**.
7. Once the database is modified, click and open **test-db** i.e, the encrypted DB Instance.
8. Click on the database and navigate to the **Configuration** tab. You can notice that the **Encryption** is **enabled**.
 #### Task 8: Delete the unencrypted RDS DB Instance and snapshot
1. Since we have the encrypted DB Instance, we shall delete the unencrypted DB Instance and the snapshot associated.
2. Click on **Databases** present to the left of the screen.
3. Select the Unencrypted DB Instance (i.e **test-db-unencrypted**) and click on **Actions**.
#### Task 8: Delete the unencrypted RDS DB Instance and snapshot
1. Since we have the encrypted DB Instance, we shall delete the unencrypted DB Instance and the snapshot associated.
2. Click on **Databases** present to the left of the screen.
3. Select the Unencrypted DB Instance (i.e **test-db-unencrypted**) and click on **Actions**.
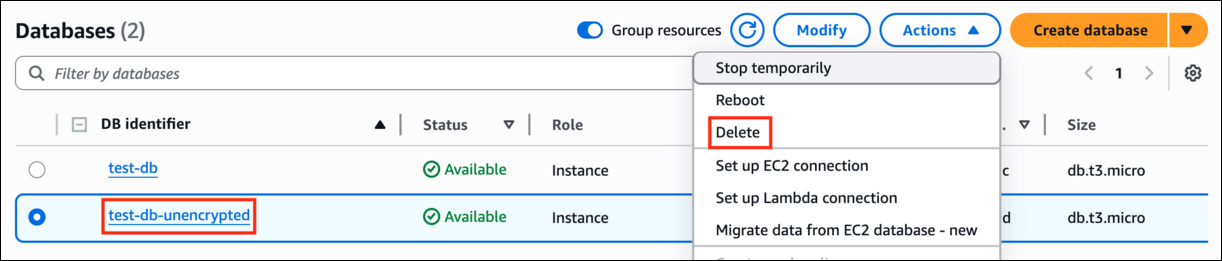 4. Click on the **Delete** option.
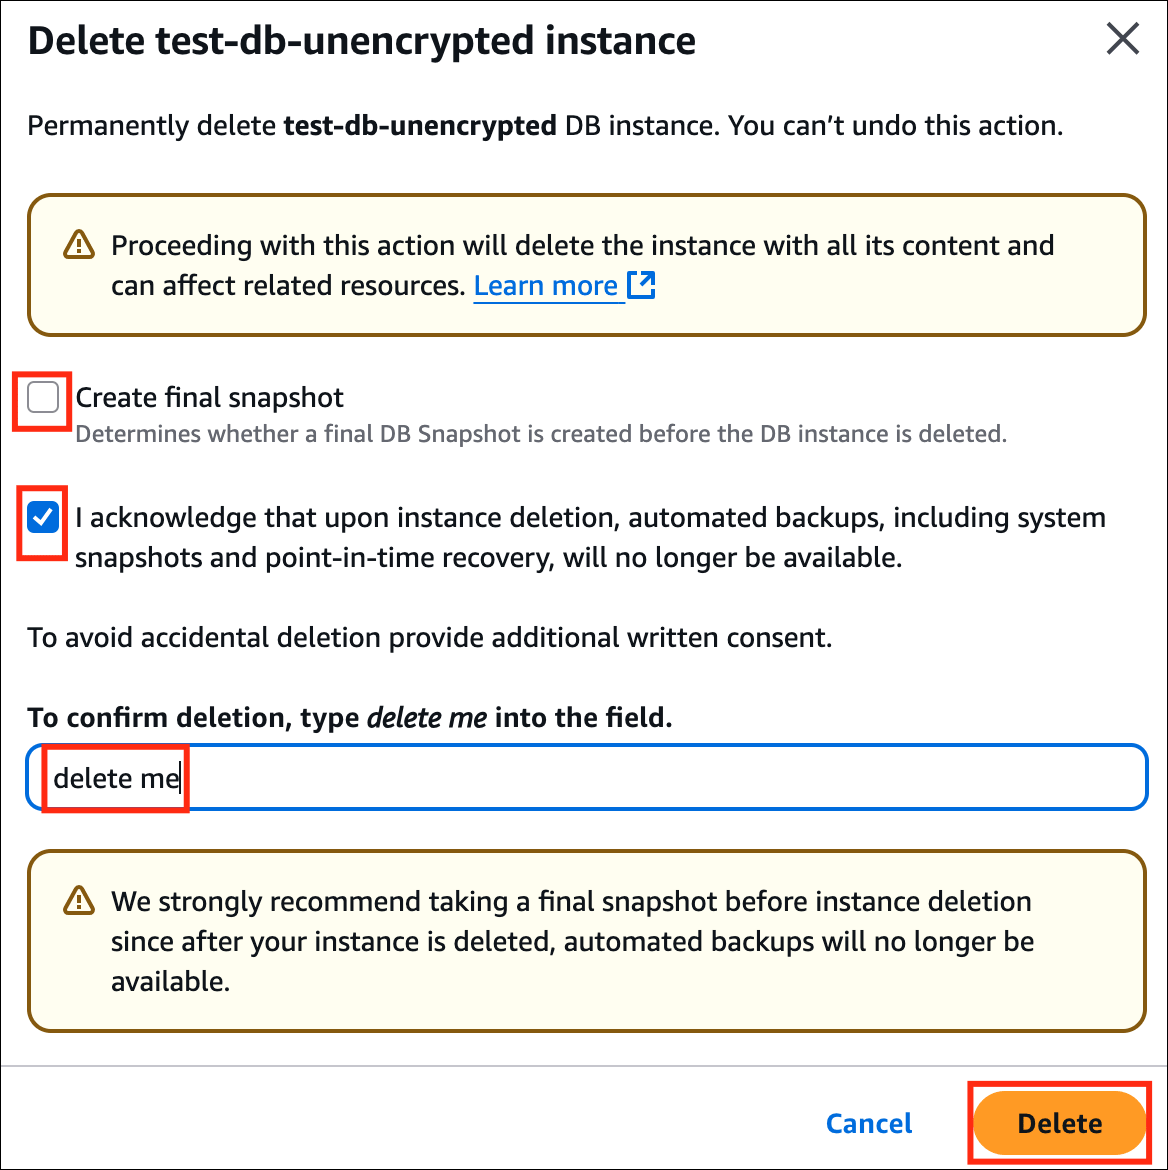
5. Uncheck the Create final snapshot option.
6. Check the Acknowledge box.
7. Confirm the deletion by entering **delete me** and click on **delete**.
4. Click on the **Delete** option.
5. Uncheck the Create final snapshot option.
6. Check the Acknowledge box.
7. Confirm the deletion by entering **delete me** and click on **delete**.
 8. Click on the **Snapshots** on the left of your screen.
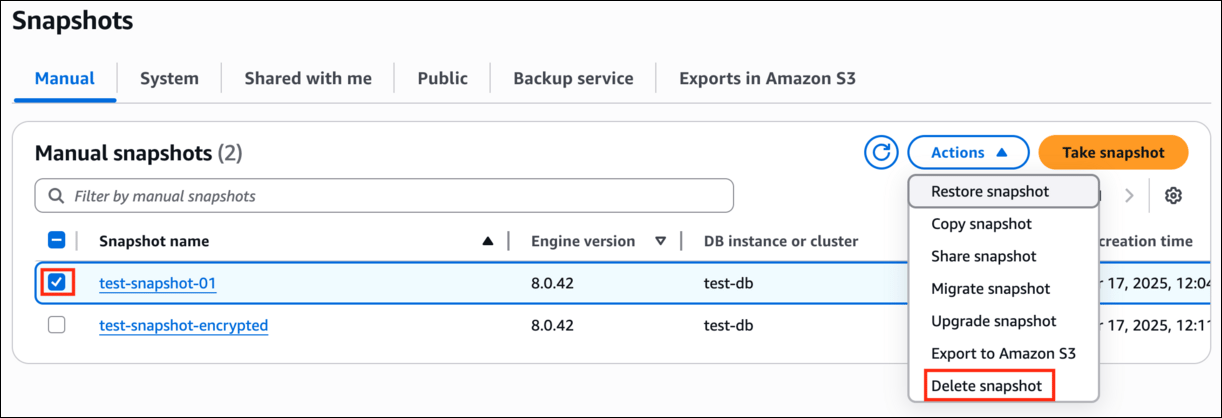
9. Under **Manual snapshots**, select the unencrypted snapshot (i.e. **test-snapshot-01**) and click on **Actions**.
10. Click on the **Delete snapshot** option.
8. Click on the **Snapshots** on the left of your screen.
9. Under **Manual snapshots**, select the unencrypted snapshot (i.e. **test-snapshot-01**) and click on **Actions**.
10. Click on the **Delete snapshot** option.
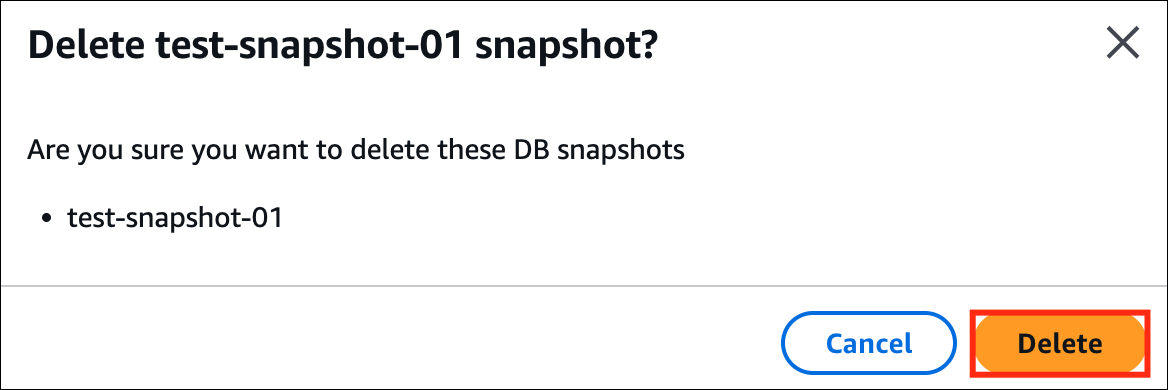
 11. Confirm by clicking on the **Delete** button.
 12. In this way, you can encrypt an unencrypted RDS DB Instance.
13. Wait till both resources are completely deleted. This step is to avoid confusion in the validation report.
> #### Do you know?
>
> Database encryption is a critical component of a comprehensive security strategy. It helps protect data from unauthorized access, complies with regulatory requirements, mitigates the impact of data breaches, enhances cloud security, builds trust with customers, and mitigates insider threats.
1. Once the lab steps are completed, please click on the **Validation** button on the right-side panel.
### Task 9: Delete AWS Resources
##### Deleting the DB Instance
1. Click on **Databases** present to the left of the screen.
2. Select the DB Instance and click on **Actions**.
3. Click on the **Delete** option.
12. In this way, you can encrypt an unencrypted RDS DB Instance.
13. Wait till both resources are completely deleted. This step is to avoid confusion in the validation report.
> #### Do you know?
>
> Database encryption is a critical component of a comprehensive security strategy. It helps protect data from unauthorized access, complies with regulatory requirements, mitigates the impact of data breaches, enhances cloud security, builds trust with customers, and mitigates insider threats.
1. Once the lab steps are completed, please click on the **Validation** button on the right-side panel.
### Task 9: Delete AWS Resources
##### Deleting the DB Instance
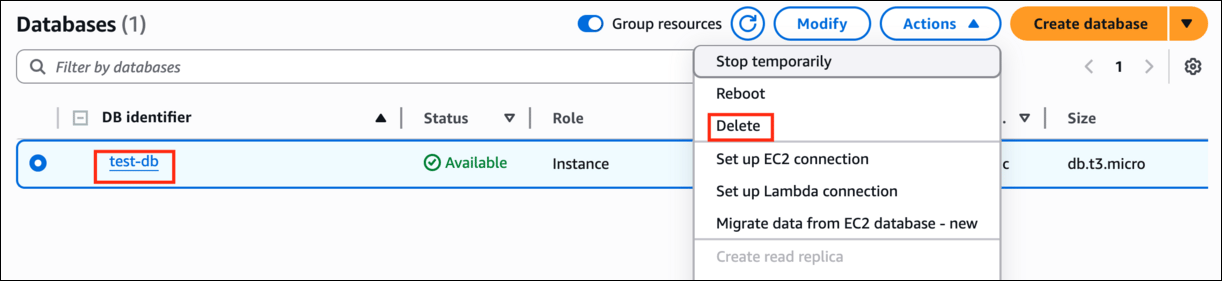
1. Click on **Databases** present to the left of the screen.
2. Select the DB Instance and click on **Actions**.
3. Click on the **Delete** option.
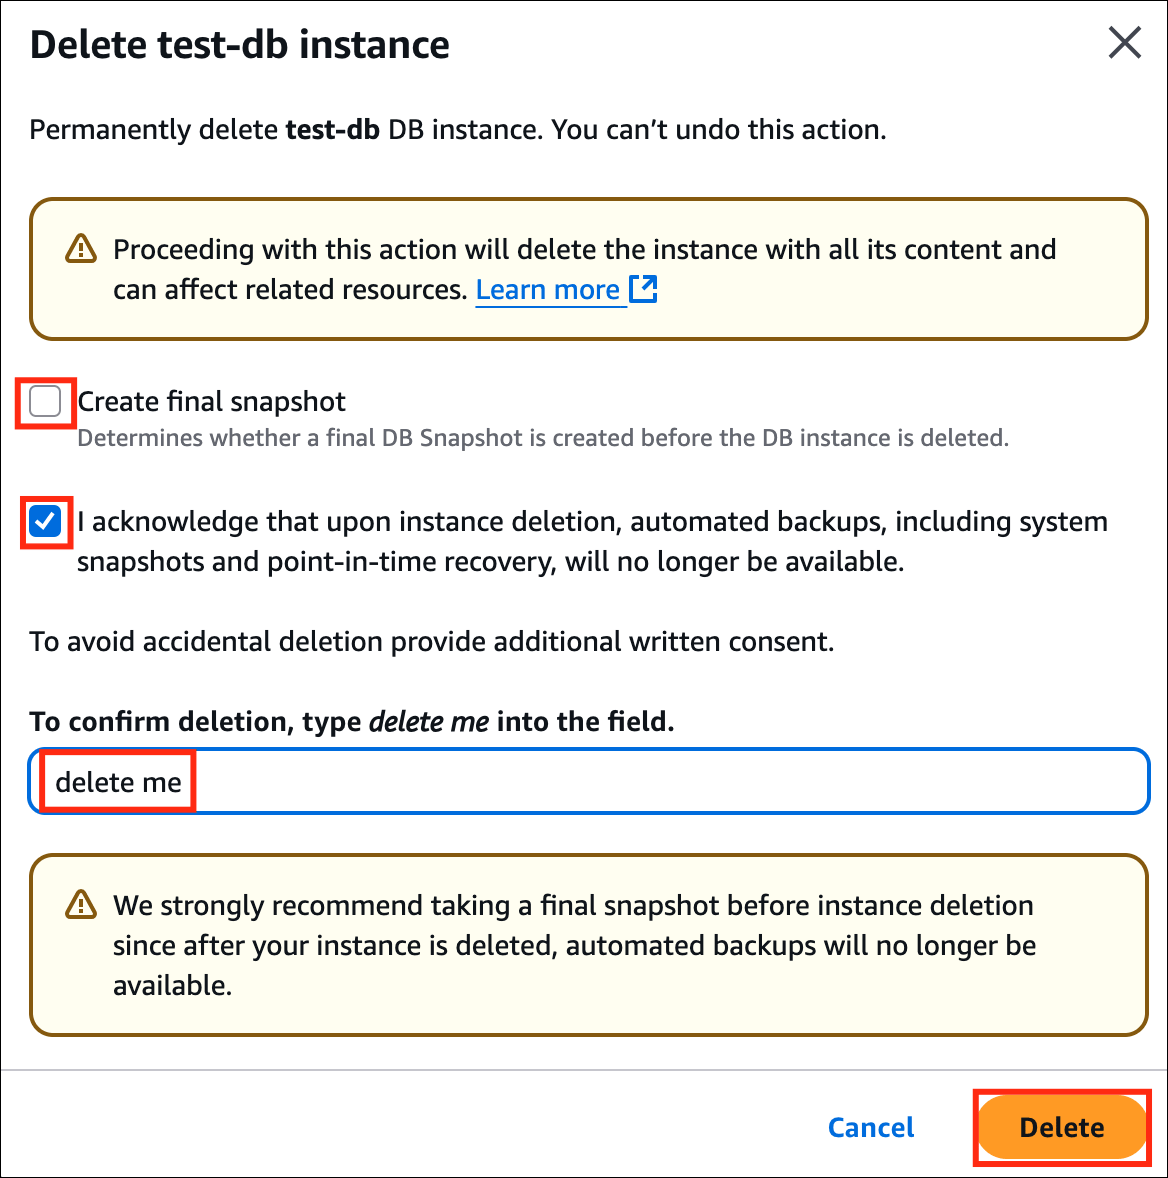
 4. Uncheck the Create final snapshot option.
5. Check the Acknowledge box.
6. Confirm the deletion by entering **delete me** and click on **delete**.
4. Uncheck the Create final snapshot option.
5. Check the Acknowledge box.
6. Confirm the deletion by entering **delete me** and click on **delete**.
 7. The status changes to **Deleting** and the DB Instance gets deleted.
8. You can proceed to further steps even if it is in a **deleting** state.
##### Deleting the Snapshot
1. Click on the **Snapshots** on the left of your screen. Under **Manual snapshots**, select the unencrypted snapshot and click on **Actions**.
2. Click on the **Delete Snapshot** option.
7. The status changes to **Deleting** and the DB Instance gets deleted.
8. You can proceed to further steps even if it is in a **deleting** state.
##### Deleting the Snapshot
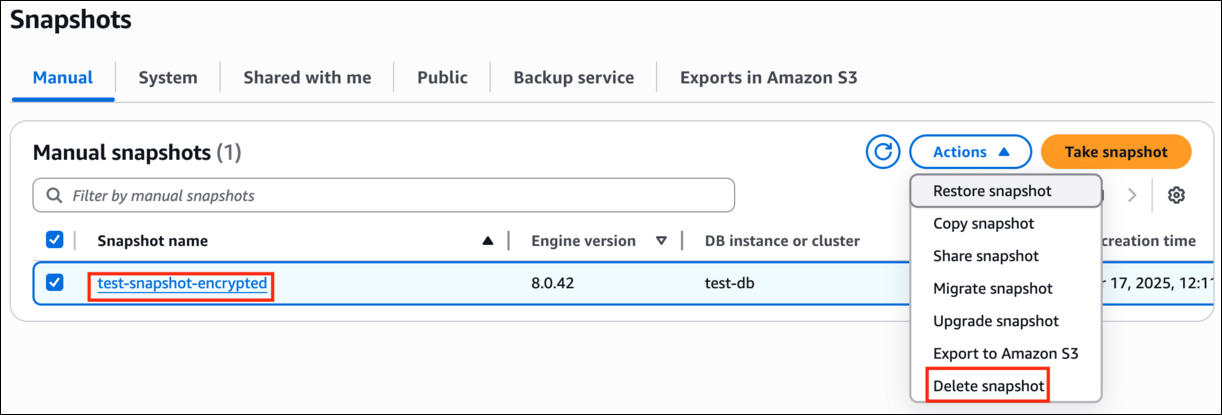
1. Click on the **Snapshots** on the left of your screen. Under **Manual snapshots**, select the unencrypted snapshot and click on **Actions**.
2. Click on the **Delete Snapshot** option.
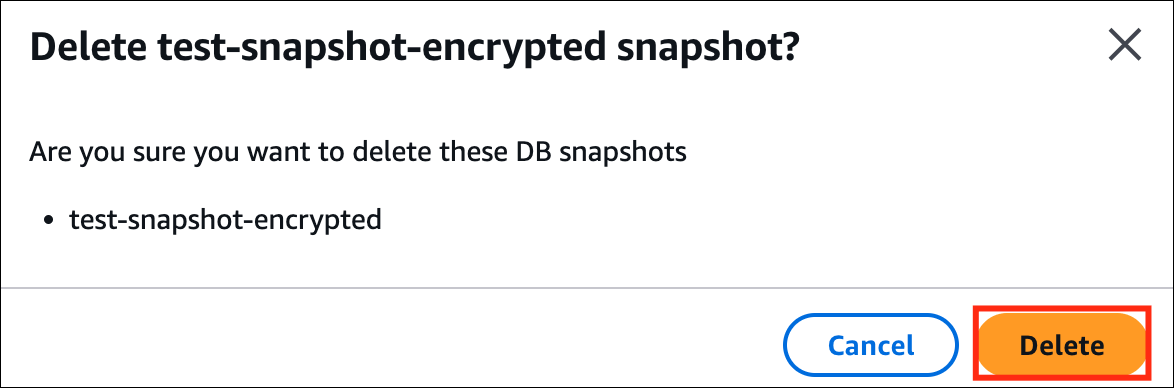
 3. Confirm by clicking on the **Delete** button.
 ### Completion and Conclusion
1. You have created an unencrypted Amazon RDS DB Instance.
2. You have taken the snapshot of the DB Instance.
3. You have made a copy of the snapshot and encrypted it.
4. You have restored the DB Instance with the copied snapshot.
5. You have changed the names of the original and restored DB instances.
6. You have made sure that the Endpoint of the restored database is the same as the originally created DB Instance.
7. You have deleted the Unencrypted DB Instance and snapshot.
### End Lab
1. Sign out of AWS Management Console.
2. You have successfully completed the lab.
3. Once you have completed the steps, click on **End Lab** from your IP Lab Portal and wait till the process gets completed.
## What gets checked
When you press **Check my work**, the platform verifies each of these:
* **Launch RDS instance** — Check whether an RDS Instance is created or not
* **Create RDS Snapshot** — Check whether an RDS Snapshot is created or not.
## Related help
* [FAQs and Troubleshooting](/aws-saa/support/faqs-and-troubleshooting)
This documentation is built and hosted on [Mintlify](https://mintlify.com), a developer documentation platform.
### Completion and Conclusion
1. You have created an unencrypted Amazon RDS DB Instance.
2. You have taken the snapshot of the DB Instance.
3. You have made a copy of the snapshot and encrypted it.
4. You have restored the DB Instance with the copied snapshot.
5. You have changed the names of the original and restored DB instances.
6. You have made sure that the Endpoint of the restored database is the same as the originally created DB Instance.
7. You have deleted the Unencrypted DB Instance and snapshot.
### End Lab
1. Sign out of AWS Management Console.
2. You have successfully completed the lab.
3. Once you have completed the steps, click on **End Lab** from your IP Lab Portal and wait till the process gets completed.
## What gets checked
When you press **Check my work**, the platform verifies each of these:
* **Launch RDS instance** — Check whether an RDS Instance is created or not
* **Create RDS Snapshot** — Check whether an RDS Snapshot is created or not.
## Related help
* [FAQs and Troubleshooting](/aws-saa/support/faqs-and-troubleshooting)
This documentation is built and hosted on [Mintlify](https://mintlify.com), a developer documentation platform.