> ## Documentation Index
> Fetch the complete documentation index at: https://cloud-architect.ipoint-labs.com/llms.txt
> Use this file to discover all available pages before exploring further.
# AWS VPC NACL Lab - Case study
> Hands-on lab · 45m
Launch this lab in the IP Lab Portal, then follow the steps below in the AWS console.
Open IP Lab Portal
## Overview
### Lab Details
1. This Lab walks you through the steps to create a custom NACL and associate the NACL to subnets.
2. Duration: **1 hour**
3. AWS Region: **US East (N. Virginia)** **us-east-1**
#### Introduction
1. Overview of AWS VPC: Provide a brief explanation of what Amazon Virtual Private Cloud (VPC) is and its significance in the AWS ecosystem. Emphasize the concept of virtual networks, subnets, and their role in achieving network isolation and security in the cloud.
2. Introduction to Network Access Control Lists (NACLs): Explain the purpose and functionality of NACLs within an AWS VPC. Highlight that NACLs act as a firewall for controlling traffic at the subnet level, allowing or denying inbound and outbound traffic based on user-defined rules.
3. Importance of NACLs: Discuss the significance of NACLs in enhancing the security posture of an AWS VPC. Explain that NACLs complement security groups by providing an additional layer of defense, enabling more granular control over traffic flows.
4. Lab Objective: Describe the main objective of the AWS VPC NACL Lab. Emphasize that the lab aims to provide participants with practical experience in configuring NACL rules and understanding their impact on network traffic.
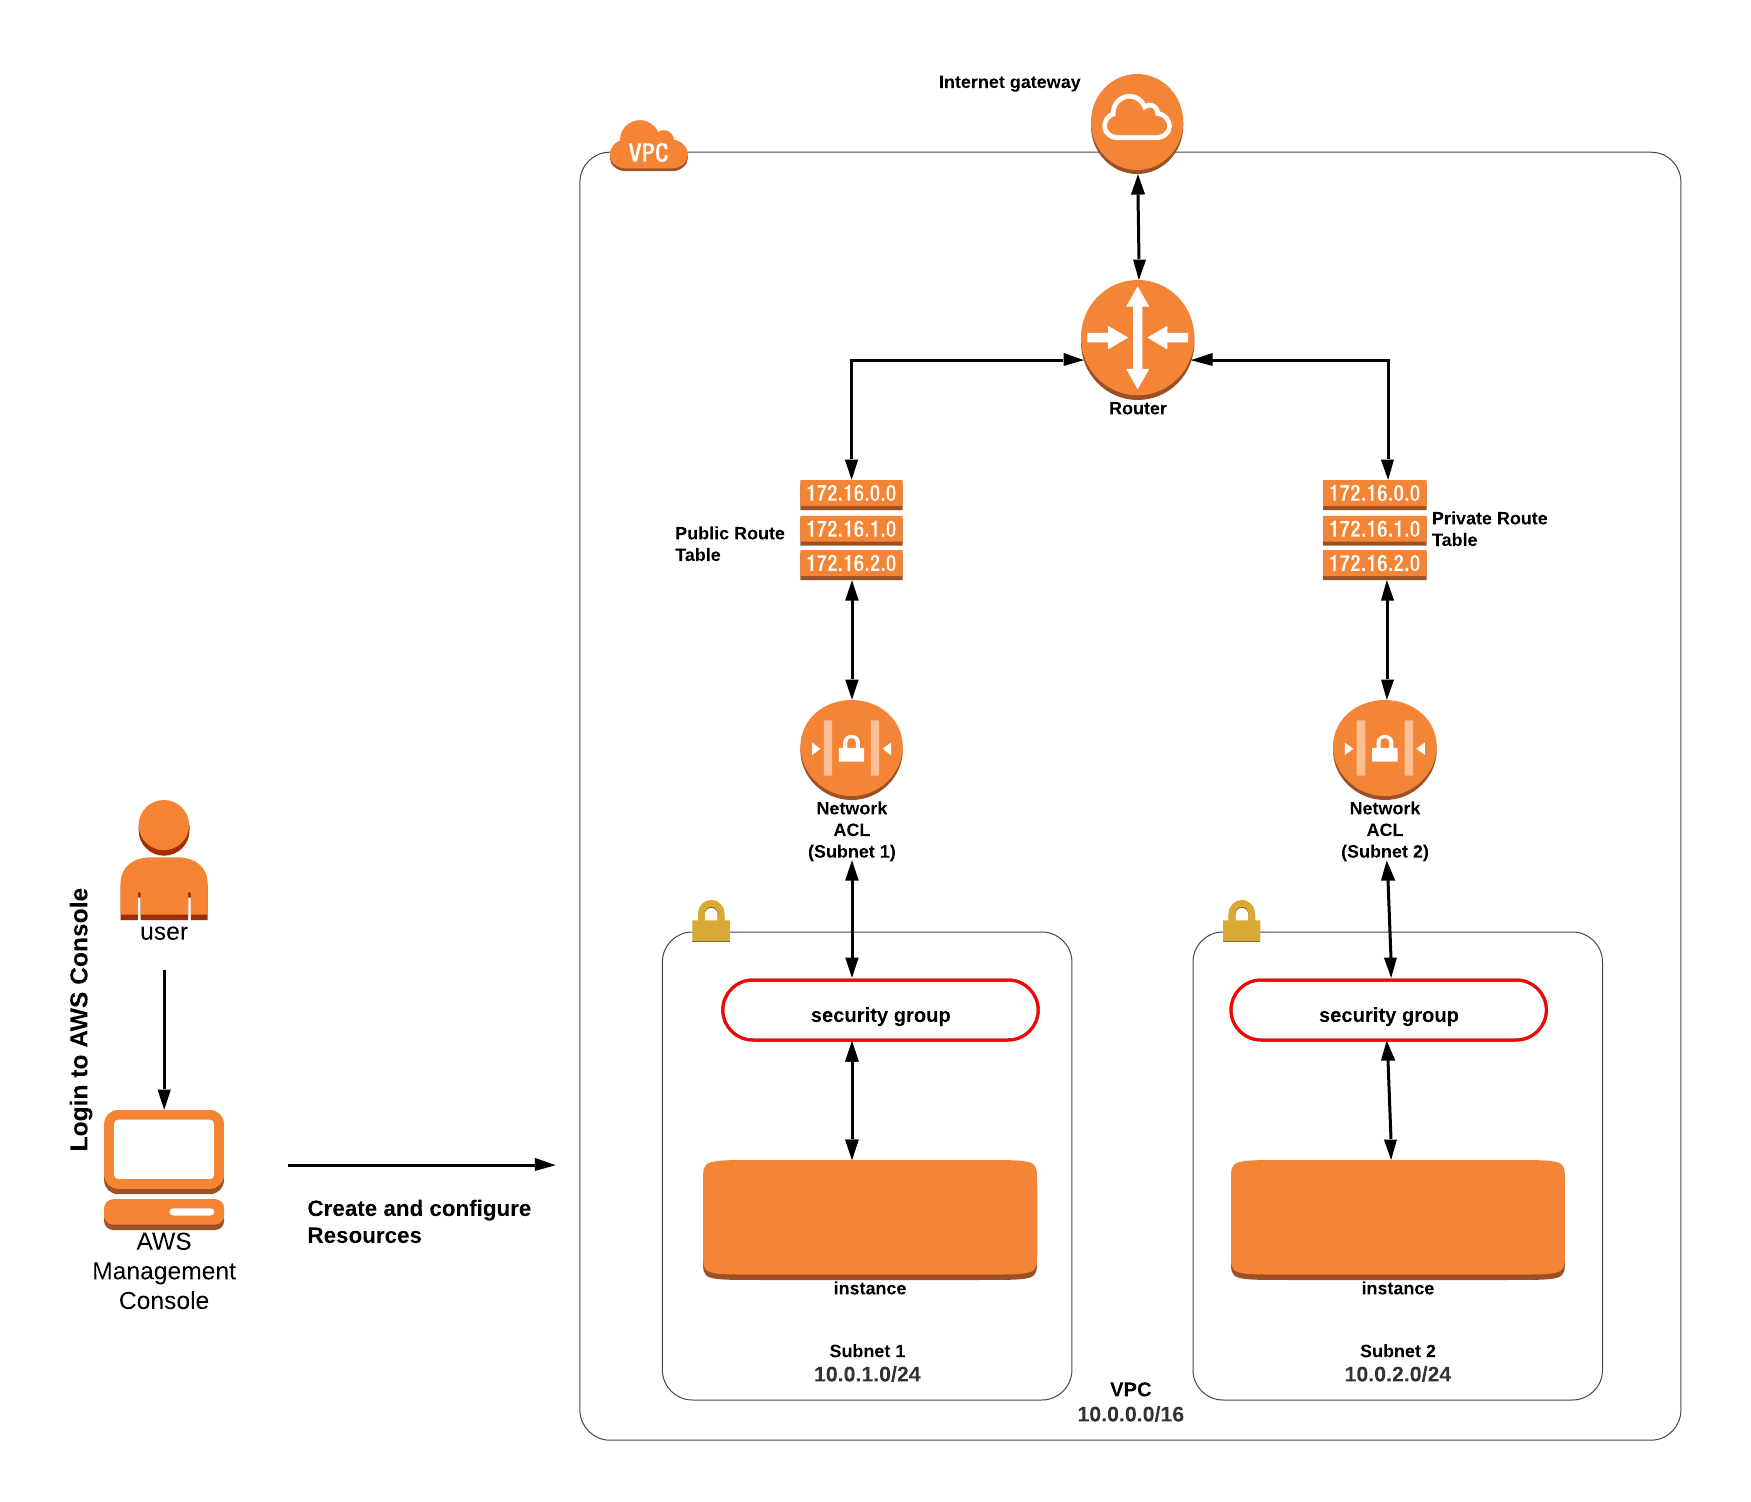
5. Lab Environment: Provide an overview of the lab environment, detailing the pre-configured AWS resources such as VPCs, subnets, and instances that participants will use during the lab. Mention any additional tools or services utilized to facilitate the lab exercise.
6. Lab Tasks: Outline the specific tasks participants will perform in the lab, such as creating NACLs, defining inbound and outbound rules, associating NACLs with subnets, and observing the effects of these rules on network traffic.
7. Learning Outcomes: Highlight the key learning outcomes participants can expect from the AWS VPC NACL Lab. These may include a better understanding of NACL functionality, improved ability to configure secure networking within an AWS VPC, and familiarity with troubleshooting common NACL-related issues.
8. Conclusion: Summarize the importance of NACLs in securing AWS VPCs and how the AWS VPC NACL Lab provides a hands-on learning experience to reinforce this knowledge. Encourage participants to actively engage with the lab and explore different scenarios to enhance their understanding of NACLs.
#### Architecture Diagram
 ### Task Details
1. Sign into the AWS Management Console
2. Creating a New VPC
3. Create Subnets
4. Create and attach an Internet Gateway
5. Create Route Tables and Associate them it with Subnets
6. Update Route Table and Configure the Internet Gateway
7. Enabling Auto-Assign Public IP for Public Subnets
8. Launching an EC2 Instance in the Public Subnet
9. Launching an EC2 Instance in the Private Subnet
10. Testing Both EC2 instances.
11. Creating Custom NACL and Associate it to the Subnet
12. Testing the Public and Private Server
13. Adding Rules to Custom NACL (MyPublicNACL)
14. Testing Both EC2 instances
### Launching Lab Environment
1. To launch the lab environment, Click on the **Start Lab** button.
2. Please wait until the cloud environment is provisioned. It will take less than a minute to provision.
3. Once the Lab is started, you will be provided with **IAM user name**, **Password**, **Access** **Key**, and **Secret** **Access** **Key**.
> **Note** : You can only start one lab at any given time
## Lab guide
### Lab Steps
#### Task 1: Sign in to AWS Management Console
1. Click on the **Open Console** button, and you will get redirected to AWS Console in a new browser tab.
2. On the AWS sign-in page,
* Leave the Account ID as default. Never edit/remove the 12 digit Account ID present in the AWS Console. otherwise, you cannot proceed with the lab.
* Now copy your **User Name** and **Password** in the Lab Console to the **IAM Username and Password** in AWS Console and click on the **Sign in** button.
3. Once Signed In to the AWS Management Console, Make the default AWS Region as **US East (N. Virginia) us-east-1.**
#### Task 2: Creating a New VPC
1. Navigate to VPC by clicking on the **Services** button on the top of the AWS Console.
2. Click on **VPC** (under **Networking & Content Delivery** section) or you can also search for VPC.
3. Click on **Your VPCs** from the left menu.
4. Here you can see the list of all VPC. No need to do anything yet. We will create a new VPC for this lab.
5. Click on **Create VPC**.
* **Name tag:** Enter ***MyVPC***
* **IPv4 CIDR block:** Enter ***10.0.0.0/16***
* **IPv6 CIDR block:** No need to change this, make sure **No IPv6 CIDR Block** is checked.
* **Tenancy:** No need to change this, just be sure **Default** is selected.
* Click on **Create VPC**.
6. Once the VPC is created, it will look like the example below:
### Task Details
1. Sign into the AWS Management Console
2. Creating a New VPC
3. Create Subnets
4. Create and attach an Internet Gateway
5. Create Route Tables and Associate them it with Subnets
6. Update Route Table and Configure the Internet Gateway
7. Enabling Auto-Assign Public IP for Public Subnets
8. Launching an EC2 Instance in the Public Subnet
9. Launching an EC2 Instance in the Private Subnet
10. Testing Both EC2 instances.
11. Creating Custom NACL and Associate it to the Subnet
12. Testing the Public and Private Server
13. Adding Rules to Custom NACL (MyPublicNACL)
14. Testing Both EC2 instances
### Launching Lab Environment
1. To launch the lab environment, Click on the **Start Lab** button.
2. Please wait until the cloud environment is provisioned. It will take less than a minute to provision.
3. Once the Lab is started, you will be provided with **IAM user name**, **Password**, **Access** **Key**, and **Secret** **Access** **Key**.
> **Note** : You can only start one lab at any given time
## Lab guide
### Lab Steps
#### Task 1: Sign in to AWS Management Console
1. Click on the **Open Console** button, and you will get redirected to AWS Console in a new browser tab.
2. On the AWS sign-in page,
* Leave the Account ID as default. Never edit/remove the 12 digit Account ID present in the AWS Console. otherwise, you cannot proceed with the lab.
* Now copy your **User Name** and **Password** in the Lab Console to the **IAM Username and Password** in AWS Console and click on the **Sign in** button.
3. Once Signed In to the AWS Management Console, Make the default AWS Region as **US East (N. Virginia) us-east-1.**
#### Task 2: Creating a New VPC
1. Navigate to VPC by clicking on the **Services** button on the top of the AWS Console.
2. Click on **VPC** (under **Networking & Content Delivery** section) or you can also search for VPC.
3. Click on **Your VPCs** from the left menu.
4. Here you can see the list of all VPC. No need to do anything yet. We will create a new VPC for this lab.
5. Click on **Create VPC**.
* **Name tag:** Enter ***MyVPC***
* **IPv4 CIDR block:** Enter ***10.0.0.0/16***
* **IPv6 CIDR block:** No need to change this, make sure **No IPv6 CIDR Block** is checked.
* **Tenancy:** No need to change this, just be sure **Default** is selected.
* Click on **Create VPC**.
6. Once the VPC is created, it will look like the example below:
 #### Task 3: Creating Subnets
**Note:** In this lab, we will create one public subnet and a private subnet in us-east-1a and us-east-1b Availability Zones.
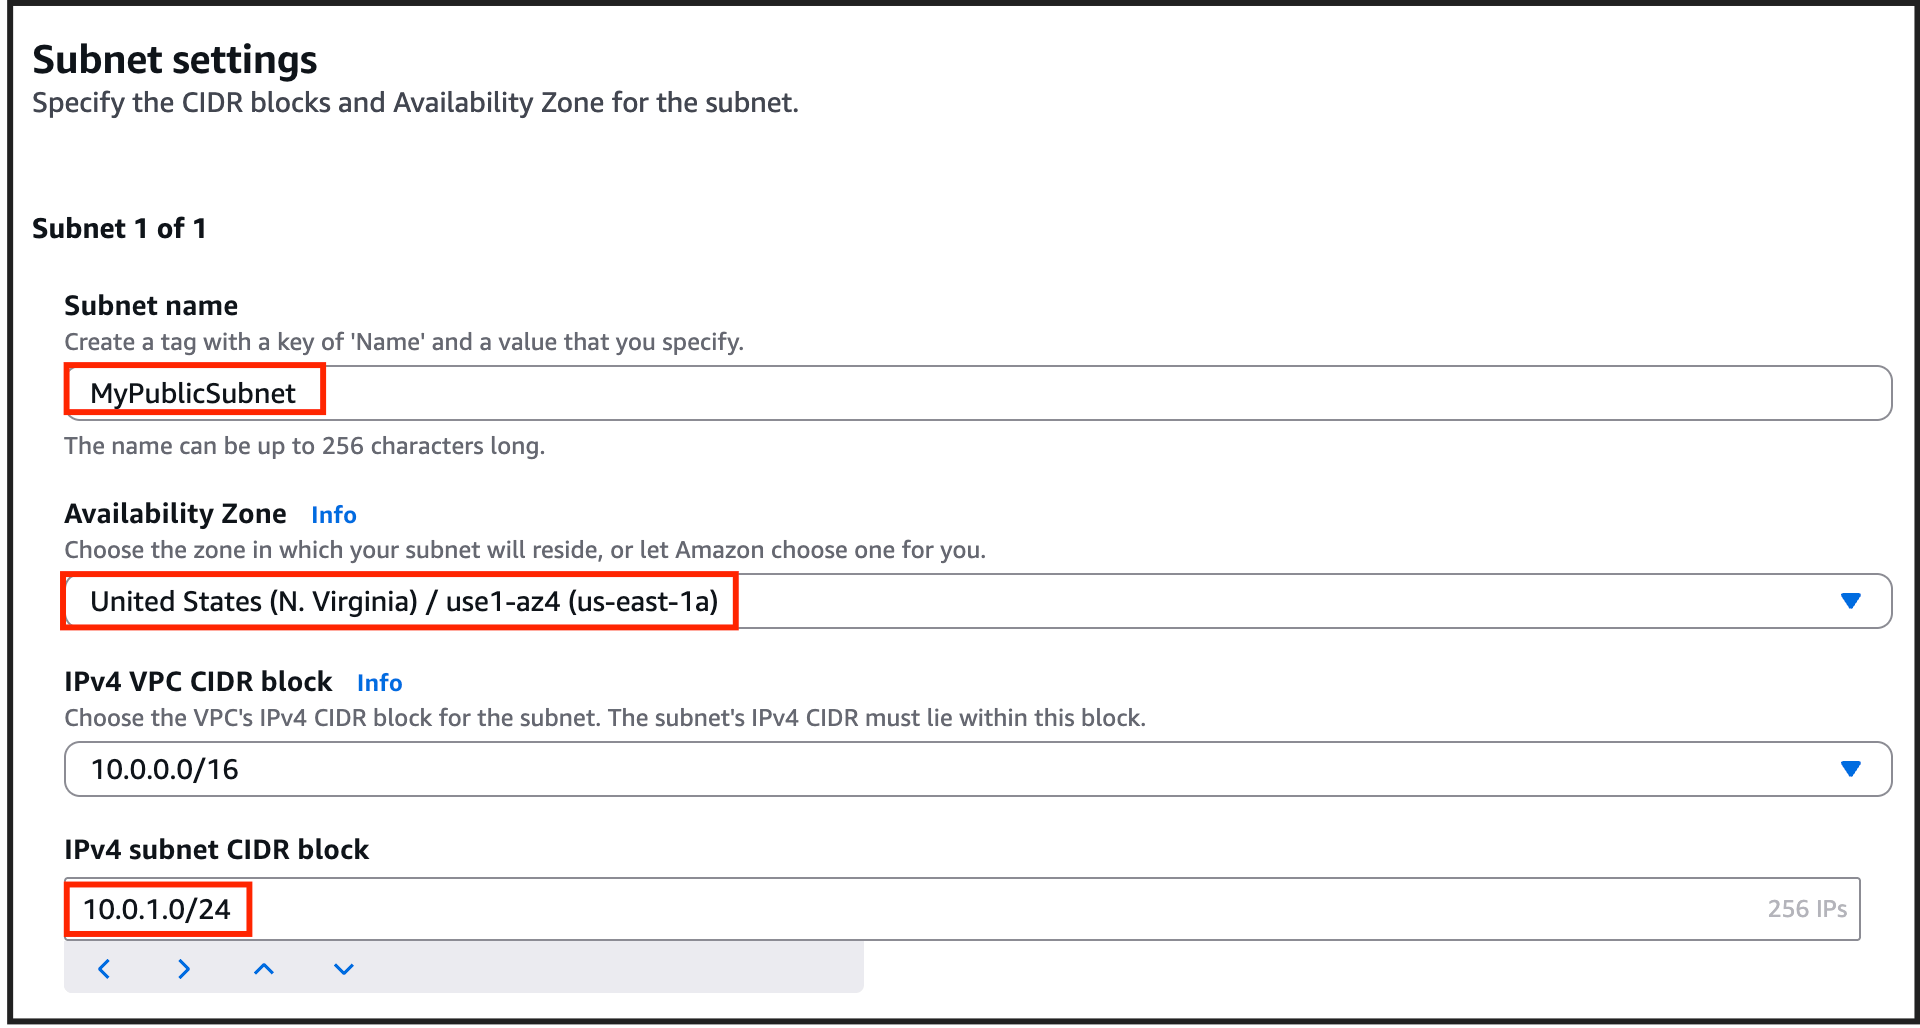
1. For the Public Subnet\*\*,\*\* click on **Subnets** from the left menu and click on **Create subnet.**
* **VPC ID :** Select **MyVPC** from the list.
* **Subnet Name :** Enter ***MyPublicSubnet***
* **Availability Zone :** Select **us-east-1a**
* **IPv4 CIDR block :** Enter the range ***10.0.1.0/24***
* Click on **Create Subnet**
#### Task 3: Creating Subnets
**Note:** In this lab, we will create one public subnet and a private subnet in us-east-1a and us-east-1b Availability Zones.
1. For the Public Subnet\*\*,\*\* click on **Subnets** from the left menu and click on **Create subnet.**
* **VPC ID :** Select **MyVPC** from the list.
* **Subnet Name :** Enter ***MyPublicSubnet***
* **Availability Zone :** Select **us-east-1a**
* **IPv4 CIDR block :** Enter the range ***10.0.1.0/24***
* Click on **Create Subnet**
 2. For Private Subnet\*\*,\*\* click on **Create Subnet** again.
* **VPC ID :** Select **MyVPC** from the list.
* **Subnet Name :** Enter ***MyPrivateSubnet***
* **Availability Zone :** Select **us-east-1b**
* **IPv4 CIDR block :** Enter the range ***10.0.2.0/24***
* Click on **Create subnet.**
2. For Private Subnet\*\*,\*\* click on **Create Subnet** again.
* **VPC ID :** Select **MyVPC** from the list.
* **Subnet Name :** Enter ***MyPrivateSubnet***
* **Availability Zone :** Select **us-east-1b**
* **IPv4 CIDR block :** Enter the range ***10.0.2.0/24***
* Click on **Create subnet.**
 #### Task 4: Create and attach an Internet Gateway
**Note:** By default, instances that are launched in a VPC cannot communicate with the Internet.
To enable Internet access, an Internet gateway needed to be attached to the VPC.
1. Click on **Internet Gateways** from the left menu and click **Create Internet Gateway**.
* **Name Tag :** Enter ***MyInternetGateway***
* Click on **Create Internet Gateway.**
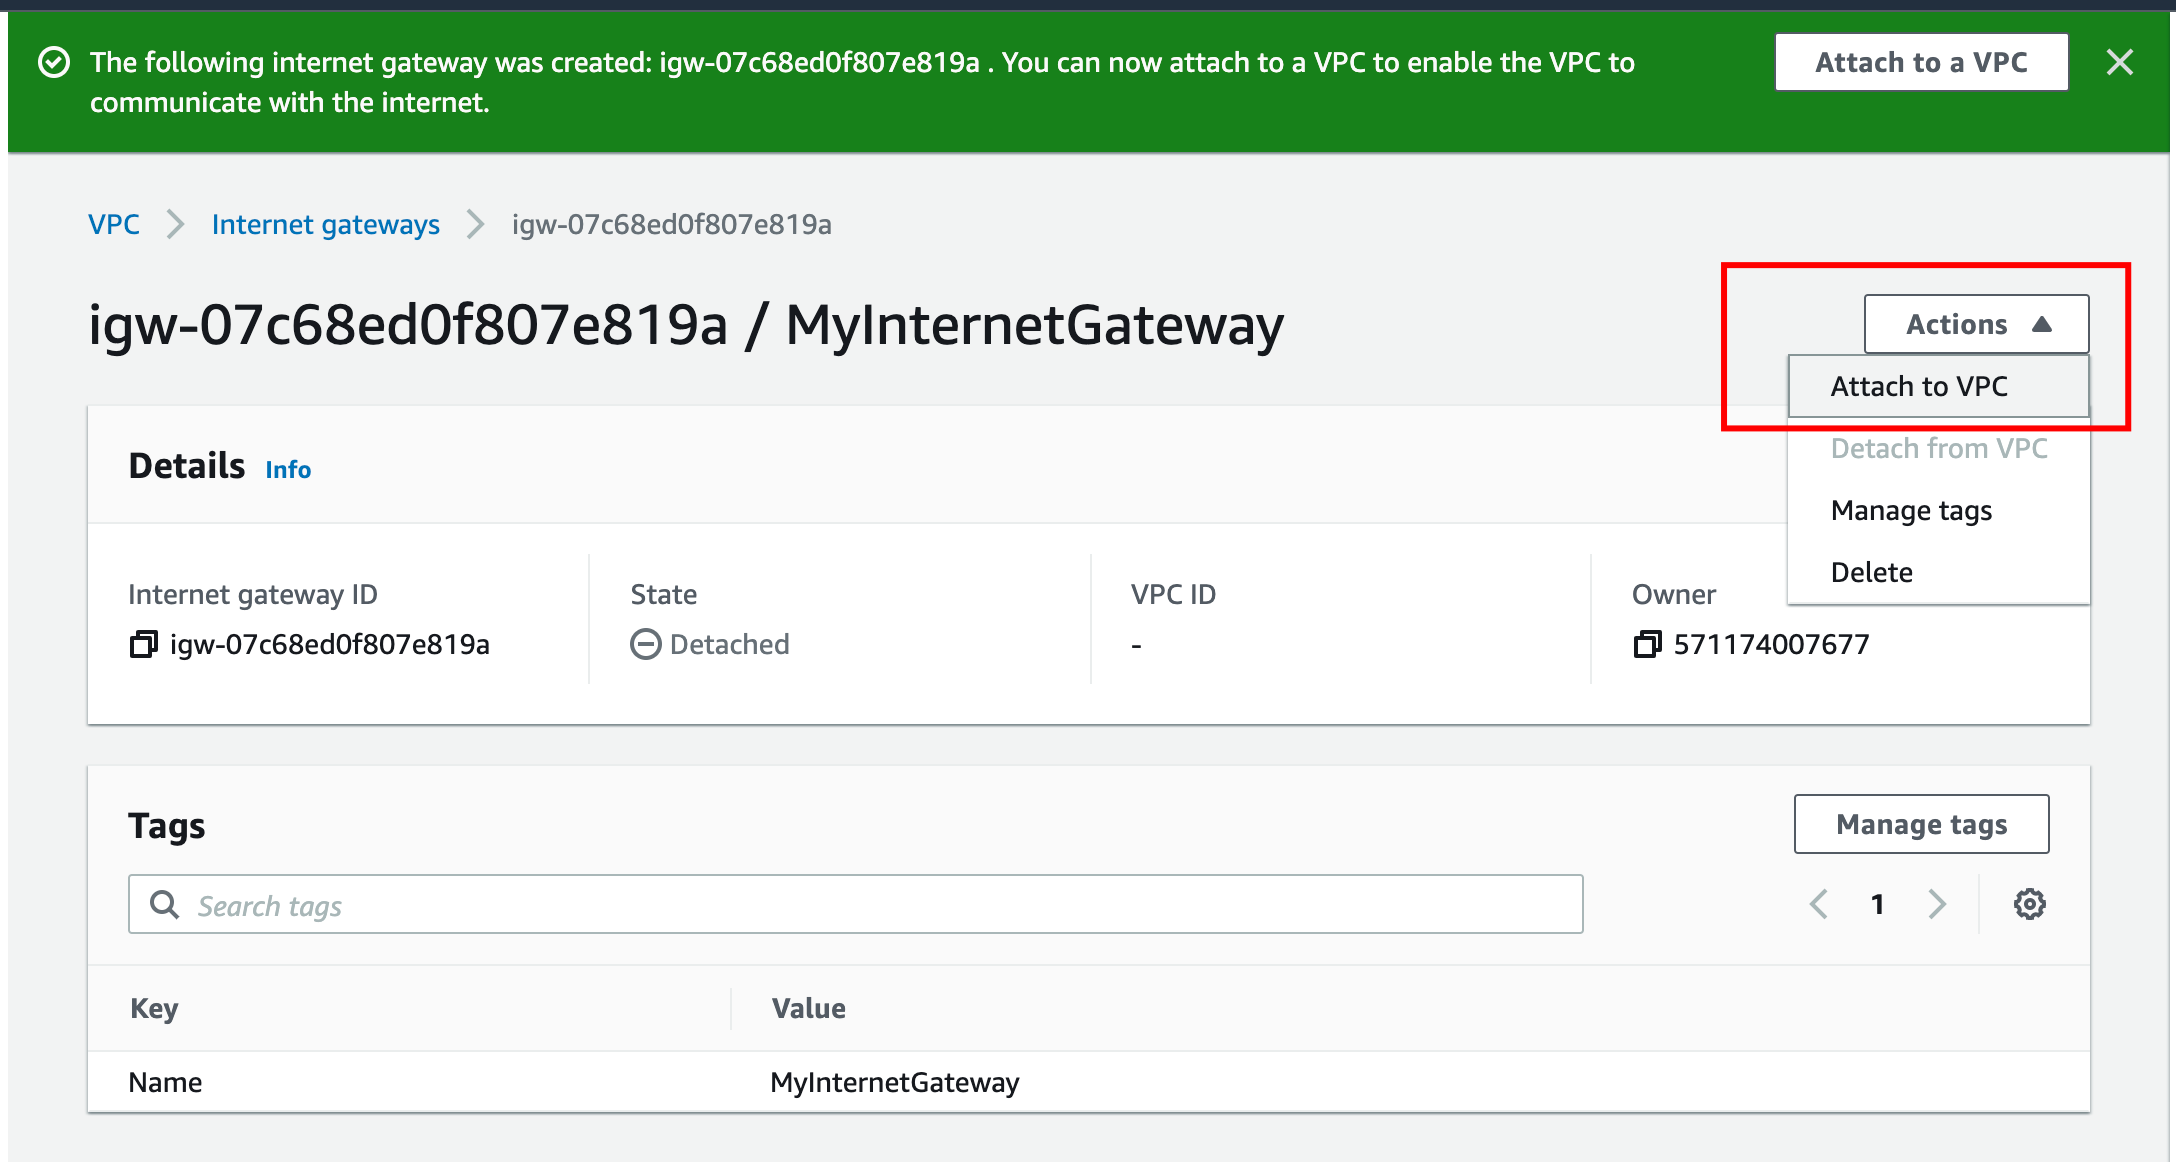
2. Select the Internet gateway you created from the list.
* Click on **Actions**.
* Click on **Attach to VPC**.
* Select MyVPC and click on **Attach to VPC.**
#### Task 4: Create and attach an Internet Gateway
**Note:** By default, instances that are launched in a VPC cannot communicate with the Internet.
To enable Internet access, an Internet gateway needed to be attached to the VPC.
1. Click on **Internet Gateways** from the left menu and click **Create Internet Gateway**.
* **Name Tag :** Enter ***MyInternetGateway***
* Click on **Create Internet Gateway.**
2. Select the Internet gateway you created from the list.
* Click on **Actions**.
* Click on **Attach to VPC**.
* Select MyVPC and click on **Attach to VPC.**
 #### Task 5: Create Route Tables and Associate them it with Subnets
1. Go to **Route Tables** from the left menu and click on **Create route table.**
* **Name Tag:** Enter ***PublicRouteTable.***
* **VPC:** Select **MyVPC** from the list.
* Click on **Create route table.**
2. We will be using the **default (main) Route Table** created by VPC for the RDS database tier.
#### Task 5: Create Route Tables and Associate them it with Subnets
1. Go to **Route Tables** from the left menu and click on **Create route table.**
* **Name Tag:** Enter ***PublicRouteTable.***
* **VPC:** Select **MyVPC** from the list.
* Click on **Create route table.**
2. We will be using the **default (main) Route Table** created by VPC for the RDS database tier.
 * You will be able to see the Route table with **VPC ID MyVPC** and **Main** as **Yes**
* Select the Route Table and rename it.
* **Name Tag:** Enter ***PrivateRouteTable*** and \[Enter]
* You will be able to see the Route table with **VPC ID MyVPC** and **Main** as **Yes**
* Select the Route Table and rename it.
* **Name Tag:** Enter ***PrivateRouteTable*** and \[Enter]
 3. Now **associate the subnets** to the route tables.
4. Click on **PublicRouteTable** and go to the **Action** and in that go to **Edit Subnet Associations tab.**
* Click on **Edit Subnet Associations**.
* Select **MyPublicSubnet** from the list.
* Click on **Save Associations**
5. Click on **PrivateRouteTable** and go to the **Action** and in that go to **Edit Subnet Associations tab.**
* Click on **Edit Subnet Associations**.
* Select **MyPrivateSubnet** from the list.
* Click on **Save Associations**
#### Task 6: Update Route Table and Configure the Internet Gateway
1. **PublicRouteTable** : Add a route to allow Internet traffic to the VPC.
* Select **PublicRouteTable.**
* Go to the **Routes** tab click on **Edit routes**. On the next page, click on **Add route.**
* Specify the following values:
* **Destination:** Enter ***0.0.0.0/0***
* **Target:** Select **Internet Gateway** from the dropdown menu to select **MyInternetGateway**.
3. Now **associate the subnets** to the route tables.
4. Click on **PublicRouteTable** and go to the **Action** and in that go to **Edit Subnet Associations tab.**
* Click on **Edit Subnet Associations**.
* Select **MyPublicSubnet** from the list.
* Click on **Save Associations**
5. Click on **PrivateRouteTable** and go to the **Action** and in that go to **Edit Subnet Associations tab.**
* Click on **Edit Subnet Associations**.
* Select **MyPrivateSubnet** from the list.
* Click on **Save Associations**
#### Task 6: Update Route Table and Configure the Internet Gateway
1. **PublicRouteTable** : Add a route to allow Internet traffic to the VPC.
* Select **PublicRouteTable.**
* Go to the **Routes** tab click on **Edit routes**. On the next page, click on **Add route.**
* Specify the following values:
* **Destination:** Enter ***0.0.0.0/0***
* **Target:** Select **Internet Gateway** from the dropdown menu to select **MyInternetGateway**.
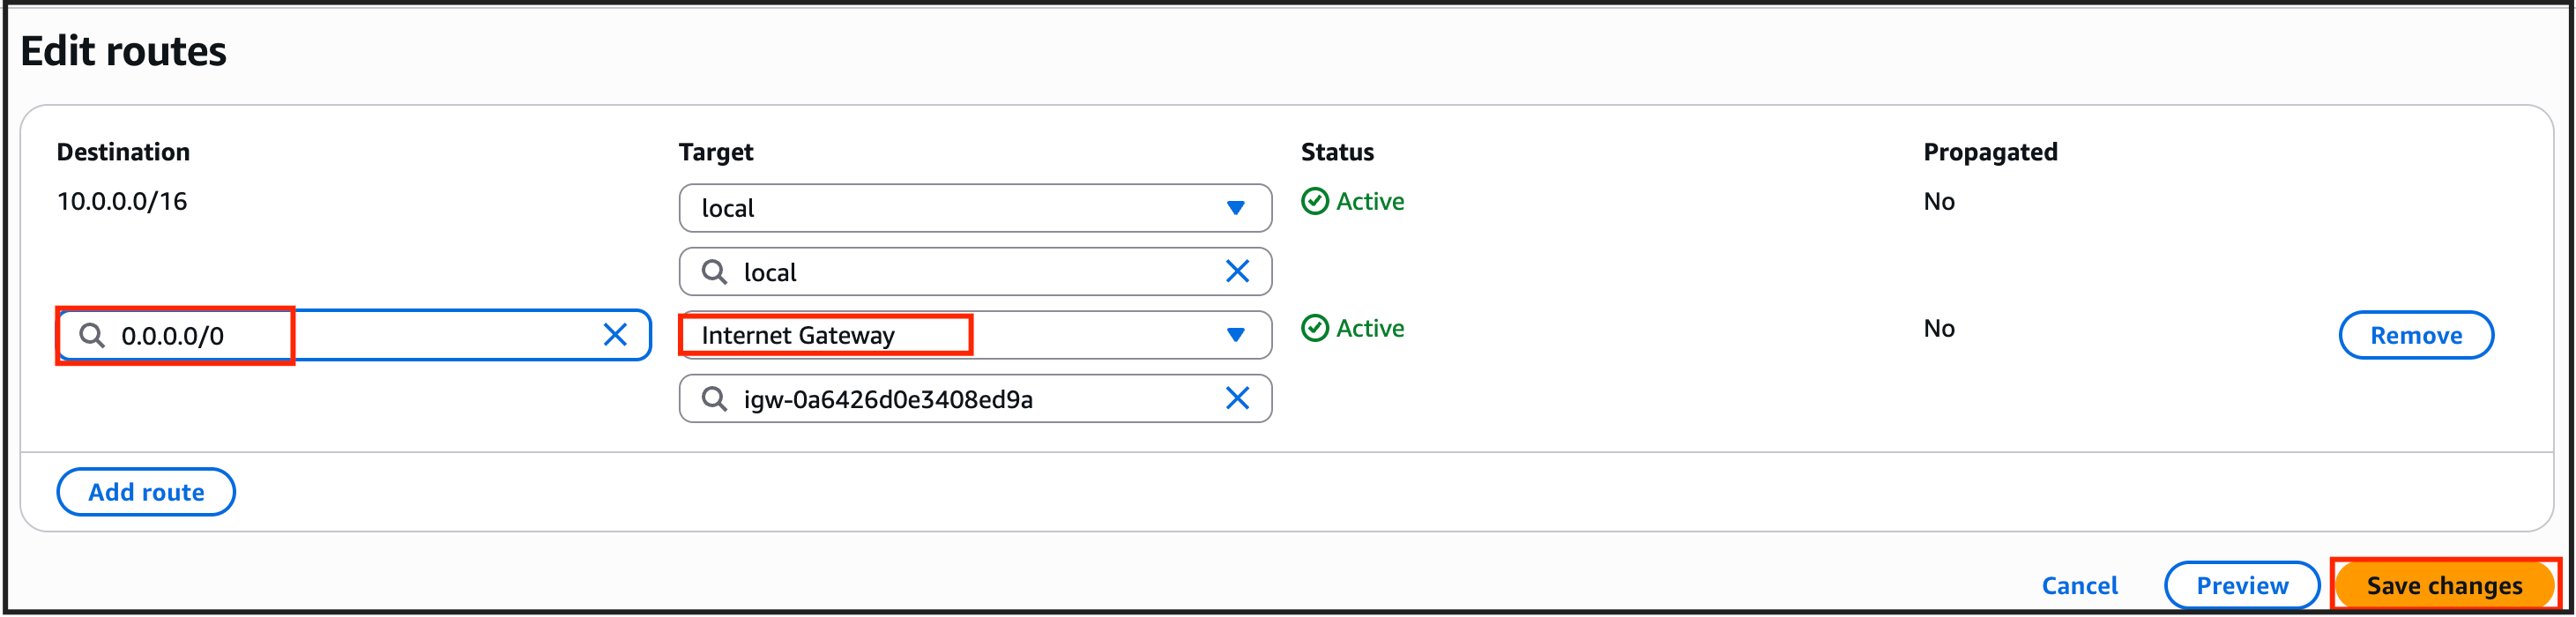 * Click on **Save changes.**
#### Task 7: Enabling Auto-Assign Public IP for Public Subnets
**Note**: This setting will allow you to automatically assign public IP for all the EC2 instances launched in the public subnet
Click on **Subnets** from the left menu on VPC.
* Select **MyPublicSubnet** from the Subnet list
* Click on **Actions** and then select **Edit subnet settings**
* Check the **Enable** **Auto-assign IPv4 address** check box
* Check the **Enable resource name DNS A record on launch** check box
* Now click on **Save**
#### Task 8: Launching an EC2 Instance in the Public Subnet
1. Navigate to **EC2** by clicking on the **Services** menu in the top, then click on **EC2** in the **Compute** section.
2. Navigate to **Instances** from the left side menu and click on **Launch Instance.**
3. Enter name as **MyPublicEC2Server**
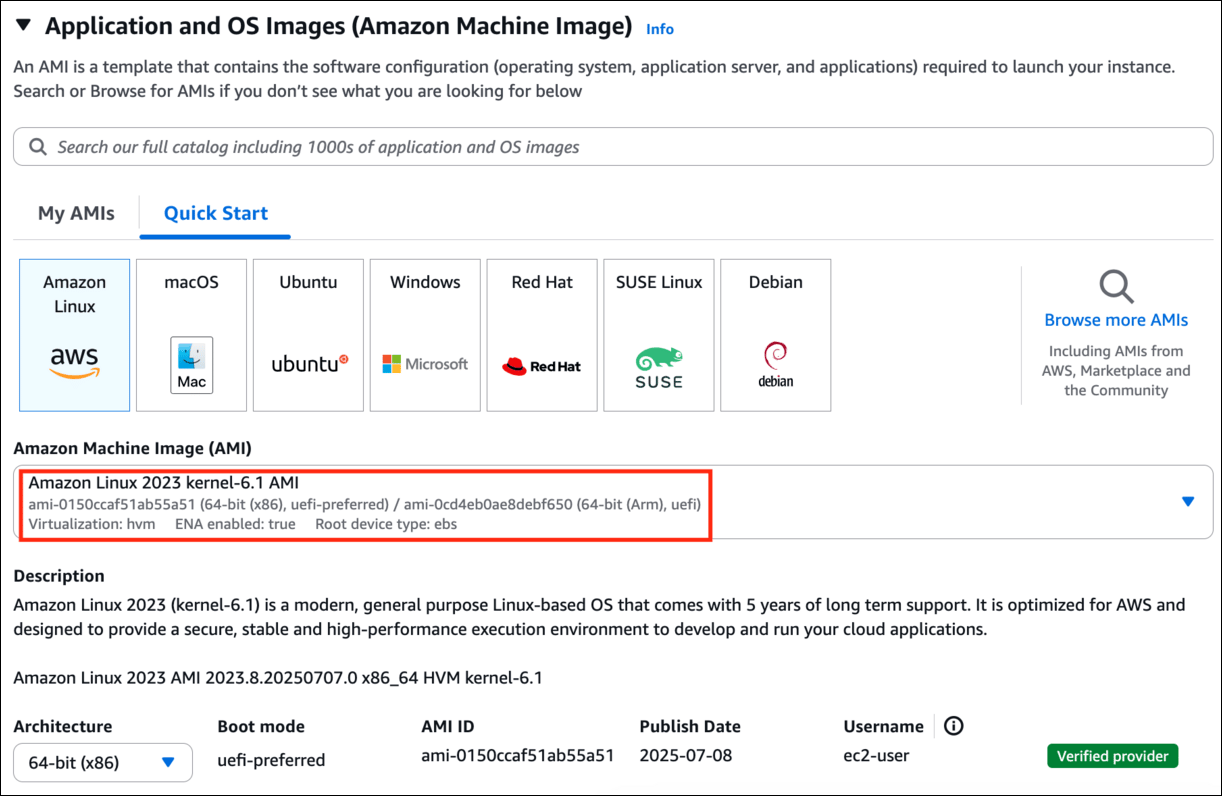
4. Choose an Amazon Machine Image (AMI): Select **Amazon Linux 2023 AMI**.
* Choose **architecture** as **64-bit(x86)**
* Click on **Save changes.**
#### Task 7: Enabling Auto-Assign Public IP for Public Subnets
**Note**: This setting will allow you to automatically assign public IP for all the EC2 instances launched in the public subnet
Click on **Subnets** from the left menu on VPC.
* Select **MyPublicSubnet** from the Subnet list
* Click on **Actions** and then select **Edit subnet settings**
* Check the **Enable** **Auto-assign IPv4 address** check box
* Check the **Enable resource name DNS A record on launch** check box
* Now click on **Save**
#### Task 8: Launching an EC2 Instance in the Public Subnet
1. Navigate to **EC2** by clicking on the **Services** menu in the top, then click on **EC2** in the **Compute** section.
2. Navigate to **Instances** from the left side menu and click on **Launch Instance.**
3. Enter name as **MyPublicEC2Server**
4. Choose an Amazon Machine Image (AMI): Select **Amazon Linux 2023 AMI**.
* Choose **architecture** as **64-bit(x86)**
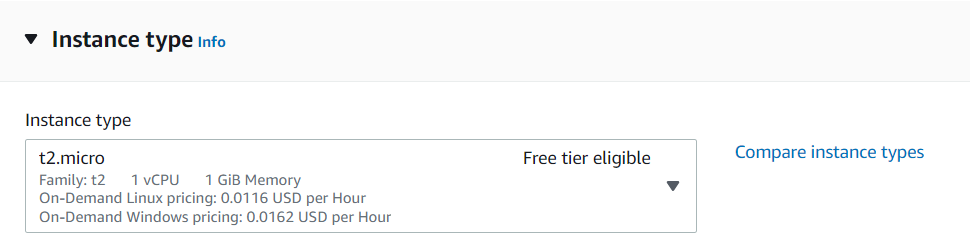
 5. Choose an **Instance Type**: Select ***t2.micro***\*\*.\*\*
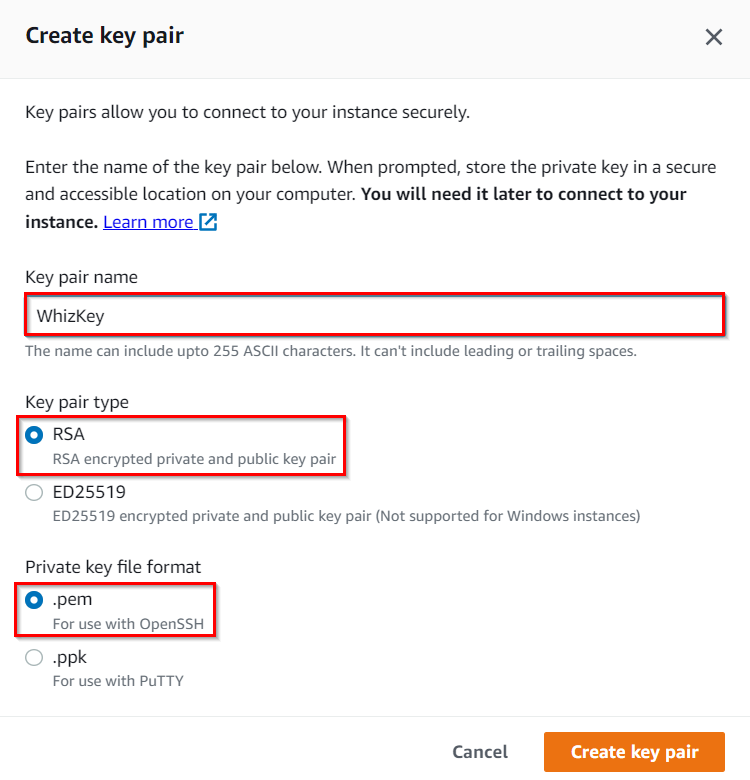
 6. **For Key pair:** Select **Create a new key pair** Button
* Key pair name: **WhizKey**
* Key pair type: **RSA**
* Private key file format: **.pem**
7. Select **Create key pair** Button.
6. **For Key pair:** Select **Create a new key pair** Button
* Key pair name: **WhizKey**
* Key pair type: **RSA**
* Private key file format: **.pem**
7. Select **Create key pair** Button.
 8. In Network Settings Click on **Edit** Button:
* VPC : **MyVPC**
* Subnet : Choose **MyPublicSubnet**
* Auto-assign public IP: **Enable**
* Select **Create new Security group**
* Security group name : Enter ***MyWebserverSG***
* Description : Enter ***My EC2 Security Group***
* Check Allow SSH from and Select Anywhere from dropdown
* Choose Type: **SSH**
* Source: **Anywhere**
* For **HTTP,** Select **Add Security rule** Button
* Choose Type: **HTTP**
* Source: Select **Anywhere**
9. Under the **Advanced Details,** scroll down to the User data section, enter the following script to create an HTML page served by Apache:
\#!/bin/bash
sudo su
yum update -y
yum install httpd -y
echo "\\
8. In Network Settings Click on **Edit** Button:
* VPC : **MyVPC**
* Subnet : Choose **MyPublicSubnet**
* Auto-assign public IP: **Enable**
* Select **Create new Security group**
* Security group name : Enter ***MyWebserverSG***
* Description : Enter ***My EC2 Security Group***
* Check Allow SSH from and Select Anywhere from dropdown
* Choose Type: **SSH**
* Source: **Anywhere**
* For **HTTP,** Select **Add Security rule** Button
* Choose Type: **HTTP**
* Source: Select **Anywhere**
9. Under the **Advanced Details,** scroll down to the User data section, enter the following script to create an HTML page served by Apache:
\#!/bin/bash
sudo su
yum update -y
yum install httpd -y
echo "\\Welcome to IP Lab Portal Server \
\" >> /var/www/html/index.html
systemctl start httpd
systemctl enable httpd
10. Keep Rest thing Default and Click on **Launch Instance** Button.
11. Select **View all Instances** to View Instance you Created
12. **Launch Status:** Your instance is now launching, Click on the instance ID and wait for complete initialization of the instance till status changes to **Running**.
#### Task 9: Launching an EC2 Instance in the Private Subnet
1. Click on **Launch Instances** again at the top right of the EC2 dashboard.
2. Enter name as **MyPrivateEC2Server**
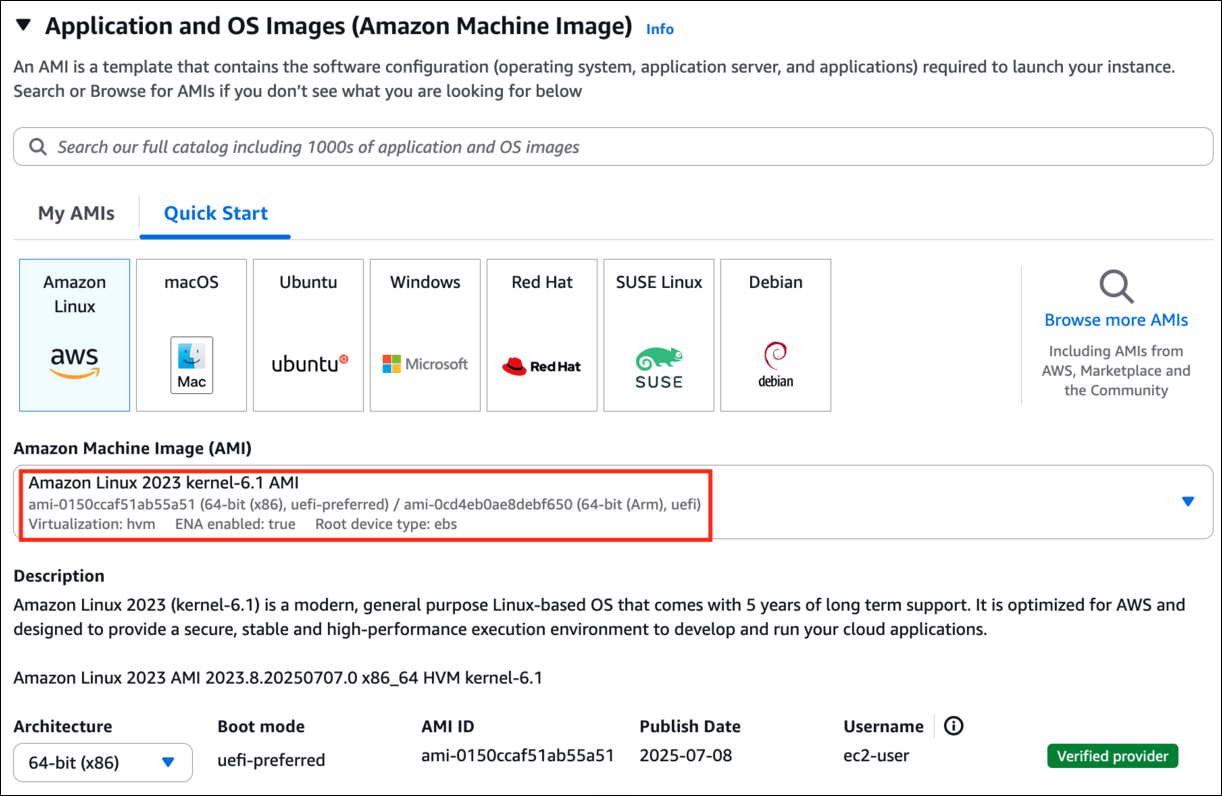
3. Choose an Amazon Machine Image (AMI): Select **Amazon Linux 2023 AMI**.
* Choose **architecture** as **64-bit(x86)**
 5. Choose an **Instance Type**: Select ***t2.micro***\*\*.\*\*
6. **For Key pair:** Select **the existing key pair.**
7. In Network Settings Click on **Edit** Button:
* VPC : **MyVPC**
* Subnet : Choose **MyPrivateSubnet**
* Auto-assign public IP: **Disable**
* Select **Create new Security group**
* Security group name : Enter ***MyServerSG***
* Description : Enter ***My EC2 Security Group***
* Check Allow SSH from and Select Anywhere from dropdown
* Choose Type: **SSH**
* Source: Select **Anywhere**
* For **ALL ICMP IPv4** **,** Select **Add Security rule** Button
* Choose Type: **All ICMP IPv4**.
* Source: Select **Anywhere**
8. Keep Rest thing Default and Click on **Launch Instance** Button.
9. Select **View all Instances** to View Instance you Created
10. Note the Private IP Address of **MyPrivateEC2Server.**
11. Two servers are launched and ready.
5. Choose an **Instance Type**: Select ***t2.micro***\*\*.\*\*
6. **For Key pair:** Select **the existing key pair.**
7. In Network Settings Click on **Edit** Button:
* VPC : **MyVPC**
* Subnet : Choose **MyPrivateSubnet**
* Auto-assign public IP: **Disable**
* Select **Create new Security group**
* Security group name : Enter ***MyServerSG***
* Description : Enter ***My EC2 Security Group***
* Check Allow SSH from and Select Anywhere from dropdown
* Choose Type: **SSH**
* Source: Select **Anywhere**
* For **ALL ICMP IPv4** **,** Select **Add Security rule** Button
* Choose Type: **All ICMP IPv4**.
* Source: Select **Anywhere**
8. Keep Rest thing Default and Click on **Launch Instance** Button.
9. Select **View all Instances** to View Instance you Created
10. Note the Private IP Address of **MyPrivateEC2Server.**
11. Two servers are launched and ready.
 #### Task 10: Testing Both EC2 instances
1. **Public EC2 instances**: We have installed a web application on this server.
* Select the **MyPublicEC2Server** EC2 instance from the instance list.
* From the Description tab, copy the **IPv4 Public IP**.
#### Task 10: Testing Both EC2 instances
1. **Public EC2 instances**: We have installed a web application on this server.
* Select the **MyPublicEC2Server** EC2 instance from the instance list.
* From the Description tab, copy the **IPv4 Public IP**.
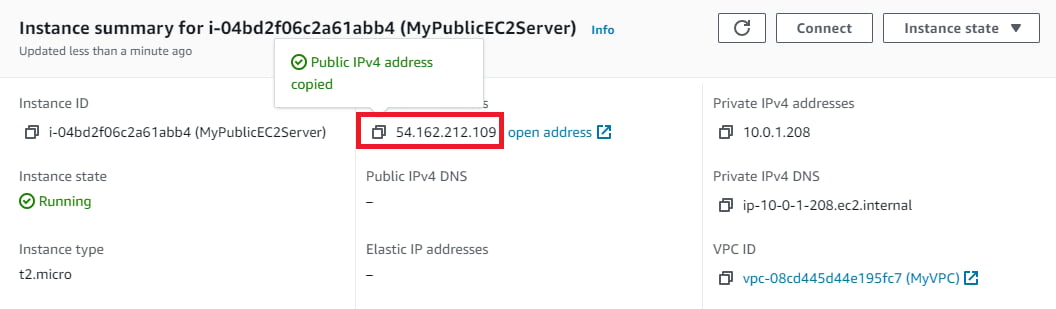 * Now paste this IP in you Web Browser and click \[Enter]
* You will be able to see the following page:
* Now paste this IP in you Web Browser and click \[Enter]
* You will be able to see the following page:
 2. Next, we will try to ping the Private EC2 from the Public EC2 instance.
* SSH into EC2 Instance
* Please follow the steps in [SSH into EC2 Instance](https://play.whizlabs.com/site/task_support/ssh-into-ec-instance).
* Once connected to the server:
* Change to root user:
```python theme={null}
sudo su
```
* Copy the Private IP of **MyPrivateEC2Server** from the Description tab.
2. Next, we will try to ping the Private EC2 from the Public EC2 instance.
* SSH into EC2 Instance
* Please follow the steps in [SSH into EC2 Instance](https://play.whizlabs.com/site/task_support/ssh-into-ec-instance).
* Once connected to the server:
* Change to root user:
```python theme={null}
sudo su
```
* Copy the Private IP of **MyPrivateEC2Server** from the Description tab.
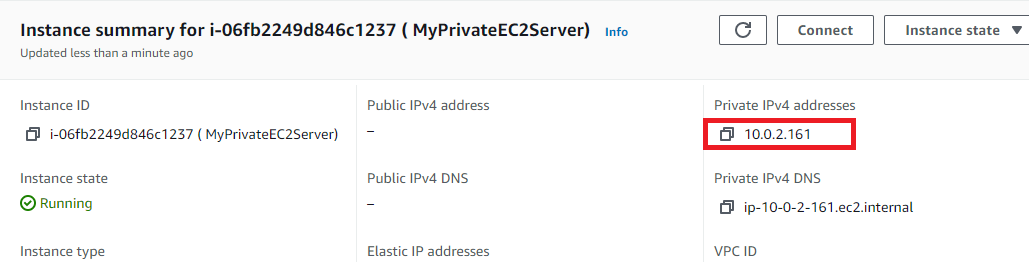 * Ping the Private Instance using the Private IPv4. **ping \**
* Example: ping 10.0.2.161
* Ping the Private Instance using the Private IPv4. **ping \**
* Example: ping 10.0.2.161
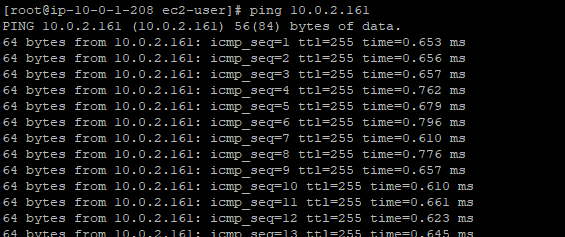 * Press \[Ctrl] + C to stop instead of pause.
* **Note: You were able to do these tasks because the Default NACL that was created during VPC creation allows both INBOUND and OUTBOUND by Default.**
#### Task 11: Creating Custom NACL and Associate it to the Subnet
**Note:** By default, both subnets will be associated with the Default NACL of **MyVPC.** Once you create a custom NACL and attach it to the public subnet and private Subnet.
1. Navigate to **VPC** under the Services menu. Click on **Network ACLs** under **Security**
2. Click on **Create Network ACL**
3. Create Network ACL:
* Name tag: Enter ***MyPublicNACL***
* VPC: Select **MyVPC** from the dropdown list.
* Click on **Create.**
4. Associating MyPublicNACL to the Public Subnet
* Select the Action tab and click on **Edit subnet associations**
* Select both the **Public and Private** subnets from the table.
* Click on **Save changes**
5. Renaming the Main NACL
* Select the **Default NACL** of the VPC MyVPC
* Press \[Ctrl] + C to stop instead of pause.
* **Note: You were able to do these tasks because the Default NACL that was created during VPC creation allows both INBOUND and OUTBOUND by Default.**
#### Task 11: Creating Custom NACL and Associate it to the Subnet
**Note:** By default, both subnets will be associated with the Default NACL of **MyVPC.** Once you create a custom NACL and attach it to the public subnet and private Subnet.
1. Navigate to **VPC** under the Services menu. Click on **Network ACLs** under **Security**
2. Click on **Create Network ACL**
3. Create Network ACL:
* Name tag: Enter ***MyPublicNACL***
* VPC: Select **MyVPC** from the dropdown list.
* Click on **Create.**
4. Associating MyPublicNACL to the Public Subnet
* Select the Action tab and click on **Edit subnet associations**
* Select both the **Public and Private** subnets from the table.
* Click on **Save changes**
5. Renaming the Main NACL
* Select the **Default NACL** of the VPC MyVPC
 * Enter the name ***MyPrivateNACL*** and click on **Save**
#### Task 12: Testing the Public and Private Server
1. Public EC2 Instance:
* Navigate to the **EC2 Instance Dashboard.** Click on **Instances** from the left side menu.
* Select the **MyPublicEC2Server** EC2 instance from the instance list.
* From the Description tab, copy the **IPv4 Public IP**.
* Now paste this IP into your web browser and click \[Enter]
* You will see the following page:
* Enter the name ***MyPrivateNACL*** and click on **Save**
#### Task 12: Testing the Public and Private Server
1. Public EC2 Instance:
* Navigate to the **EC2 Instance Dashboard.** Click on **Instances** from the left side menu.
* Select the **MyPublicEC2Server** EC2 instance from the instance list.
* From the Description tab, copy the **IPv4 Public IP**.
* Now paste this IP into your web browser and click \[Enter]
* You will see the following page:
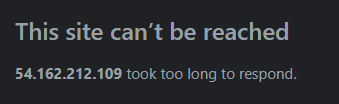 **Note: This is because the Custom NACL which is attached to your Public subnet restricts both INBOUND and OUTBOUND traffic.**
2. Private EC2 Instance:
* Since the Public NACL restricts all traffic, you won't be able to SSH into the public EC2 Instance to ping the Private Instance.
* Next, we are going to solve this.
#### Task 13: Adding Rules to Custom NACL (MyPublicNACL)
1. Navigate to **VPC** under the **Services** menu. Click on **Network ACLs** under **Security.**
2. Select **MyPublicNACL** from the list.
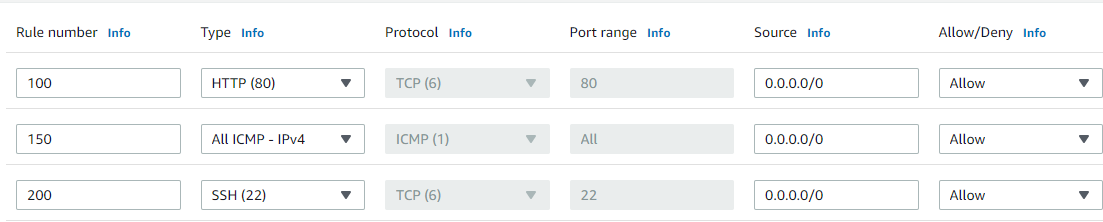
3. In the Inbound rules, click **Edit inbound rules**
4. Add the following rules:
* **HTTP** click on **Add rules,**
* Rule# : Enter ***100***
* Type: Choose **HTTP (80)**
* Source: Enter ***0.0.0.0/0***
* Allow / Deny: Select Allow
* For **ALL ICMP- IPv4**, click on **Add rules**,
* Rule# : Enter ***150***
* Type: Choose **ALL ICMP - IPv4**
* Source: Enter ***0.0.0.0/0***
* Allow / Deny: Select Allow
* For **SSH**, click on **Add rules**,
* Rule# : Enter ***200***
* Type: Choose **SSH (22)**
* Source: Enter ***0.0.0.0/0***
* Allow / Deny: Select Allow
**Note: This is because the Custom NACL which is attached to your Public subnet restricts both INBOUND and OUTBOUND traffic.**
2. Private EC2 Instance:
* Since the Public NACL restricts all traffic, you won't be able to SSH into the public EC2 Instance to ping the Private Instance.
* Next, we are going to solve this.
#### Task 13: Adding Rules to Custom NACL (MyPublicNACL)
1. Navigate to **VPC** under the **Services** menu. Click on **Network ACLs** under **Security.**
2. Select **MyPublicNACL** from the list.
3. In the Inbound rules, click **Edit inbound rules**
4. Add the following rules:
* **HTTP** click on **Add rules,**
* Rule# : Enter ***100***
* Type: Choose **HTTP (80)**
* Source: Enter ***0.0.0.0/0***
* Allow / Deny: Select Allow
* For **ALL ICMP- IPv4**, click on **Add rules**,
* Rule# : Enter ***150***
* Type: Choose **ALL ICMP - IPv4**
* Source: Enter ***0.0.0.0/0***
* Allow / Deny: Select Allow
* For **SSH**, click on **Add rules**,
* Rule# : Enter ***200***
* Type: Choose **SSH (22)**
* Source: Enter ***0.0.0.0/0***
* Allow / Deny: Select Allow
 * Click on **Save changes**
5. In the **Outbound rules** Tab, Click Edit outbound rules
6. Add the following rules:
* **Custom Port** is already available,
* Rule# : Enter ***100***
* Type: Choose **Custom TCP Rule**
* Port Range: Enter ***1024 - 65535***
* Source: Enter ***0.0.0.0/0***
* Allow / Deny: Select *Allow*
* For **ALL ICMP- IPv4**, click on **Add rules**,
* Rule# : Enter ***150***
* Type: Choose **ALL ICMP - IPv4**
* Source: Enter ***0.0.0.0/0***
* Allow / Deny: Select Allow
* For **SSH**, click on **Add rules** ,
* Rule# : Enter ***200***
* Type: Choose **SSH (22)**
* Source: Enter **0.0.0.0/0**
* Allow / Deny: Select Allow
* Click on **Save changes**
5. In the **Outbound rules** Tab, Click Edit outbound rules
6. Add the following rules:
* **Custom Port** is already available,
* Rule# : Enter ***100***
* Type: Choose **Custom TCP Rule**
* Port Range: Enter ***1024 - 65535***
* Source: Enter ***0.0.0.0/0***
* Allow / Deny: Select *Allow*
* For **ALL ICMP- IPv4**, click on **Add rules**,
* Rule# : Enter ***150***
* Type: Choose **ALL ICMP - IPv4**
* Source: Enter ***0.0.0.0/0***
* Allow / Deny: Select Allow
* For **SSH**, click on **Add rules** ,
* Rule# : Enter ***200***
* Type: Choose **SSH (22)**
* Source: Enter **0.0.0.0/0**
* Allow / Deny: Select Allow
 * Click on **Save**
#### Task 14: Testing Both EC2 instances
1. We will try to ping the Private EC2 from the Public EC2 instance.
* SSH into EC2 Instance
* Please follow the steps in [SSH into EC2 Instance](https://play.whizlabs.com/site/task_support/ssh-into-ec-instance).
* Once connected to the server:
* Change to root user:
```
sudo su
```
* Copy the Private IP of **MyPrivateEC2Server** from the Description tab.
* Ping to the Private Instance using the Private IPv4. **ping \**
* Example:
* Press \[Ctrl] + C again to cancel the process instead of pausing it.
* Note: You were able to do these tasks because we added NACL Rules.
> ##### Do you know?
>
> By participating in the AWS VPC NACL Lab, users acquire a range of practical skills and knowledge, including the ability to create NACLs, define rule sets for specific subnets, evaluate traffic patterns, implement allow and deny rules, and analyze the impact of NACL configurations on network communication. Additionally, participants gain insight into optimizing NACL configurations for different use cases, securing sensitive workloads, and mitigating potential security risks within their AWS VPCs.
### Completion and Conclusion
* You have created a VPC using the VPC Wizard.
* You have created an Internet Gateway.
* You have created a private and public subnet for the VPC.
* You have created and associated Route tables.
* You have added routes to the Route table
* You have launched some EC2 instances into the Public and Private subnets.
* You have created a Custom NACL.
* You have associated the NACL with the subnets.
* You added inbound and outbound rules to the custom NACL.
* You have tested our VPC.
### End Lab
1. Sign out of AWS Account.
2. You have successfully completed the lab.
3. Once you have completed the steps, click on **End Lab** from the IP Lab Portal dashboard.
## What gets checked
When you press **Check my work**, the platform verifies each of these:
* **Create Amazon Custom VPC** — Check whether a Custom VPC is created or not.
* **Create Amazon Custom VPC Subnet** — Check whether a Subnet is created for the Custom VPC or not.
* **Create Internet Gateway** — Check whether an Internet Gateway is created and attached to the Custom VPC or not.
* **Create Amazon Custom VPC Public Route Table** — Check whether a Custom VPC Public Route Table is created and an Internet Gateway route is added or not.
* **Create Amazon Custom VPC Private Route Table** — Check whether a Custom VPC Private Route Table is created or not.
* **Launch an EC2 Instance** — Check whether an EC2 Instance is launched or not.
* **Create Custom VPC Network ACL** — Check whether a Network ACL is created for the Custom VPC or not.
## Related help
* [FAQs and Troubleshooting](/aws-saa/support/faqs-and-troubleshooting)
This documentation is built and hosted on [Mintlify](https://mintlify.com), a developer documentation platform.
* Click on **Save**
#### Task 14: Testing Both EC2 instances
1. We will try to ping the Private EC2 from the Public EC2 instance.
* SSH into EC2 Instance
* Please follow the steps in [SSH into EC2 Instance](https://play.whizlabs.com/site/task_support/ssh-into-ec-instance).
* Once connected to the server:
* Change to root user:
```
sudo su
```
* Copy the Private IP of **MyPrivateEC2Server** from the Description tab.
* Ping to the Private Instance using the Private IPv4. **ping \**
* Example:
* Press \[Ctrl] + C again to cancel the process instead of pausing it.
* Note: You were able to do these tasks because we added NACL Rules.
> ##### Do you know?
>
> By participating in the AWS VPC NACL Lab, users acquire a range of practical skills and knowledge, including the ability to create NACLs, define rule sets for specific subnets, evaluate traffic patterns, implement allow and deny rules, and analyze the impact of NACL configurations on network communication. Additionally, participants gain insight into optimizing NACL configurations for different use cases, securing sensitive workloads, and mitigating potential security risks within their AWS VPCs.
### Completion and Conclusion
* You have created a VPC using the VPC Wizard.
* You have created an Internet Gateway.
* You have created a private and public subnet for the VPC.
* You have created and associated Route tables.
* You have added routes to the Route table
* You have launched some EC2 instances into the Public and Private subnets.
* You have created a Custom NACL.
* You have associated the NACL with the subnets.
* You added inbound and outbound rules to the custom NACL.
* You have tested our VPC.
### End Lab
1. Sign out of AWS Account.
2. You have successfully completed the lab.
3. Once you have completed the steps, click on **End Lab** from the IP Lab Portal dashboard.
## What gets checked
When you press **Check my work**, the platform verifies each of these:
* **Create Amazon Custom VPC** — Check whether a Custom VPC is created or not.
* **Create Amazon Custom VPC Subnet** — Check whether a Subnet is created for the Custom VPC or not.
* **Create Internet Gateway** — Check whether an Internet Gateway is created and attached to the Custom VPC or not.
* **Create Amazon Custom VPC Public Route Table** — Check whether a Custom VPC Public Route Table is created and an Internet Gateway route is added or not.
* **Create Amazon Custom VPC Private Route Table** — Check whether a Custom VPC Private Route Table is created or not.
* **Launch an EC2 Instance** — Check whether an EC2 Instance is launched or not.
* **Create Custom VPC Network ACL** — Check whether a Network ACL is created for the Custom VPC or not.
## Related help
* [FAQs and Troubleshooting](/aws-saa/support/faqs-and-troubleshooting)
This documentation is built and hosted on [Mintlify](https://mintlify.com), a developer documentation platform.