

Overview
Prerequisites
-
Good knowledge of AWS service
- Elastic Compute (EC2)
- Elastic Load Balancer
- Laptop/Desktop
- Internet Browser
- Internet connection
Challenge Instructions
- Region : Make Sure To Use Us-East-1 Region To Create All The Resources.
- You Will Be Provided With The Requirements Of The Challenge. If You Are New To AWS Cloud, We Recommend You Go Through Our Hands-On Labs Before Taking This Challenge.
- Challenge Duration: 90 Min
How to submit the challenge
- After Building The Infrastructure, Click On The Validation Button, To Validate If You Have Built The Required Infrastructure And Completed The Challenge Successfully.
-
Validation Status:
- Success - You Have Completed The Challenge Successfully.
- Failed - You Have Failed To Complete The Challenge.
- Once You Have Successfully Validated The Challenge, Click On End Lab Button To End The Challenge.
Launching Challenge Environment
- To Launch The Challenge Environment, Click On The Start Challenge Button.
- Please Wait Until The Cloud Environment Is Provisioned. It Will Take Less Than A Minute To Provision.
- Once The Challenge Is Started, You Will Be Provided With IAM User Name, Password, Access Key, and Secret Access Key.
Note : You Can Only Start One Challenge At Any Given Time
Lab guide
Sign in to AWS Management Console
- Click On The Open Console Button, And You Will Get Redirected To AWS Console In A New Browser Tab.
- On The AWS Sign-In Page, Leave The Account ID As Default. Never Edit/Remove The 12 Digit Account ID Present In The AWS Console. Otherwise, You Cannot Proceed With The Challenge.
- Now Copy Your User Name and Password In The Lab Console To The IAM Username and Password In AWS Console And Click On The Sign In Button.
- Once Signed In To The AWS Management Console, Make The Default AWS Region As US East (N. Virginia) Us-East-1.
Cloud Challenge Details
In This Challenge, Your AWS Compute Skills Are Put To The Test. You’ll Be Given A Requirement And You Have To Reach It Using Your Knowledge Of Elastic Compute (EC2) And Elastic Load Balancer (ELB) Which Will Be Used In This Challenge. This Challenge Will Help You Understand The Real-Time Scenarios.Architecture Diagram
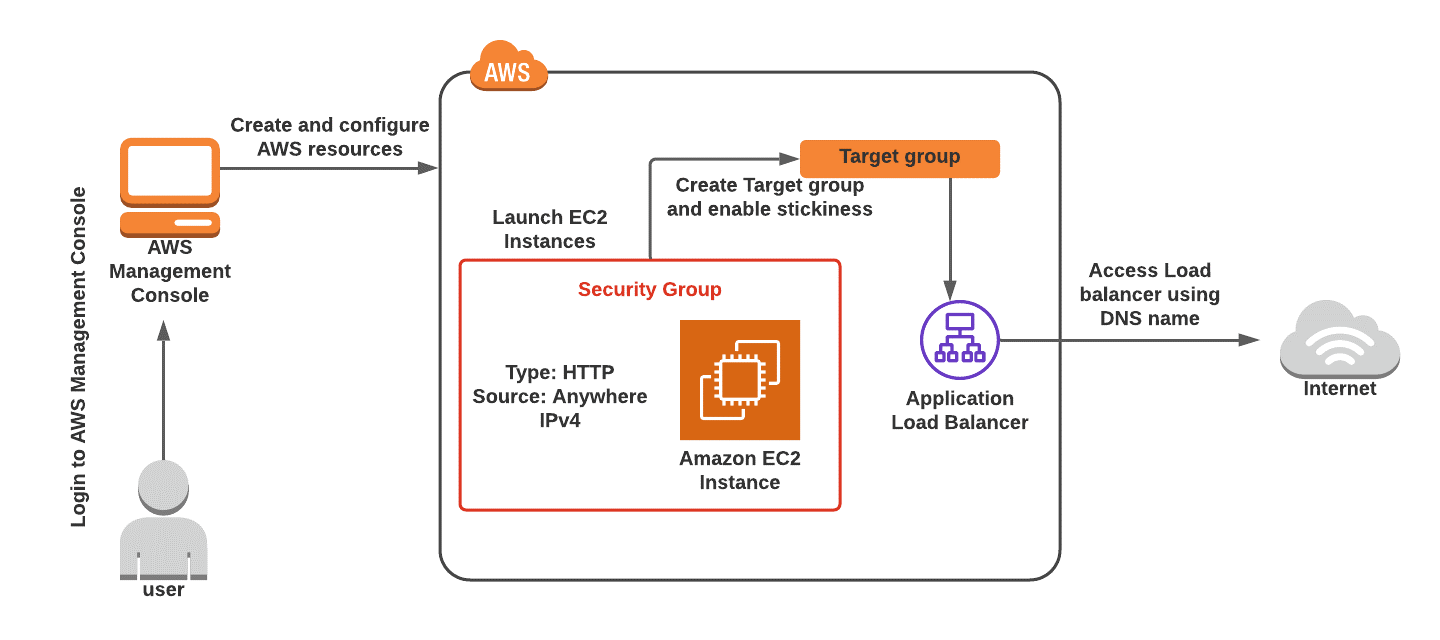
- Launch 2 Amazon Linux 2023 kernel-6.1EC2 Instances with instance type as t2.micro and HTTP port
- Under the User data: section, Enter the script to create an HTML page served by an Apache httpd web server, create a custom html page as below:
- Create Target group including both EC2 instances.
- Create Application Load balancer, map all the Availability zones, attach the security group created during EC2 creation and target group created.
- Enable the Load balancer stickiness for 2 minutes in target group created.
- Test the Elastic Load Balancer Stickiness.
- The load balancer will stick to an instance for the duration of 2 minutes, keep refreshing and the instance will not change.
End Challenge
- Sign Out Of The AWS Account.
- You Have Successfully Completed The Challenge.
- Click On End Challenge Button From IP Lab Portal Labs Console And Wait Till The Process Gets Completed.
What gets checked
When you press Check my work, the platform verifies each of these:- Launch an EC2 Instance — Check whether an EC2 Instance is launched or not.
- Create ELB Target Group — Check if given type of Load Balancer is created or not.
- Create a Application Load Balancer — Check if given type of Load Balancer is created or not.