

Overview
Lab Details:
- The lab involves creating an VPC, EC2 and Application Load Balancer.
- Troubleshooting the security group and subnet association to connect IP address and DNS name in the web page.
- Duration: 1 hour
- AWS Region: US East (N. Virginia) us-east-1
Introduction
- Virtual Private Cloud (VPC) A logically isolated section of the AWS cloud where you can launch AWS resources in a virtual network that you define.
- Elastic Compute Cloud (EC2) A web service that provides resizable compute capacity in the cloud, making web-scale cloud computing easier for developers.
- Load Balancer Distributes incoming application or network traffic across multiple targets, such as EC2 instances, in multiple Availability Zones to increase the availability and fault tolerance of your applications.
- Misconfigured Security Groups and Network ACLs: Ensuring that security groups and network access control lists (ACLs) are properly configured to allow traffic between the VPC, EC2 instances, and the load balancer.
- Route Table Misconfigurations Checking if the route tables are correctly set up to direct traffic to the intended subnets and instances.
- DNS and Load Balancer Configuration Ensuring the DNS settings and load balancer configurations (such as listeners and target groups) are correctly set to route traffic appropriately.
Architecture Diagram
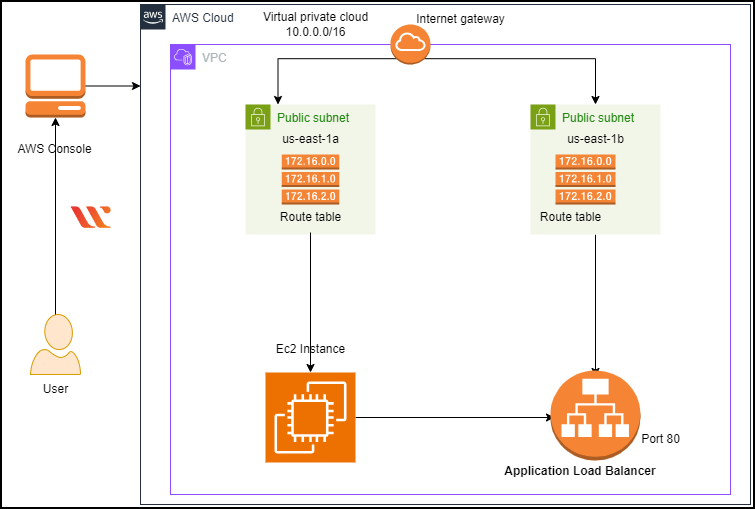
Task Details
- Sign in to AWS Management Console
- Creating an VPC
- Creating a Subnets
- Creating a Route table
- Creating an Internet gateway
- Launching an Ec2 Instance
- Creating an Application Load Balancer
- Testing the ALB and Ec2 instance
- Troubleshooting the services.
- Rebooting the Ec2 instance
- SSH into your Ec2 instance
- Installing an Apache server
- Testing the DNS name and Ec2 Instance Ip address
Launching Lab Environment
- To Launch The Project Environment, Click On The Start Lab Button.
- Please Wait Until The Cloud Environment Is Provisioned. It Will Take Less Than A Minute To Provision.
- Once The Project Is Started, You Will Be Provided With IAM User Name, Password, Access Key, And Secret Access Key.
Note : You can only start one Guided lab at any given time
Lab guide
Lab Steps
Task 1: Sign in to AWS Management Console
- Click On The Open Console Button, And You Will Get Redirected To AWS Console In A New Browser Tab.
- On The AWS Sign-In Page, Leave The Account ID As Default. Never Edit/Remove The 12 Digit Account ID Present In The AWS Console. Otherwise, You Cannot Proceed With The Lab.
- Now Copy Your User Name And Password In The Lab Console To The IAM Username And Password In AWS Console And Click On The Sign In Button.
- Once Signed In To The AWS Management Console, Make The Default AWS Region As US East (N. Virginia) Us-East-1.
Task 2: Create a VPC
- Creating New VPC
- Make sure you are in the US East (N. Virginia) us-east-1 Region.
- Navigate to VPC by clicking on Services on the top of AWS Console.
- Click on VPC (under Networking & Content Delivery section) or you can also search for VPC.
- Click on Your VPCs from the left menu.
- Here you can see the list of all VPC, No need to do anything with the existing and default VPCs, we will create a new VPC for this lab.
- Select VPC Only
- Name tag: Enter a VPC name for identification to your VPC. Ex: MyVPC
- IPv4 CIDR block: Enter 10.0.0.0/16
- IPv6 CIDR block: No need to change this, make sure No IPv6 CIDR Block is checked.
- Tenancy: No need to change this, make sure Default is selected.
- Now click on Create VPC button.
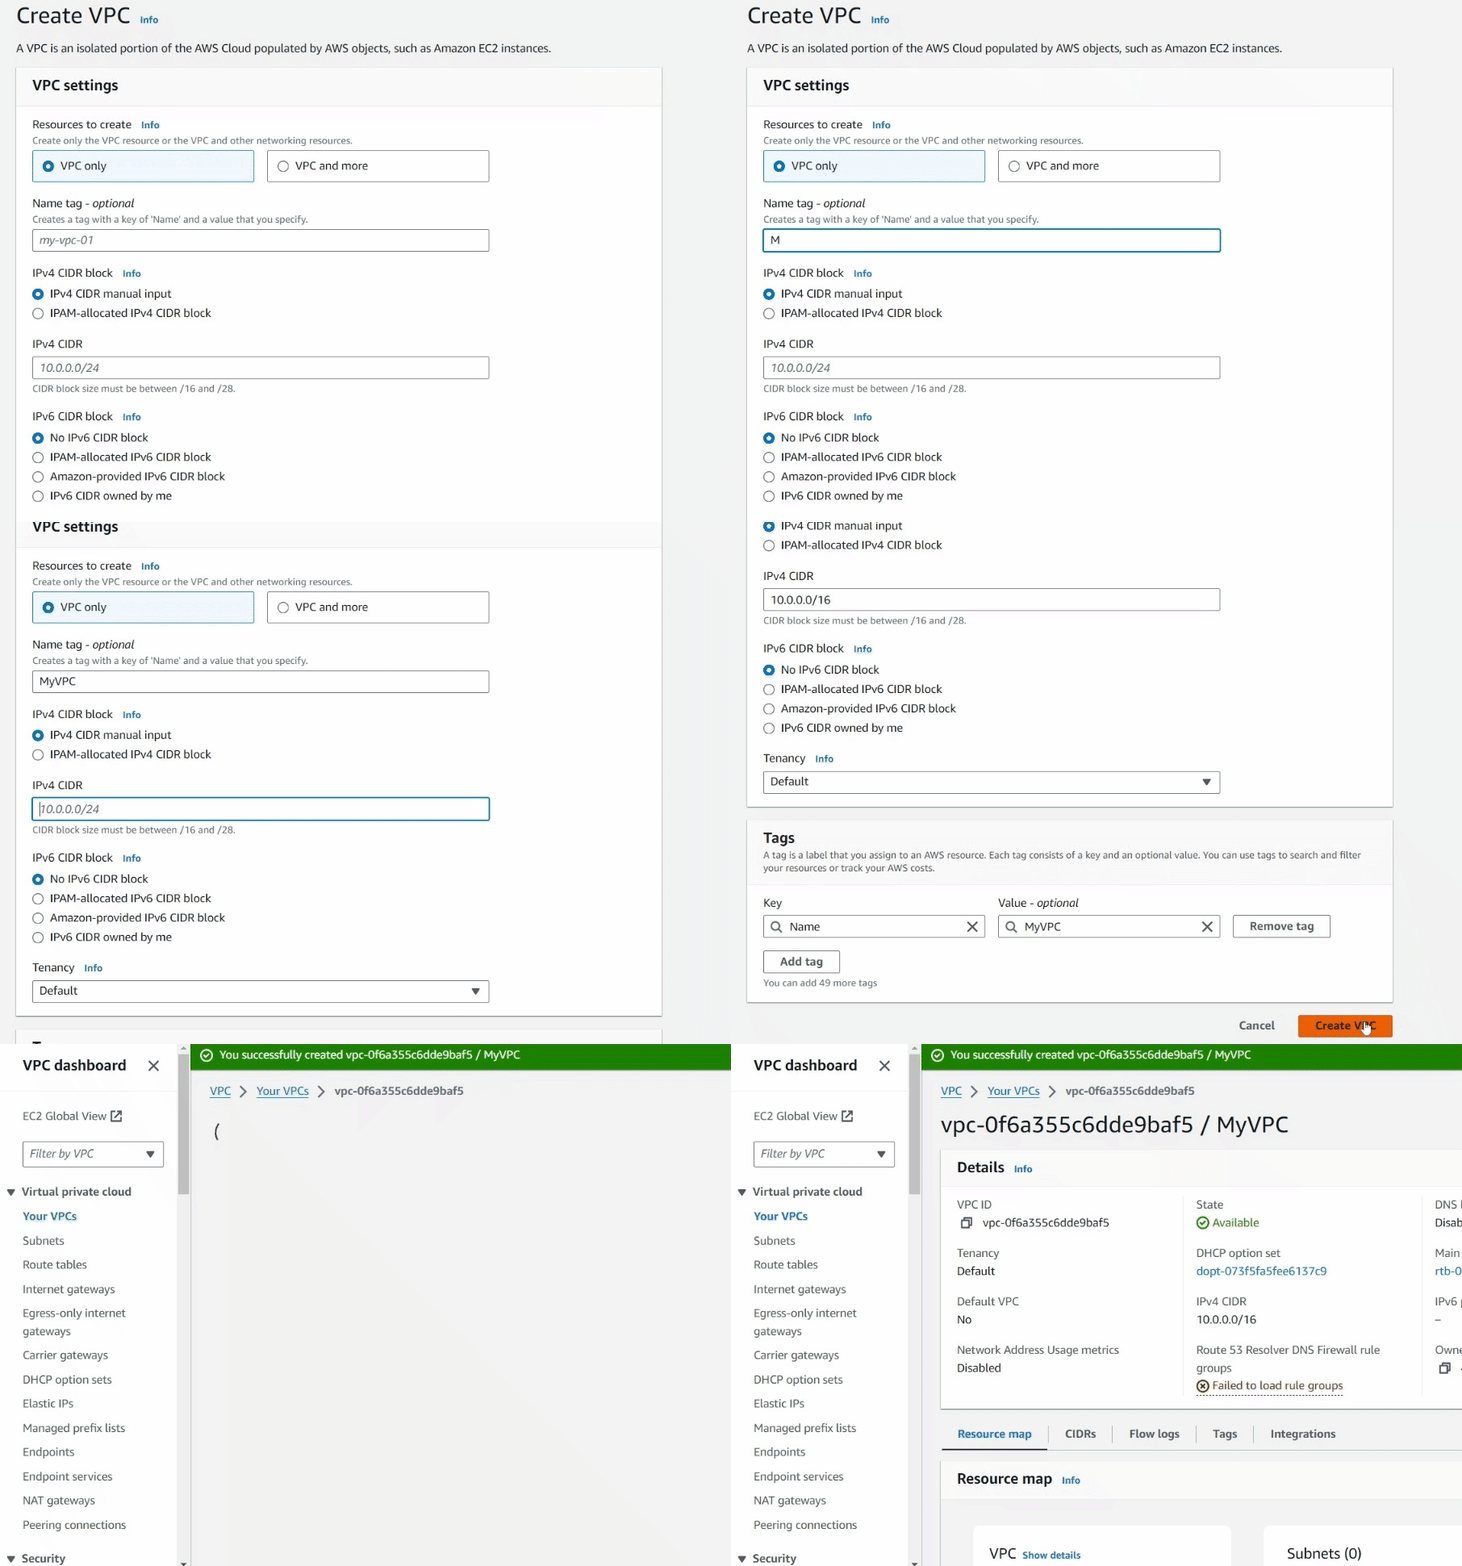
- Once VPC is created, it will appear with details as shown below:
Task 3: Creating Subnets
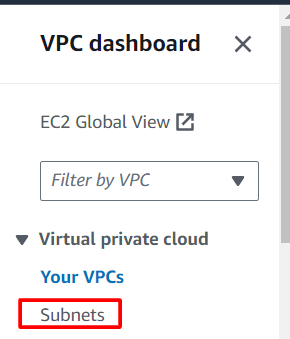
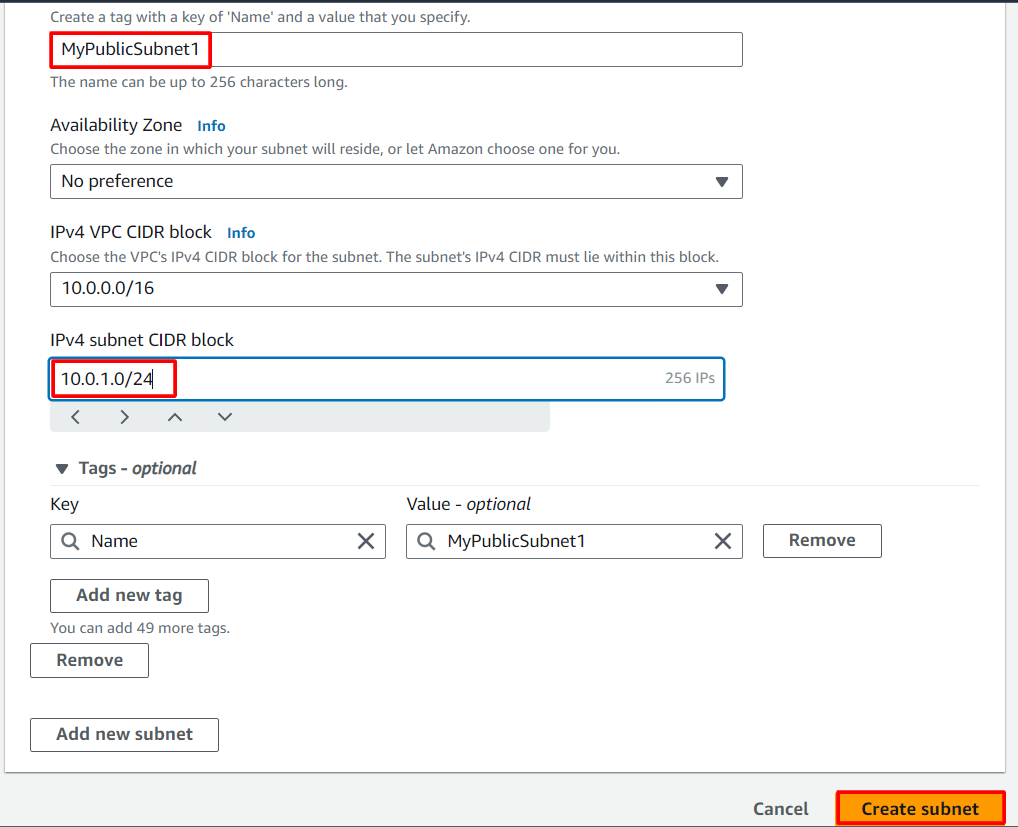
In this lab, we will create two public subnets in us-east-1a and us-east-1b Availability Zones respectively as follows:- For the Public Subnet, click on Subnets from the left menu and click on Create subnet button.
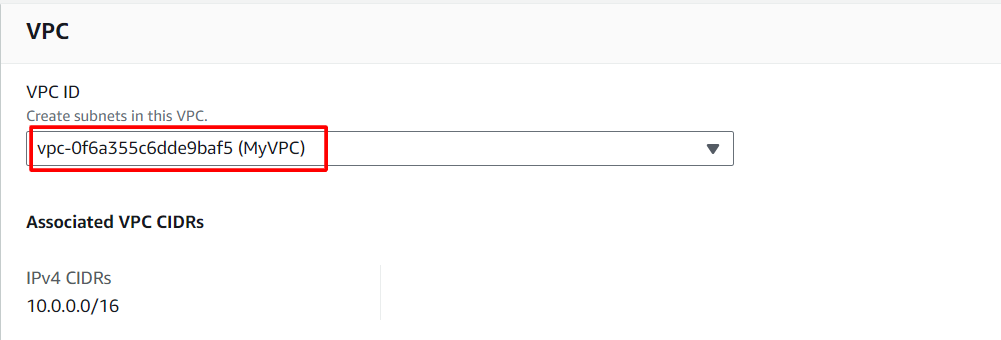
- VPC ID: Select MyVPC from the list you created earlier.
- Subnet Name: Enter Name MyPublicSubnet1
- Availability Zone: Select us-east-1a
- IPv4 CIDR block: Enter the range 10.0.1.0/24
- Click on Create subnet button.
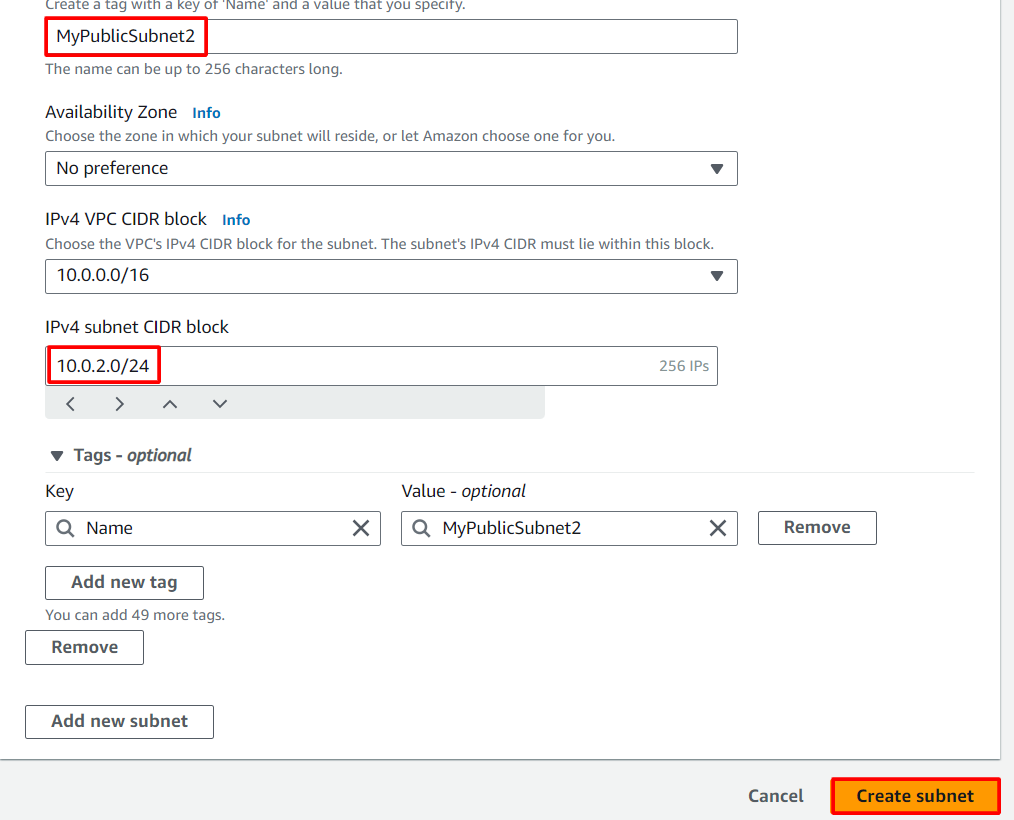
- Repeat the same steps to create another subnet, but the availability Zone: Select us-east-1b.
- Subnet Name: Enter Name MyPublicSubnet2
- IPv4 CIDR block: Enter the range 10.0.2.0/24
Task 4: Create and configure Internet Gateway
- In this task, we are going to create an internet gateway and configure it with the VPC.
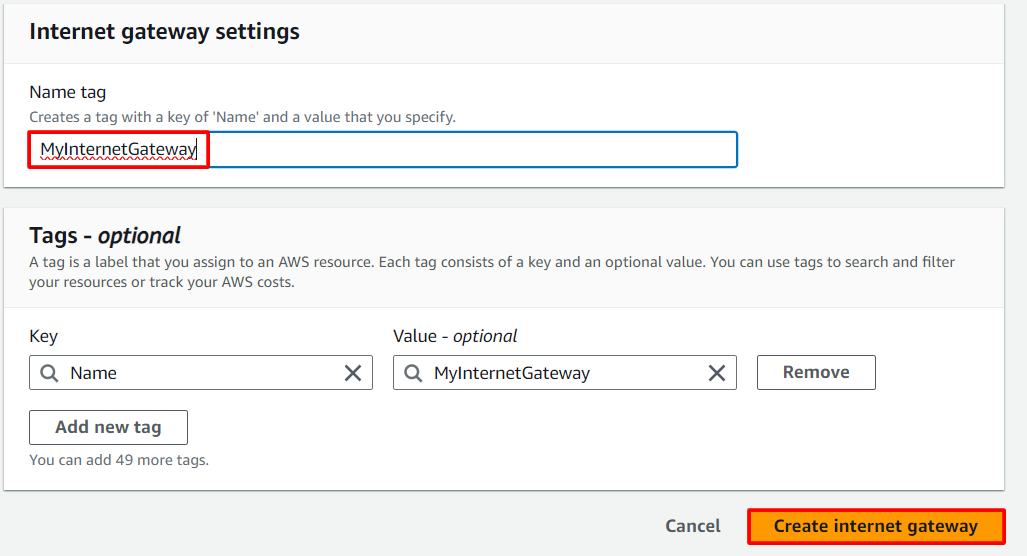
- Click on Internet Gateways from the left menu and click on Create internet gateway button.
- Name Tag: Enter MyInternetGateway
- Click on Create internet gateway button.
- Select the Internet gateway you created from the list
- Click on Actions.
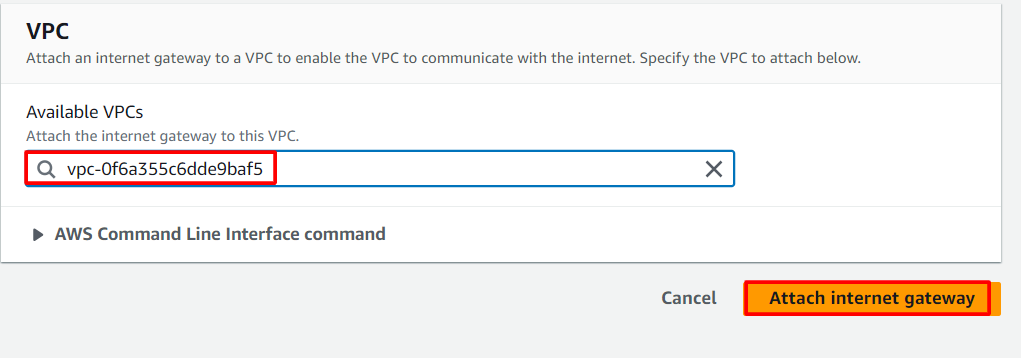
- Click on Attach to VPC.
- Select MyVPC which you created from the list and click on Attach internet gateway button.
Task 5: Create Route Tables
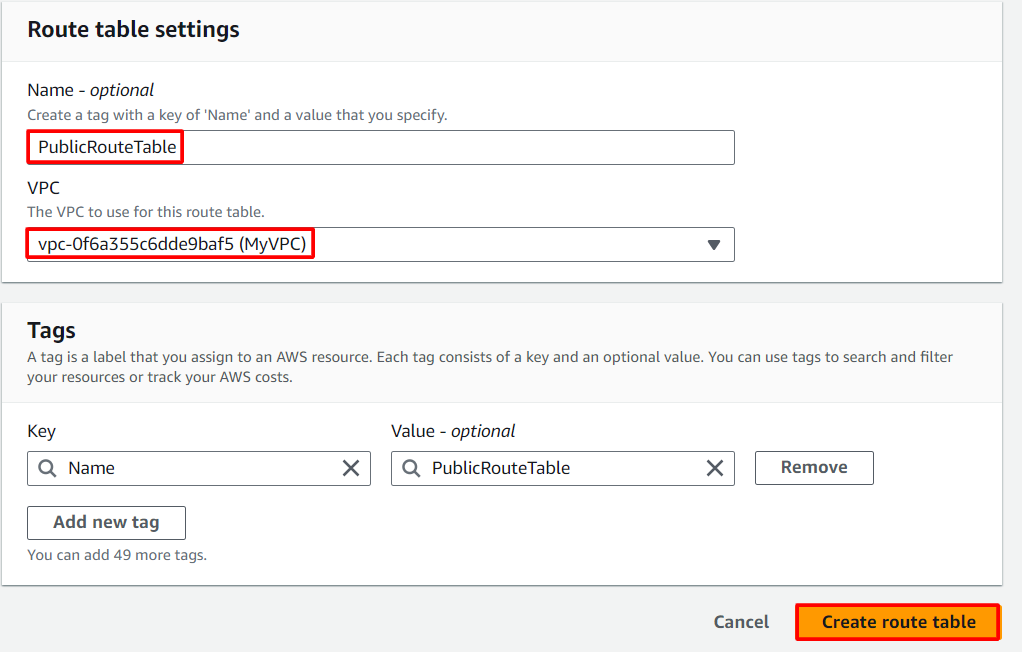
In this task, we are going to create route table and associate them with their respective subnets.- Go to Route Tables from the left menu and click on Create route table button.
- Name: Enter PublicRouteTable
- VPC: Select MyVPC from the list.
- Click on Create route table button.
- Now we will associate the subnets to the route tables.
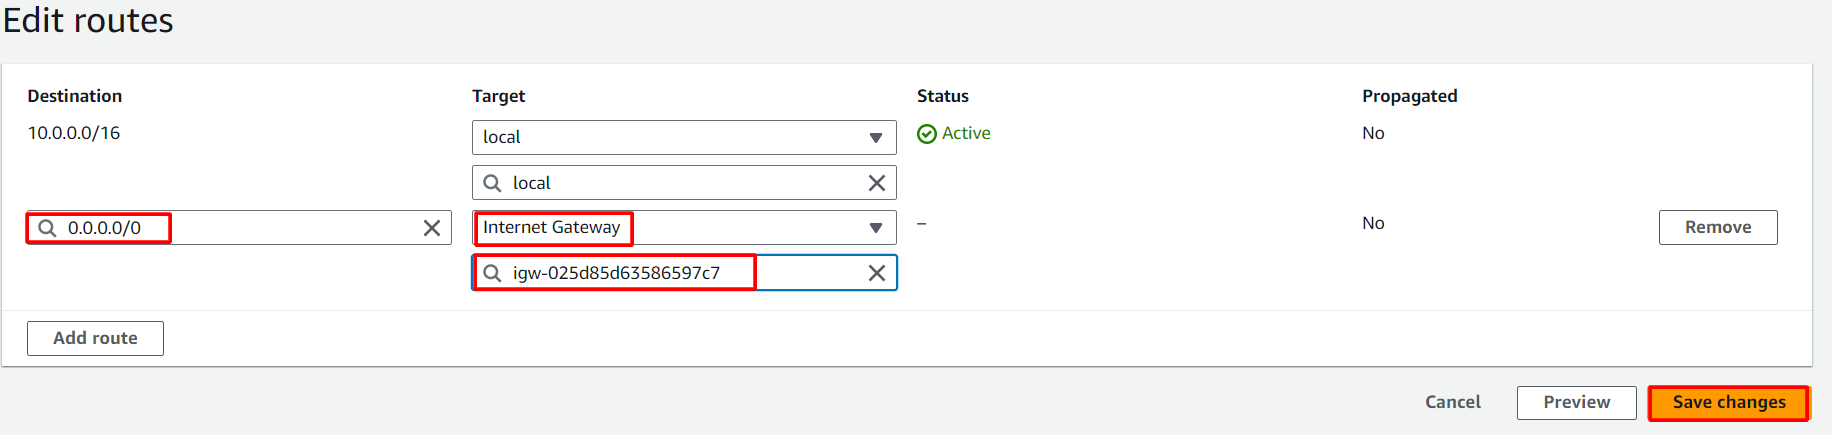
- PublicRouteTable: Add a route to allow Internet traffic to the VPC.
- Select PublicRouteTable.
- Go to Routes tab, click on Edit routes and on the next page, click on Add route button.
- Specify the following values:
- Destination: Enter 0.0.0.0/0
- Target: Select Internet Gateway from the dropdown menu to select MyInternetGateway.
- Click on Save changes button.
Task 6: Launching an EC2 Instance
In this task, we are going to create an EC2 instance, which will serve as one of the targets for the Application Load Balancer- Make sure you are in US East (N. Virginia) us-east-1 Region.
- Navigate to EC2 by clicking on the Services menu in the top, then click on EC2 in the Compute section.
- Click on Instances from the left sidebar and then click on Launch instances button.
- Name : Enter EC2server
-
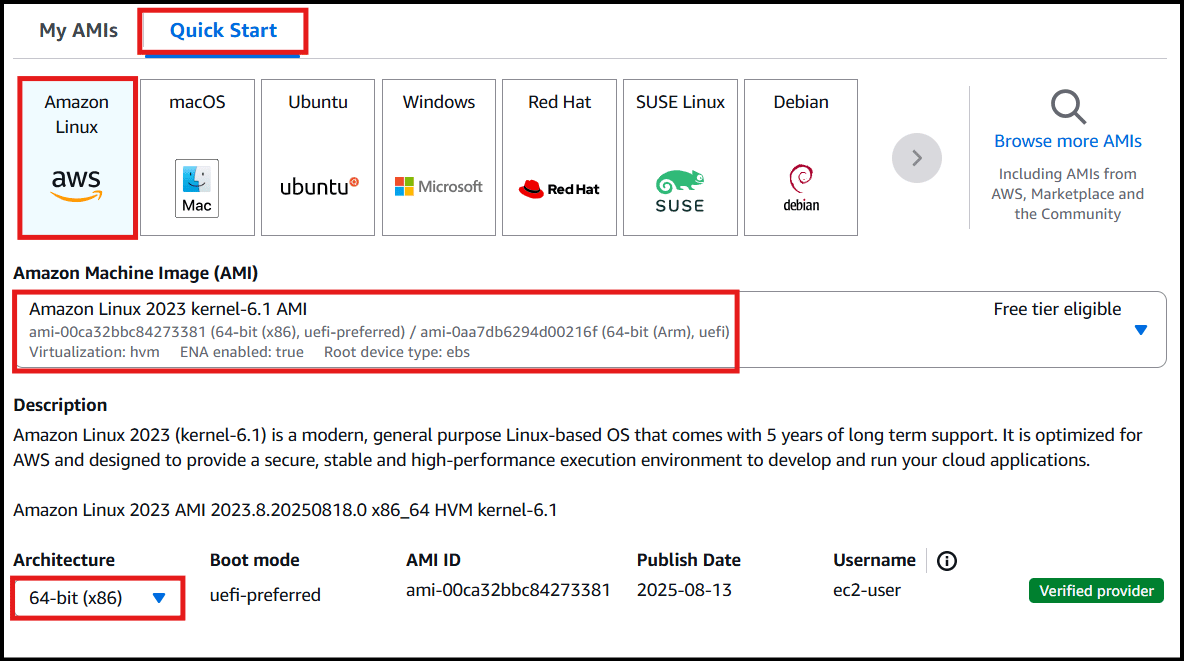
For Amazon Machine Image (AMI): In the Quick Start menu, select Amazon Linux 2023 kernel-6.1 AMI
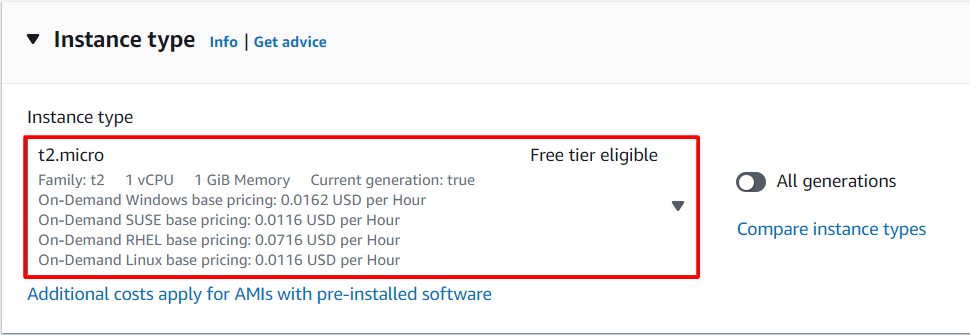
- For Instance Type: select t2.micro
- For Key pair: Proceed without a key pair (Not recommended)
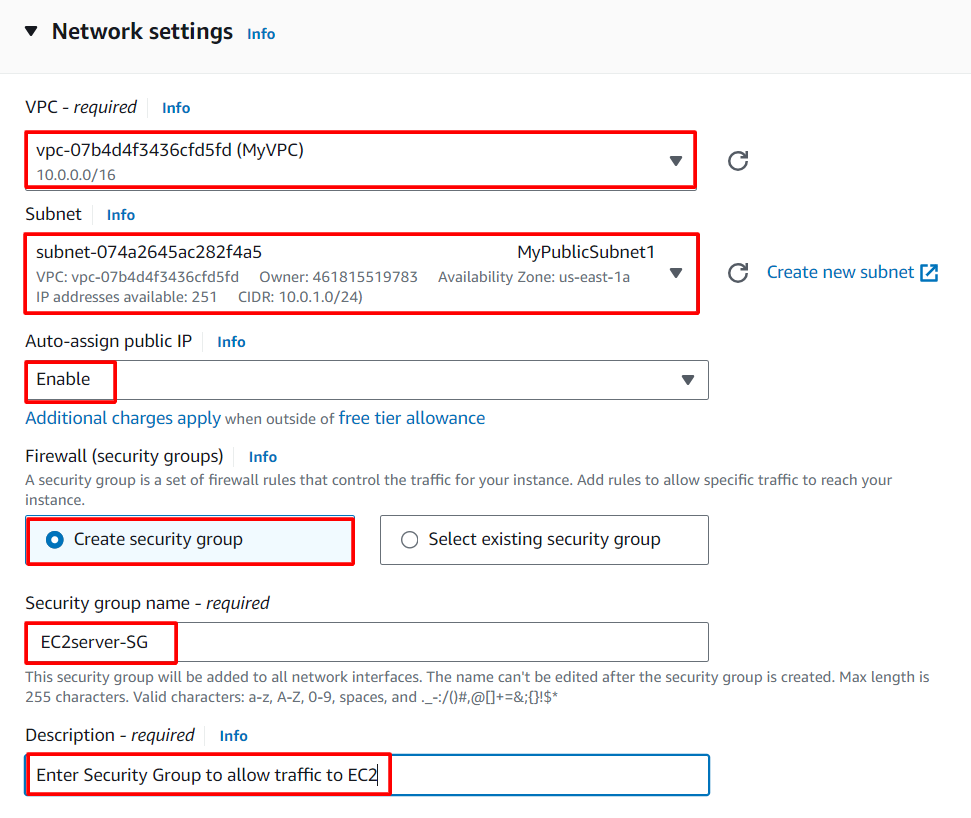
- In Network Settings, Click on Edit:
- VPC: Select MyVPC
- Subet: Publicsubnet1
- Auto-assign public IP: Enable
- Create new Security group
- Security group name : Enter EC2server-SG
- Description : Enter Security Group to allow traffic to EC2
- Expand Advanced Details.
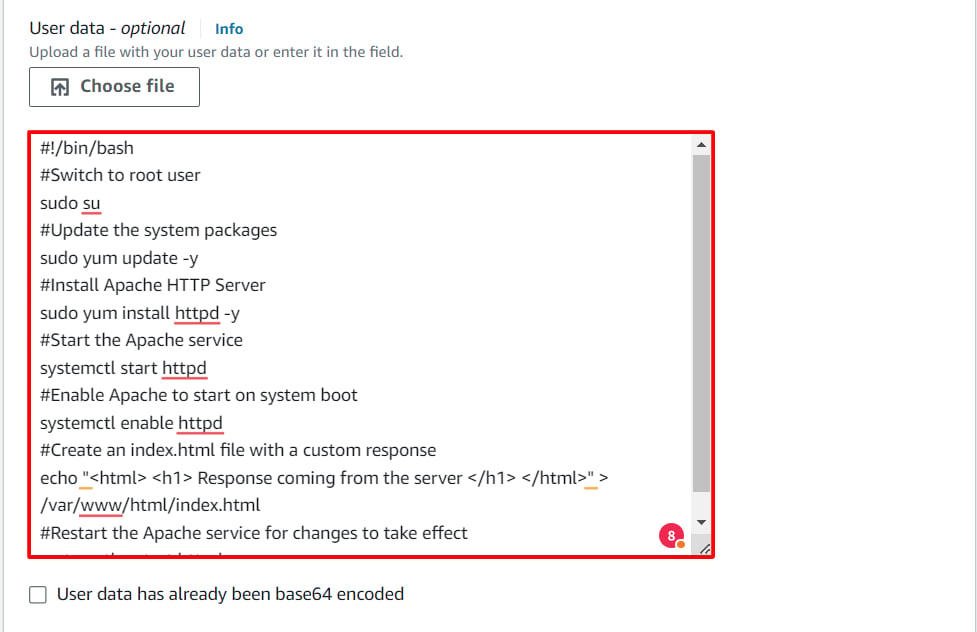
- Under the User data section, copy and paste the below code. This code installs Apache Server and also creates a web page.
Note: After pasting the user data, make sure to remove extra spacing.
- Keep rest thing Default and Click on Launch Instance Button.
- Select View all Instances to View the Instance you Created
- Launch Status: Your instances are now launching, Navigate to Instances page from left menu and wait the status of the EC2 Instance changes to running
- Now in the EC2 dashboard, you can see the instance is running as shown below:

Task 7: Creating Application Load Balancer
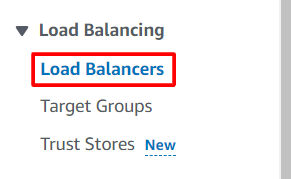
- In the left side menu, scroll down to the bottom and select Load Balancer under Load Balancing.
- Click on the Create load balancer button.
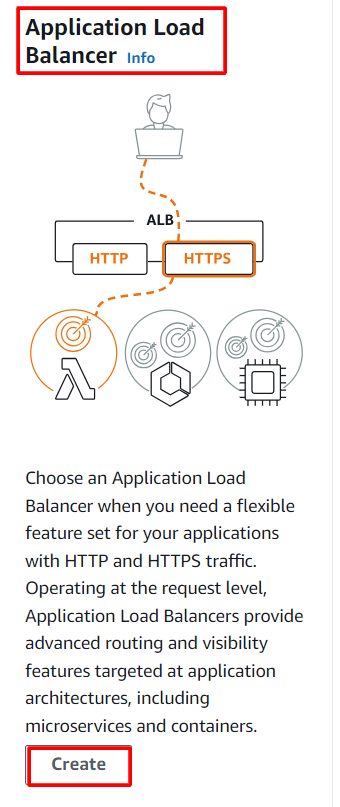
- Select Load Balancer Type: Under the Application Load Balancer, click on Create button.
- Configure Load Balancer:
- Name : Enter Myapplication-LB
- Scheme : Select internet-facing
- Ip Address: IPv4
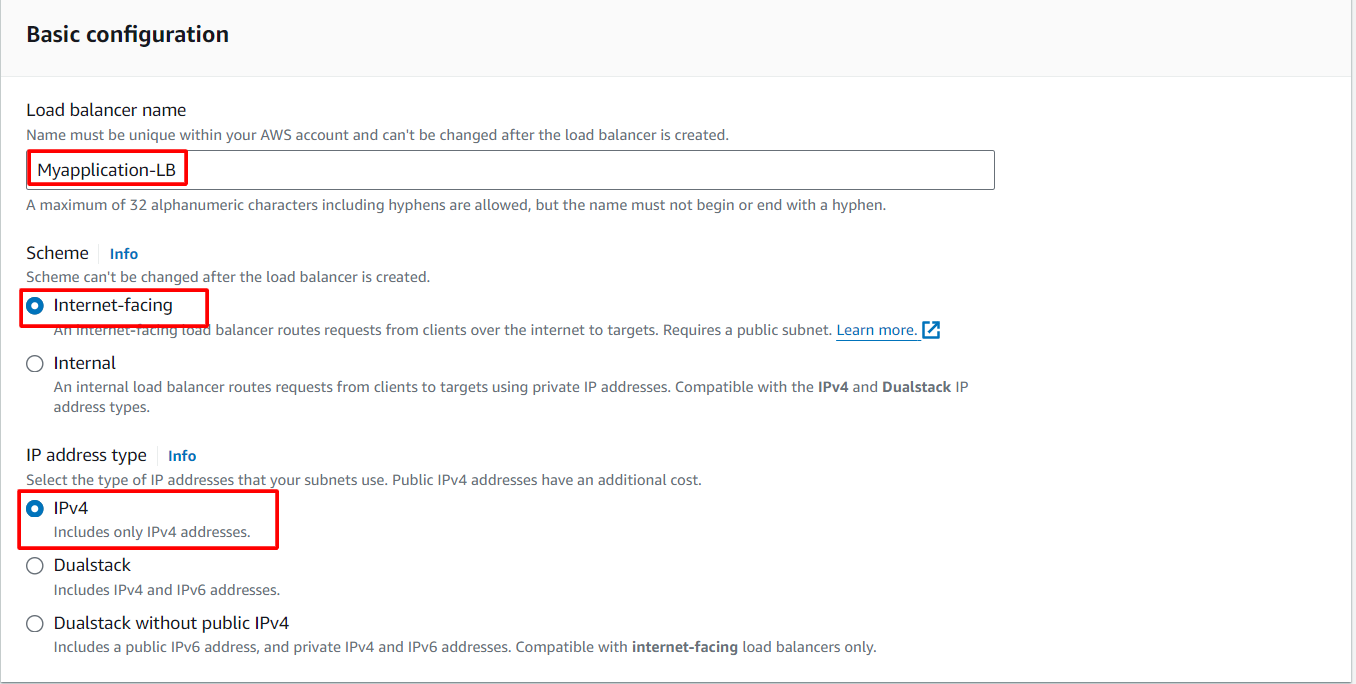
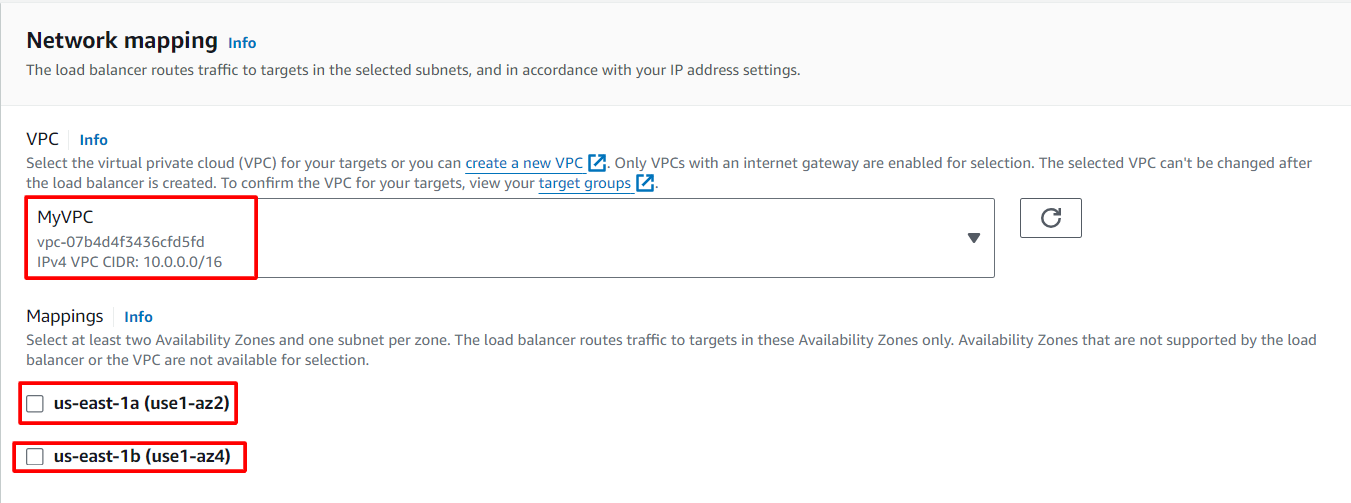
- Network Mappings: MyVPC and select both subnets Note: If you are getting any error while adding the subnet, ignore it and follow the rest of the steps.
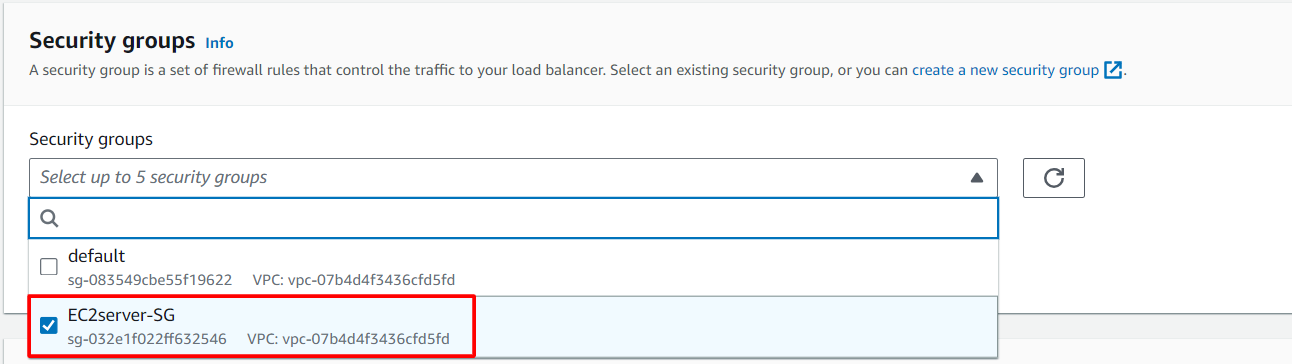
- Security groups:
- Select EC2server-SG security group which we created while launching EC2
- Listeners and routing:
- Load Balancer Protocol : Select HTTP
- Load Balancer Port : Choose 80
- Default action : Create target group
- Choose a security group: default
- Choose a target type: Instances
- Target group name: Apache-TG
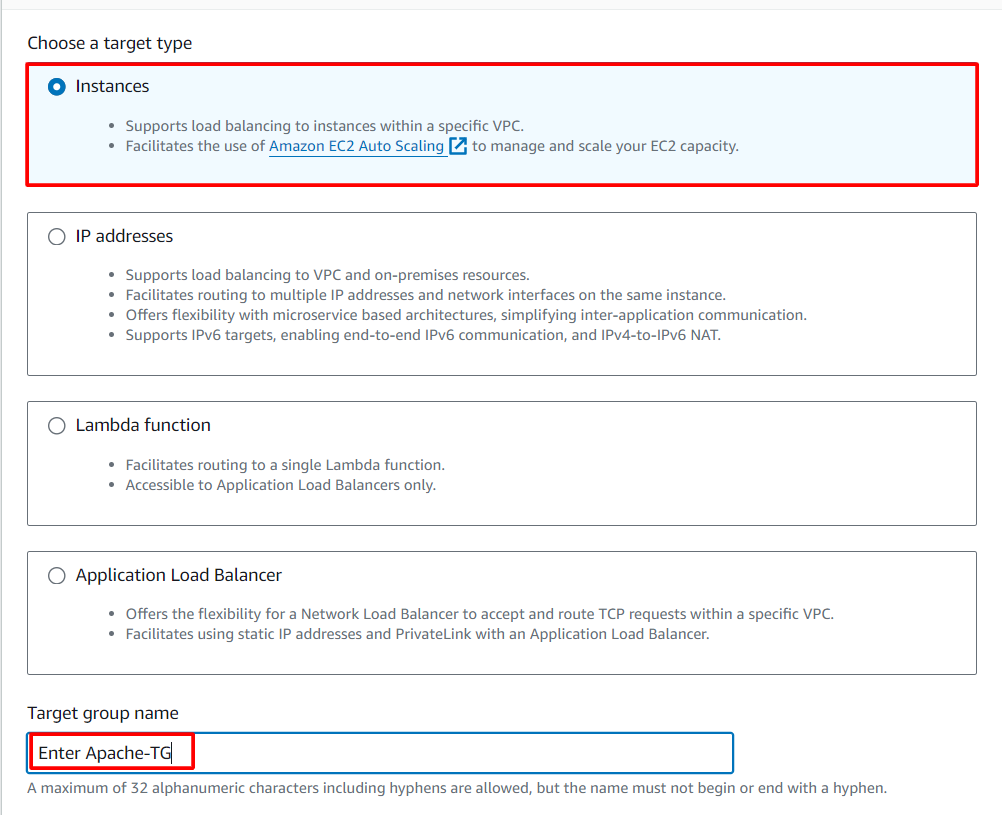
- Everything leaves it as default.
- Click Next.
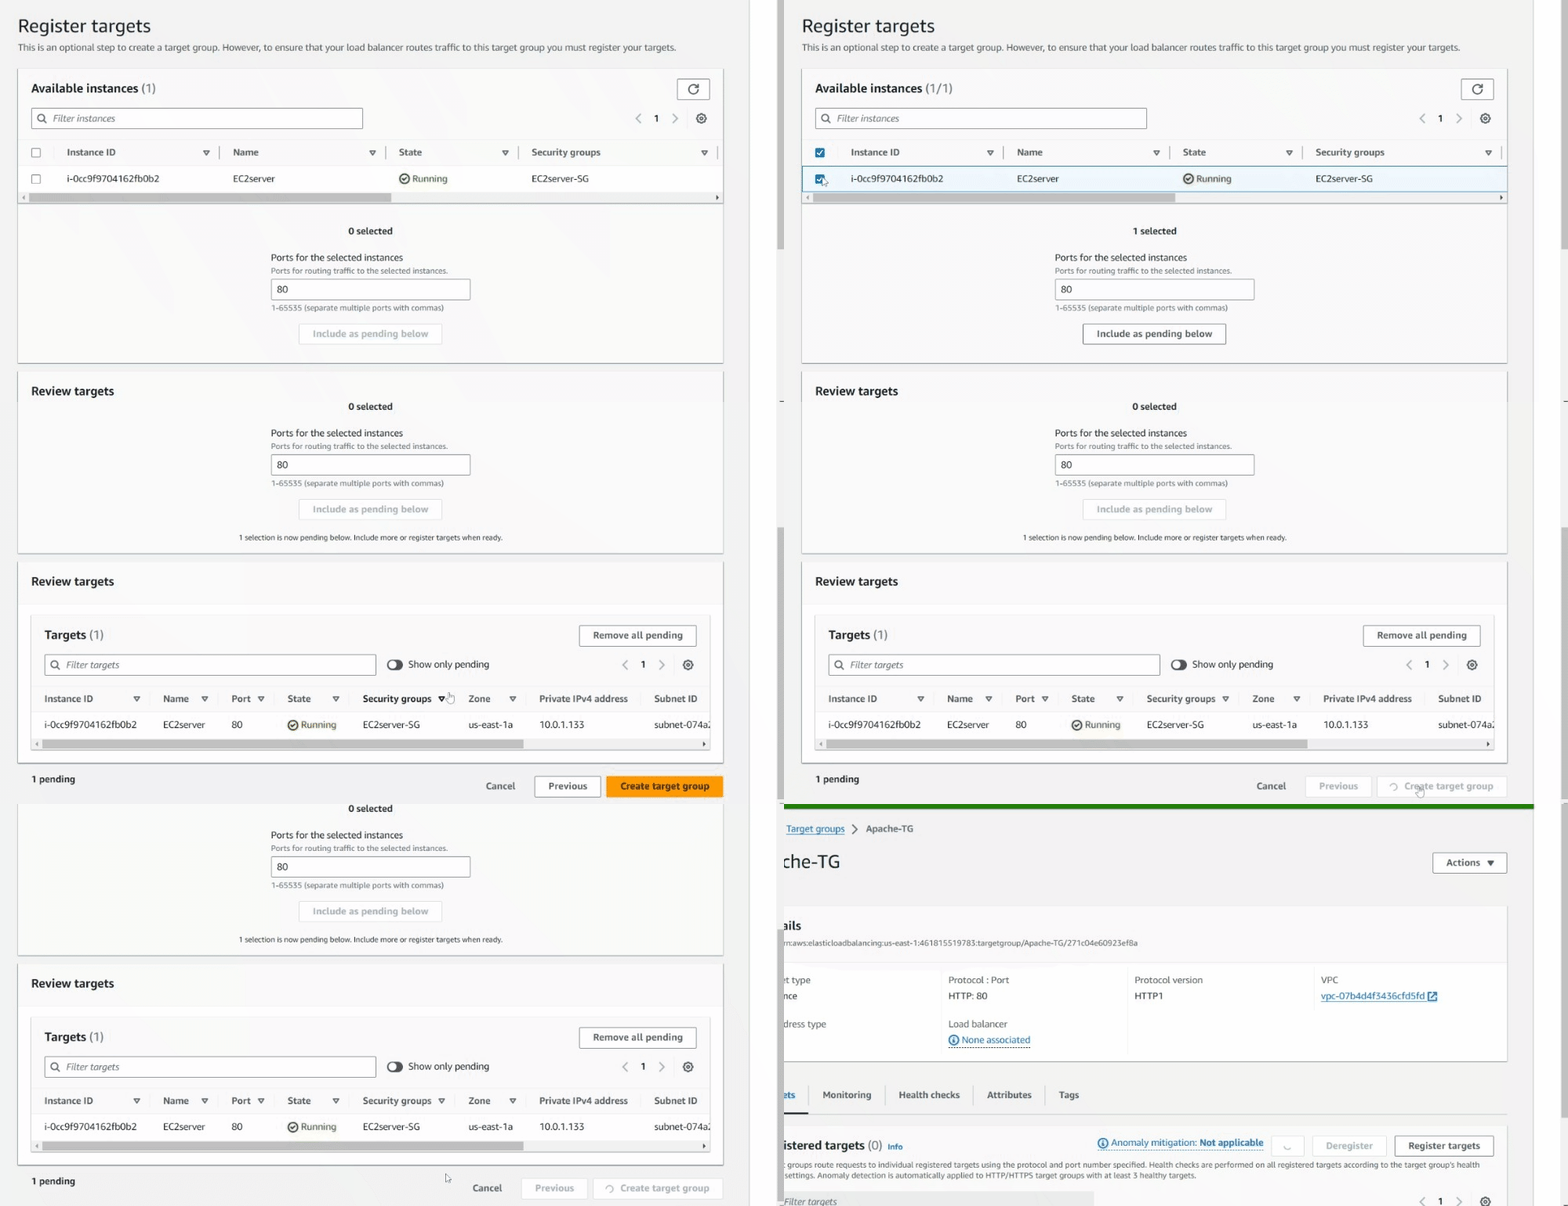
- Select Ec2Server and select Include as pending below button.
- Click Create target group button.
- Ignore the warning message and click Continue.
- Now we can see Apache-TG target group created.
- Now go back to the Load Balancers tab, and select Apache-TG in Default Action in Listeners and routing.
- Click on Refresh button if target-group is not visible
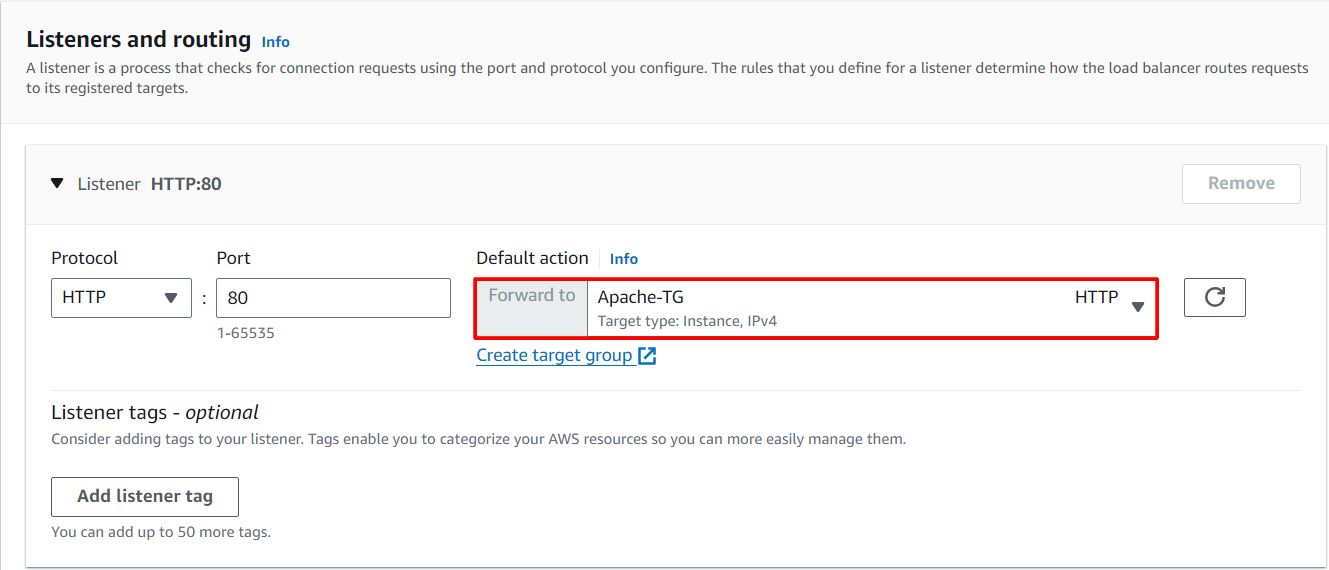
- Click on Create load balancer button
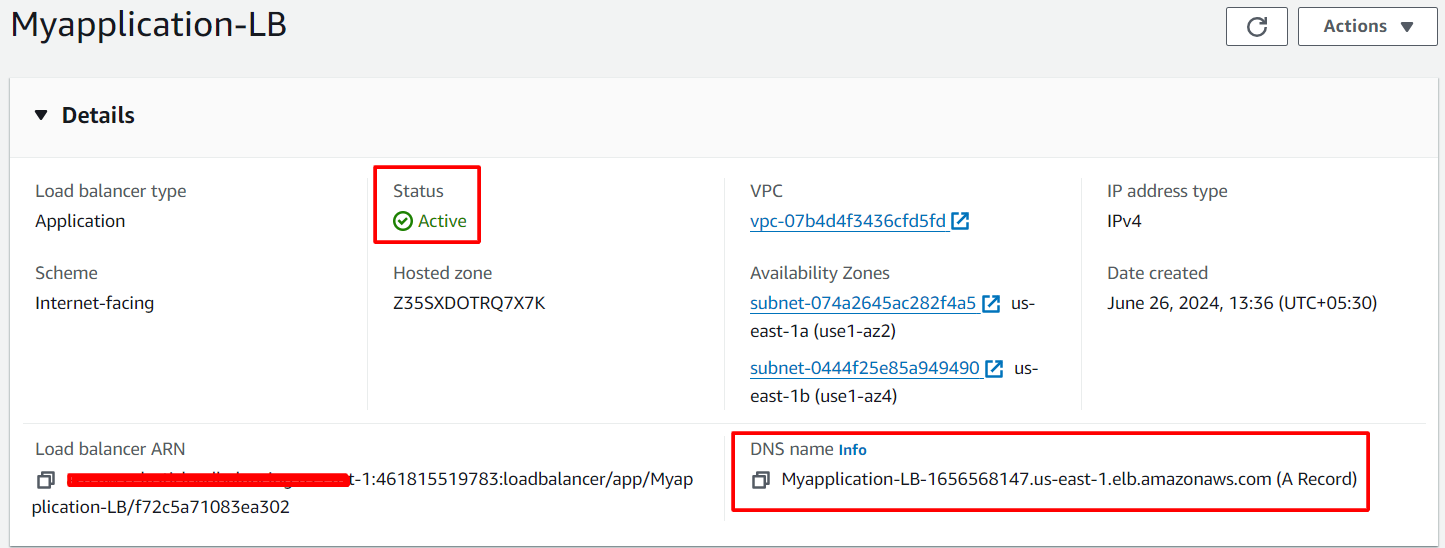
- Click on View Load Balancers.
- After 1–2 minutes, the state will change to active and is ready.
Task 8: Testing Application Load Balancer
- Copy the DNS name. Enter the address in the browser.
- Example DNS name: Myapplication-LB-LB-0a4ff4cc035bae63.elb.us-east-1.amazonaws.com
- You will see the default apache page. By default, the application load balancer will route the traffic to port 80
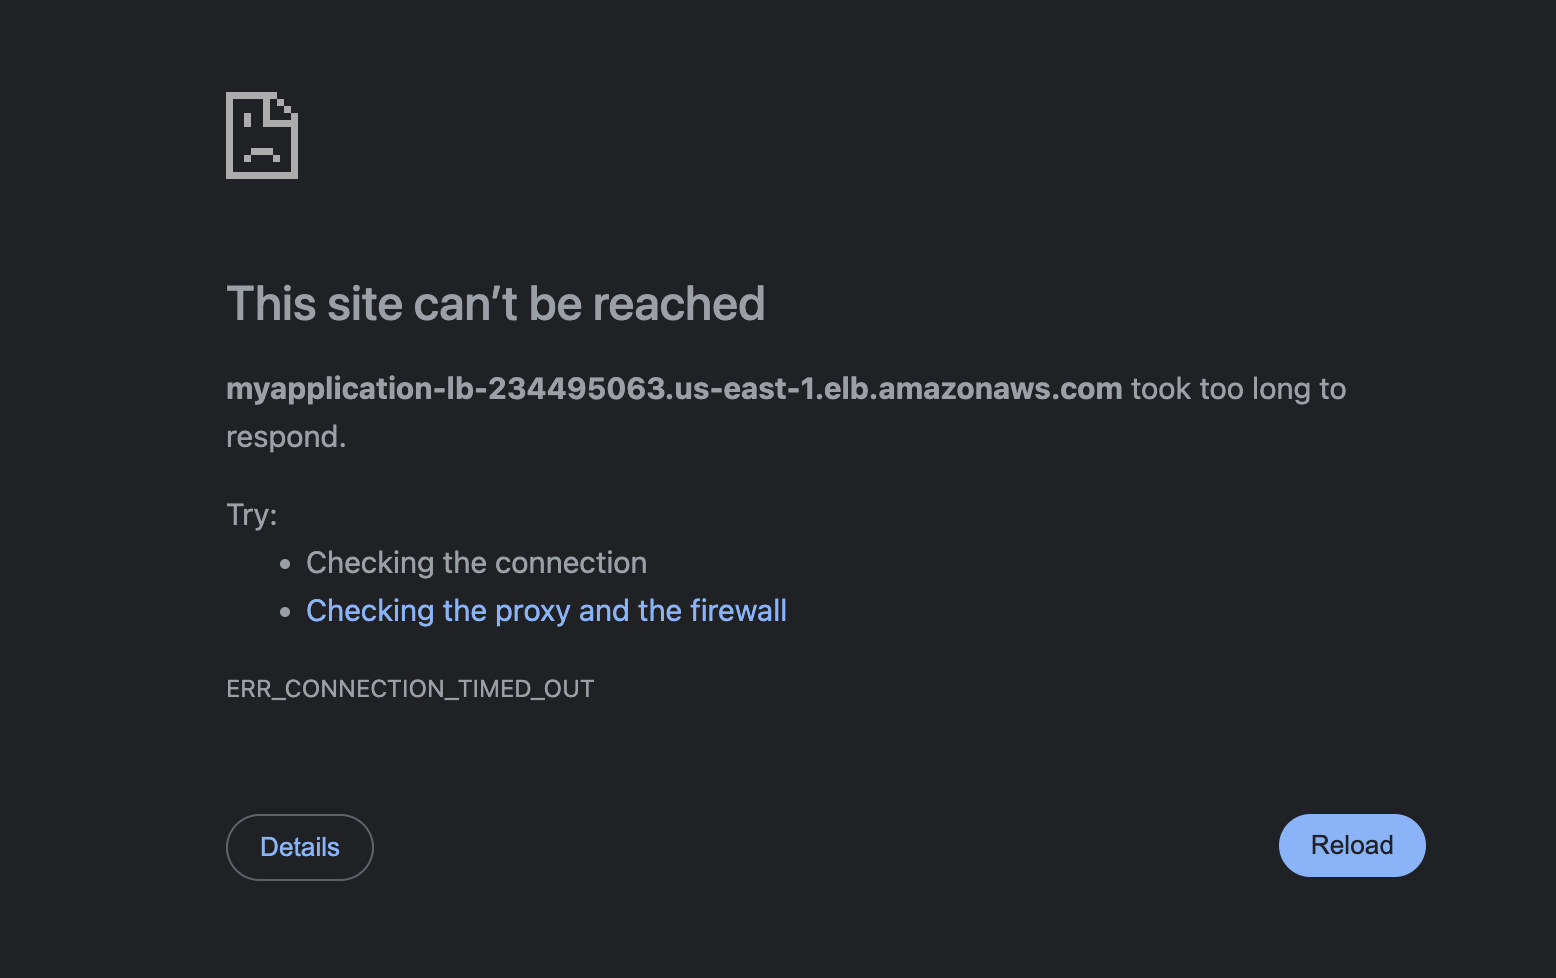
- If the DNS name is not showing in the web page, there is some issue with your configuration.
Task 9: Troubleshooting and Fixing Issues
- Step 1: Verify Internet Gateway Attachment
- Check Internet Gateway Attachment
- Go to the VPC dashboard.
- In the Internet Gateways section, verify that the Internet Gateway is attached to your VPC.
- If not, attach it.
- Step 2: Check Route Table Association
- Verify Route Table Association for Public Subnet
- Go to the “Route Tables” section.
- Select your route table (e.g., PublicRouteTable).
- Go to the “Subnet associations” tab.
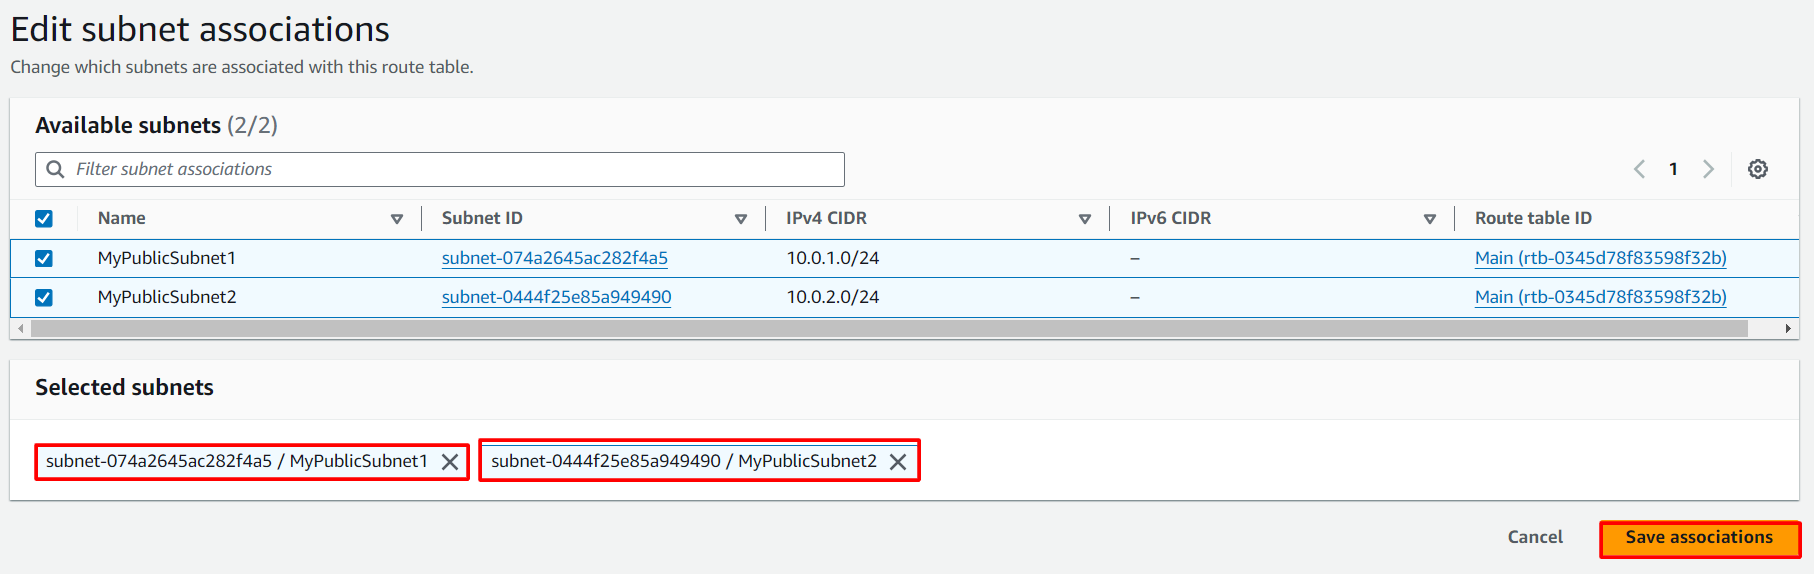
- If Subnet is not associated, click edit subnet associations, select your both public subnet, and save.
- Step 3: Verify Security Group Rules
- Check Security Group Rules
- Go to the EC2 dashboard.
- Select your instance and view its security groups.
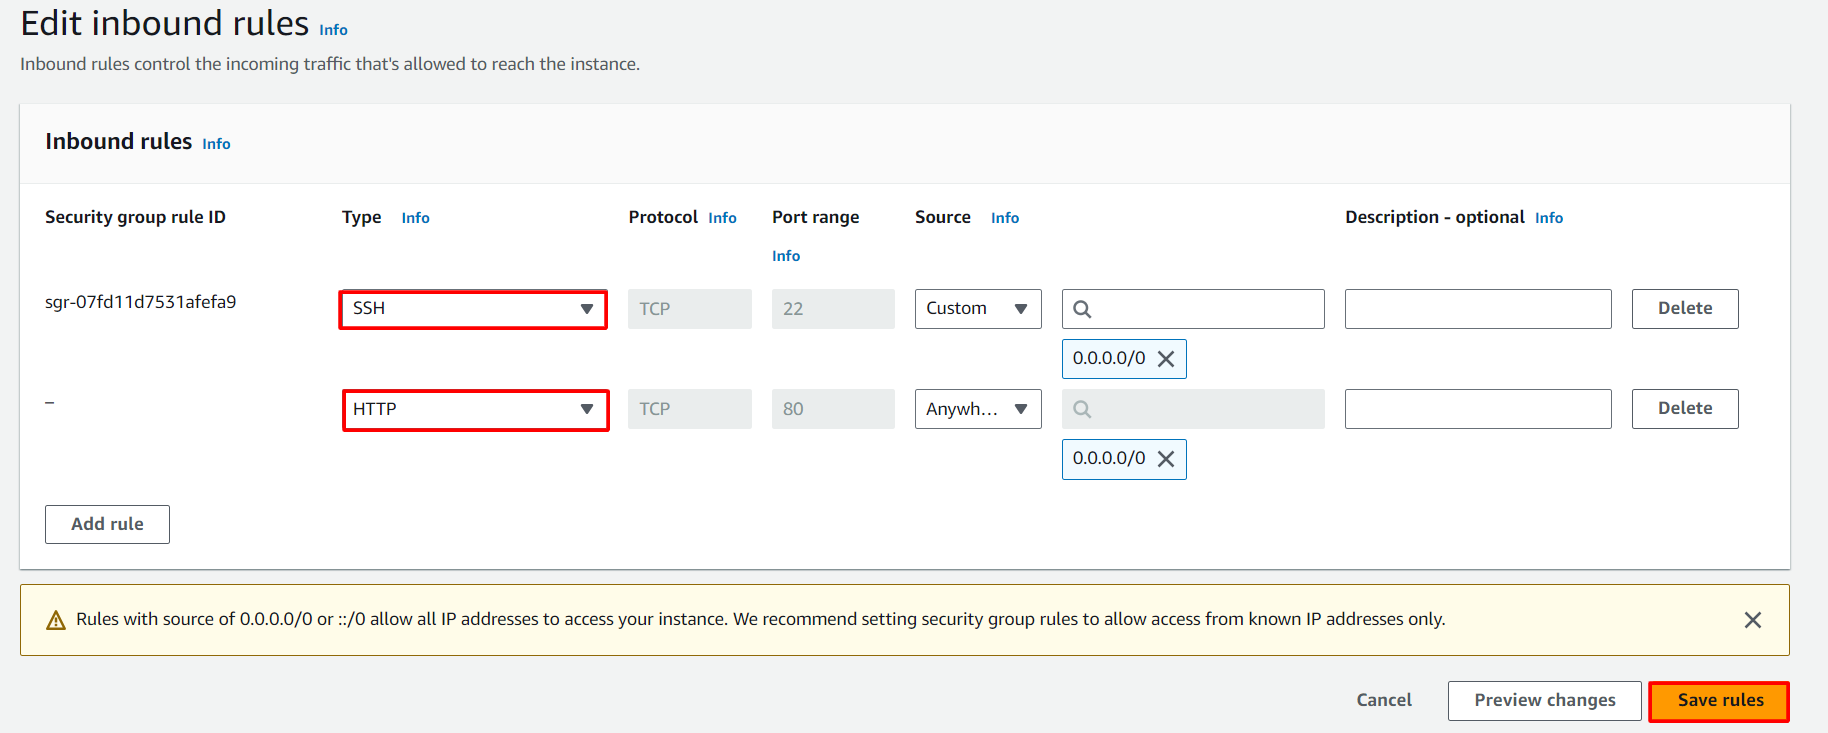
- Verify that the security group allows inbound SSH (port 22) from your IP and HTTP.
- If not, add a rule to allow SSH and HTTP access.
- Click on edit inbound rules
- Click on add rule select HTTP and click on save rules.
Task 10: Rebooting the Ec2 instance
- Go to the EC2 dashboard, you can see the instance is running as shown below:
- Click on your Ec2 instance and click on instance state and reboot your Ec2 Instance.

- Now we are going to test the Application Load balancer DNS name again in web page.
- Enter the address in the browser.
- Myapplication-LB-0a4ff4cc035bae63.elb.us-east-1.amazonaws.com
- Now we are going to test the Ec2 instance also.
- Go to the EC2 dashboard, you can see the instance is running as shown below:
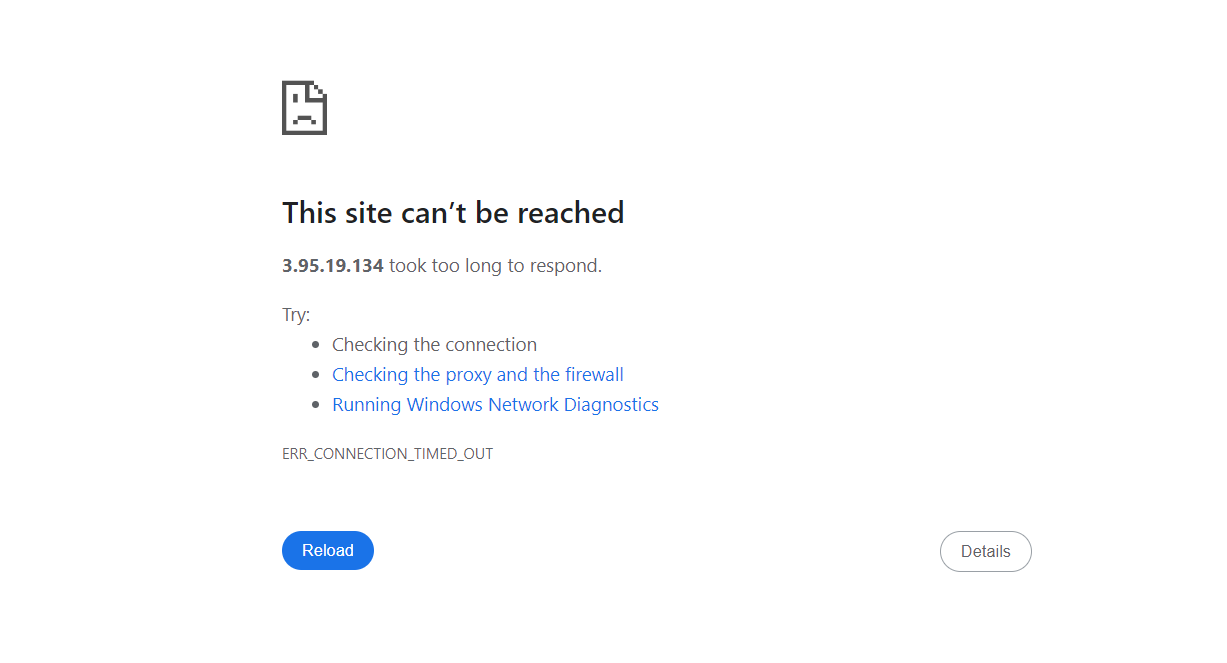
- copy the public IP address, and paste it into your browser
- If you are getting this error, please try repeating the troubleshooting steps.
Task 12: SSH into your EC2 instance
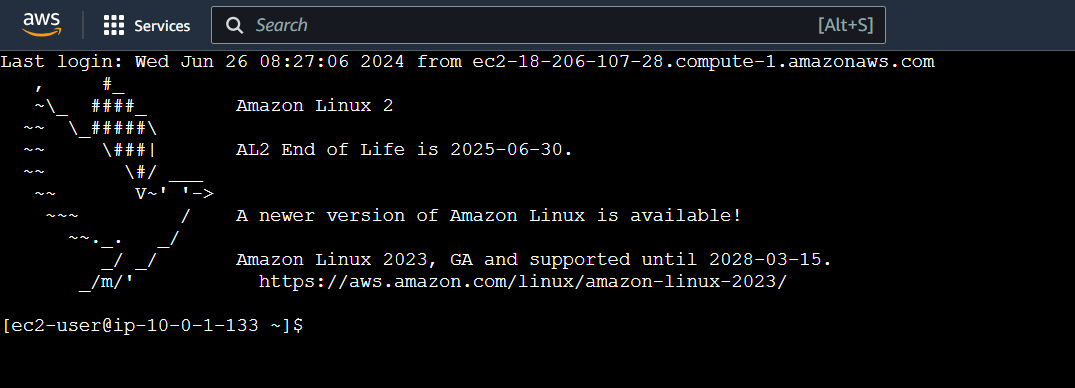
- Select your EC2 instance(MyEC2Server) and click on the Connect button.
- Select EC2 Instance Connect option and click on Connect button.(Keep everything else as default)
- A new tab will open in the browser where you can execute the Linux Commands.
Task 13: Re-Installing the Apache Server on the EC2 instance
Note: The re-installation process helps validate that the Apache server installation and configuration steps have been executed correctly. If there were any issues during the initial setup, this step provides an opportunity to identify and resolve them.
- Now again, we are going to troubleshoot the Amazon EC2 instance to run an Apache Web Server and verify its functionality by accessing the web server via a web browser using the instance’s public IPv4 address.
- Switch to root user
- Now run the updates using the following command:
- Once completed, lets install and run an apache server
- Install the Apache web server:
- Start the web server:
- Now Enable httpd:
- Check the webserver status
- You can see Active status is running.
- To add the contents into index.html file using echo, copy and paste the below command to shell.
- Restart the webserver by using the following command:
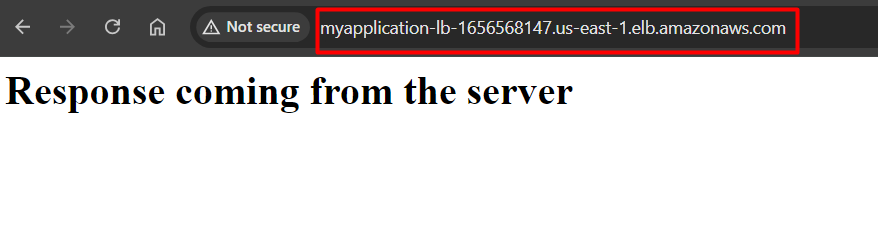
- Load balancer DNS name:
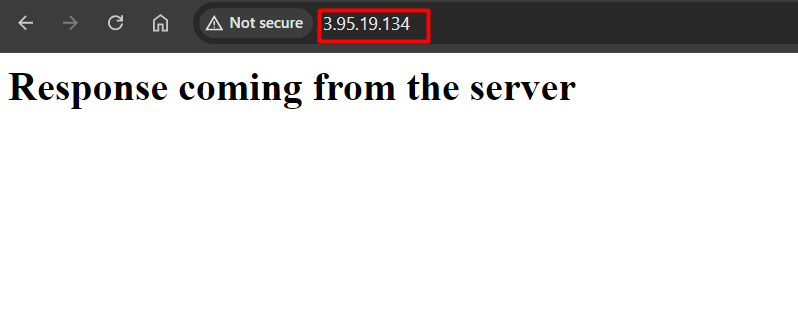
- EC2 instance public Ip:
Do you know?
Troubleshooting connectivity issues between VPC, EC2, and Load Balancer involves addressing overlooked aspects like misconfigured security groups, subtle route table errors, and conflicting Network ACL rules. These misconfigurations can silently block traffic or cause unexpected issues. Additionally, ensuring proper health check settings on the load balancer is crucial to avoid false negatives.
Completion and Conclusion
- You Have Successfully logged into AWS console.
- You Have Successfully created VPC and other configuration.
- You Have Successfully launched the Ec2 instance.
- You Have Successfully created an Application load balancer.
- You Have Successfully done the troubleshooting steps
End Lab
- Sign Out Of AWS Account.
- You Have Successfully Completed The Lab.
- Once You Have Completed The Steps, Click On End Lab From Your IP Lab Portal And Wait Till The Process Gets Completed.
What gets checked
When you press Check my work, the platform verifies each of these:- Create Amazon Custom VPC — Check whether a Custom VPC is created or not.
- Create Amazon Custom VPC Subnet — Check whether a Subnet is created for the Custom VPC or not.
- Create Internet Gateway — Check whether an Internet Gateway is created and attached to the Custom VPC or not.
- Create Amazon Custom VPC Public Route Table — Check whether a Custom VPC Public Route Table is created and an Internet Gateway route is added or not.
- Launch an EC2 Instance — Check whether an EC2 Instance is launched or not.
- Create a Application Load Balancer — Check if given type of Load Balancer is created or not.
- Create ELB Target Group — Check if given type of Load Balancer is created or not.
- Invoke Load Balancer DNS — Check whether the Elastic Load Balancer DNS URL is accessible from the internet or not.
- Install Apache Web Server — Check whether Apache Web Server is installed in EC2 Instance or not.