

Overview
Lab Details
- In this lab, you will set up and test the Amazon EBS Multi-Attach feature within a Virtual Private Cloud (VPC) using two EC2 instances running Amazon Linux 2023. You’ll create a Multi Attach enabled EBS volume and attach it to both instances. On the first instance, you’ll format and mount the volume with the ext4 file system, create a test file, and then mount the same volume as read-only on the second instance to safely read that file.
- Duration: 45 minutes.
- AWS Region: US East (N. Virginia) us-east-1.
Introduction
What is EBS Multi-Attach?
-
EBS Multi-Attach is an Amazon Elastic Block Store (EBS) feature that allows you to attach a single EBS volume to multiple EC2 instances at the same time — as long as the instances are in the same Availability Zone and the volume type is io1 or io2.
- You can attach one EBS volume to up to 16 EC2 instances at once.
- All instances see the same block device, which means they can read from or write to the same volume.
- It is designed for high-availability applications like clustered databases or shared file systems.
Lab Feature:
- This lab shows how to configure Amazon EBS Multi-Attach to share a single volume between two EC2 instances. You’ll mount the volume as read-write on one instance and read-only on the other to safely share files. It demonstrates proper use of ext4 with Multi-Attach and best practices to avoid data corruption.
Benefits:
- Enables shared storage access across multiple EC2 instances in the same AZ.
- Supports high availability and failover scenarios with shared data.
- Demonstrates safe use of ext4 file system with Multi-Attach by controlling read/write access.
- Helps monitor and share files in real-time without data corruption risks.
Architecture Diagram
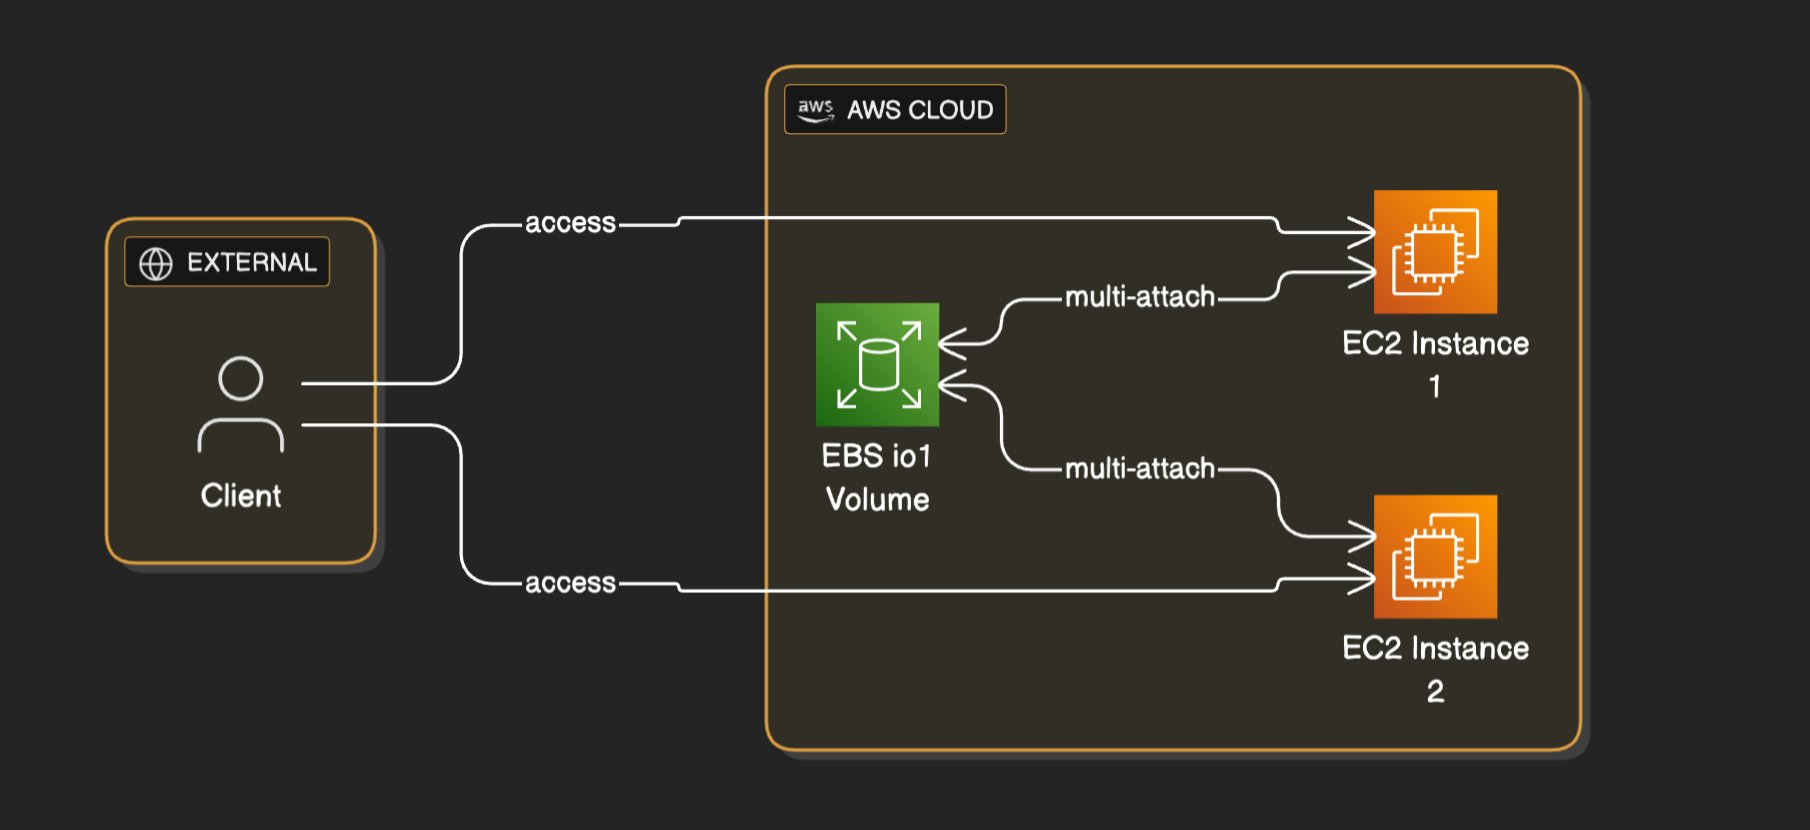
Task Details
- Sign in to the AWS Management Console.
- Launch an EC2 Instances
- Create New EBS Volume
- Mounting an EBS Volume in Linux
Launching Lab Environment
- To launch the lab environment, click on the Start Lab button.
- Please wait until the cloud environment is provisioned. It will take less than a minute to provision.
- Once the Lab is started, you will be provided with IAM username, Password, Access Key, and Secret Access Key.
Note: You can only start one lab at any given time.
Lab guide
Lab Steps
Task 1: Sign in to AWS Management Console
- Click on the Open Console button, and you will get redirected to AWS Console in a new browser tab.
-
On the AWS sign-in page,
- Leave the Account ID as default. Never edit/remove the 12 digit Account ID present in the AWS Console. otherwise, you cannot proceed with the lab.
- Now copy your User Name and Password in the Lab Console to the IAM Username and Password in AWS Console and click on the Sign in button.
- Once Signed In to the AWS Management Console, Make the default AWS Region as US East (N. Virginia) us-east-1.
Task 2: Launch an EC2 Instances
- Ensure you are in the US East (N. Virginia) us-east-1 Region to begin launching an EC2 instance in the Amazon cloud.
- Navigate to EC2 by clicking on the Services menu in the top, then click on EC2 in the Compute section.
- Click on the Instances option on the left panel, and then click on the Launch Instances button.
- Name : Enter EC2Server

- Select Amazon Linux 2023 AMI from the dropdown.
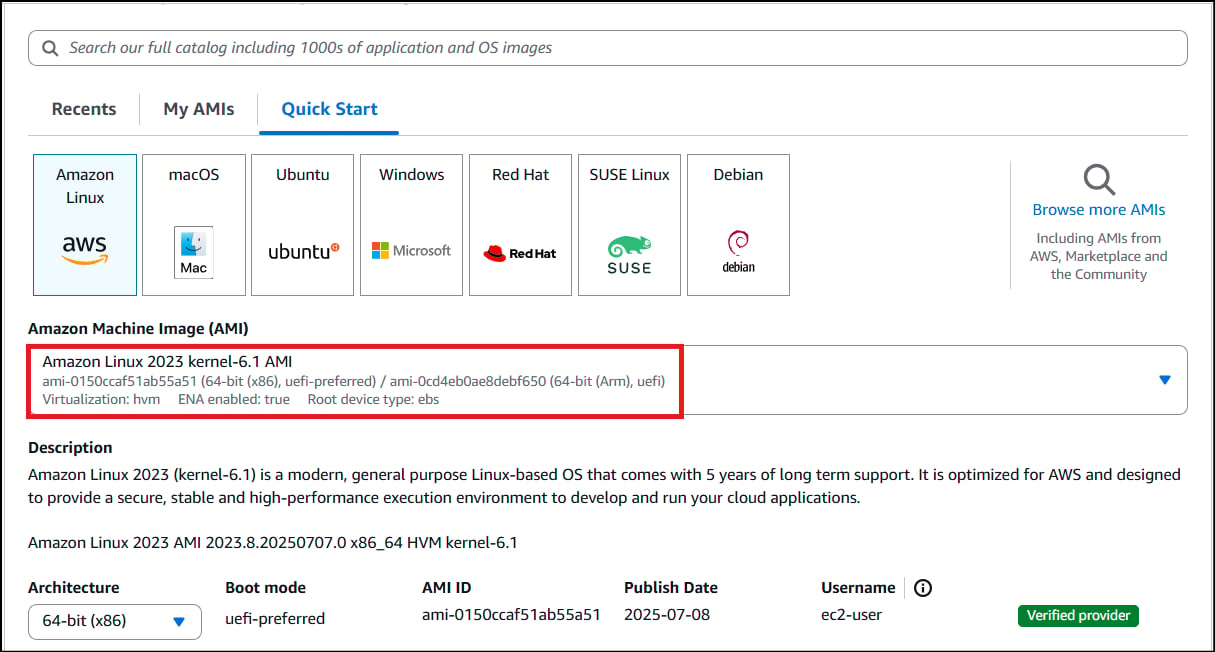
Note: If there are two AMI’s present for Amazon Linux 2o23 kernel-6.1 AMI.
- An instance type in AWS refers to a virtual server configuration that determines the computing resources, such as CPU, memory, and storage, available to an instance. It is the basic building block for creating an EC2 instance in the AWS cloud.
- For Instance Type: Select t3.micro

- t3.micro is an instance type in AWS that comes with 2 vCPU, and 1GB memory and is suitable for low-traffic web servers, small development environments, and other lightweight applications.
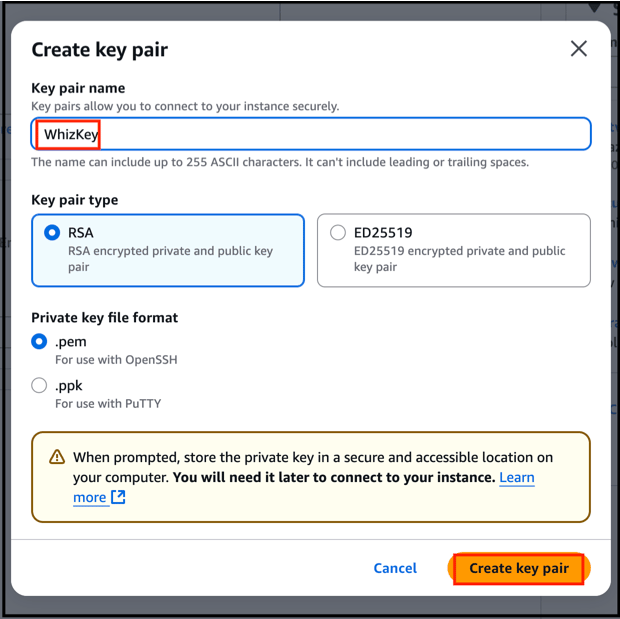
- AWS Key pair is a secure pair of keys used for login and access to EC2 instances. It includes a public key placed on the instance and a private key kept on the user’s local computer, used for authentication to prevent unauthorized access.
- For Key pair(login): Select Create a new key pair Button
- Key pair name: WhizKey
- Key pair type: RSA
- Private key file format: .pem
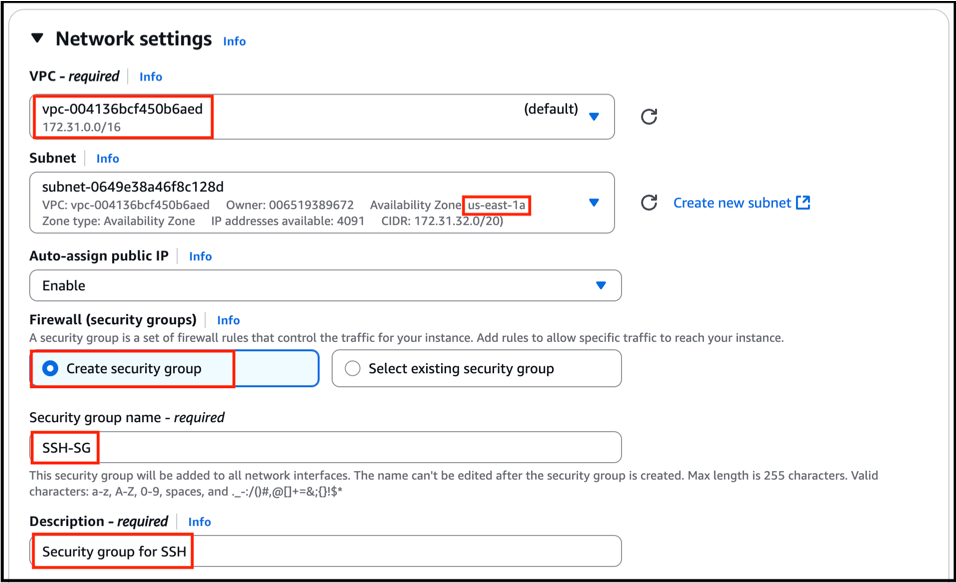
- Click the Edit button in the network settings.
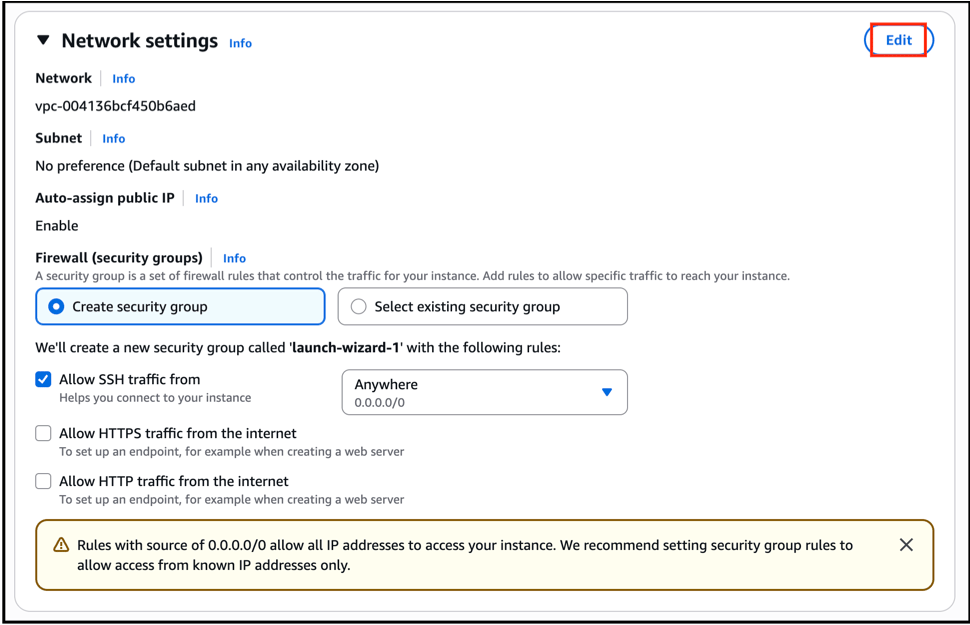
- Select the default VPC and a subnet in the us-east-1 region. Enable Auto-assign public IP, choose Create security group, and give name as SSH_SG and description as Security Group for SSH. And leave everything as default.
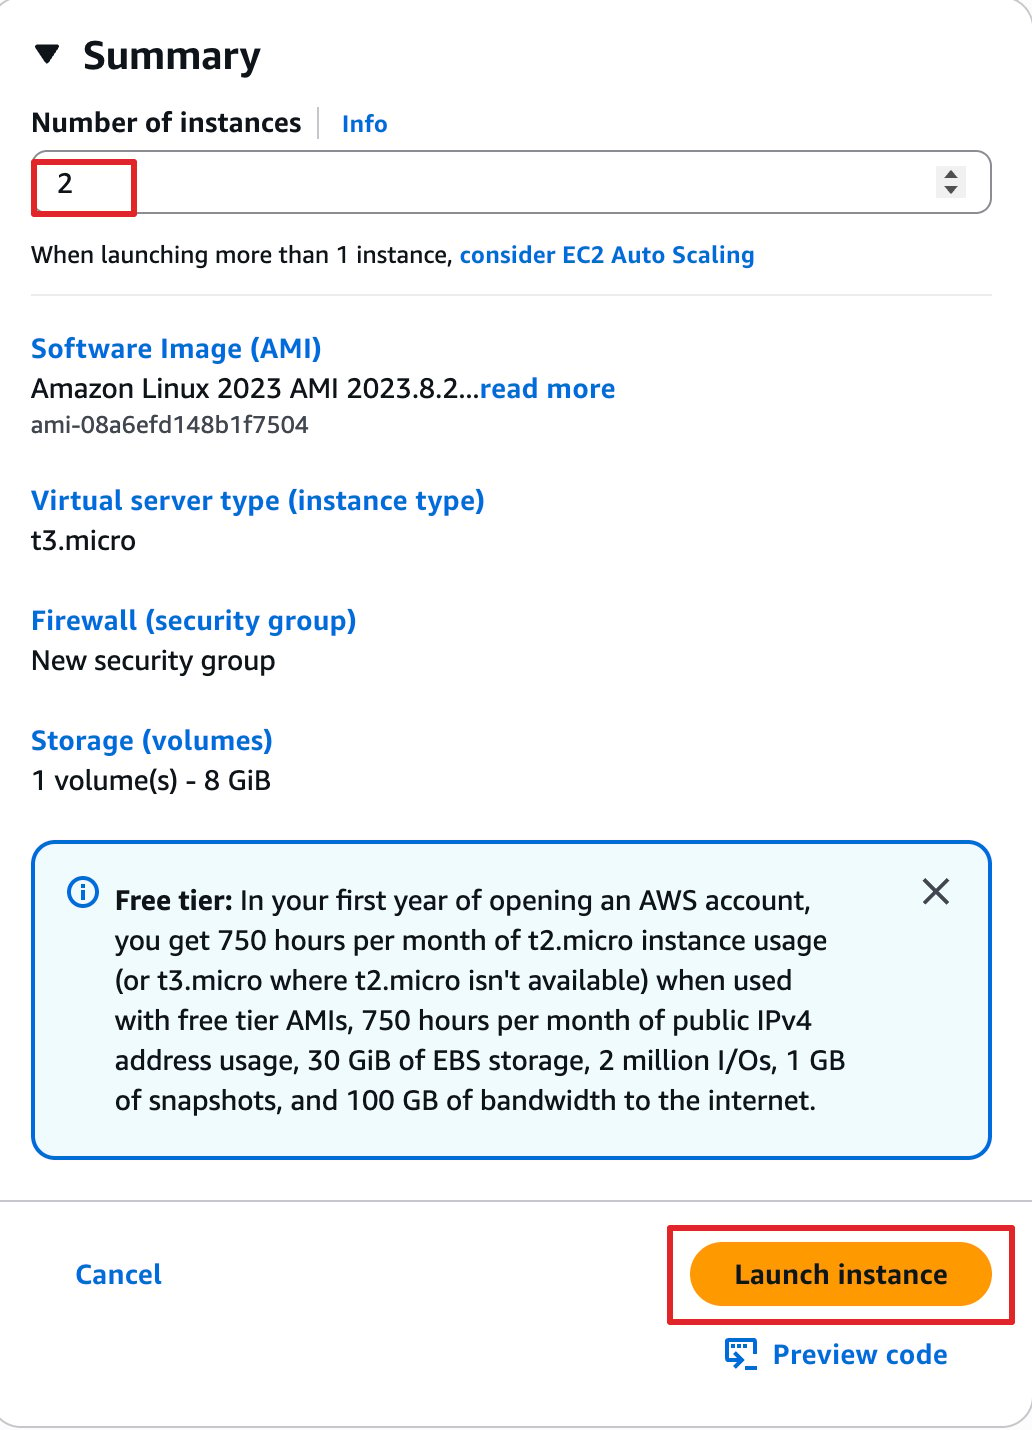
- At the top right, set the Number of instances to 2, then click Launch instance.
- After creating the EC2 instances, rename the first instance from EC2server to ‘EC2server-1’ and the second instance from ‘EC2server’ to ‘EC2server-2’.

Task 3 : Create New EBS Volume
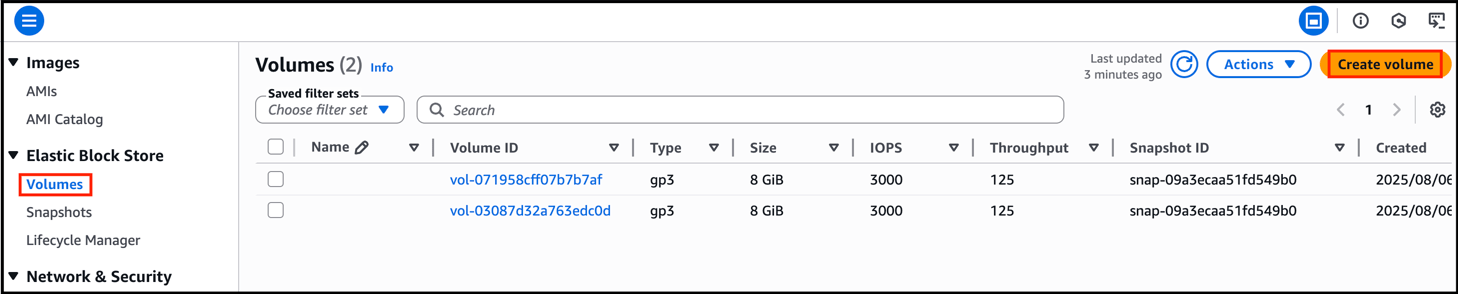
- In the EC2 sidebar panel, click Volumes to create a new volume.
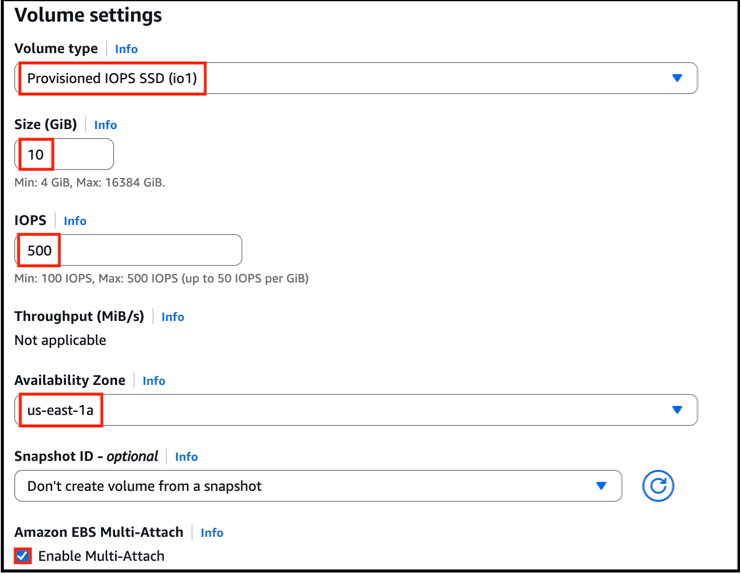
- Set the following values in the Create volume form:
- Volume type: Provisioned IOPS SSD (io1)
- Size (GiB): 4
- IOPS: 100
- Availability Zone: us-east-1a
- You must check the box for Enable Multi-Attach before proceeding.
- Leave other settings as default, then click Create Volume.
- After creating the volume and EC2 instances:
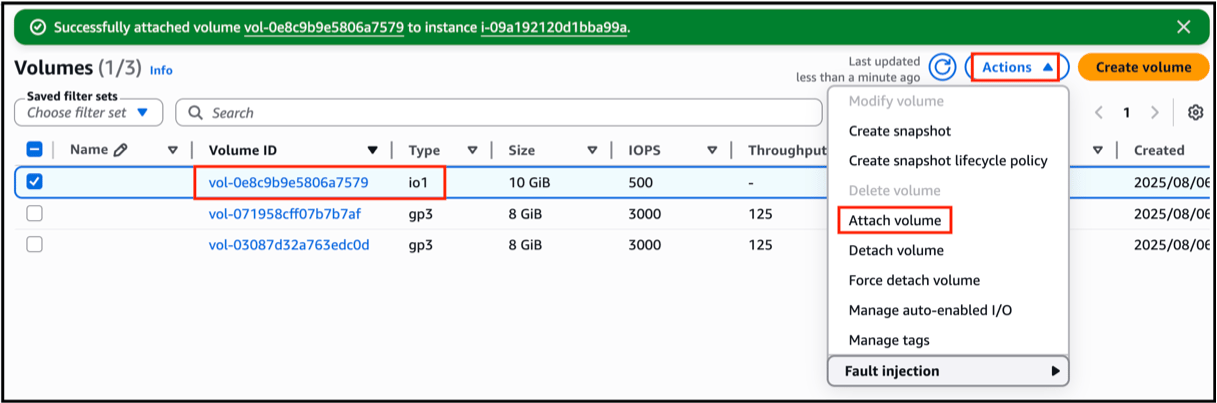
- Now, Select the newly created volume.
- Click Actions and then choose Attach volume.
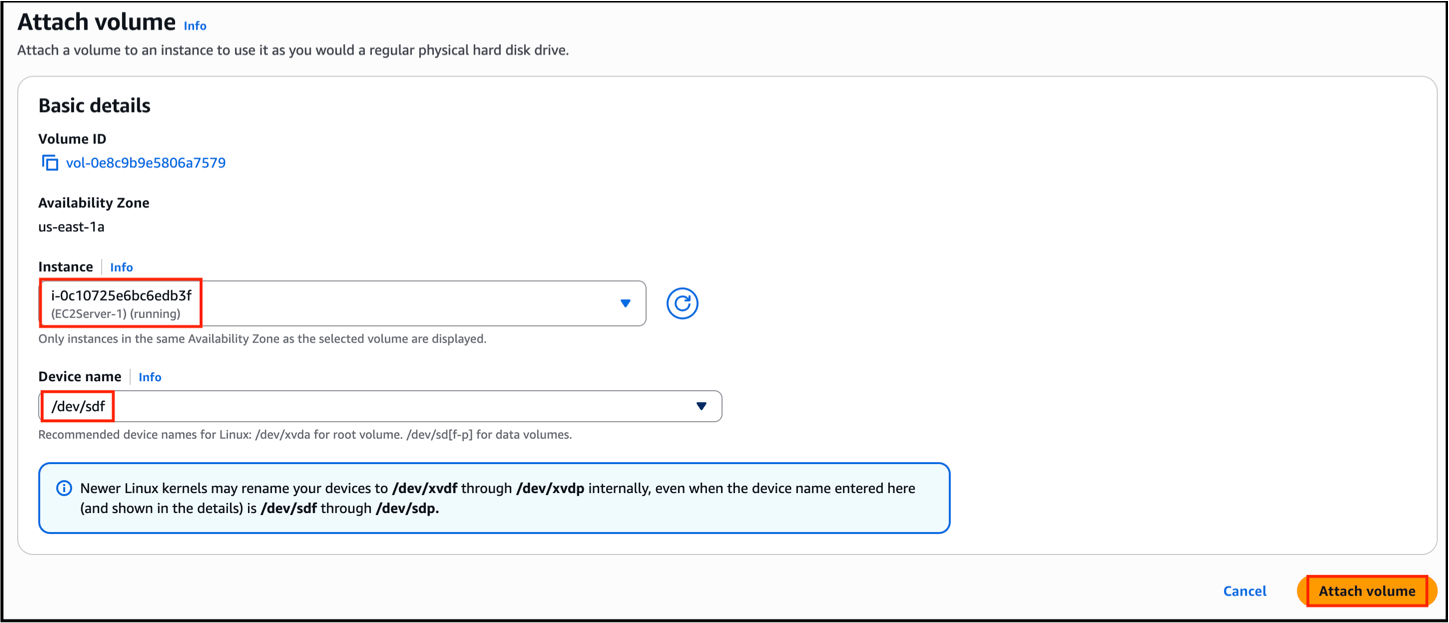
- In the Instance field, choose EC2server-1, choose Device name “ /dev/sdf ” then click Attach.
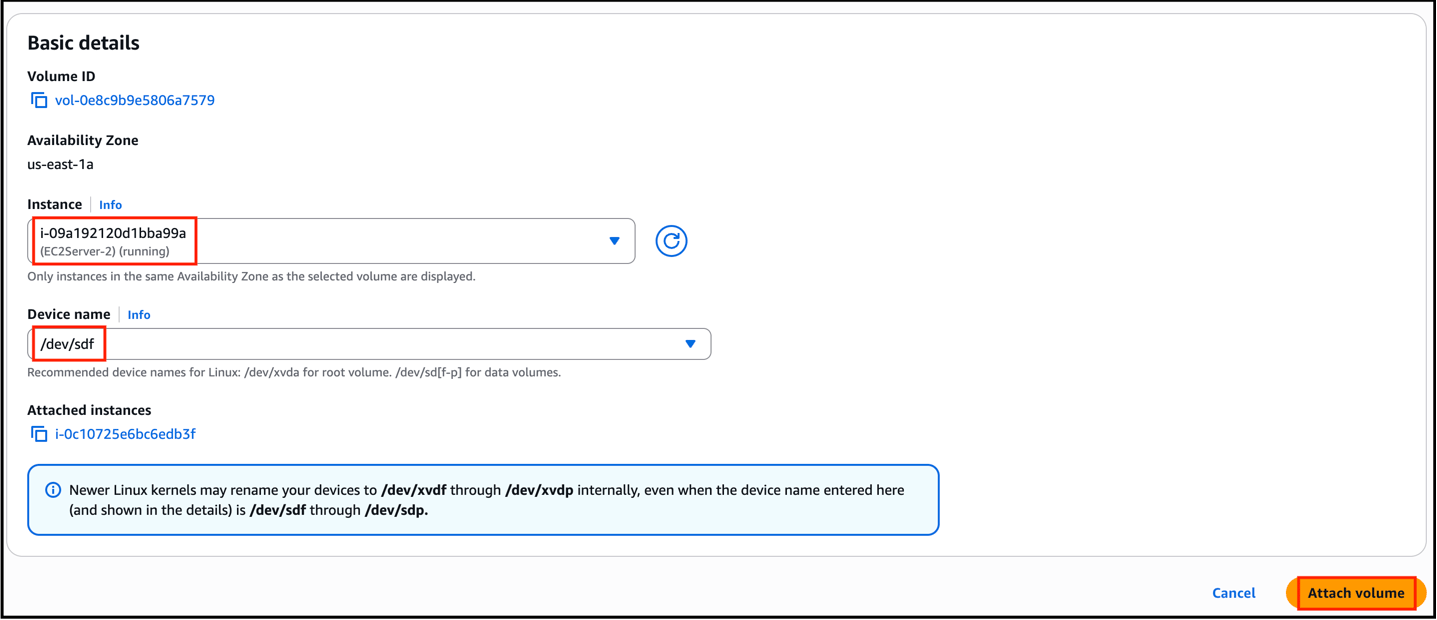
- Repeat the same process to attach the same volume to EC2server-2.
- Make sure the volume is in the same Availability Zone (us-east-1a) as both instances.
Task 4 : Mounting an EBS Volume in Linux
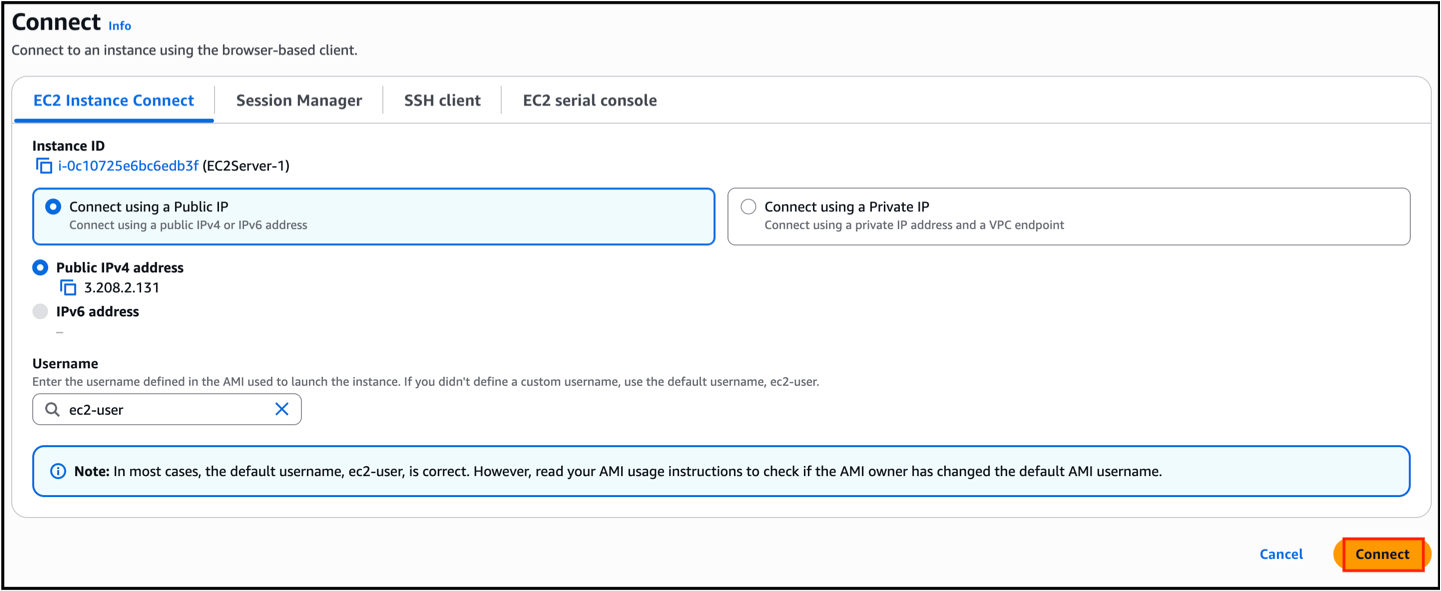
- Now, Navigate to EC2 Instance, Use EC2 Instance Connect to access and establish a connection between EC2Server-1 and EC2Server-2 via the browser.

- On Both EC2s, Check and Identify the EBS Volume :
- Look for the EBS volume. It should show up as follow,
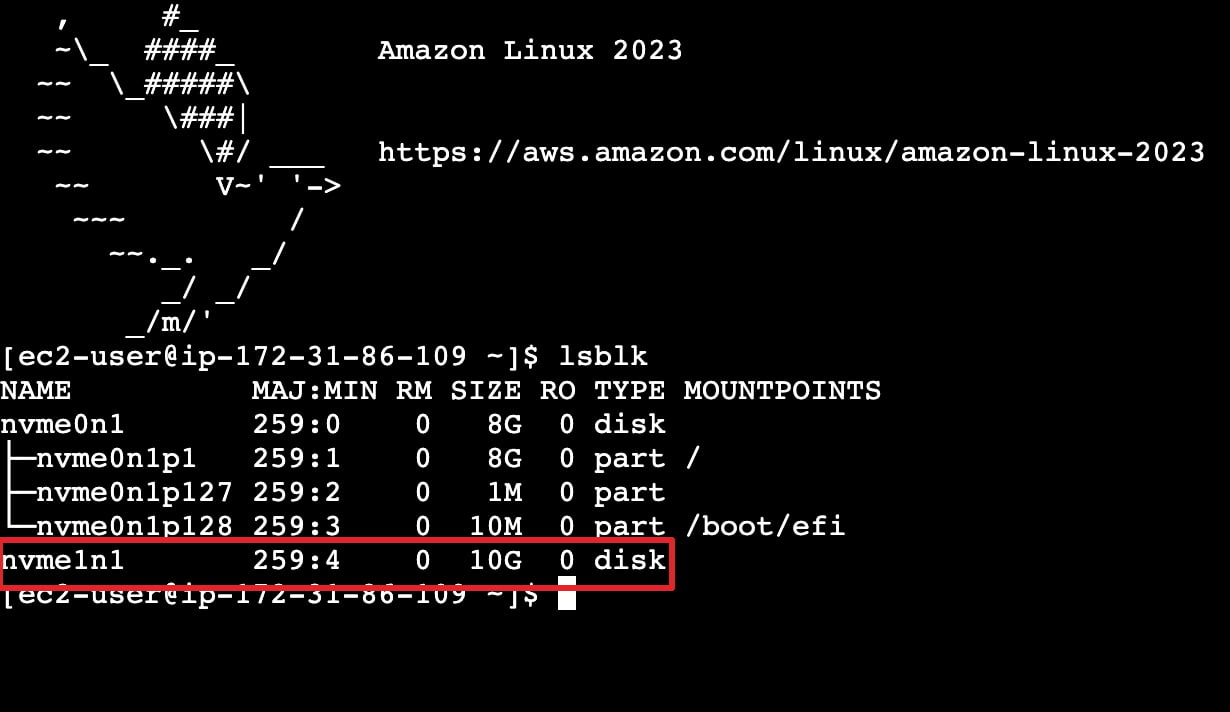
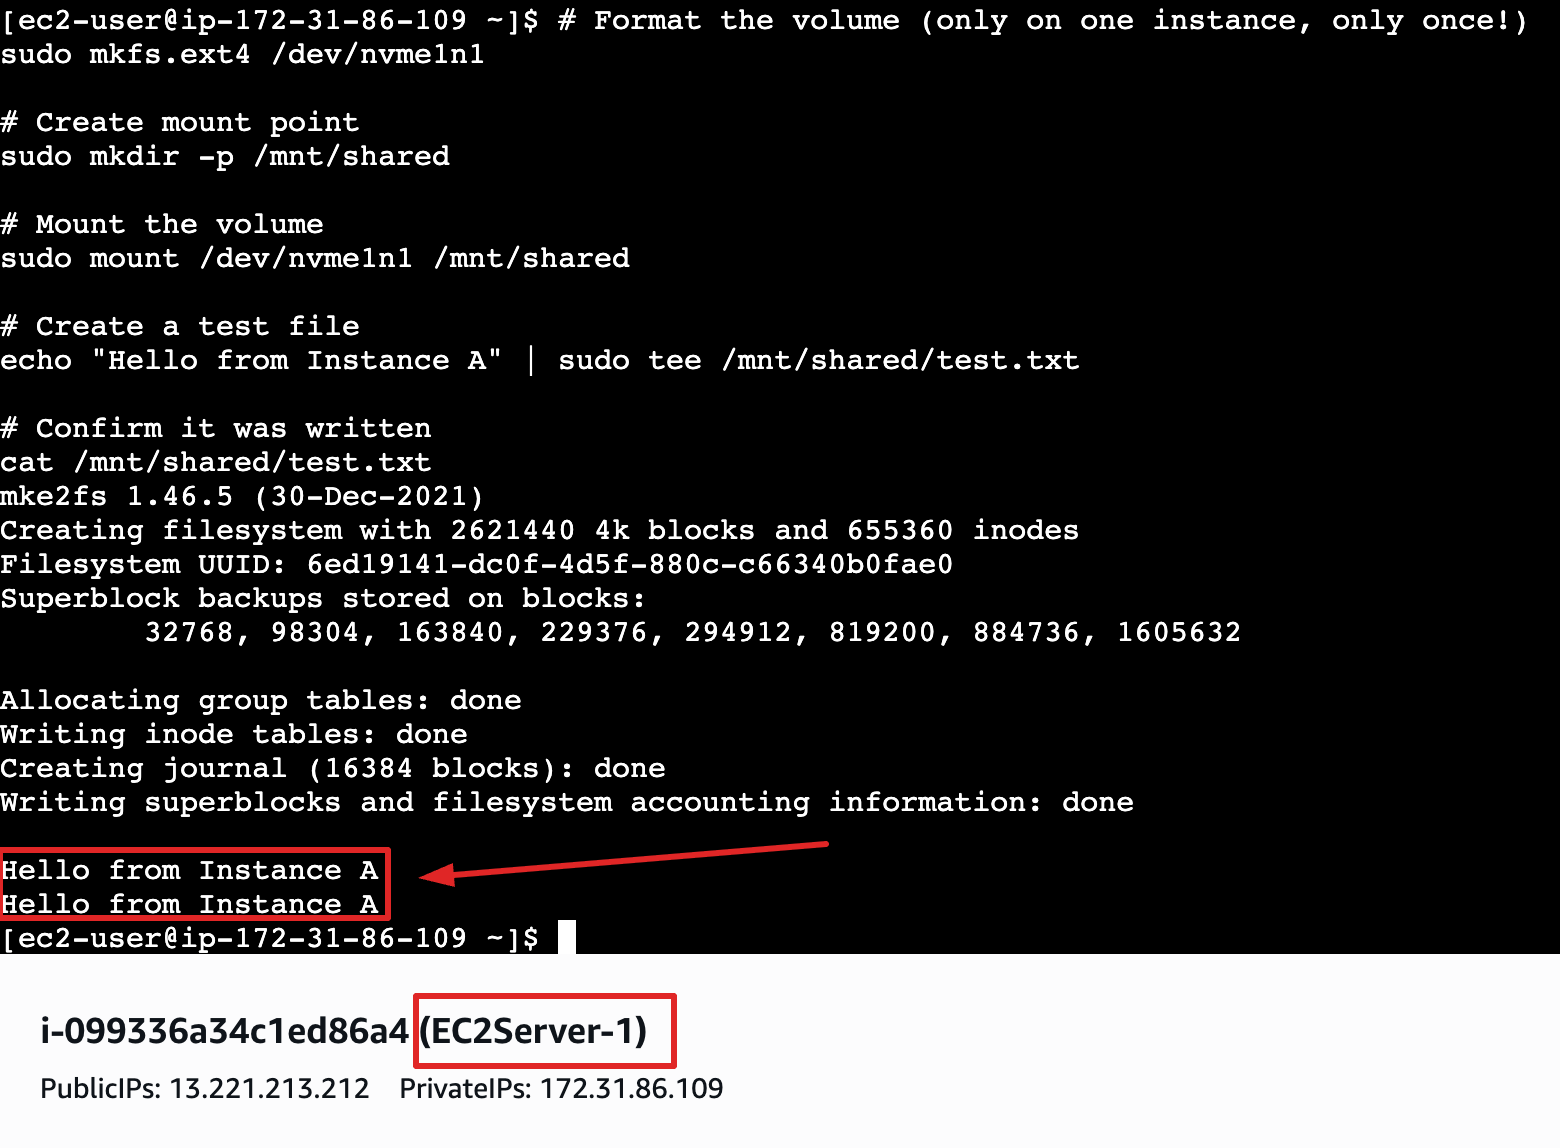
- On EC2Server-1 (Writer) — Format, Mount, Write paste and run the following command:
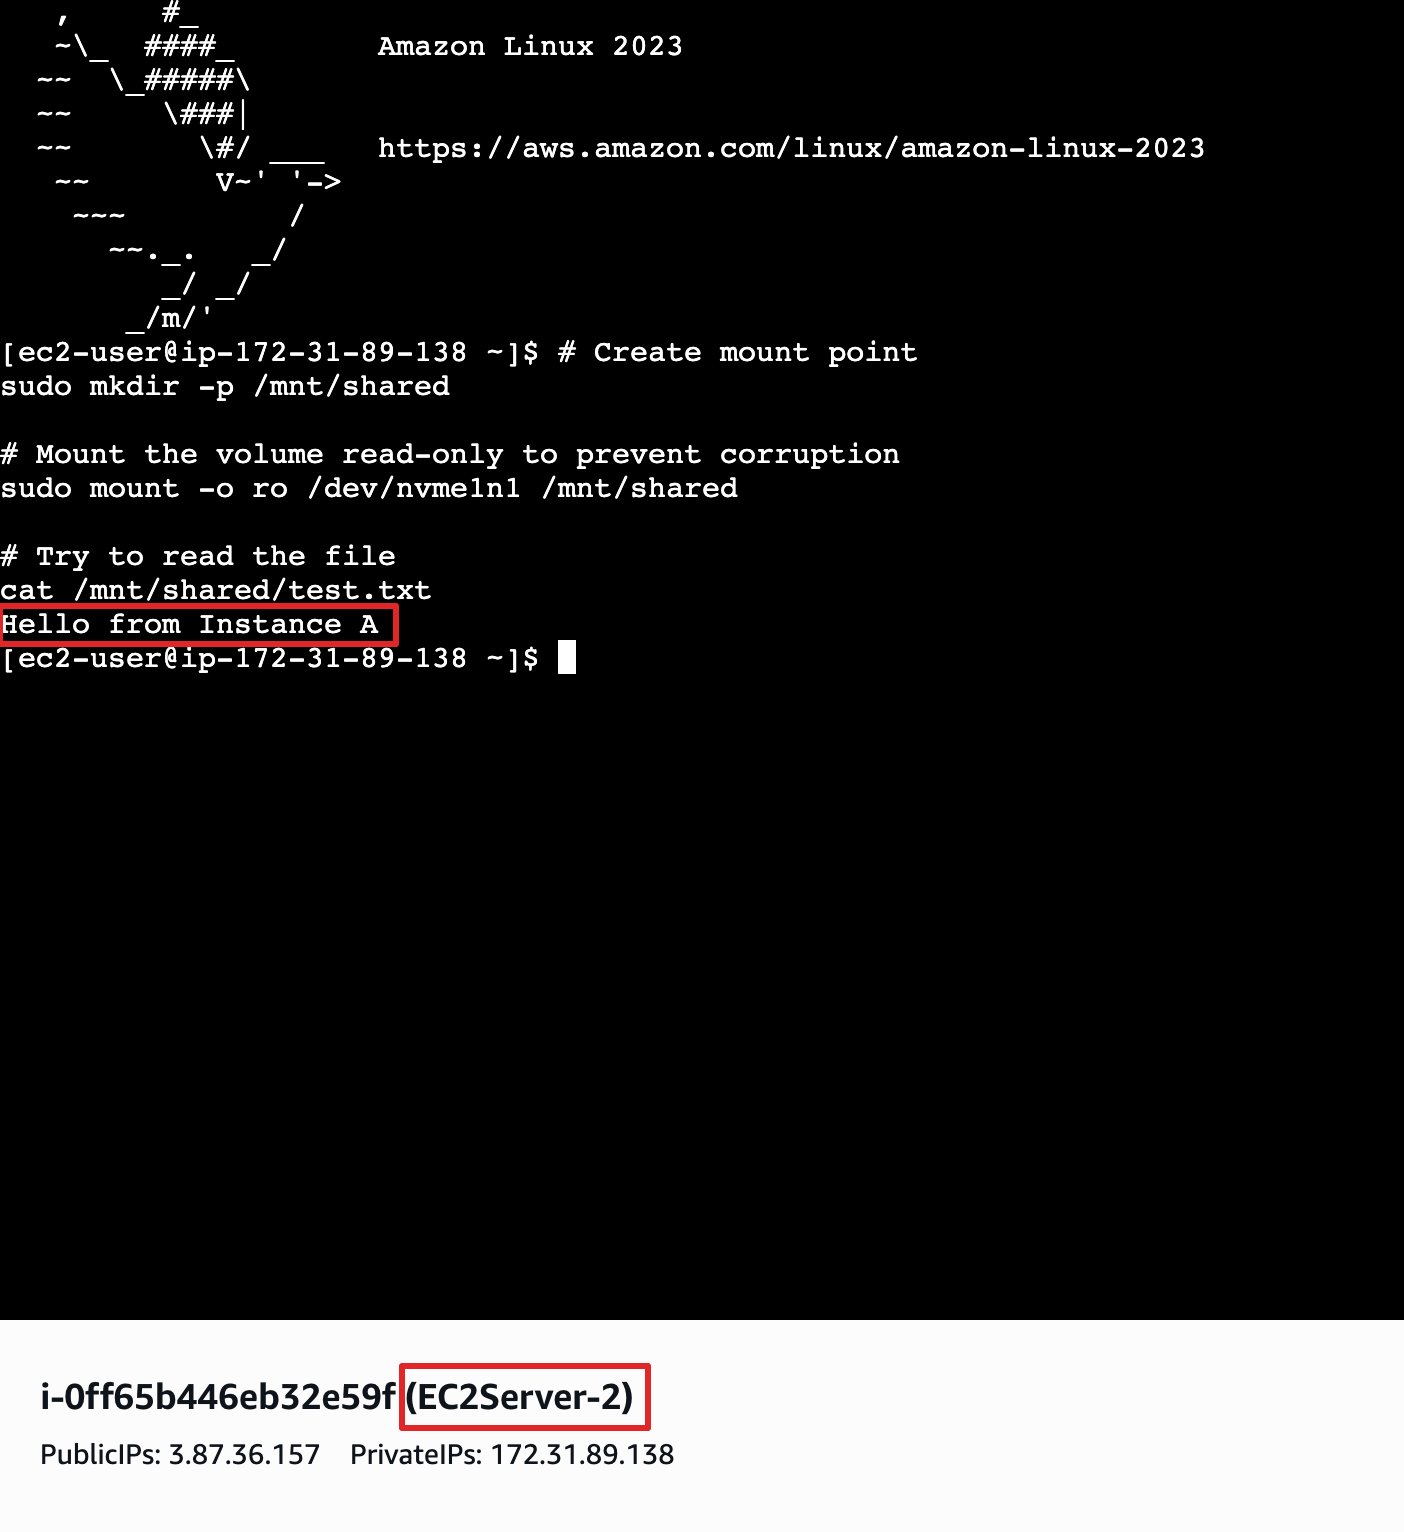
- On EC2server-2 (Reader) — Mount as Read-Only paste and run the following command:
Do You Know?
EBS Multi-Attach is a feature that allows a single Amazon EBS volume to be attached to multiple EC2 instances at the same time within the same Availability Zone. This is useful when you want several instances to access the same data — like for high availability or shared storage systems.
Completion & Conclusion
- You have successfully launched two EC2 Instances
- You have successfully created an EBS volume
- You have attached the Multi-attach enabled EBS volume to multiple EC2 instances.
- You have formatted and mounted the EBS volume on both instances.
- You have verified that Instance B can read the file created by Instance A.
End Lab
- Sign out of AWS Account.
- You have successfully completed the lab.
- Once you completed the steps, click on End Lab from your IP Lab Portal and wait till the process gets completed.
What gets checked
When you press Check my work, the platform verifies each of these:- Create EBS Volume — Check whether an EBS volume is created.
- Launch an EC2 Instance — Check whether an EC2 Instance is launched or not.
- Launch EC2 AMI type Amazon Linux — Check whether the EC2 instance is launched using an Amazon AMI.