

Overview
Lab Details
- This lab walks you through the steps to launch, configure, and manage an HTTPD container on ECS Cluster with the application load balancer.
- You will practice using Amazon Elastic Container Service (ECS) Cluster by creating Task definitions and Service. During the creation of the Service inside the cluster, you will select an existing Application load balancer and Target group.
- Duration: 90 minutes
- AWS Region: N. Virginia (us-east-1)
Introduction
- Create a Task Definition: A Task Definition in ECS defines how your containers should be run within a task. It includes essential information such as the Docker image, resource requirements, networking, and container-to-container communication.
- Create a Service: A Service in ECS allows you to run and maintain a specified number of instances of a task definition. When creating the service, you specify the desired number of tasks to run, the Task Definition to use, and other configurations like load balancing.
- Configure Load Balancing: While creating the service, you can specify that it should use an Application Load Balancer to distribute incoming traffic. You’ll need to configure the listener rules, target group(s), and health checks for the ALB.
- Register Target Group with ALB: The service automatically registers the tasks (containers) with the specified target group(s) associated with the ALB. As new tasks are launched, they are automatically registered, and as tasks are terminated, they are removed from the target group.
- Load Balancing and Scaling: The ALB continuously monitors the health of the registered tasks and routes traffic to healthy containers. If you enable automatic scaling for the ECS service, it can dynamically adjust the number of running tasks based on CPU utilization, memory usage, or other CloudWatch metrics.
- By utilizing an Application Load Balancer in Amazon ECS, you can ensure that your containerized applications are resilient, highly available, and capable of handling varying levels of traffic while maintaining a consistent user experience. The load balancer distributes the load intelligently, reducing the risk of performance bottlenecks and ensuring that your application remains responsive and reliable.
Architecture Diagram
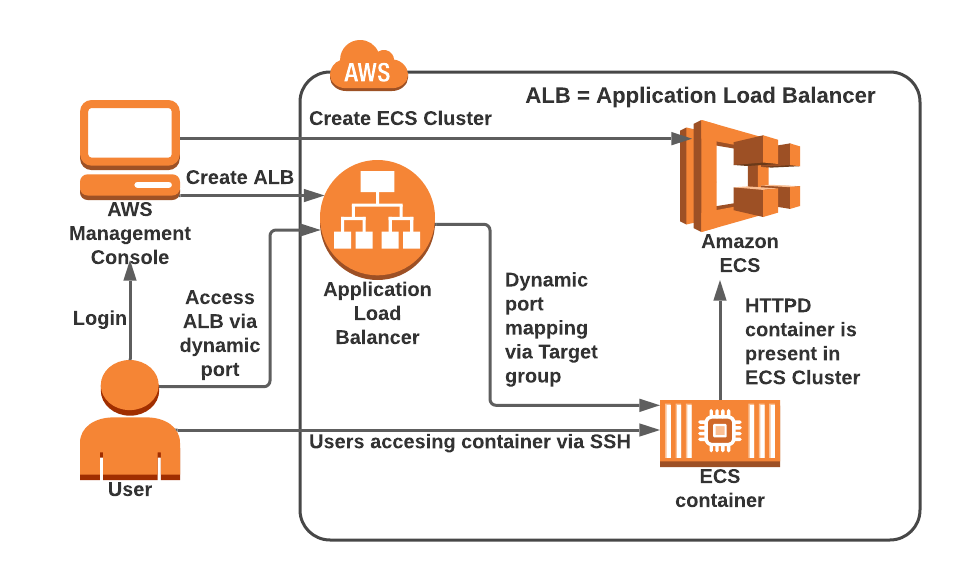
Task Details
- Sign in to AWS Management Console.
- Create a Security Group for the ECS Cluster.
- Create a Key Pair for the EC2 instances inside the ECS Cluster.
- Creating the Load Balancer.
- Launching an ECS Cluster.
- Create Task definitions.
- Create a Service and start HTTPD container in ECS.
- Test the HTTPD container in ECS Cluster.
- SSH into the underlying EC2 instance and run Docker commands.
- SSH into running docker container.
- Test the load balancer.
- Delete AWS Resources.
Launching Lab Environment
- To launch the lab environment, Click on the Start Lab button.
- Please wait until the cloud environment is provisioned. It will take less than a minute to provision.
- Once the Lab is started, you will be provided with IAM user name, Password, Access Key, and Secret Access Key.
Note : You can only start one lab at any given time
Lab guide
Lab Steps
Task 1: Sign in to AWS Management Console
- Click on the Open Console button, and you will get redirected to AWS Console in a new browser tab.
-
On the AWS sign-in page,
- Leave the Account ID as default. Never edit/remove the 12 digit Account ID present in the AWS Console. otherwise, you cannot proceed with the lab.
- Now copy your User Name and Password in the Lab Console to the IAM Username and Password in AWS Console and click on the Sign in button.
- Once Signed In to the AWS Management Console, Make the default AWS Region as US East (N. Virginia) us-east-1.
Task 2: Create a Security Group for the Load balancer
- Make sure you are in the N.Virginia Region.
- Navigate to EC2 by clicking on the Services menu in the top left, then click on EC2 in the Compute section.
- On the left panel menu, select the security group under the Network & Security section.
- Click on the Create Security Group.
-
We are going to create a Security group for the ECS cluster.
- Security group name: Enter ALB-SG
- Description: Enter Security group for the load balancer
-
VPC: Select Default VPC
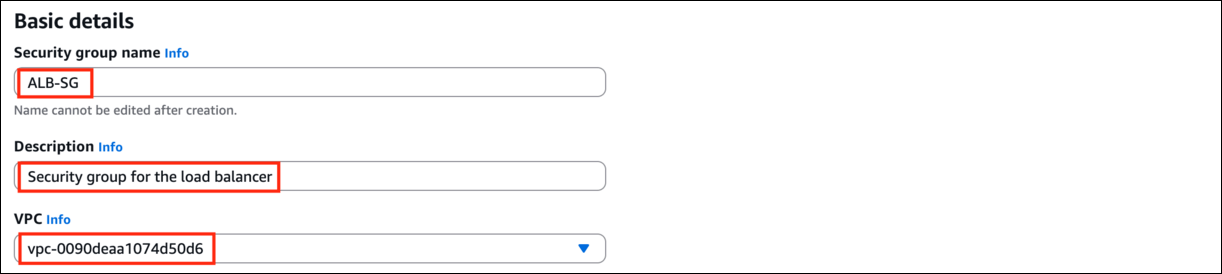
-
Click on the Add Rule under Inbound rules.
- Type : Select All TCP
- Source : Select Anywhere-IPv4
-
In the textbox add 0.0.0.0/0

- Leave everything as default and click on the Create Security group.
Task 3: Create a Security Group for the ECS Cluster
- On the left panel menu, select the security group under the Network & Security section.
- Click on the Create Security group.
-
We are going to create a Security group for the ECS cluster.
- Security group name: Enter ECS-SG
- Description: Enter Security group for ECS Cluster
-
VPC: Select Default VPC
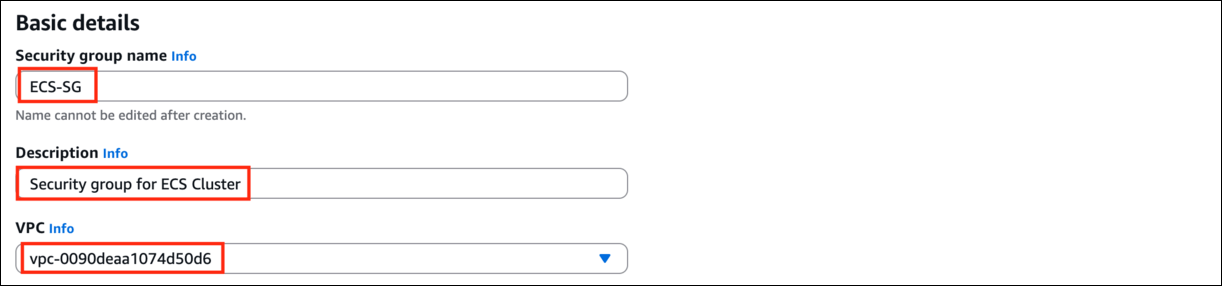
-
Click on the Add Rule under Inbound rules.
- Type : Select SSH
- Source : Select Anywhere-IPv4
- Click on the Add Rule to add All TCP traffic from the load balancers security group
- Type : Select All TCP
- Source : Select Custom
-
In the textbox add, Select ALB-SG by typing ALB-SG

- Leave everything as default and click on the Create Security group.
Task 4: Create a Key Pair for the EC2 instances inside the ECS Cluster
- In the left navigation pane (scroll down) within Network & Security, click on the Key Pairs.
- To create a new key pair, click on the Create Key pair.
-
Fill in the details below:
- Name: Enter WhizKeyPair
- Key Pair Type: Select RSA
- Private key file format: pem (Linux & Mac Users) or ppk (Windows users)
- Leave other options as default.
-
Click on the Create Key pair.
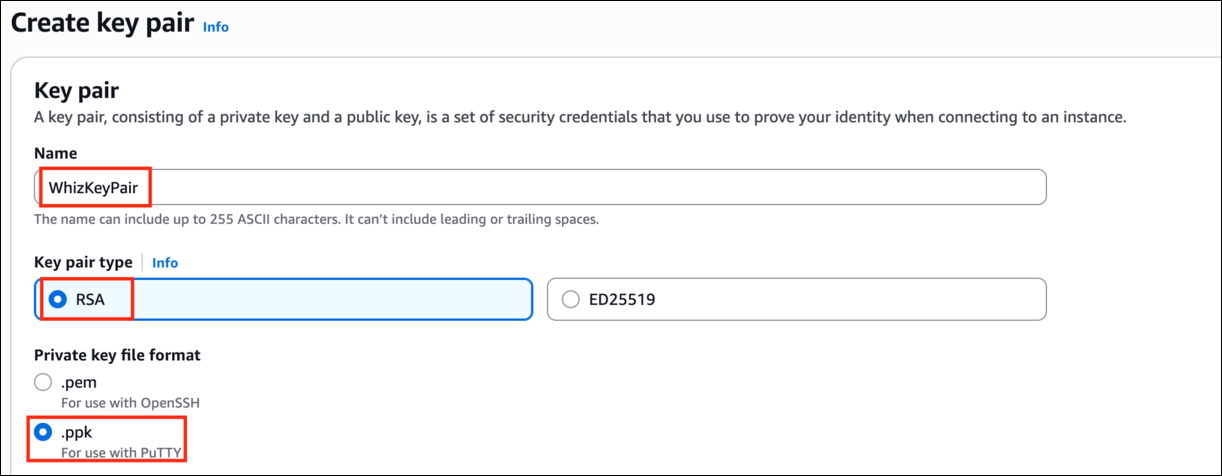
- After clicking on the Create key pair, you will get a pop-up to download the key pair in your local, save that file.
- Key pair will be created.
Task 5: Creating the Load Balancer
- In the EC2 console, navigate to “Load Balancers” in the left-side panel.
- Click on Create Load balancer at the top-left to create a new load balancer for our web servers.
- On the next screen, choose Application Load Balancer and click on create, since we are testing the high availability of the web application.
- In Configure the load balancer as below
- Name : Enter httpd-LB
- Scheme : Select Internet-facing
-
IP address type : Choose ipv4
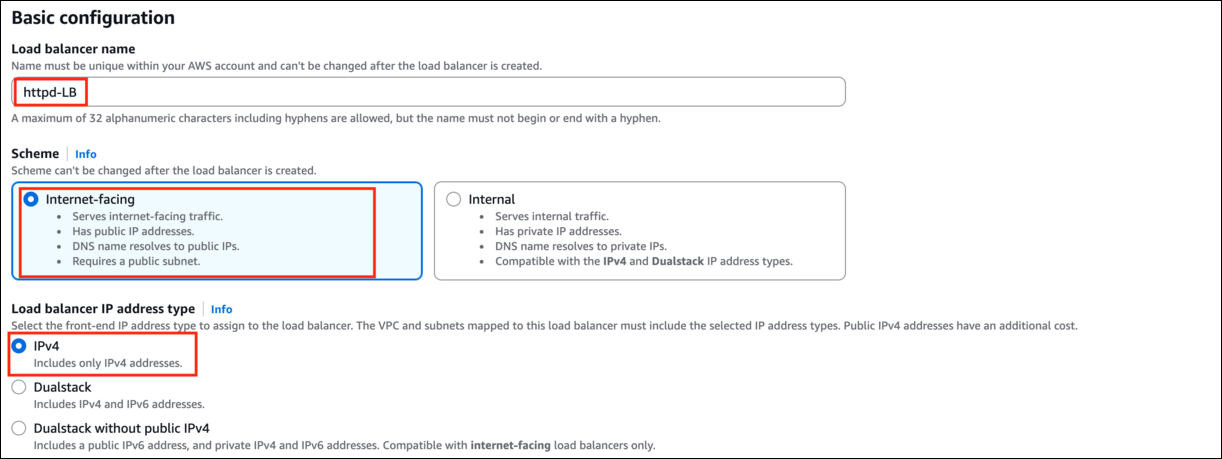
- Availability Zones: Select us-east-1a and us-east-1b.
- VPC : Choose Default
- For Security Groups: Remove the existing security group attached and select the security group ALB-SG.
- Under Listeners and Routing
- Protocol: HTTP
- Port: 80
- Under Default action:
- Routing action: select Forward to target groups
-
Click on create target group.
- Choose Target Type : Select Instances
- Name : Enter ecs-TG
- Leave everything as default.
- Note: The target group is used to route requests to one or more registered targets
-
Note: The load balancer periodically sends pings, attempts connections, or sends requests to test the EC2 instances. These tests are called health checks.
- Click on the Next.
- Leave this page as default and click on Create target group button and Go back to the Load balancer tab.
- Choose the Target group you created in the Step 7.
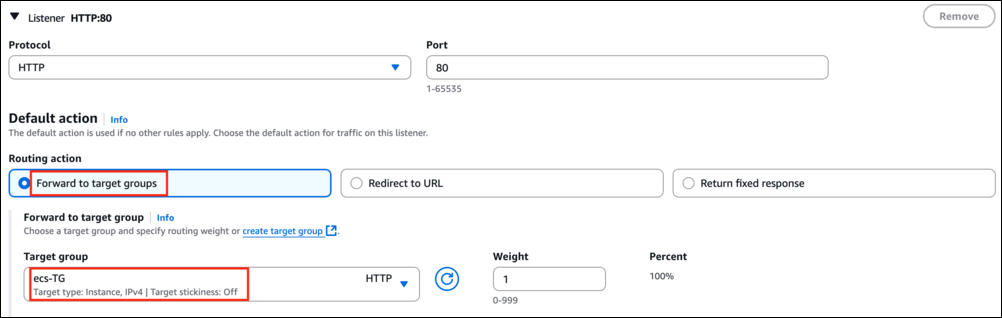
- Click on Create Load Balancer button. You have successfully created the Application Load balancer.
- Wait for 2 to 3 minutes for the load balancer to become Active.
Task 6: Launching an ECS Cluster
- Navigate to Elastic Container Service by clicking on the Services menu in the top, then click on Elastic Container Service in the Containers section.
- Go to Cluster section from left sidebar and Click on the Create Cluster button.
- Cluster name: Leave the name section as default.
-
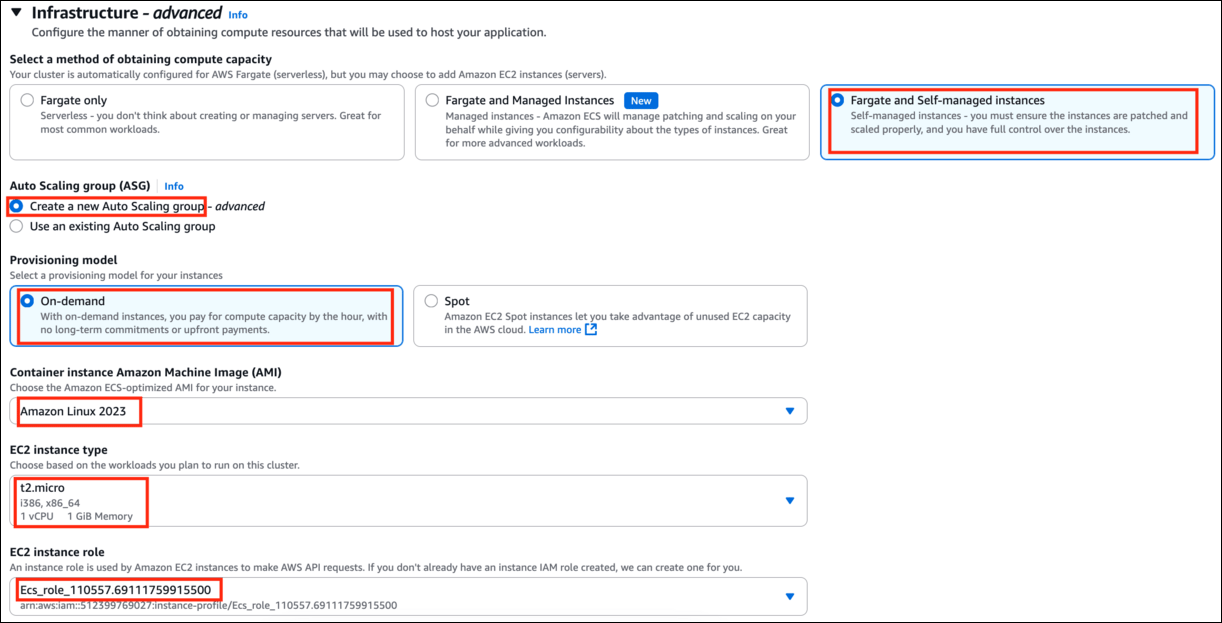
Under Infrastructure:
- Select Fargate and Self-managed instances
- Auto Scaling group: select Create new Auto Scaling group
- Provisioning Model: Select On-Demand
- AMI: Amazon Linux 2023
- EC2 instance type: t2.micro
-
EC2 instance role: Choose the existing Ecs_role_random_number
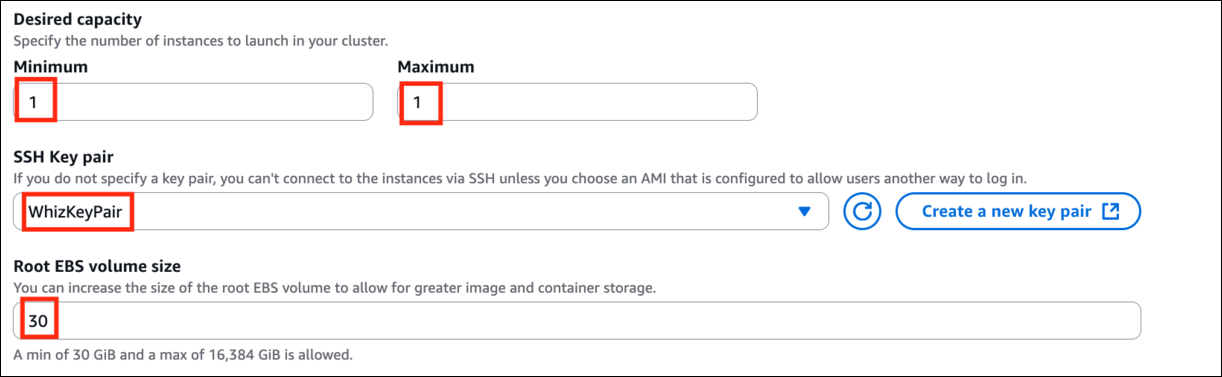
- Set desired capacity as Minimum: 1 and Maximum :1
- Key pair: select WhizKeyPair
- Root EBS Volume Size (GiB): Enter 30 (default)
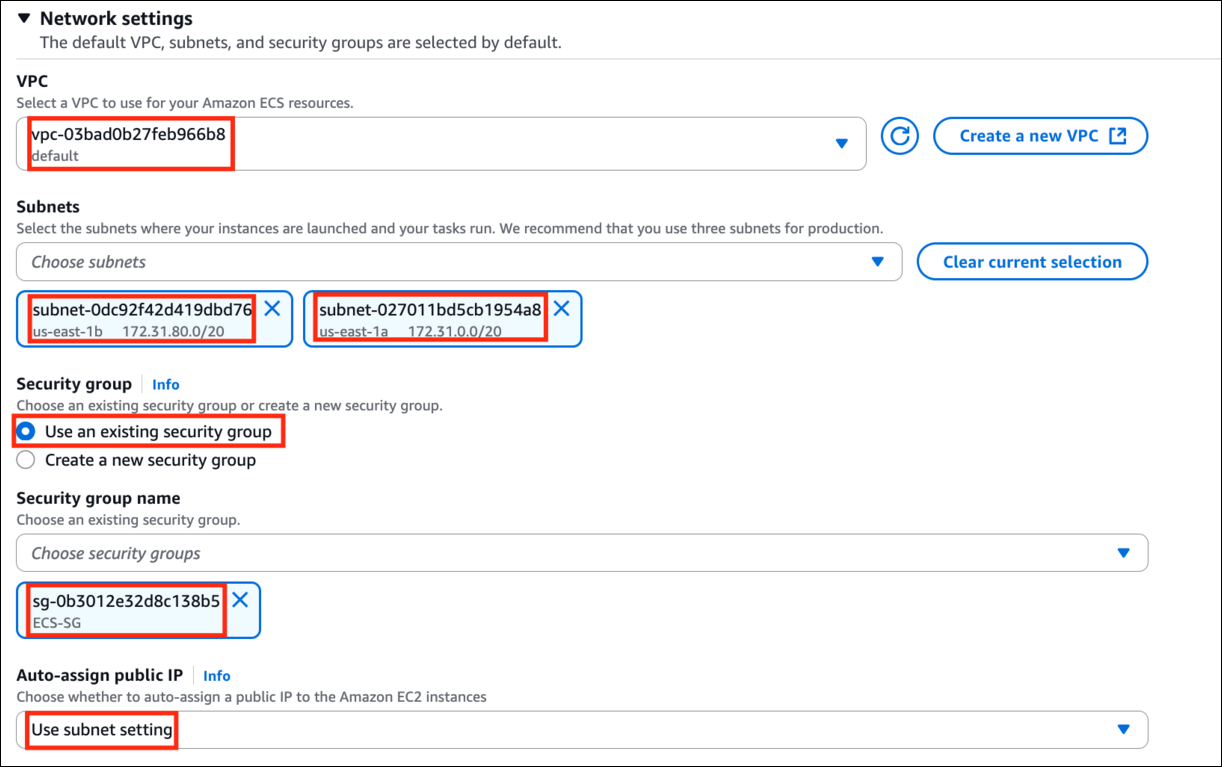
- For Step 3: Under Network settings
- VPC: Default VPC
- Subnets: Select us-east-1a and us-east-1b
- Security group: Select ECS-SG security group
- Auto-assign public IP: Use subnet setting
- Keep other options as default.
- ECS cluster will be created in 2 minutes.

Task 7: Create Task Definitions
- On the left sidebar, click on the Task Definitions option present under the Amazon ECS section.
- Click on the Create New task definition.
-
Enter task definition family name: ecs-whiz

-
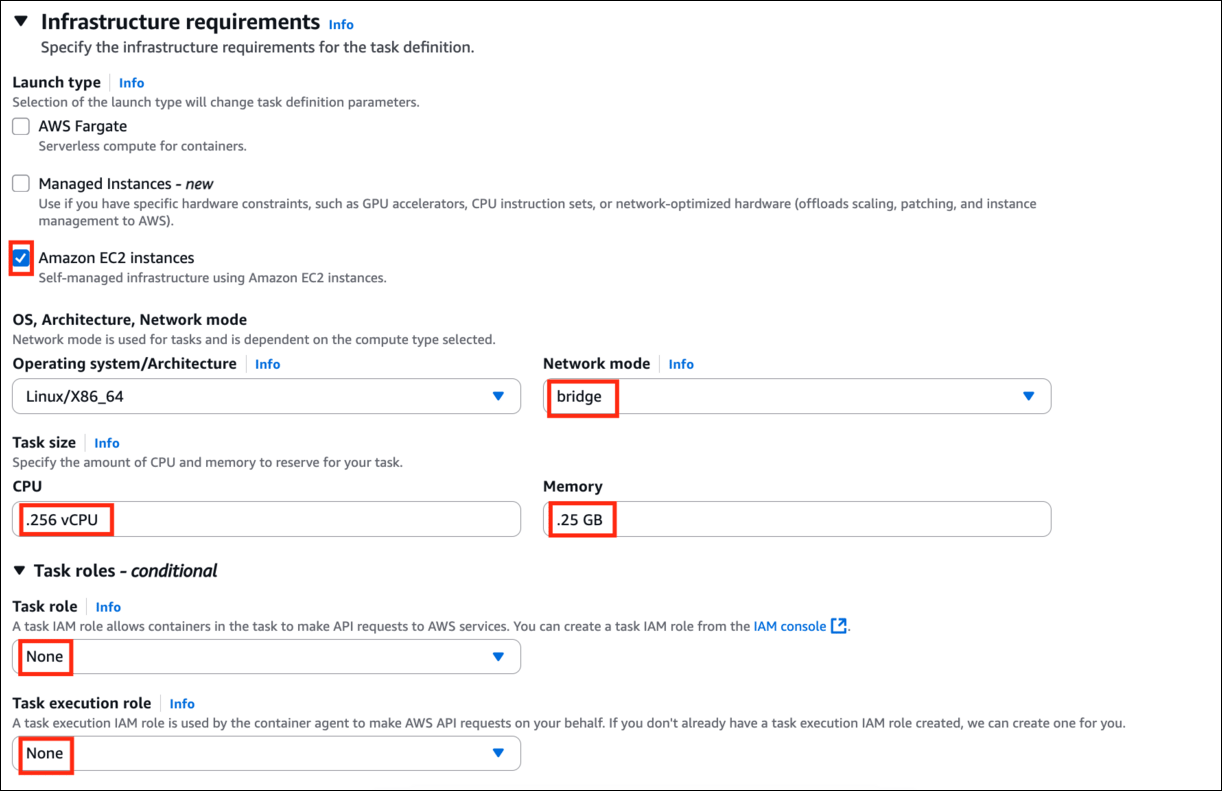
For Infrastructure requirements
- Launch type: Remove AWS Fargate and select AWS EC2 instances
- Network Mode: Select bridge
-
In Task Size:
- CPU: .256 vCPU
- Memory: .25 GB
- Task Role: None
-
Task Execution Role: None
-
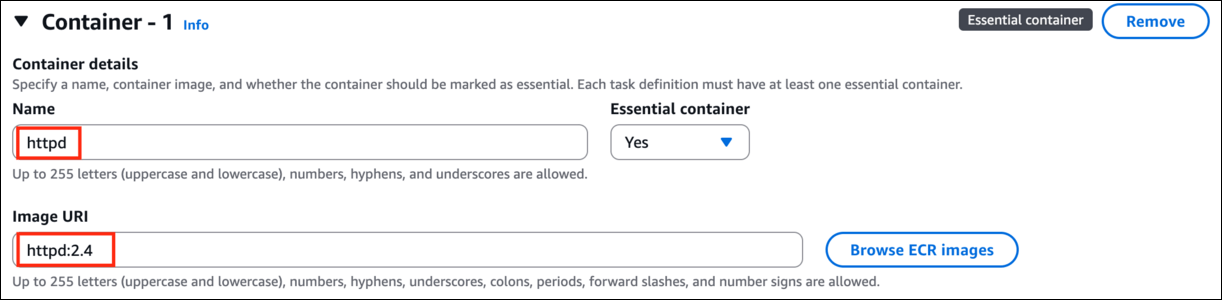
Under Container - 1
- Container name: Enter httpd
-
Image: enter httpd:2.4 (make sure no extra space is given)
- Keep other options as default and click on the Create button.
- Task Definition ecs-whiz is now created.
Task 8: Create a Service and start HTTPD container in ECS
- On the left sidebar, click on the Clusters option present under the Amazon ECS section.
- whiz ECS Cluster will be listed here, Click on the whiz.
-
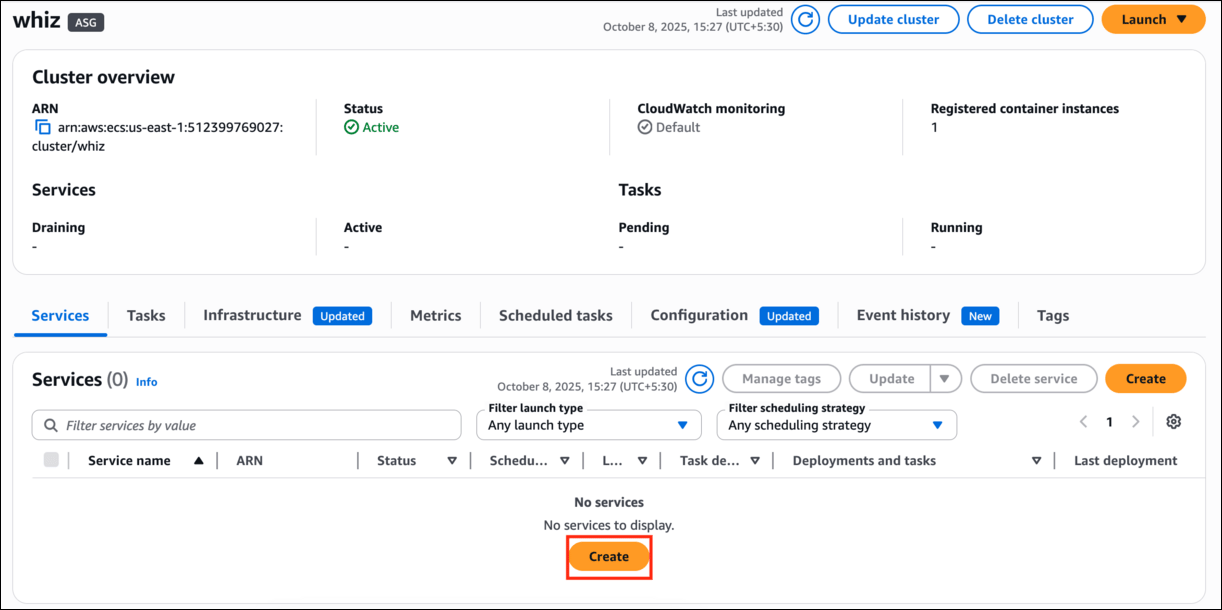
To create a service, scroll down to service tab and click on the Create button.
-
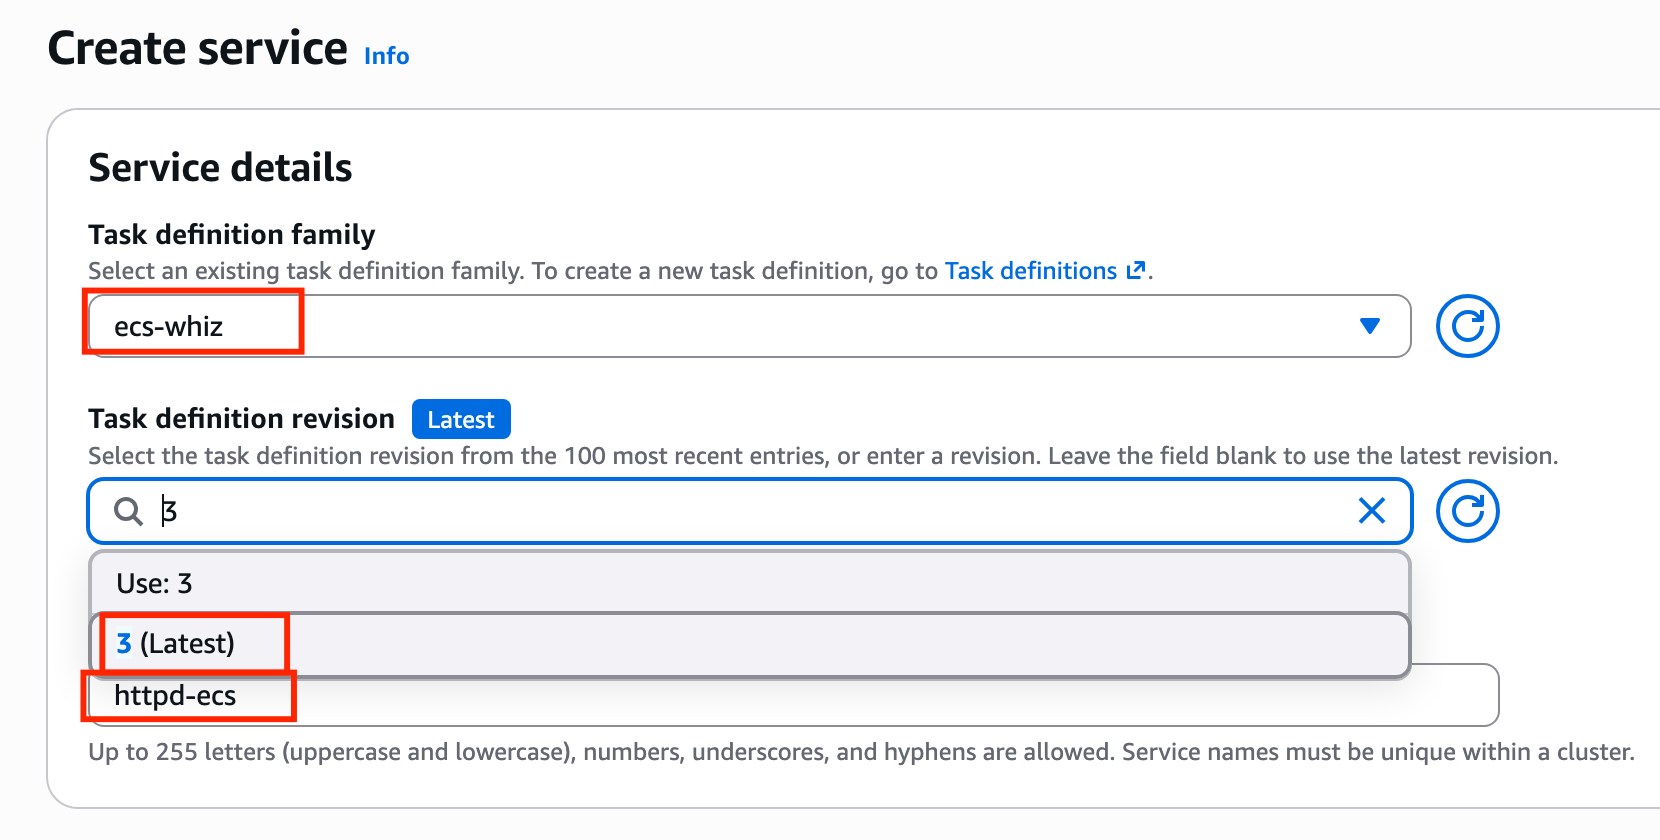
Service details:
- Task definition family: Select ecs-whiz
- Task definition revision: Leave it as default (Latest)
-
Service name: httpd-ecs
-
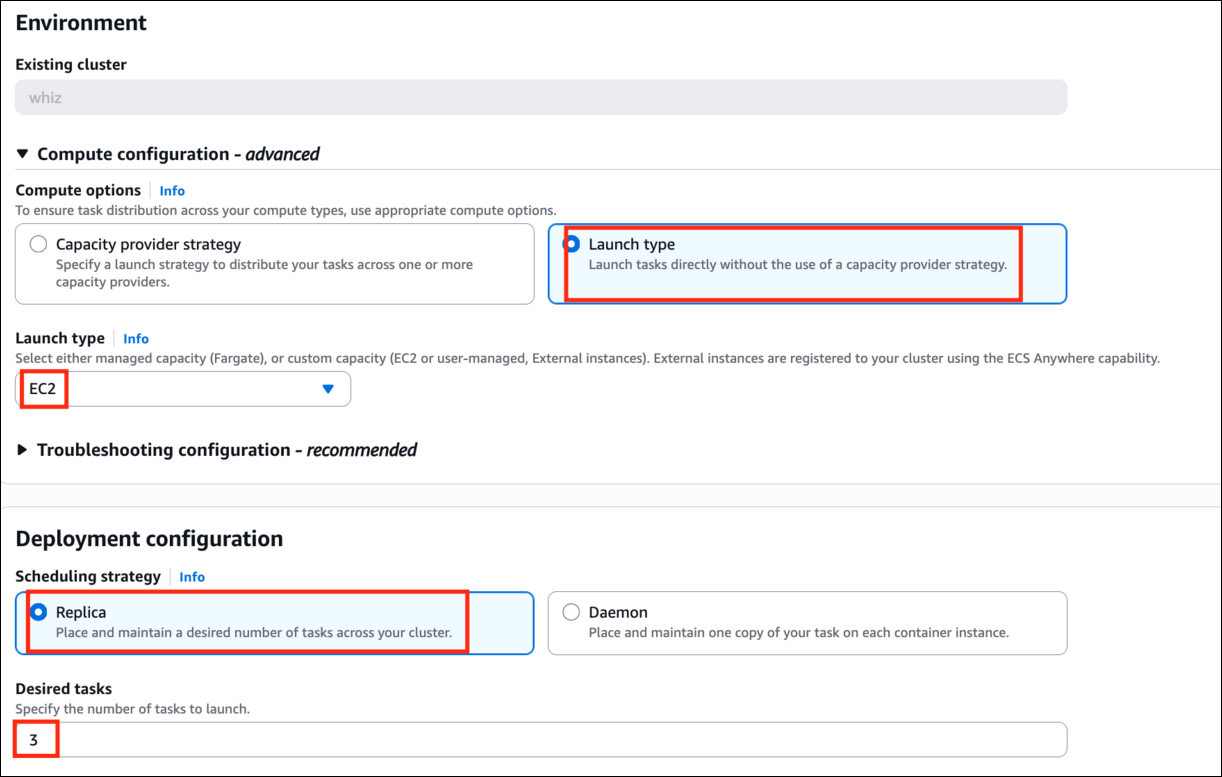
Under Environment:
- Compute options: select Launch type
- Launch type: select EC2
- Scheduling strategy: select Replica
-
Desired tasks: Enter 3
-
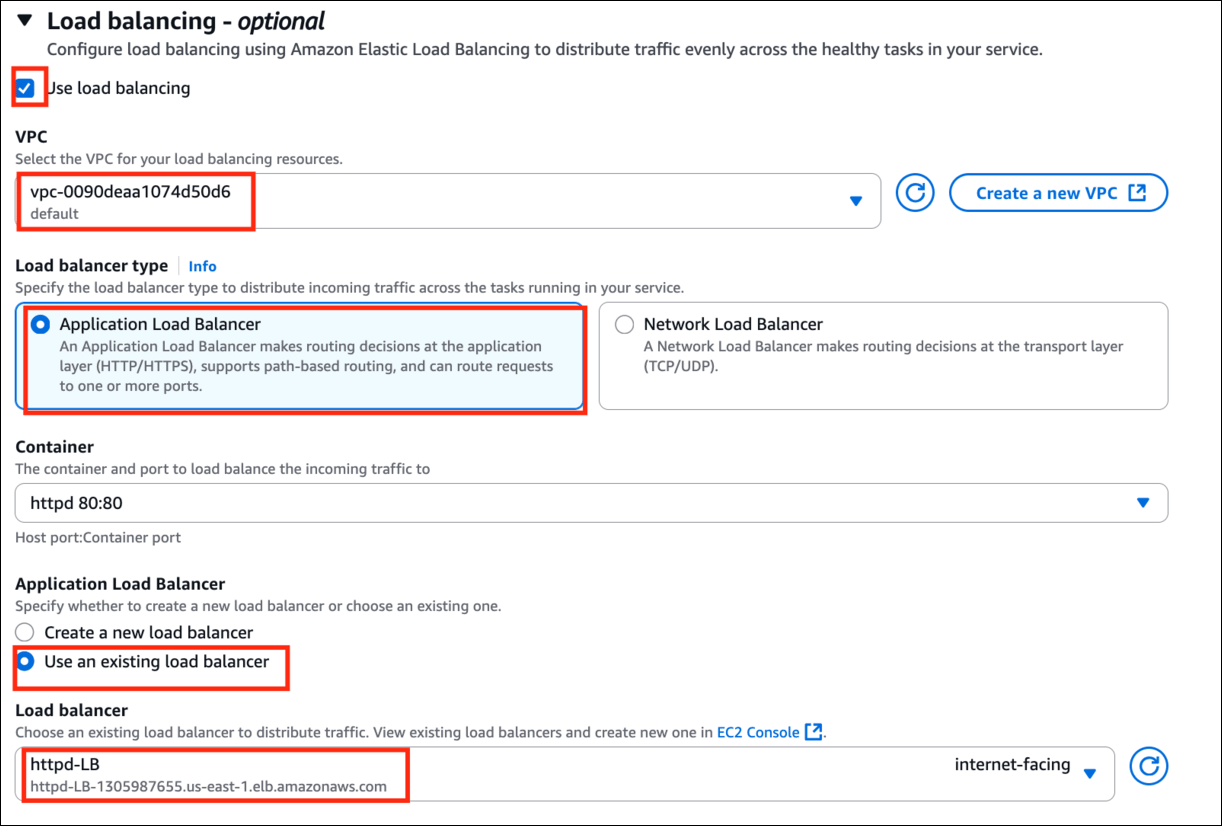
In Load Balancing section:
- Check Use load balancing
- VPC: select default vpc
- Load balancer type: select Application Load Balancer
- Specify Application Load Balancer: select Use an existing load balancer
-
Load balancer name: Select httpd-LB
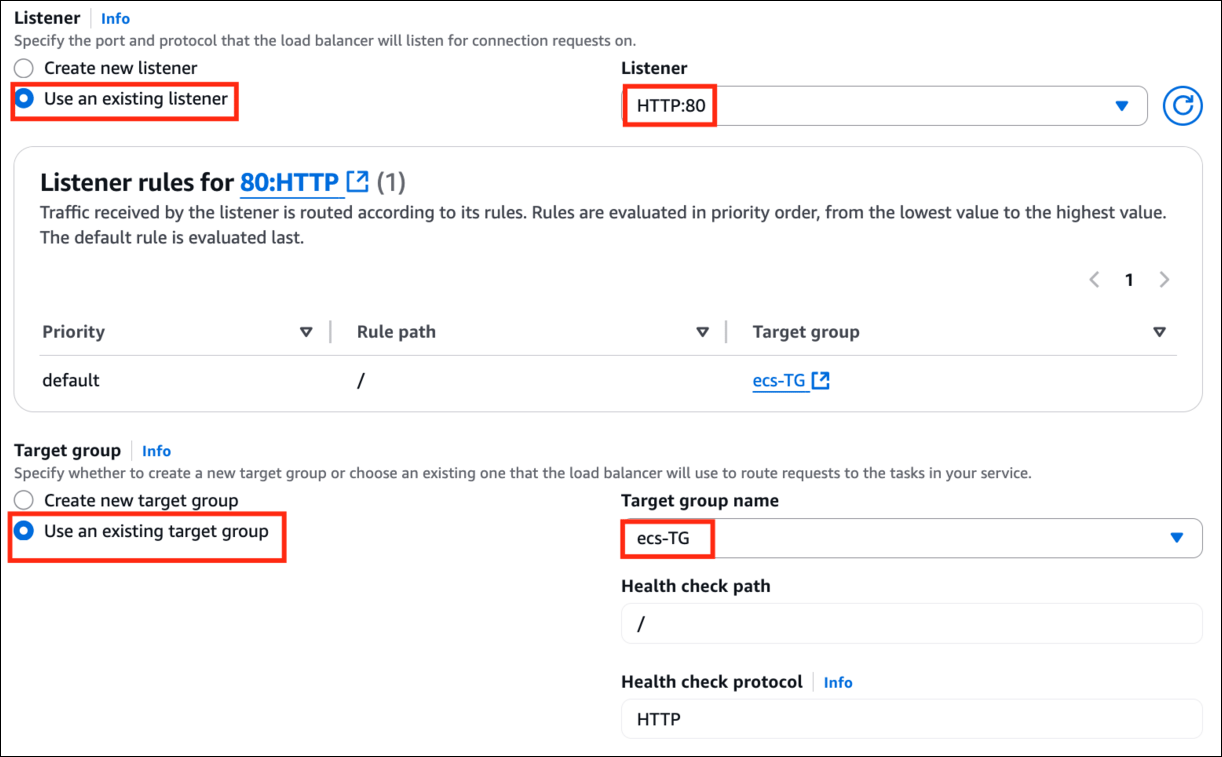
- Listener : use an existing listener
- Listener: Select 80:HTTP
- Target Group : use an existing target group
-
Target group name: Select ecs-TG
- Keep other options as default. Review everything and click on the Create service.
-
Service will be is created, please wait till the Deployments and tasks changes to 3/3 Tasks running.
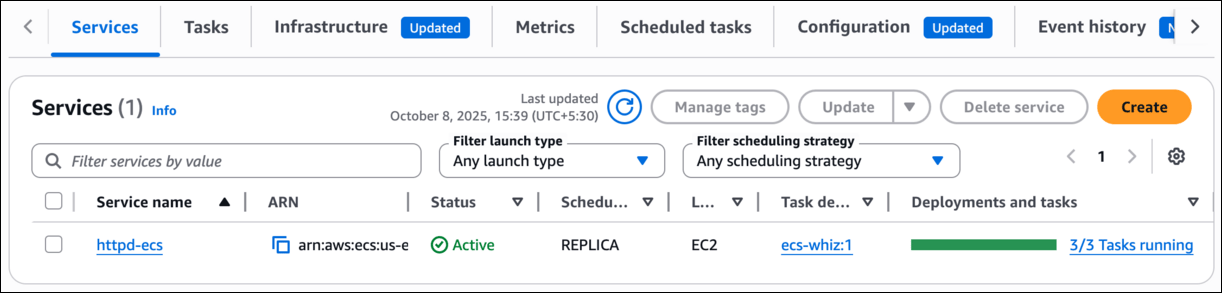
-
The tasks are now running, let’s check by switching to Tasks tab.
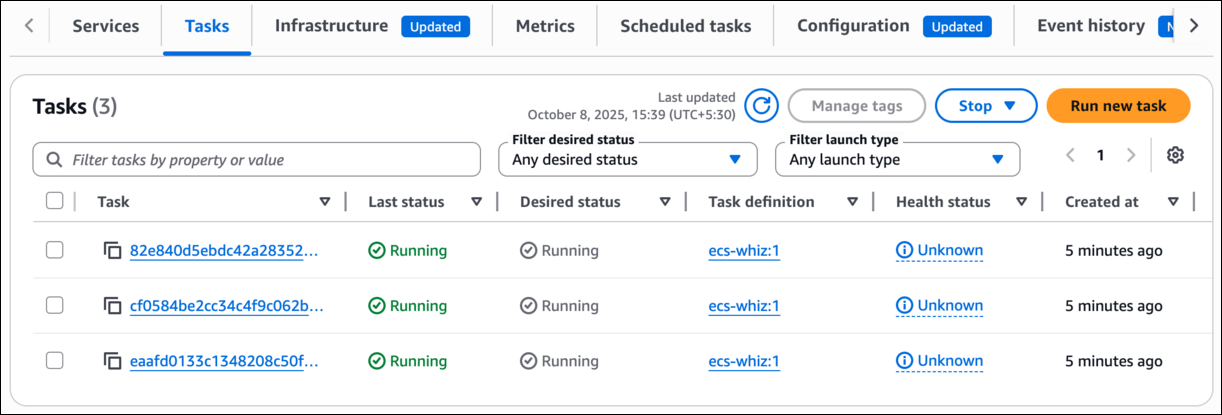
-
Check the history of the event, by clicking on service name (httpd-ecs) and switching to the Events tab.
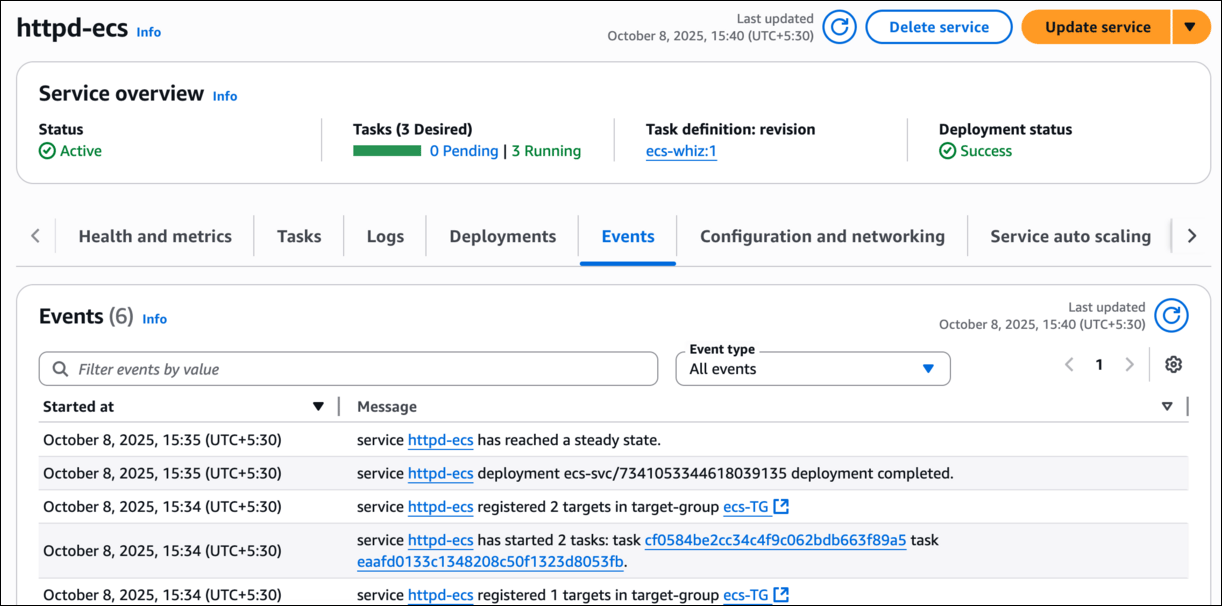
Task 9: Test the HTTPD container in ECS Cluster
- On the left sidebar, click on the Clusters option present under the Amazon ECS section.
- whiz ECS Cluster will be listed here, Click on the whiz cluster.
-
To view the ECS Instance,
- Switch to the Infrastructure tab
- Under Container Instances
-
Click on the Instance ID present there.

- You can able to see the instance summary.
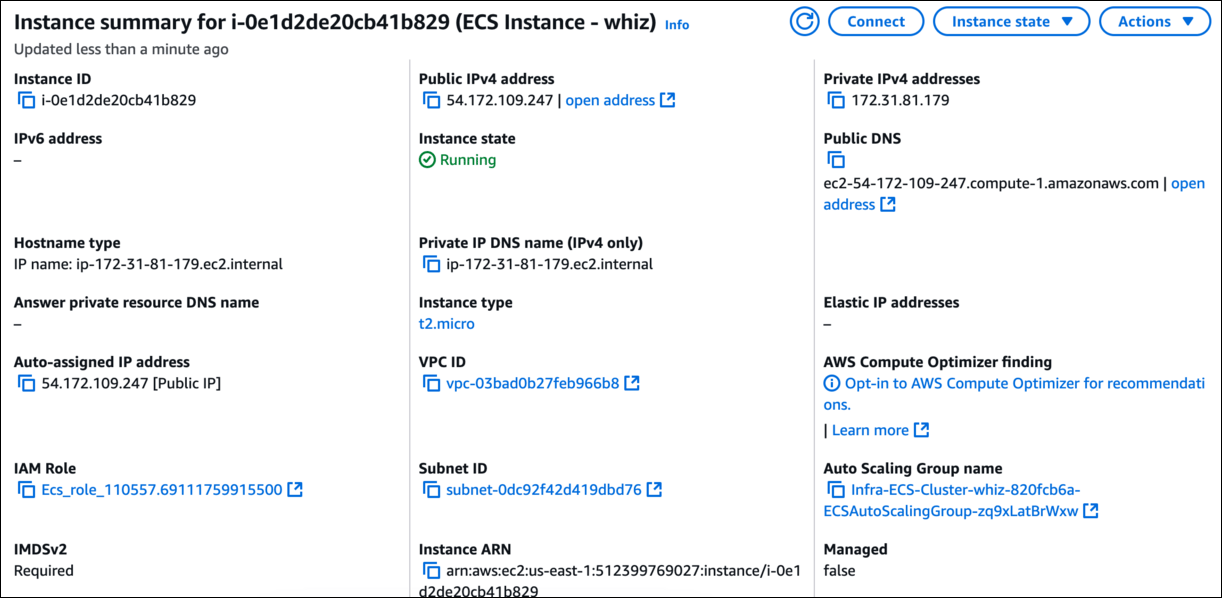
Task 10: SSH into the underlying EC2 instance and run Docker commands
- Please follow the steps in SSH into EC2 Instance Note: Please note that the Ec2 instance connect will not work for the ECS instance, so please try other SSH methods.
-
Get the root access using the following command:
-
Now run the updates using the following command:
-
Check the Docker version by running the following command:
-
Check all the docker processes running in the ECS Cluster

- Default ECS agent and 3 httpd containers are running in the underlying EC2 instance.
- This is using a dynamic port, i.e. 32767, 32768, and 32769.
Task 11: SSH into running docker container
- The reason why we are entering into docker containers is, all 3 running container will have the same output. Let’s customize it according to the port it’s running on.
-
To SSH into the first running container, copy the container id, listed using docker ps, run the following command:
-
Syntax:
- Eg: docker exec -it d8200f70bf57 /bin/bash
-
Syntax:
-
To append the traffic is coming from this port in the index.html file present in the htdocs folder, run the following command:
-
View the index.html file present in the htdocs folder, using the following command:

- To come out of this container, enter exit command and hit enter.
- Repeat the same step from Step-2 for the other 2 containers and make sure to change the port numbers.
Task 12: Test the load balancer
- Click on Target Groups from the left menu section.
-
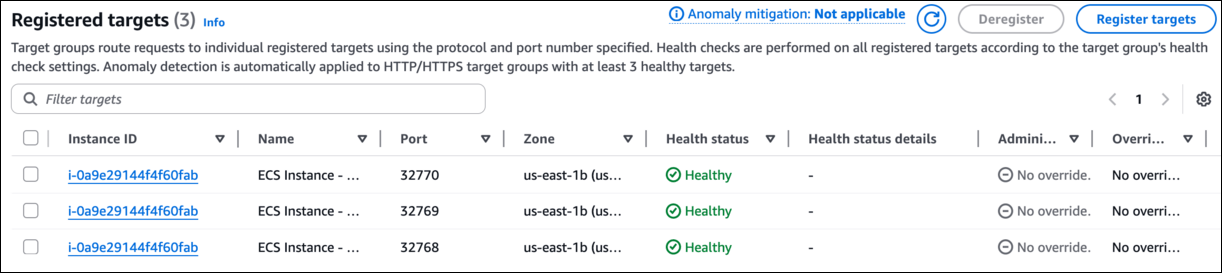
Select ecs-TG and navigate to the Targets menu.
-
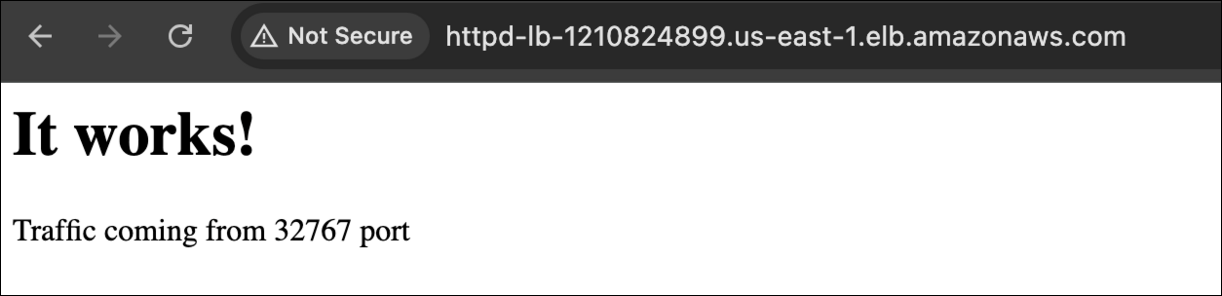
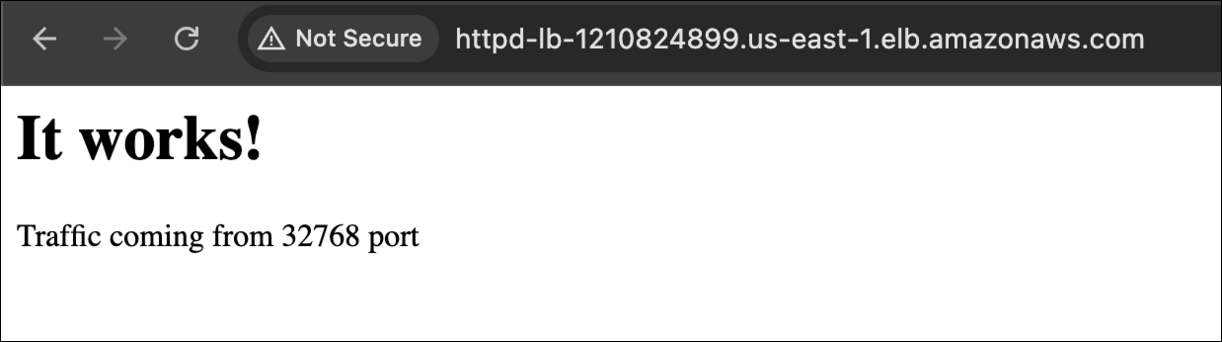
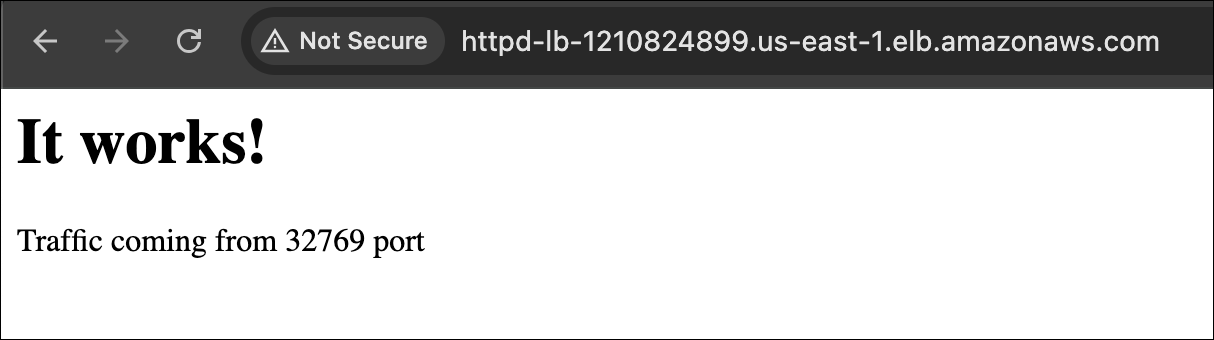
Next, navigate to Load Balancer and notice the state of ALB is active. Copy the DNS name of the ALB and enter the address in the browser.
- DNS Example: httpd-LB-1244528727.us-east-1.elb.amazonaws.com
-
You should see the index.html page content of different containers and traffic coming from 32768, 32769, and 32770 port.
- Once the lab steps are completed, please click on the Validation button on the left side panel.
Completion and Conclusion
- You have successfully created and launched Amazon ECS Cluster.
- You have successfully created an HTTPD container.
- You have successfully created an Application load balancer and Target group.
End Lab
- Sign out of AWS Account.
- You have successfully completed the lab.
- Once you have completed the steps, click on End Lab from your IP Lab Portal and wait till the process gets completed.
What gets checked
When you press Check my work, the platform verifies each of these:- Check EC2 Cluster Active — Check ECS cluster with EC2 launch type is active
- Create ECS Service — Check whether ECS service created or not
- Create ECS Task Definition — Check whether ECS task definition created or not
- Create a Application Load Balancer — Check if given type of Load Balancer is created or not.
- Invoke Load Balancer DNS — Check whether the Elastic Load Balancer DNS URL is accessible from the internet or not.
- Launch EC2 AMI type Amazon Linux — Check whether the EC2 instance is launched using an Amazon AMI.