

Overview
Lab Details
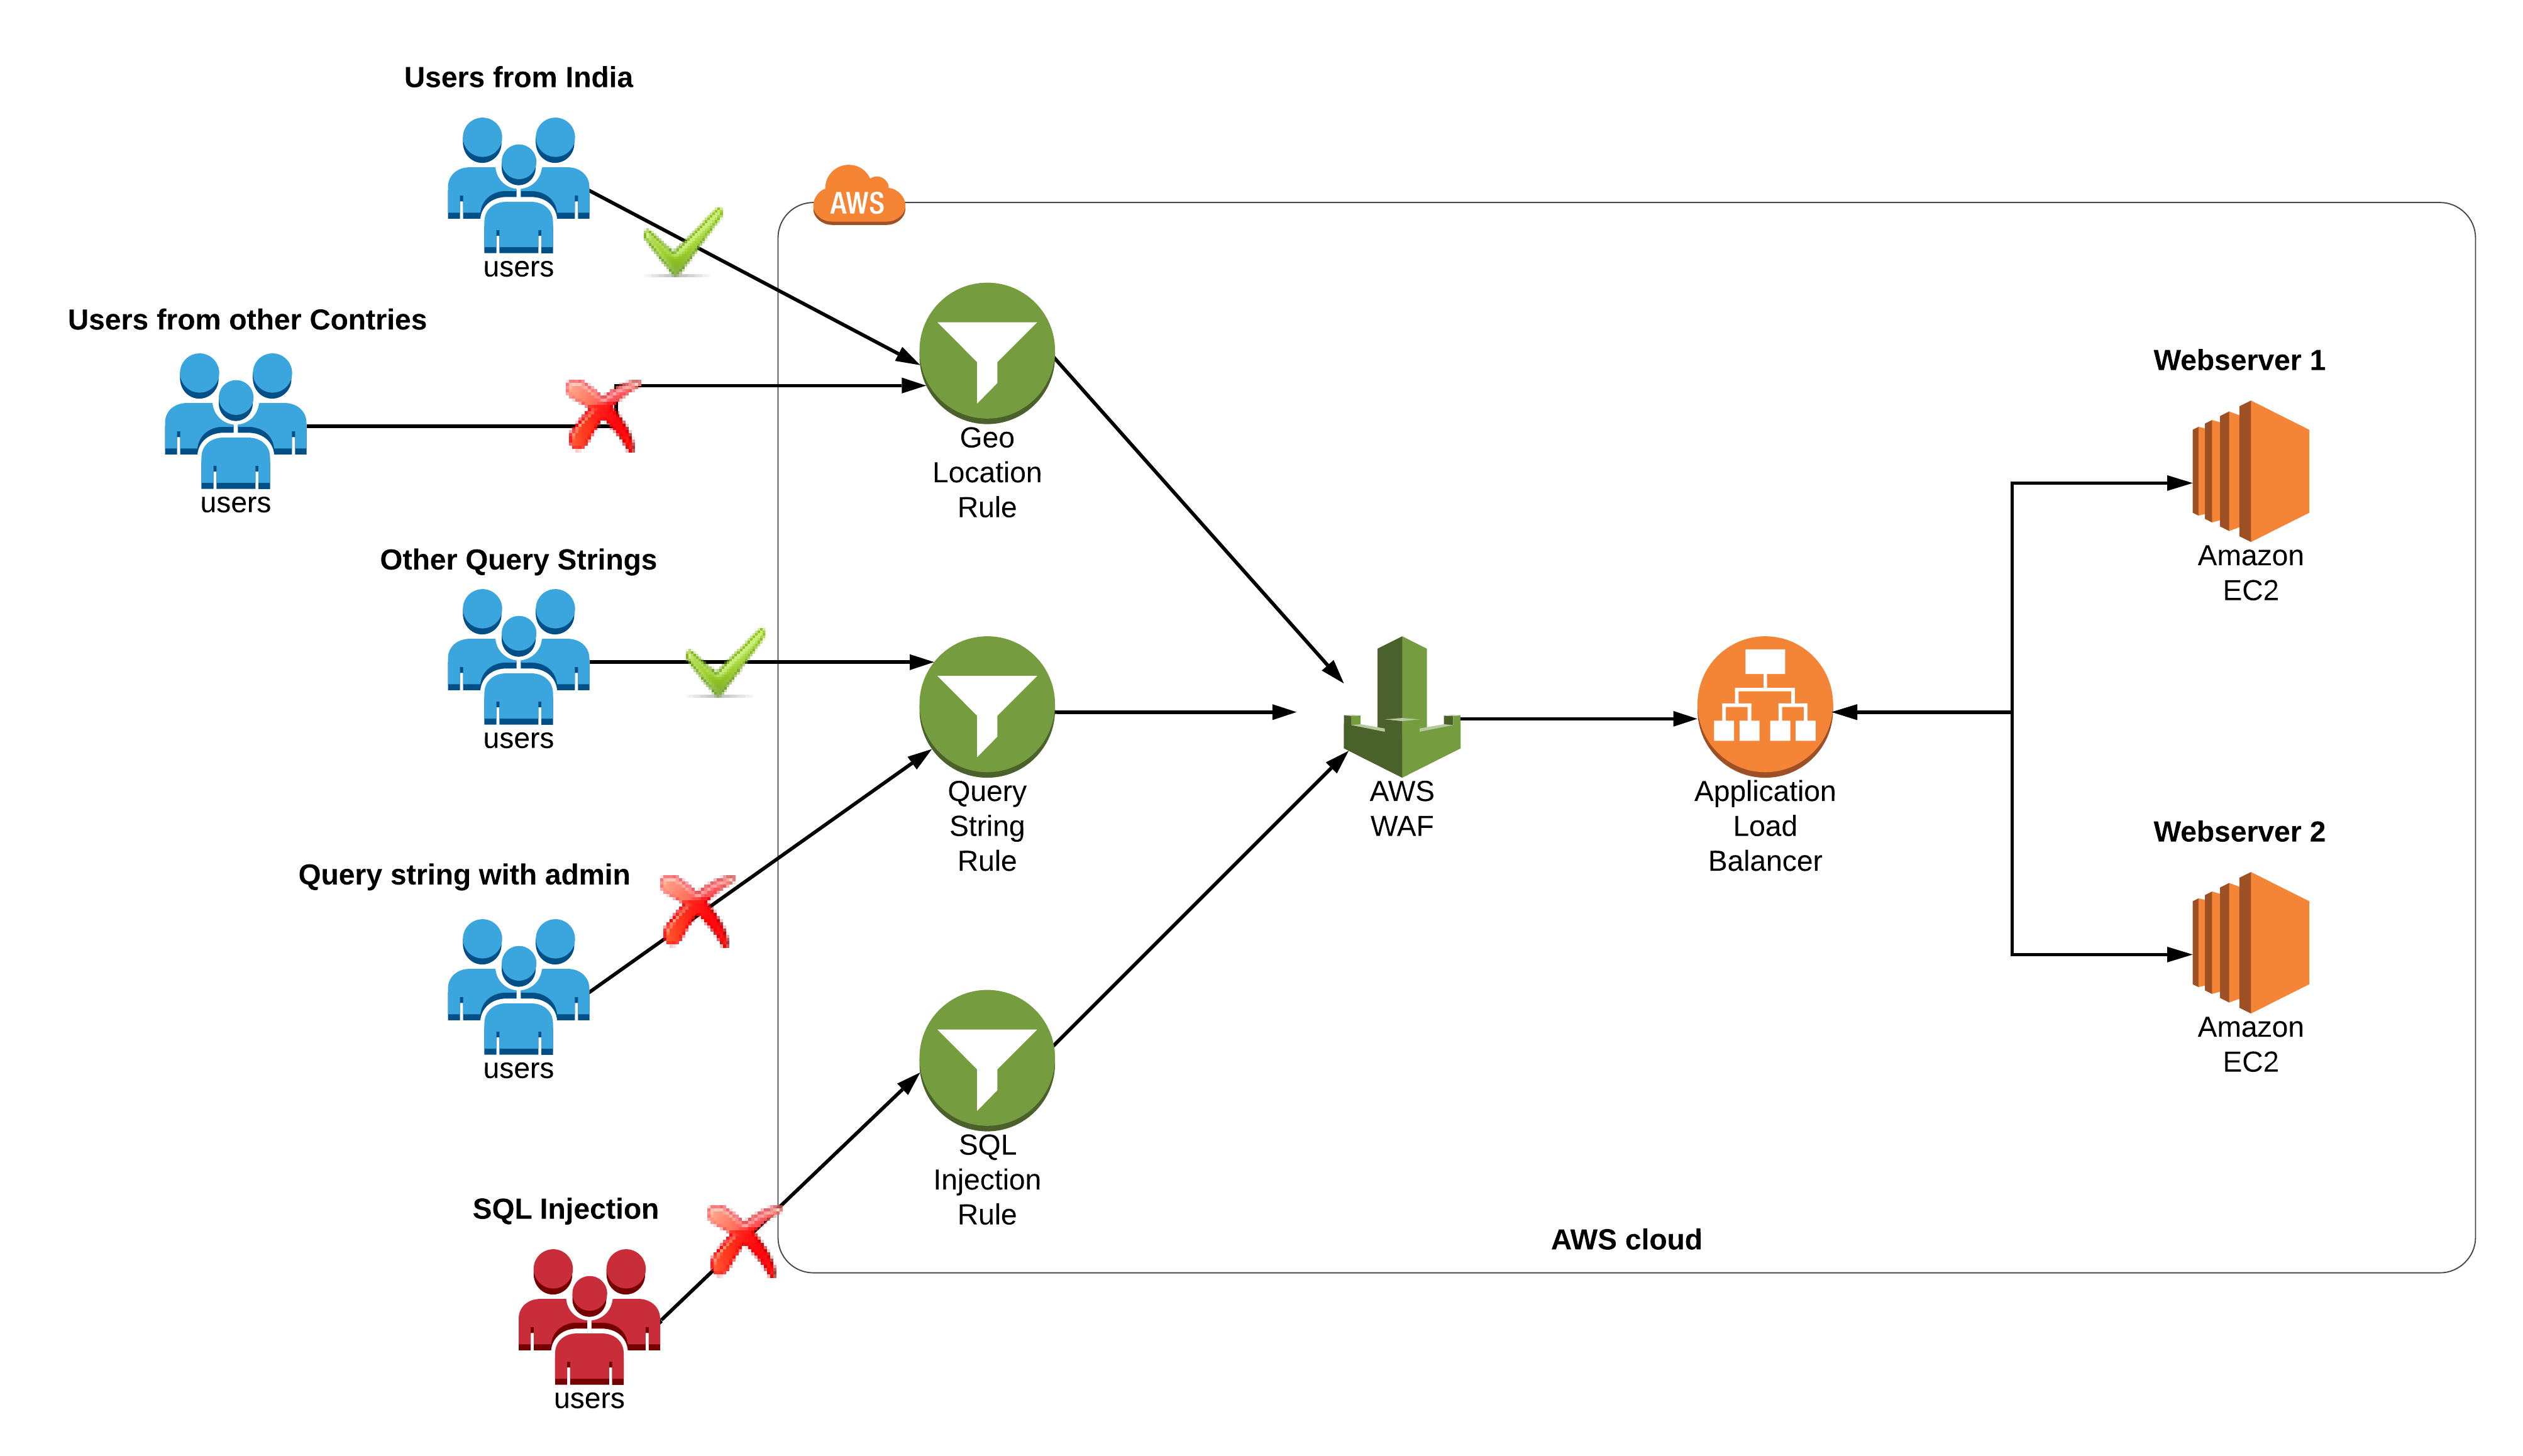
- This tutorial guides you through the process of setting up an Application Load Balancer in AWS Elastic Load Balancer. This advanced load balancing solution efficiently divides incoming application traffic among two Amazon EC2 instances. Furthermore, we will establish a series of regulations to prevent access from specific geographical locations, safeguard against SQL injections, and restrict certain Query String parameters.
- Duration: 120 minutes
- AWS Region: N. Virginia (us-east-1)
Introduction
What is AWS WAF?
- AWS WAF is a web application firewall that helps you to protect your web applications against common web exploits that might affect availability and compromise security.
- AWS WAF gives you control over how traffic reaches your applications by enabling you to create security rules that block common attack patterns like SQL injection and cross-site scripting.
- It only allows the request to reach the server based on the rules or patterns you define.
- Users create their own rules and specify the conditions that AWS WAF searches for in incoming web requests.
- The cost of WAF is only for what you use.
- The pricing is based on how many rules you deploy and how many web requests your application receives.
- For example, you can deploy AWS WAF on Amazon CloudFront, Load Balancer or API Gateways.
What is Elastic Load Balancing?
- ELB is a service that automatically distributes incoming application traffic and scales resources to meet traffic demands.
- It helps in adjusting capacity according to incoming application and network traffic.
- It can be enabled within a single availability zone or across multiple availability zones to maintain consistent application performance.
- ELB offers features like:
- Detection of unhealthy EC2 instances.
- Spreading EC2 instances across healthy channels only.
- Centralized management of SSL certificates.
- Optional public key authentication.
- Support for both IPv4 and IPv6.
- ELB accepts incoming traffic from clients and routes requests to its registered targets.
- When an unhealthy target or instance is detected, ELB stops routing traffic to it and resumes only when the instance is healthy again.
- ELB monitors the health of its registered targets and ensures that the traffic is routed only to healthy instances.
- ELB’s are configured to accept incoming traffic by specifying one or more listeners. A listener is a process that checks for connection requests.
- Listeners are configured with a protocol and port number from the client to the ELB and vice-versa i.e., back from ELB to the client.
- ELB supports the following :
- Application Load Balancers.
- Network Load Balancers.
- Gateway Load Balancers.
- Classic Load Balancers.
- Each load balancer is configured differently.
- For Application and Network Load Balancers, you register targets in target groups and route traffic to target groups.
- Gateway Load Balancers use Gateway Load Balancer endpoints to securely exchange traffic across VPC boundaries.
- For Classic Load Balancers, you register instances with the load balancer.
- AWS recommends users to work with Application Load Balancer to use multiple Availability Zones because if one availability zone fails, the load balancer can continue to route traffic to the next available one.
- We can have our load balancer be either internal or internet-facing.
- The nodes of an internet-facing load balancer have Public IP addresses, and the DNS name is publicly resolvable to the Public IP addresses of the nodes.
- Due to the point above, internet-facing load balancers can route requests from clients over the Internet.
- The nodes of an internal load balancer have only Private IP addresses, and the DNS name is publicly resolvable to the Private IP addresses of the nodes.
- Due to the point above, internal load balancers can only route requests from clients with access to the VPC for the load balancer.
- Both internet-facing and internal load balancers route requests to your targets using Private IP addresses.
- Your targets do not need Public IP addresses to receive requests from an internal or an internet-facing load balancer.
- You can create your own rules, depending on your requirements, whether to block or allow the incoming and outgoing request. You can also customise the string that appears in your web request.
- Blocking malicious requests
- You can also configure rules in AWS WAF to identify and block web requests threats like SQL injections and cross-site scripting.
- Tune your rules and monitor traffic
- AWS WAF also allows us to review our rules and customize them to prevent new attacks from reaching the server.
Architecture Diagram
Task Details
- Sign in to AWS Management Console.
- Launch First EC2 Instance.
- Launch Second EC2 Instance.
- Create a Target Group.
- Create an Application Load Balancer.
- Test Load Balancer DNS.
- Create AWS WAF Web ACL.
- Test Load Balancer DNS.
- Deleting AWS Resources.
Launching Lab Environment
- To launch the lab environment, Click on the Start Lab button.
- Please wait until the cloud environment is provisioned. It will take less than a minute to provision.
- Once the Lab is started, you will be provided with IAM user name, Password, Access Key, and Secret Access Key.
Note : You can only start one lab at any given time
Lab guide
Lab Steps
Task 1: Sign in to AWS Management Console
- Click on the Open Console button, and you will get redirected to AWS Console in a new browser tab.
-
On the AWS sign-in page,
- Leave the Account ID as default. Never edit/remove the 12 digit Account ID present in the AWS Console. otherwise, you cannot proceed with the lab.
- Now copy your User Name and Password in the Lab Console to the IAM Username and Password in AWS Console and click on the Sign in button.
- Once Signed In to the AWS Management Console, Make the default AWS Region as US East (N. Virginia) us-east-1.
Task 2: Launch First EC2 Instance
In this task, we are going to launch the first EC2 instance by providing the required configurations like name, AMI selection, security group , instance type and other settings. Furthermore, we will provide the user data as well.- Make sure you are in the N. Virginia(us-east-1) Region.
- Navigate to EC2 by clicking on the Services menu in the top left, then click on EC2 in the Compute section.
- Navigate to Instances from the left side menu and click on Launch Instances button.
-
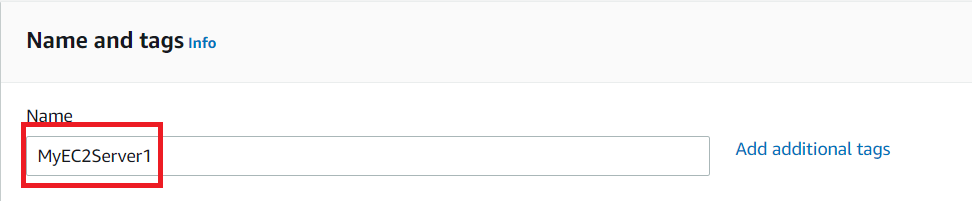
Under the Name and tags section :
- Name : Enter MyEC2Server1
-
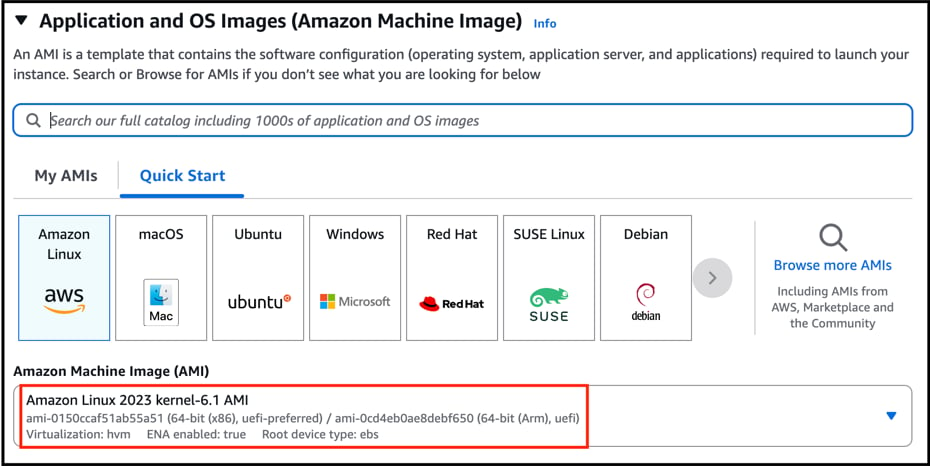
Under the Application and OS Images (Amazon Machine Image) section :
- Select Quick Start tab and Amazon Linux under it
- Amazon Machine Image (AMI) : select Amazon Linux 2023 kernel 6.1 AMI
-
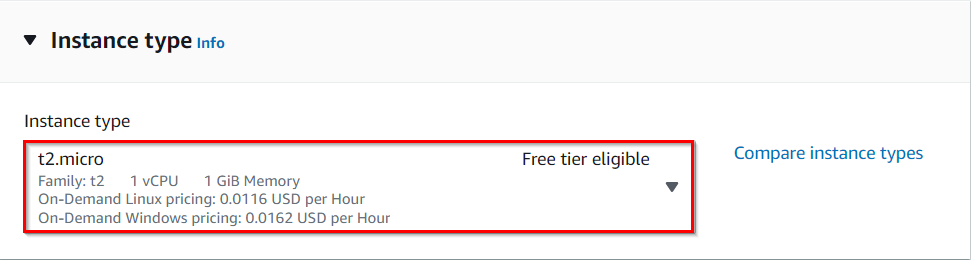
Under the Instance Type section :
- Instance Type : Select t2.micro
-
Under the Key Pair (login) section :
- Click on Create new key pair hyperlink
- Key pair name: MyWebserverKey
- Key pair type: RSA
- Private key file format: .pem or .ppk
- Click on Create key pair and then select the created key pair from the drop-down.
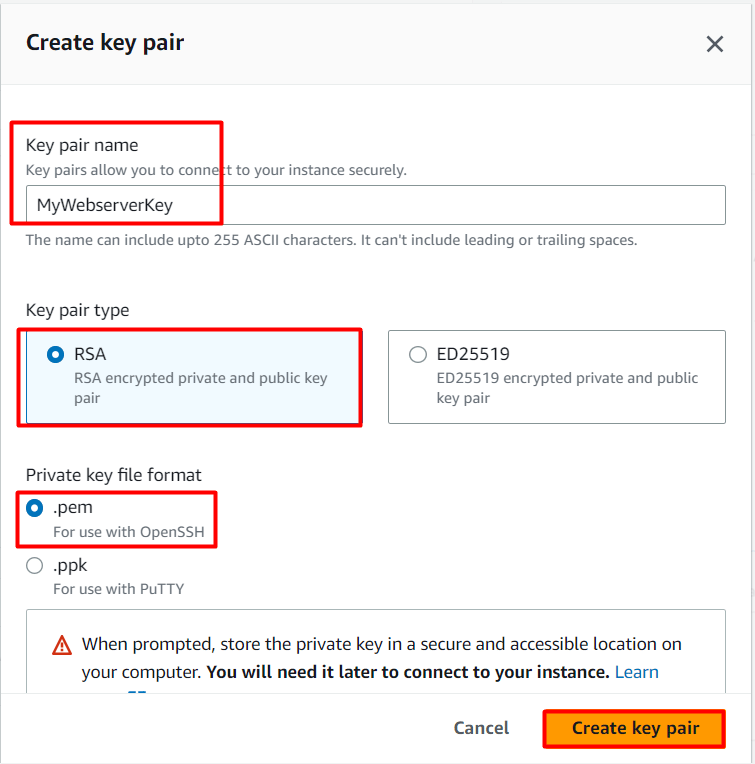
-
Under the Network Settings section :
- Click on Edit button
- Auto-assign public IP: select Enable
- Firewall (security groups) : Select Create a new security group
- Security group name : Enter MyWebserverSG
- Description : Enter My EC2 Security Group
-
To add SSH:
- Choose Type: SSH
- Source: Anywhere (From ALL IP addresses accessible).
-
For HTTP, click on Add security group rule,
- Choose Type: HTTP
- Source: Anywhere (From ALL IP addresses accessible).
-
For HTTPS, click on Add security group rule,
- Choose Type: HTTPS
- Source: Anywhere (From ALL IP addresses accessible).
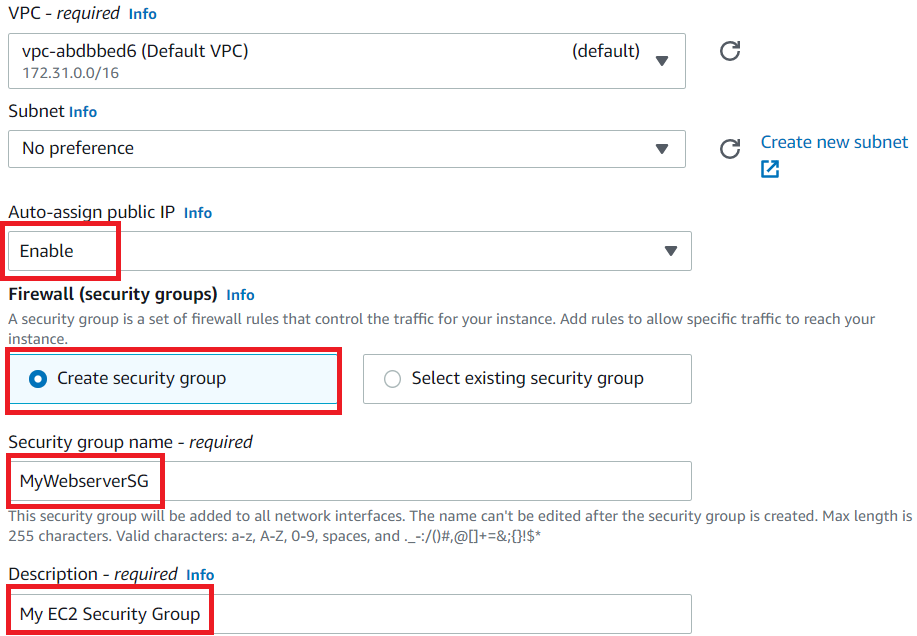
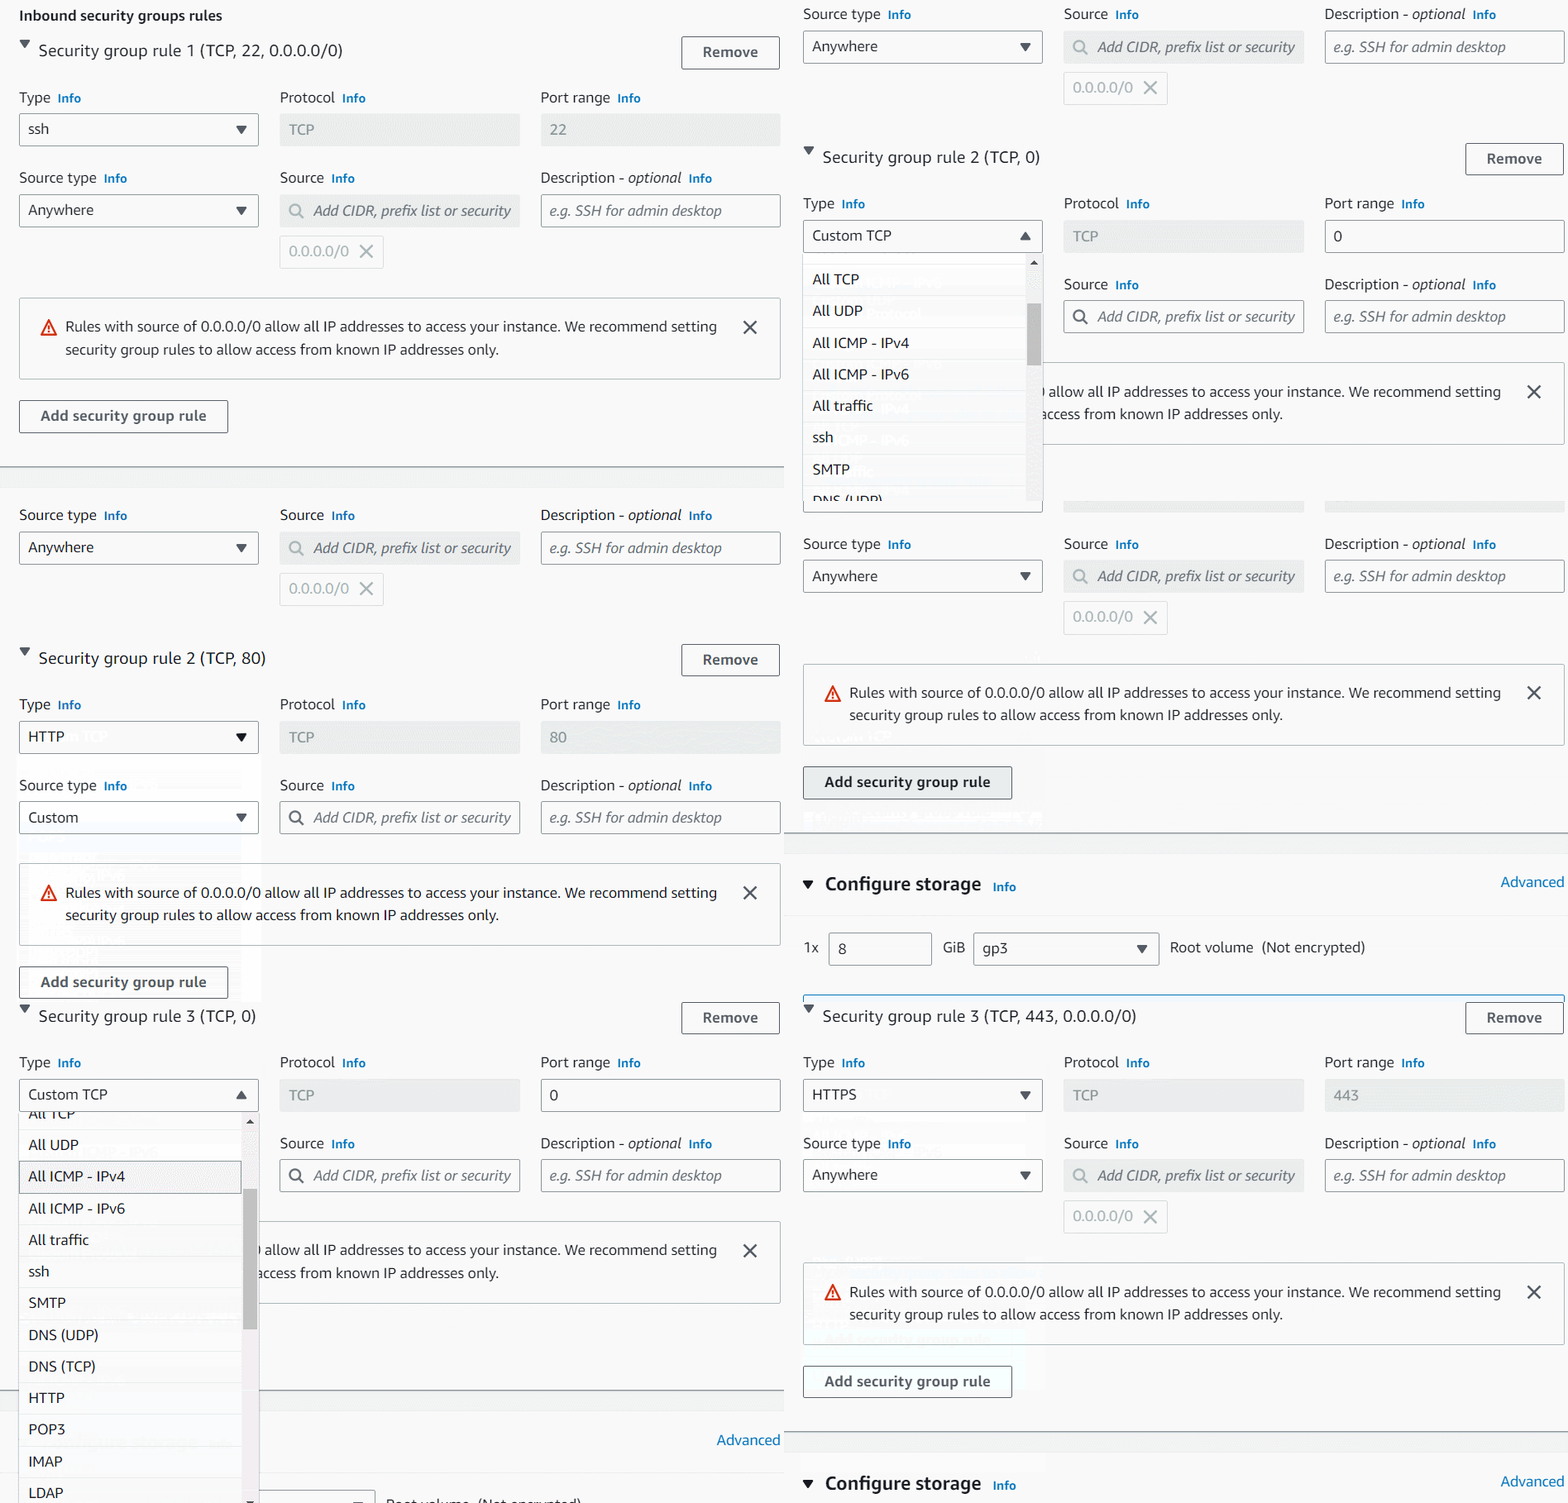
-
Under the Advanced details section :
-
Under the User data: copy and paste the following script to create an HTML page served by an Apache HTTPD web server.
-
Under the User data: copy and paste the following script to create an HTML page served by an Apache HTTPD web server.
- Keep everything else as default and click on the Launch instance button.
- Launch Status: Your instance is now launching, Navigate to Instances page from the left menu and wait until the status of the EC2 Instance changes to running.

Task 3: Launch Second EC2 Instances
In this task, we are going to launch the second EC2 instance by providing the required configurations like name, AMI selection, security group , instance type and other settings. Furthermore, we will provide the user data as well.- Now again click on Launch Instances button.
- Under the Name and tags section :
- Name : Enter MyEC2Server2
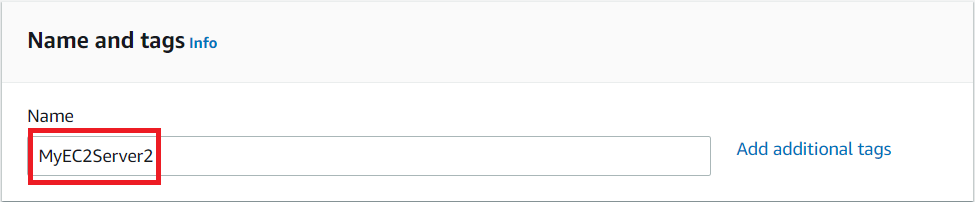
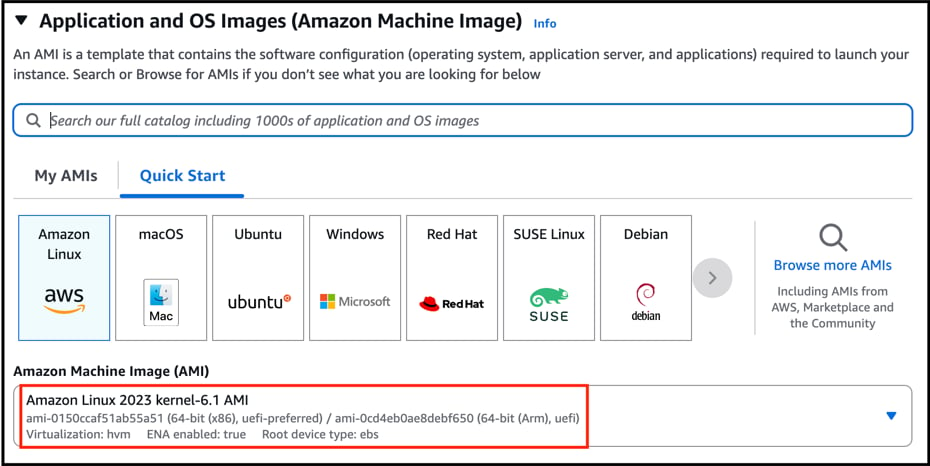
- Under the Application and OS Images (Amazon Machine Image) section :
- Select Quick Start tab and Amazon Linux under it
- Amazon Machine Image (AMI) : select Amazon Linux 2023 kernel 6.1 AMI
-
Under the Instance Type section :
- Instance Type : Select t2.micro
-
Under the Key Pair (login) section :
- Select MyWebserverKey from the list.
- Under the Network Settings section :
- Click on Edit button
- Auto-assign public IP: select Enable
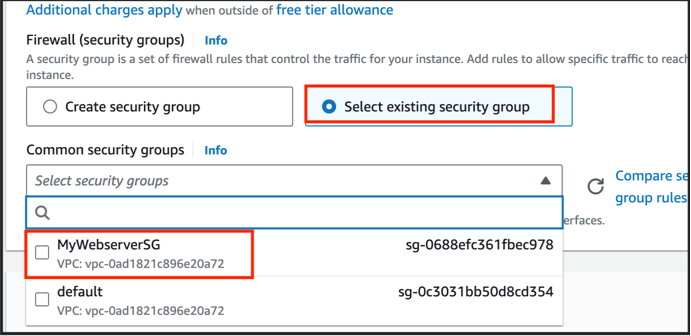
- Firewall (security groups) : Select existing security group
- Security group name : Enter MyWebserverSG
-
Under the Advanced details section :
-
Under the User data: copy and paste the following script to create an HTML page served by Apache httpd web server:
-
Under the User data: copy and paste the following script to create an HTML page served by Apache httpd web server:
- Keep everything else as default and then click on the Launch Instance button.
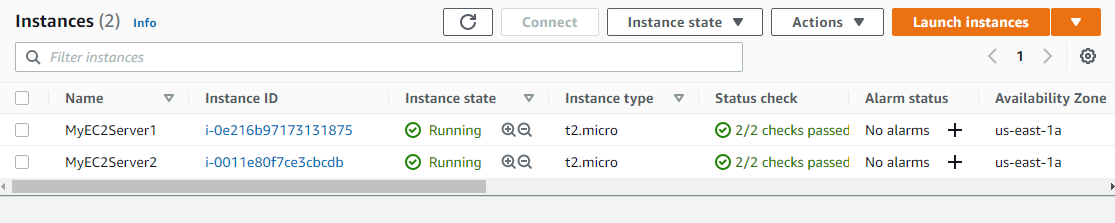
- Your instances are now launching. Navigate to the EC2 instance page and wait until the status changes to the Running. It will usually take 1-2 minutes.
Task 4: Create a Target Group
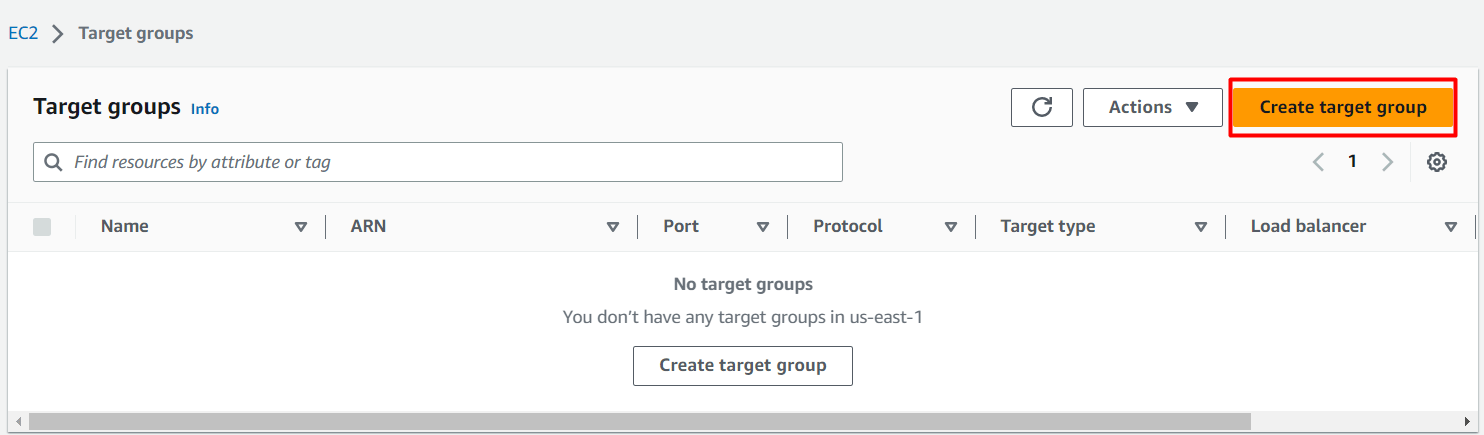
In this task, we are going to create a target group for the load balancer and will add the target instances so that the load balancer can distribute the traffic among these instances.- In the EC2 console, navigate to Target Groups in the left-side panel under Load Balancer in the Load Balancing section.
- Click on Create target group button on the top right corner.
- Basic configuration:
- Choose a target type : Select Instances
- Target group name : Enter MyWAFTargetGroup
- Protocol : Select HTTP
- Port : Enter 80
- Health Checks:
- Health check protocol : Select HTTP
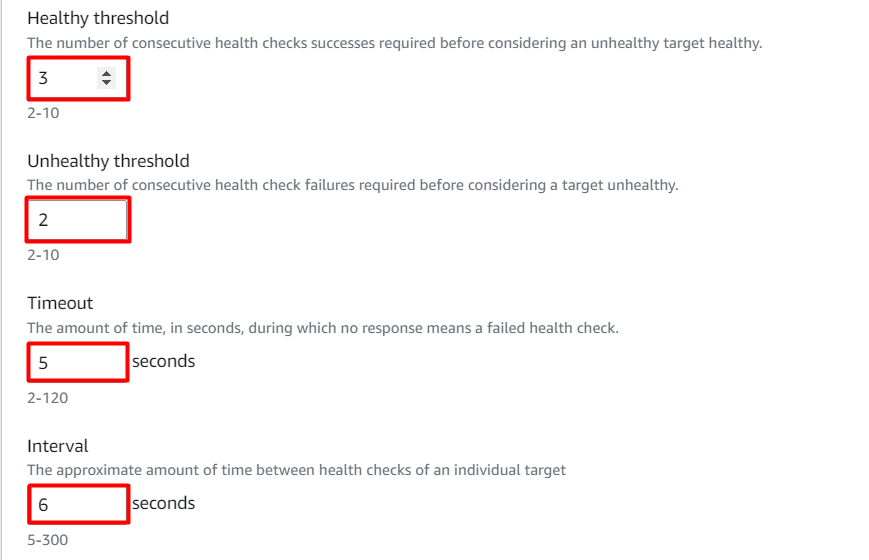
- Under Advanced Health Check Settings :
- Choose Healthy threshold : 3
- Choose Unhealthy threshold : 2
- Choose Timeout : 5 seconds
- Choose Interval : 6 seconds
- Leave everything as default and click on Next button.
- Register targets:
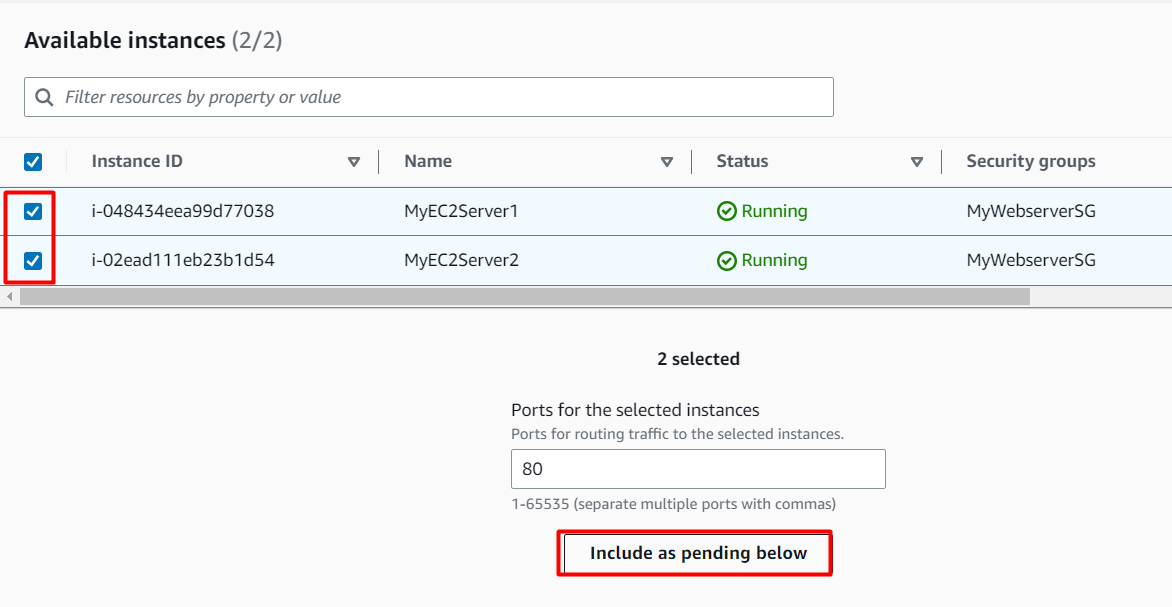
- Select the two instances we have created i.e MyEC2Server1 and MyEC2Server2.
- Click on Include as pending below and scroll down.
- Review targets:
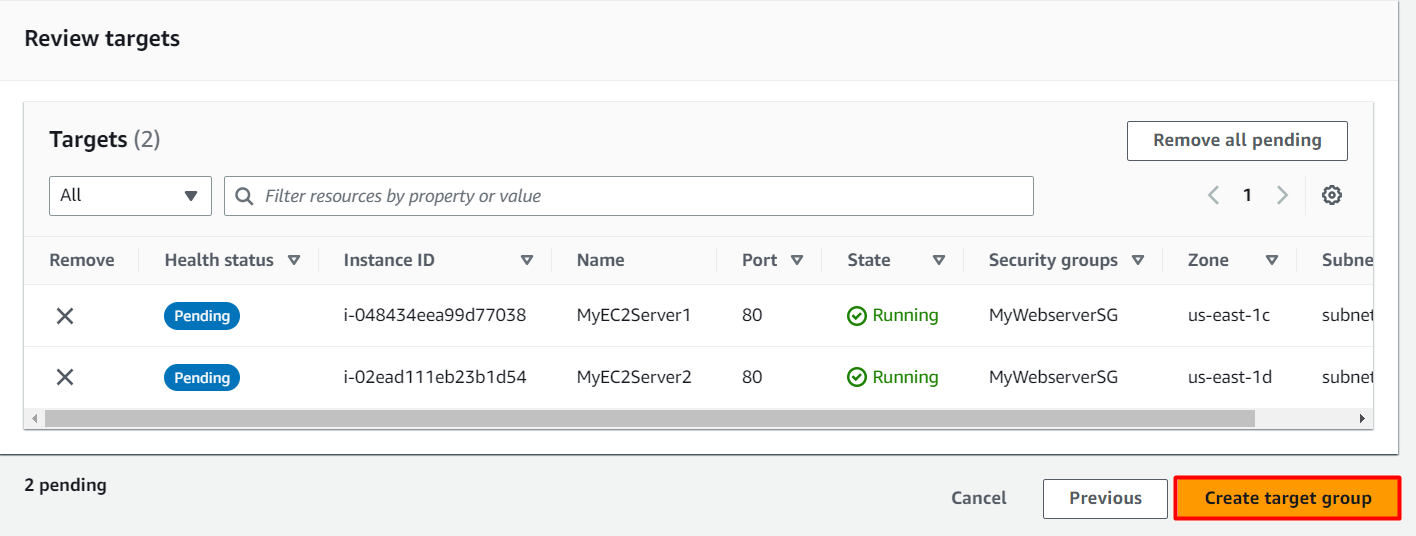
- Review the targets and click on Create target group button.
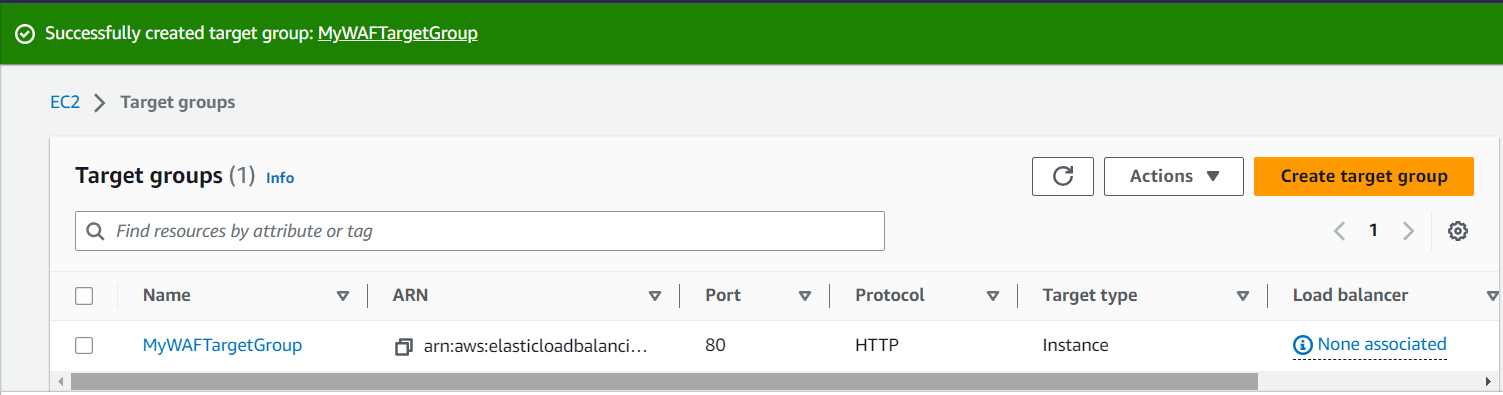
- Your Target group has been successfully created.
Task 5: Create an Application Load Balancer
In this task, we are going to create an Application Load balancer by providing the required configurations like name, target group etc.- In the EC2 console, navigate to Load Balancers in the left-side panel under Load Balancing.
- Click on Create Load Balancer at the top-left to create a new load balancer for our web servers.
- On the next screen, choose Application Load Balancer since we are testing the high availability of the web application and click on Create button.
-
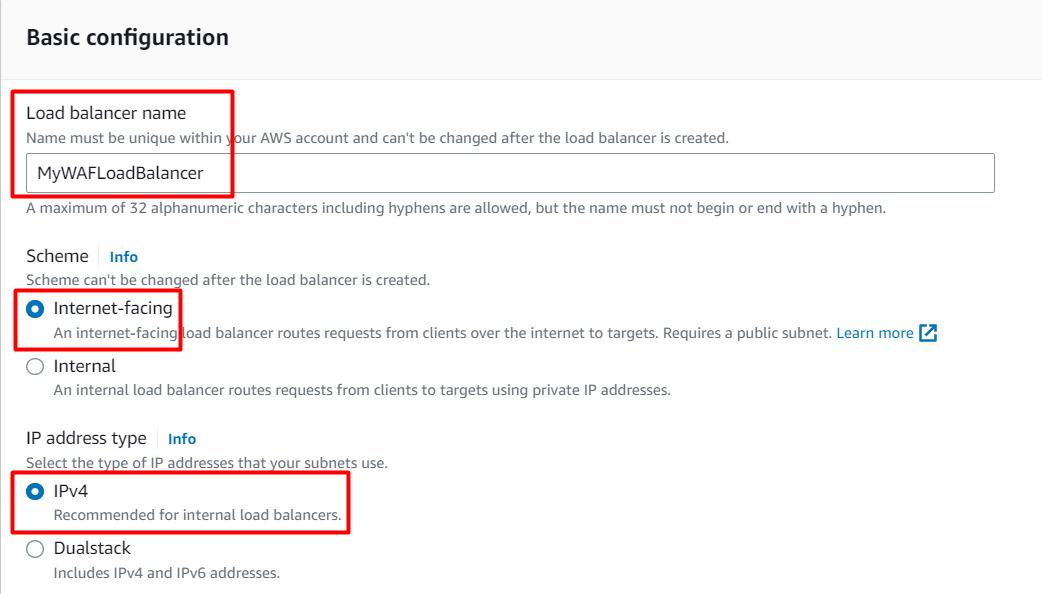
Basic configuration:
- Load balancer name: Enter MyWAFLoadBalancer
- Scheme: Select Internet-facing
- IP address type: Choose IPv4
- Network mapping:
- VPC : Select Default
- Mappings : Check All Availability Zones
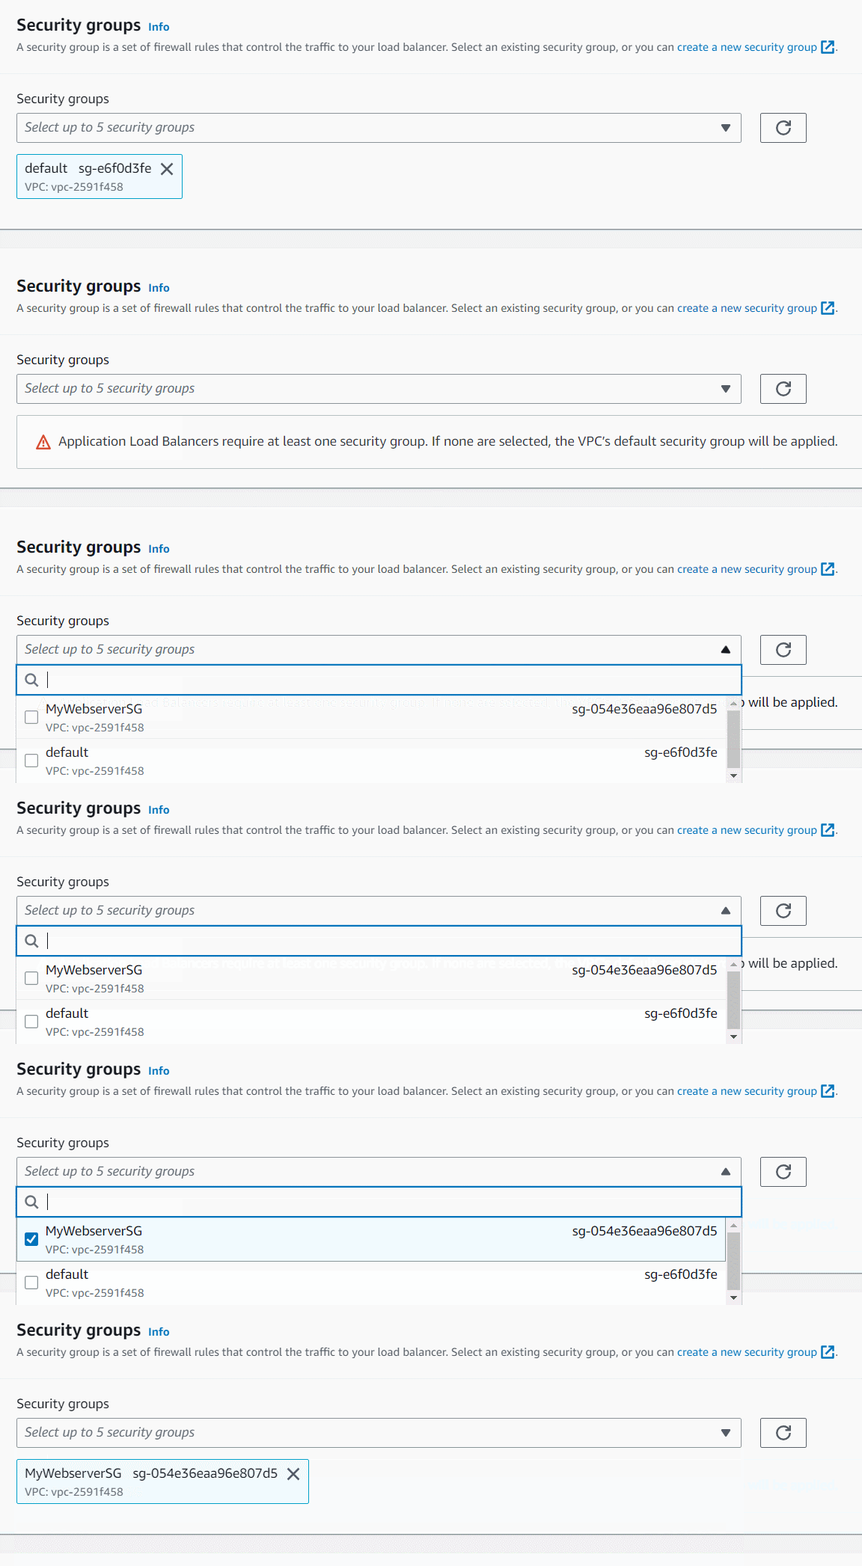
- Security groups:
- Security groups : Select an existing security group i.e MyWebserverSG from the drop down menu.
- Listeners and routing:
- Protocol : Select HTTP
- Port : Enter 80
- Default action : Select MyWAFTargetGroup from the drop down menu

- Leave everything as default and click on Create load balancer button.
- You have successfully created Application Load Balancer.
Task 6: Test Load Balancer DNS
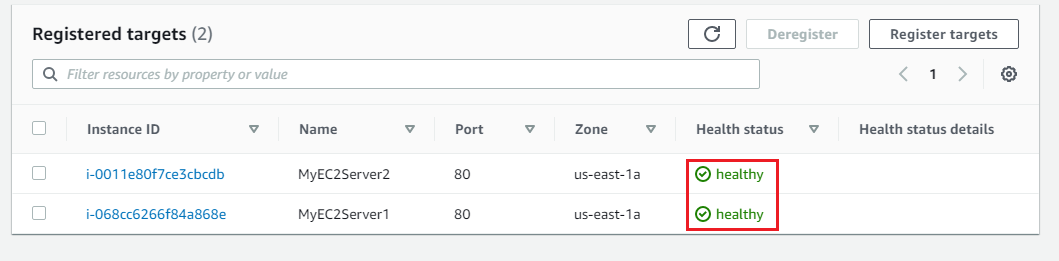
In this task, we will test the working of load balancer by copying the DNS to the browser and find out whether it is able to distribute the traffic or not.- Now navigate to the Target Groups from the left side menu under Load balancing.
- Click on the MyWAFTargetGroup Target group name.
- Now select the Targets tab and wait till both the targets become healthy (Important).
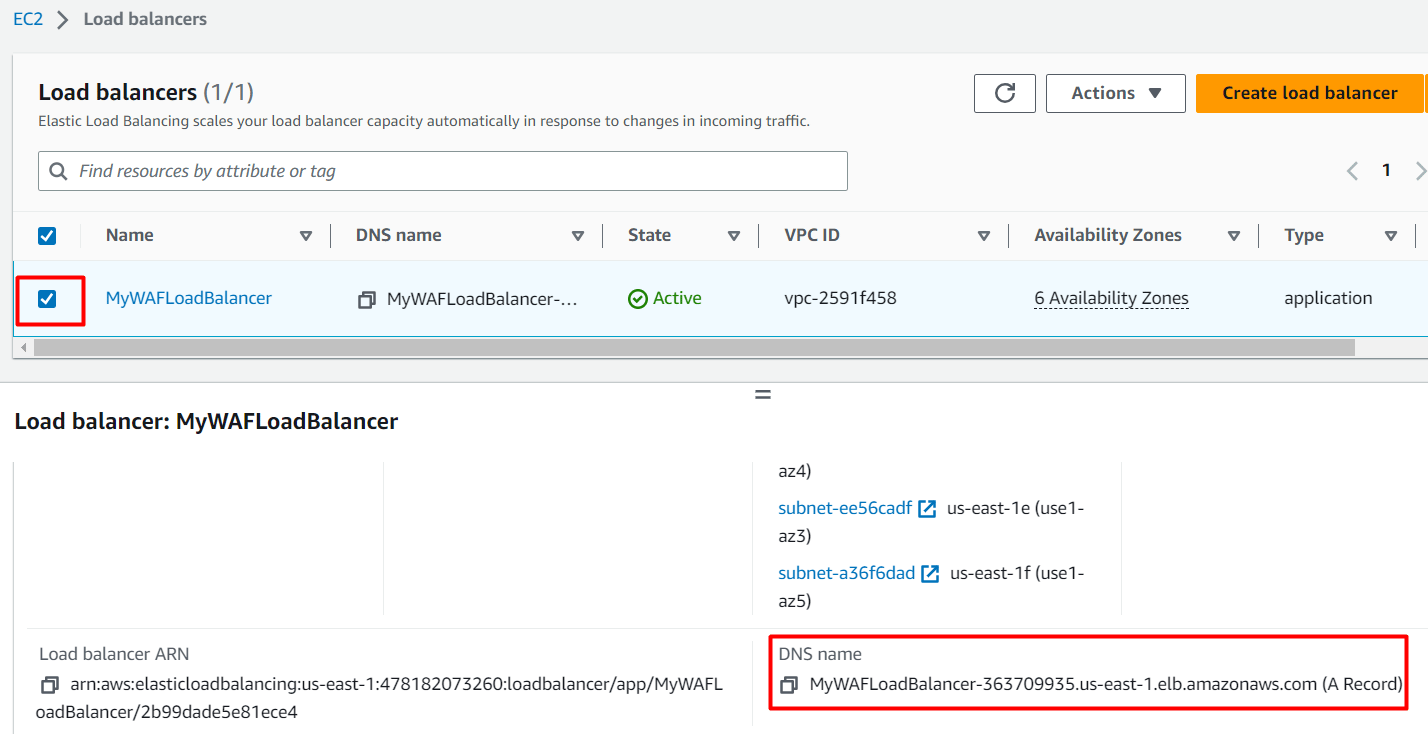
- Now again navigate to Load Balancers from the left side menu under Load balancing.
- Select the MyWAFLoadBalancer Load Balancer and copy the DNS name under Description tab.
-
Copy the DNS name of the ELB and enter the address in the browser.
- DNS Example: MyWAFLoadBalancer-2020171322.us-east-1.elb.amazonaws.com
- You should see the index.html page content of Web Server 1 or Web Server 2
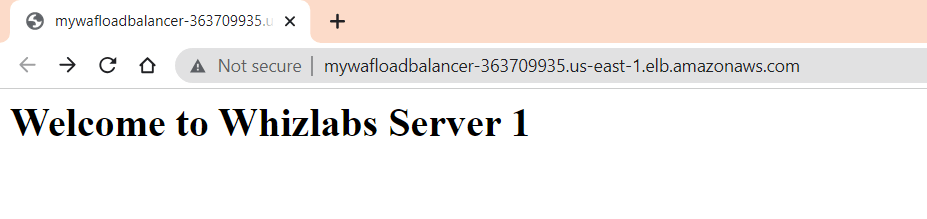
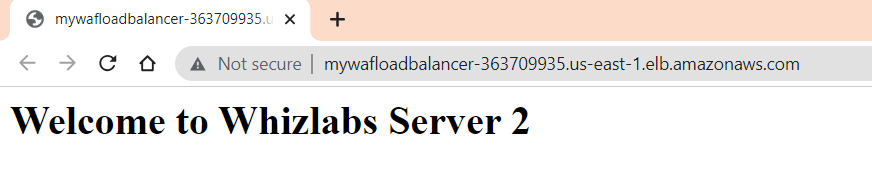
- Now Refresh the page a few times. You will observe that the index pages change each time you refresh.
Note: The ELB will equally divide the incoming traffic to both servers in a Round Robin manner.
- Test SQL Injection :
- Along with the ELB DNS add the following URL parameter: /product?item=securitynumber’+OR+1=1—
- Syntax : http://<ELB DNS>/product?item=securitynumber’+OR+1=1—
- Example : MyWAFLoadBalancer-2020171322.us-east-1.elb.amazonaws.com***/product?item=securitynumber’+OR+1=1—***
- You will be able to see the below output.
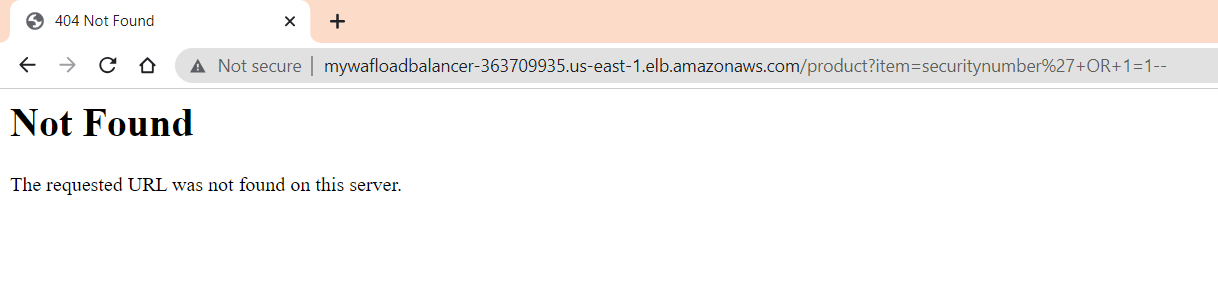
- Here the SQL Injection went inside the server and since we only have an index page, the server doesn’t know how to solve the URL that is why you got Not Found page.
- Test Query String Parameter :
- Along with the ELB DNS add the following URL parameter: /?admin=123456
- Syntax : http://<ELB DNS>/?admin=123456
- Example : MyWAFLoadBalancer-2020171322.us-east-1.elb.amazonaws.com***/?admin=123456***
- You will be able to see the below output.
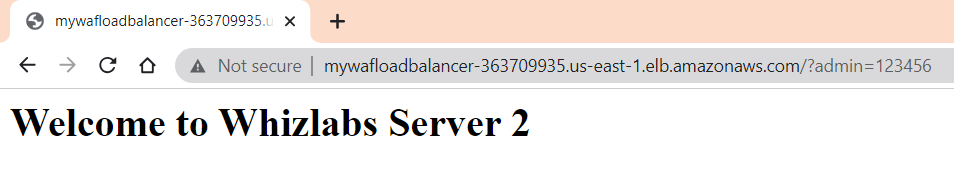
- Here also the Query string went inside the server and the server always passes the query string inside and it is resolved by the code that you write. Here the query string is passed and there is no code to resolve the this but it wont throw any error it just becames an unused value. so you got a response back.
Task 7: Create AWS WAF Web ACL
In this task , we are going to create an AWS WAF Web ACL where we will add some customized rules for location restriction, query strings and-
Navigate to WAF by clicking on the Services menu in the top, then click on WAF & Shield in the Security, Identity & Compliance section.
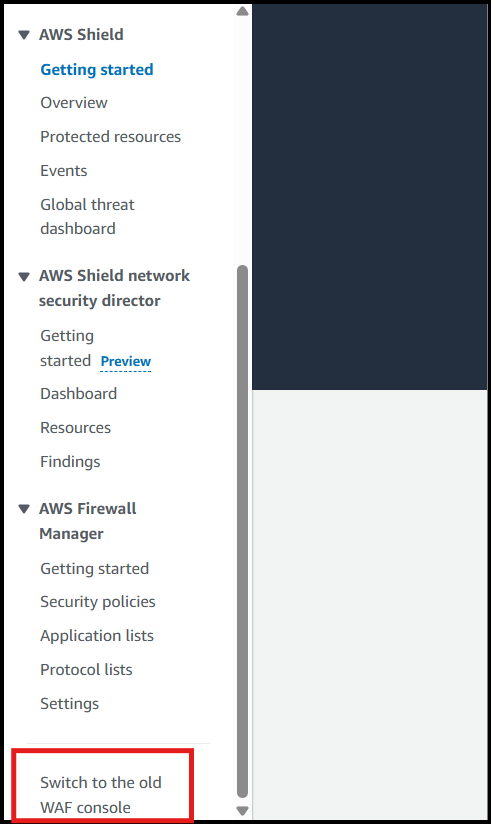
Click on Switch to the Old WAF Console option at the Bottom.
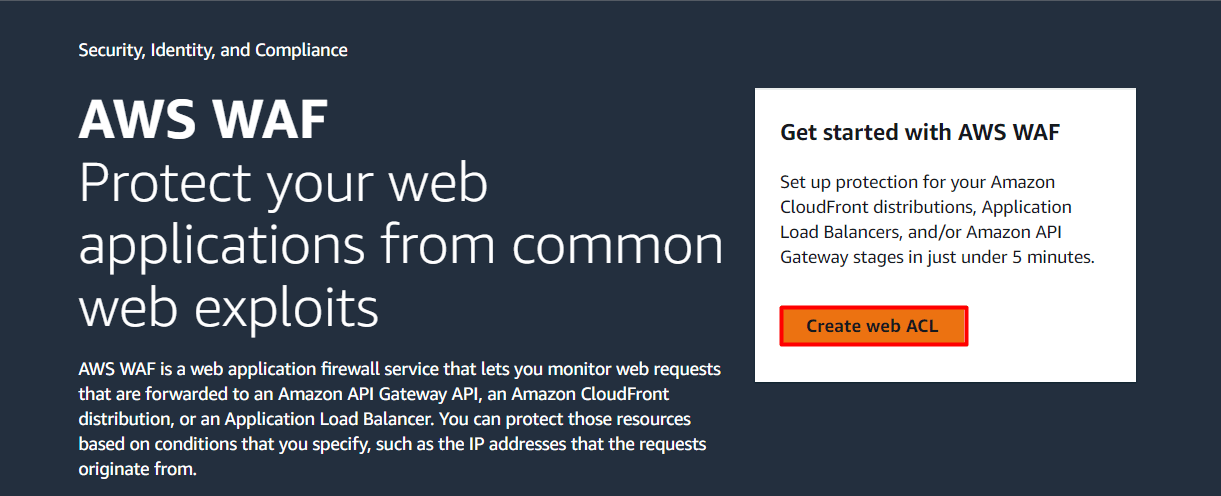
- Click on Create web ACL button.
- Describe web ACL and associate it to AWS resources :
- Resource type : Select Regional resources
- Region : Select US East (N.Virginia) from the dropdown.
- Name : Enter MyWAFWebAcl
- Description : Enter WAF for SQL Injection, Geo location and Query String parameters.
- CloudWatch metric name : Automatically selects the WAF name, so no changes required.
- Associated AWS resources :
- Click on the Add AWS resources button.
- Resource type : Select Application Load Balancer
- Select MyWAFLoadBalancer Load Balancer from the list.
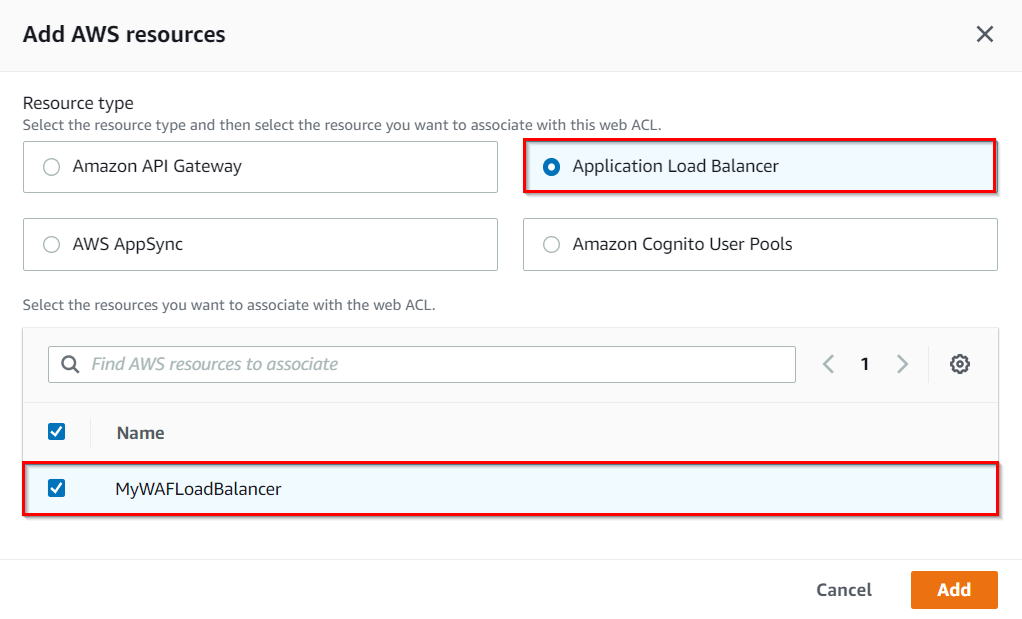
- Now click on the Add button.
- Click on the Next button.
-
Add rules and rule groups :
-
Under Rules, click on Add rules and then select Add my own rules and rule groups.
- Rule type : Select Rule builder
- Name : Enter GeoLocationRestriction
- Type : Select Regular rule
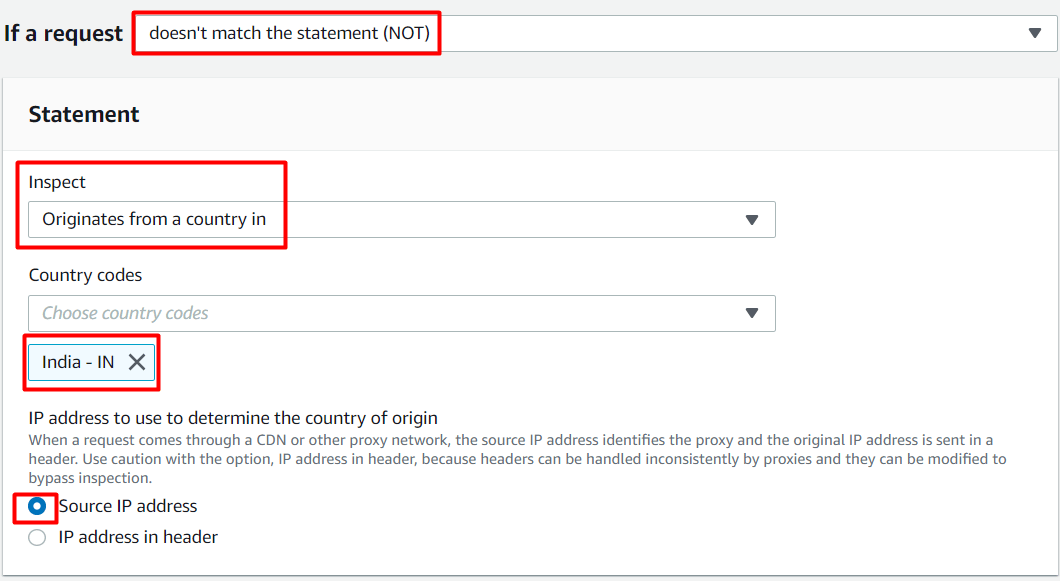
- If a request : Select doesn’t match the statement (NOT)
- Inspect : Select Originates from a country in
-
Country codes : Select <Your Country> In this example we select India-IN
Note : You can also select multiple countries also.
- IP address to use to determine the country of origin : Select Source IP address
-
Under Rules, click on Add rules and then select Add my own rules and rule groups.
- Under Then : Action Select Block.
- Click on Add rule.
- Here we are only allowing requests to come from India and all the requests that come from other countries will be blocked.
-
Under Rules, click on Add rules and then select Add my own rules and rule groups.
- Rule type : Select Rule builder
- Name : Enter QueryStringRestriction
- Type : Select Regular rule
- If a request : Select matches the statement
- Inspect : Select Query string
- Match type : Select Contains string
- String to match : Enter admin
- Text transformation : Leave as default.
- Under Then : Action Select Block.
- Click on Add rules.
- Anytime in the request URL contains a query string as admin WAF will block that request.
-
Under Rules, click on Add rules and then select Add managed rule groups.
- It will take a few minutes to load the page. It lists all the rules which are managed by AWS.
- Click on AWS managed rule groups.
- Scroll down to SQL database and enable the corresponding Add to web ACL button.

- Scroll down to the end and click on Add rules button.
- Now you have 3 rules added.
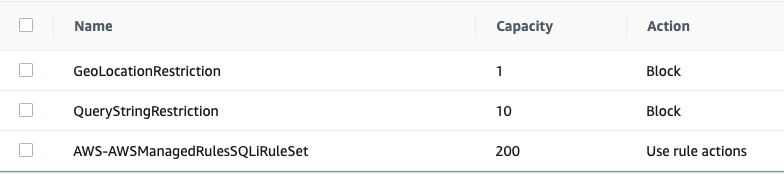
- Under Default web ACL action for requests that don’t match any rules, Default action Select Allow.
- Click on the Next button.
-
Set rule priority :
- No changes required, leave as default.
- You can move the rules based on your priority.
- Click on the Next button.
-
Configure metrics :
- Leave it as default.
- Click on the Next button.
-
Review and create web ACL :
- Review the configuration done, scroll to the end and click on Create web ACL button.
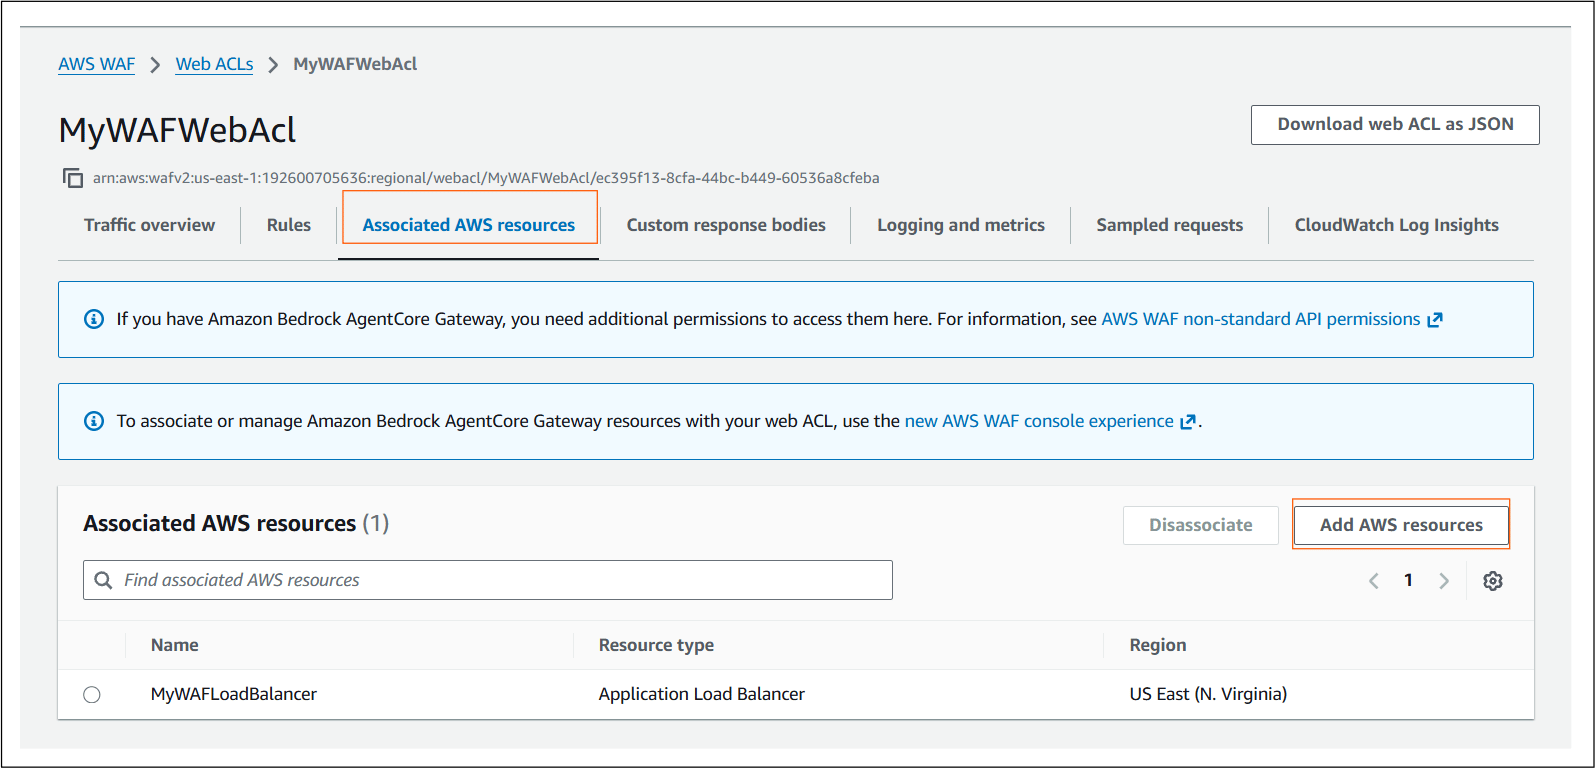
- It will take a few seconds to create the Web ACL, so wait till its completed. Note: Make sure the Load Balancer is attached to the Web ACL by navigating to the Associated AWS resources tab. If it is not attached, click Add AWS resources and manually add the Load Balancer.
Task 8: Test Load Balancer DNS
- Now again navigate to Load Balancers from the left side menu under Load balancing.
- Select the MyWAFLoadBalancer Load Balancer and copy the DNS name under Description tab.
-
Copy the DNS name of the ELB and enter the address in the browser.
- DNS Example: MyWAFLoadBalancer-2020171322.us-east-1.elb.amazonaws.com
- You should see the index.html page content of Web Server 1 or Web Server 2.
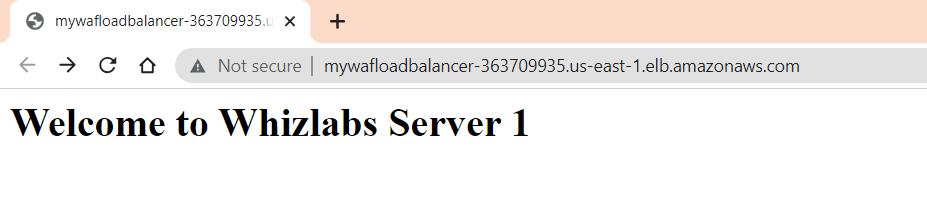
-
Now Refresh the page a few times.You will observe that the index pages change each time you refresh.
Note: The ELB will equally divide the incoming traffic to both servers in a Round Robin manner.
-
Test SQL Injection :
- Along with the ELB DNS add the following URL parameter: /product?item=securitynumber’+OR+1=1—
- Syntax : http://<ELB DNS>/product?item=securitynumber’+OR+1=1—
- Example : MyWAFLoadBalancer-2020171322.us-east-1.elb.amazonaws.com***/product?item=securitynumber’+OR+1=1—***
- You will be able to see the below output.

- Here the SQL Injection is blocked by WAF before it goes inside the server.
-
Test Query String Parameter :
- Along with the ELB DNS add the following URL parameter: /?admin=123456
- Syntax : http://<ELB DNS>/?admin=123456
- Example : MyWAFLoadBalancer-2020171322.us-east-1.elb.amazonaws.com***/?admin=123456***
- You will be able to see the below output.

- Here also the Query string which contains admin is blocked by WAF before it could go inside the server.
Do you know?
WAF can offer protection against Distributed Denial of Service (DDoS) attacks by analyzing traffic patterns, detecting abnormal behavior, and mitigating the impact of such attacks.
Task 9: Delete AWS Resources
10.1 Deleting an EC2 Instance- Make sure you are in the US East (N. Virginia) us east-1 Region.
- Navigate to EC2 by clicking on the Services menu in the top, then click on EC2 under Compute section.
- Now select the EC2 instance that you have created, click on the Instance State and click on the Terminate option.
- Click on Yes,Terminate button and your EC2 will start terminating.
- In the EC2 console, navigate to Load Balancer in the left-side paneol.
- MyWAFLoadBalancer will be listed here.
-
To delete the load balancer, need to perform the following actions:
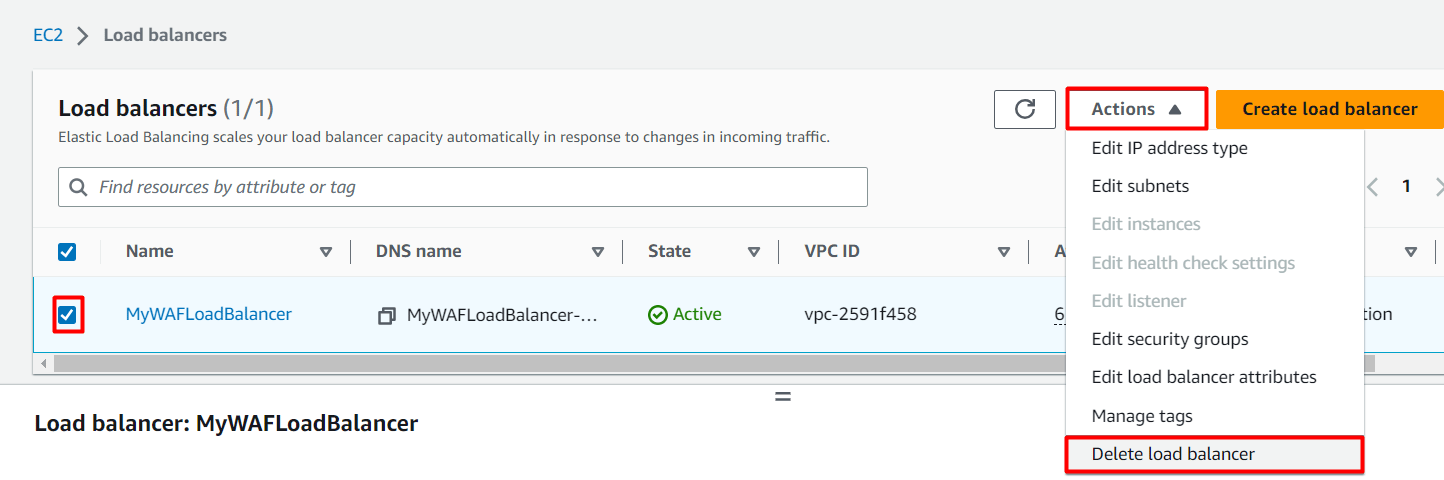
- Select the load balancer,
- Click on the Actions button,
-
Select the Delete option.
-
Confirm by typing confirm and then click on Delete button when a pop-up is shown.
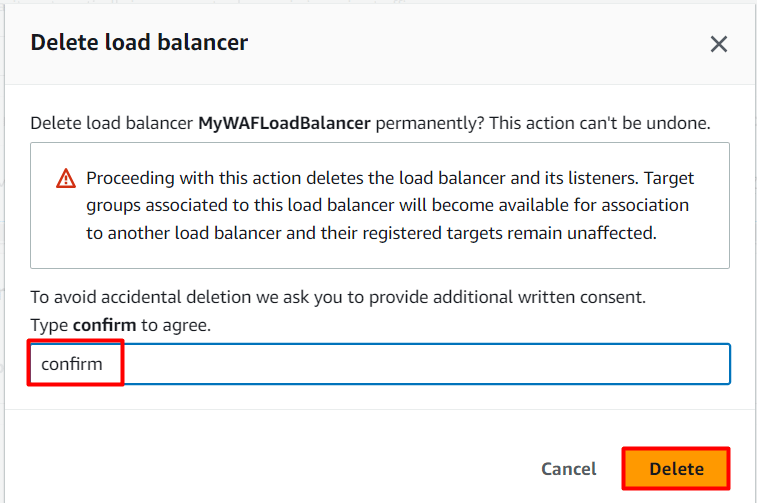
- MyWAFLoadBalancer be deleted immediately.
- In the EC2 console, navigate to Target Groups in the left-side panel.
- MyWAFTargetGroup will be listed here.
-
To delete the target group, need to perform the following actions:
- Select the target group,
- Click on the Actions button,
-
Select the Delete option.
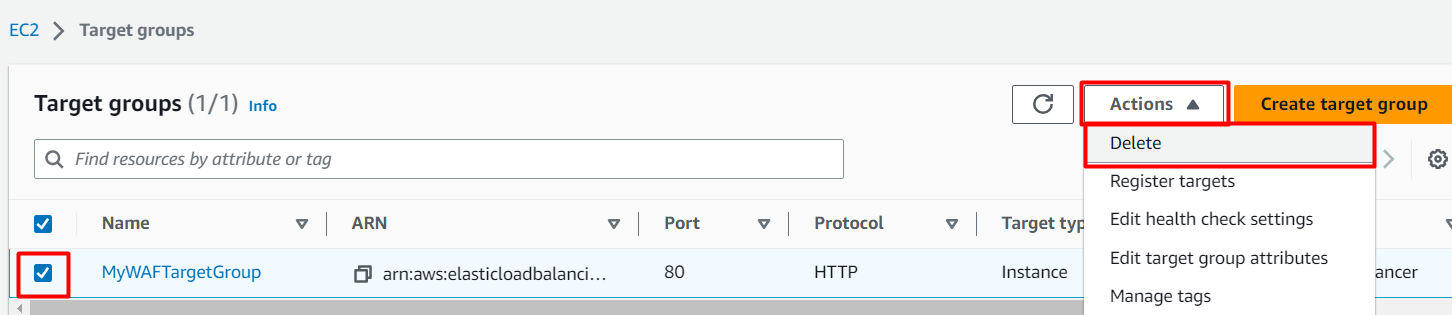
- Now click on the Yes, delete button to confirm deletion.
- MyWAFTargetGroup will be deleted immediately.
- Navigate to WAF by clicking on the Services menu in the top, then click on WAF & Shield in the Security, Identity & Compliance section.
- On the left side menu, select Web ACLs and then click on the Web ACL name that you created, MyWAFWebAcl.
- Select Associated AWS resources tab, select the application load balancer and click on Diassociate button.
- In the textbox enter remove and click on Diassociate button.
- On the left side menu, select Web ACLs and then select the radio button of the Web ACL that you created, MyWAFWebAcl.
- Click on the Delete button, In the textbox enter delete and click on Delete button.
- Now the WAF will be successfully deleted.
Completion and Conclusion
- You have successfully launched First EC2 Instance.
- You have successfully launched Second EC2 Instance.
- You have successfully created an Application Load Balancer and Target Group.
- You have successfully tested Load Balancer DNS.
- You have successfully created AWS WAF Web ACL.
- You have successfully tested Load Balancer DNS.
End Lab
- Sign out of the AWS Account.
- You have successfully completed the lab.
- Once you have completed the steps, click on End Lab from your IP Lab Portal and wait till the process gets completed.
What gets checked
When you press Check my work, the platform verifies each of these:- Launch EC2 AMI type Amazon Linux — Check whether the EC2 instance is launched using an Amazon AMI.
- Create a Application Load Balancer — Check if given type of Load Balancer is created or not.
- Create ELB Target Group — Check if given type of Load Balancer is created or not.
- Check Load Balancer DNS Status — Check whether the Elastic Load Balancer DNS URL is accessible from the internet or not.