

Overview
Lab Details
- Welcome to this comprehensive lab that will guide you through the process of launching and configuring a virtual machine in the powerful and dynamic Amazon Web Services (AWS) cloud.
- In this lab, you will gain practical experience using Amazon Machine Images (AMI) to launch Amazon EC2 instances and master the art of using key pairs for SSH authentication to log into your instance. Additionally, you will learn how to create a web page and publish it on your AWS virtual machine.
- Duration: 30 minutes
- AWS Region: US East (N. Virginia) us-east-1
Introduction
What is EC2 ?
Amazon Web Services (AWS) offers a revolutionary cloud-based web service called Elastic Compute Cloud (EC2) that provides unparalleled compute capacity in the cloud. In this cutting-edge platform, users have the ability to rent virtual machines, called instances, that are fully customizable to meet their specific computing needs. Here are some additional key points about Amazon EC2:- EC2 provides users with full control over their virtual computing resources, allowing them to customize their instances with their preferred operating system, programming languages, and application servers.
- Users can configure security groups and network access control lists (ACLs) to control inbound and outbound traffic to their instances, providing a secure environment for their applications.
- EC2 offers various purchasing options, including On-Demand Instances, Reserved Instances, and Spot Instances, allowing users to optimize their costs based on their application requirements.
- EC2 provides a wide range of monitoring and logging features, including Amazon CloudWatch, which allows users to monitor their instances, applications, and resources in real-time, and Amazon CloudTrail, which provides a record of all API calls made in their AWS account.
- EC2 supports a variety of storage options, including Amazon Elastic Block Store (EBS), Amazon Elastic File System (EFS), and instance store volumes, providing users with the flexibility to choose the most suitable storage solution for their applications.
- EC2 allows users to create custom machine images (AMIs) of their instances, which can be used to launch new instances with the same configuration and software stack, saving time and effort in application deployment.
Architecture Diagram
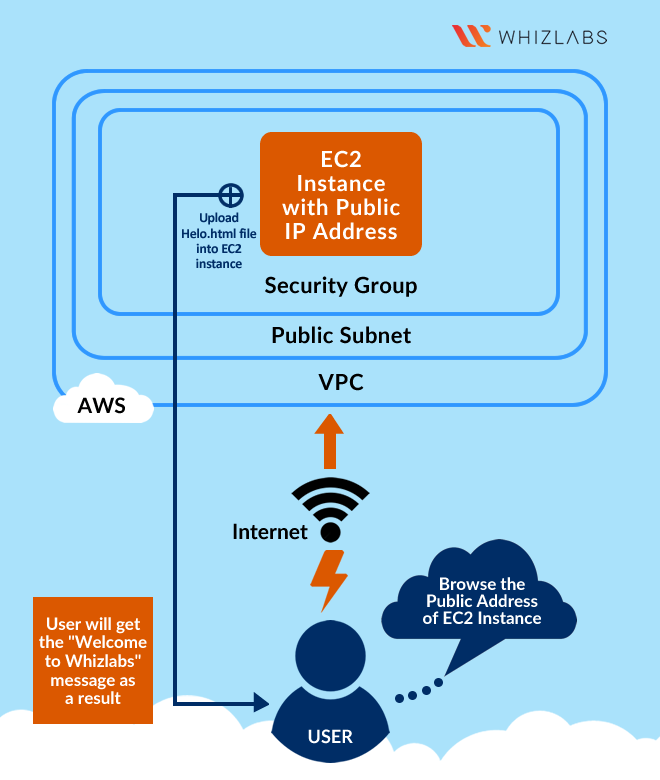
Task Details
- Sign in to AWS Management Console
- Launch an EC2 instance with desired specifications
- SSH into the EC2 instance using the key pair
- Install an Apache server on the instance
- Create a web page and publish it on the instance
Launching Lab Environment
- To launch the lab environment, Click on the Start Lab button.
- Please wait until the cloud environment is provisioned. It will take less than a minute to provision.
- Once the Lab is started, you will be provided with IAM user name, Password, Access Key, and Secret Access Key.
Note : You can only start one lab at any given time
Lab guide
Lab Steps
Task 1: Sign in to AWS Management Console
- Click on the Open Console button, and you will get redirected to AWS Console in a new browser tab.
-
On the AWS sign-in page,
- Leave the Account ID as default. Never edit/remove the 12 digit Account ID present in the AWS Console. otherwise, you cannot proceed with the lab.
- Now copy your User Name and Password in the Lab Console to the IAM Username and Password in AWS Console and click on the Sign in button.
- Once Signed In to the AWS Management Console, Make the default AWS Region as US East (N. Virginia) us-east-1.
Task 2: Provision Default VPC
- Navigate to VPC by clicking on the Services menu in the top, then click on VPC or Open the Amazon VPC console via https://console.aws.amazon.com/vpc/.
-
Delete the default VPC by following the below steps:
- In the navigation pane, choose Your VPCs.
-
Select the VPC with value as yes in default VPC column.

- Go to actions button and click on delete VPC button.
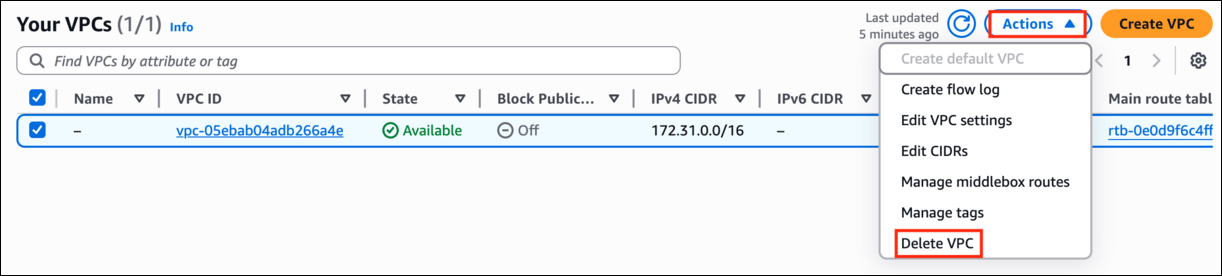
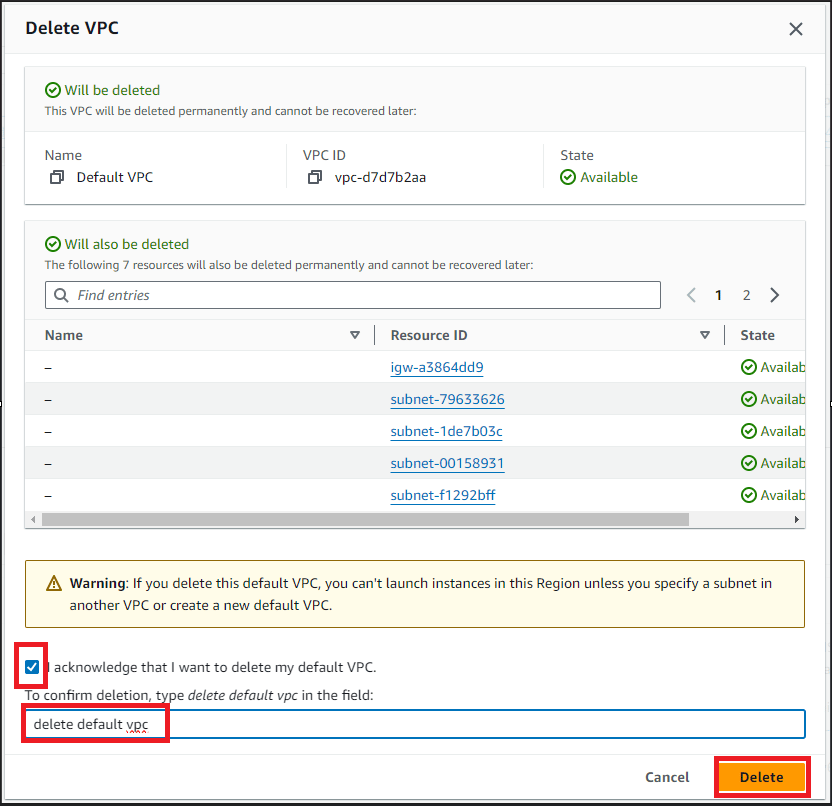
- Check I acknowledge that I want to delete my default VPC option.
- Type default delete VPC and click on Delete button.
- Now to provision Default VPC again, Refresh your console go to actions and click Create default VPC
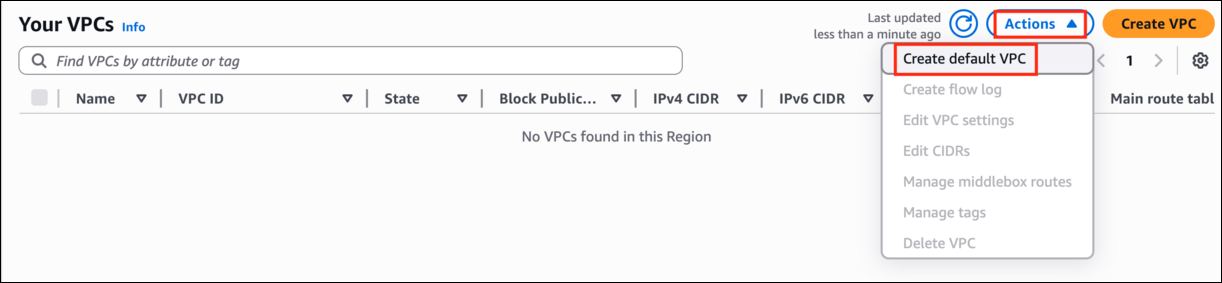
- Click Create default VPC button and your default VPC will get created


Task 3 : Launch an EC2 Instance with desired specifications
- Ensure you are in the US East (N. Virginia) us-east-1 Region to begin launching an EC2 instance in the Amazon cloud.
- Navigate to EC2 by clicking on the Services menu in the top, then click on EC2 in the Compute section.
- Click on the Instances option on the left panel, and then click on the Launch Instances button.
-
Name : Enter MyEC2Server

-
Select Amazon Linux 2023 AMI from the dropdown.
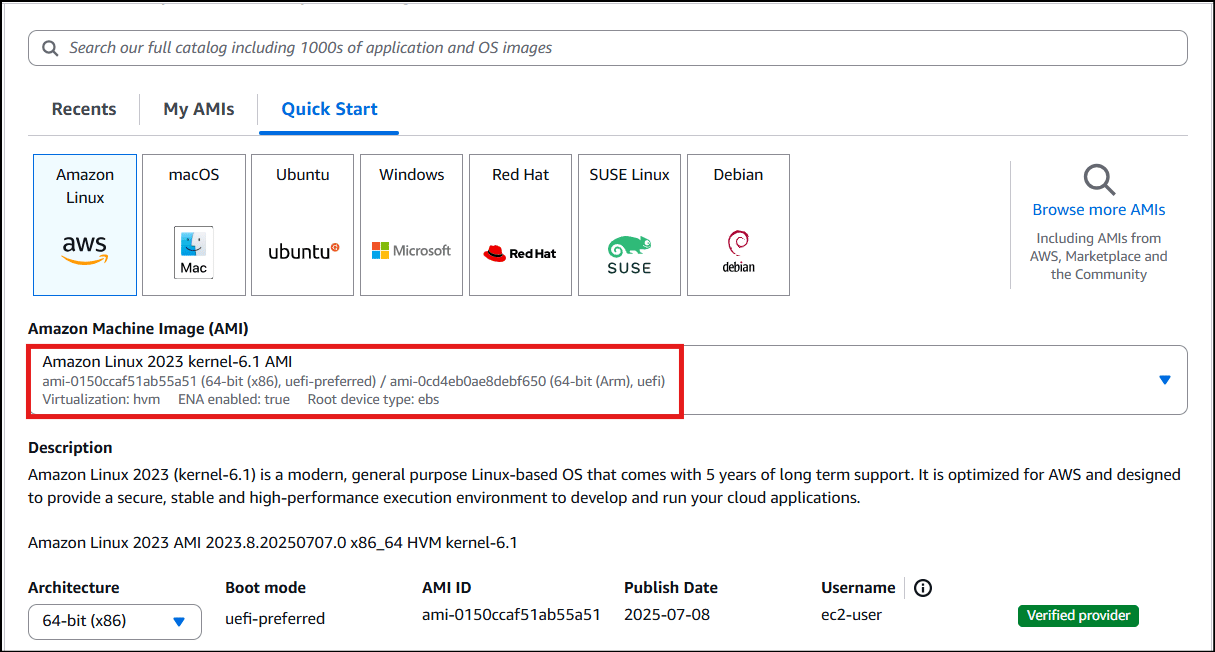
Note: if there are two AMI’s present for Amazon Linux 2o23 kernel-6.1 AMI.
-
An instance type in AWS refers to a virtual server configuration that determines the computing resources, such as CPU, memory, and storage, available to an instance. It is the basic building block for creating an EC2 instance in the AWS cloud.
-
For Instance Type: Select t2.micro
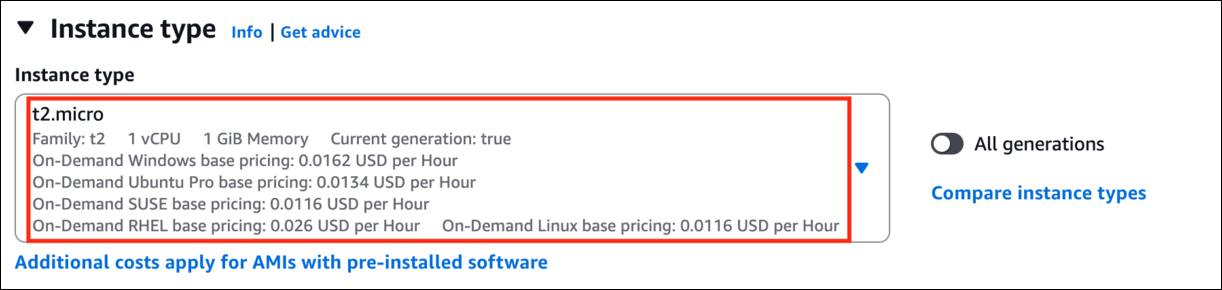
-
For Instance Type: Select t2.micro
- t2.micro is an instance type in AWS that comes with 1 vCPU, and 1GB memory and is suitable for low-traffic web servers, small development environments, and other lightweight applications.
- AWS key pair is a secure pair of keys used for login and access to EC2 instances. It includes a public key placed on the instance and a private key kept on the user’s local computer, used for authentication to prevent unauthorized access.
- For Key pair(login): Select Create a new key pair Button
- Key pair name: WhizKey
- Key pair type: RSA
- Private key file format: .pem
- In Network Settings, Click on Edit Button:
- Auto-assign public IP: Enable
- Select Create security group
- Security group name: Enter MyEC2Server_SG
- Description: Enter Security Group to allow traffic to EC2.
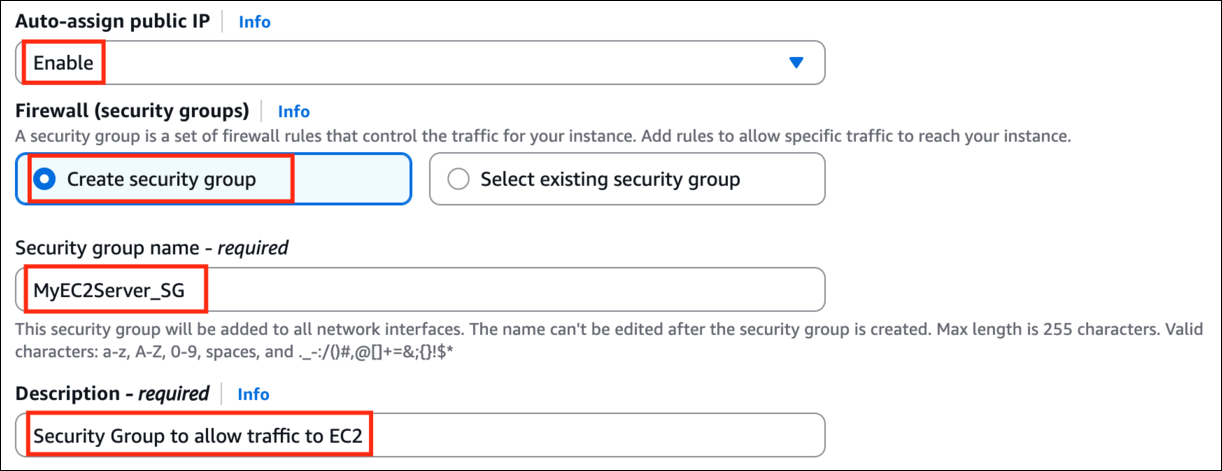
- We will now add the security group rules. SSH will already be present there.
- For HTTP, Select Add security group rule Button
- Choose Type: Select HTTP
- Source: Select Anywhere
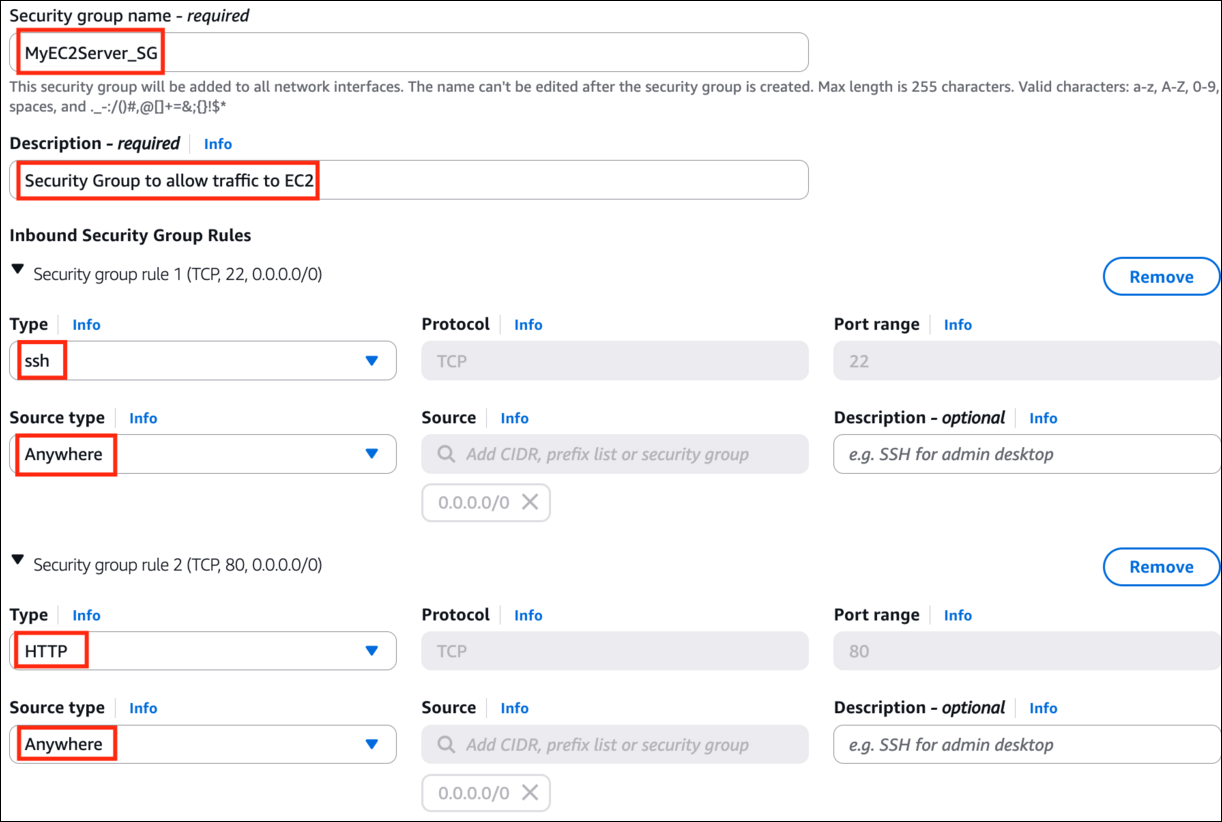
- A security group is a virtual firewall that controls the inbound and outbound traffic for instances in a particular network in a cloud computing environment. Here we have selected SSH and HTTP rules that will allow incoming SSH and HTTP traffic to instances that are associated with the security group.
- Proceed with launching the instance while leaving all other settings as default. Simply click on the Launch Instance without modifying any other configuration.
- To view the instance that you have created, choose the View all Instances option.
-
Launch Status: Once you have initiated the instance launch process, Go to the Instances page from the left menu and wait for your EC2 instance to become “Running” while ensuring the health check status is 2/2 checks passed for optimal performance.

-
Select the instance that you have created and copy the public IPv4 address within the details section and paste it into the editor for later use. An example of this process is depicted in the screenshot provided.

Task 4 : SSH into EC2 Instance using the key pair
-
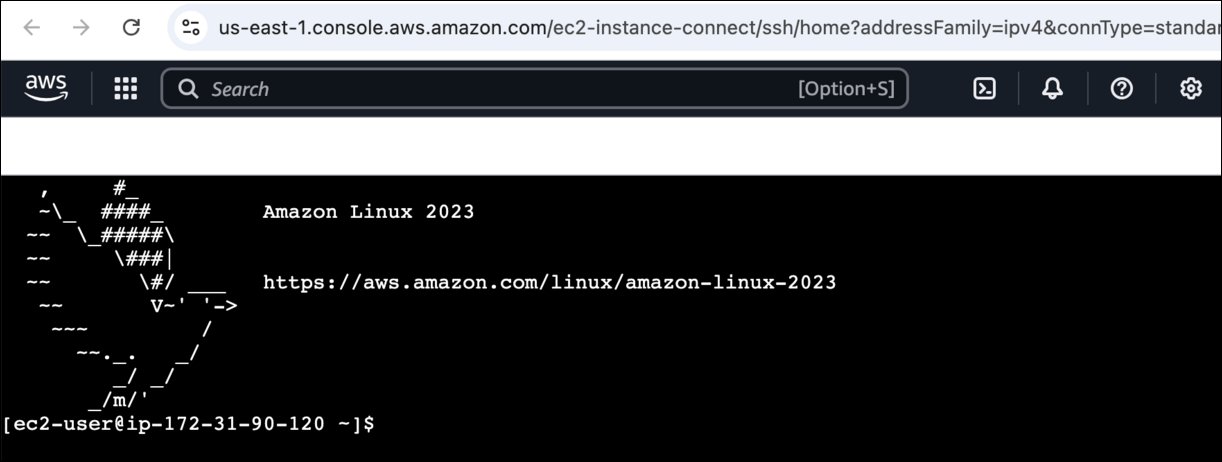
Select your EC2 instance (MyEC2Server) and click on the Connect button.

- Select EC2 Instance Connect option and click on Connect button. Keep everything else as default.
- A new tab will open in the browser where you can execute the Linux Commands.
- Please follow the steps in SSH into EC2 Instance for more options to SSH.
Task 5: Install an Apache Server on the instance
In this task, our goal is to configure an Amazon EC2 instance to run an Apache Web Server and verify its functionality by accessing the web server via a web browser using the instance’s public IPv4 address.-
Switch to root user:
- Now run the updates using the following command:
- Once completed, lets install and run an apache server
- Install the Apache web server:
- Start the web server:
- Now Enable httpd:
- Check the webserver status
- You can see Active status is running.
- You can test that your web server is properly installed and started by entering the public IPv4 address of your EC2 instance in the address bar of a web browser. If your web server is running, then you see the Apache test page. If you don’t see the Apache test page, then verify whether you followed the above steps properly and check your inbound rules for the security group that you created.
Task 6 : Create a web page and publish it on the instance
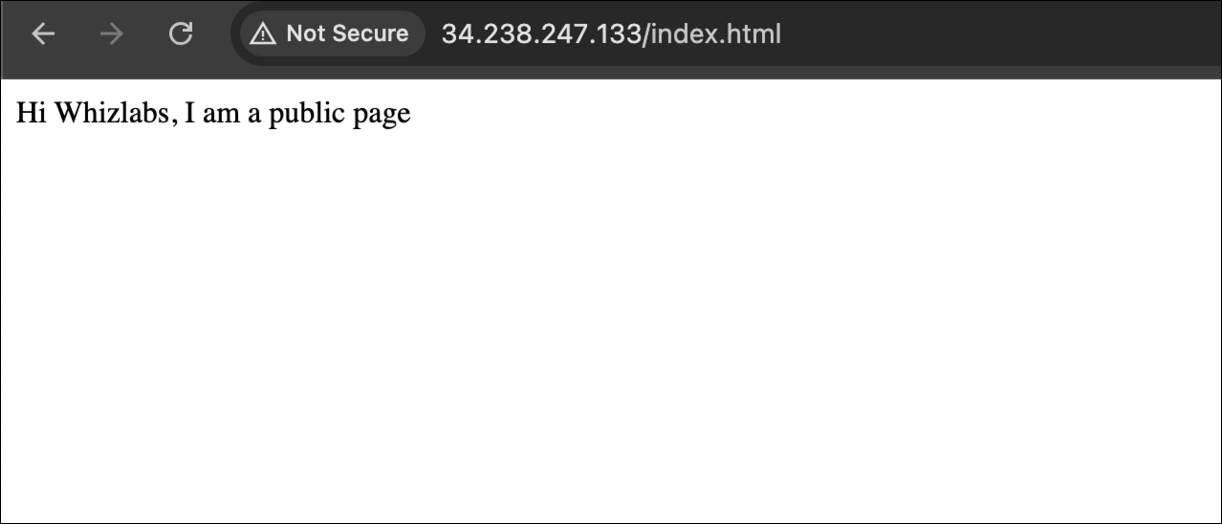
In this task, you will add content to the index.html file using the “echo” command and restart the webserver. Then, you can view the content by entering the public IPv4 address followed by “/index.html” in a web browser, ensuring that the URL protocol is HTTP.-
To add the contents into index.html file using echo, copy and paste the below command to shell.
- Restart the webserver by using the following command:
- Now enter the file name, /index.html after the public IPv4 Address which you got when you created the ec2 instance in the browser, and you can see your HTML content.
- Make sure URL Protocol is http not https.
- Syntax: http://<Your_Public_IPv4_Address>/index.html
- Sample URL: http://52.87.50.168/**_**index.html_
- Note: If the index.html page is not loading, try removing s from the link, it should be HTTP.
Do You Know?
The Amazon EC2 P4d instance is the most powerful EC2 instance type available, with eight NVIDIA A100 Tensor Core GPUs, 1.1 TB of NVMe storage, and 400 Gbps network bandwidth, making it ideal for large-scale machine learning and HPC workloads.
Completion and Conclusion
- You have successfully created and launched an Amazon EC2 instance
- You have successfully logged into the EC2 instance using SSH
- You have successfully installed an Apache server on the instance
- You have successfully created a webpage and published it.
- You have successfully validated the lab.
End Lab
- Sign out of AWS Account.
- You have successfully completed the lab.
- Once you have completed the steps, click on End Lab from your IP Lab Portal and wait till the process gets completed.
What gets checked
When you press Check my work, the platform verifies each of these:- Launch an EC2 Instance — Check whether an EC2 Instance is launched or not.
- Validate EC2 Instance Type t2.micro — Check whether the EC2 instance type is t2.micro.
- Launch EC2 AMI type Amazon Linux — Check whether the EC2 instance is launched using an Amazon AMI.