

Overview
Lab Details
- In this lab, you will set up an AWS NAT instance within a Virtual Private Cloud (VPC) to provide secure outbound internet access for instances in private subnets. Additionally, you will install and configure the CloudWatch Agent on a private instance to stream live web server logs to AWS CloudWatch, allowing you to monitor web activity in real time.
- Duration: 1 hour.
- AWS Region: US East (N. Virginia) us-east-1
Introduction
What is NAT Instance ?
- A Network Address Translation (NAT) instance is an EC2 instance configured to allow instances in a private subnet within an AWS Virtual Private Cloud (VPC) to access the internet. However, the private instances remain secure, as they do not have direct inbound internet access.
- In a typical AWS setup, public subnets have direct internet access through an Internet Gateway, while private subnets do not. The NAT instance bridges this gap by providing internet access to the private subnet instances for activities like software updates or accessing external APIs, while still keeping them hidden from direct inbound internet traffic.
- By disabling the source/destination check on the NAT instance and enabling IP forwarding, the NAT instance can forward traffic between the private instances and the internet, making it a secure and scalable solution for scenarios where internet access is needed for private instances without exposing them to direct external access.
What is Nginx?
Nginx is a powerful, open-source web server and reverse proxy renowned for its ability to handle high volumes of concurrent connections efficiently. It is commonly used for:- Delivering both static and dynamic web content
- Distributing client requests across multiple backend servers as a load balancer
- Routing traffic as a reverse proxy to improve performance, scalability, and security
Lab Feature :
This lab focuses on configuring a NAT instance within an AWS Virtual Private Cloud (VPC) environment and setting up monitoring by using the CloudWatch Agent to stream live web server logs to AWS CloudWatch.Benefits:
1.Understanding NAT Instances:- Learn how to configure NAT (Network Address Translation) for private EC2 instances to enable outbound internet access without exposing them to the internet directly.
- Understand how to create a VPC with public and private subnets, as well as configuring internet gateways and route tables for proper routing.
- Gain hands-on experience deploying EC2 instances in both public and private subnets, configuring security groups, and setting up key pairs for secure access.
- Convert an EC2 instance into a NAT instance by disabling source/destination checks and configuring IP forwarding, enabling private instances to access the internet.
- Learn how to install the CloudWatch Agent on a private instance, configure it, and view web server logs in AWS CloudWatch.
Architecture Diagram
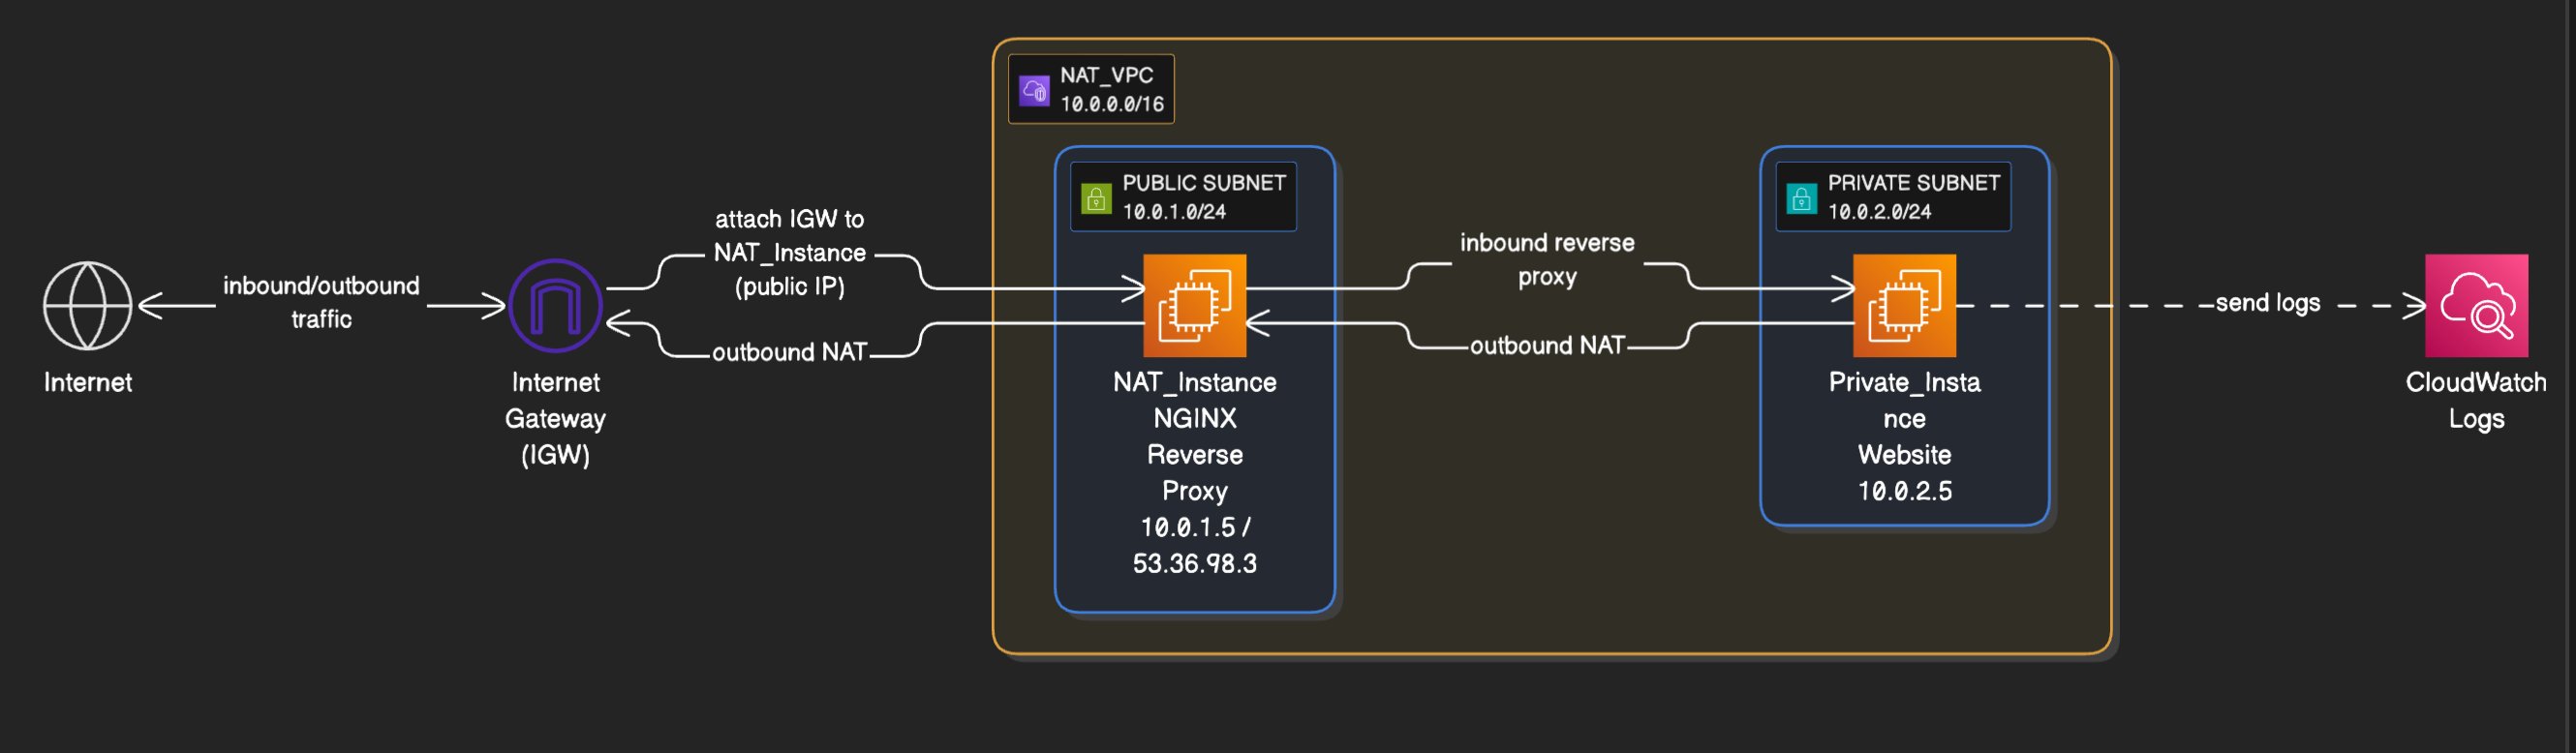
Task Details :
- Sign in to the AWS Management Console.
- VPC and Subnet Setup
- Launch EC2 instances within this VPC
- Enable NAT Configuration for EC2 Instance
- install Nginx (Webpage) in the Private Instance
- Install and Configure CloudWatch Agent
Launching Lab Environment:
- To launch the lab environment, click on the Start Lab button.
- Please wait until the cloud environment is provisioned. It will take less than a minute to provision.
- Once the Lab is started, you will be provided with IAM username, Password, Access Key, and Secret Access Key.
Note : You can only start one lab at any given time
Lab guide
Lab Steps
Task 1 : Sign in to AWS Management Console
- Click On the Open Console Button, And You Will Get Redirected To AWS Console In A New Browser Tab.
- On The AWS Sign-In Page,
- Leave The Account ID As Default. Never Edit/Remove The 12 Digit Account ID Present In the AWS Console. Otherwise, You Cannot Proceed with the Lab.
- Now Copy Your User Name And Password In the Lab Console to the IAM Username and Password In AWS Console and Click On the Sign in Button.
- Once Signed in to the AWS Management Console, Make the Default AWS Region As US East (N. Virginia) Us-East-1.
Task 2 : VPC and Subnet Setup
- In the AWS Management Console, you can find the VPC service by clicking on the “Services” dropdown at the top and type VPC in the search bar. Then, select the VPC service from the search results.
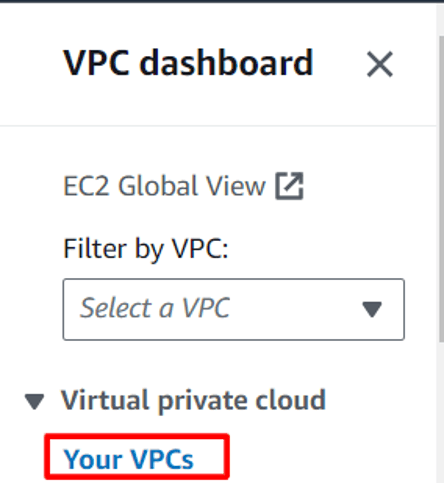
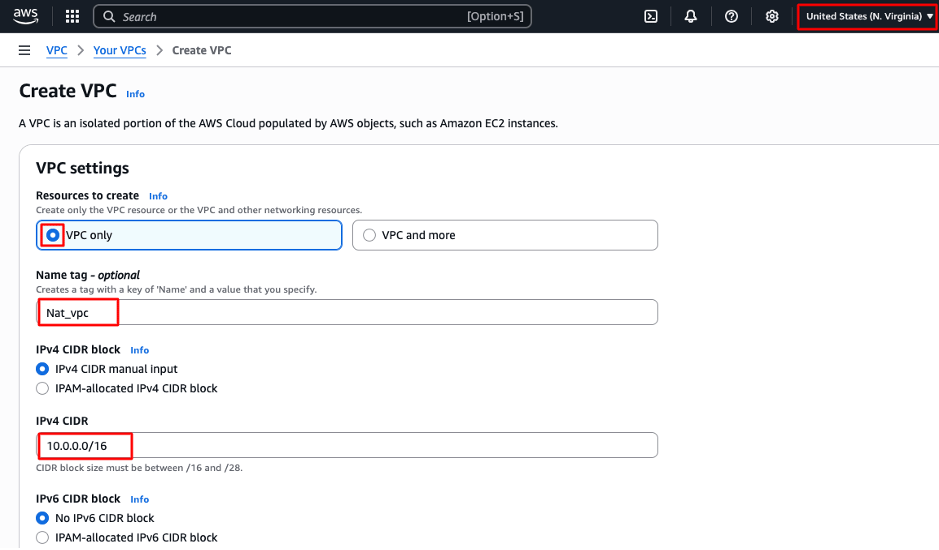
- Once you’re in the VPC service, you’ll see the option to create a new VPC on the side menu or by clicking on the create VPC button and VPC only.
- Create a new VPC: Name: Nat_vpc
- Specify an IPv4 CIDR block for your VPC (10.0.0.0/16) in the IPv4 CIDR block field.
- Click on the Create VPC button.
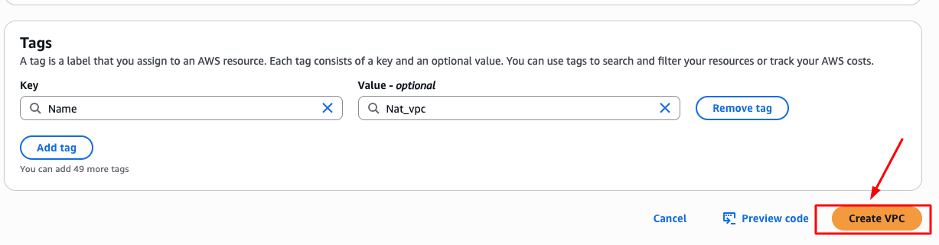
Note : Kindly Ignore the error message if anything popped up!

- Within your newly created VPC, you’ll need to create two subnets: one public and one private.
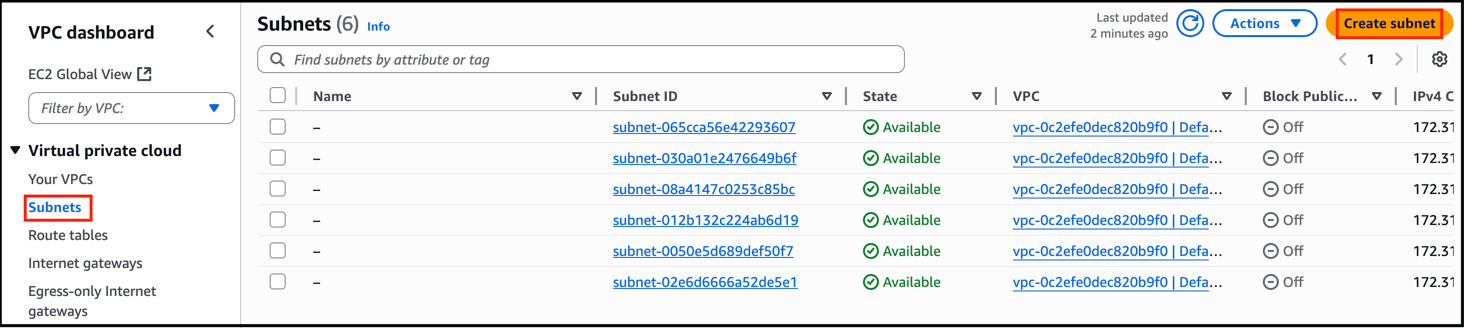
- To create a subnet, go to the subnets section in the VPC service and click on the Create Subnet button.
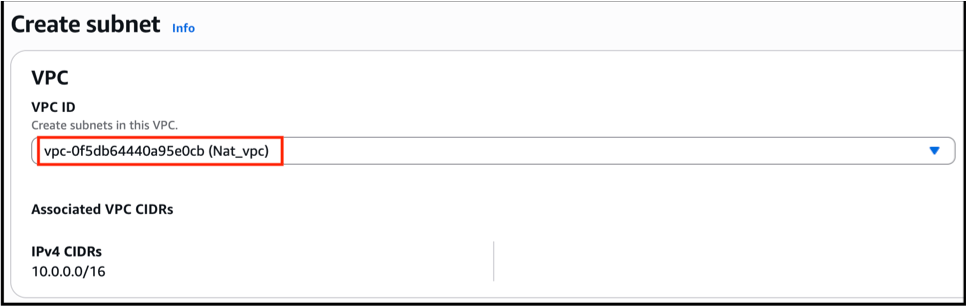
- Click the VPC which we created before i.e., Nat_vpc
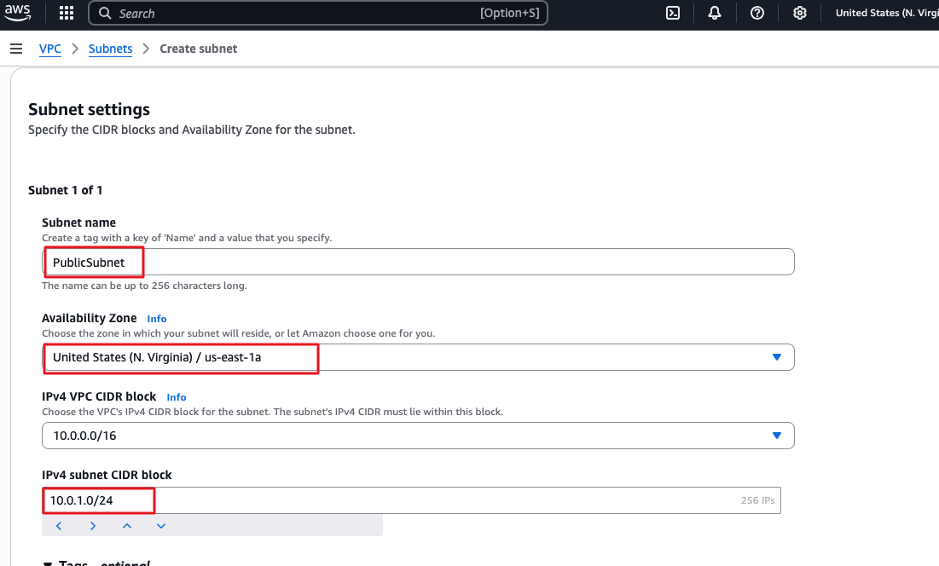
- Specify the VPC you just created, the CIDR block for the subnet
- Subnet Name: PublicSubnet
- Choose Availability zone “us-east-1a”
- IPv4 subnet CIDR block: 10.0.1.0/24
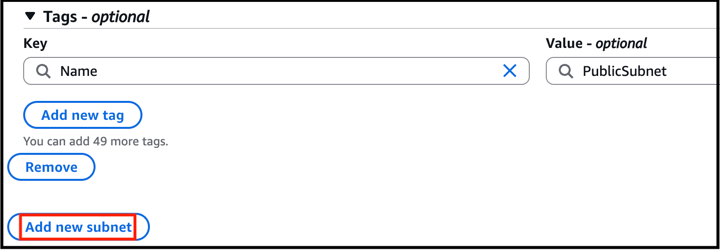
- Now we are going to create the same steps,
- Subnet name: PrivateSubnet
- Choose Availability zone “us-east-1a”
- subnet CIDR block: 10.0.2.0/24
- Click Create Subnet .
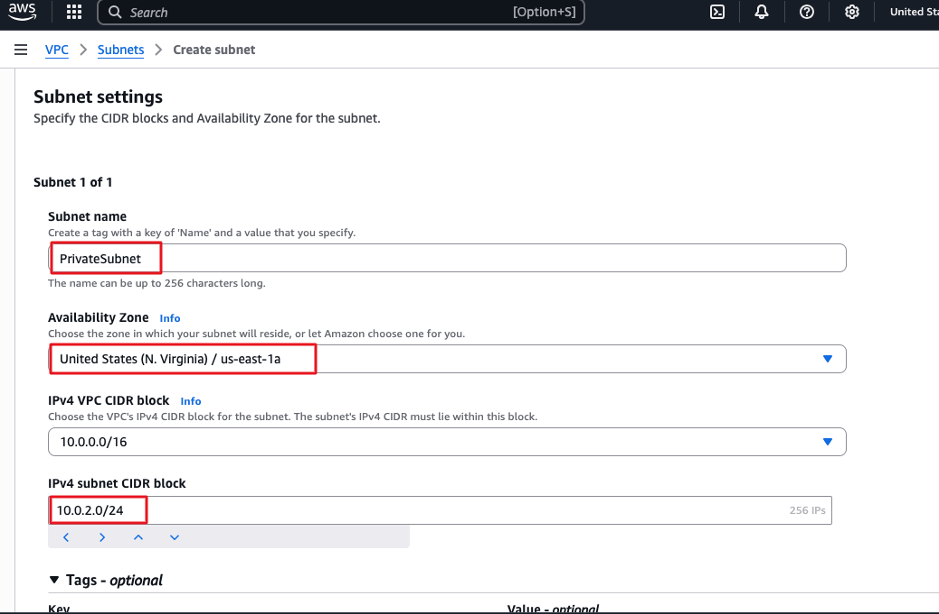
- Configure the route tables and internet gateway for the public subnet
- For the public subnet to have internet access, you’ll need to configure the route table and attach an internet gateway.
- Go to the Route Tables section in the VPC service and create a new route table for the public subnet.
- Route Table Name: “Nat_public_rt”
- Select vpc : “Nat_vpc”
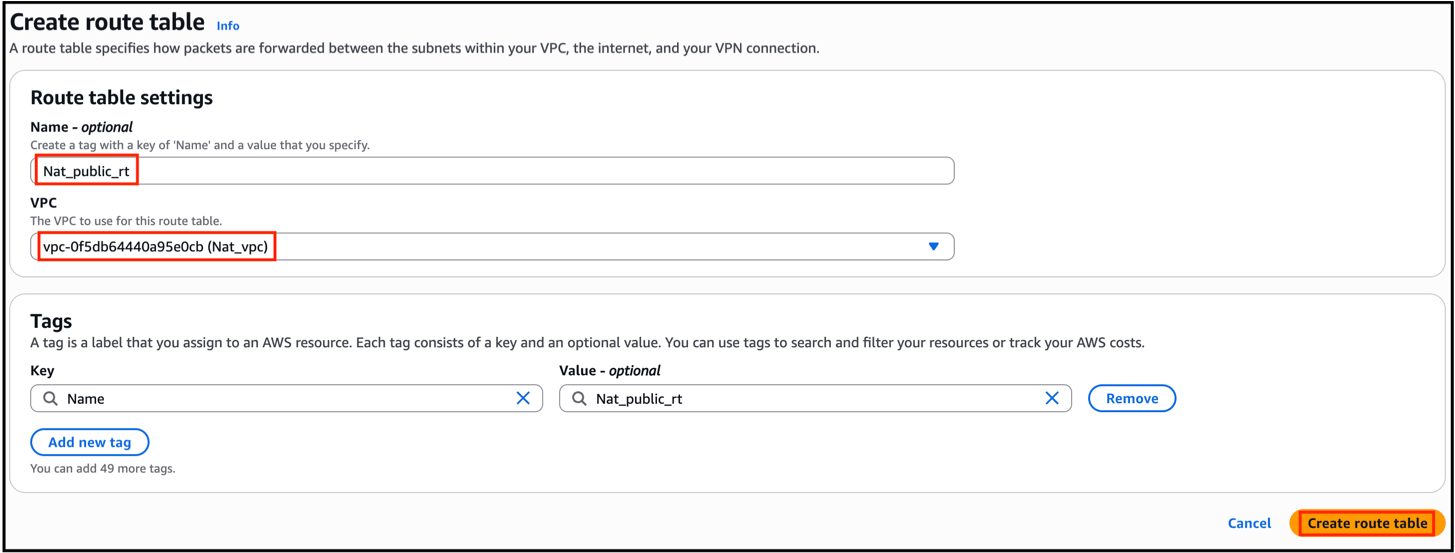
- Click Subnet associations then “Edit subnet associations”
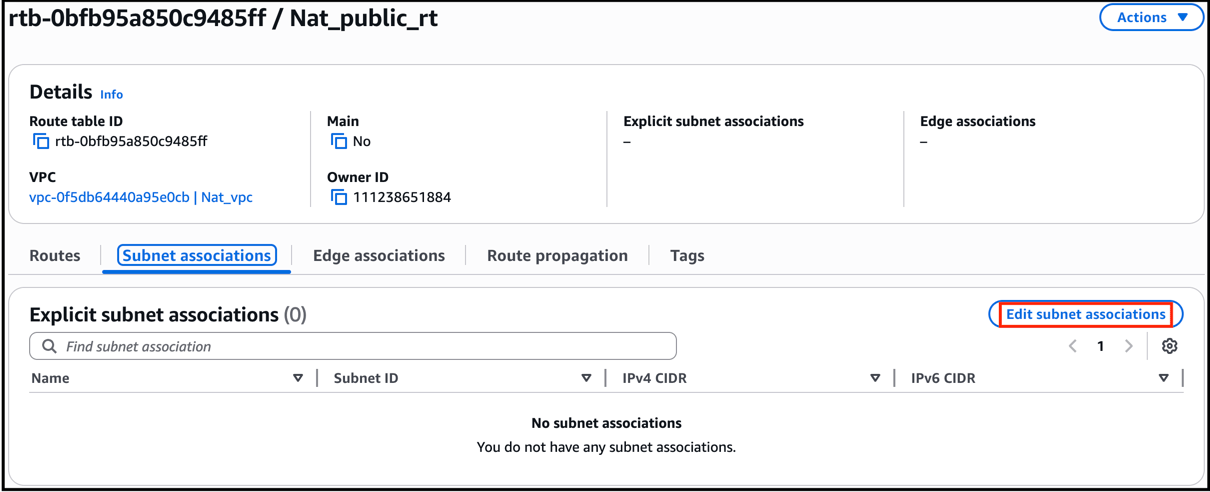
- Select PublicSubnet then click Save associations .
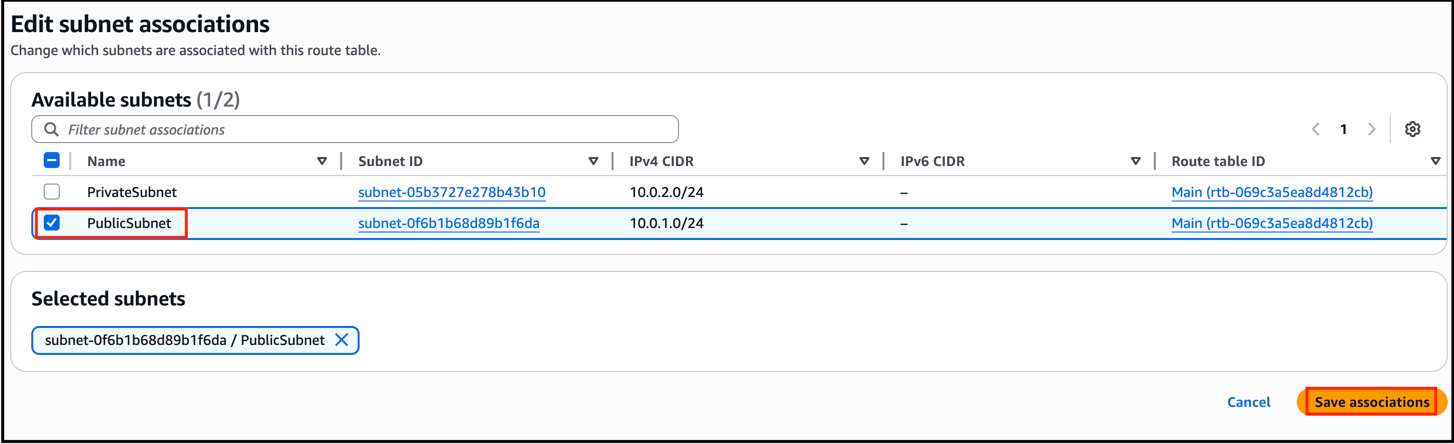
- Next, go to the Internet Gateways section and create a new internet gateway.
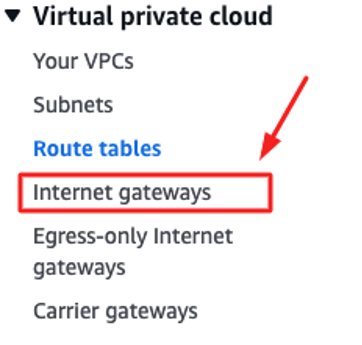
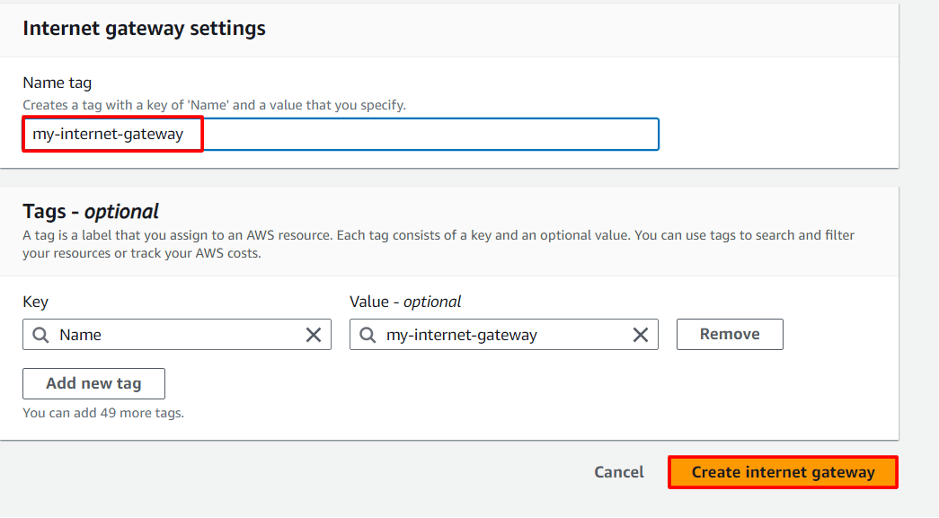
- Internet Gateway Name: My-Internet-Gateway
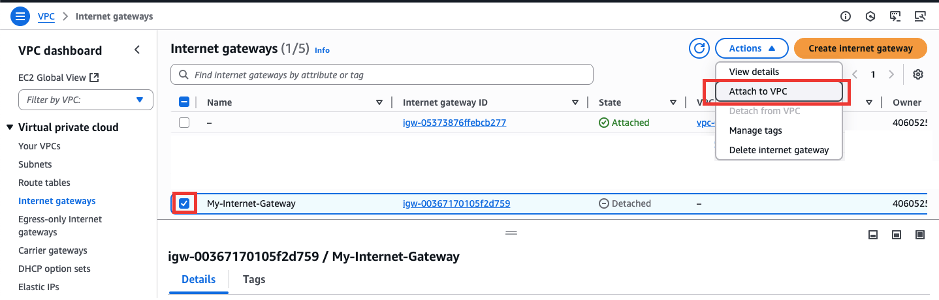
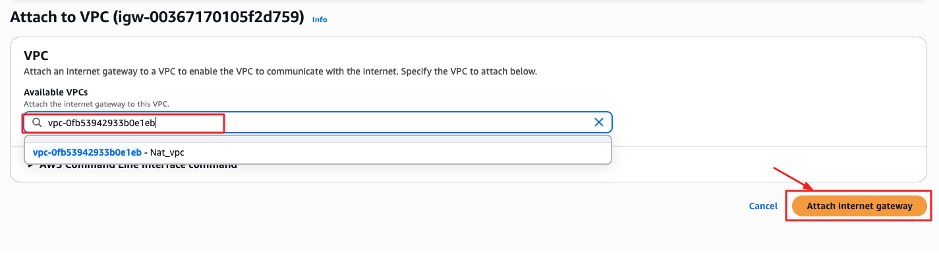
- Once Internet gateway is created attach it the VPC that you have created.
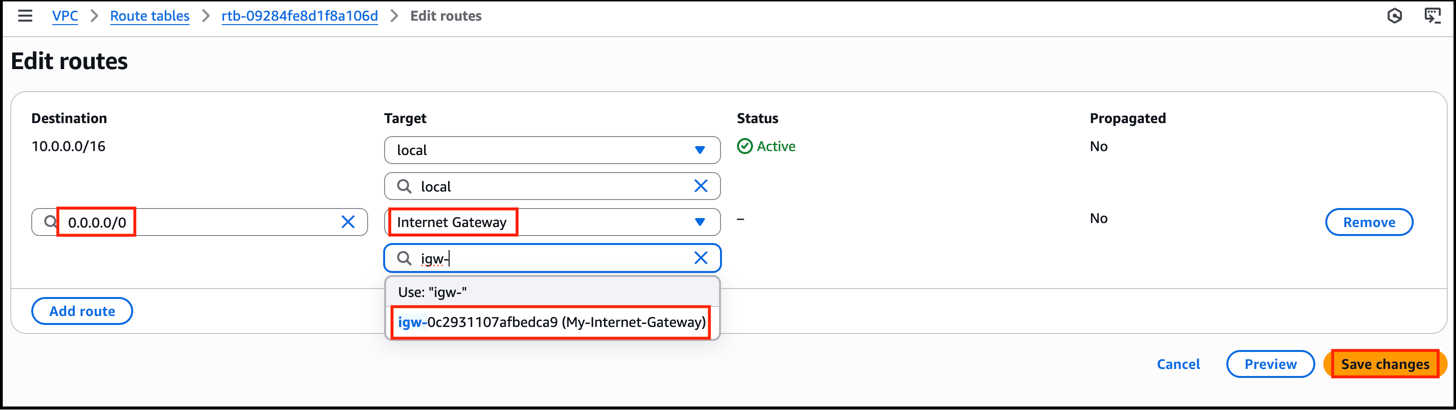
- In the ”Nat_public_rt“ route table, click on Edit routes, then add your internet gateway. The destination should be (0.0.0.0/0), and the target should be the internet gateway.
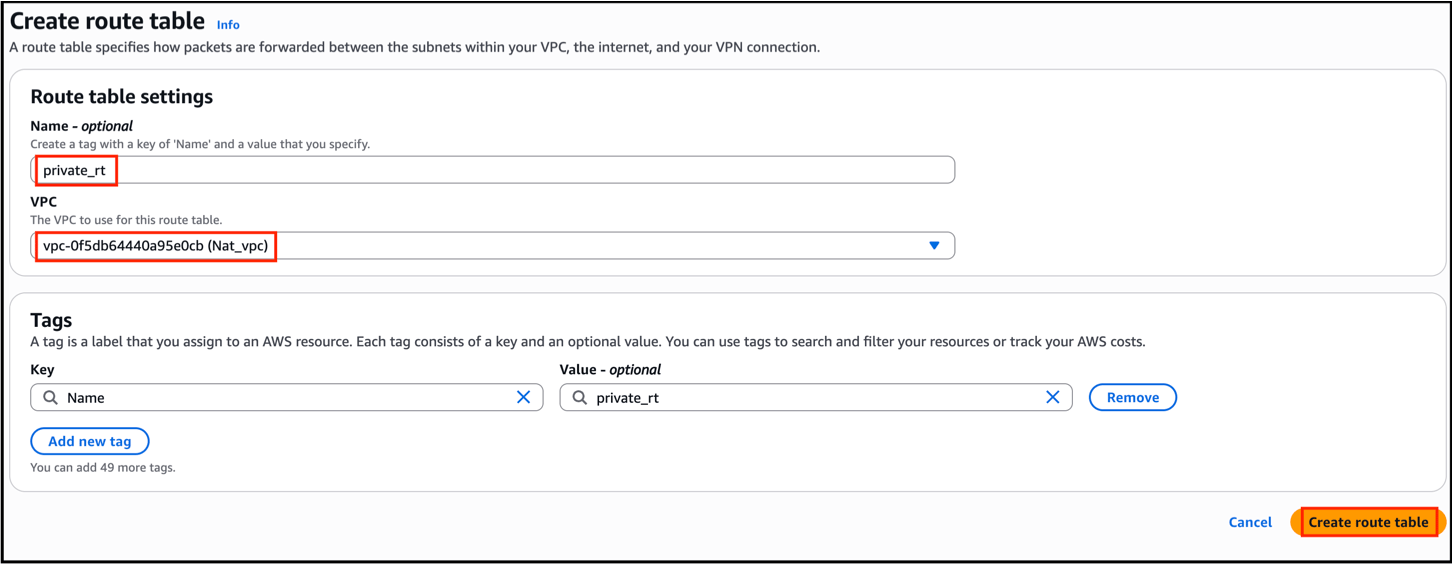
- Again create a route table for “PrivateSubnet”
- Route Table Name: “private_rt”
- Select vpc : “Nat_vpc”
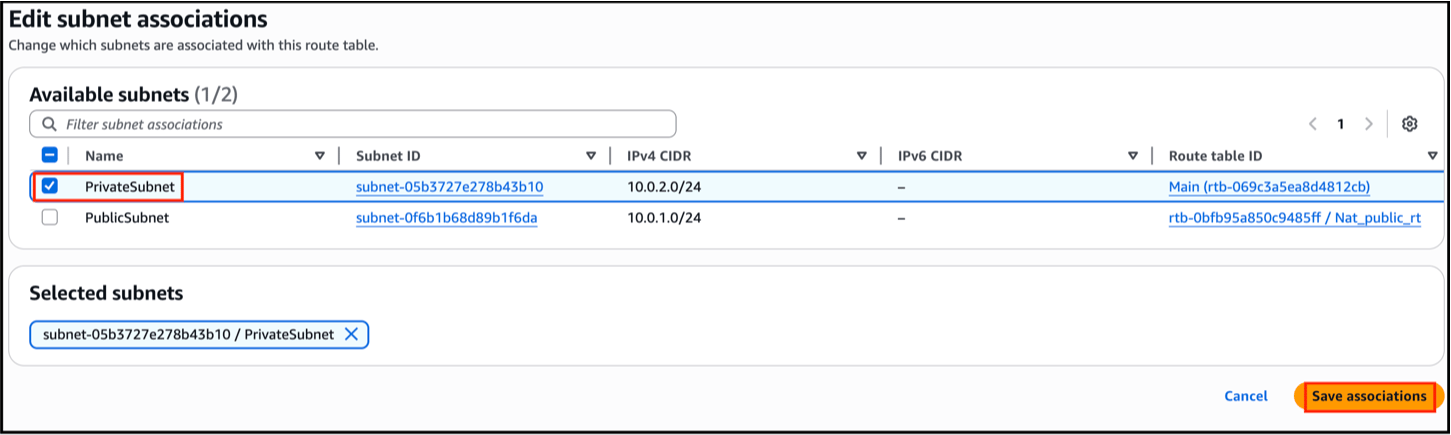
- Select PrivateSubnet then click Save associations.
Task 3 : Launch EC2 instance within this VPC
- Navigate to EC2 by clicking on the Services menu in the top, then click on EC2 in the Compute section.
- In the EC2 service, you’ll see a left-hand side menu. Click on the Instances option, and then click on the Launch Instances button to start the process of creating a new EC2 instance.
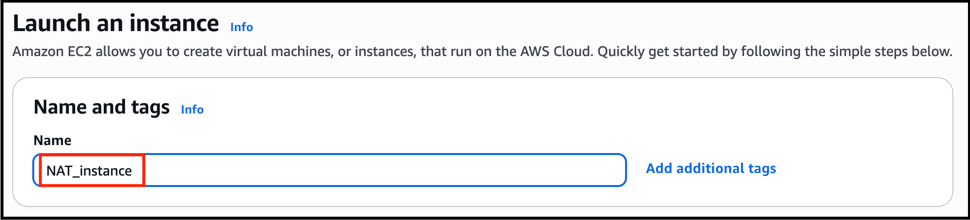
- Name: Enter NAT_instance
- Choose “Amazon Linux 2023 AMI”
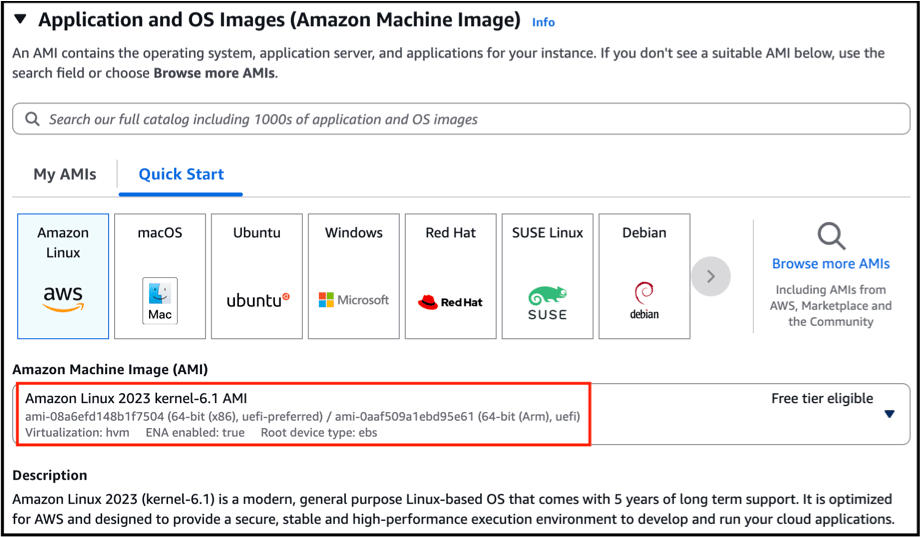
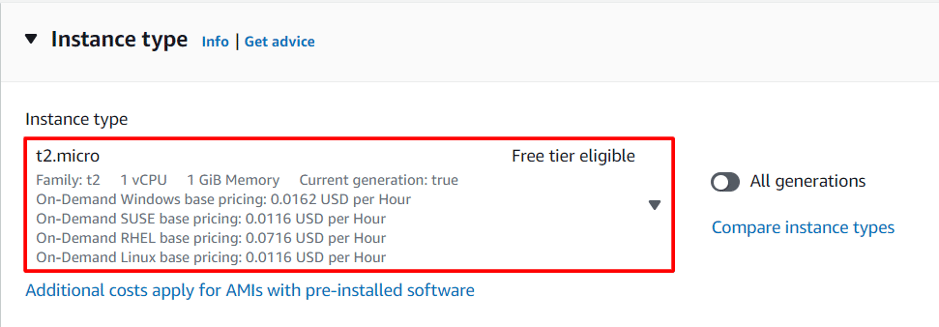
- For Instance Type: Select t2.micro
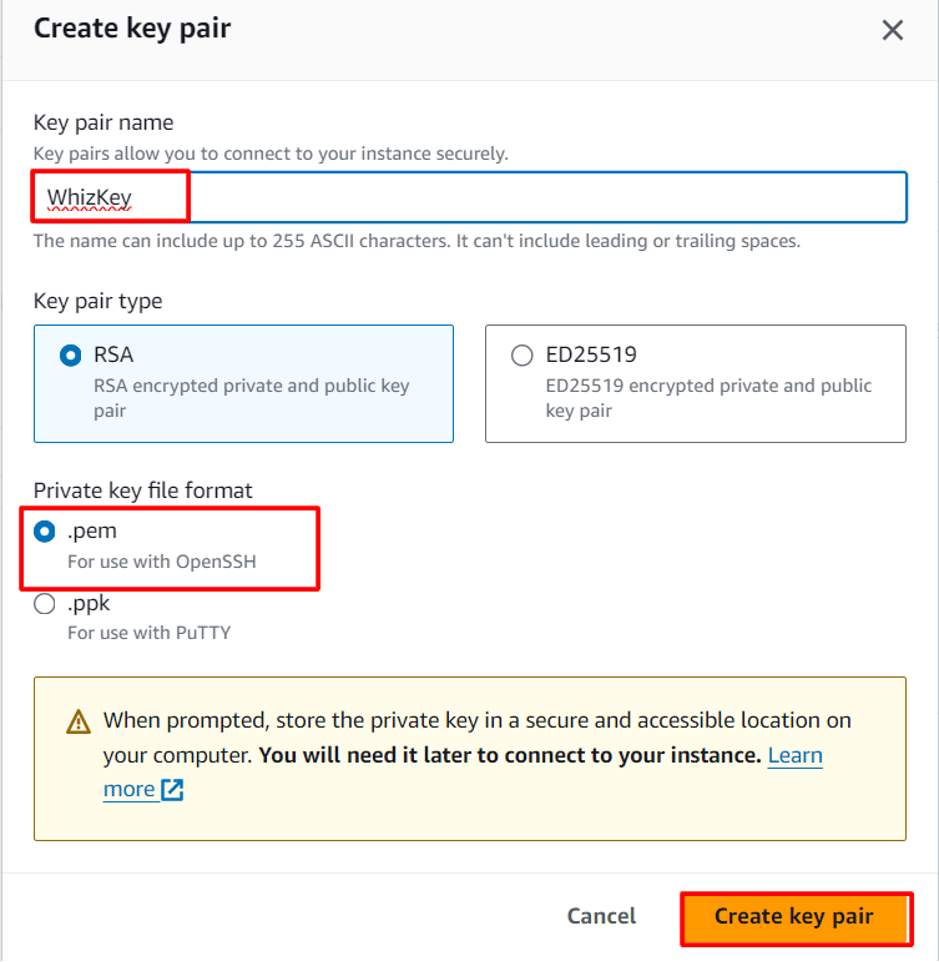
- You’ll need to create a key pair to securely connect to your EC2 instances. Select the Create a new key pair option.
- For Key pair(login): Select Create a new key pair Button
- Key pair name: WhizKey
- Key pair type: RSA
- Private key file format: .pem
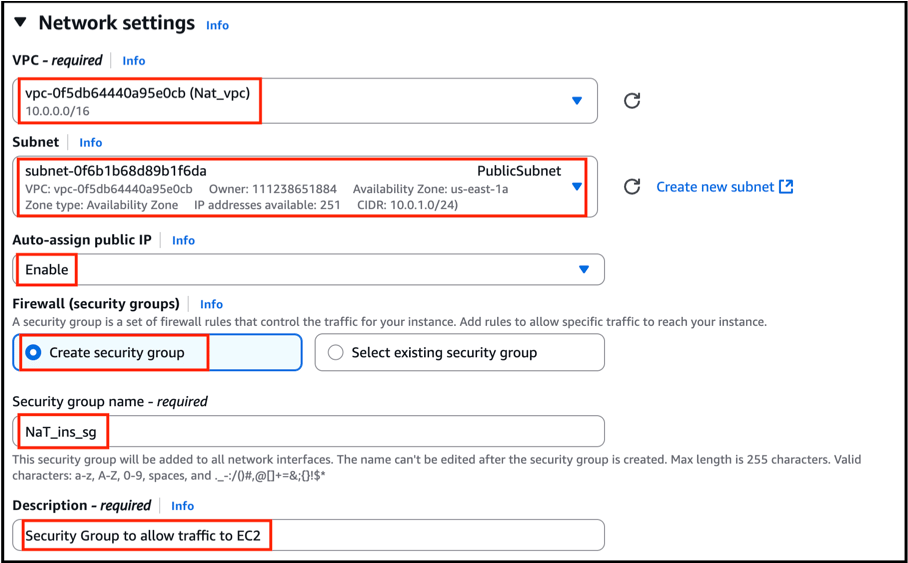
- Make sure to select the Nat_vpc and public subnet we created earlier**.**
- In Network Settings Click on Edit Button:
- Auto-assign public IP: Enable
- Select Create security group
- Security group name: “NaT_ins_sg”
- Description: “Security Group to allow traffic to EC2 “
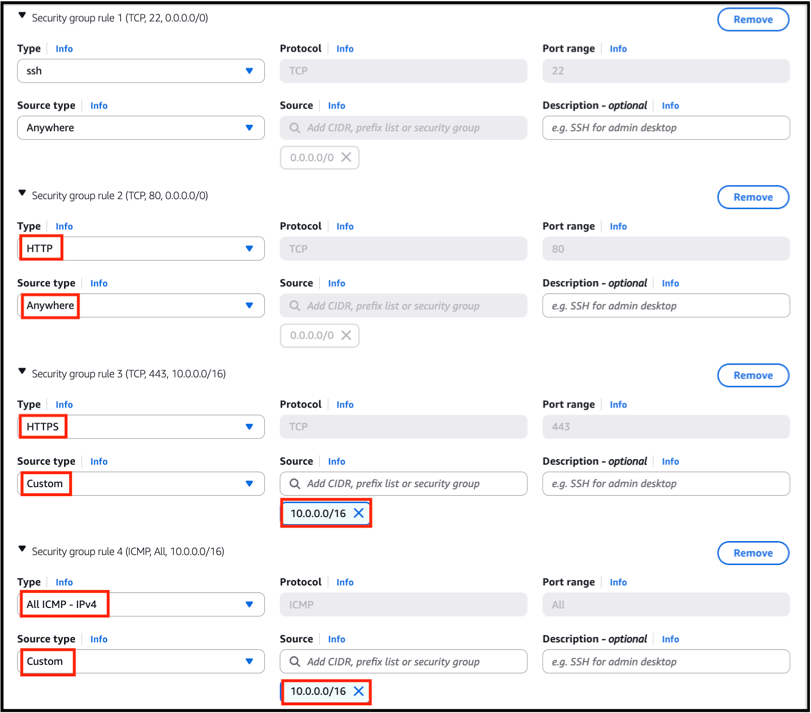
- We will now add the security group rules. SSH will already be present there.
-
Click to add rules:
- For HTTP: Set the Source type to 0.0.0.0 (Anywhere)
- For HTTPS: Set the Source to 10.0.0.0/16
- For All ICMP-IPv4: Set the Source to 10.0.0.0/16
- Click Launch Instance.
- Repeat the steps to launch another instance, ensuring it’s in the same VPC but in the private subnet.
- To create the second EC2 instance, repeat the same steps 2-7 and make sure to select the key pair which we created before.
- Auto assign Public IP - Disable
- Create a new security group for this instance as private_ins_sg, allowing inbound traffic from the first instance’s security group.
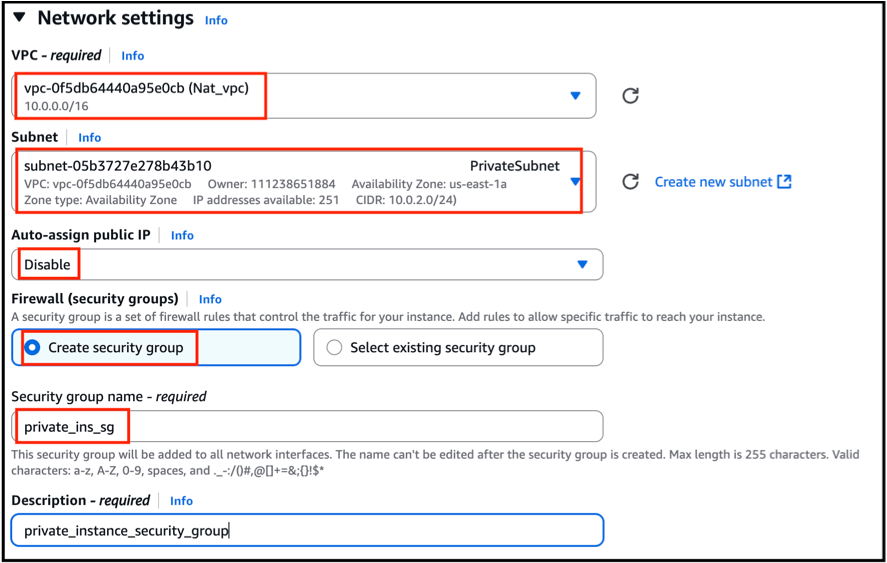
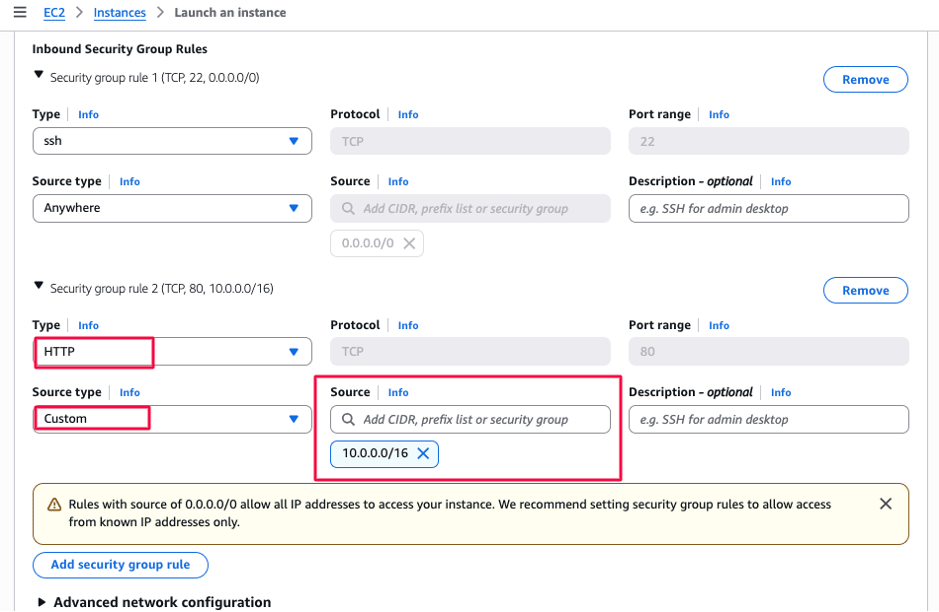
- In the Inbound Security Group Rules, leave the default settings as they are and add new rule For HTTP: Set the Source to 10.0.0.0/16
- Click Launch Instance.
Task 4 : Enable NAT Configuration for EC2 Instance
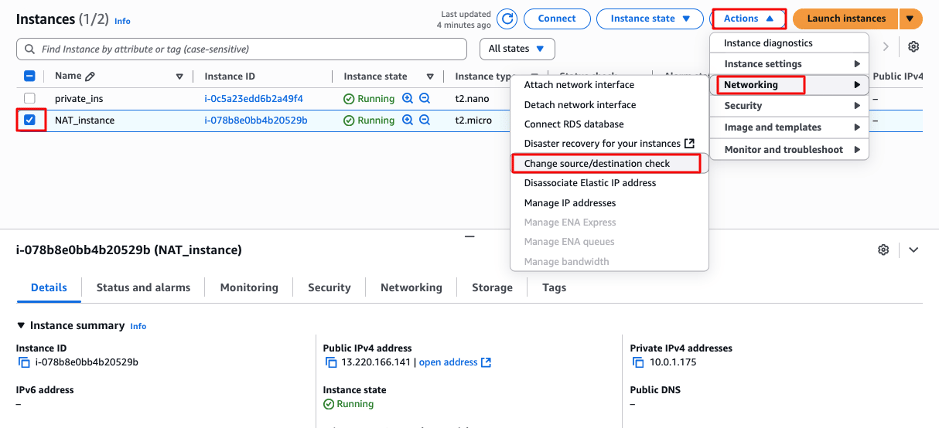
In this task, we will convert a normal EC2 instance into a NAT instance.- Select the NAT instance, go to the Actions menu, then choose Networking and click on Change Source/Destionation Check. Enable the Save option and Click on Save Opti.
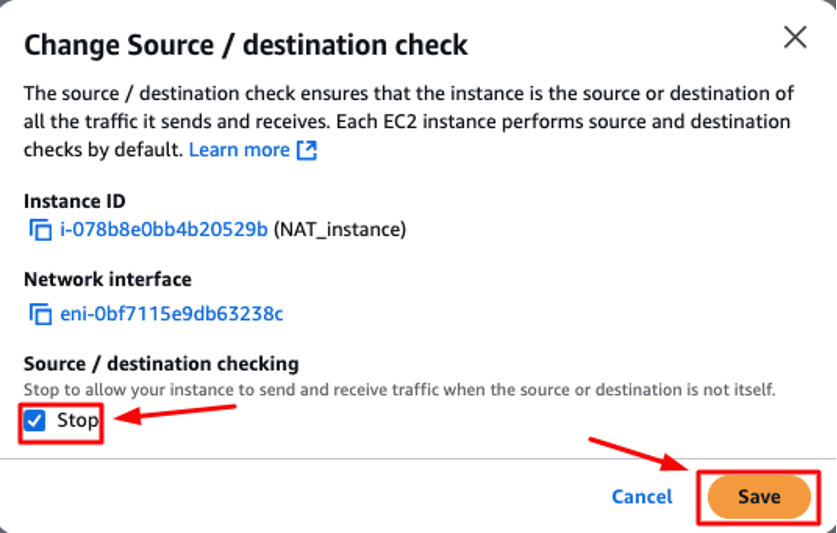
- Open your Local terminal and navigate to the location where your .pem file is stored.

- Then, Upload your .pem key from your local machine to the EC2 NAT instance using the following
- Replace the <ec2-Nat-instance-public-ip> and the Key pair name accordingly.

- Navigate to VPC and Go to Route table Section. Select private_rt.
- Select Routes Option and click Edit Routes Option.
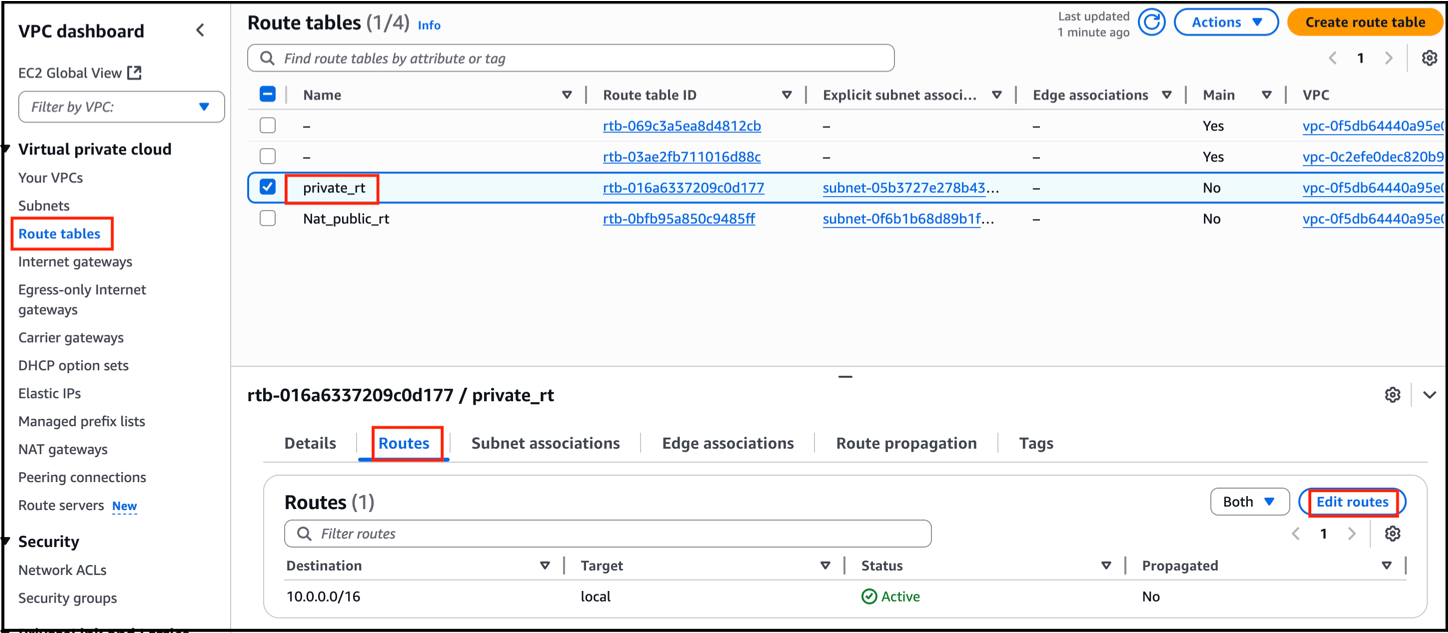
- Click Add route
- Destination : 0.0.0.0/0
- Target : Instance - Choose Nat instance
- Click “Save changes “
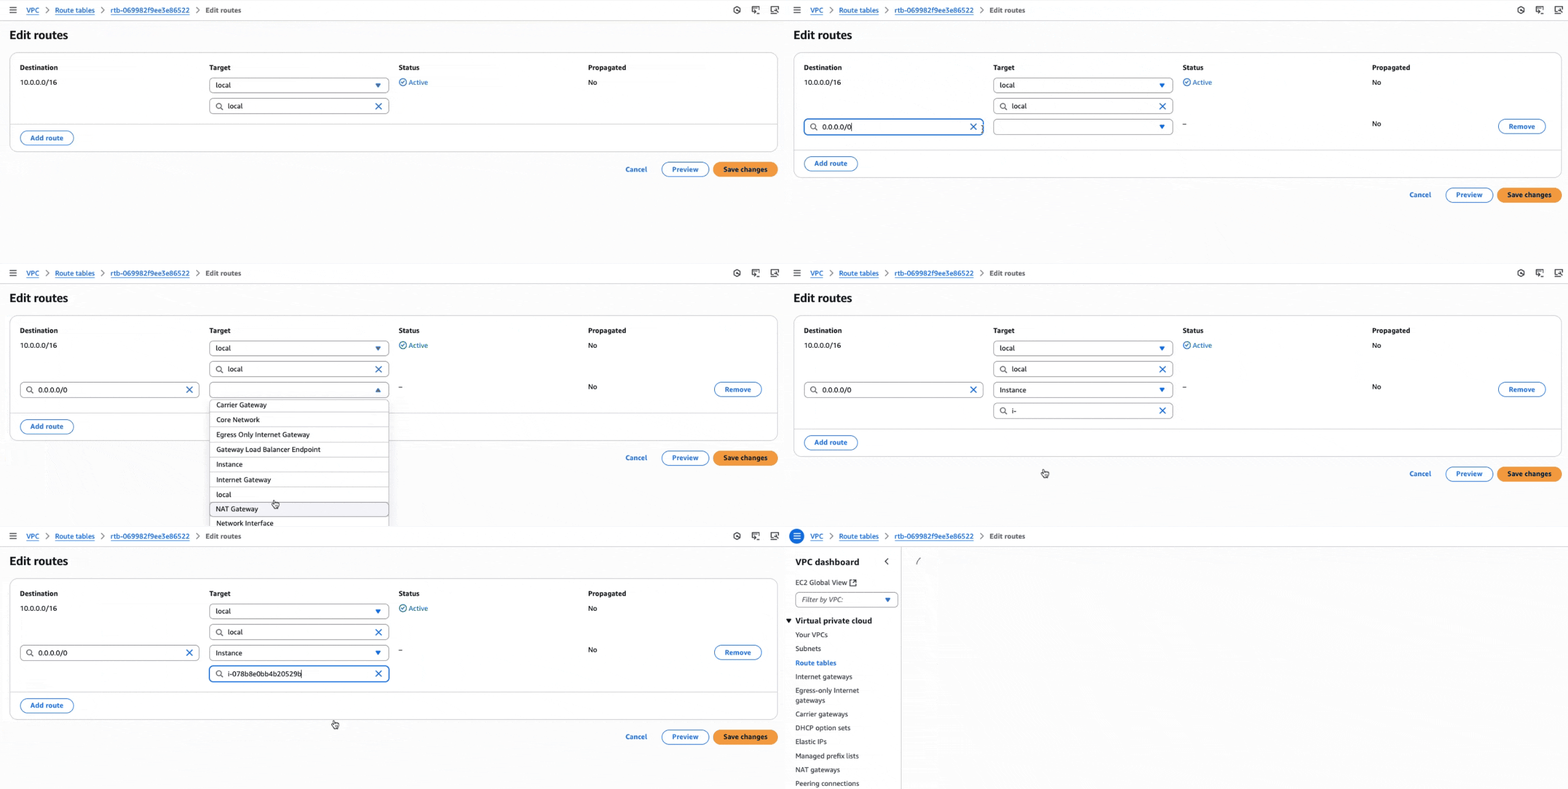
- Now, Navigate to EC2, Connect the Nat_instance
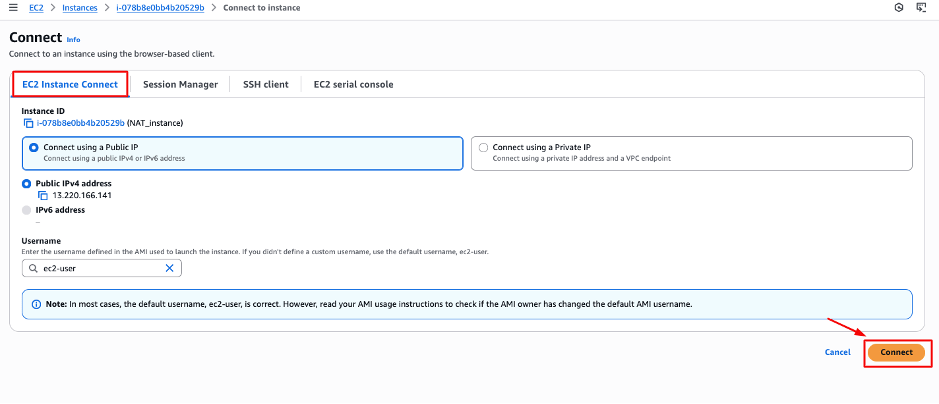
- Copy paste the command on NAT instance :
- Enable IP forwarding :
- Setting up ip-tables for NAT (correct interface!)
- Check correct interface by the below command:
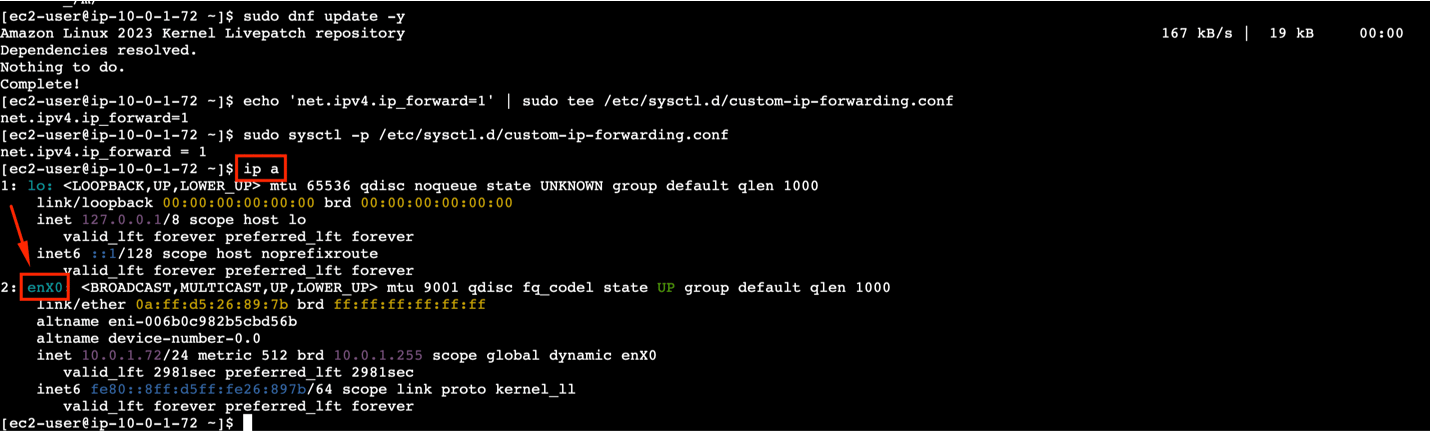
Note : Replace enX0 with your actual network interface (e.g., enX0, ens5,..). Run ip a to confirm your interface name before applying the below code.
- Ensure iptables FORWARD chain is ACCEPT :

- Paste and run each command one at a time to see where it might hang or fail.
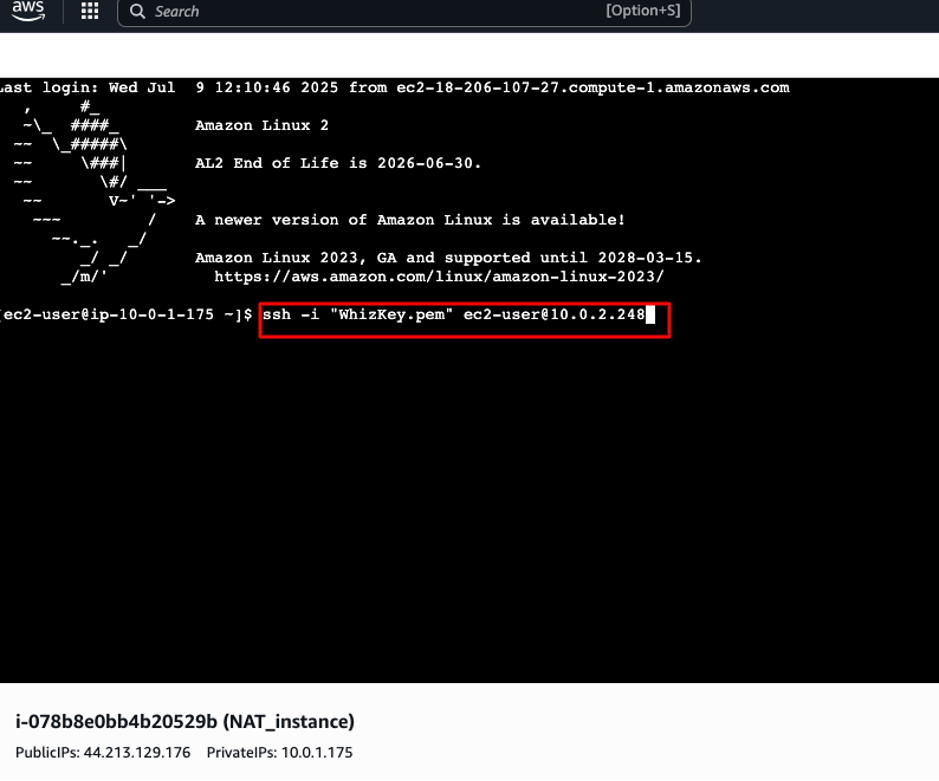
- Again go to Instance Page and Select Nat_Instance. Click on Connect and Open new tab.

- Now we doing, Private instance via ssh command which is running inside NAT instance
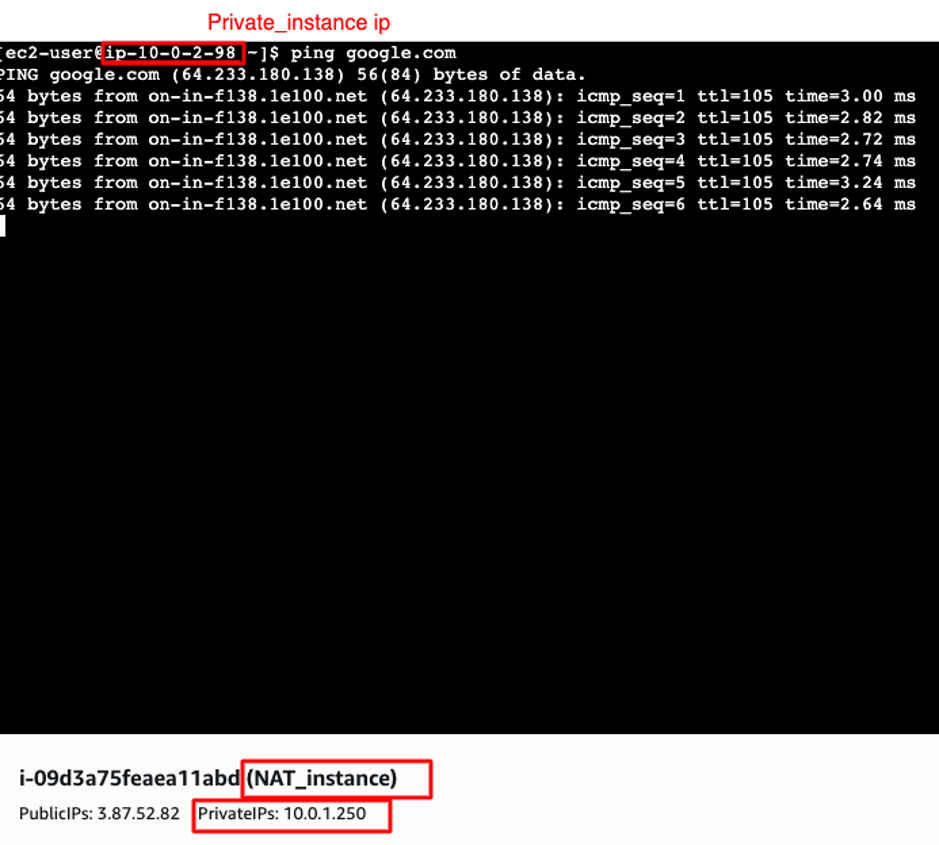
- Check the internet connectivity in the private_instance
Task 5 : Install Nginx (Webpage) in the Private Instance
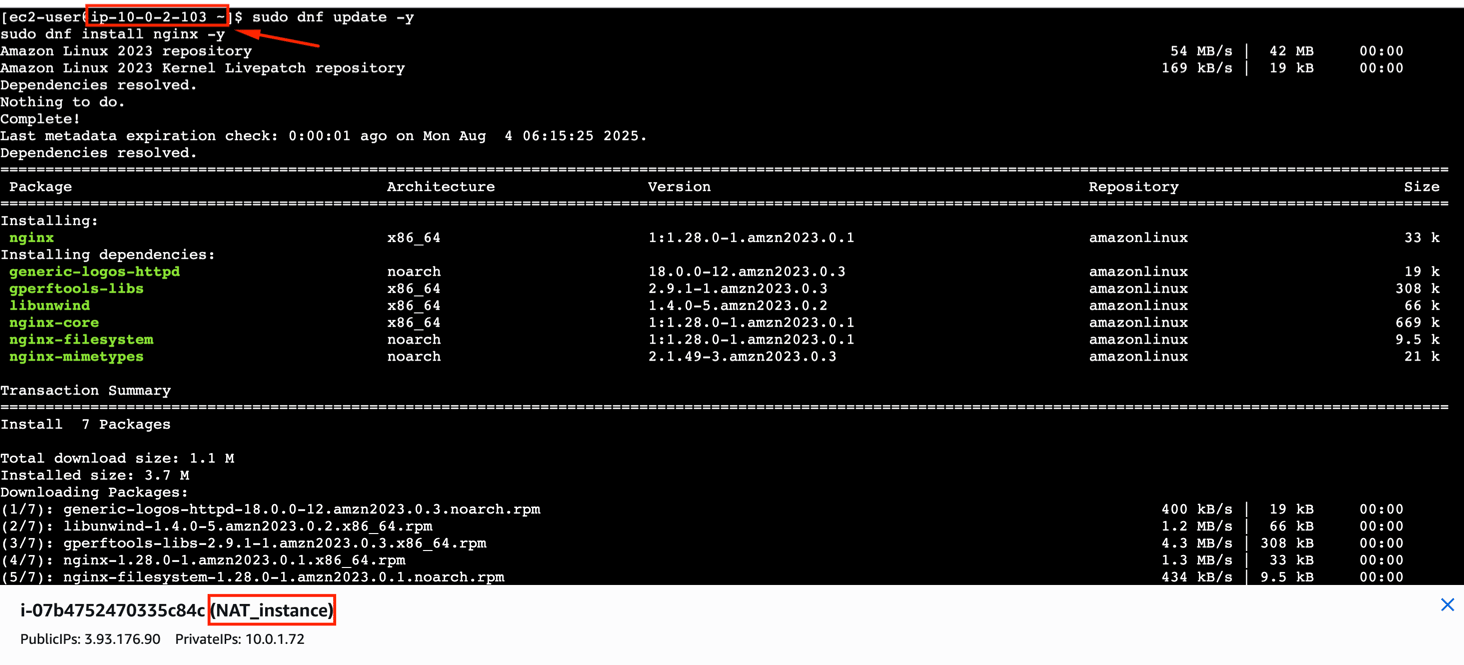
- On Private EC2 Instance,
- Install Nginx ,Copy paste the command
- Set up a Simple Web Page
- Enable and Start NGINX
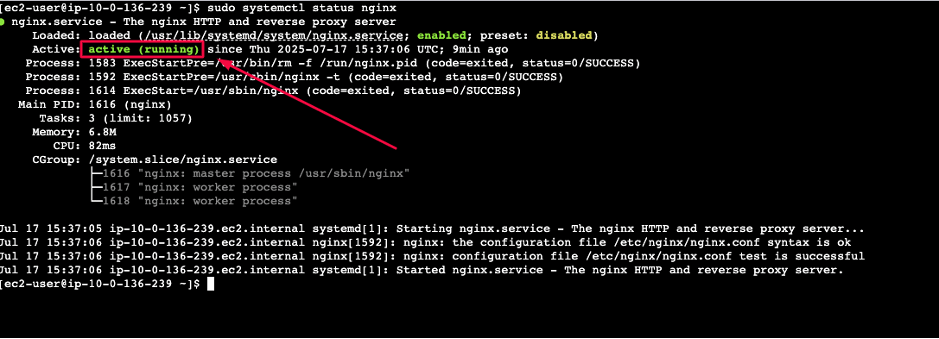
- Now, Again Login NAT_instance, Click Connect, Use EC2 Instance Connect (Browser-based SSH), You’re now inside the NAT instance terminal.

- The NAT instance will use NGINX to act as a reverse proxy, forwarding requests to the private instance.
- Install NGINX :
- Configure NGINX as a Reverse Proxy
- Open a new NGINX configuration file
- Paste the following configuration
- Replace 10.0.1.10 with the private IP address of your private_ins.
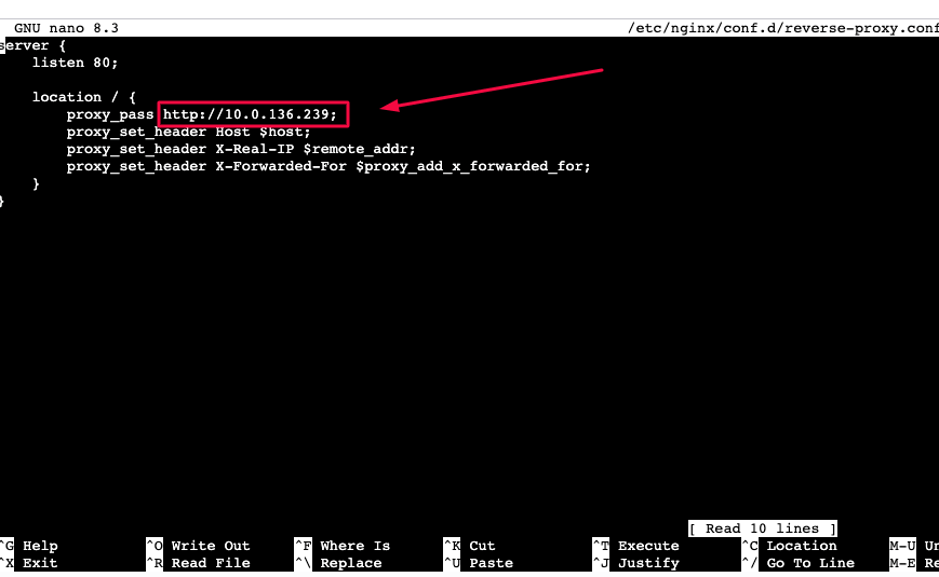
- Save and exit the file .
- Press “CTRL + X” to save. Press “Y”
- Press Enter to confirm the file name.
- Test the new configuration for syntax errors

- Reload NGINX to apply the changes
- Disable Firewalld and Flush IPTables Rules
- Run these commands on the NAT instance to stop firewalld and flush iptables
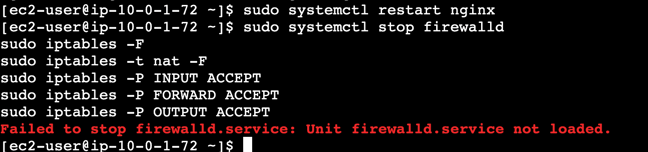
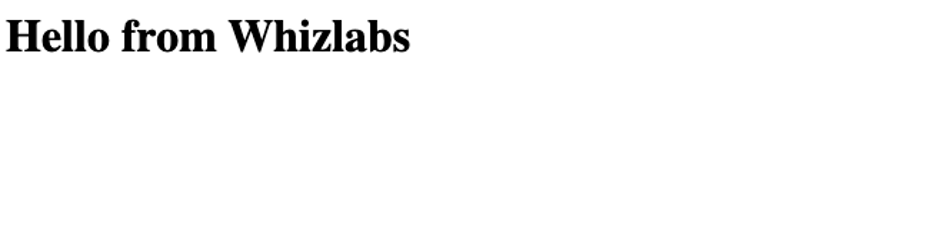
- This will allow traffic on port 80, which is necessary for NGINX reverse proxy to work.
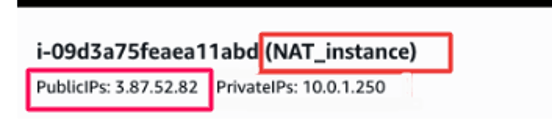
- Any requests made to the NAT instance’s public IP on port 80 will be forwarded to the private instance’s web server.
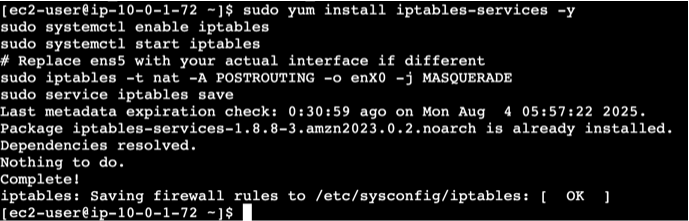
- Again run this commands, which Setup iptables NAT:
Note : Replace enX0 with your actual network interface (e.g., enX0, ens5,..), Run ip a to confirm your interface name before applying the below code.
Task 6 : Install and Configure CloudWatch Agent
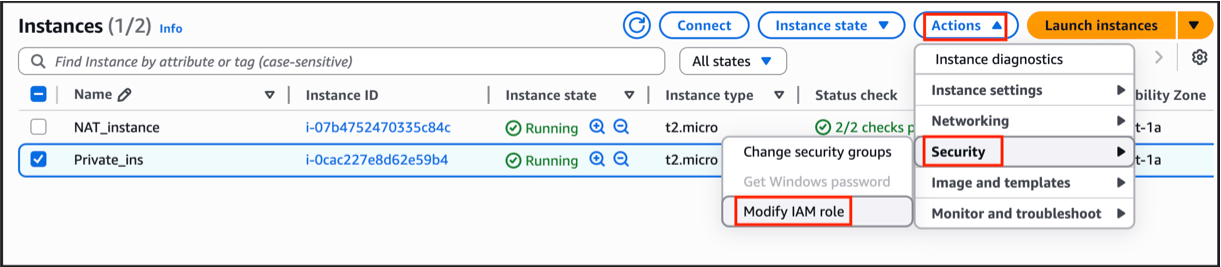
- Go to the EC2 section in the AWS Management Console, open the Instances page, and select your private_ins instance.
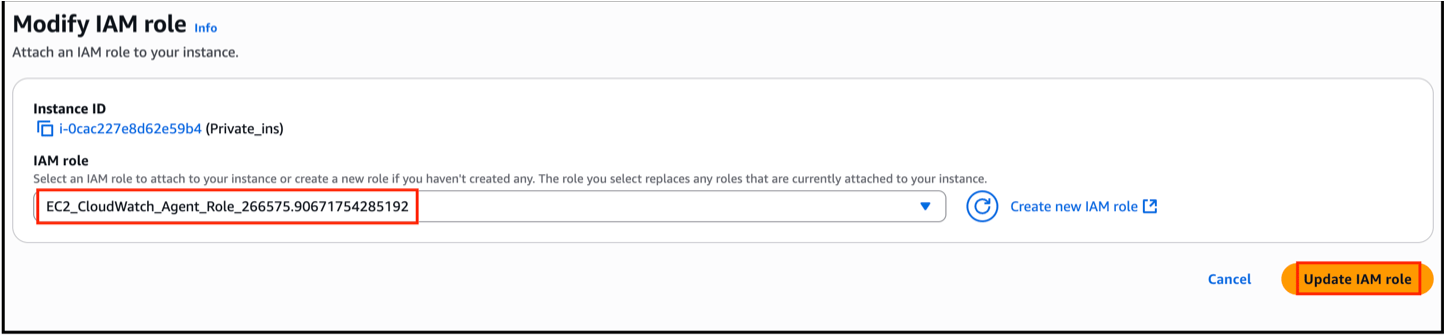
- Then open the Actions menu, navigate to the Security settings, choose Modify IAM Role, select the EC2_CloudWatch_Agent_policy from the list of available roles, and confirm the update to attach the role to your instance.
- Now we going to Connect to your private EC2 instance again,
- Install CloudWatch Agent
- Create agent config file
- Paste this config (for monitoring NGINX logs)
- Save the file
- Press “CTRL + X” to save. Press “Y”
- Press Enter to confirm the file name.
- Start the agent with your config
- Confirm Logs in CloudWatch :
- Go to AWS Console, Search for CloudWatch, Select Log Groups in the left panel.
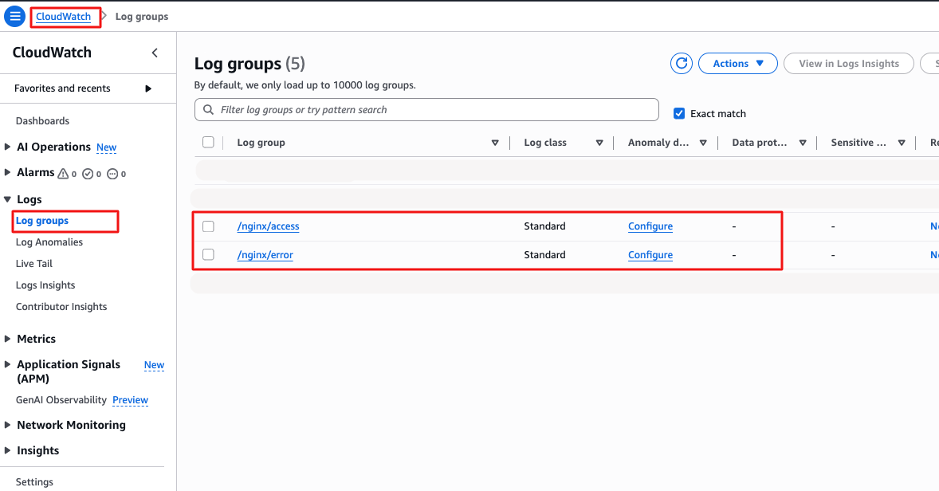
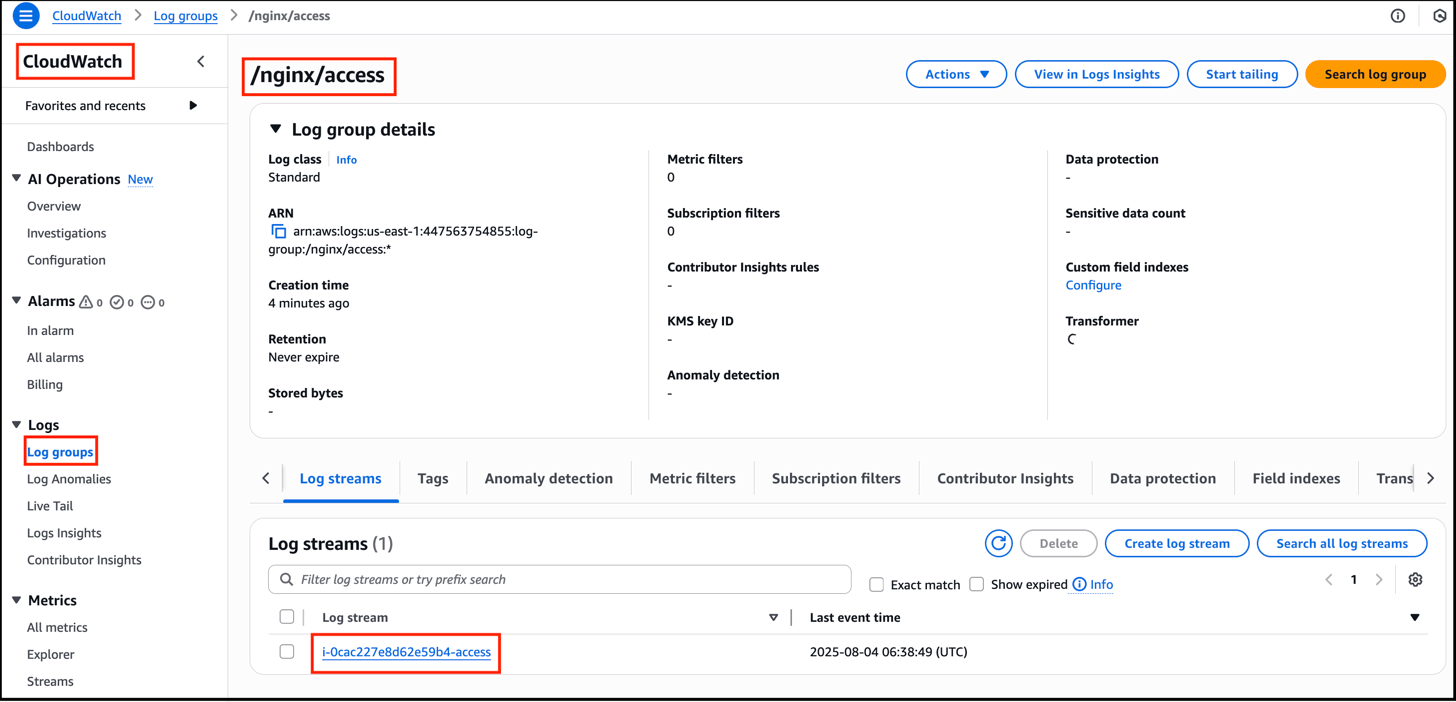
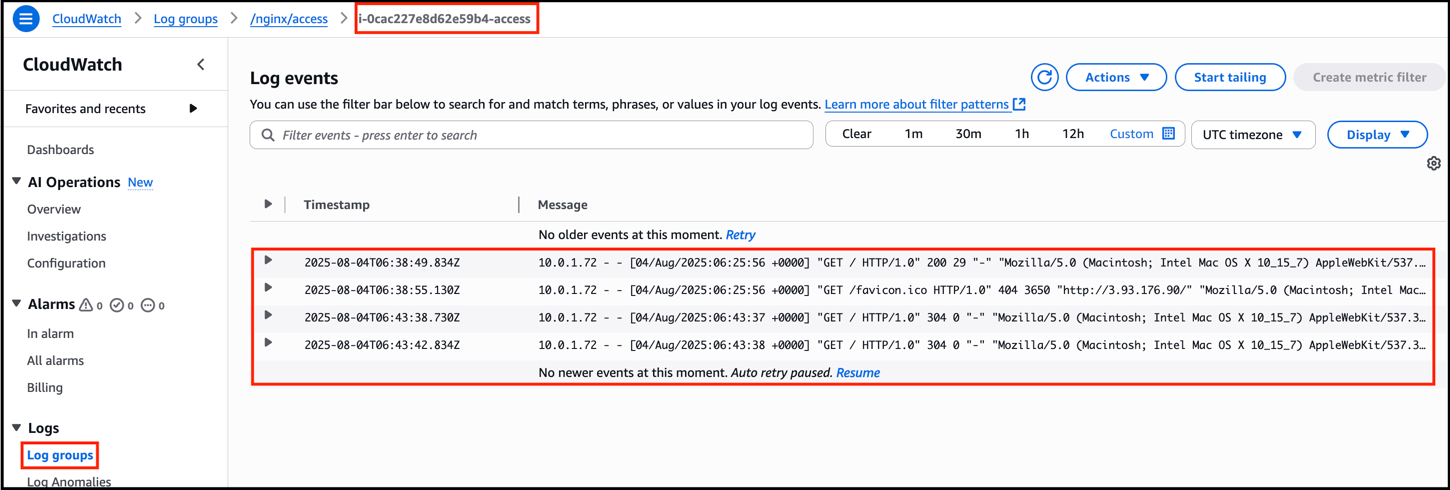
- Open the log groups in the CloudWatch console and view the log streams associated with your EC2 instance ID.
- Check whether logs from your EC2 instance are being successfully delivered and displayed in the selected log streams.
Do You Know?
While NAT Instances are great for cost-effective small-scale use cases, NAT Gateways are more scalable and highly available. With NAT Gateways, you don’t need to manage instances, and AWS automatically scales them. However, NAT Instances are often cheaper in smaller environments and offer full control.
Completion and Conclusion
- You have successfully created an VPC
- You have converted an EC2 instance into a NAT Instance
- You have successfully pinged Google from the private instance via the NAT instance.
- You have installed Nignx , Cloud Watch Agent on the private instance
- You have connected Cloud Watch Agent to AWS CloudWatch,
End Lab
- Sign out of AWS Account.
- You have successfully completed the lab.
- Once you completed the steps, click on End Lab from your IP Lab Portal and wait till the process gets completed.
What gets checked
When you press Check my work, the platform verifies each of these:- Create Amazon Custom VPC — Check whether a Custom VPC is created or not.
- Create Amazon Custom VPC Subnet — Check whether a Subnet is created for the Custom VPC or not.
- Launch an EC2 Instance — Check whether an EC2 Instance is launched or not.
- Check Log Group — Check whether a CloudWatch log group exists.