

Overview
Project Details
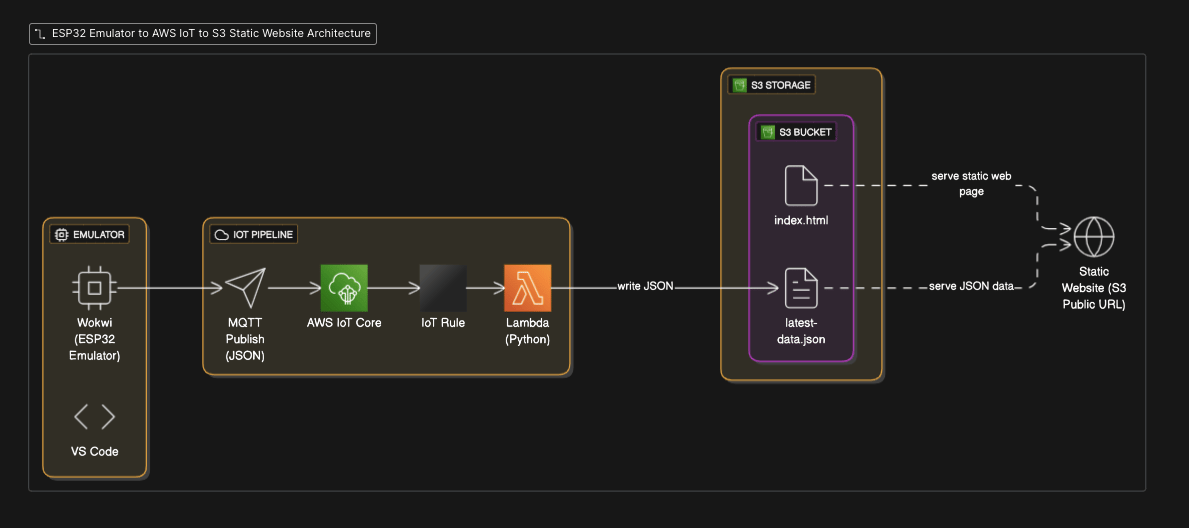
- In this lab, we demonstrate how AWS IoT Core can seamlessly integrate with AWS Lambda to process IoT device messages in real time. You will simulate an IoT device using the Wokwi ESP32 emulator, connect it to AWS IoT Core, and send telemetry data that triggers a Lambda function. The processed data is then reflected on a real-time dashboard hosted on an S3 static website.
- Duration: 2 hour.
- AWS Region: US East (N. Virginia) us-east-1.
Prerequisites (in VS Code)
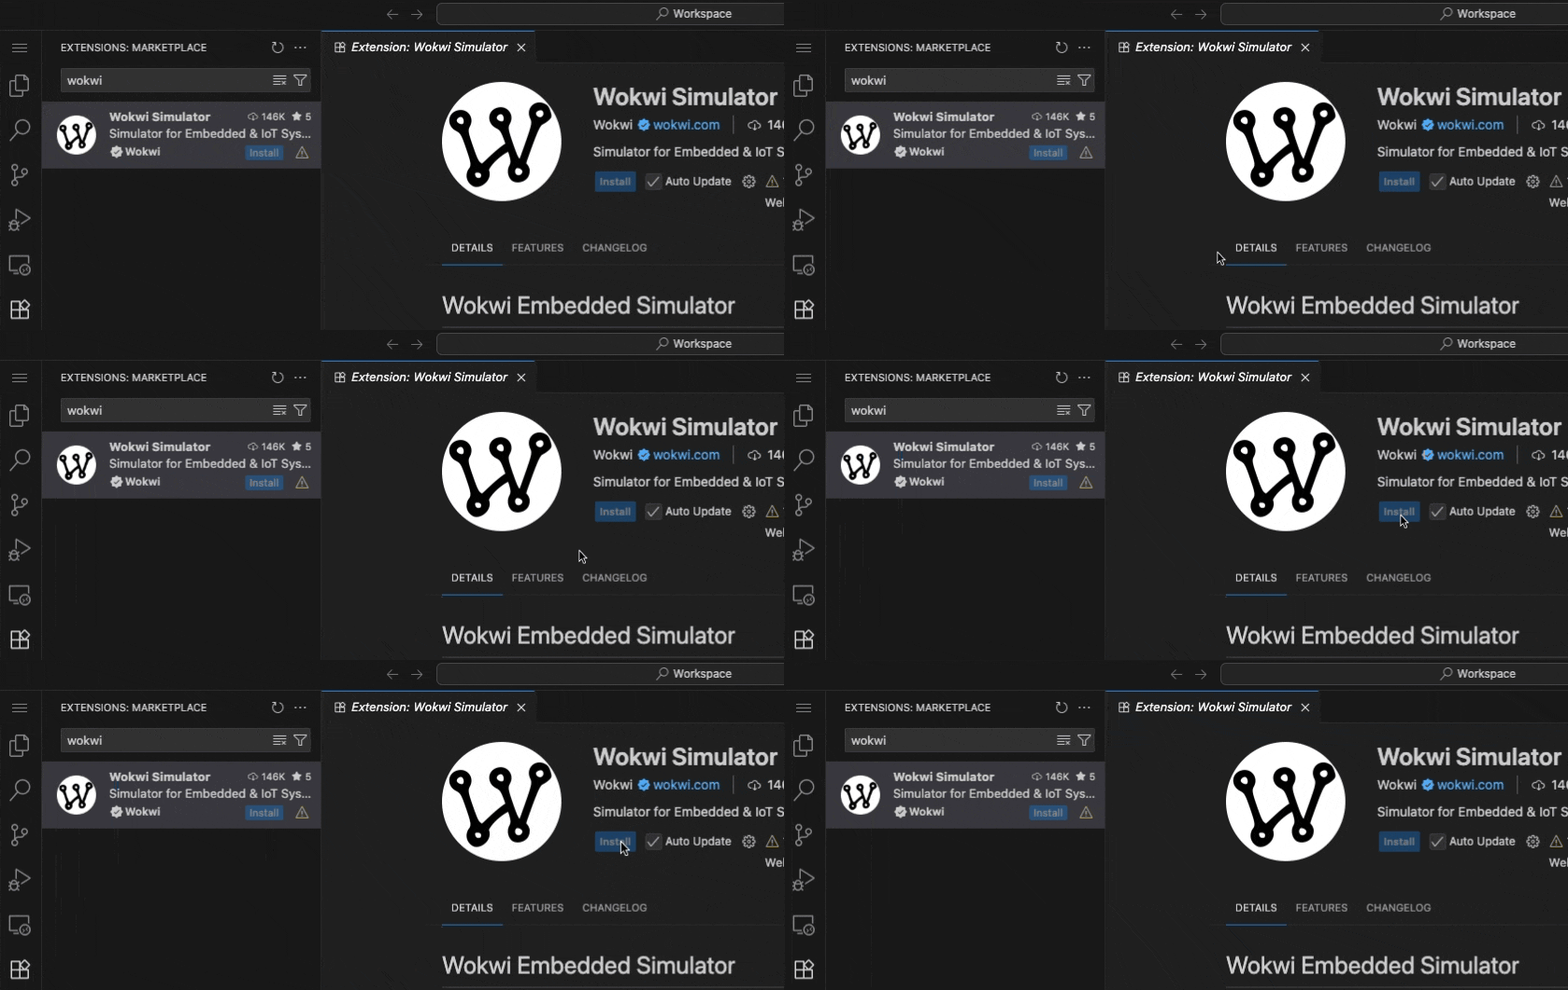
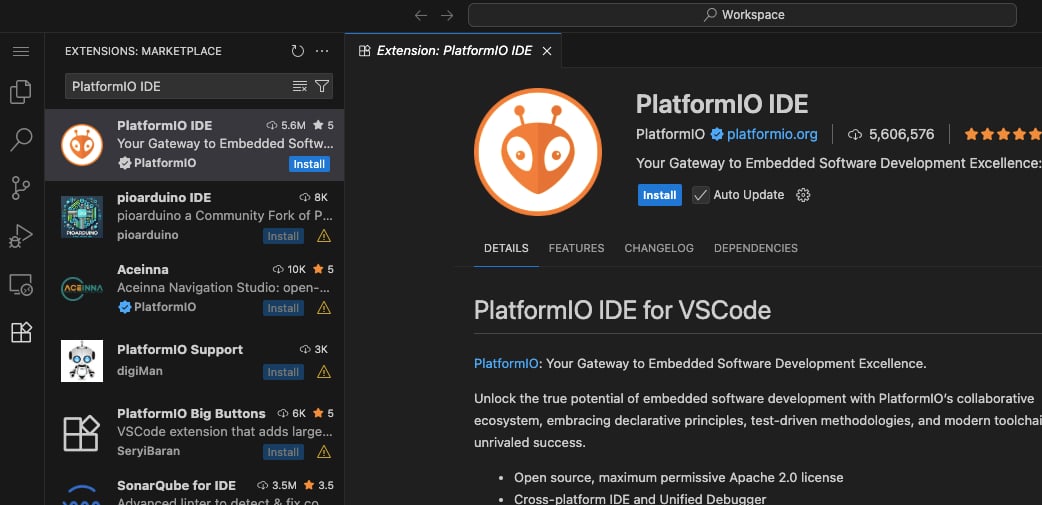
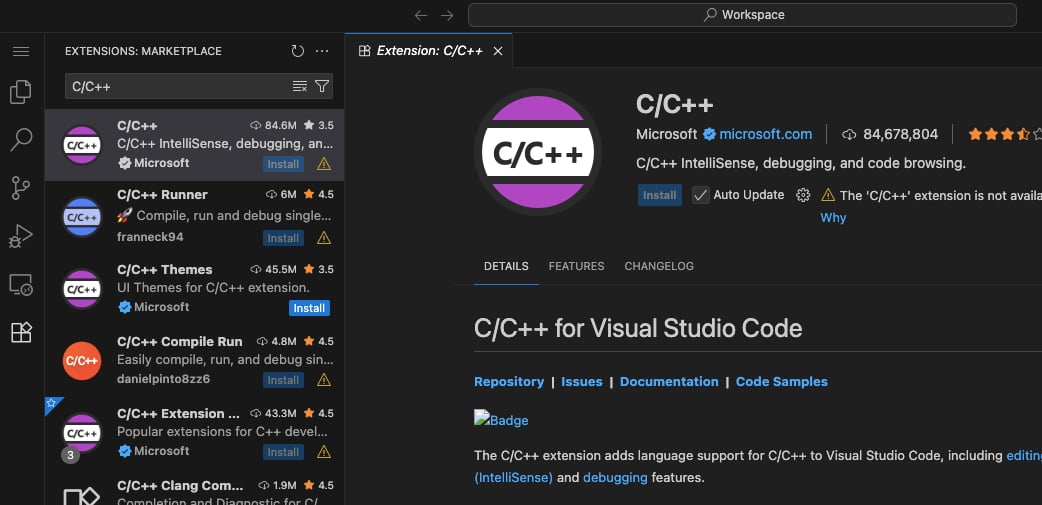
- Install the following extensions in Visual Studio Code:
- Wokwi
- PlatformIO IDE
- C/C++
Introduction
What is AWS IoT Core?
- AWS IoT Core is a managed cloud service that enables connected devices to easily and securely interact with cloud applications and other devices
- AWS IoT Core allows billions of devices to connect securely to the cloud, enabling communication between devices and cloud applications via standard protocols like MQTT, HTTP, and WebSockets
- The service provides a message broker that routes messages between devices and applications, ensuring reliable communication. It supports one-to-one or one-to-many communications, allowing for complex interactions.
- AWS IoT Core offers robust security features, including device authentication and authorization using X.509 certificates, AWS Identity and Access Management (IAM), and encryption of data in transit
- AWS IoT Core integrates seamlessly with other AWS services, such as AWS Lambda, Amazon S3, and Amazon DynamoDB, enabling users to build scalable IoT applications that leverage the full AWS ecosystem.
Project Features:
-
Simulated IoT Device (Wokwi ESP32):
- Use Wokwi’s online emulator to simulate an ESP32-based IoT device without any physical hardware.
-
Secure Device Authentication:
- Attach AWS IoT Core certificates to enable secure MQTT communication.
-
AWS IoT Core Integration:
- Establish real-time MQTT communication between the device and AWS.
-
Lambda Function Trigger:
- Use an AWS IoT Rule to trigger a Lambda function on each device message.
-
Real-Time Web Dashboard:
- Host a live HTML dashboard on Amazon S3 with static website hosting.
-
IoT Core Test Client:
- Monitor messages sent by your IoT device directly within AWS.
Benefits:
-
No Hardware Required:
- Develop and test IoT applications entirely in the cloud using Wokwi.
-
Cost Efficiency:
- Pay only for Lambda executions; no need for always-on compute.
-
Hands-On with AWS Security:
- Learn how to manage device authentication with IoT certificates and policies.
-
Real-Time Processing:
- Process data instantly using AWS Lambda for analytics or actions.
-
Data Visualization:
- Build dashboards to visually monitor IoT metrics using static web hosting.
-
Scalable Architecture:
- Gain insight into a serverless, event-driven architecture suitable for production IoT solutions.
Architecture Diagram
Task Details
- Sign in to the AWS Management Console.
- Create an IoT Policy.
- Create an IoT Thing.
- Activate the Wokwi license key in your browser.
- Attach the AWS IoT certificates in the code.
- Create a public S3 bucket.
- Upload the HTML file and enable static website hosting.
- Create a Lambda function.
- Create an IoT Core rule.
- Check IoT messages in the AWS IoT Core test client.
- Run the wokwi code and check AWS IoT Core test client.
- Check the live website and ensure data updates in real time.
Launching Environment
- To launch the lab environment, click on the Start Project button.
- Please wait until the cloud environment is provisioned. It will take less than a minute to provision.
- Once the Project is started, you will be provided with IAM username, Password, Access Key and Secret Access Key.
Note: You can only start one lab at any given time.
Lab guide
Lab Steps
Task 1: Sign in to AWS Management Console
- Click on the Open Console button, and you will get redirected to AWS Console in a new browser tab.
-
On the AWS sign-in page,
- Leave the Account ID as default. Never edit/remove the 12 digit Account ID present in the AWS Console. otherwise, you cannot proceed with the lab.
- Now copy your User Name and Password in the lab Console to the IAM Username and Password in AWS Console and click on the Sign in button.
- Once Signed In to the AWS Management Console, Make the default AWS Region as US East (N. Virginia) us-east-1.
Task 2: Create an IoT Policy
- Make sure you are in the US East (N. Virginia) us-east-1 Region.
- Navigate to IoT Core by clicking on the Services menu in the top, then click on IoT Core.
- From the left menu on Bedrock page click on Policies Under Security
- On the Policy page click on Create policy button.
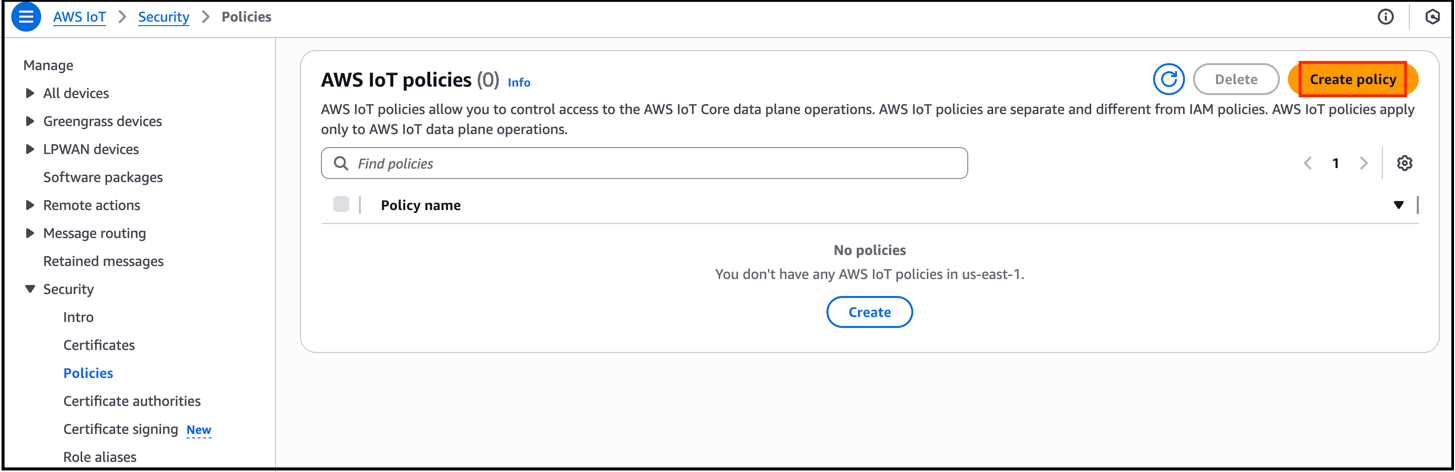
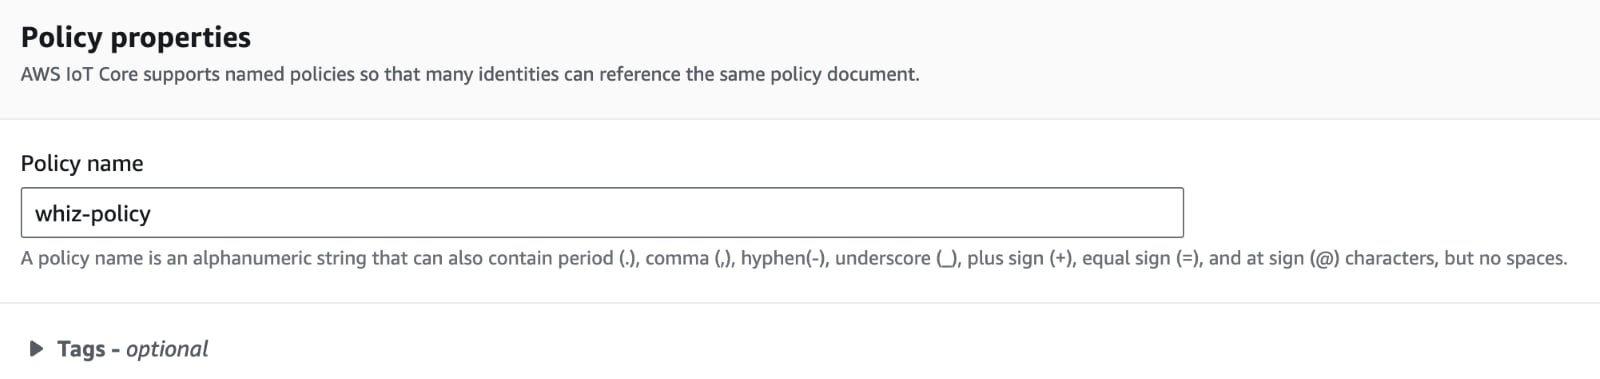
- For policy name: Enter whiz-policy
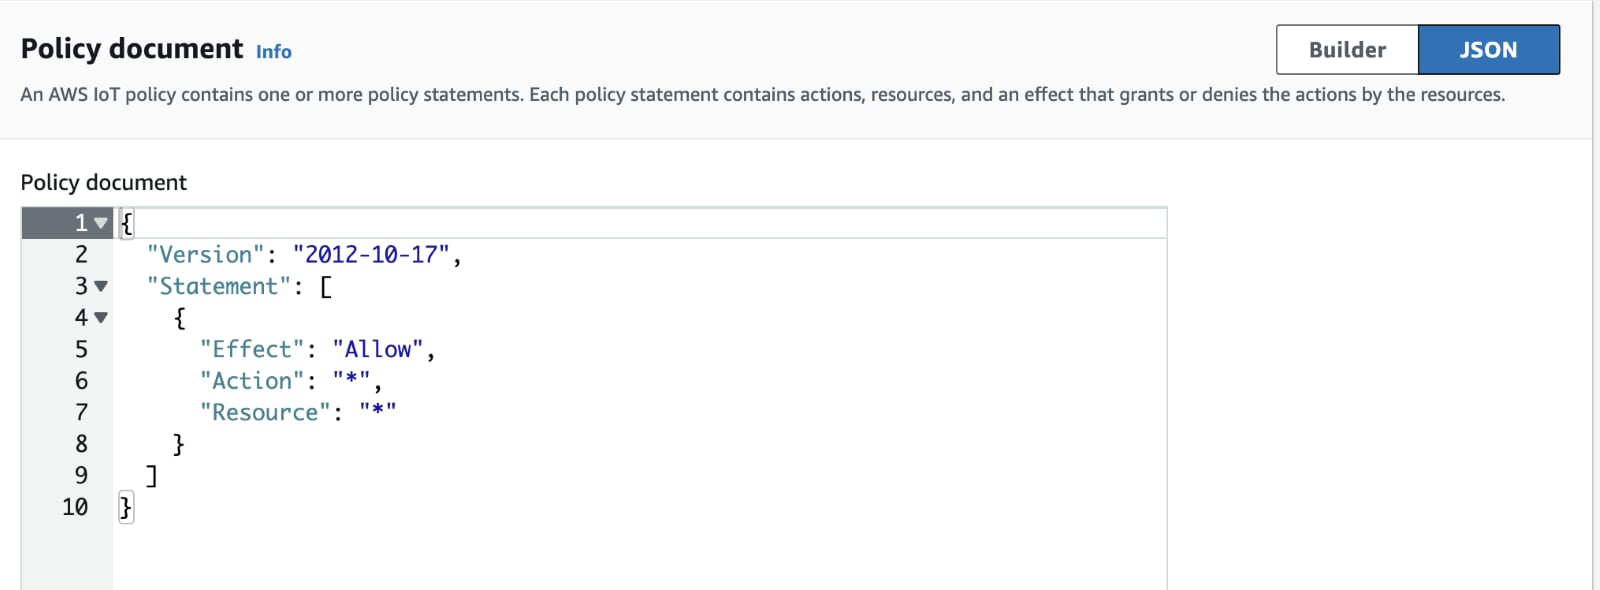
- For Policy Document Select JSON remove the existing and copy paste the below policy
- Click on Create button
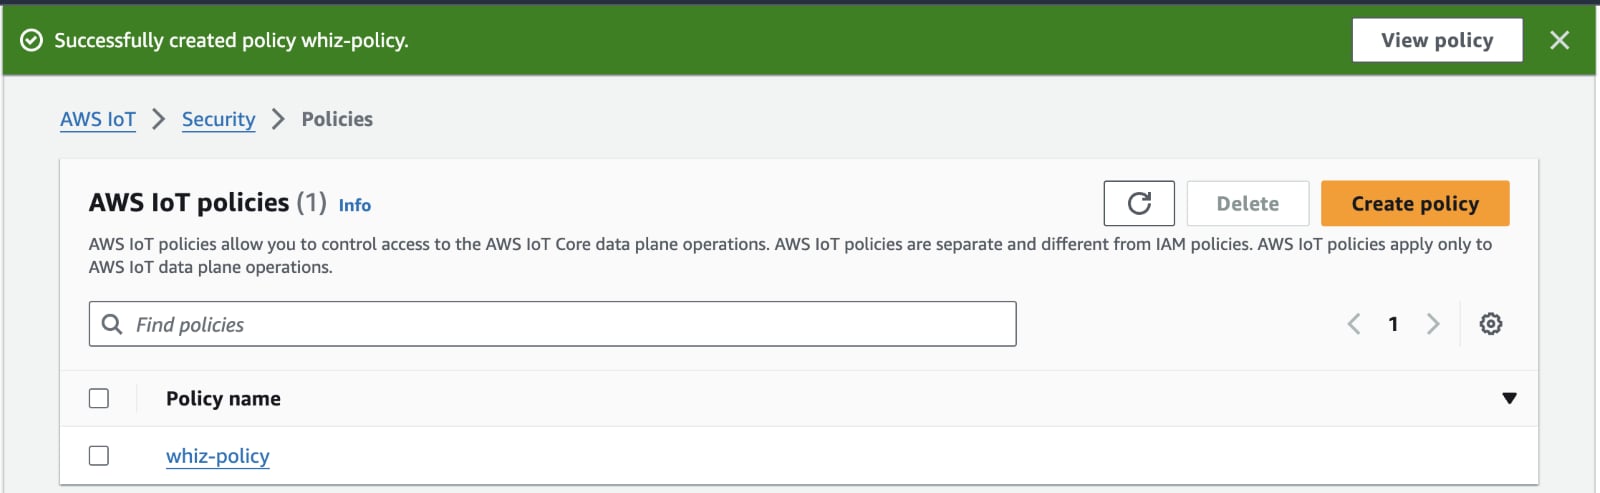
Task 3: Create an IoT Thing
- On the left side menu Click on Thing under All devices.
- Click on Create things button.
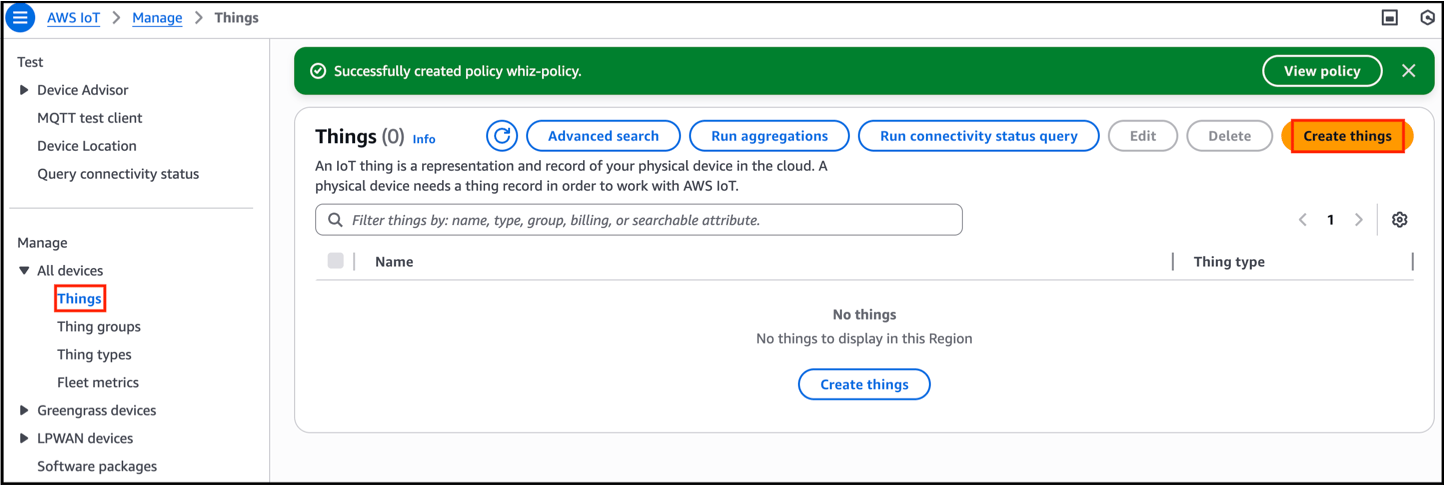
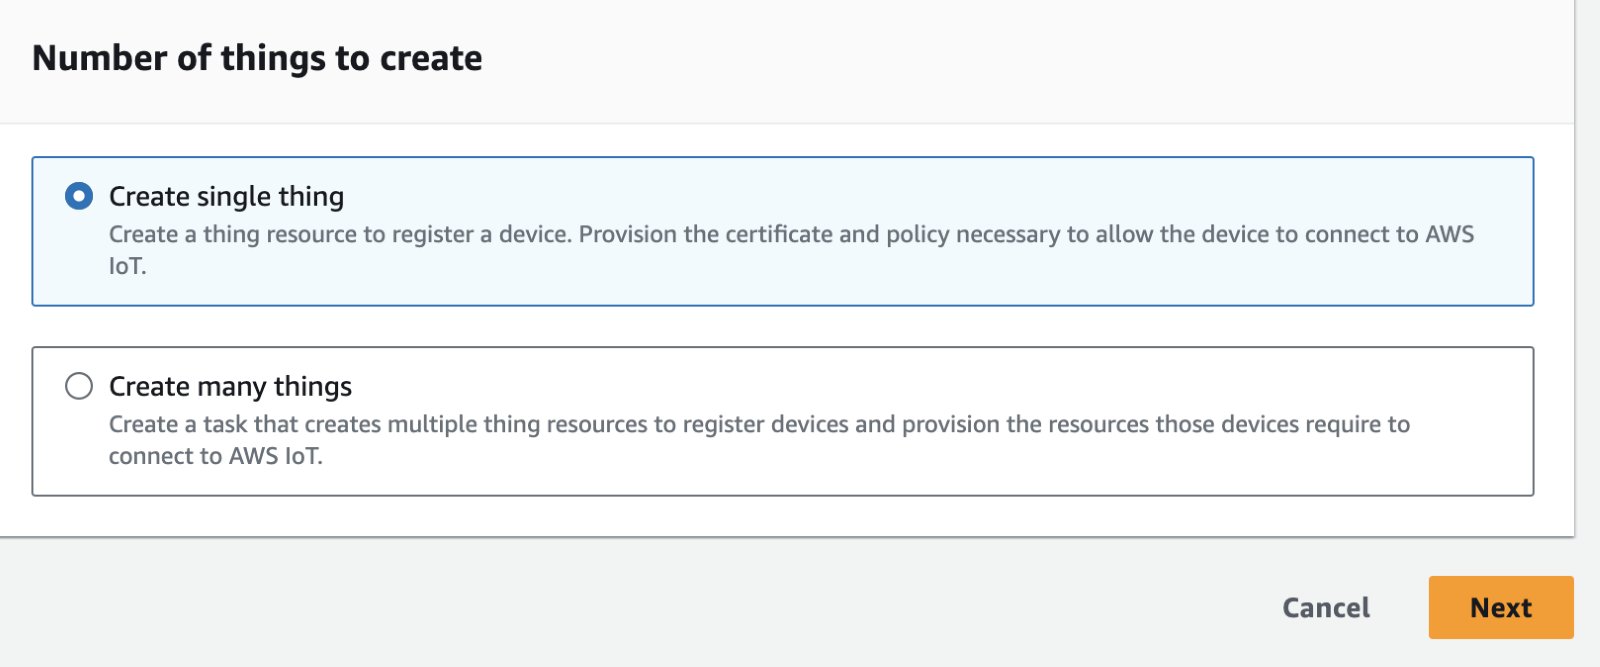
- For Number of things to create: Select Create single thing and click on Next button.
- For Thing name: Enter whiz-thing
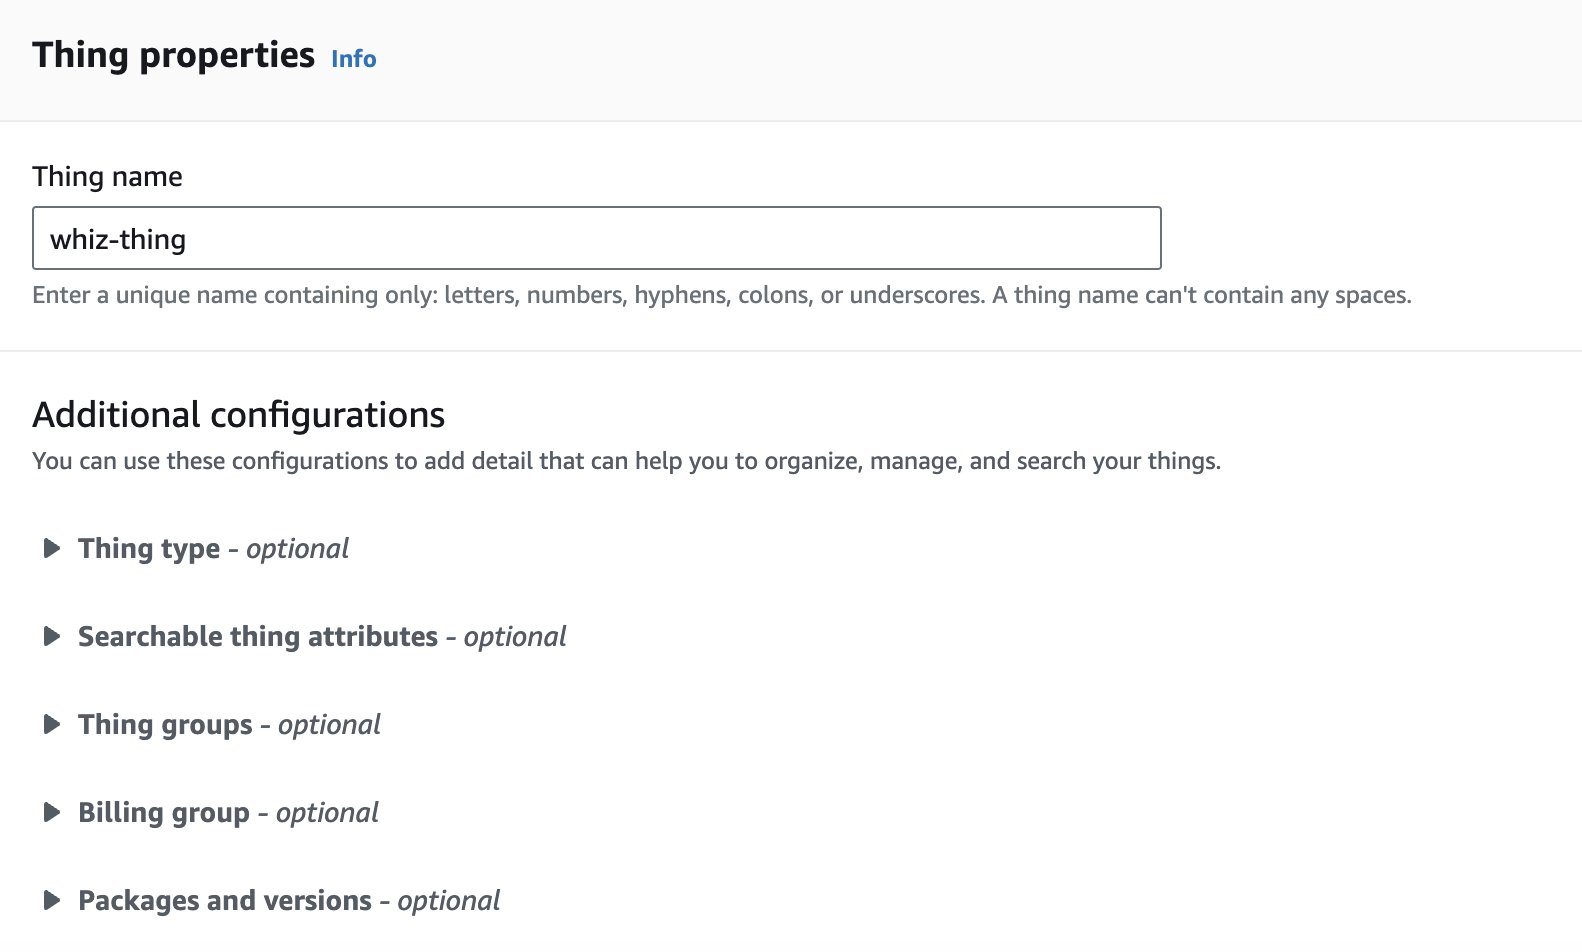
- Leave rest as default and click on Next button.
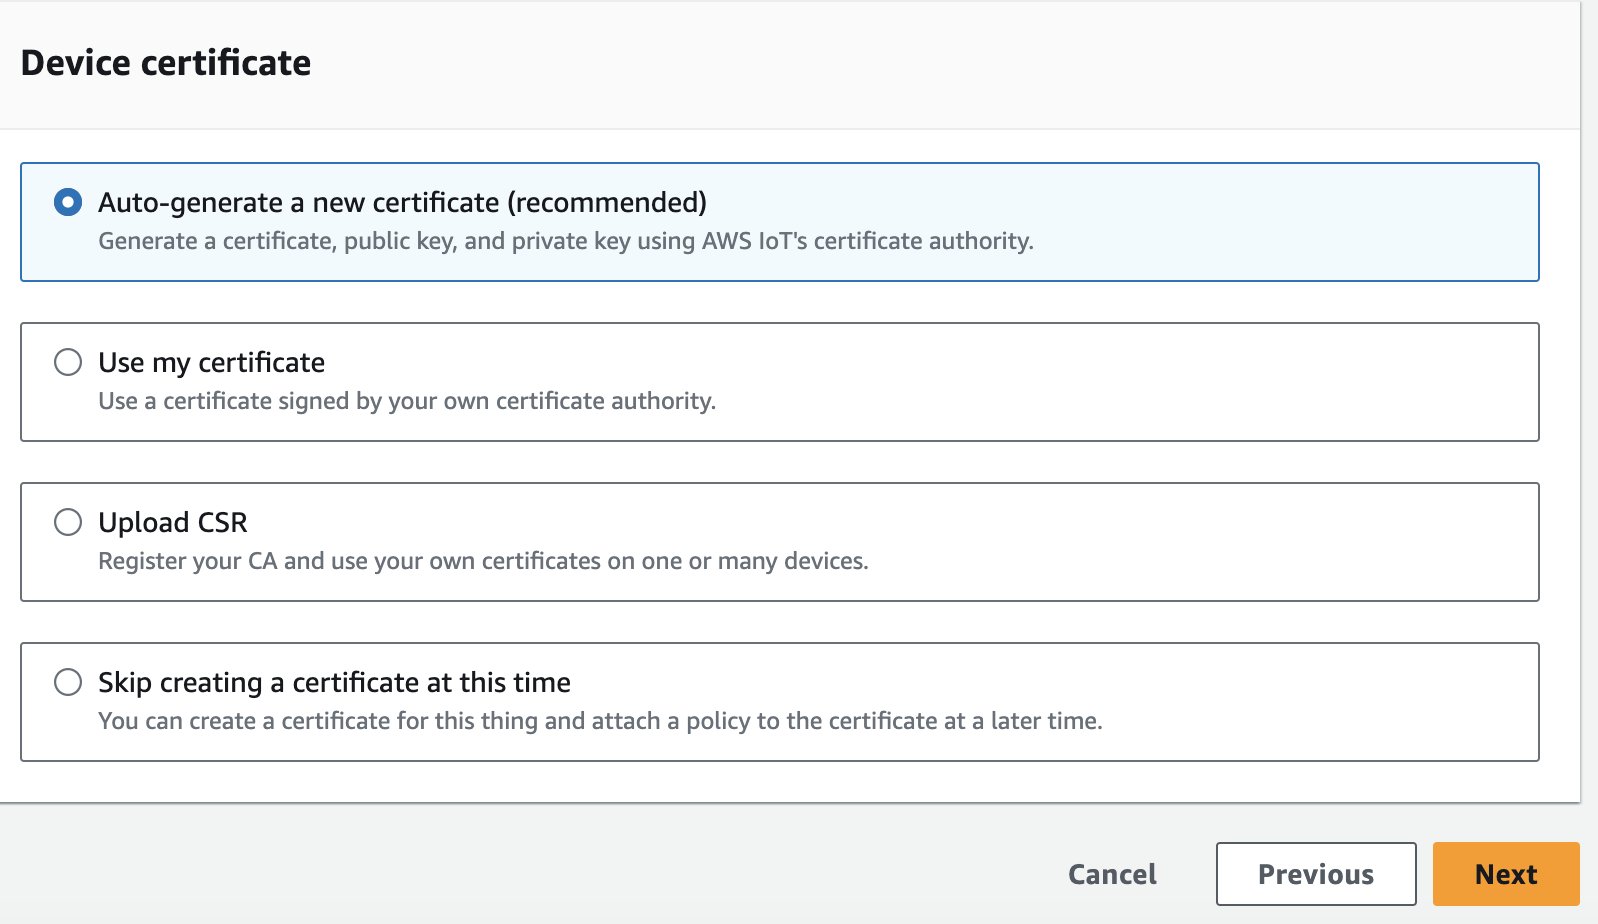
- For Device Certifications leave it as default and click on Next button.
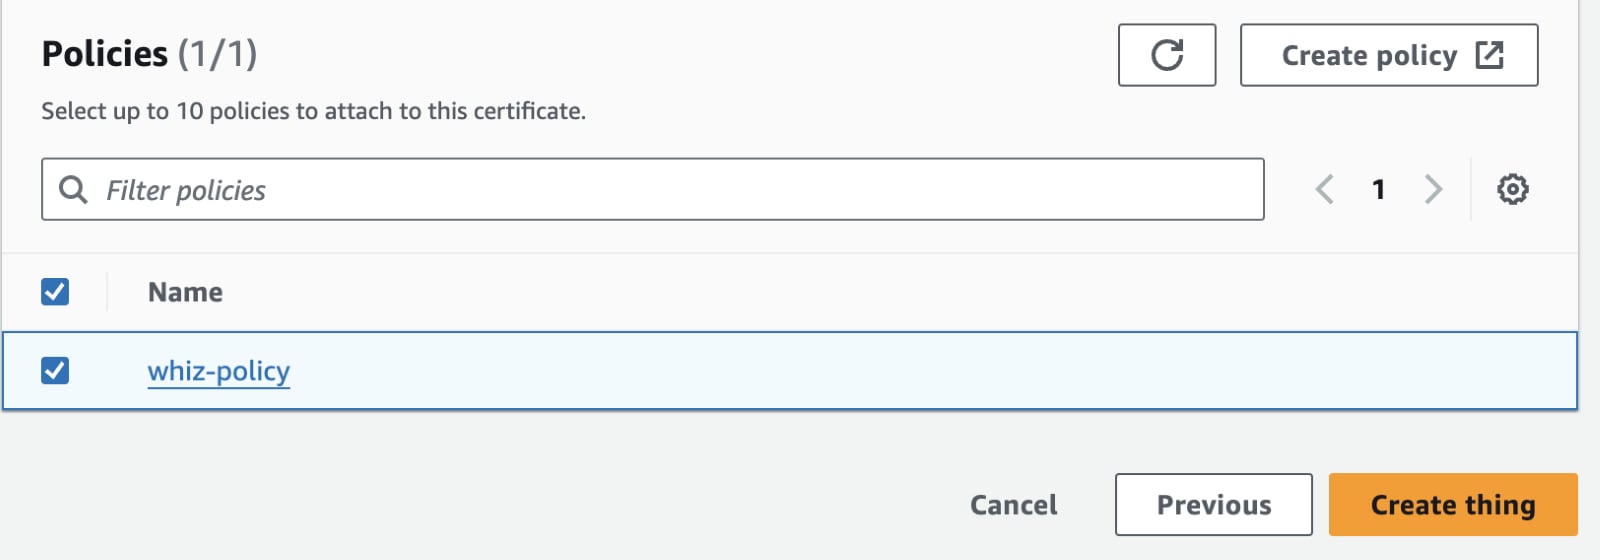
- For Attach Policies select whiz-policy created above and click on Create thing button.
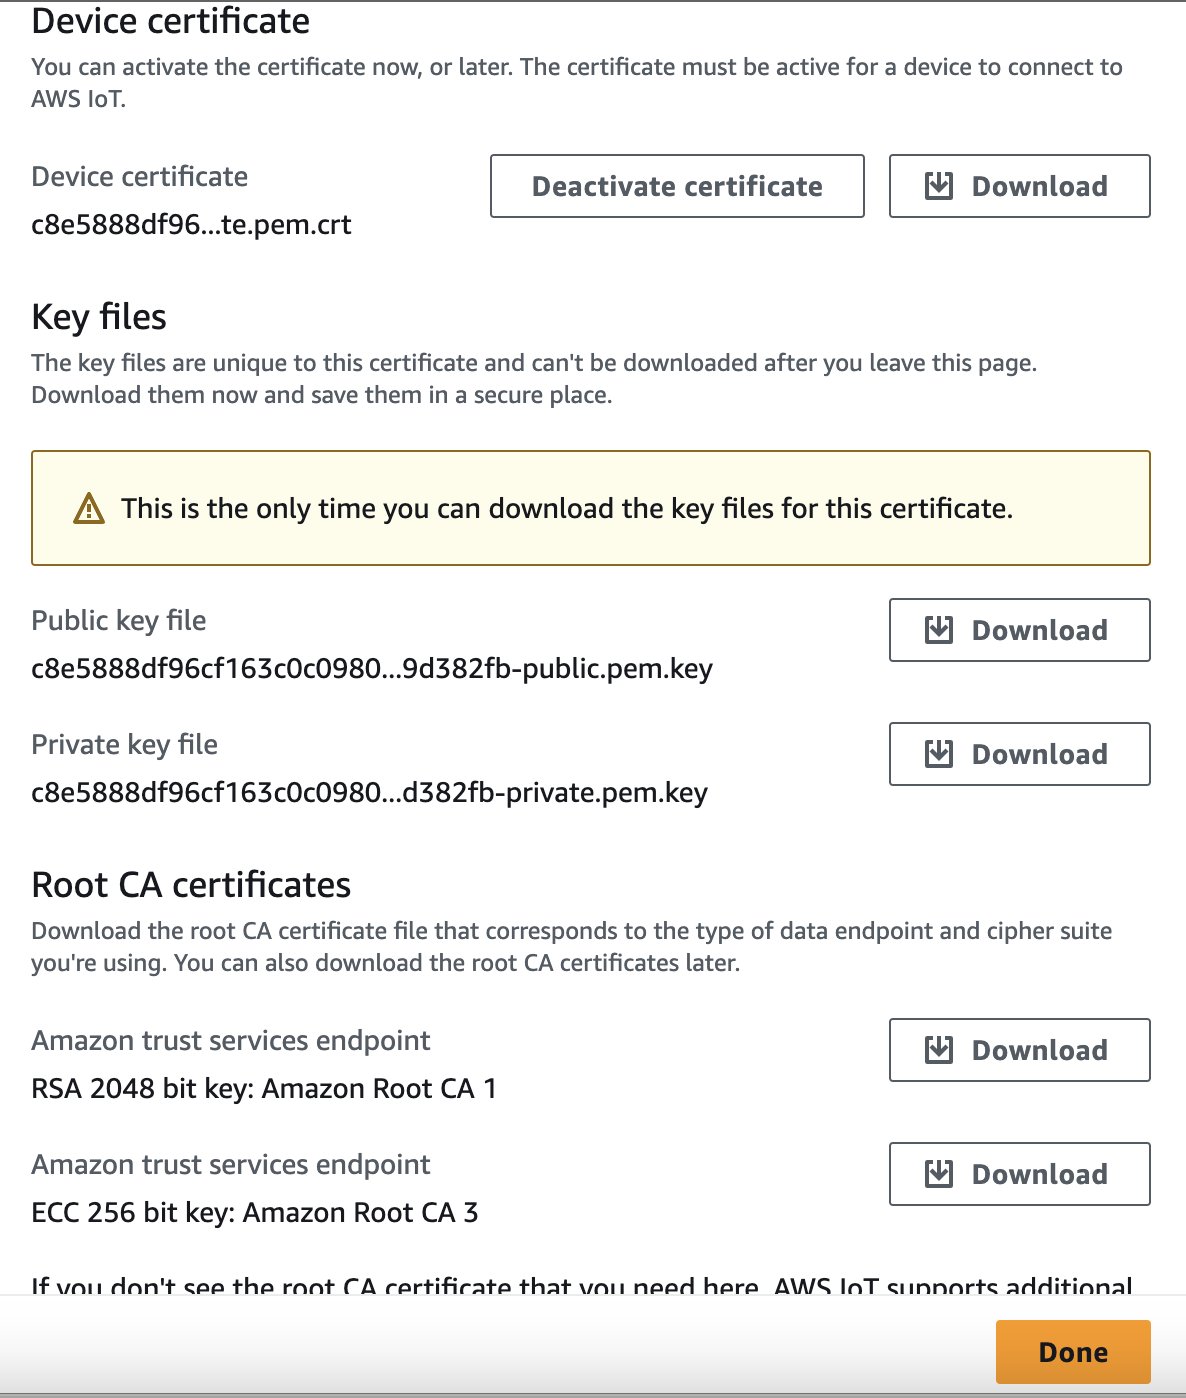
- Download all the 5 certificates and keys in your local and click on Done.
- Once certificates get downloaded navigate to downloads folder to view downloaded files.
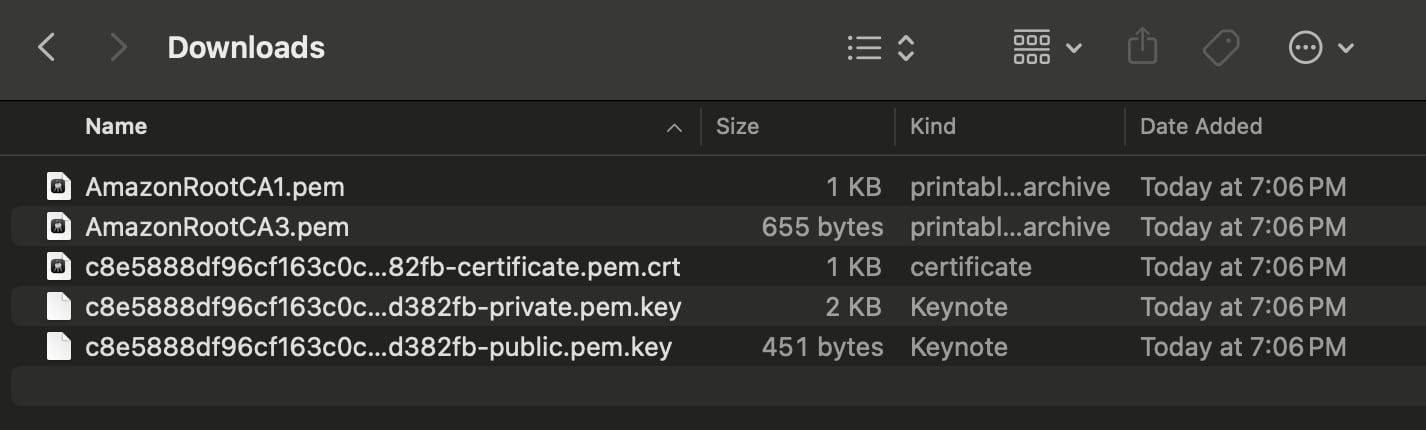
- Now first we will rename the files we will be using them later to configure authentication for the device
- Rename the certificate.pem.crt file to : device.pem.crt
- Rename the private.pem.key file to : private.pem.key

Task 4: Activate the Wokwi license key in your browser
- Download the “AWS_IoT_Core” file and extract it.
- Navigate and Open the “aws_iot_core” folder.
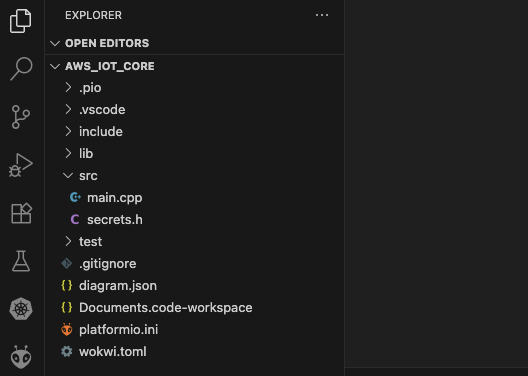
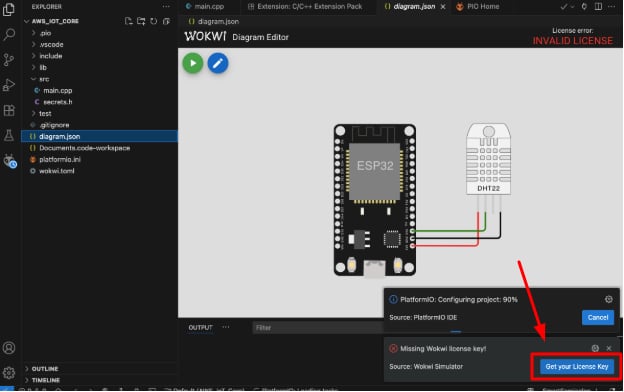
- Open the “diagram.json” file click “Get your license key” then click “Open”.
- Click “Get your license” log in with your email or Gmail ID then click “Get your license” again.
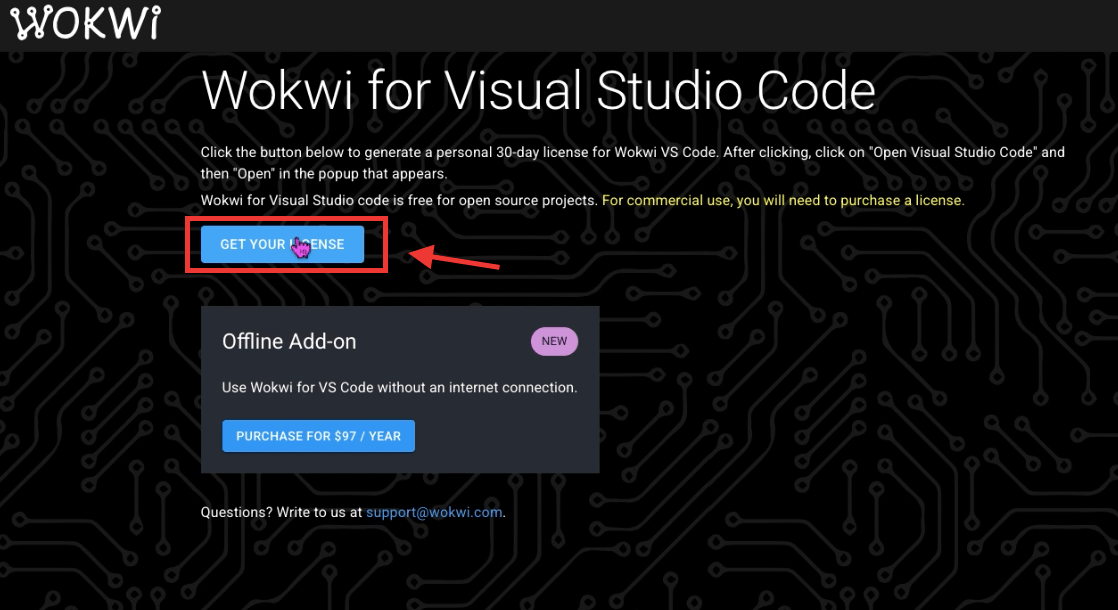
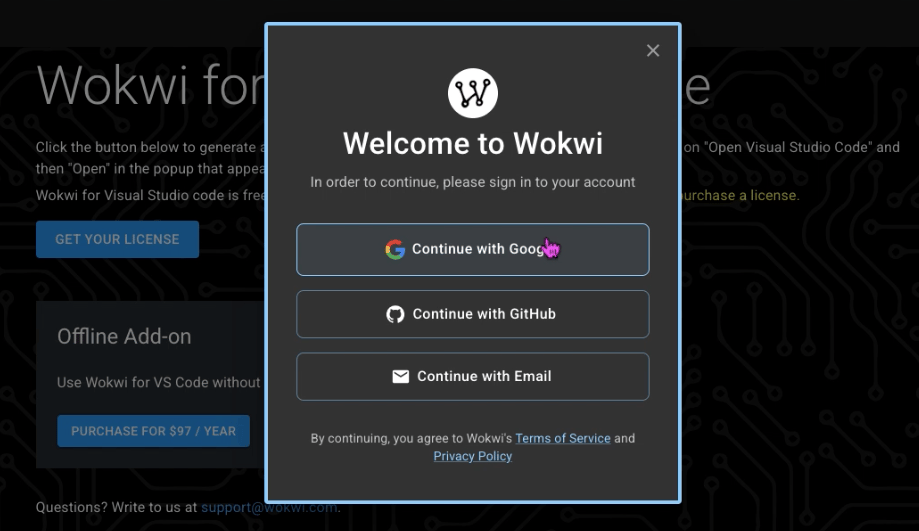
- Click Get your license.
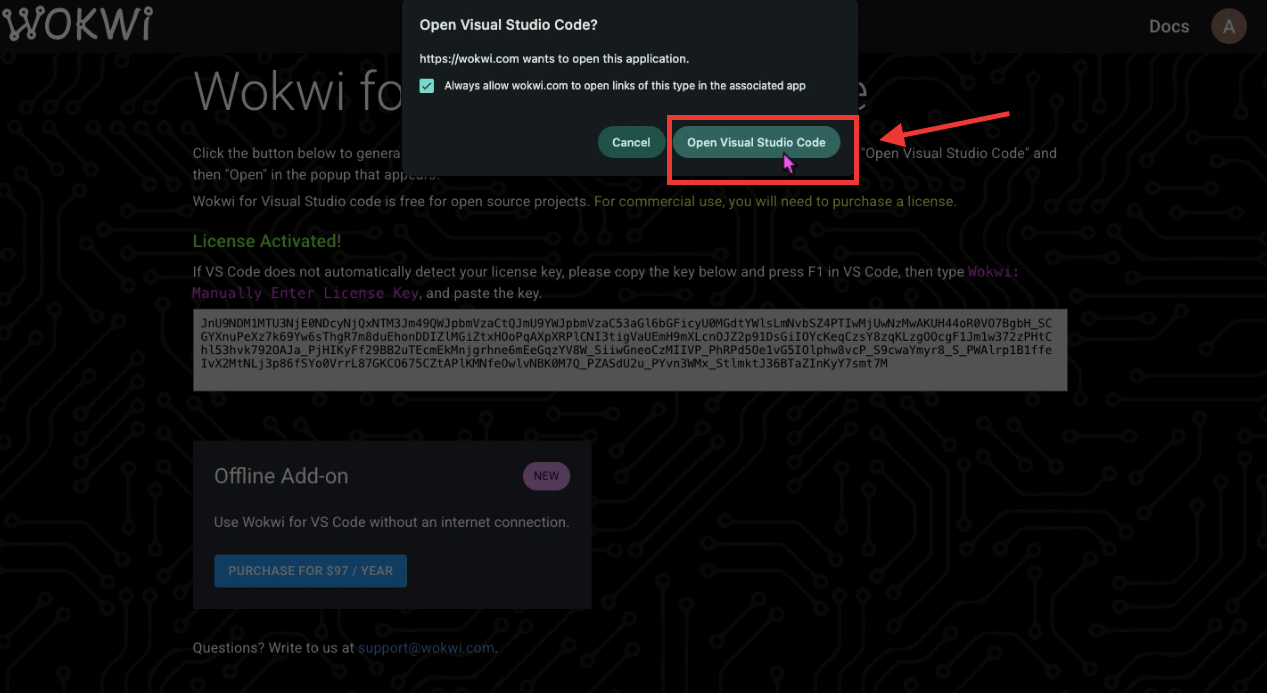
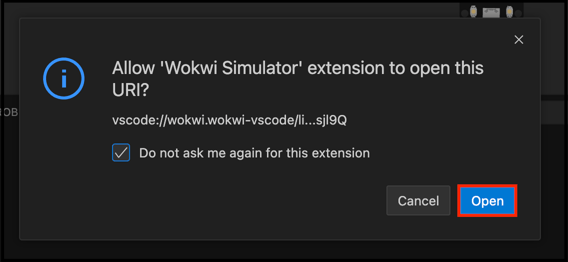
- Once the popup appears in your browser, click “Open Visual Studio Code” allow the Wokwi Simulator extension check the checkbox and click “Open”.
Task 5: Attach the AWS IoT certificates in the code
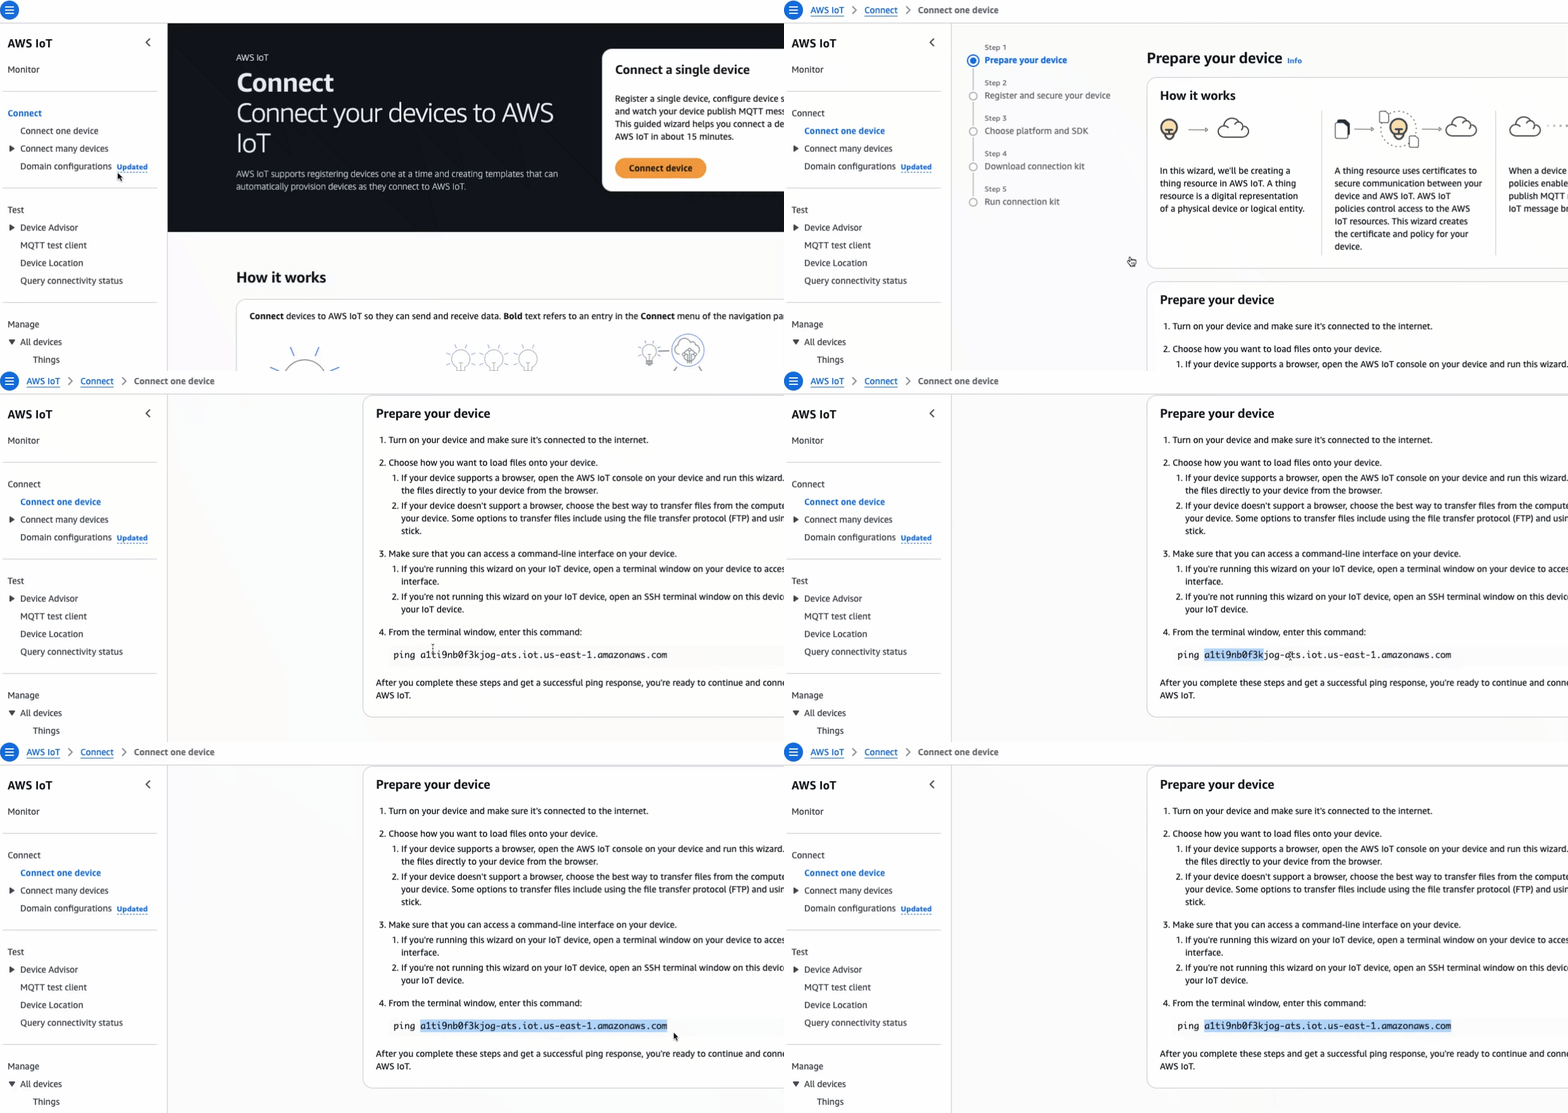
- Navigate to AWS iot core service, then Click “Connect one device”
- Scroll down to find and copy the endpoint command, e.g.: arti9nb0f3kjog-ats.iot.us-east-1.amazonaws.com
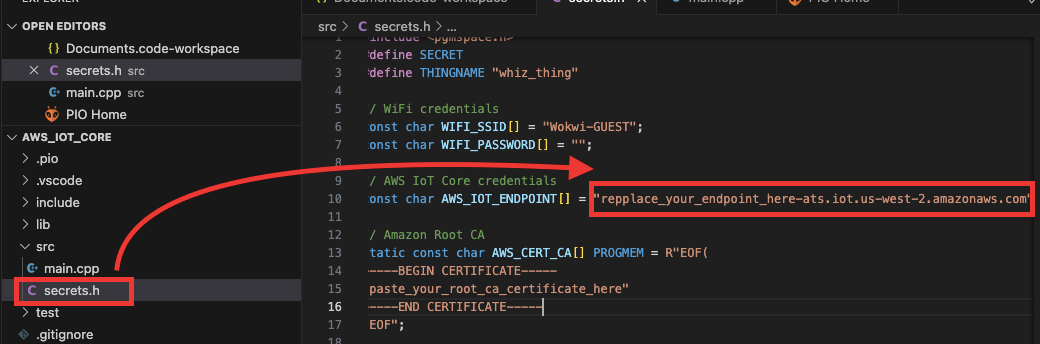
- Open VS Code aws_iot_core src secrets.h
- Replace the existing endpoint “aws_end_point” in the secrets.h file
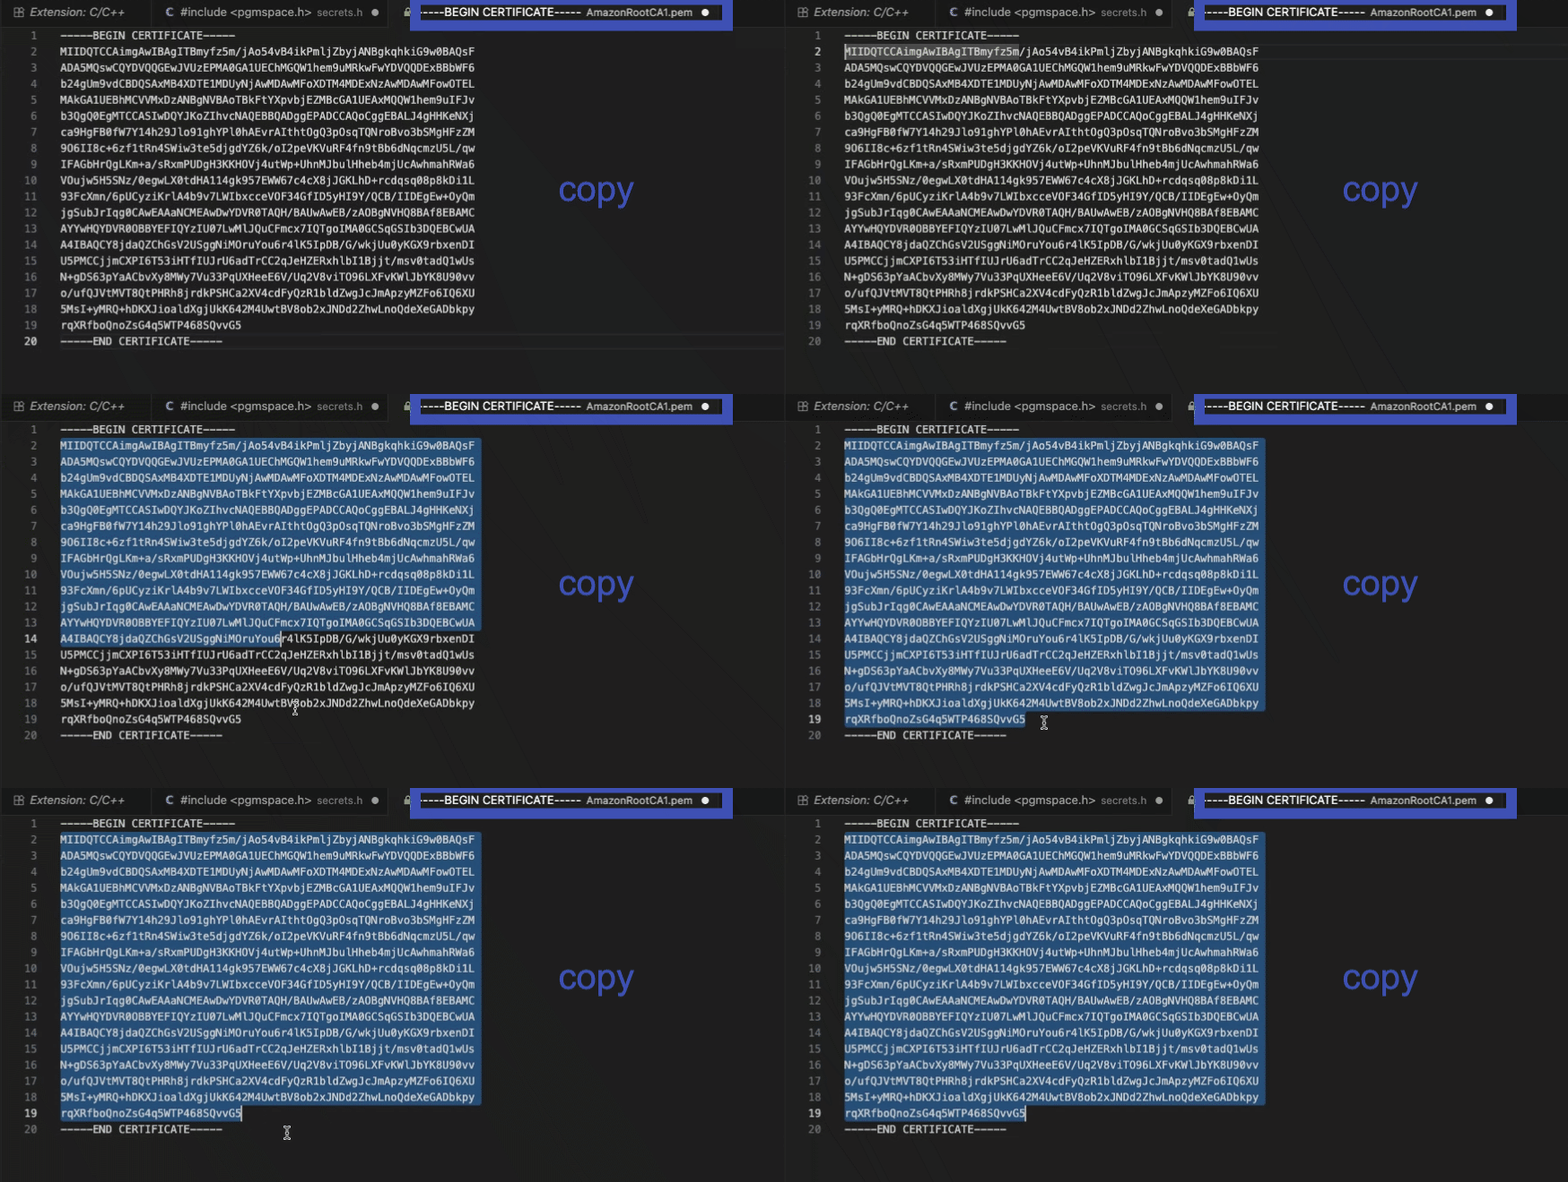
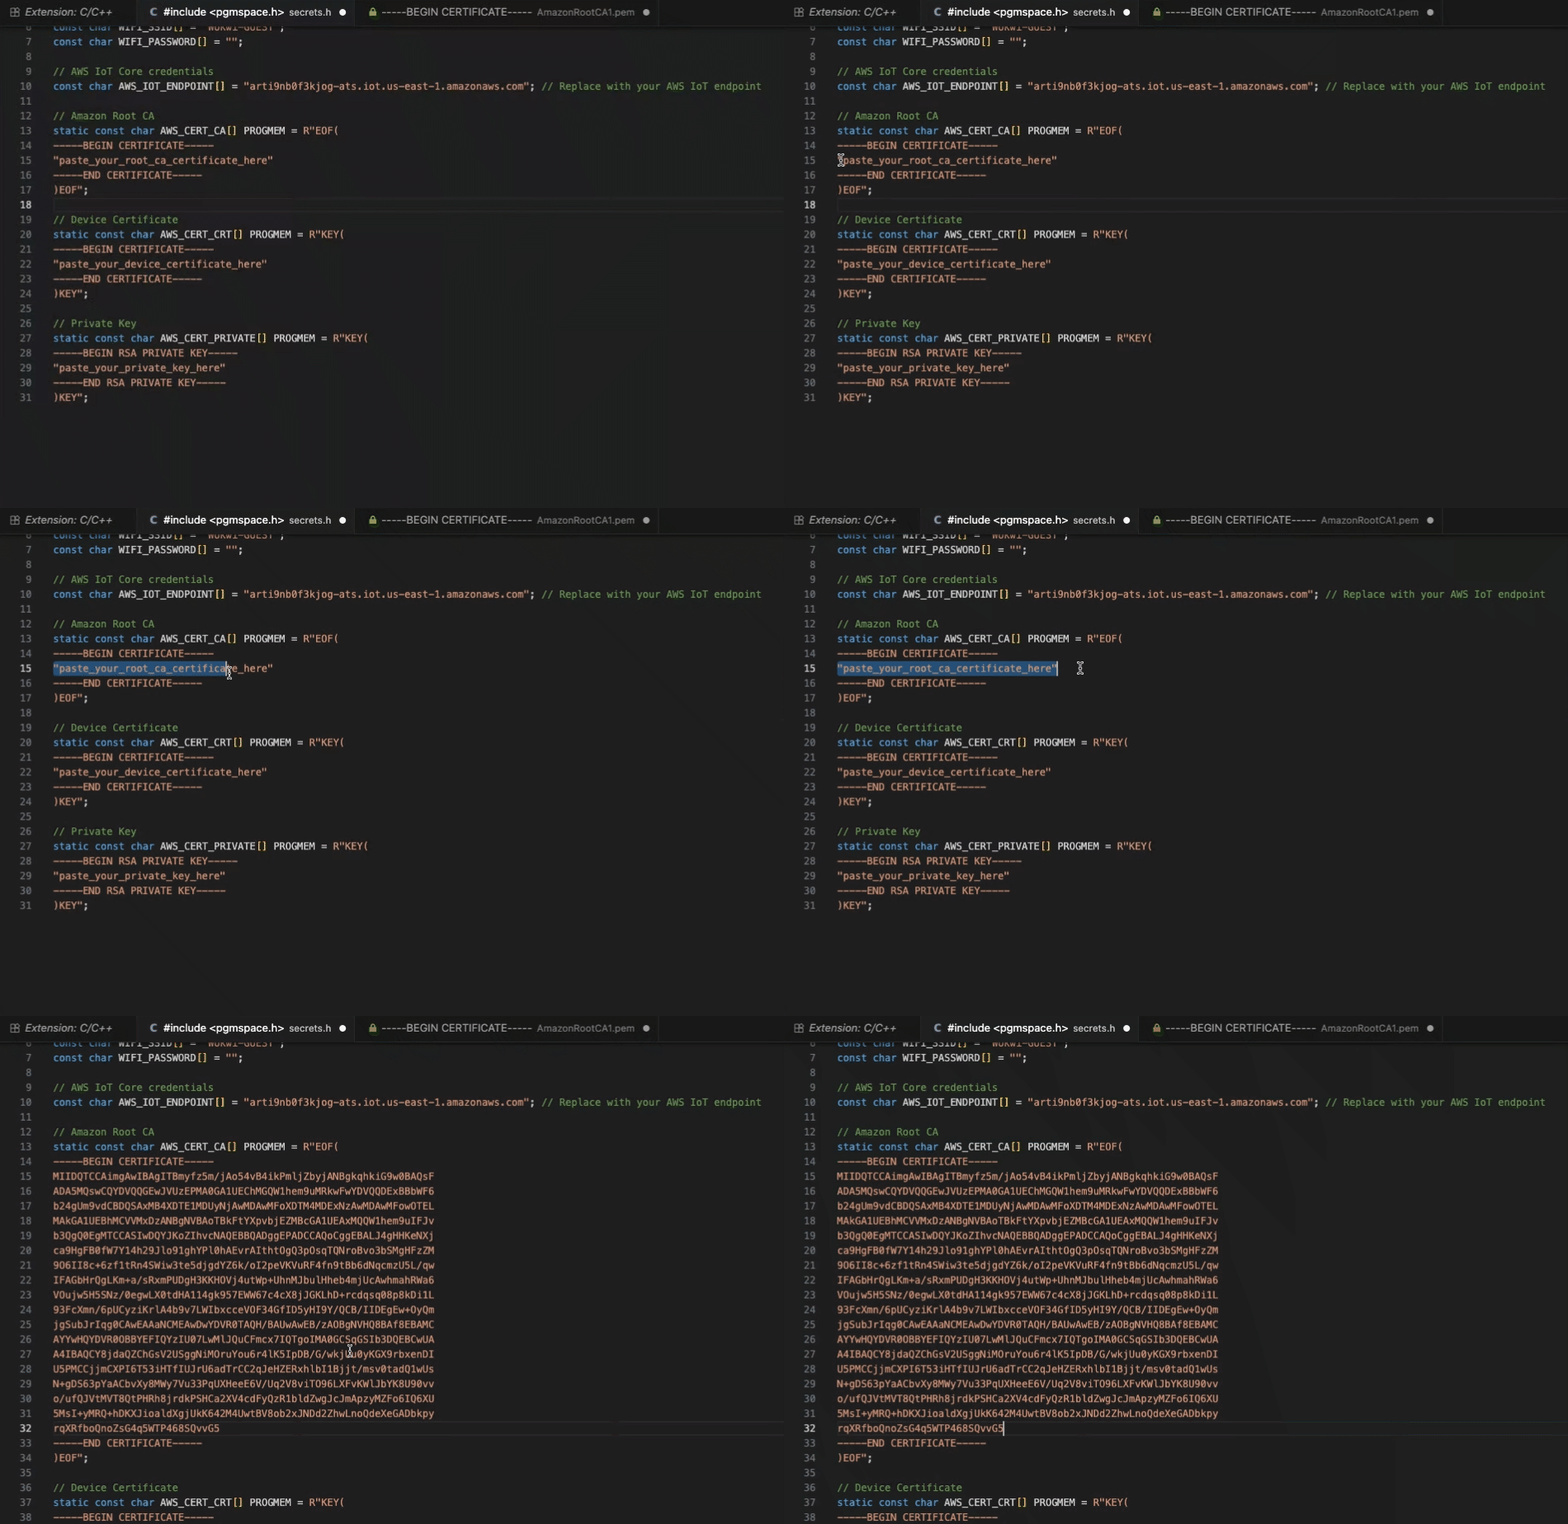
- Copy and paste the certificates in “secrets.h” : Amazon Root CA1, Device Certificate, and Private Key in the respective place.
Task 6: Create a public S3 bucket
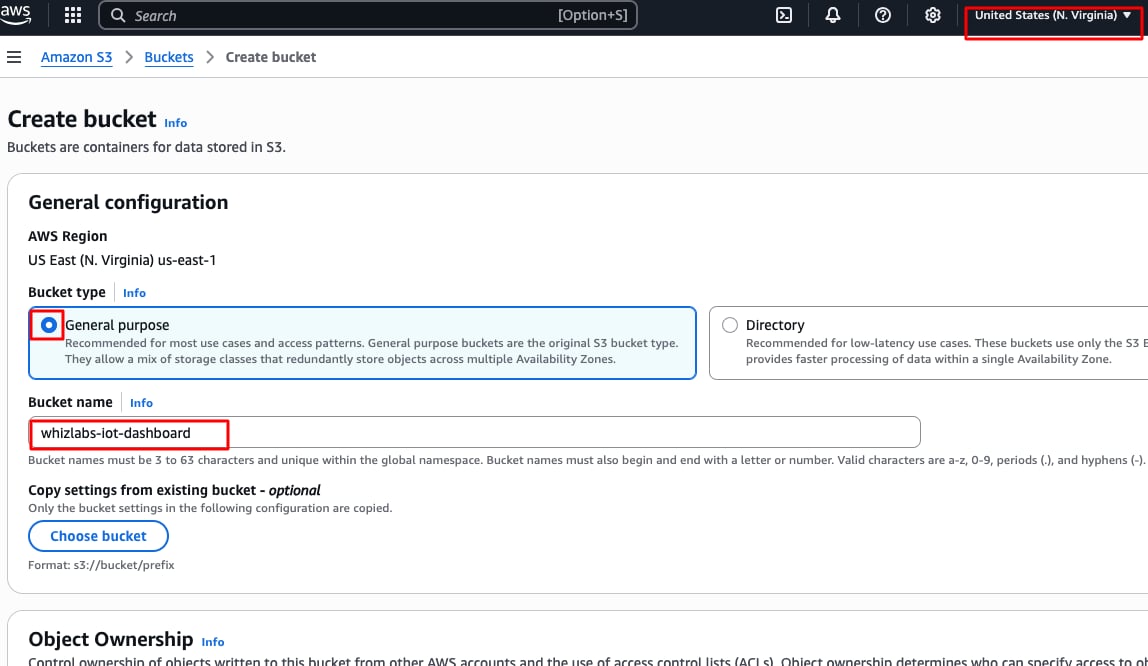
In this task, we are going to create a new S3 bucket in the US East (N. Virginia) region with a unique name disabling ACLs, and allowing public access for hosting the static website.- Navigate to S3 by clicking on the Services menu at the top, then click on S3 in the Storage section.
- In the S3 dashboard, click on the Create Bucket button.
- In the General Configuration,
- Select Bucket Type : General purpose
- Bucket name: Enter “whizlabs-iot-dashboard”
Note: S3 bucket name is globally unique, choose a name that is available.
- AWS Region: Select US East (N. Virginia) us-east-1
- Object ownership: Select ACLs disabled (recommended) option
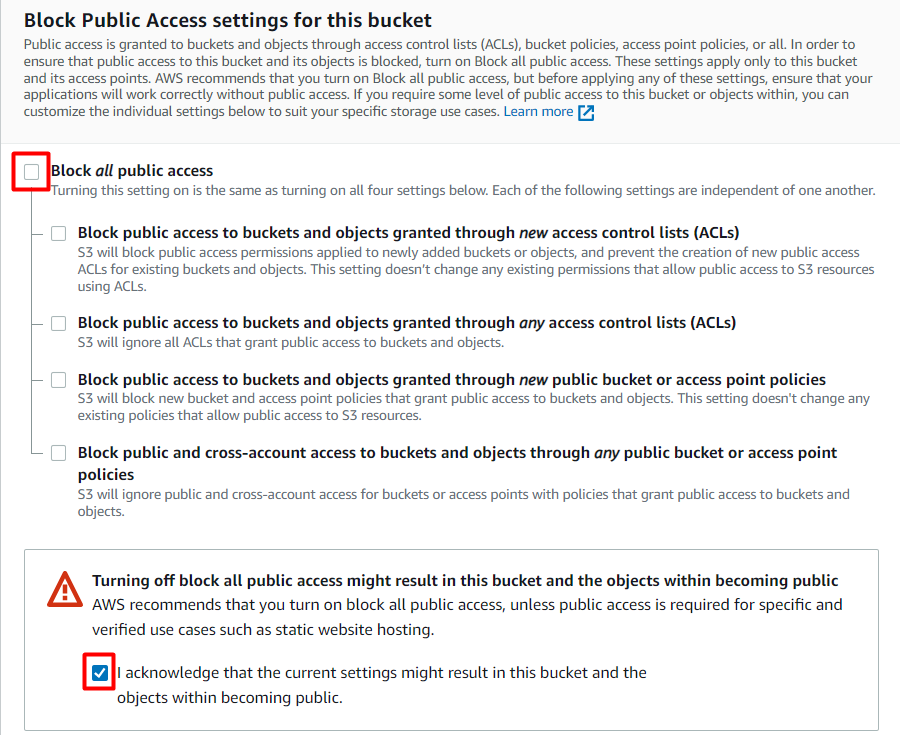
- In the option of Block Public Access settings for this bucket, Uncheck the option of Block all public access.
- Check the I acknowledge that the current settings might result in this bucket and the objects within becoming public checkbox.
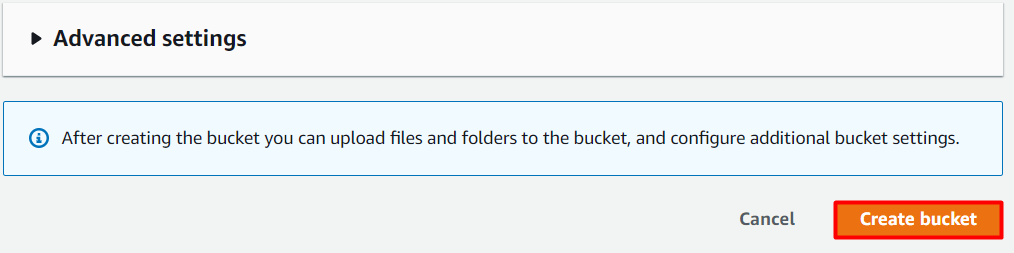
- Keep everything default and click on Create Bucket button.
Task 7: Upload the HTML file and Enable Static Website Hosting settings
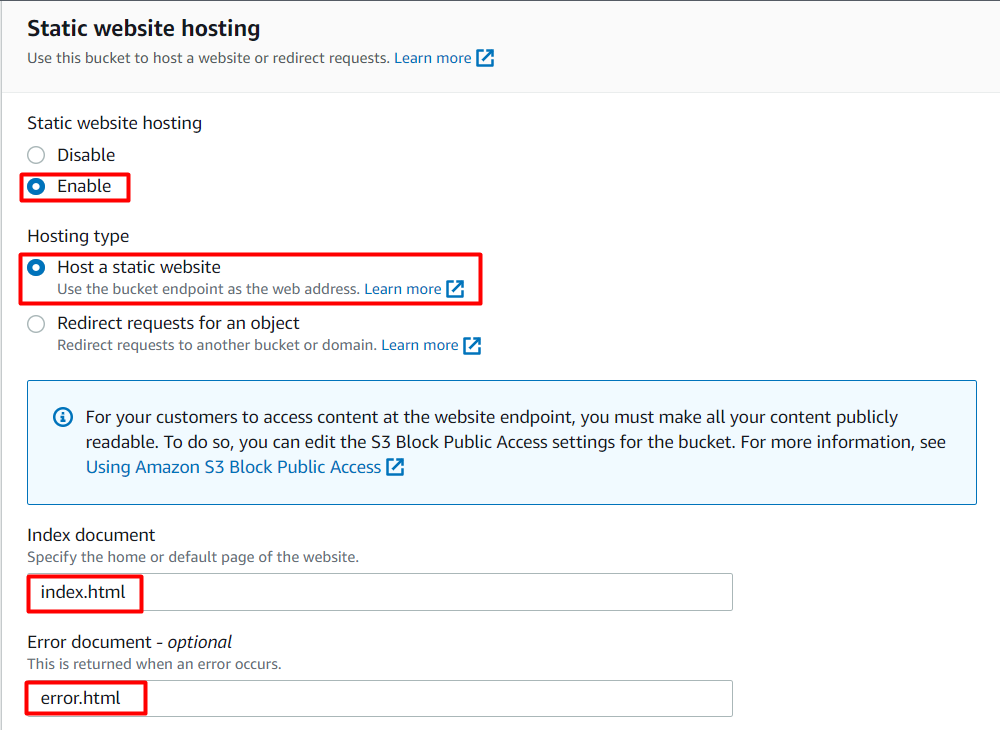
In this task, we will enable static website hosting for our S3 bucket, configure it to use index.html and error.html, copy the provided endpoint, upload two files, and configure the bucket policy by copying its ARN and pasting the provided policy code.- To proceed, go to the S3 bucket name that you created and click on it. After that, navigate to the Properties tab which can be found at the top of the screen.
- Scroll down to the Static website hosting section and click on Edit button.

- Static website hosting: Select Enable
- Hosting type: Choose Host a static website
- Index document: Type index.html
- Error document: Type error.html
- Click on Save Changes.
- Go to the Properties tab of your S3 bucket, and find the Static website hosting section. Copy the Endpoint provided in this section to your clipboard and save it for future reference.
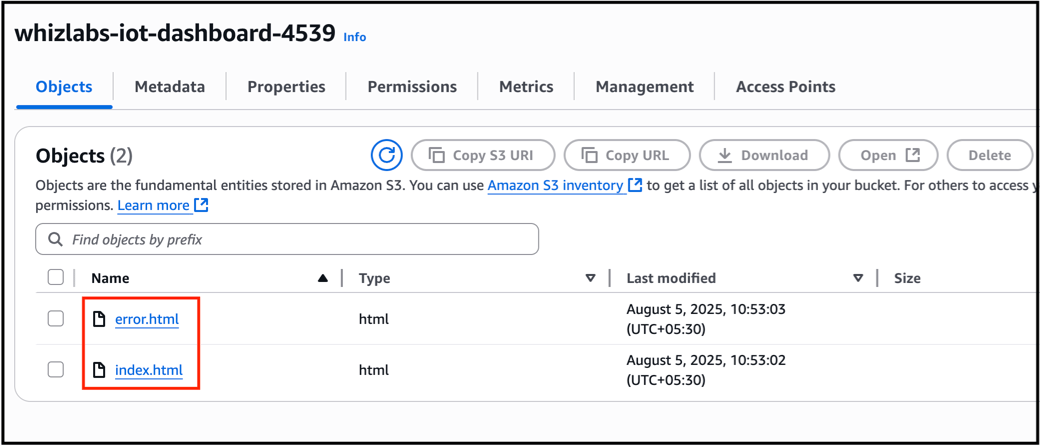
- The next step is to download the zip file by clicking on the replace the le html_file, extract it, and upload two files named index.html and error.html to the S3 bucket you created earlier.
- To configure your S3 bucket, access the Permissions tab and make the necessary configurations.
- In the Permissions tab, Click on the Edit button beside the Bucket Policy.
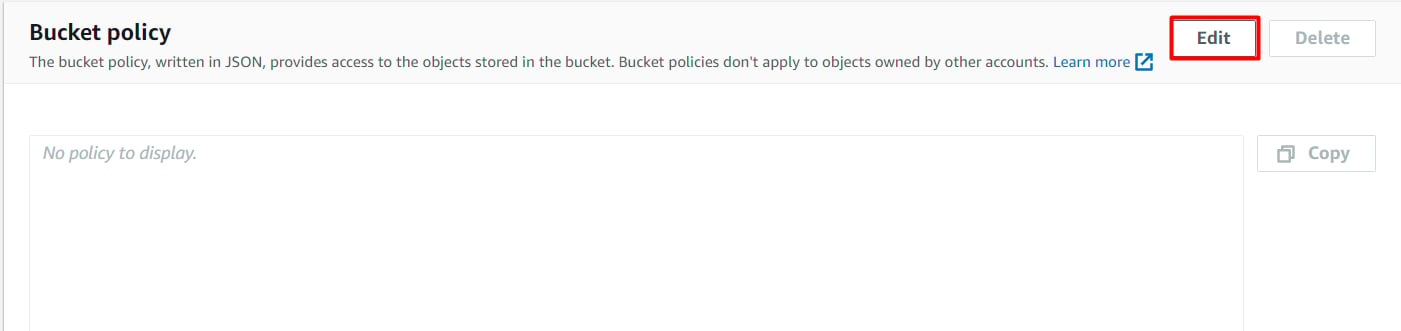
- You will be able to see a Blank policy editor.
- Before creating the policy, you will need to copy the ARN (Amazon Resource Name) of your bucket.
- Copy the ARN of your bucket to the clipboard. It is displayed at the top of the policy editor. it will look like ARN:“arn:aws:s3:::your-bucket-name”.
- In the policy below, Update the bucket ARN on the Resource key value and paste the below policy code in the editor.
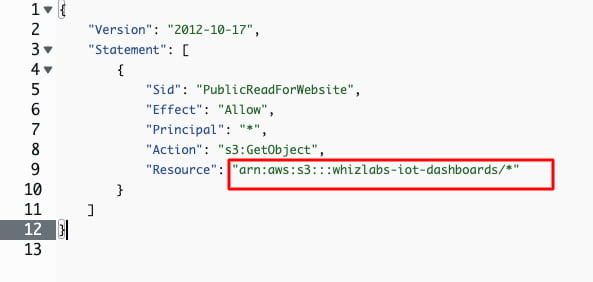
Note : Ignore if any error popped up.
- Click on Save changes button.
Task 8: Create a Lambda Function
In this task, we are going to create a Lambda function which is used to process the device messages.- Navigate to the services menu at the top, then click on Lambda under the Compute section.
- Click on the Create a function button.
- Choose: Author from scratch.
- Function name: Enter “WhizFunction”
- Runtime: Select Python 3.13
- Architecture : x86_64
- Click “Change default execution role” -> choose “Use an existing role”
- Select “Lambda_role_ xxx”
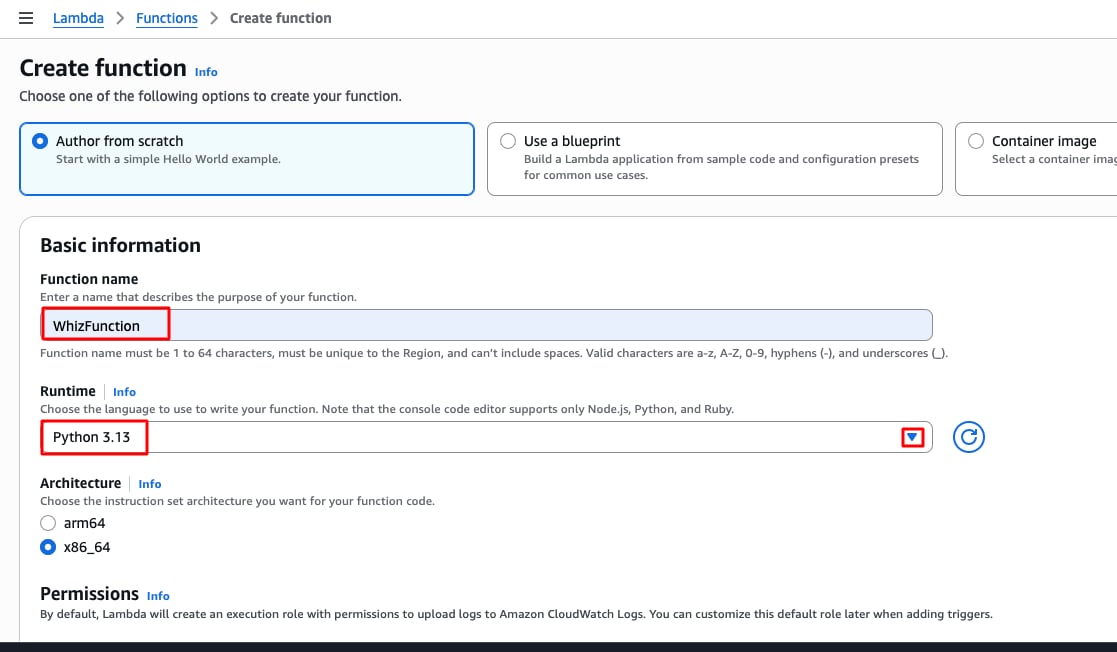
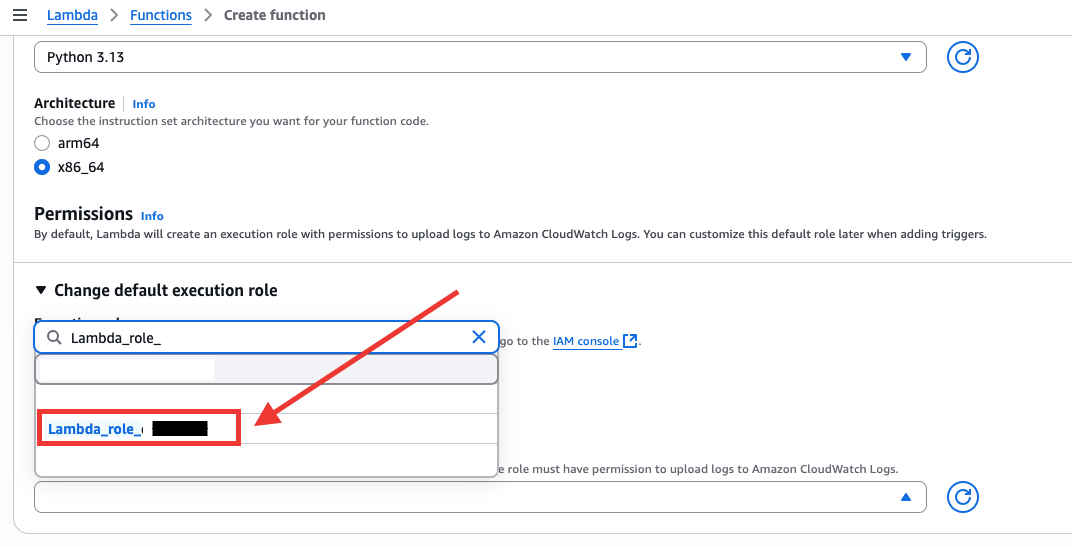
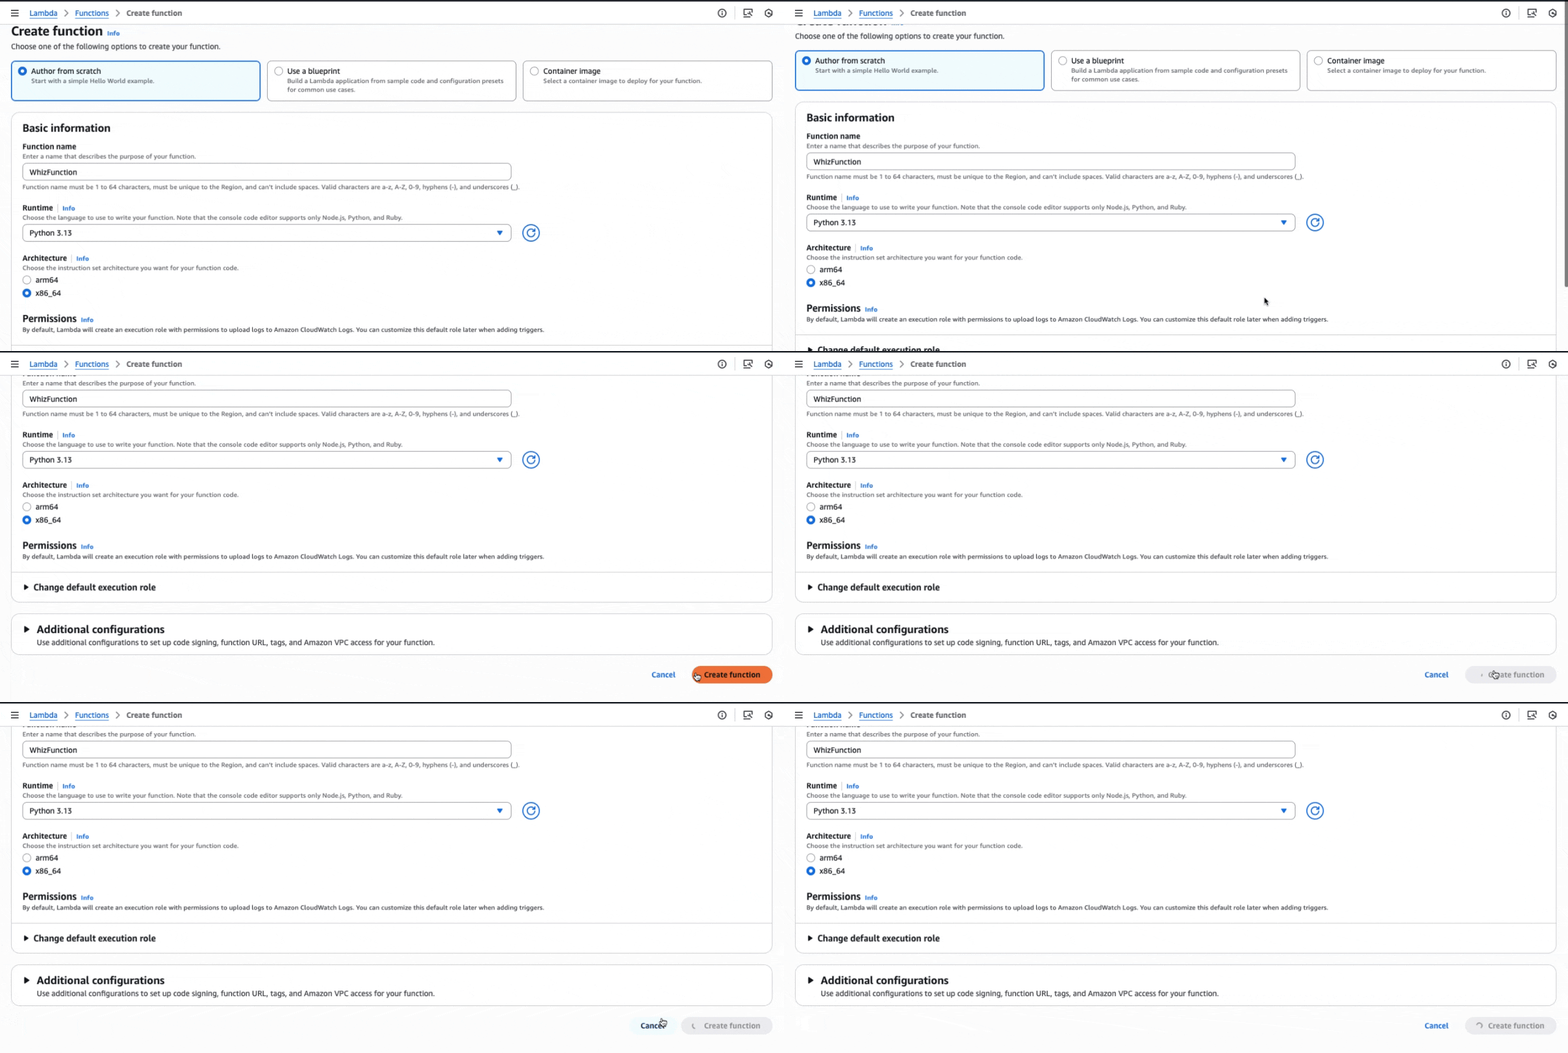
- Leave other fields as default and click on Create function button
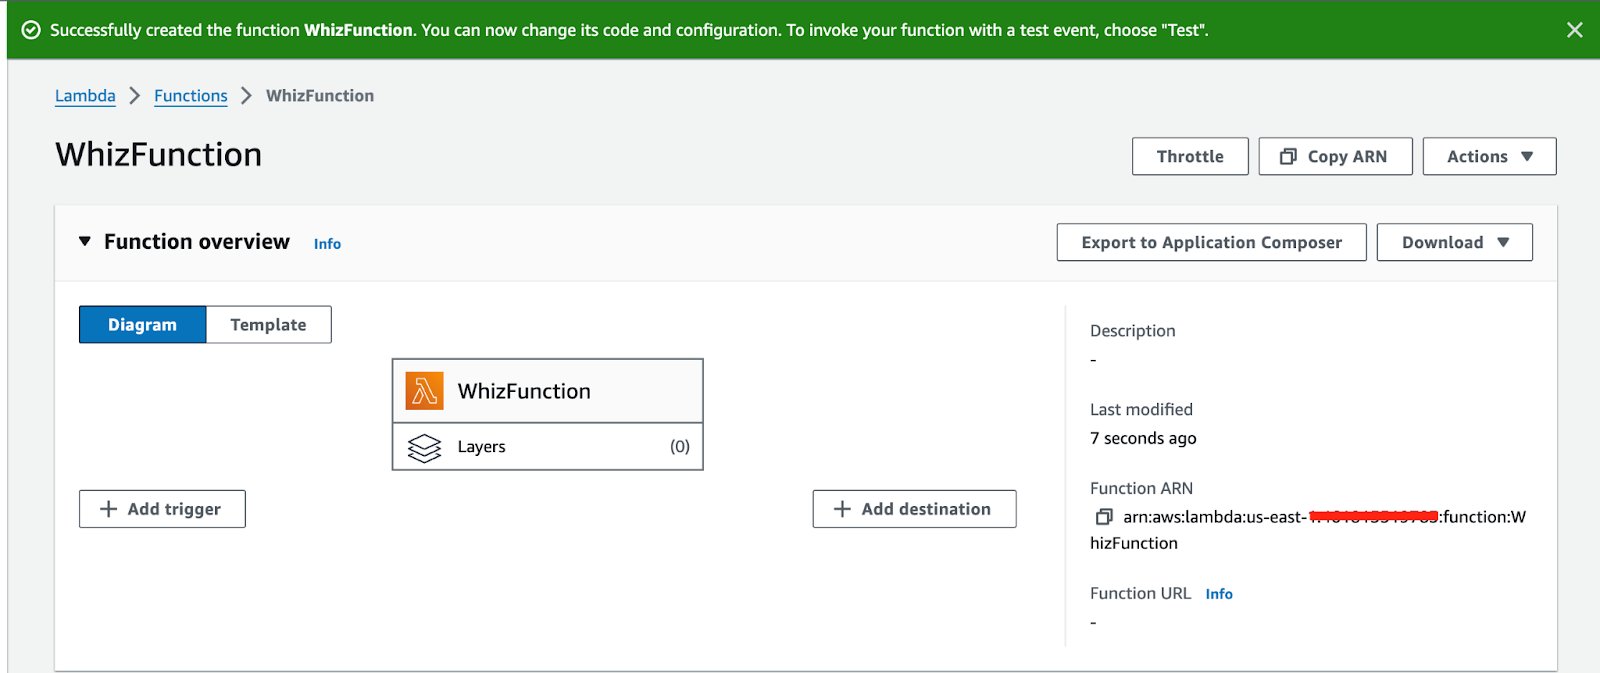
- If you scroll down a little bit, you can see the Code source section.
- Remove the existing code in AWS lambda lambda_function.py Copy the below code and paste it into your lambda lambda_function.py file.
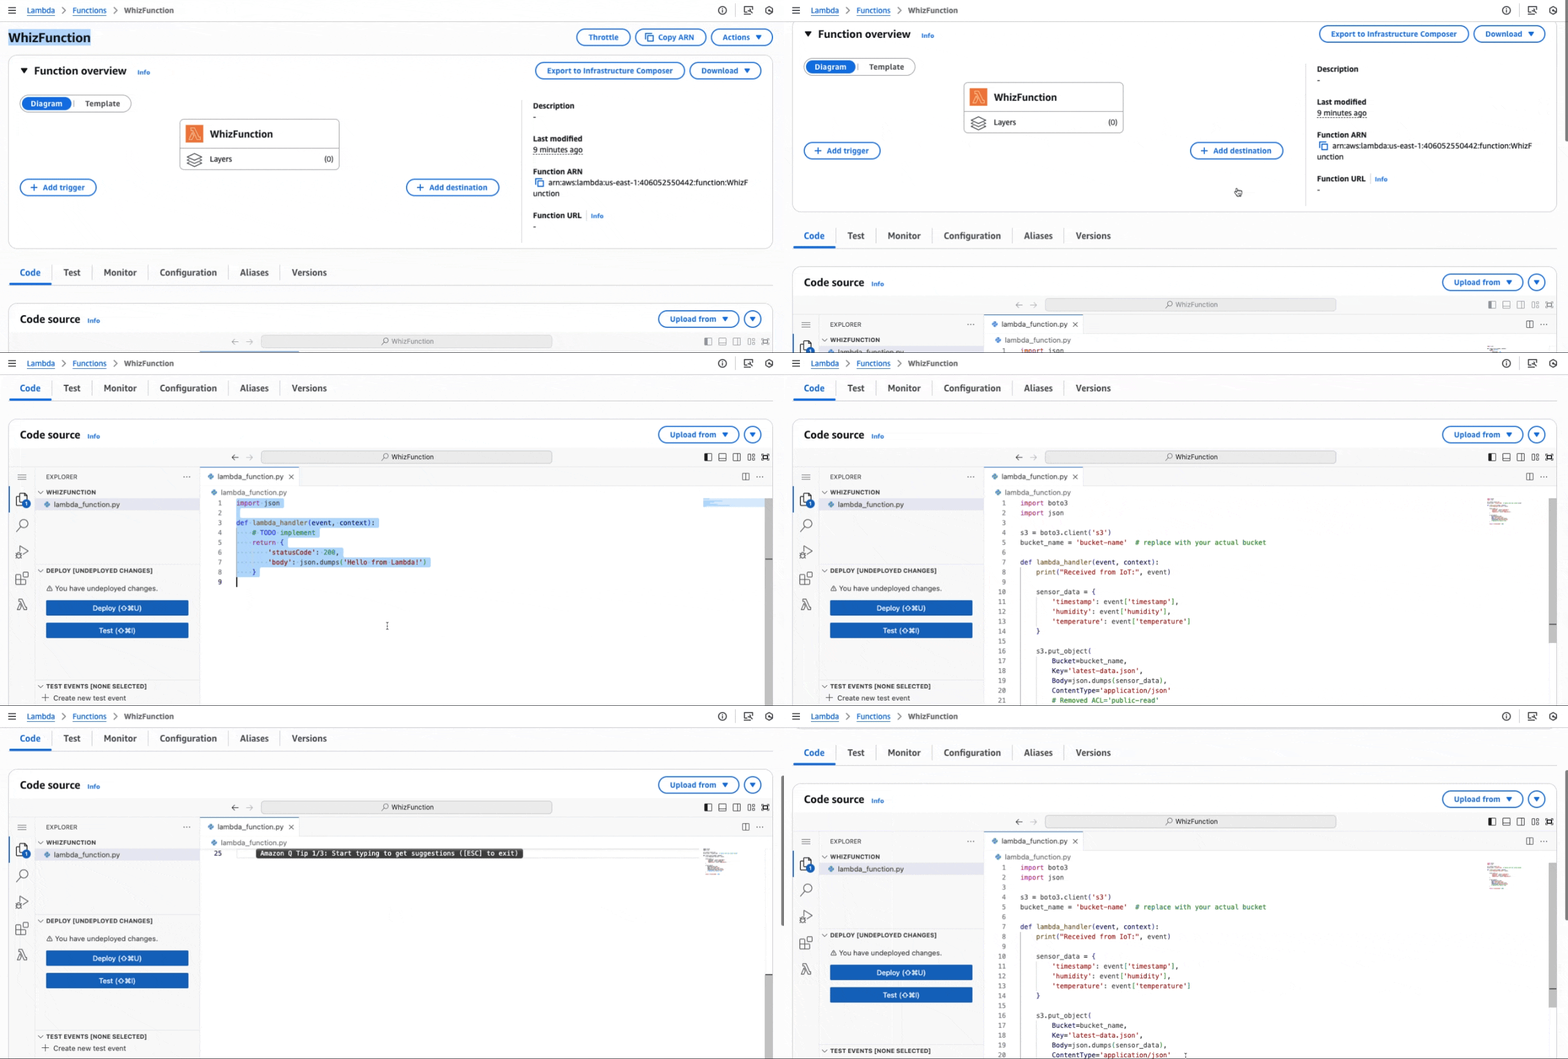
Code here:
- Replace the bucket name.
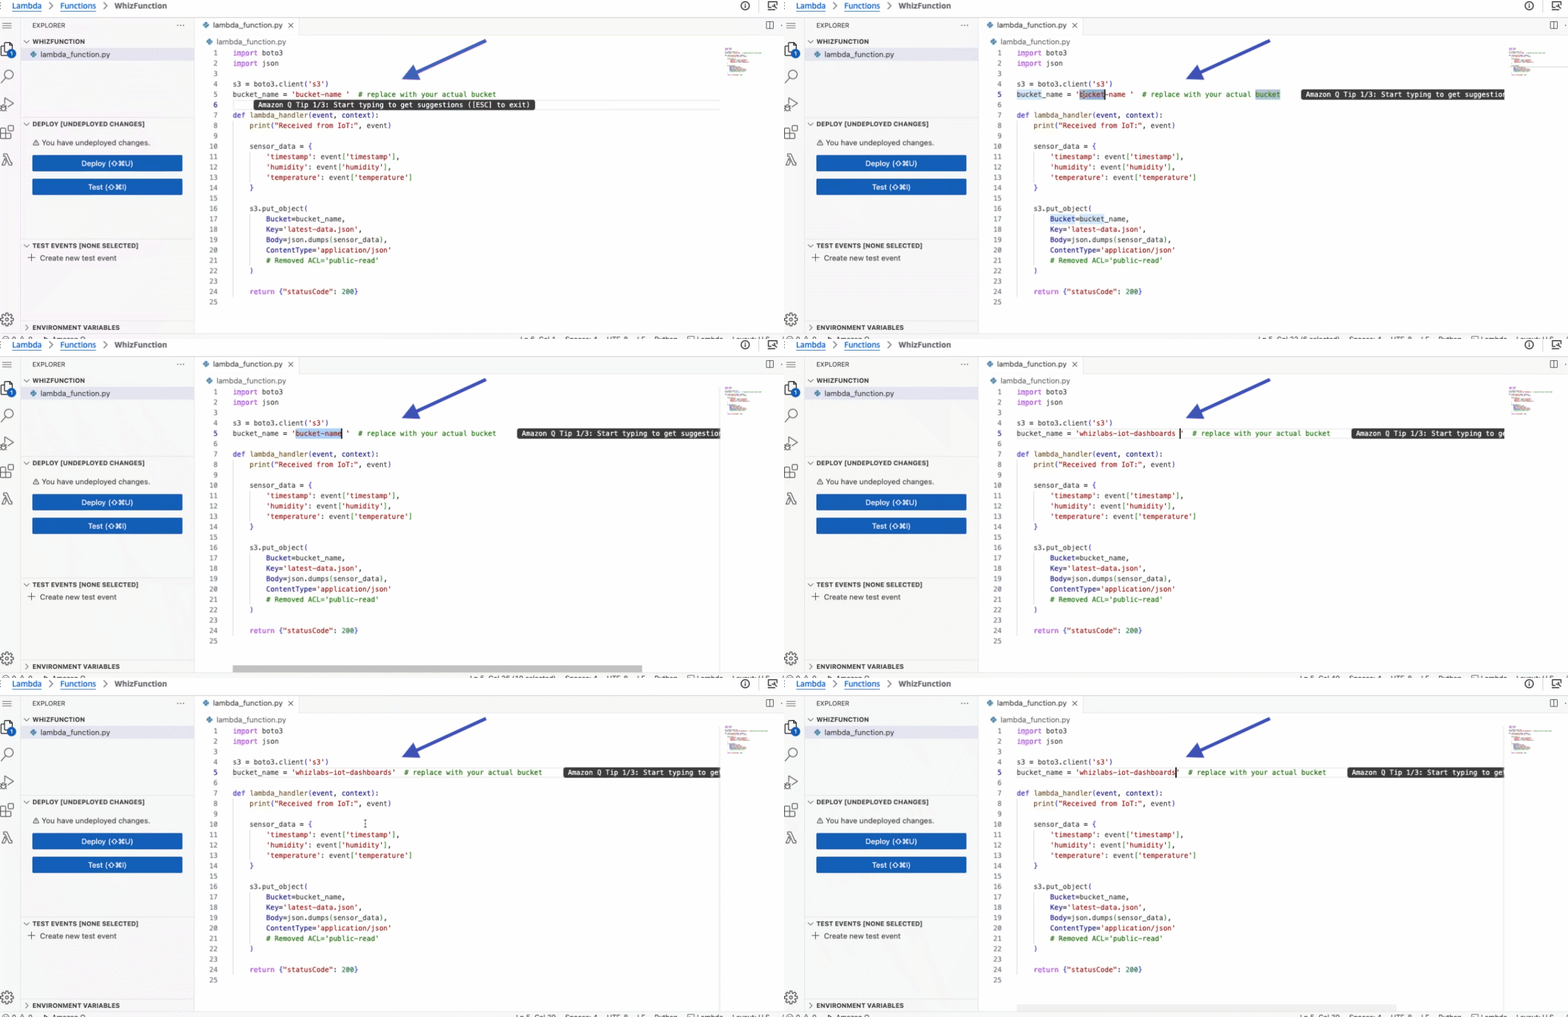
- Save the function by clicking on Deploy button.
Task 9: Create an IoT Core rule
In this task, we will create an AWS IoT rule which will call Lambda function to process the messages from the device to AWS IoT core.- Open the IoT Core console on the left side menu click on Rules under Message routing.
- Click on Create rule button.
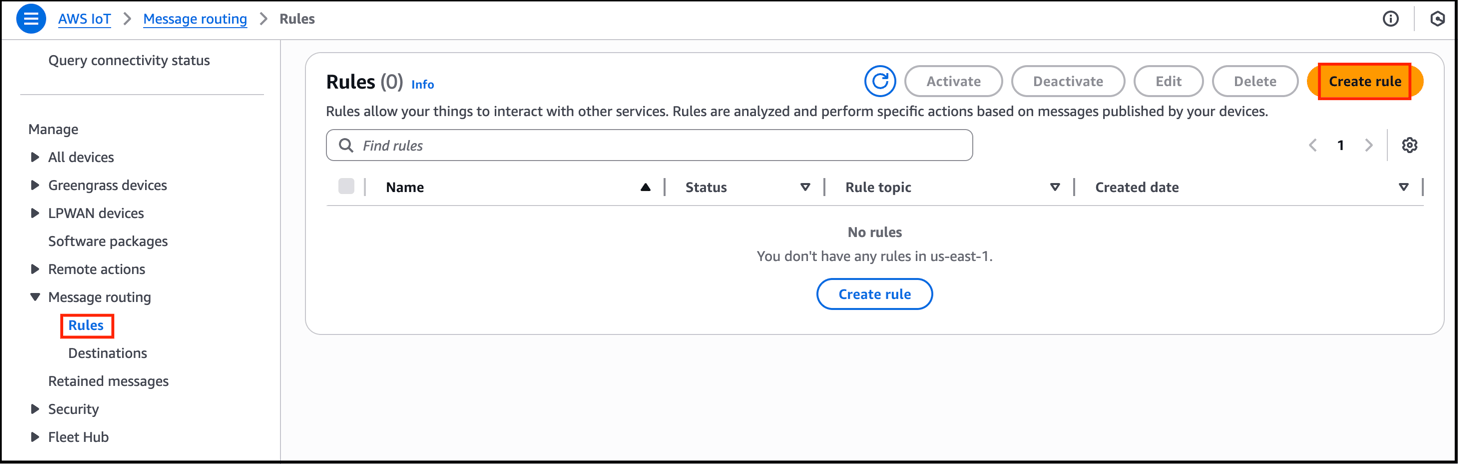
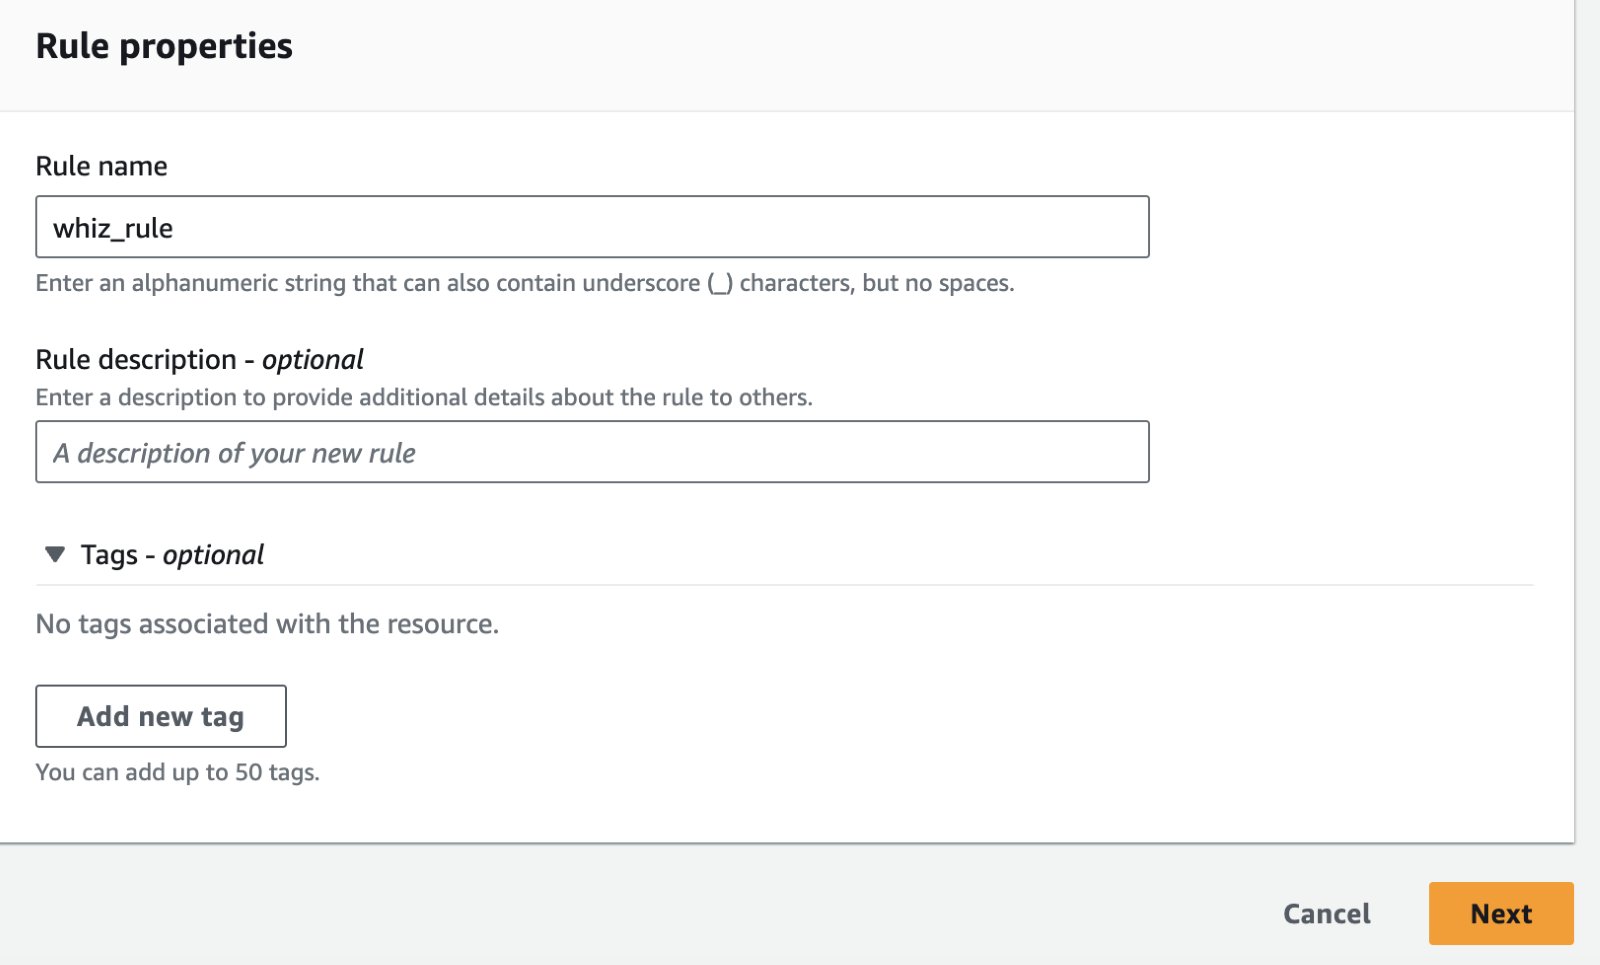
- For Rule name: Enter whiz_rule and click on Next button.
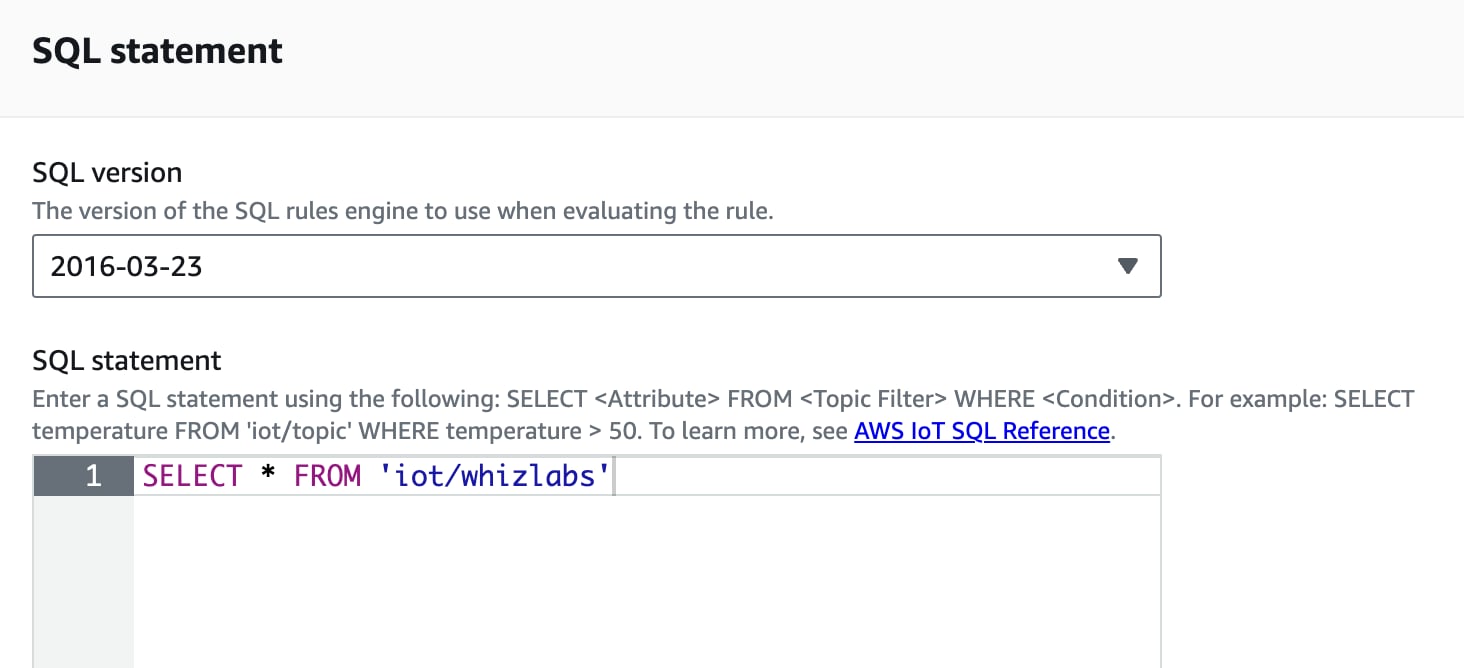
- For the SQL Query Statement copy paste the below sql statement and click on Next button.
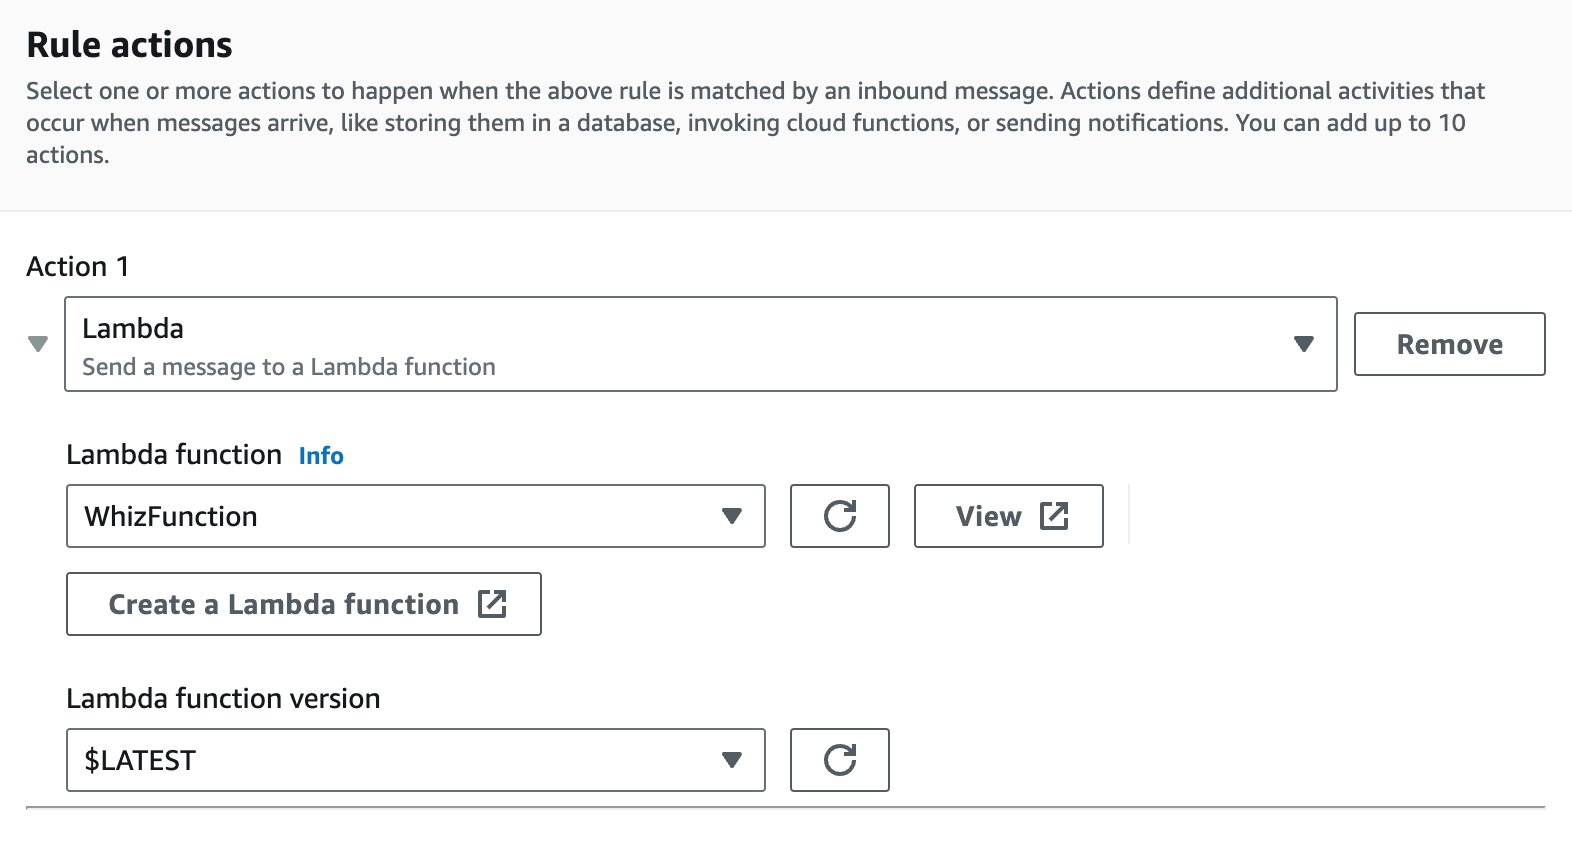
- Now to Attach rule actions search for Lambda and select Lambda action.
- For Lambda function: Select WhizFunction
- Lambda function version: Select $Latest
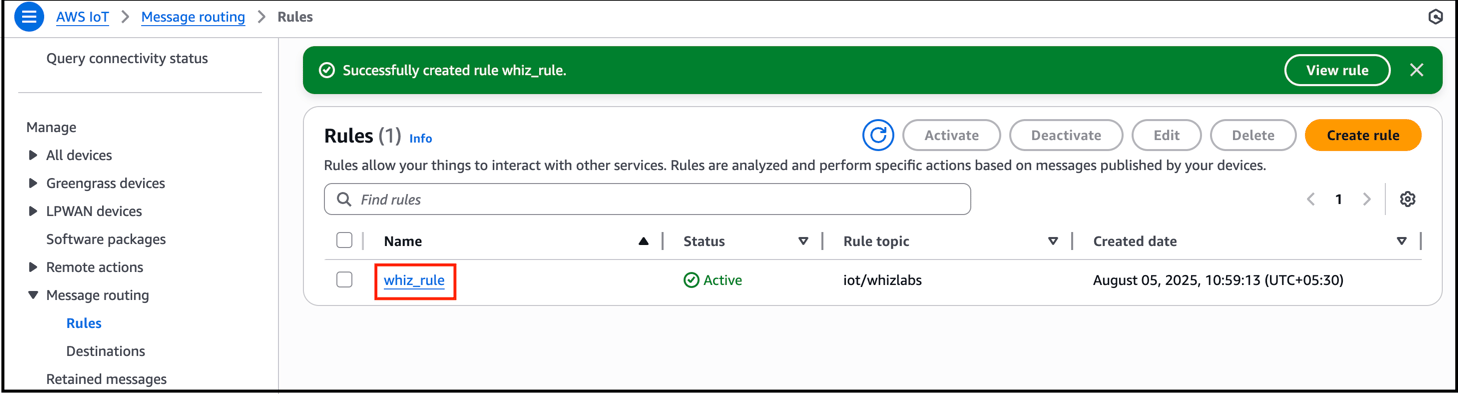
- Review all the details and click on Create button.
Task 10: Check IoT messages in the AWS IoT Core test client
In this task, we will test message sending and receiving using the MQTT client in the AWS IoT Core dashboard.- On the AWS IoT Core console, click on MQTT test client and Click on the Subscribe to a topic tab.
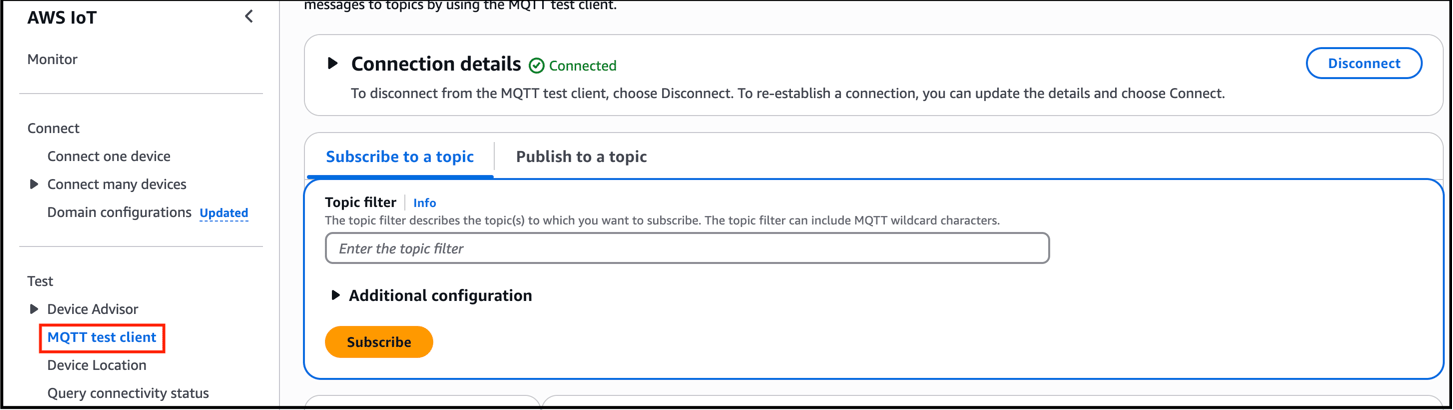
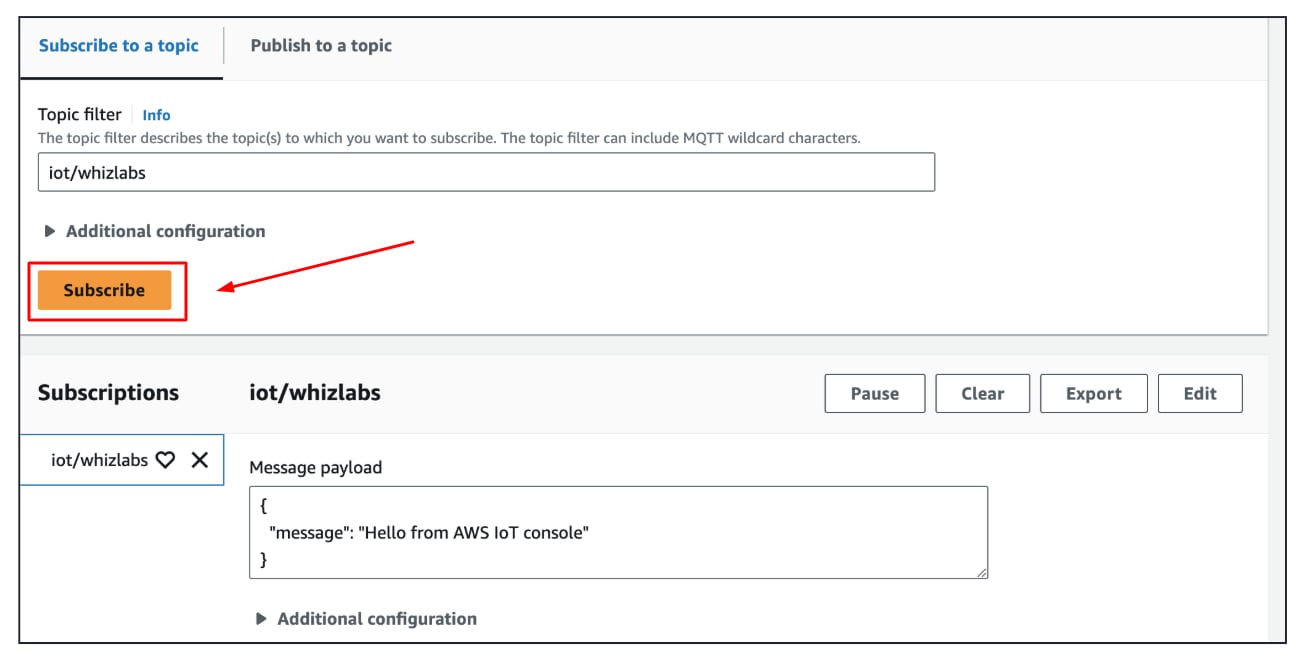
- For topic filter : Enter iot/whizlabs and click on Subscribe button.
- Scroll down to view the subscription.
- Now, click on Publish to a topic tab.
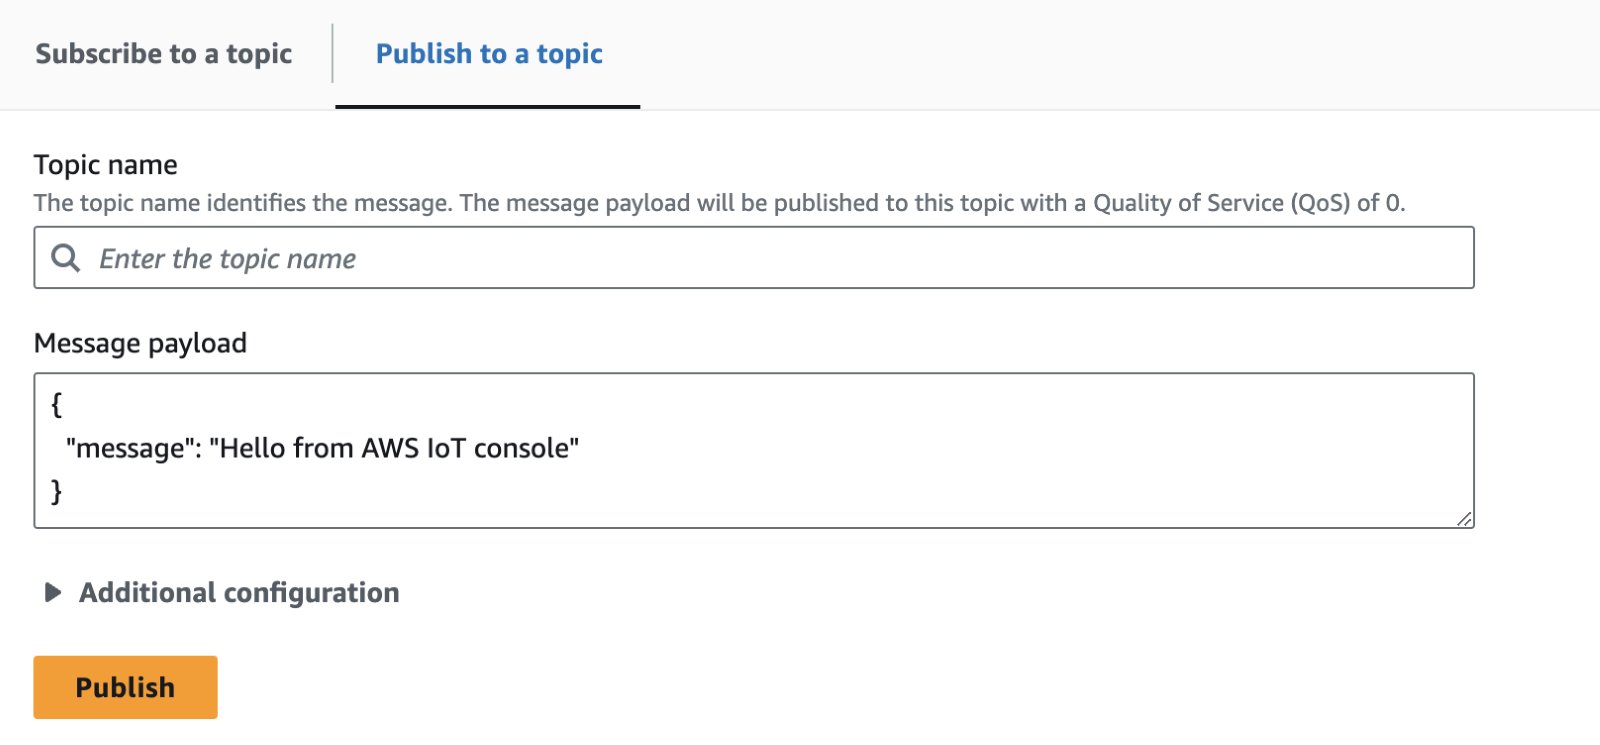
- For Topic name: Select iot/whizlabs
- For the the Message payload copy paste the below message and click on Publish button.
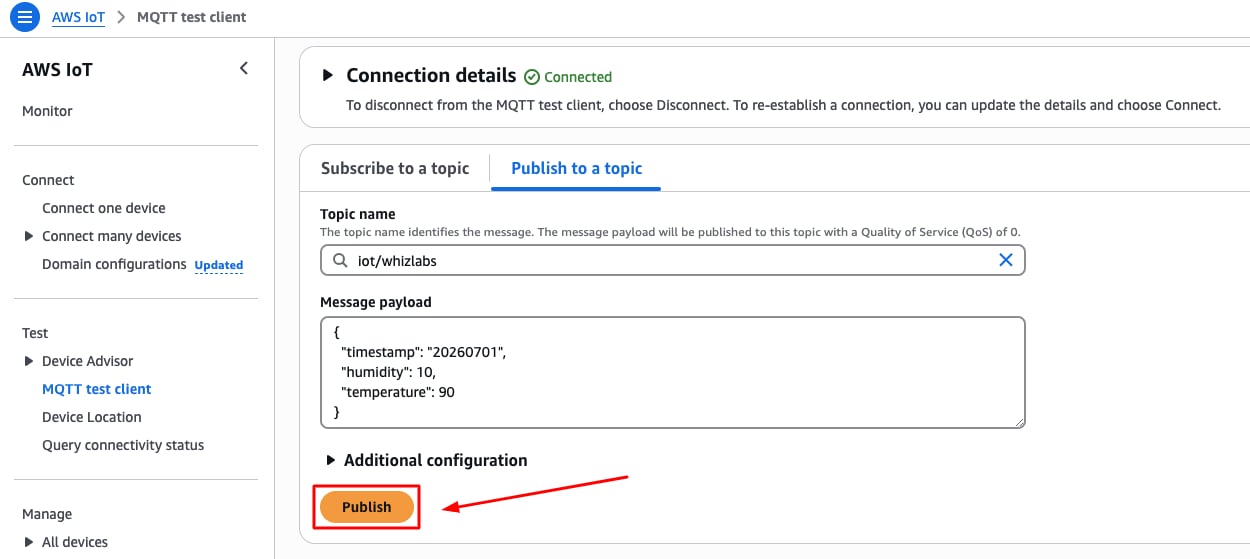
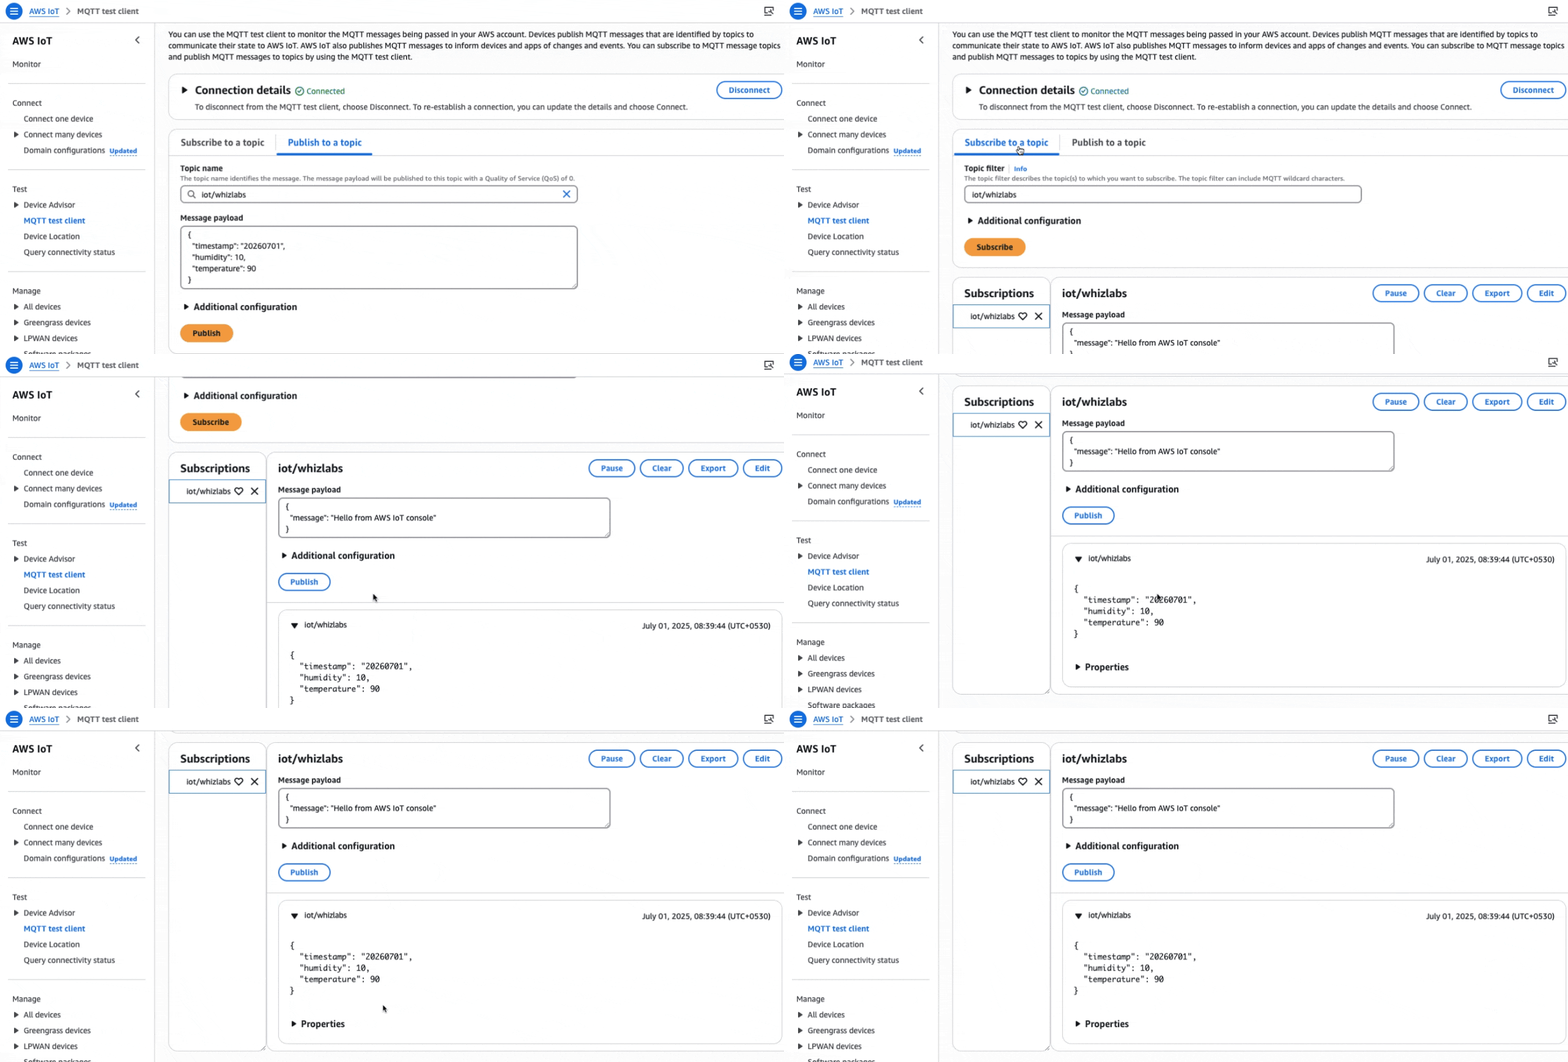
- You will see the incoming messages displayed in real time as they are published.
Task 11: Run the wokwi code and check AWS IoT Core test client
- Open the aws_iot_core folder, then navigate to the src directory and open the main.cpp file. Wait 2–3 minutes
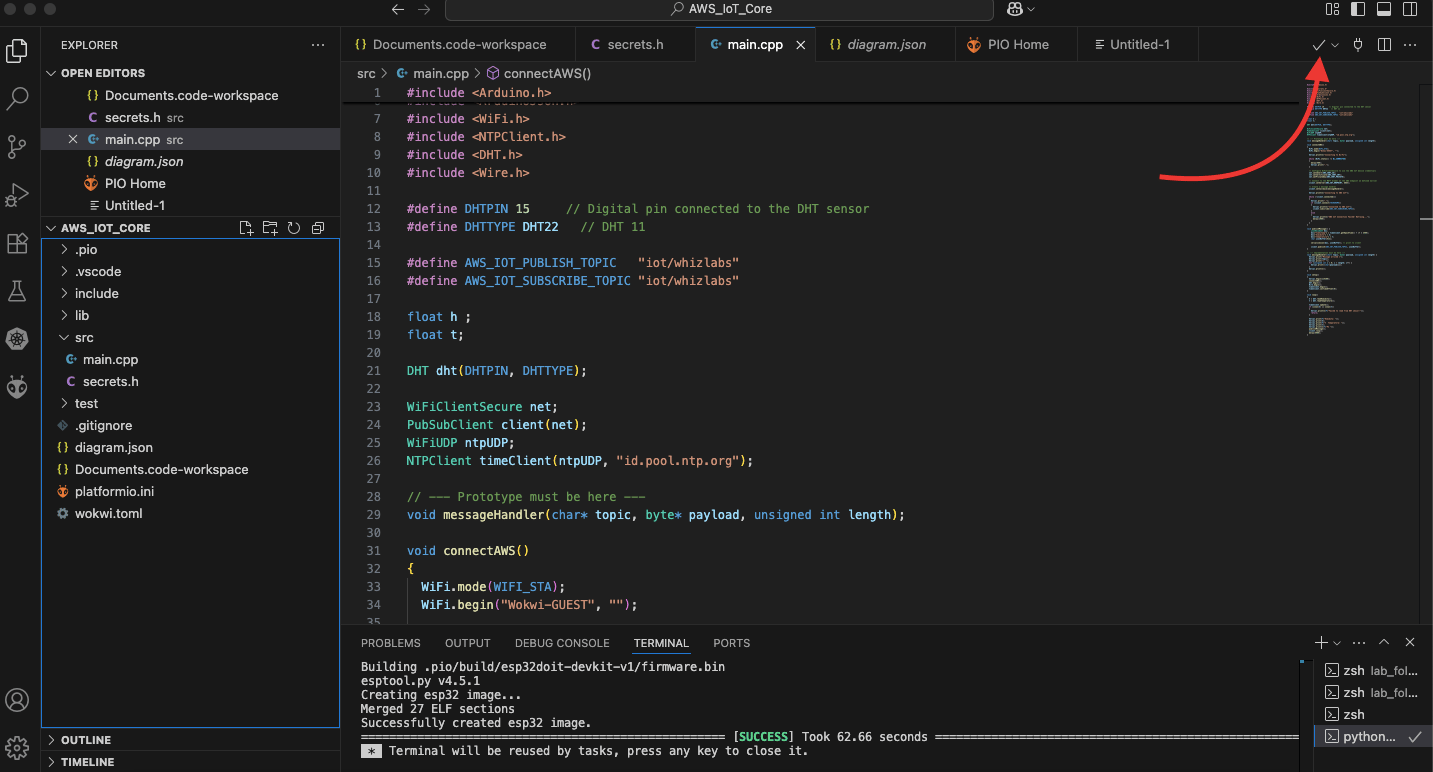
- To compile the code, click the checkmark button in the top right corner.
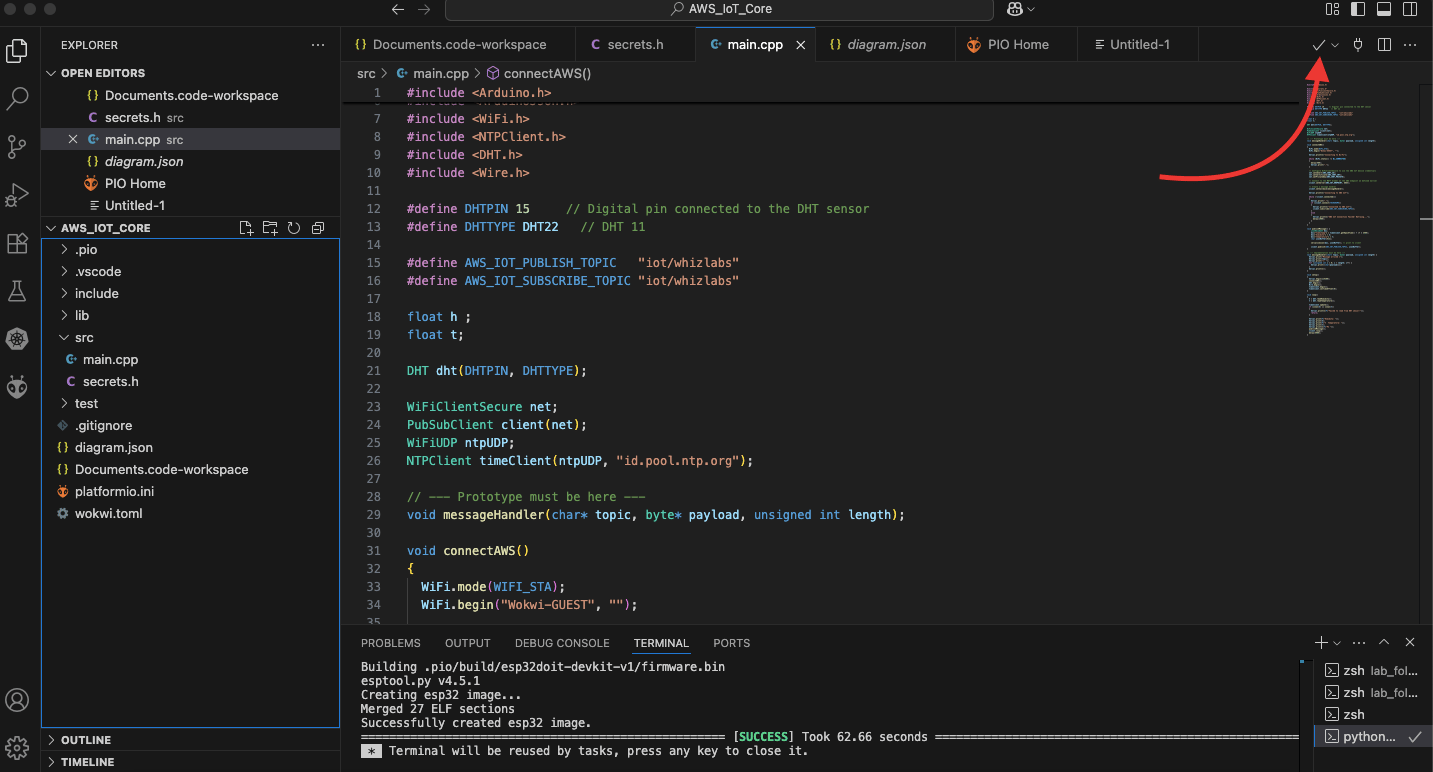
- Once the code compiles successfully, open the diagram.json file.
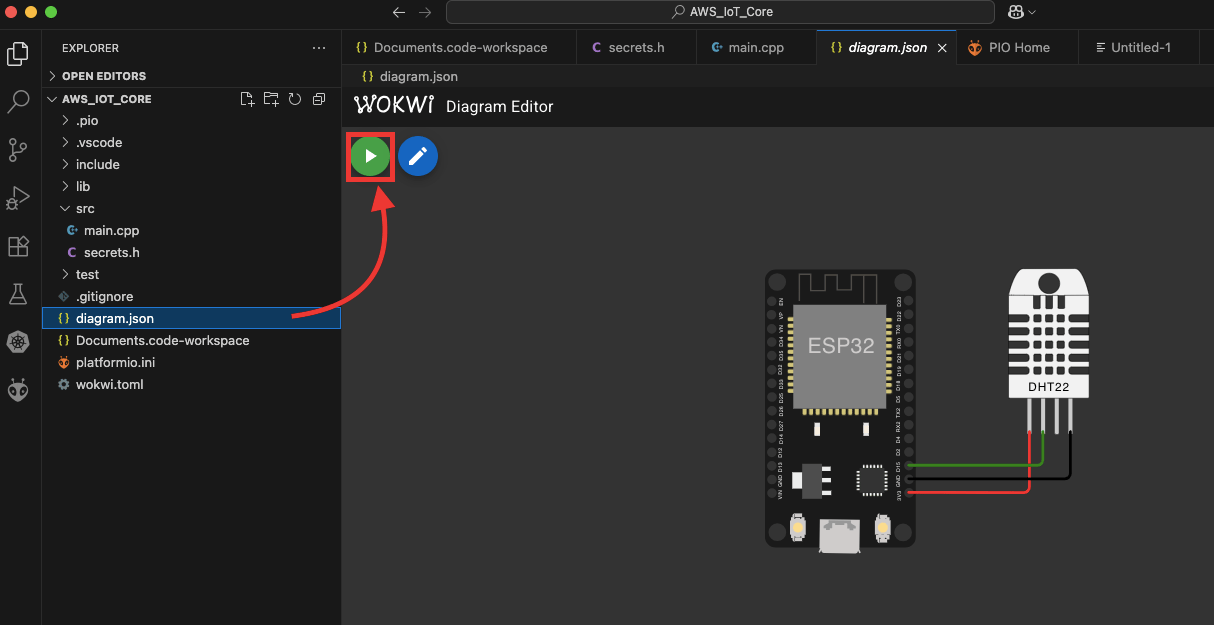
- Click the “Run” button. Please wait 2–3 minutes, as it may take some time to connect to AWS IoT Core.
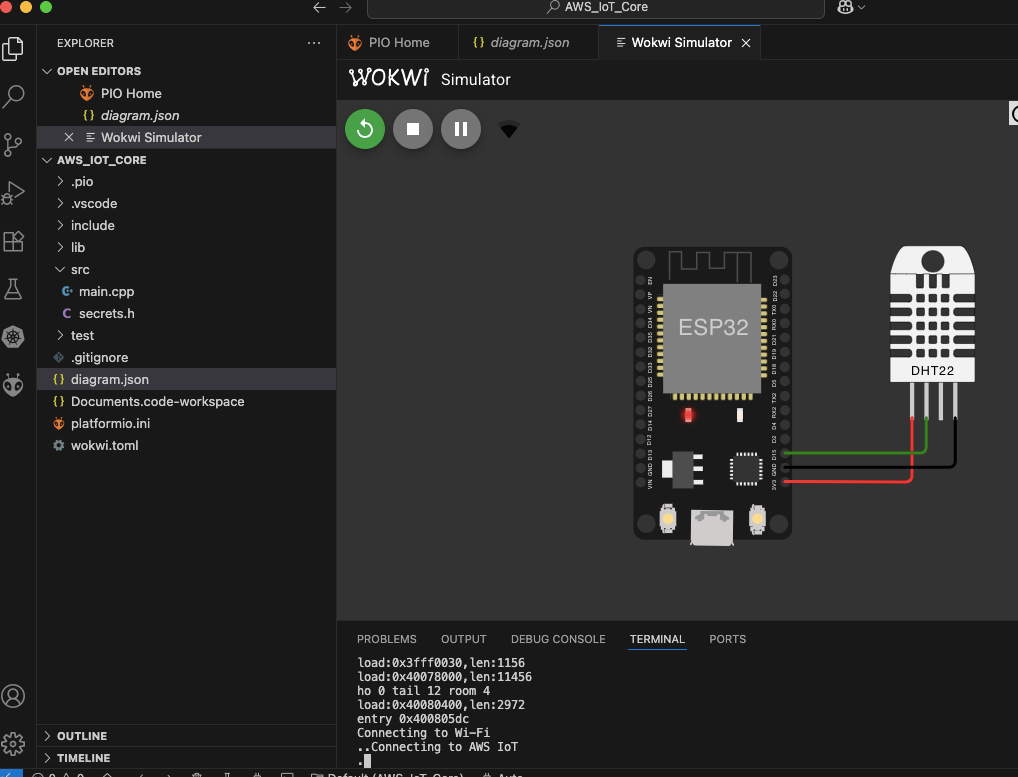
- Once successfully connected, the device will start sending data in JSON format.
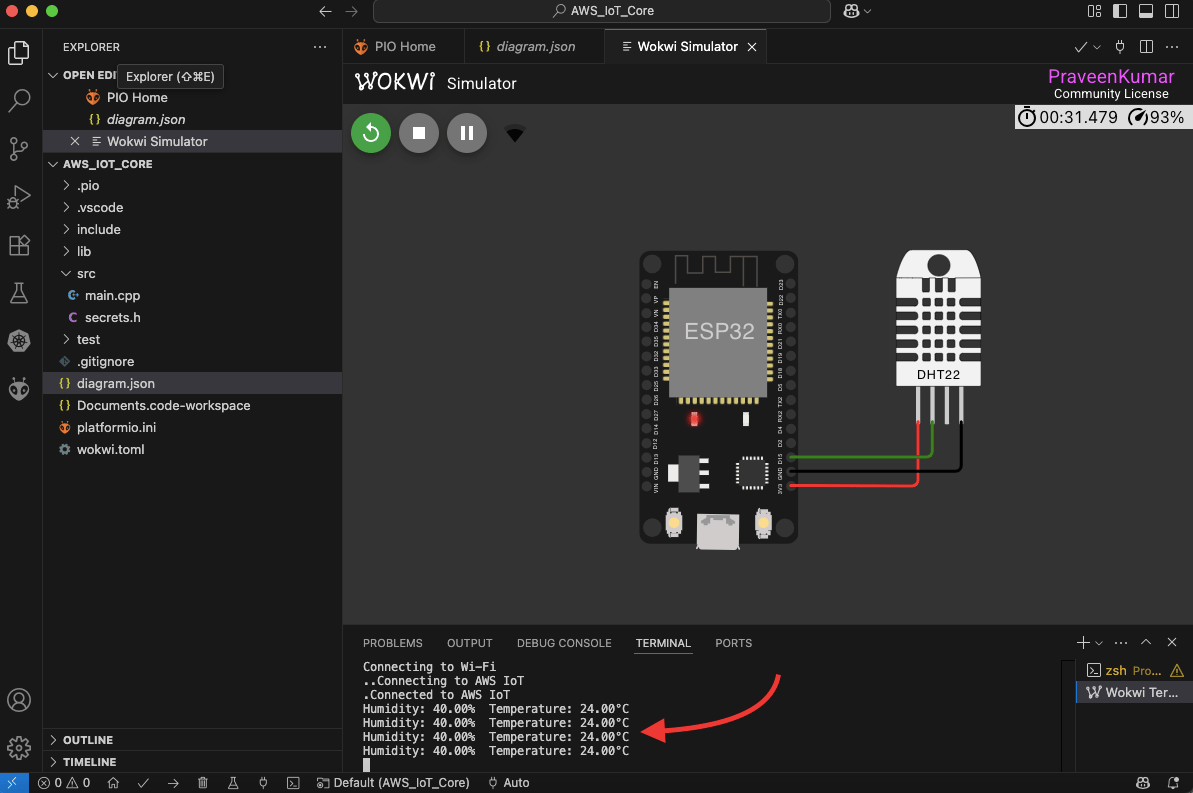
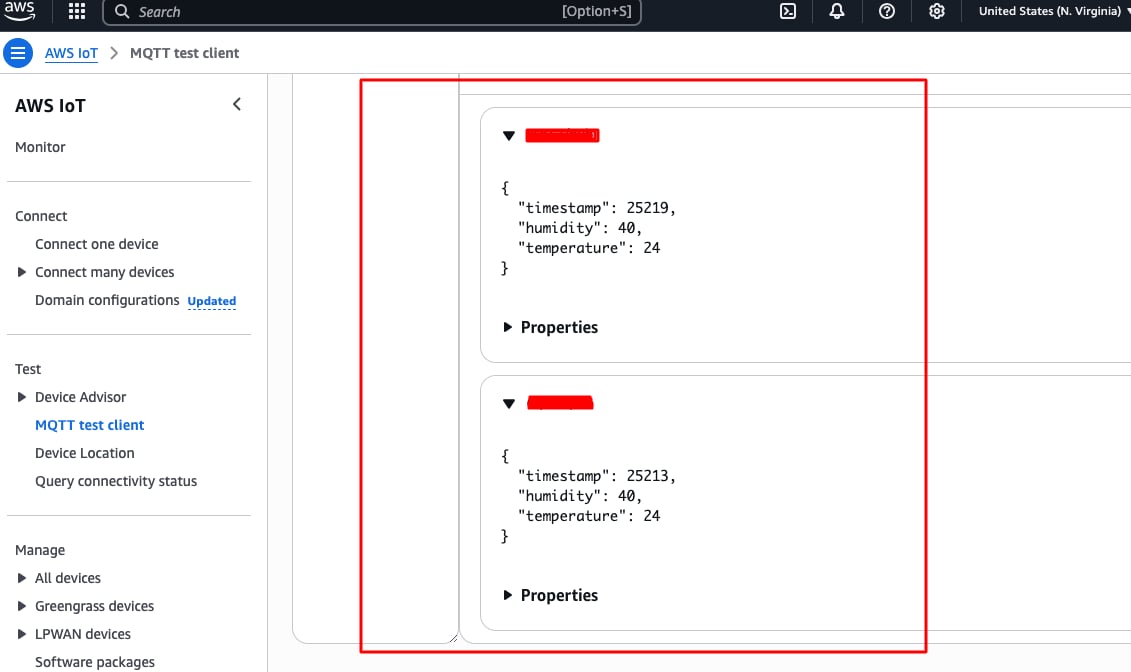
- To verify the data is being sent, go to the AWS IoT Core MQTT test client.
- In the “Subscribe to a topic” tab, enter the topic used in your code (e.g., iot/whizlabs) and click Subscribe.
- You will see the JSON-formatted messages appear in real time — this confirms successful data transmission from your device to AWS IoT Core.
Task 12: Check the live website and ensure data updates in real time
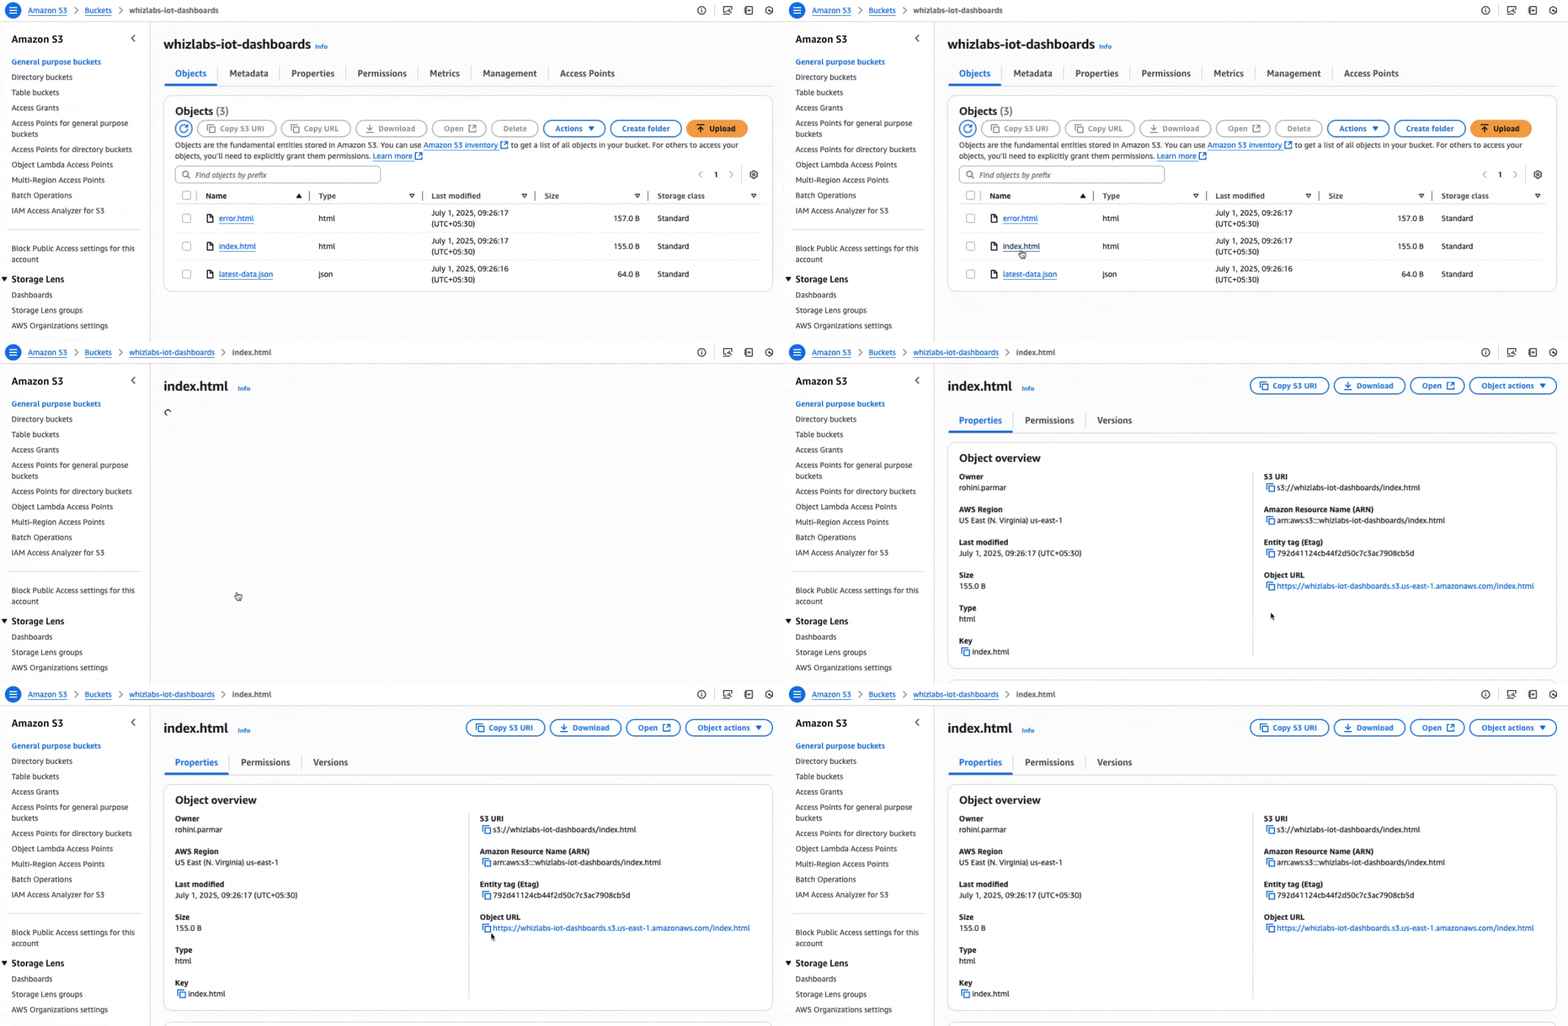
- Go to the S3 bucket where your files are stored. Click on the index.html file to open its details.
- Copy and click the “Object URL” from the file overview section — this is the public link to access the web page (if permissions allow).
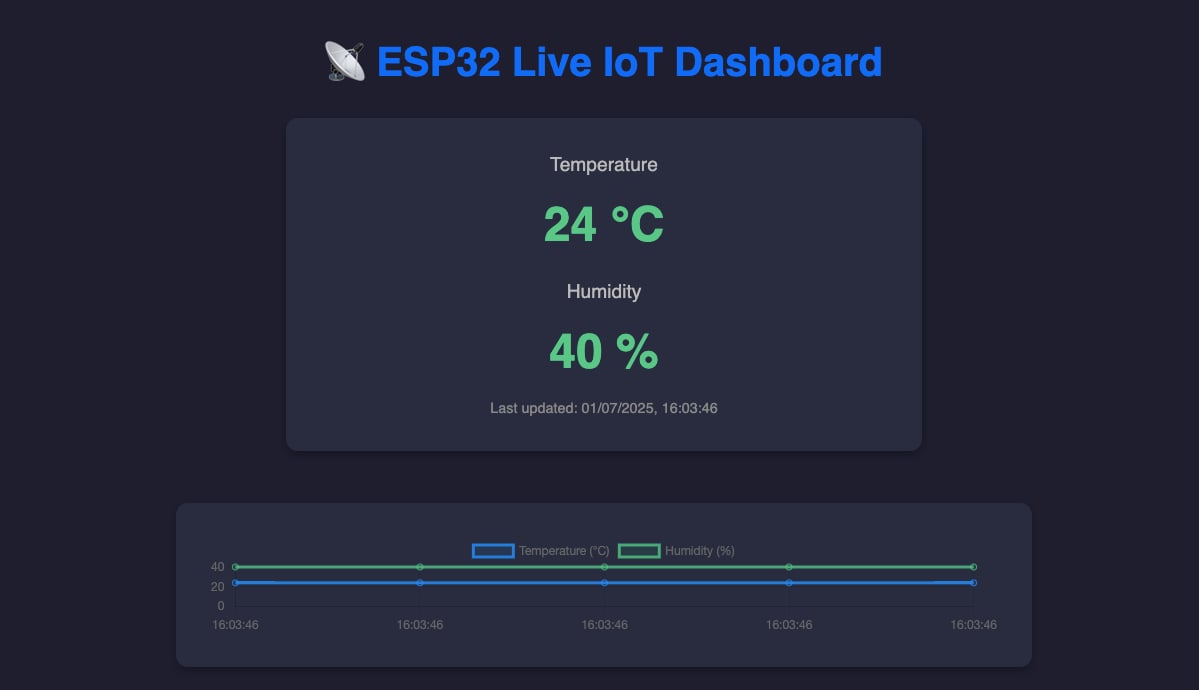
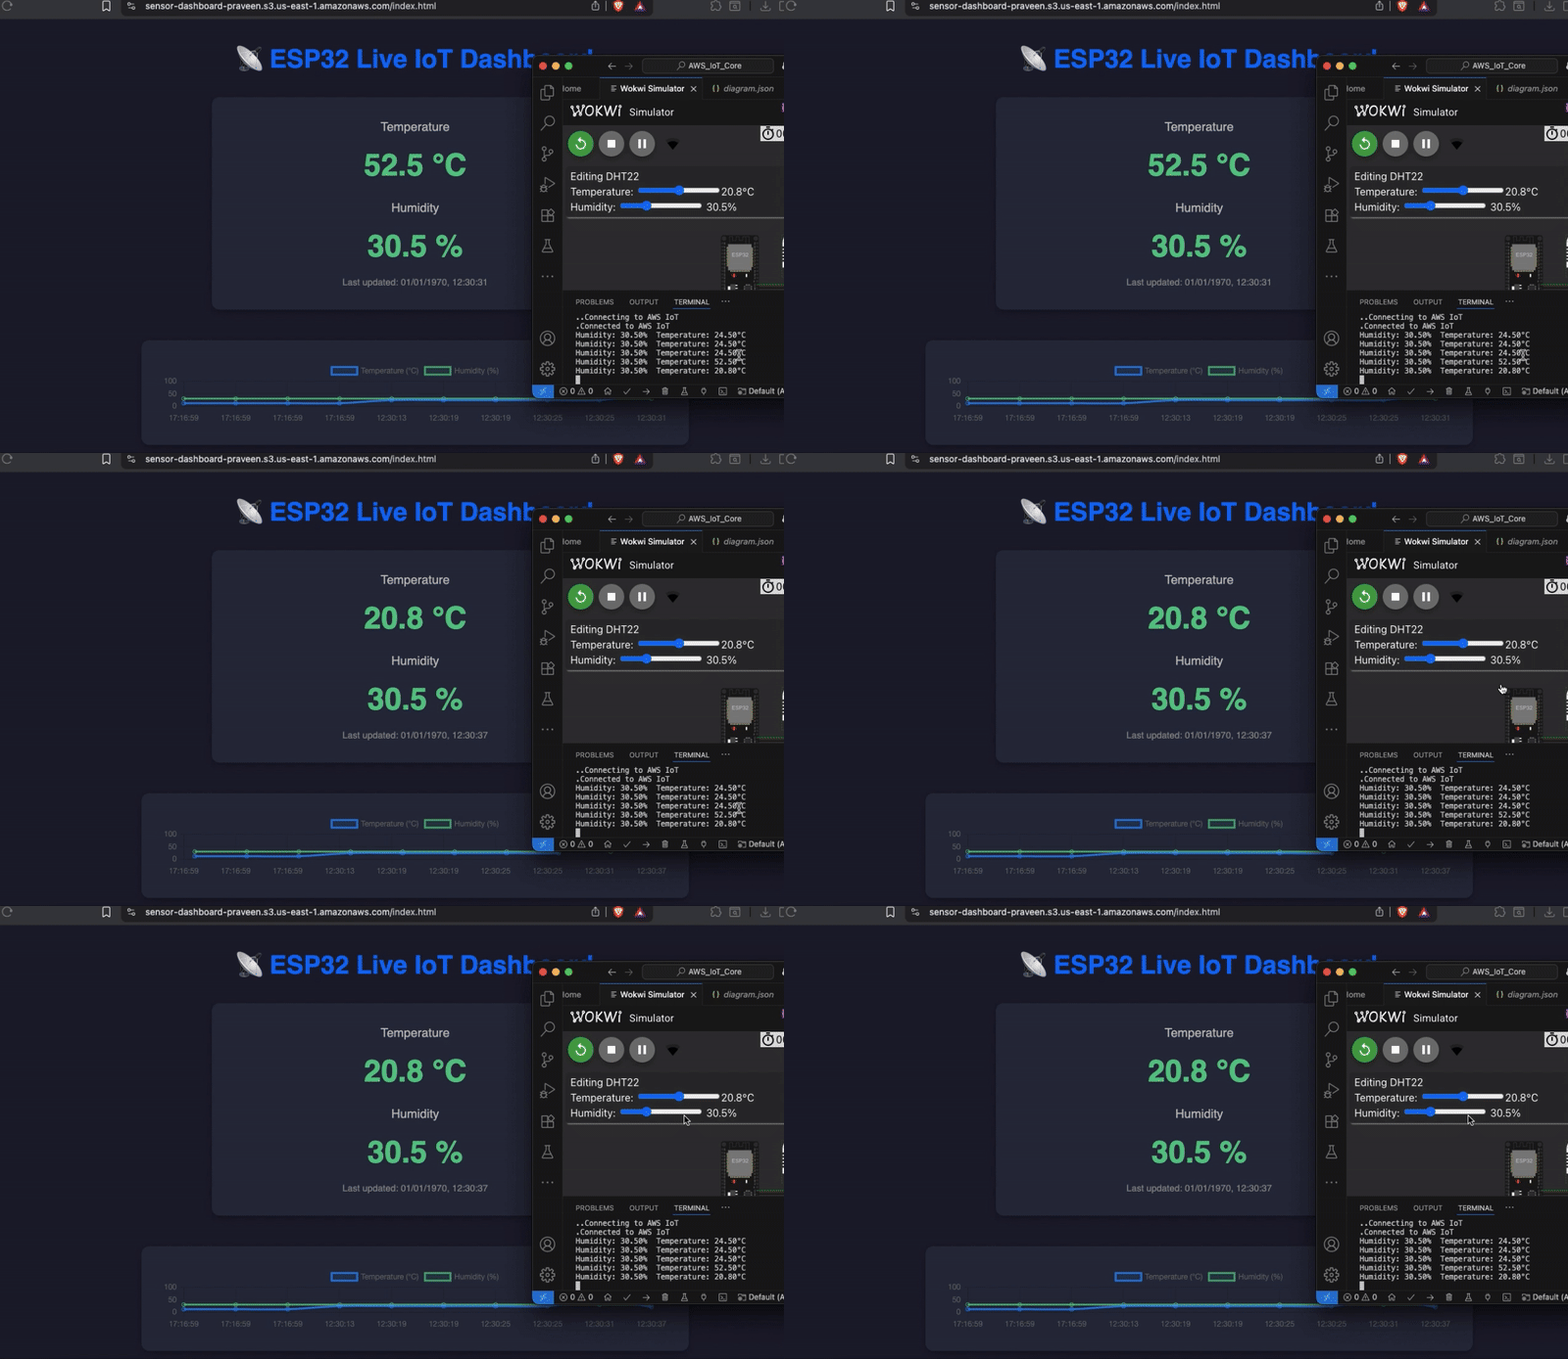
- The index.html file will open as a webpage. You should now see your hosted web content rendered in the browser.
- Click to change the value from the sensor . (vscode)
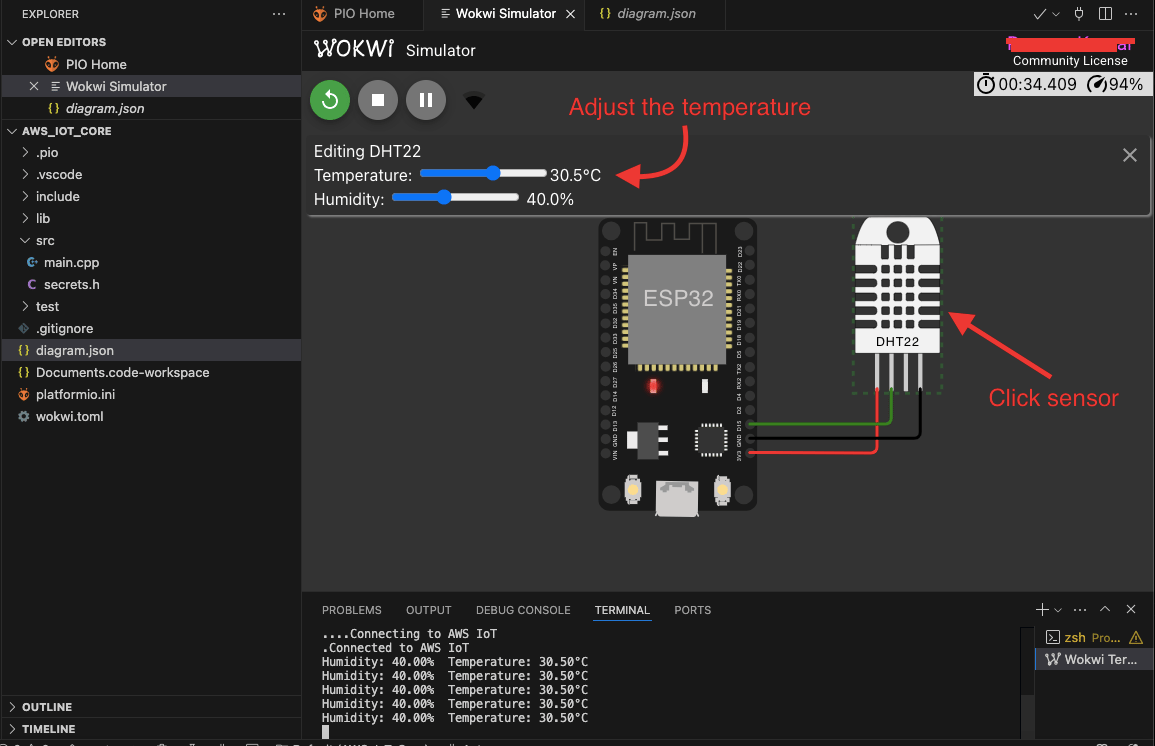
- The updated data will be sent through AWS IoT Core and you will see the values update live on the webpage.
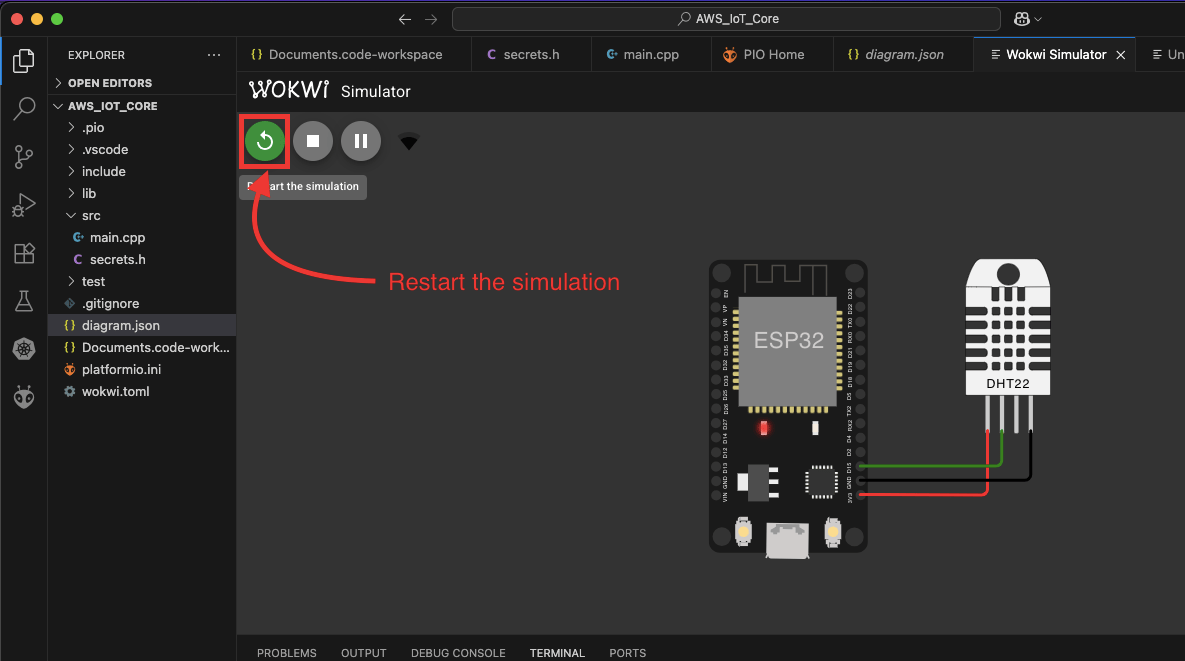
- If the data does not update on the webpage, try rerunning the Wokwi simulator. After restarting, wait for it to reconnect to AWS IoT Core, and the live data should begin updating again.
https://labresources.whizlabs.com/d4af9350a40053467c4d40549623c9a7/chrome-capture-2025-8-5\_37\_26.gifDo You Know?
“ AWS IoT Core can handle billions of messages from millions of devices simultaneously — and route them to AWS services like Lambda, S3, DynamoDB, or even Machine Learning models in real time. It uses MQTT, HTTP, and WebSocket protocols, making it flexible for different types of IoT devices — from microcontrollers to complex edge systems. ”
Completion and Conclusion
- You have successfully created an IoT Policy
- You have successfully created an IoT Thing
- You have successfully created a Wokwi simulation dashboard using VS Code.
- You have successfully created a Lambda Function.
- You have successfully created an IoT Rule.
- You have successfully created and launched an Amazon S3 bucket.
- You have successfully configured the bucket to host a static website.
- You have tested your static website to make sure it works correctly.
End Lab
- Sign out of AWS Account.
- You have successfully completed the lab.
- Once you completed the steps, click on End Lab from your IP Lab Portal and wait till the process gets completed.
What gets checked
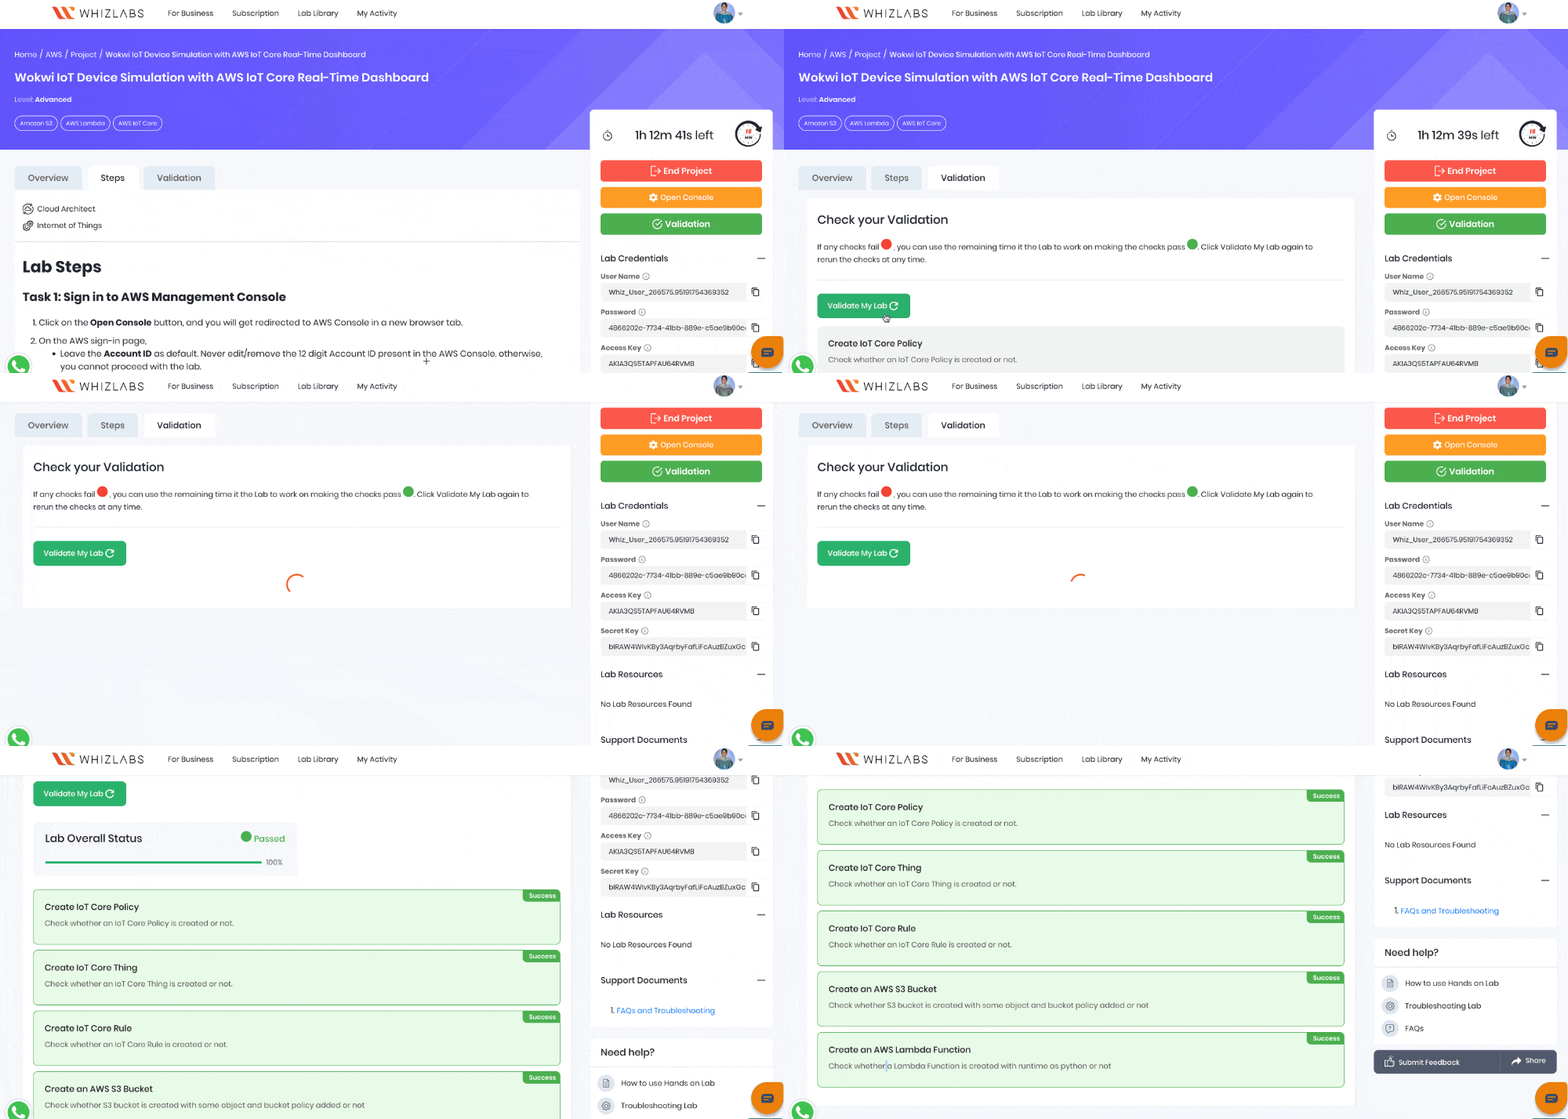
When you press Check my work, the platform verifies each of these:- Create an AWS Lambda Function — Check whether a Lambda Function is created or not
- Create IoT Core Rule — Check whether an IoT Core Rule is created or not.
- Create IoT Core Thing — Check whether an IoT Core Thing is created or not.
- Create IoT Core Policy — Check whether an IoT Core Policy is created or not.
- Create Public AWS S3 Bucket — Check whether a Public S3 Bucket created or not