

Overview
Lab Details
- This lab walks you through the steps to export the RDS DB snapshot to S3.
- In this lab, you will practice creating an Amazon RDS DB Instance, Amazon S3 Bucket, AWS KMS Key.
- Duration: 2 hours
- AWS Region: US East (N. Virginia) us-east-1
Introduction
- All types of RDS Backups can be exported to S3 whether they are Automated Backups, Manual Backups or those created by AWS Backup service.
-
Steps to export to s3:
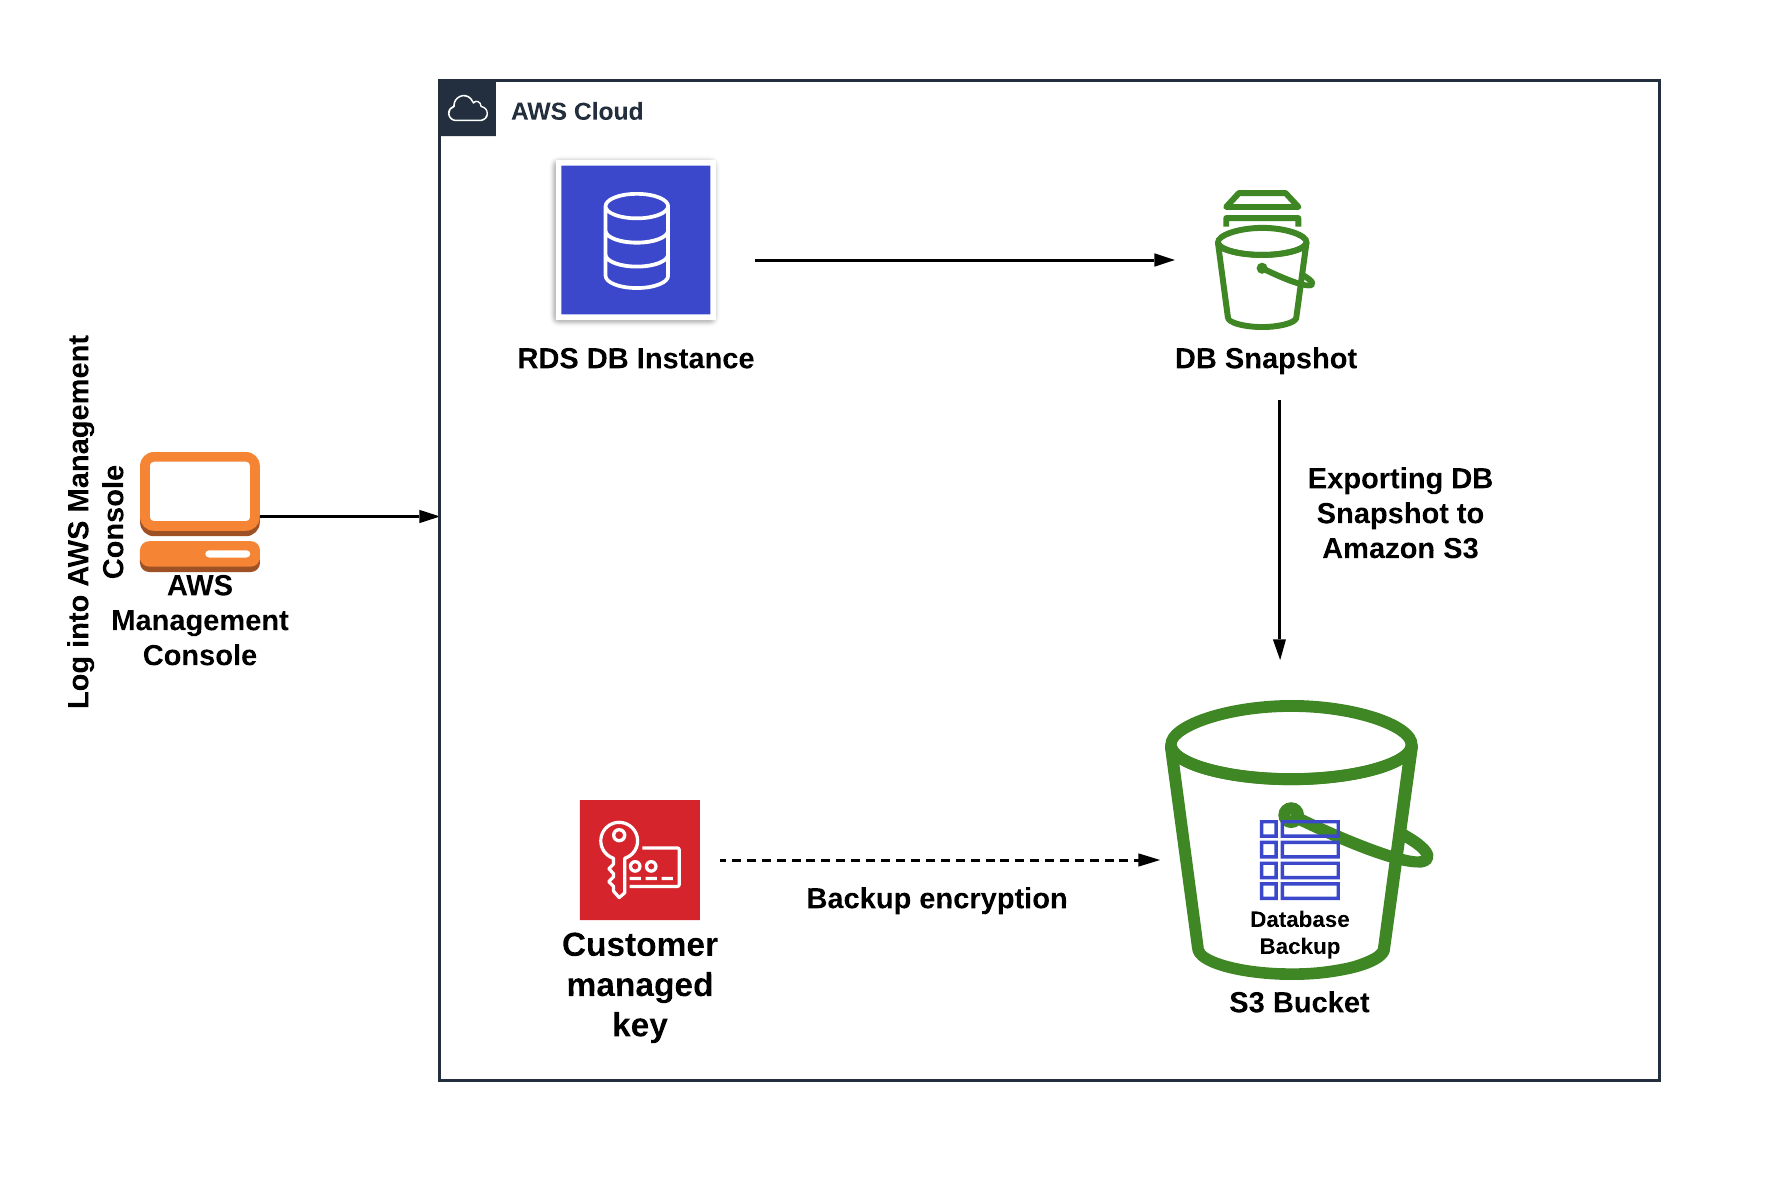
- We have to create an Amazon S3 Bucket with the required IAM permissions and create a KMS key for server-side encryption (SSE).
- The Snapshot can be exported either via Console or CLI commands.
- The Export runs in the background. It does not affect any kind of database performance.
- The data which is exported to S3 is always in the Apache Parquet format. Parquet format is 2 times faster to export and consumes up to 6 times less storage in Amazon S3 compared to test formats.
- The exported data can be analyzed by other AWS services like Amazon Sagemaker, Amazon EMR, and Amazon Athena.
Architecture Diagram
Use cases
- Disaster Recovery
- Data migration
- Perform queries on the exported snapshot using AWS services like Amazon Sagemaker, Amazon EMR, and Amazon Athena.
Task Details
- Sign in to AWS Management Console.
- Create an Amazon S3 Bucket.
- Create an AWS KMS Key.
- Create a Security group for RDS DB Instance.
- Create an Amazon RDS DB Instance.
- Take a snapshot from an existing DB Instance.
- Create a sample database and a table.
- Export the Snapshot to S3.
- Deleting AWS resources
Pre-requisites
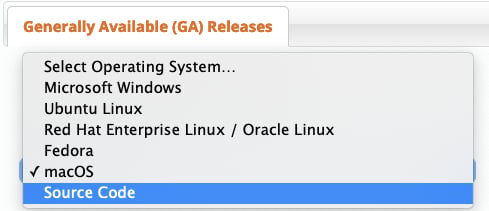
- For testing this lab, it is necessary to download the MySql GUI Tool, To download it, go to the Download MySQL Workbench page. Based on your OS, select the respective option under Generally Available (GA) Releases. Download and Install.
Launching Lab Environment
- To launch the lab environment, Click on the Start Lab button.
- Please wait until the cloud environment is provisioned. It will take less than a minute to provision.
- Once the Lab is started, you will be provided with IAM user name, Password, Access Key, and Secret Access Key.
Note : You can only start one lab at any given time
Lab guide
Lab Steps
Task 1: Sign in to AWS Management Console
- Click on the Open Console button, and you will get redirected to AWS Console in a new browser tab.
-
On the AWS sign-in page,
- Leave the Account ID as default. Never edit/remove the 12 digit Account ID present in the AWS Console. otherwise, you cannot proceed with the lab.
- Now copy your User Name and Password in the Lab Console to the IAM Username and Password in AWS Console and click on the Sign in button.
- Once Signed In to the AWS Management Console, Make the default AWS Region as US East (N. Virginia) us-east-1.
Task 2: Create an Amazon S3 Bucket
- Navigate to the Services menu at the top. Click on S3 under the Storage section.
-
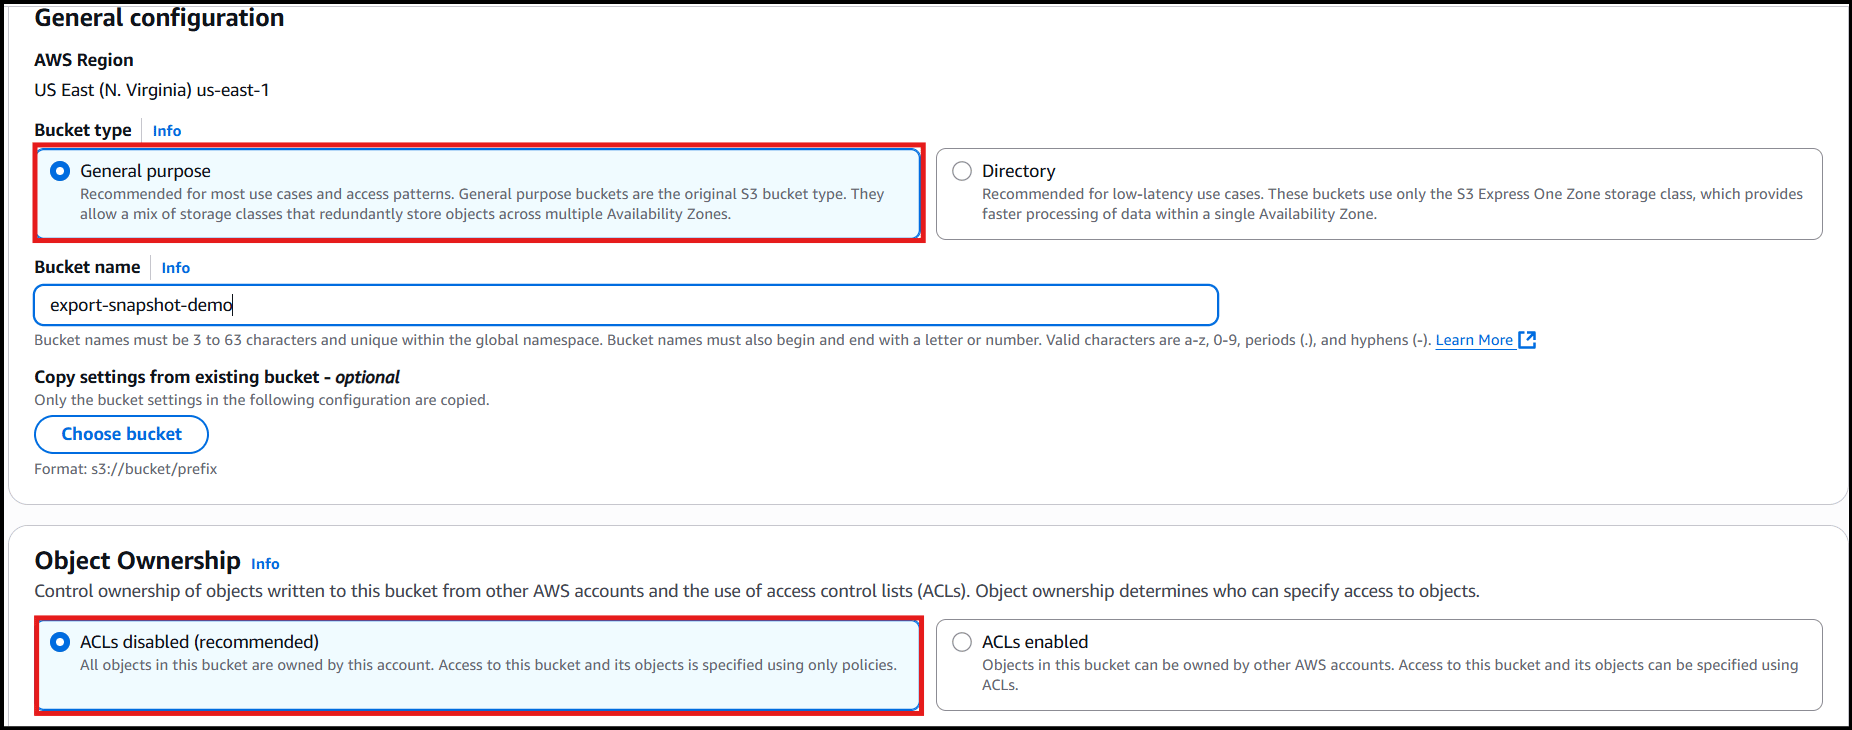
On the S3 Page, click on Create bucket and fill in the bucket details.
- Bucket type : General purpose
-
Bucket name: Enter export-snapshot-demo
- Note: S3 bucket name is globally unique, choose a name that is available.
-
Object ownership: Select ACLs disabled (recommended) option.
- Leave all the other settings as default.
- Click Create bucket button.
Task 3: Create an KMS Key
- Navigate to the Services menu on the top. Click on Key Management Service under the Security, Identity, & Compliance section.
- In the KMS console, navigate to Customer managed keys and click on Create Key.
- Select the Key Type as Symmetric and click on Next.
-
Under the Add Labels, give the following details:
- Alias: Enter kmskey_1 (Change the name, if there is a key present with the same name)
- Description: Enter Used for RDS Snapshot exports to S3 of the “database-demo” DB Instance
-
Click on Next.
Note : Ignore if any error message appear like below.
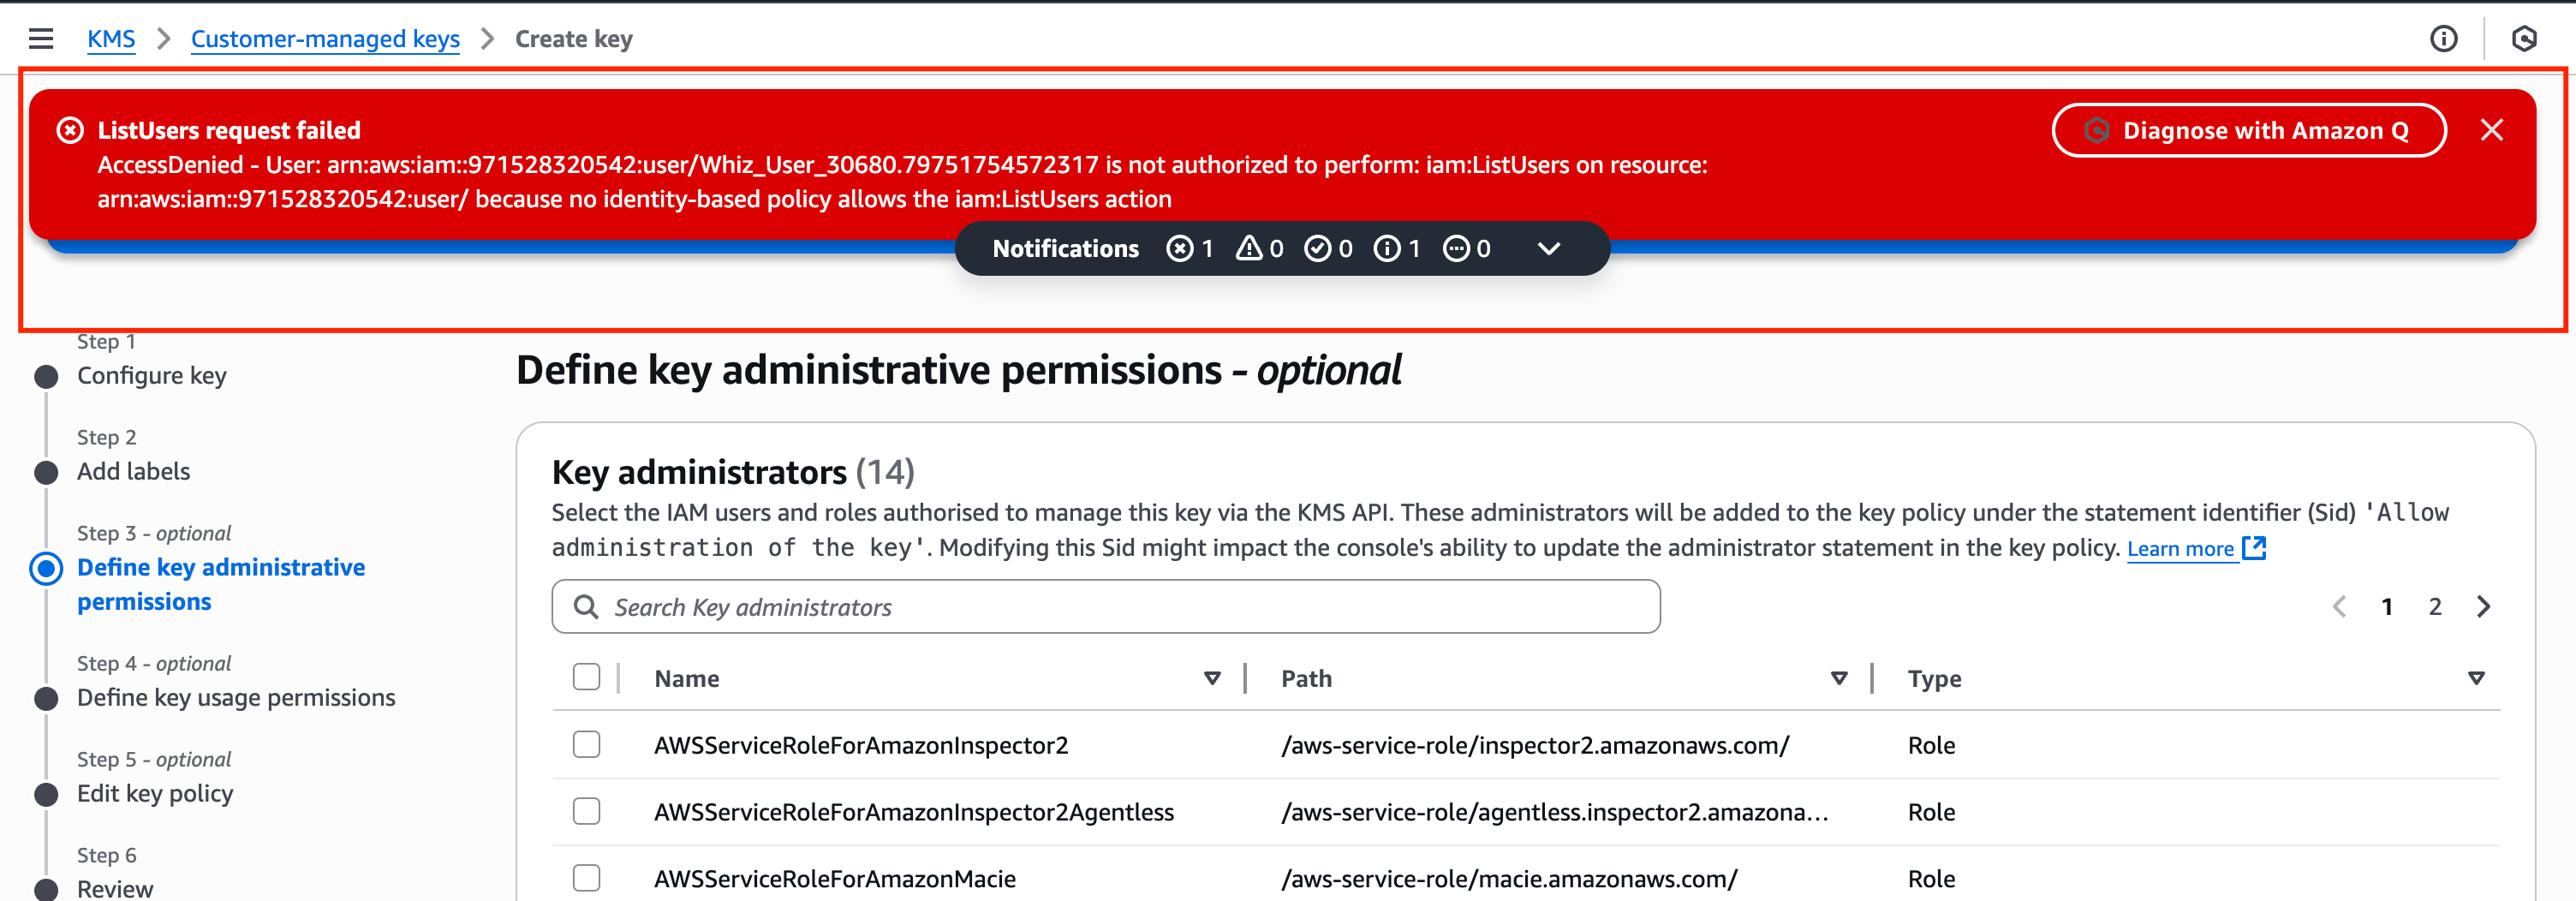
- Leave Define key administrative permissions as default and click on Next.
- Leave Define key usage permissions as default and click on Next.
- Leave Edit key policy as default and click on Next.
-
Click on the Finish button.
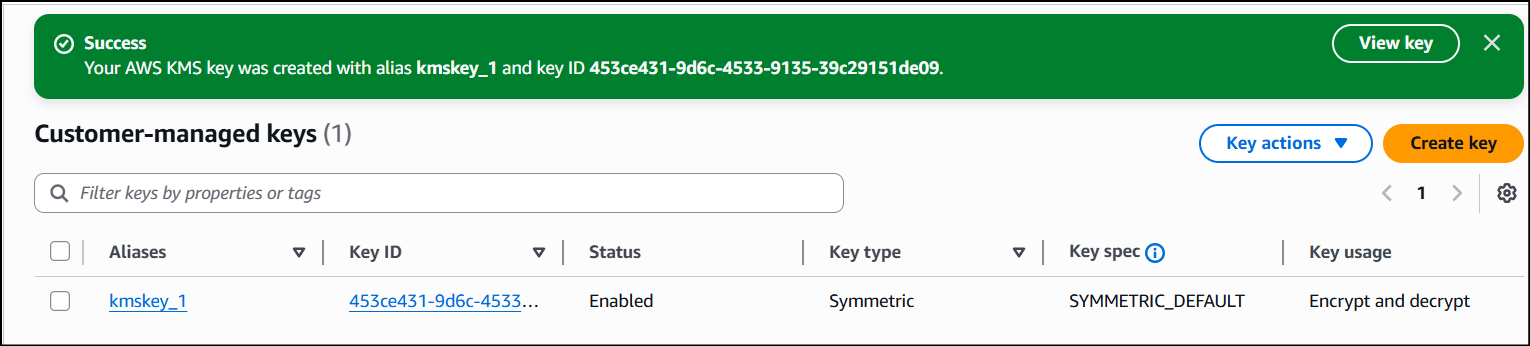
Note : Ignore if any error message appear like below.

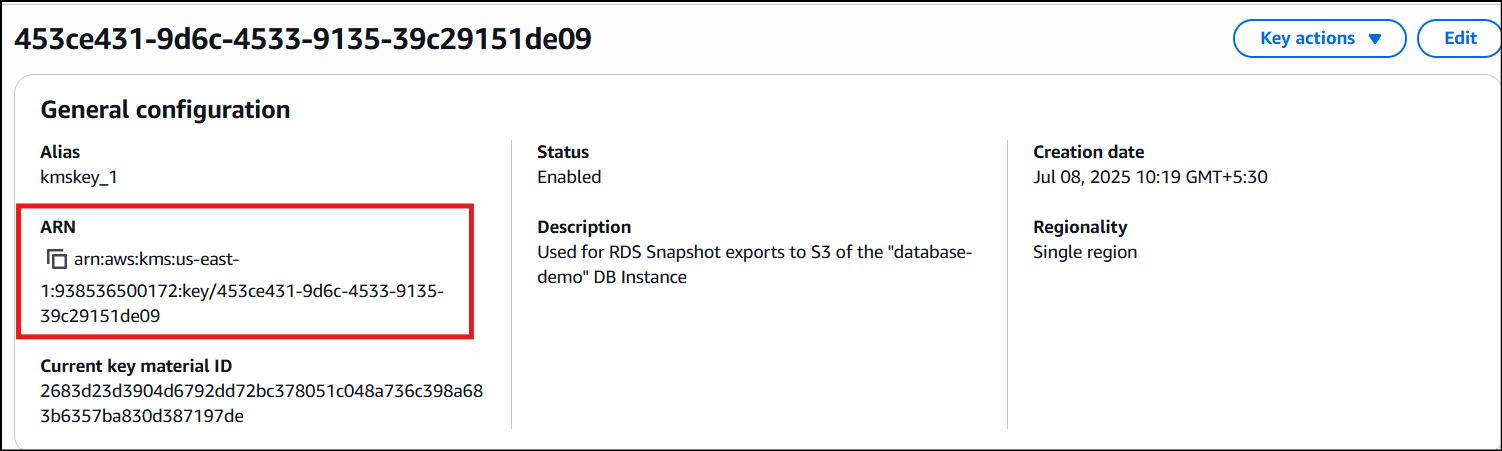
Task 4: Create a Security group for RDS DB Instance
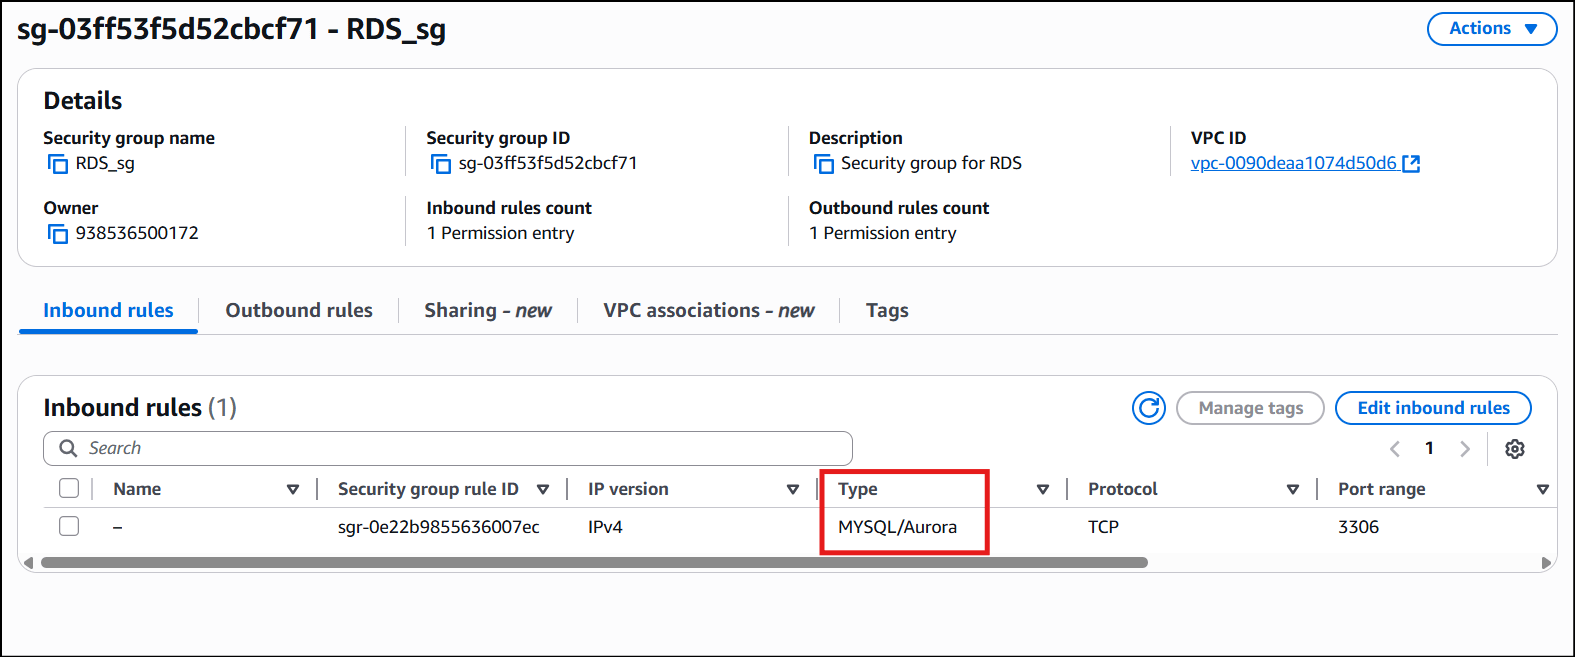
- In this task, you are going to create a Security group for RDS with a 3306 port number enabled
- Navigate to EC2 by clicking on the Services menu, under the Compute section.
- On the left panel menu, select the security group under the Network & Security section.
- Click on the Create Security group button.
-
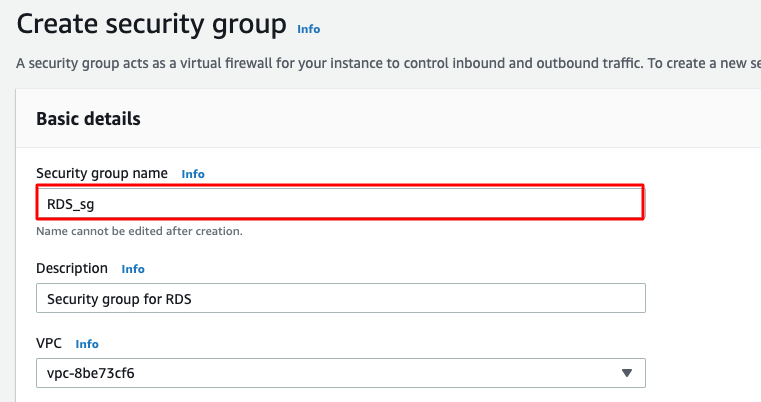
In the security group page,
- Security group name: Enter RDS_sg
- Description: Enter Security group for RDS
- VPC: Select Default VPC
-
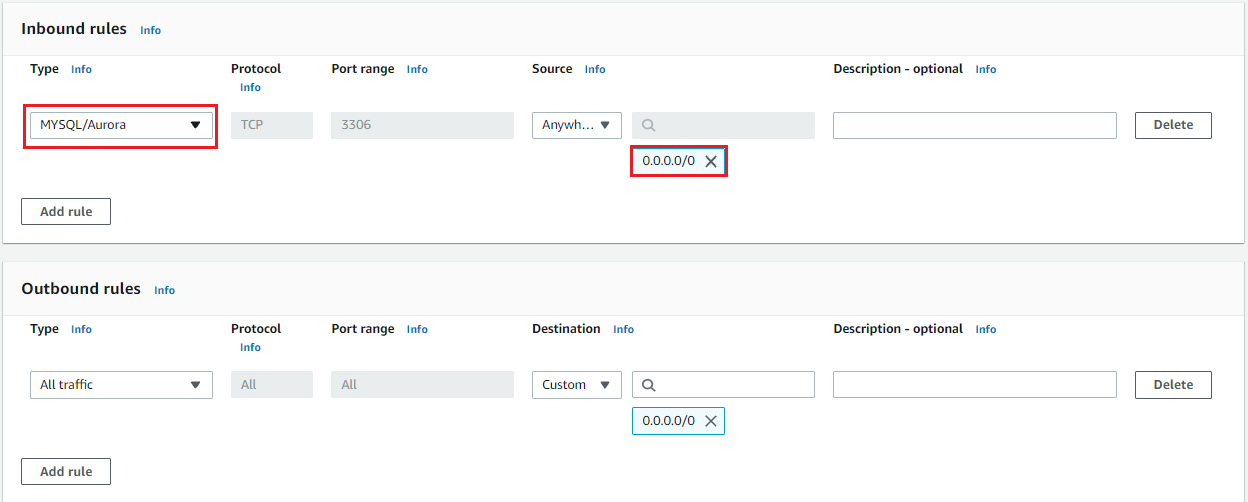
Click on the Add Rule button under Inbound rules.
- Type: Select MYSQL/Aurora
- Source: Select Anywhere-IPv4
- In the textbox add 0.0.0.0/0
- Leave the outbound rules as it is.
Task 5: Create an Amazon RDS DB Instance
- Navigate to the Services menu at the top left corner and click on Aurora and RDS present under the Database section.
- RDS dashboard is displayed.
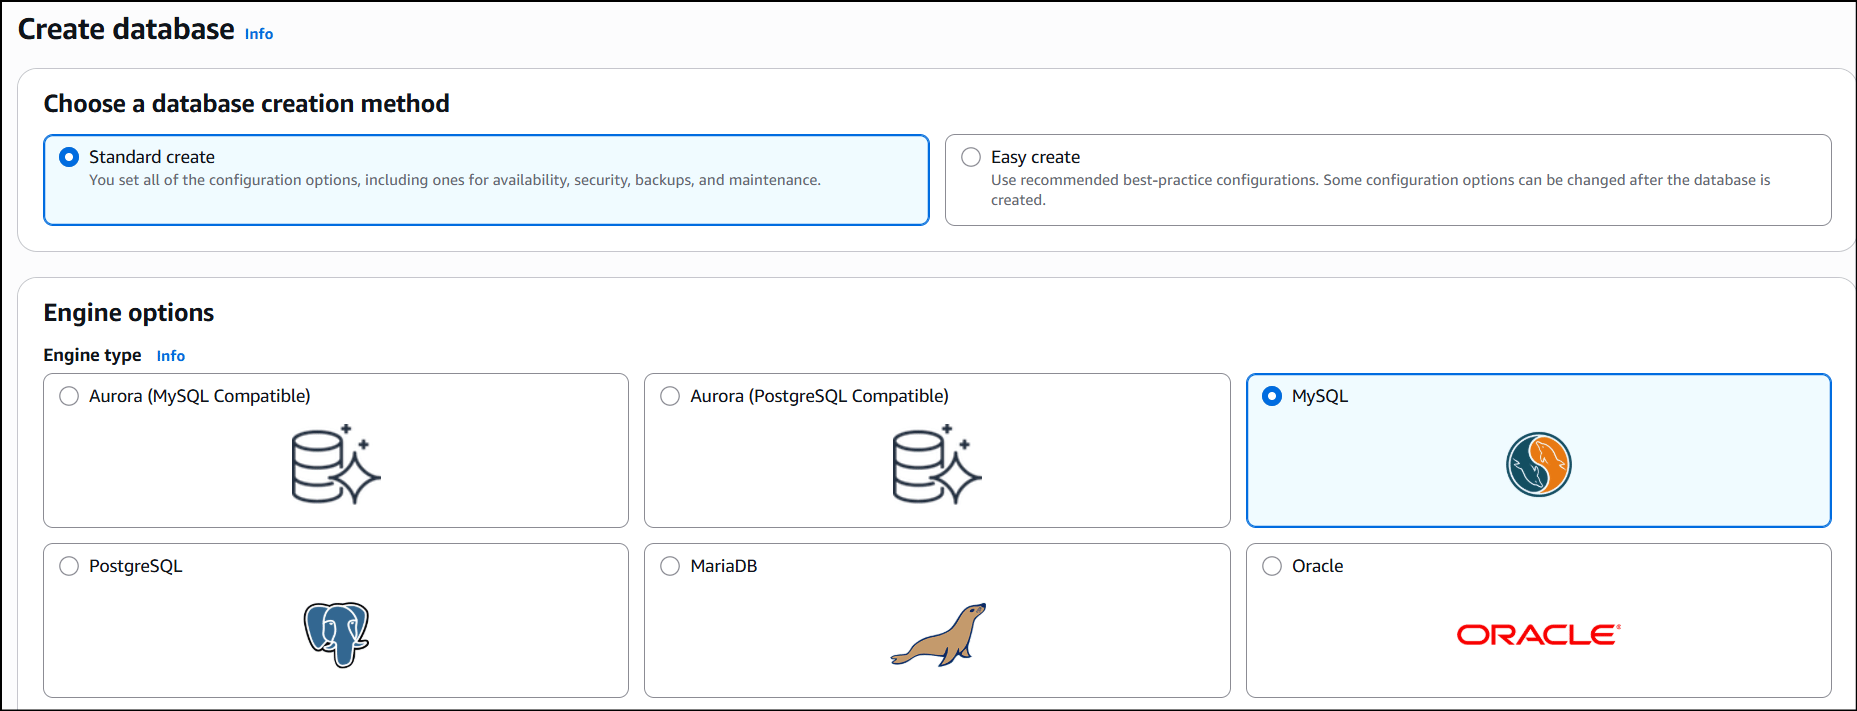
- Click on the Create database button and you are navigated to the page where you will provide all the required details to create a MySQL database.
- On the page, click on the option Standard create a method for our lab requirement.
-
In the Engine options, select MySQL engine type.
- Edition: Leave it as default
- Under Templates, select Sandbox option.
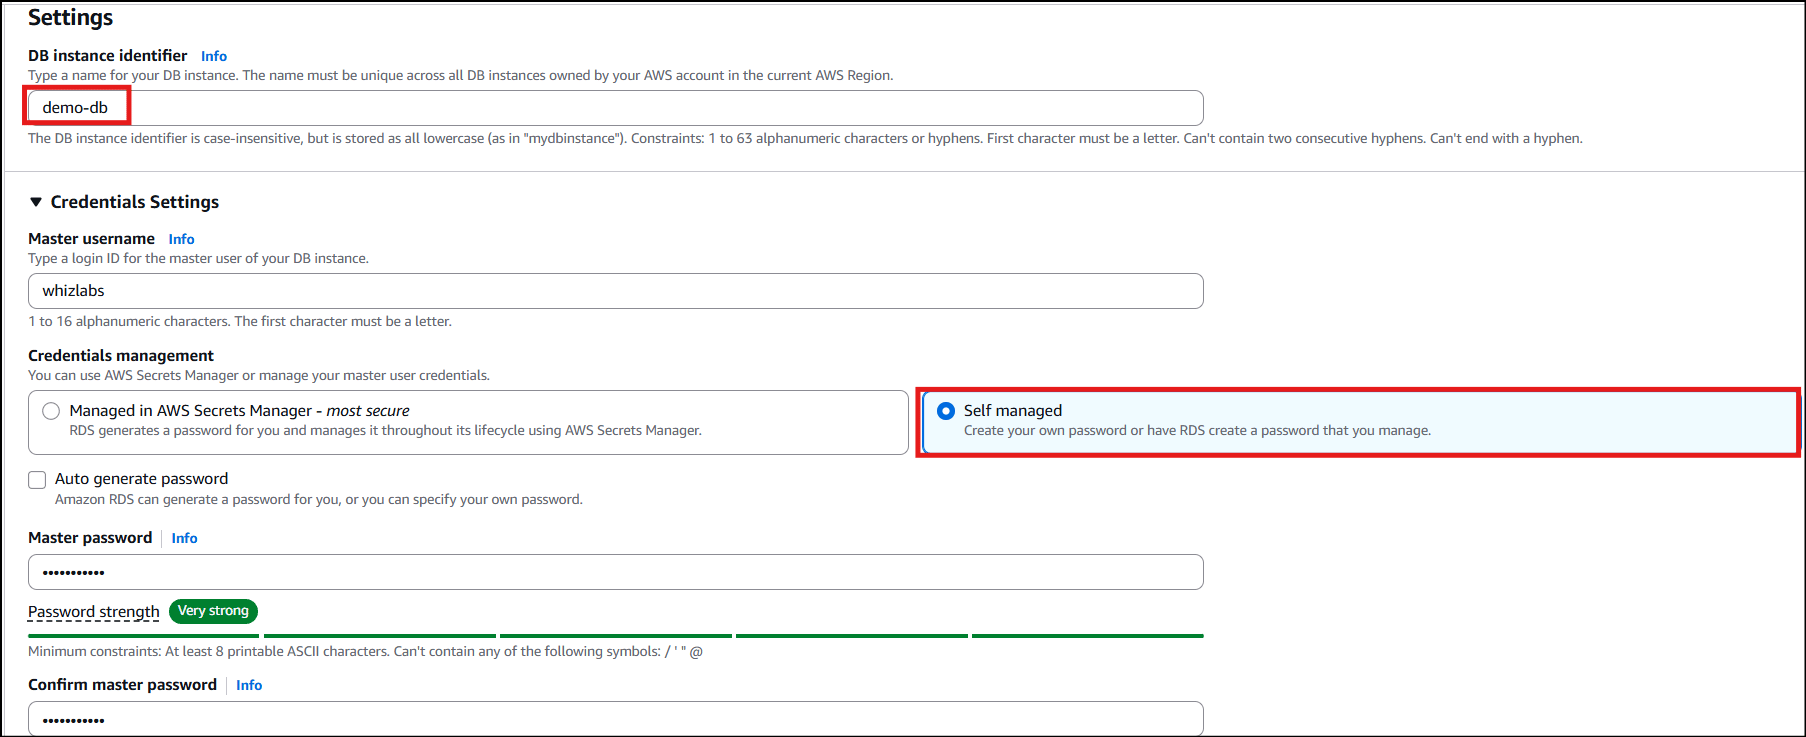
- Under Settings, provide the following details.
- DB instance identifier: Enter demo-db
- Master username: Enter whizlabs
- Master password: Enter Whizlabs123
- Confirm password: Enter Whizlabs123
-
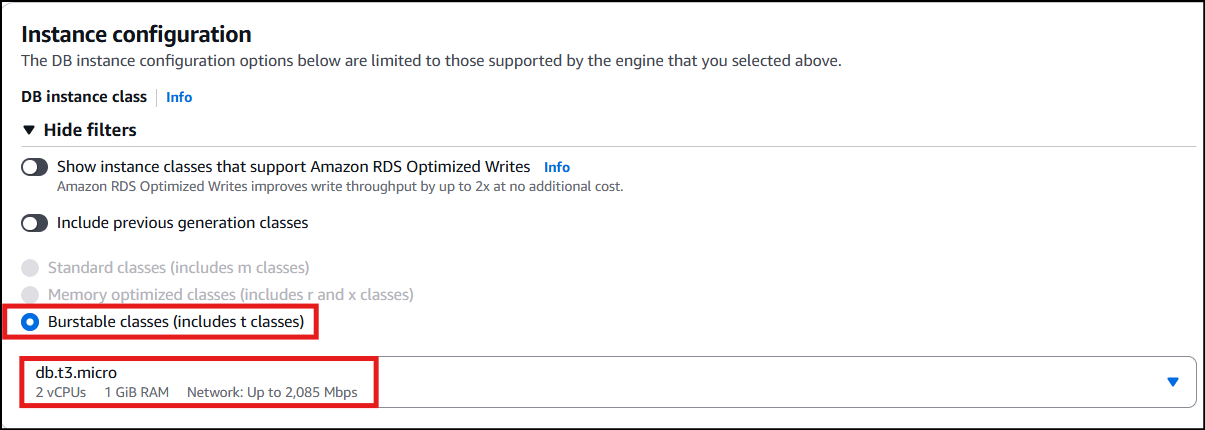
Under DB instance class, select Burstable classes (including t classes) and select db.t3.micro
-
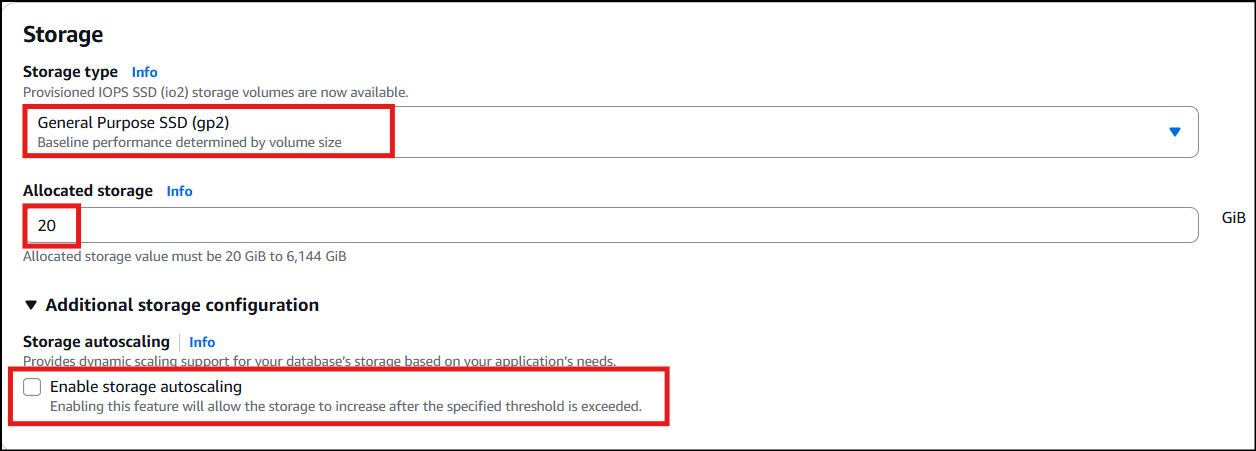
Under Storage,
- Storage type: General Purpose (SSD)
- Allocated storage: 20
-
Uncheck Enable storage autoscaling.
- Leave the Availability and durability as default.
-
Under Connectivity:
-
Network & Security
- Virtual Private Cloud (VPC): default VPC
- Subnet group: default
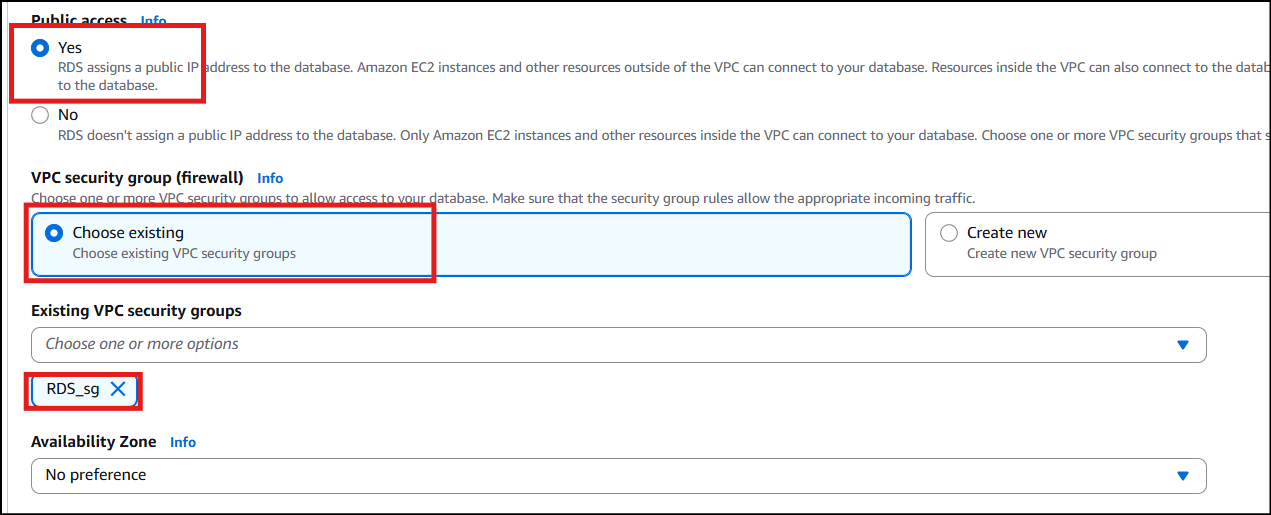
- Public accessibility: Choose Yes (Important)
- VPC security groups: Select Choose existing Remove the default one and select RDS_sg instead.
-
Network & Security
-
Availability zone: default No Preference.
- Leave Database Authentication as default.
- Expand the Additional configuration.

- In the displayed layout provide the following values under Database options.
- Initial database name: Enter demodb
- Leave DB parameter group and Option group as default.
- Under Backup, uncheck Enable automated backups.
- Leave other settings as default.
- Uncheck Deletion protection.
- Click on Create database button to create the database. This process does take time between 5-10 minutes.
-
Once the database is created the status changes to Available.
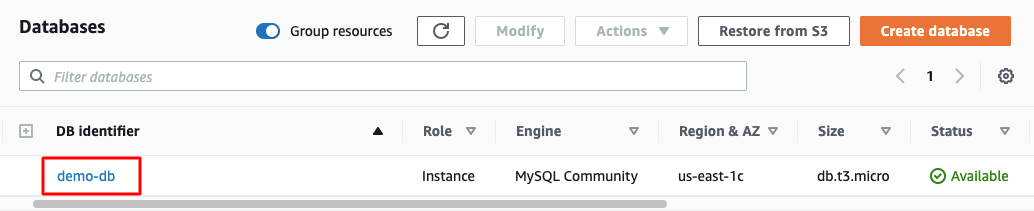
- Click on the database identifier demo-db and copy the database endpoint.
Task 6: Connect to RDS Database using the MySQL Workbench
In this example, we will connect to a database on a MySQL DB instance using MySQL monitor commands. One GUI-based application you can use to connect is MySQL workbench, which you have already downloaded and installed based on instructions in the prerequisite section.-
To connect to a database on a DB instance using MySQL monitor, find the endpoint (DNS name) and port number for your DB Instance.
- Navigate to Databases and click on the created demo-db.
-
Under Connectivity & security section, copy and note the endpoint and port.
- Endpoint: demo-db.c7owzvjtjkvz.us-east-1.rds.amazonaws.com
- Port: 3306
- You need both the endpoint and the port number to connect to the DB instance.
-
Open MySQL Workbench. Click on the MYSQL Connection plus icon.
- Connection Name : Enter a sample name MyDBConnection.
- Host Name: Enter the endpoint: demo-db.c03iqoooef9u.us-east-1.rds.amazonaws.com
- Port: 3306
- Username: Enter whizlabs
- Password: Click on Store in Vault option and enter a password - Whizlabs123. Click on Ok.
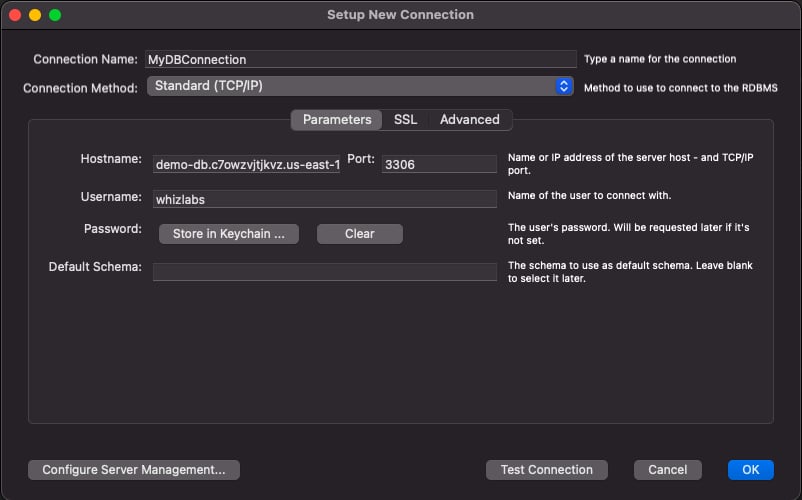
- Click on Test Connection to make sure that you are able to connect to the database properly.
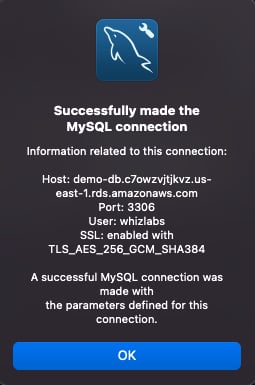
- Click on OK and OK again to save the connection.
- A database connection will be created in MySQL Workbench.
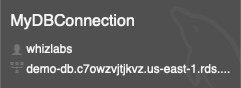
- Double-click on it to open the database. Enter the database password if prompted.
- After successfully connecting and opening the database, you can create tables and perform various queries over the connected database.
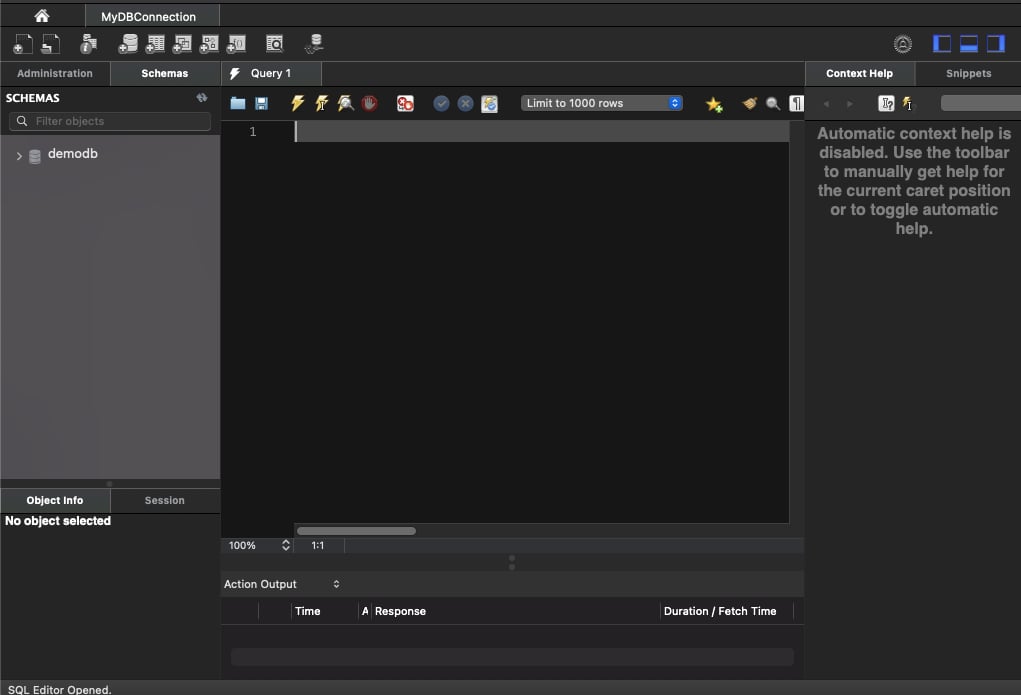
- Navigate to the Schemas tab to see databases available to start doing database operations.
Task 7: Create a sample database and a table
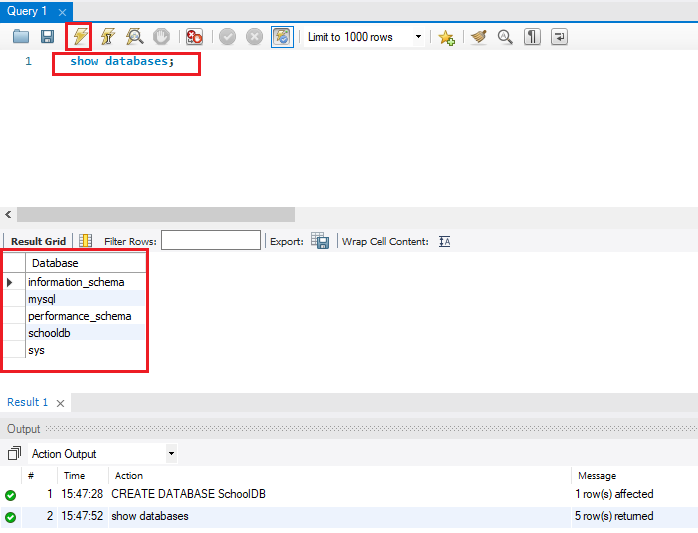
- In the SQL Editor, let us create a sample database and a table for demo purposes.
Note: After executing every command, it is necessary to clear the editor and proceed to the next command.
- For executing the command press the icon as shown below in the image.

-
To see the changes after every execution, click on the Refresh button, right to the SCHEMAS.
Note: Please copy-paste the SQL queries carefully, double-check, and remove extra whitespaces.
- Create a database:
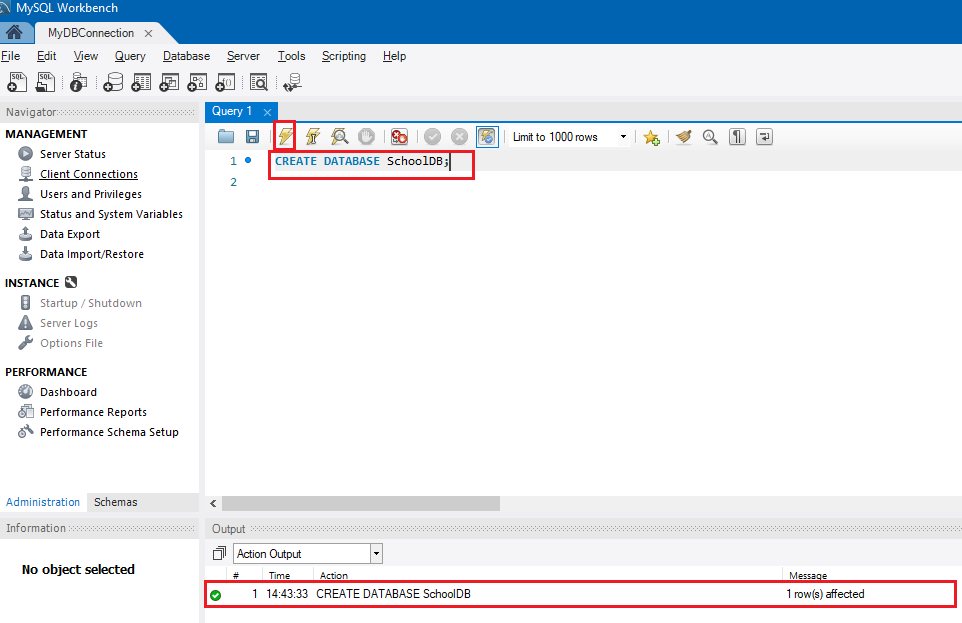
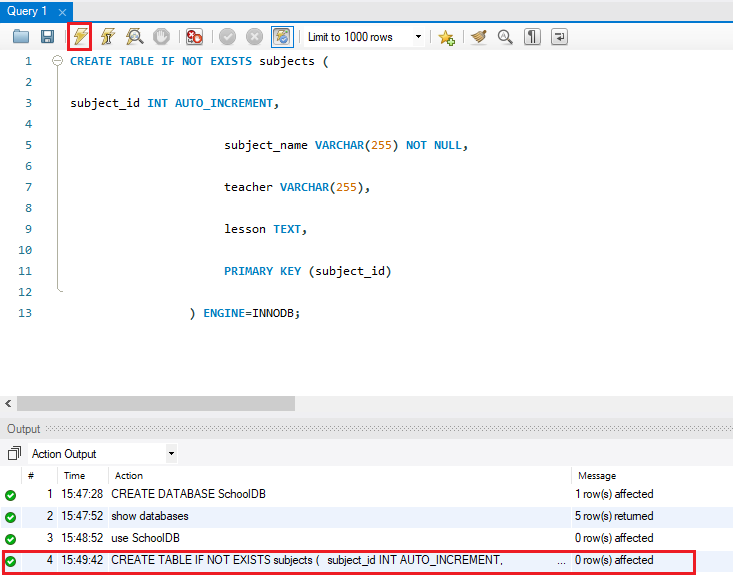
- Enter
- to see the table you just created.
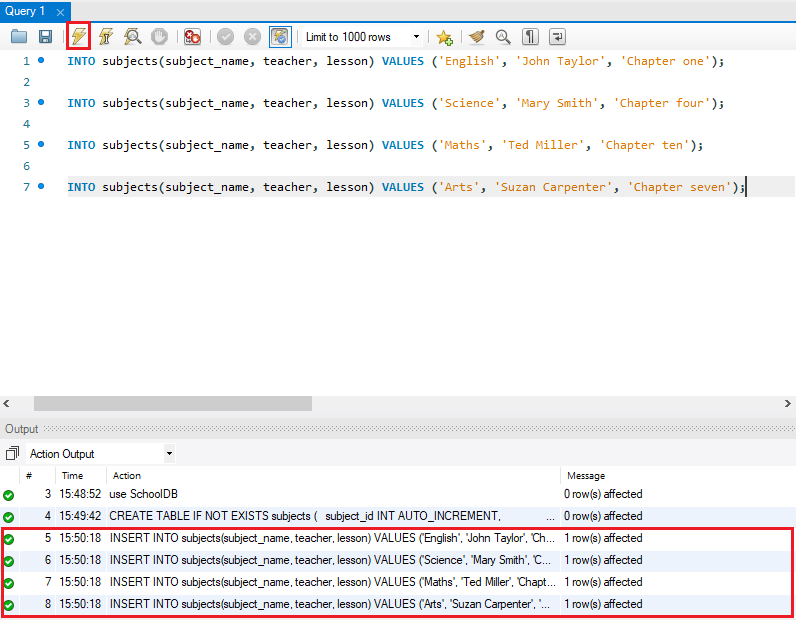
- Insert some details into the table executing one after the other:
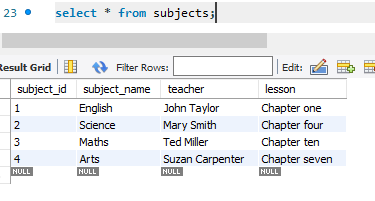
- Let’s check the items we added to the table:
Task 8: Take a Snapshot from the existing DB Instance
- Let us take a snapshot of the database.
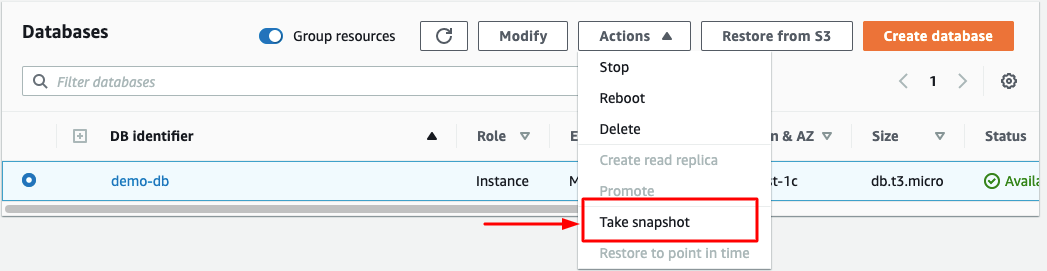
- Select the created DB Instance and click on Actions.
- Click Take snapshot from the options.
-
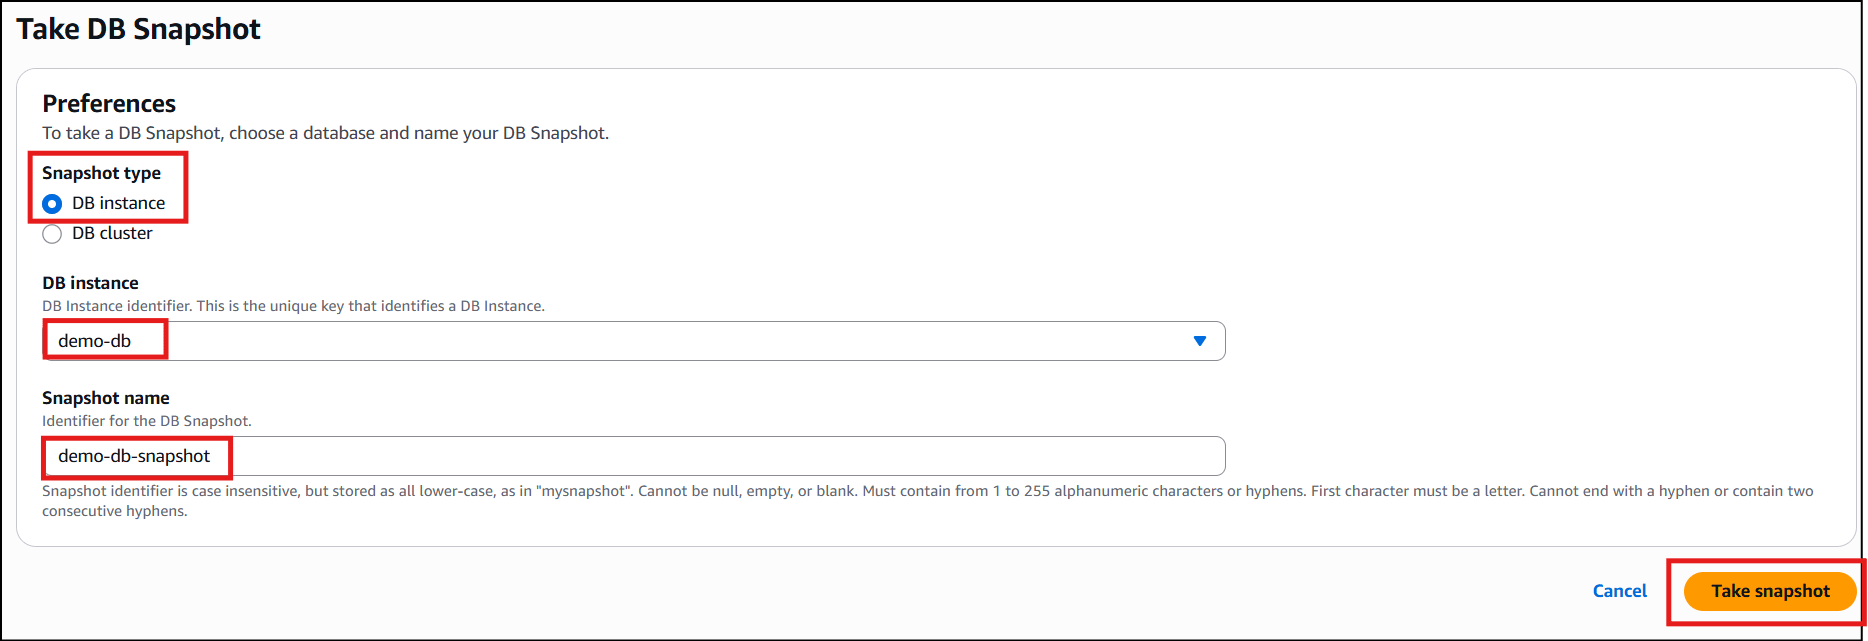
Give a name to the snapshot, demo-db-snapshot (give a unique name for validation report purposes) and click on the Take snapshot button.
-
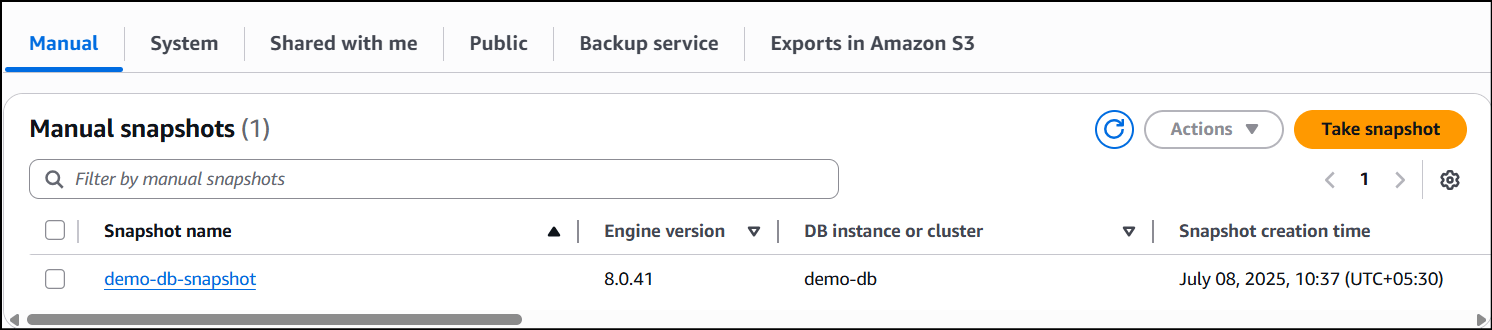
The snapshot creation takes 3-5 minutes. Refresh after some time, the snapshot creation status will be Available.
Task 9: Export the DB snapshot to S3
- Let us export the snapshot to S3.
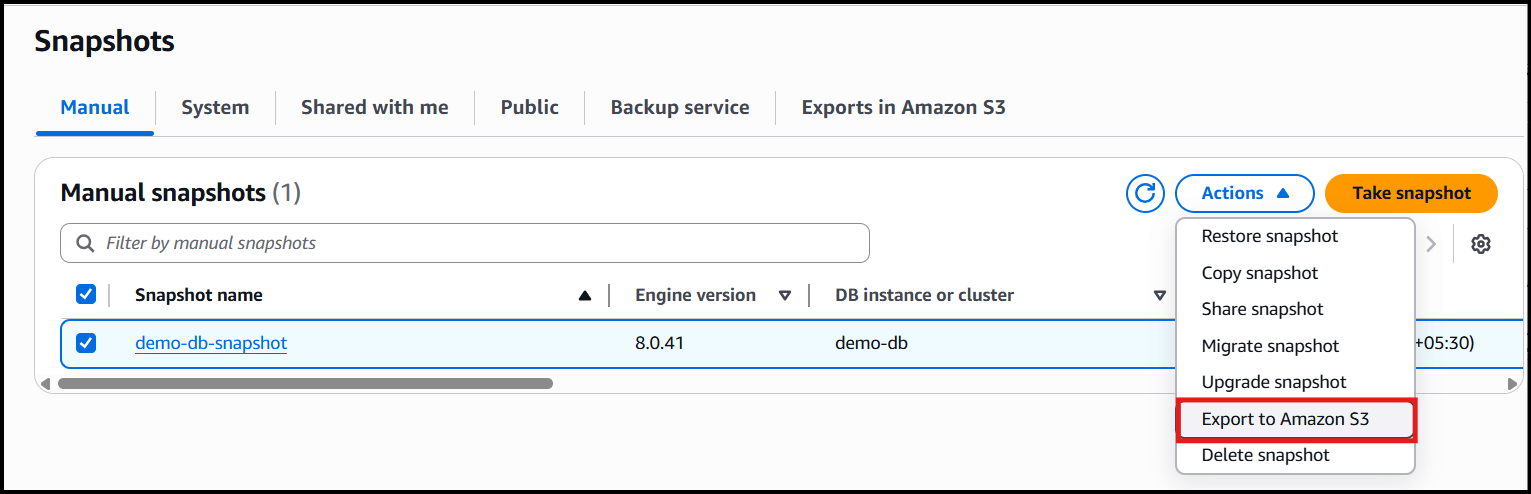
- Select the created snapshot and click on the Actions.
-
Click on Export to Amazon S3 from the options.
-
Under Settings, give a name to identify the export:
- Export Identifier: Enter snap-export-s3
- Leave the Exported data as default.
- Under the S3 destination, select the created S3 from the drop-down.
-
Under IAM Role, choose to Select an existing role from the drop-down named as WhizRole.
Note: Do not select any other IAM role present instead of WhizRole.

- Select the created KMS key from the drop-down or enter the ARN that we noted while creating the key.
Note: There may be other keys present, select the one you created in previous steps.
- Review all the settings and click on Export to Amazon S3.
-
This may take upto 20-25 minutes as it is exporting the whole database. You can see a Complete status once the export is done.
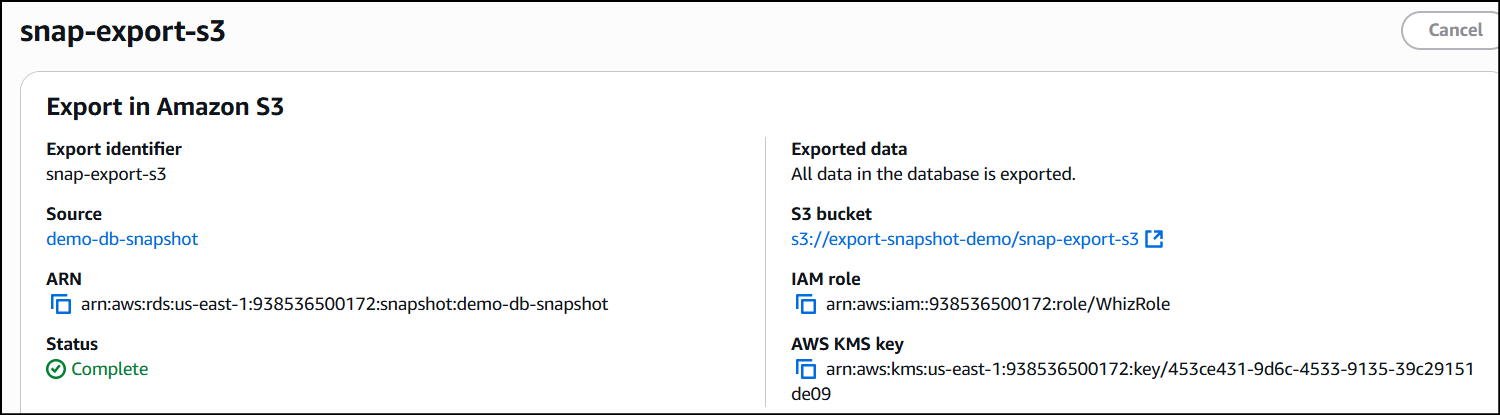
Note: You will be seeing other exports also in the Export to Amazon S3 tab. The reason is, we cannot delete them. Ignore the other exports done, if you see them.
Task 10: Check the exported data in Amazon S3
- Once the export is completed, navigate to the created S3 Bucket.
- You will be able to see a folder with the name of the export identifier.
-
When clicked on that, you can see 2 JSON files.
- The First JSON file is the final report of the export task.
- The Second JSON file gives us information about the individual table including overall size and the data type mappings.
-
You can see the SchoolDB database we created earlier.
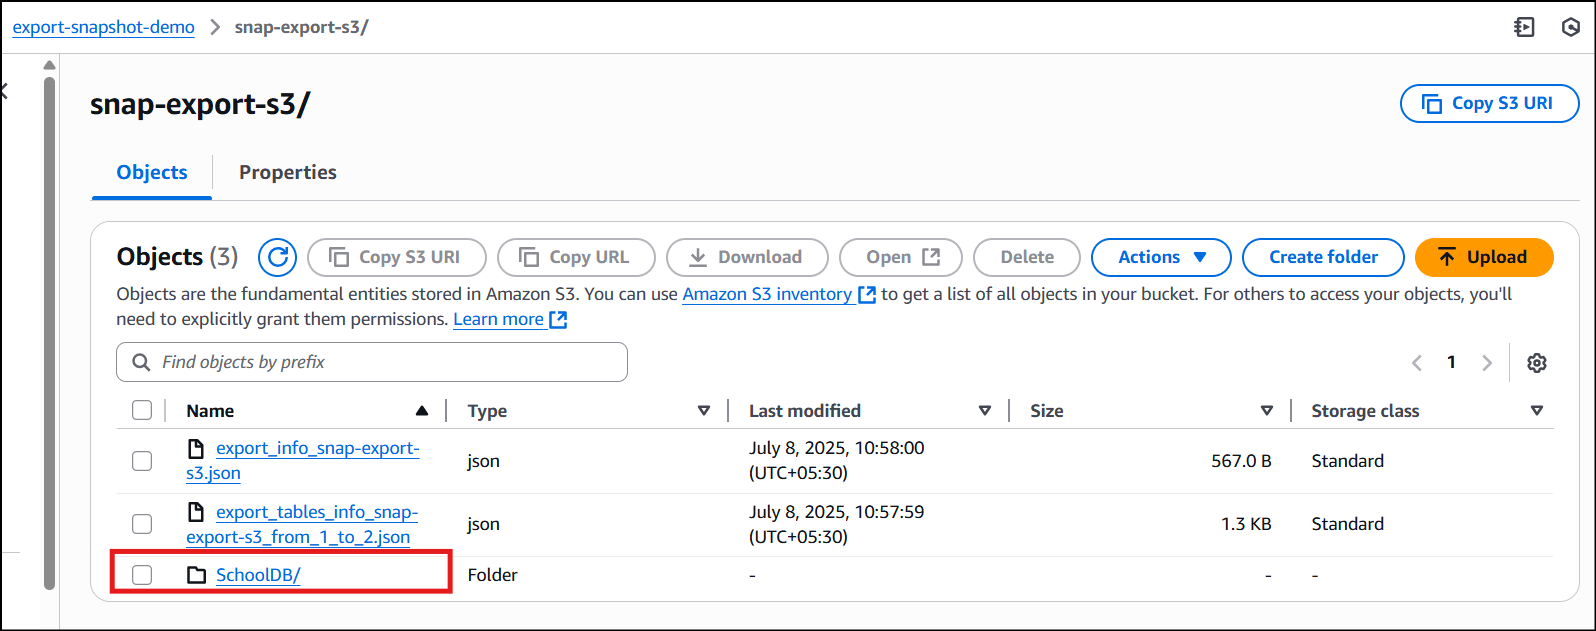
- In this way, we can export the snapshots to S3.
Do you know?
Cross-Region Snapshot Exports: By default, you can export an RDS DB snapshot to an S3 bucket in the same AWS Region. However, if you need to export the snapshot to an S3 bucket in a different AWS Region, you can leverage the AWS Data Pipeline service. It allows you to create a pipeline that copies the snapshot to a different region.
Task 11: Delete AWS Resources
Deleting the DB Instance
- Click on Databases present to the left of the screen.
- Select the DB Instance and click on Actions.
- Click on the Delete option.
- Uncheck the Create final snapshot option.
- Check the Acknowledge box.
- Confirm the deletion by entering delete me and click on delete.
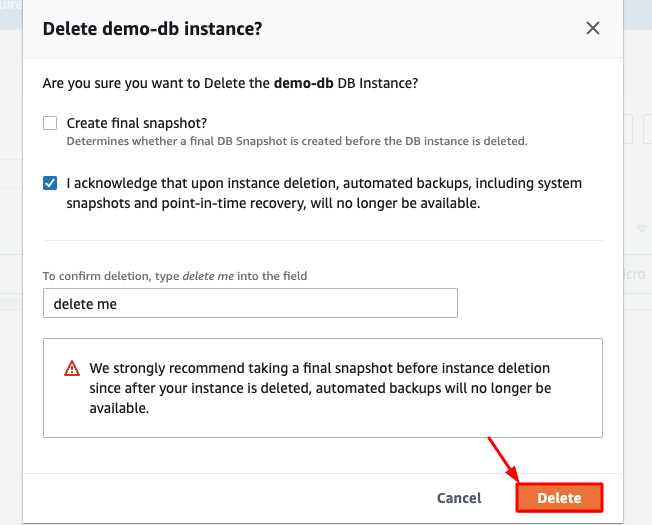
- The status changes to deleting and the DB Instance gets deleted.
- You can proceed to further steps even if it is in a deleting state.
Deleting the Snapshot
- Click on the Snapshots on the left of your screen. Under Manual snapshots, select the unencrypted snapshot and click on Actions.
- Click on the Delete snapshot option.
- Confirm by clicking on the Delete button.
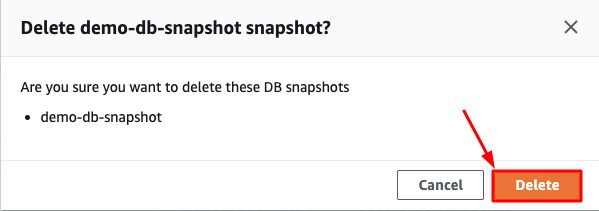
Completion and Conclusion
- You have created an S3 Bucket to store the backup of exports.
- You have created a Customer managed KMS key.
- You have created an Amazon RDS DB Instance.
- You have taken the snapshot of the DB Instance.
- You have exported the snapshot to Amazon S3.
- You have checked the exported data in the S3 Bucket.
End Lab
- Sign out of AWS Management Console.
- You have successfully completed the lab.
- Once you have completed the steps, click on End Lab from your IP Lab Portal and wait till the process gets completed.
What gets checked
When you press Check my work, the platform verifies each of these:- Create Private S3 bucket — Check whether a private S3 bucket is created or not
- Launch RDS instance — Check whether an RDS Instance is created or not
- Create RDS Snapshot — Check whether an RDS Snapshot is created or not.
- check s3 object — Check whether an object is uploaded to the S3 bucket.