

Overview
Lab Details
- This lab walks you through the steps to create Amazon Data Firehose delivery streams.
- You will practice using sample data in VPC Flow generated by EC2 Instance and Send that data to Amazon S3 Bucket using the Kinesis Firehose delivery stream.
- Duration: 90 minutes
- AWS Region: US East (N. Virginia) us-east-1
Introduction
What is Kinesis Data Firestore?
Amazon Data Firehose is a fully managed service that delivers real-time streaming data to destinations such as Amazon Simple Storage Service (Amazon S3), Amazon Redshift, Amazon OpenSearch Service, Amazon OpenSearch Serverless, Splunk, and any custom HTTP endpoint. Kinesis Data Firehose can capture, transform, and load streaming data into data lakes, data stores, and analytics services. It is a reliable and scalable service that can handle high volumes of data. Here are some of the benefits of using Kinesis Data Firehose:- Reliability: Kinesis Data Firehose is a reliable service that can handle high volumes of data. It uses a variety of techniques to ensure that your data is delivered reliably, including replication, buffering, and retrying.
- Scalability: Kinesis Data Firehose can scale to handle any amount of data. It automatically scales up or down based on the volume of data that you are ingesting.
- Ease of use: Kinesis Data Firehose is easy to use. You can configure it to deliver data to your destination with just a few clicks.
Architecture diagram
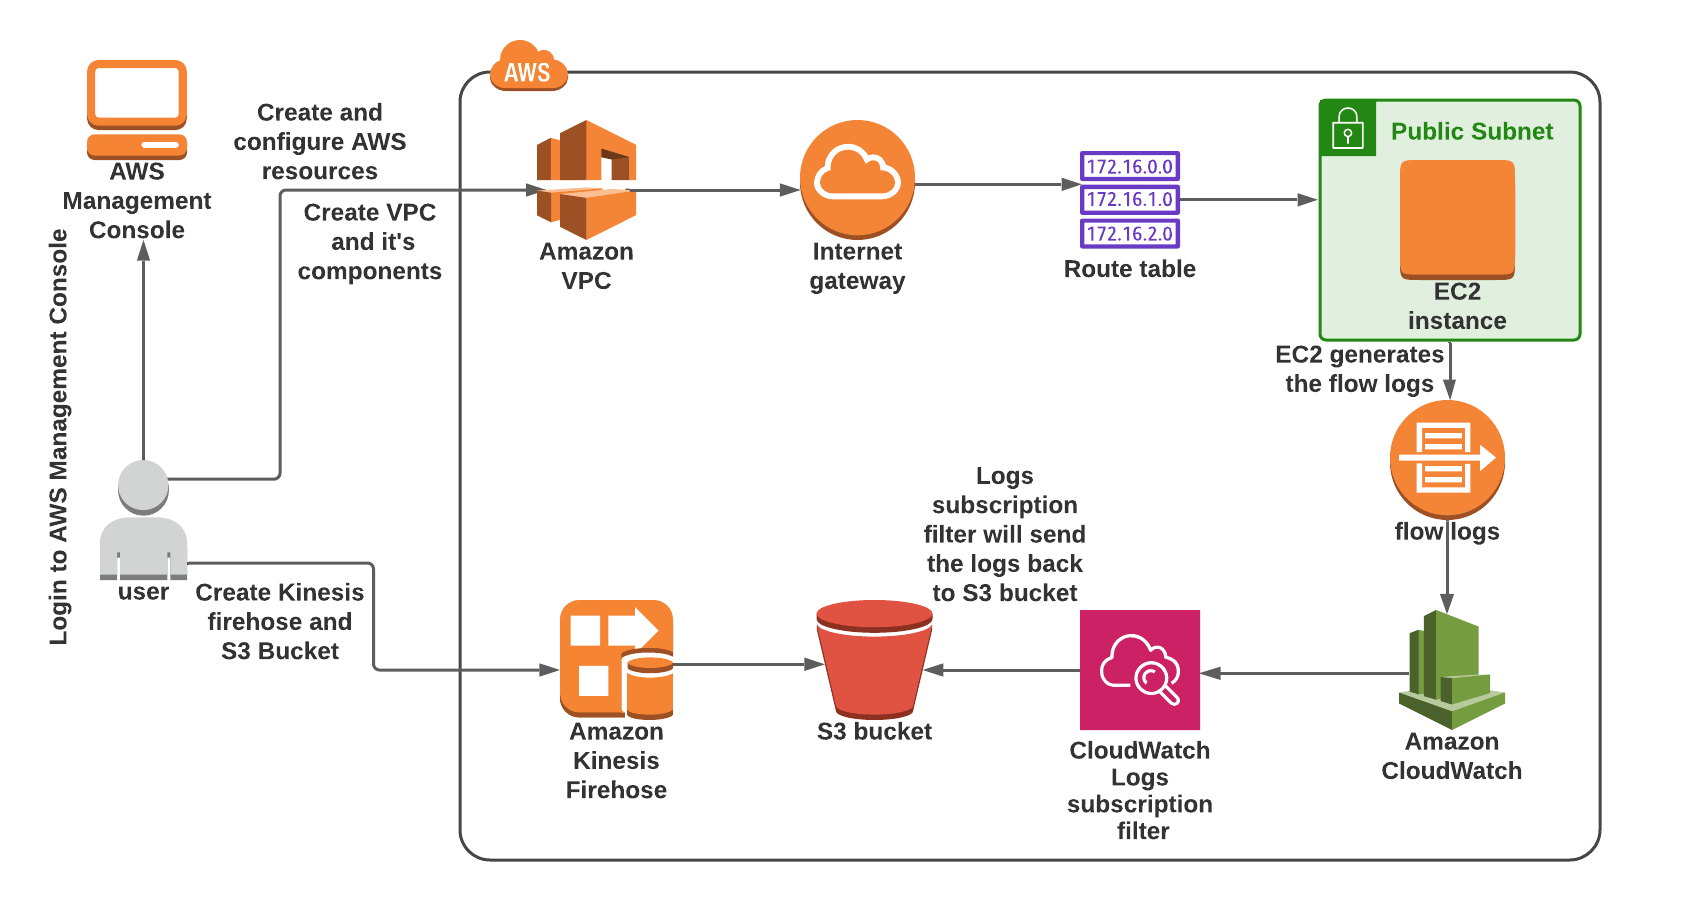
Task Details
- Sign in to AWS Management Console.
- Creating an S3 Bucket.
- Create an Amazon Kinesis Data Firehose delivery stream.
- Create a VPC
- Creating an Internet Gateway
- Create a Subnet
- Create VPC Flow Logs
- Create an EC2 Instance
- Generate traffic
- Check the logs in the CloudWatch Log group
Launching Lab Environment
- To launch the lab environment, Click on the Start Lab button.
- Please wait until the cloud environment is provisioned. It will take less than a minute to provision.
- Once the Lab is started, you will be provided with an IAM user name, Password, Access Key, and Secret Access Key.
Note: You can only start one lab at any given time
Lab guide
Lab StepsTask 1: Sign in to the AWS Management Console
- Click on the Open Console button, and you will get redirected to AWS Console in a new browser tab.
-
On the AWS sign-in page,
- Leave the Account ID as default. Never edit/remove the 12-digit Account ID present in the AWS Console. otherwise, you cannot proceed with the lab.
- Now copy your User Name and Password in the Lab Console to the IAM Username and Password in the AWS Console and click on the Sign in button
- Once Signed In to the AWS Management Console, Make the default AWS Region as US East (N. Virginia) us-east-1.
Note: If you face any issues, please go through FAQs and Troubleshooting for Labs.?
Task 2: Create an S3 Bucket
- Make sure you are in the US East (N. Virginia) us-east-1 Region.
- Navigate to S3 by clicking on the Services menu at the top, then click on S3 in the Storage section.
-
On the S3 Page, click on Create Bucket and fill in the bucket details.
- Bucket type : General purpose
-
Bucket name: Enter kinesisfirehose-whizlabs
- Note: The S3 bucket name is globally unique, choose an available name.
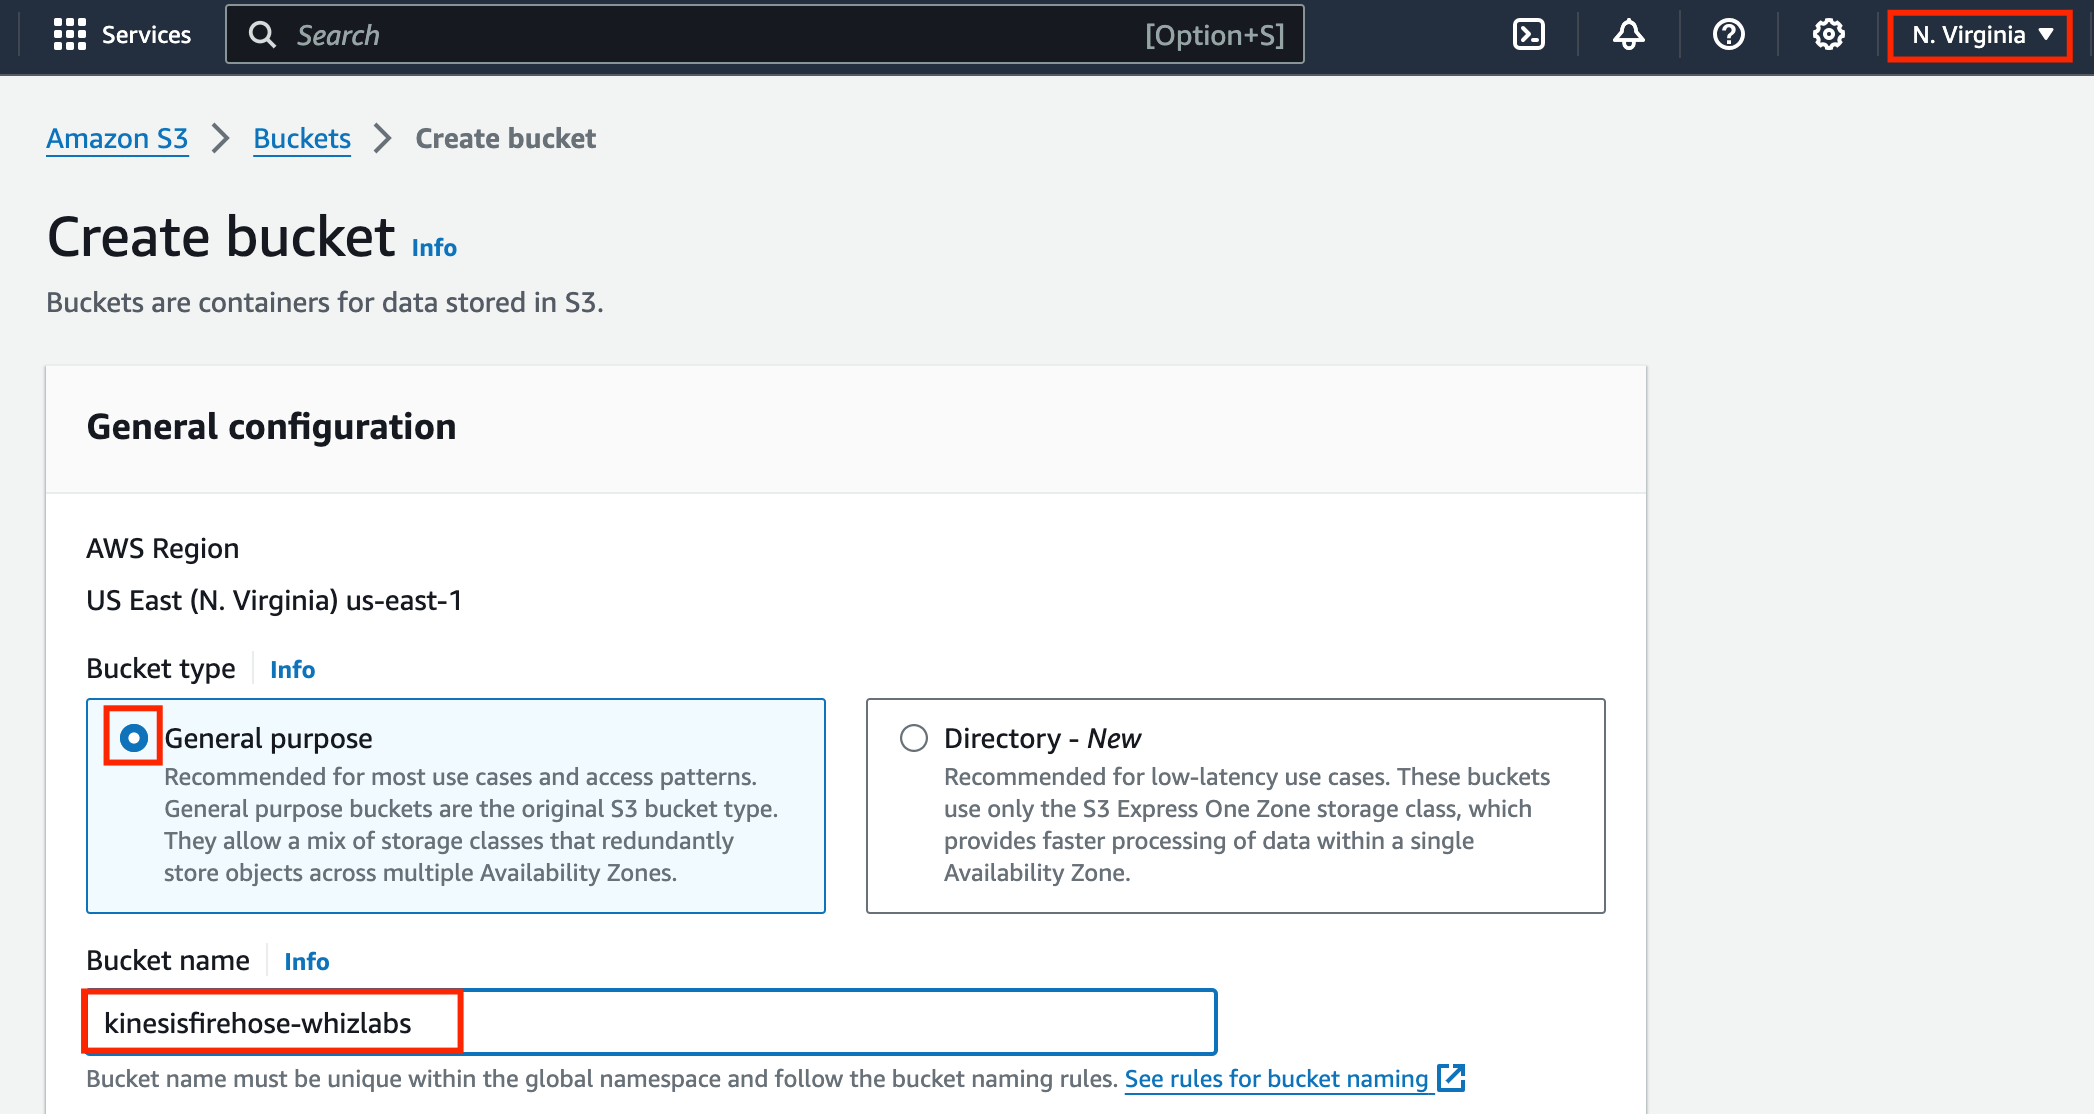
- Object ownership: Select the ACLs disabled (recommended) option
-
Uncheck the option**, Block all public access,** and check the acknowledge option.
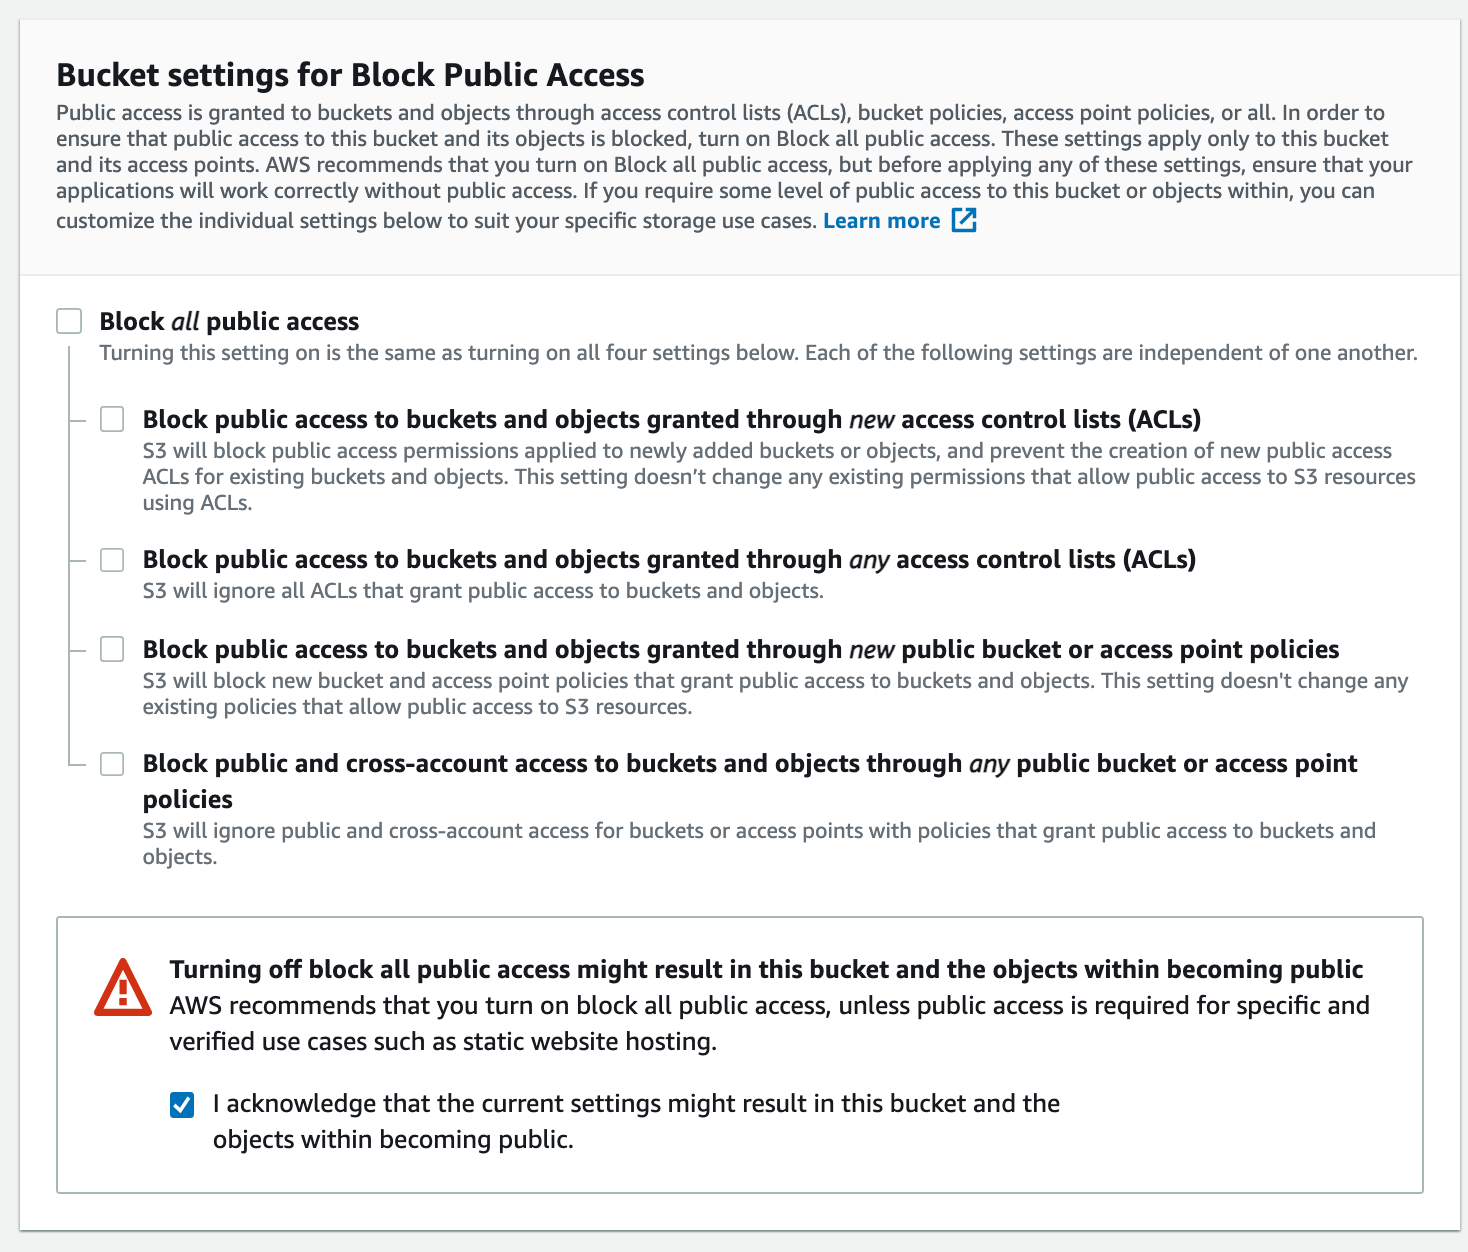
- Leave other settings as default.
-
Click on Create Bucket

- Select the Created S3 bucket and click on Copy ARN button to copy the s3 bucket arn and note it down in notepad for later use
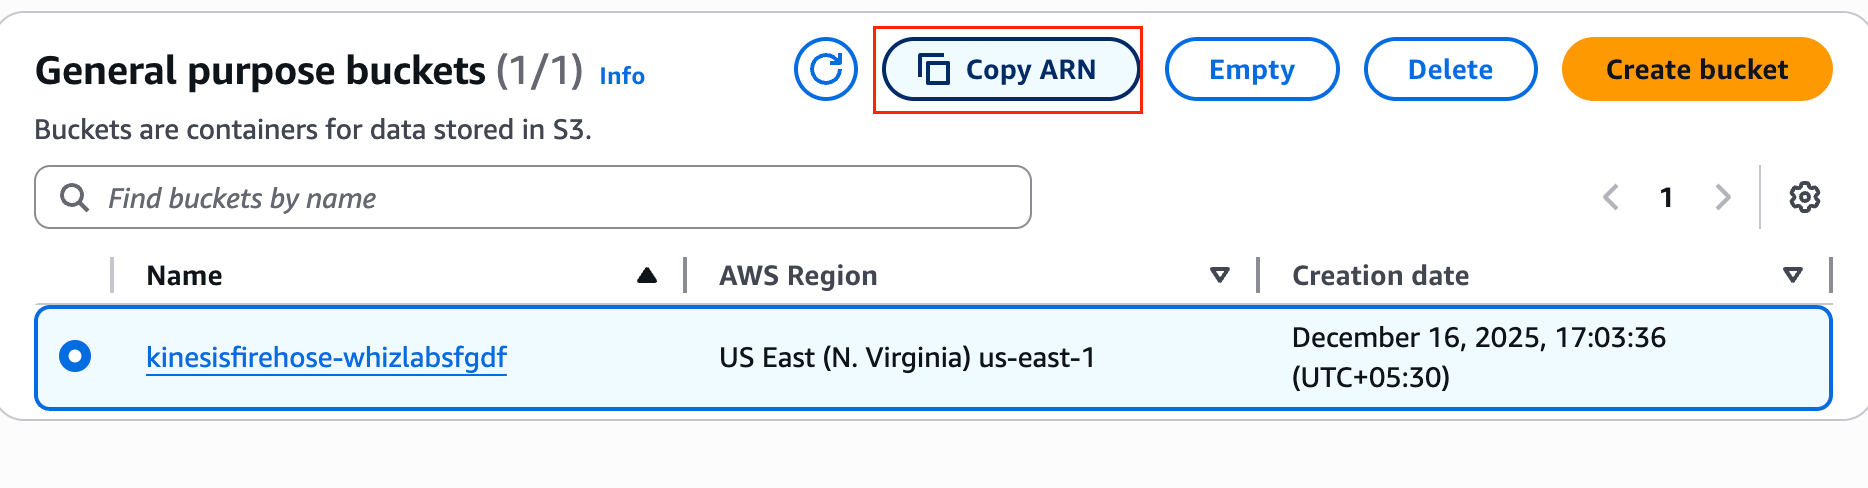
Task 3: Create an Amazon Kinesis Data Firehose delivery stream
- Navigate to Kinesis by clicking on the Services menu at the top, then click on Kinesis in the Analytics section.
-
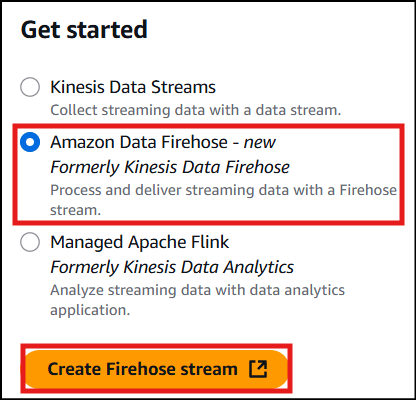
On the Get started page, Select amazon Data Firehose and click on the Create Firehose stream button.
-
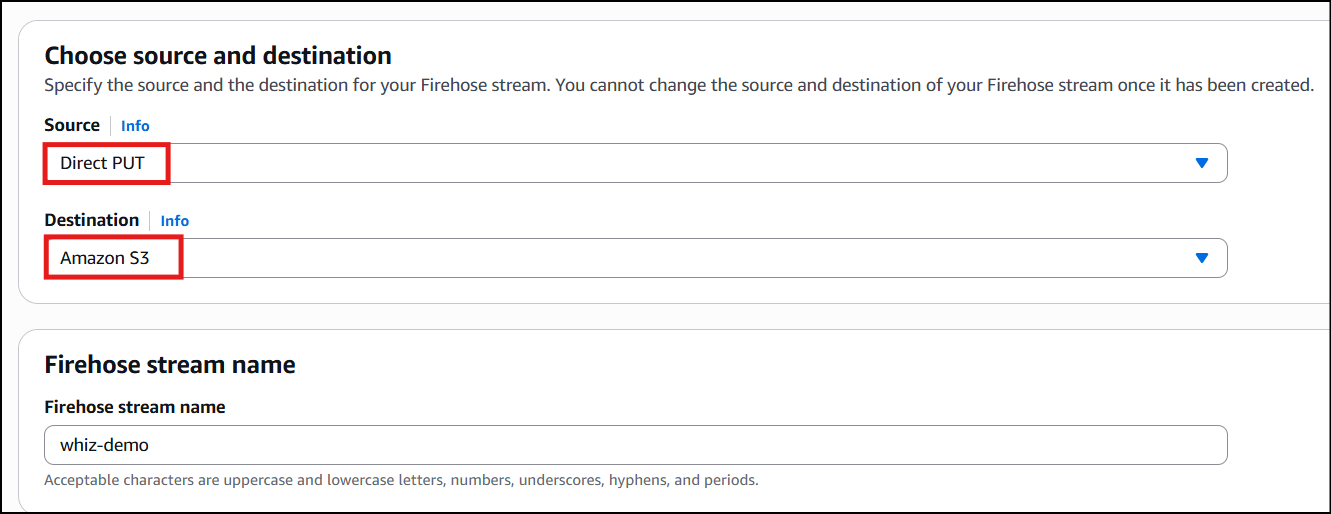
Under Choose source and destination section:
- Source: Select Direct PUT
- Destination: Select Amazon S3
-
Under the Firehose stream name section:
-
Delivery stream name: Enter whiz-demo
-
Delivery stream name: Enter whiz-demo
-
Under Transformand convert records - optional**:**
- Do nothing keep everything as disabled
-
Under Destination settings:
- S3 bucket: Click on browse and Choose the bucket we have created earlier [In my case - S3://kinesisfirehose-whizlabs1]
- Leave the rest as default.
-
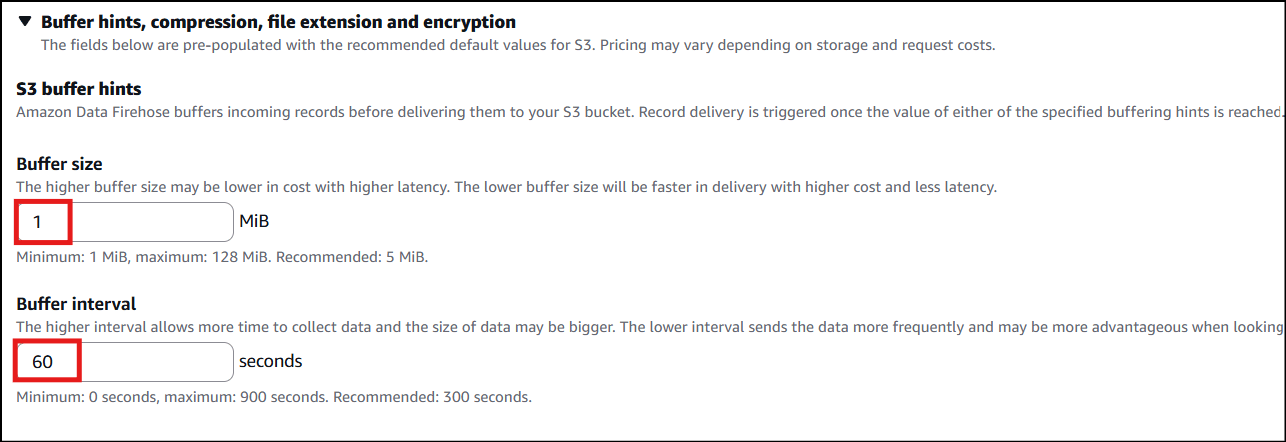
Click on Buffer hints, compression and encryption to expand, Under S3 buffer hints:
- Buffer size: 1 MiB
- Buffer interval: 60 seconds
-
Note: If you enter buffer size as more than 1 MiB and Buffer interval as more than 60 seconds, then it will take more time to load the sample data in S3.
-
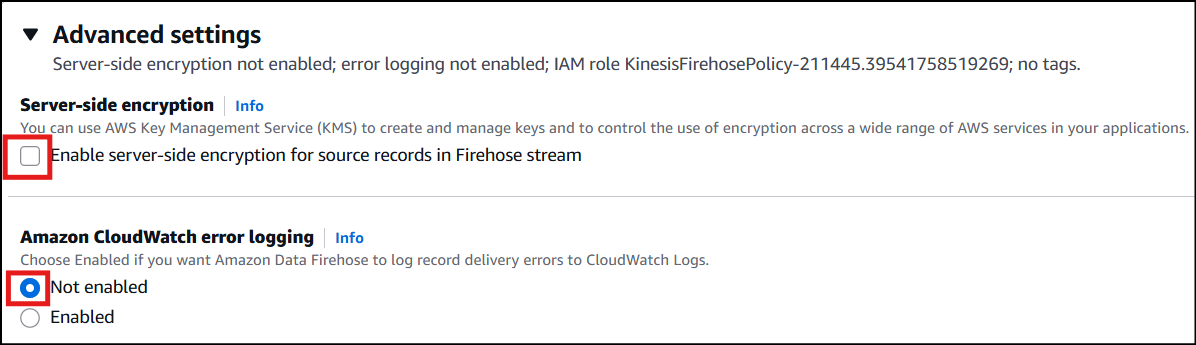
Under Advanced settings:
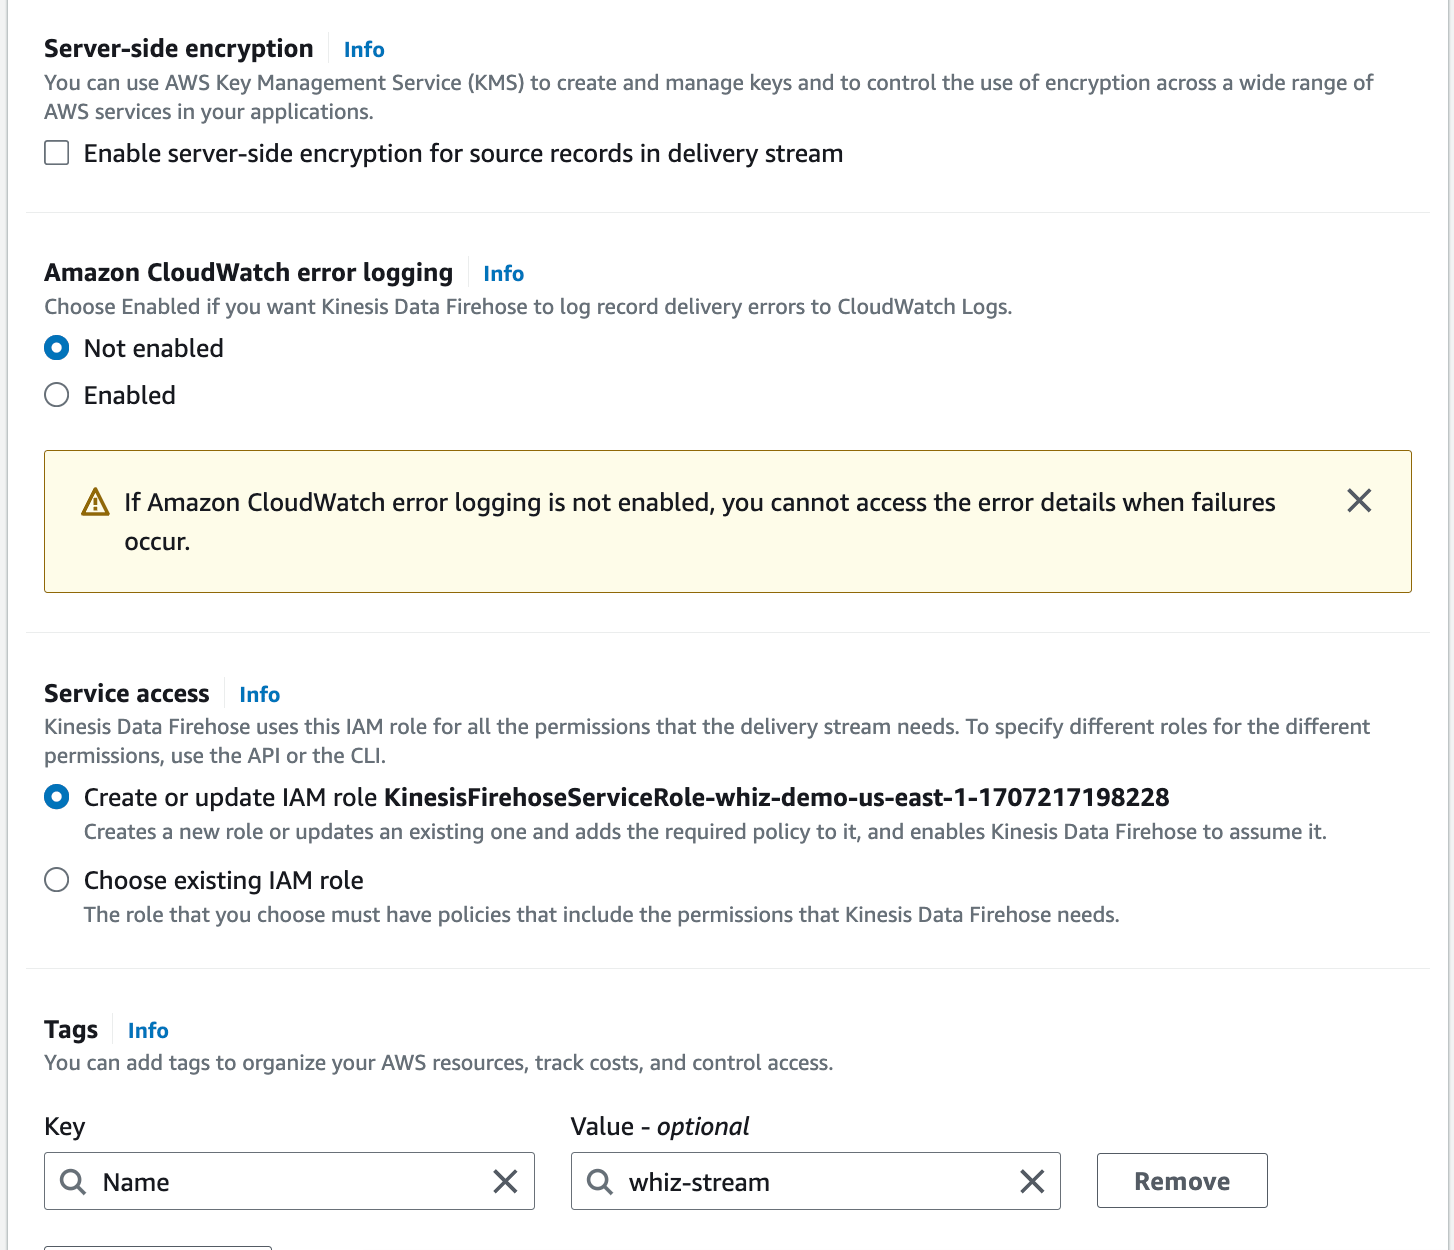
- Server-side encryption: Uncheck Enable server-side encryption for source records in the delivery stream.
-
Amazon CloudWatch error logging**: Not enabled**
-
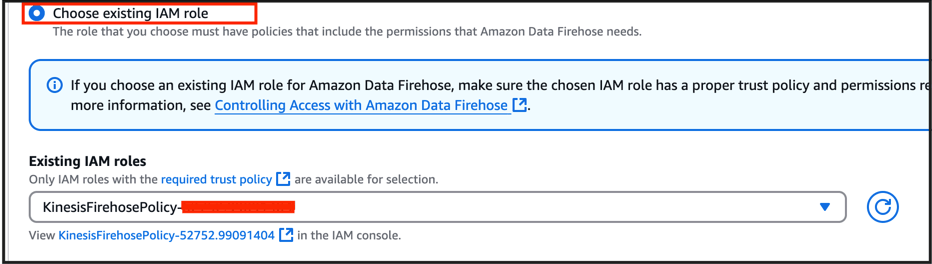
Service access: Choose existing IAM role
From the drop down select role name starts with : KinesisFirehosePolicy-Random-Number
-
Under Tags:
- Key: Name
-
Value: whiz-stream
- Click on Create Firehose stream
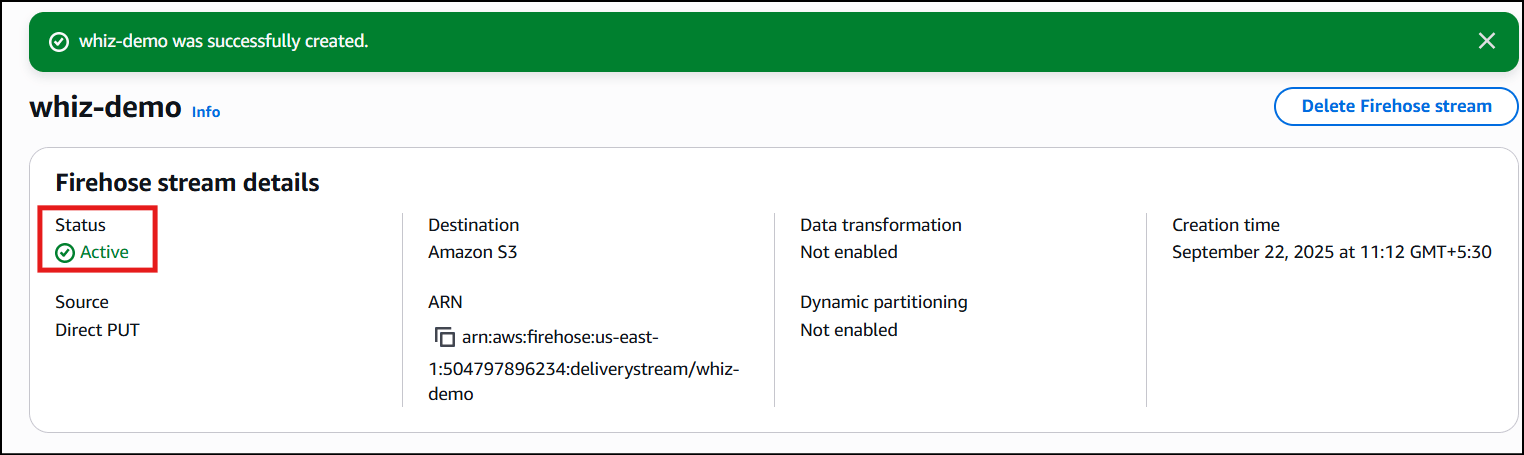
- Creation of the delivery stream will take a few minutes**.**
-
Once created, the Status will be shown as Active.
Task 4: Create a VPC
- Navigate to the Services menu at the top and choose VPC under Networking and Content Delivery.
- Click on Your VPC’s in the left side panel then click on Create VPC
-
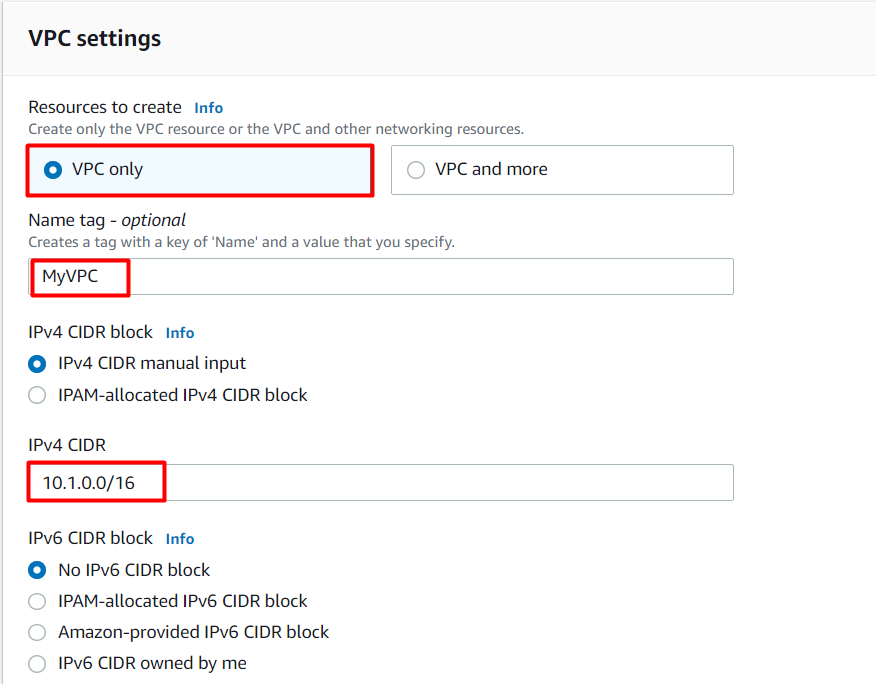
Select VPC Only.
-
Enter the Name tag: MyVPC and enter IPv4 CIDR block: 10.1.0.0/16**.**
-
Enter the Name tag: MyVPC and enter IPv4 CIDR block: 10.1.0.0/16**.**
- Then leave the other fields as default and click on Create VPC.
- Once created it will be shown like this.

Task 5: Creating an Internet Gateway
- Select Internet Gateways in the left side panel and click on the Create Internet Gateway
-
Enter the name MyInternetGateway and Click on Create Internet Gateway
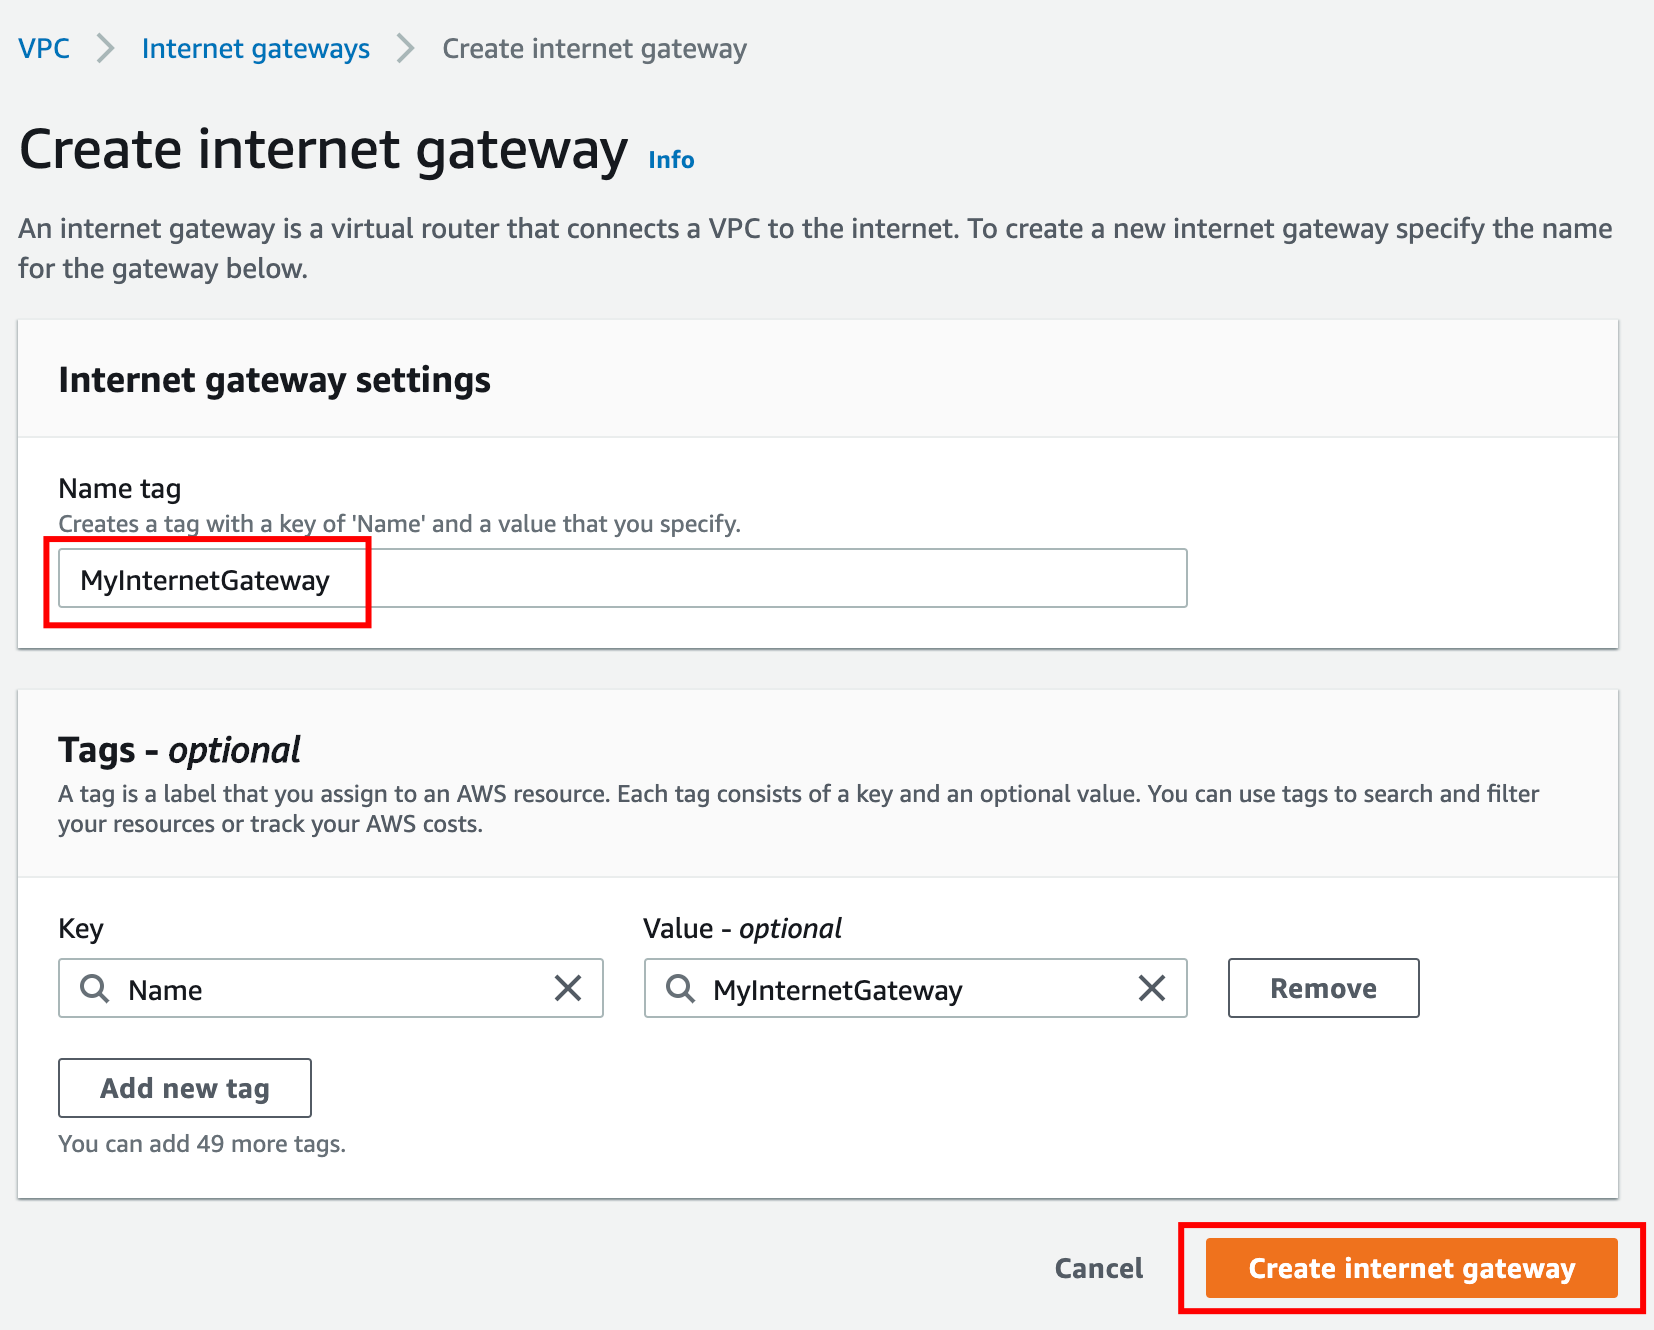
-
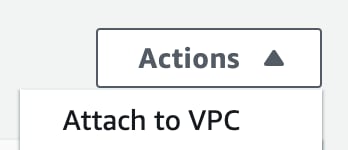
Once created, attach it to MyVPC by clicking on Actions at the top and selecting Attach to VPC, and then selecting MyVPC.
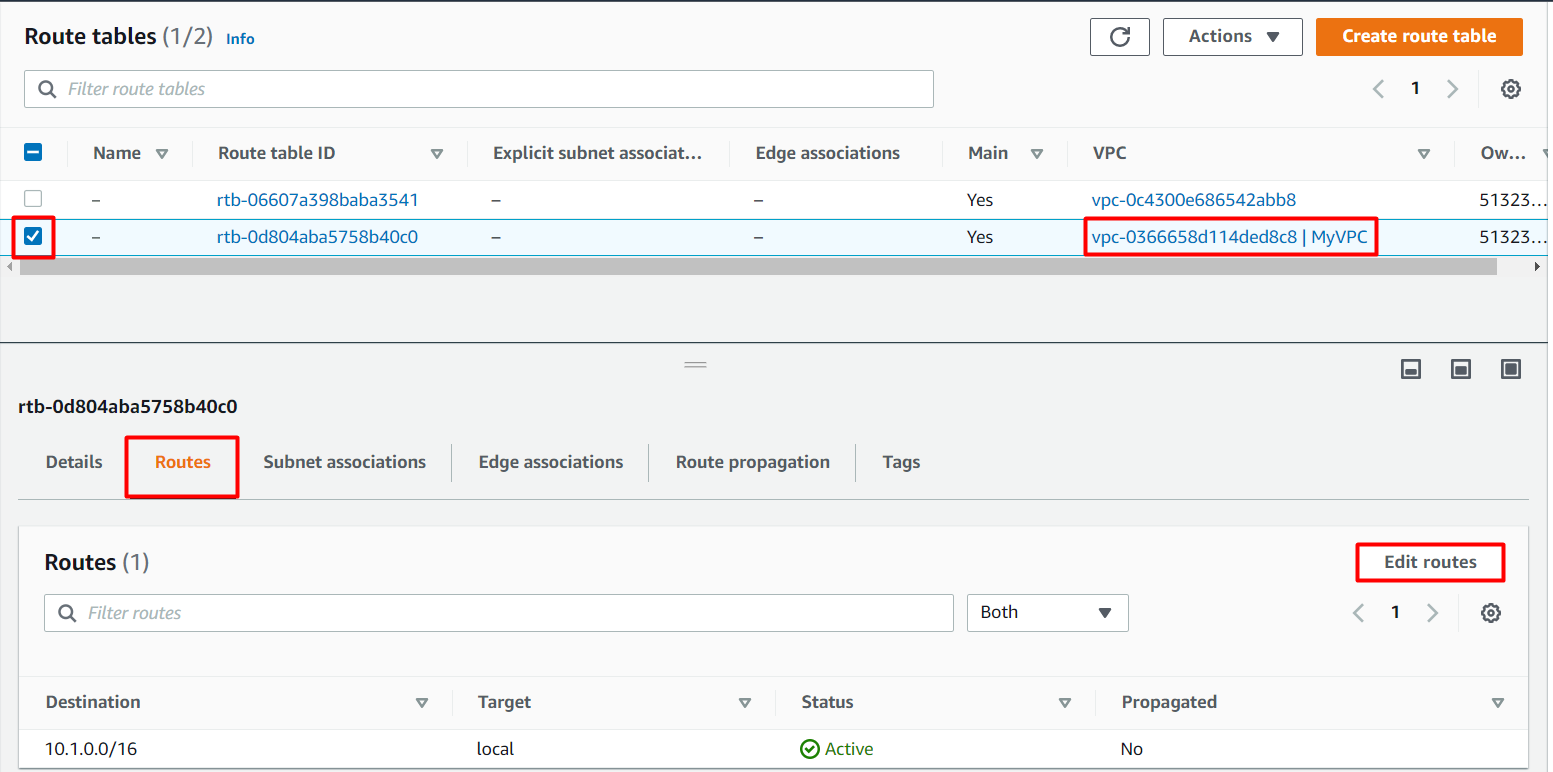
- Select Route Tables on the left side and click on MyVPC route table. Click on Routes and select Edit routes.
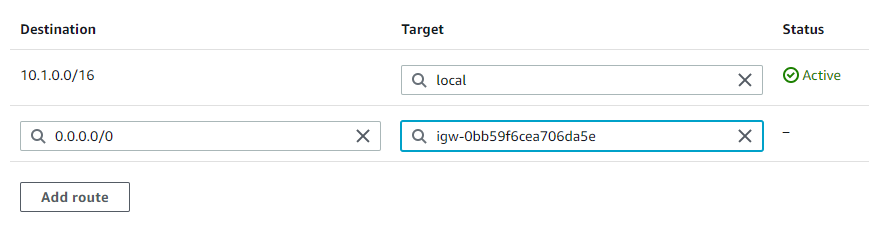
- Select Add Routes then enter 0.0.0.0/0**.** Set the Target as “Internet Gateway” and choose Your Internet Gateway from the drop-down list. Click on Save Routes.
Task 6: Create a Subnet
-
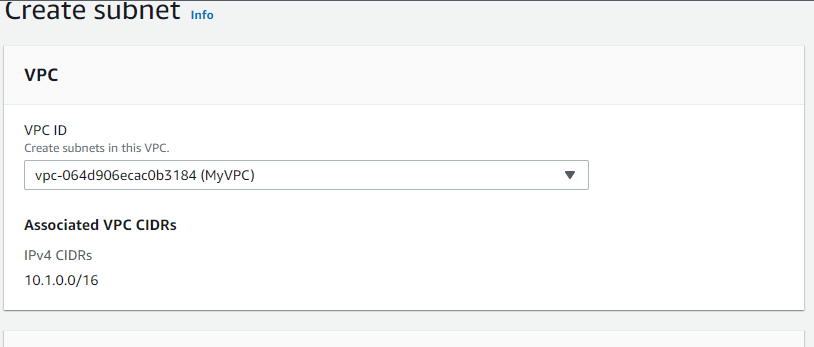
Click on Subnets in the left side panel and click on Create Subnet. Select “MyVPC” in VPCID.
-
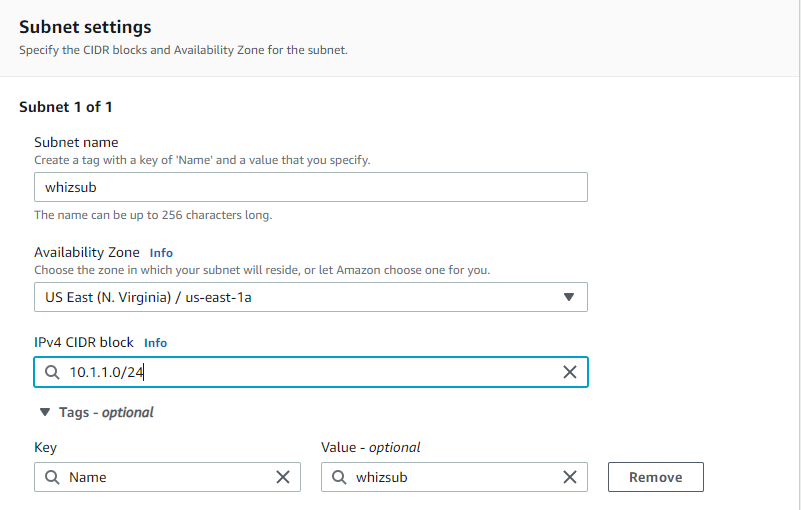
Give whizsub as the name of your subnet and us-east-1a for the availability zone. Enter the IPv4 CIDR Block as 10.1.1.0/24 and click on the Create subnet button.
Task 7: Create VPC Flow Logs
- Make sure you are in the US East (N. Virginia) us-east-1 Region.
- Navigate to VPC by clicking on Services at the top of the AWS Console.
- Click on VPC (under the Networking & Content Delivery section) or you can also search for VPC.
- Click on Your VPCs from the left menu.
- Navigate to the VPC you just created, click on Actions then select Create Flow Log.
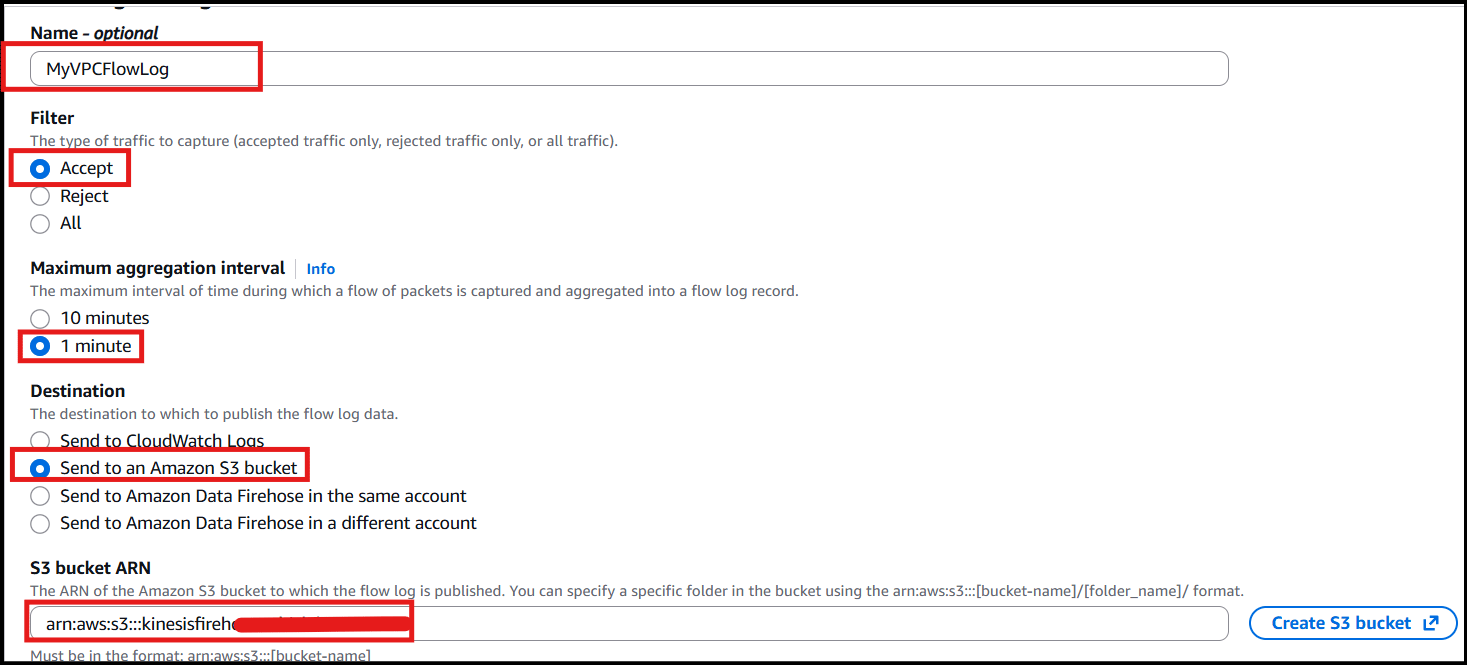
- Enter the name as MyVPCFlowLog
- Select Accept in Filter options and then set the “Maximum Aggregation Interval” to 1 minute.
- Select Send to Amazon S3 bucket as the Destination.
-
Enter the ARN of your S3 Bucket, which you’ve copied earlier, then click on the Create Flow Log button.
- Once the flow logs are created, head back to the AWS VPC service, select it, and click on the Flow Logs tab.


- Now you have successfully learned how to create the VPC Flow Logs.
Task 8: Creating an EC2 Instance
- Make sure you are in the US-East (N.Virginia) us-east-1 region.
- Navigate to Services at the top and click on EC2 under Compute.
- Select Instances in the left side panel and click on Launch Instances
- Enter Name as whizlabsec2instance
-
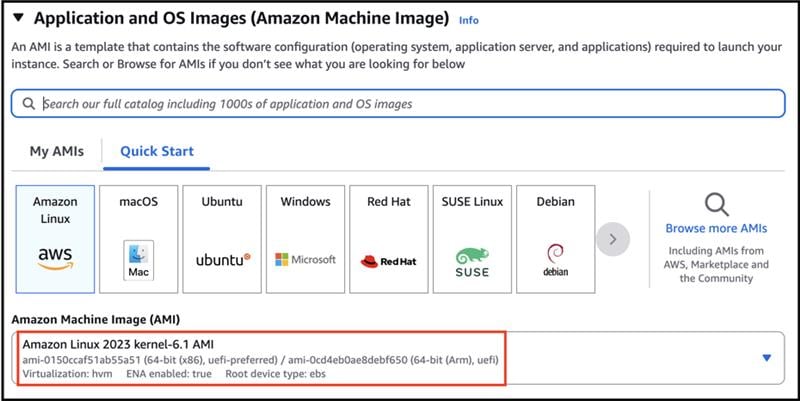
Select Amazon Linux 2023 AMI from the dropdown:
-
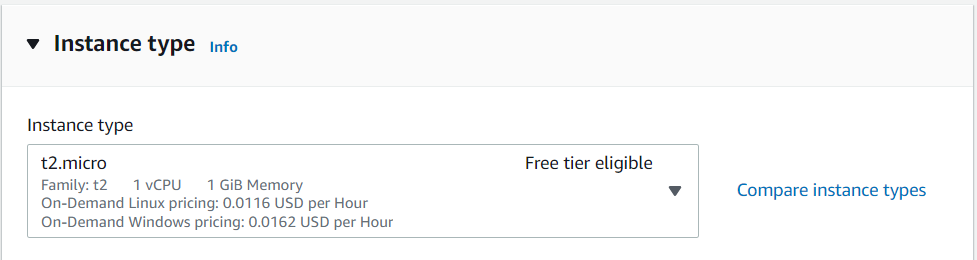
Choose an Instance Type: Choose t2.micro
-
For Key pair: Select Create a new key pair
- Key pair name: MySSHKey
- Key pair type: RSA
- Private key file format: .pem
-
In Network Settings Click on Edit Button:
- VPC: Choose MyVPC
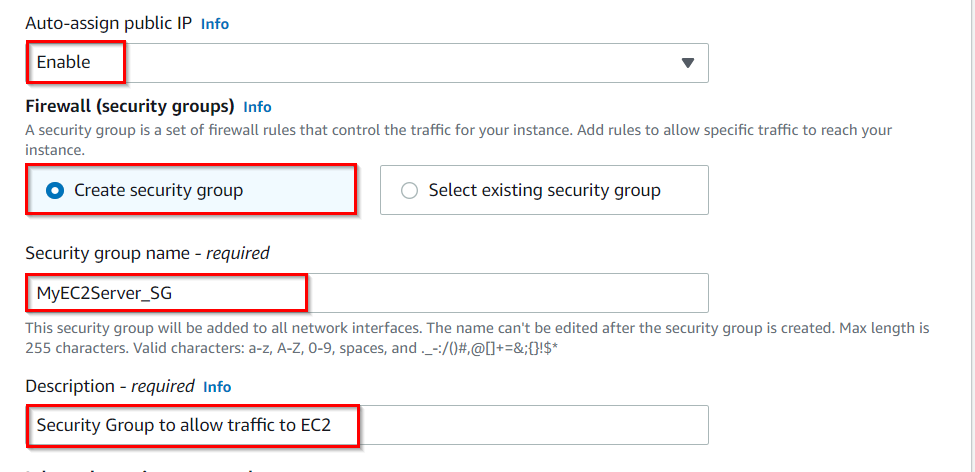
- Auto-assign public IP: Enable
- Select Create new Security group
- Security group name: Enter MyEC2Server_SG
-
Description: Enter Security Group to allow traffic to EC2
-
To add SSH,
- Choose Type: SSH
- Source: Select Anywhere
-
For HTTP, Select the Add Security rule Button
- Choose Type: HTTP
- Source: Select Anywhere
-
For HTTPs, Select the Add Security rule Button
- Choose Type: HTTPS
- Source: Select Anywhere
- Leave others as default, and click on the Launch Instance button.
-
After 1-5 minutes, the Instance State will change to running, as shown below:

Task 9: Generating Traffic
- We need to SSH into the instance to generate traffic. To do so, please follow the steps in SSH into EC2 Instance.
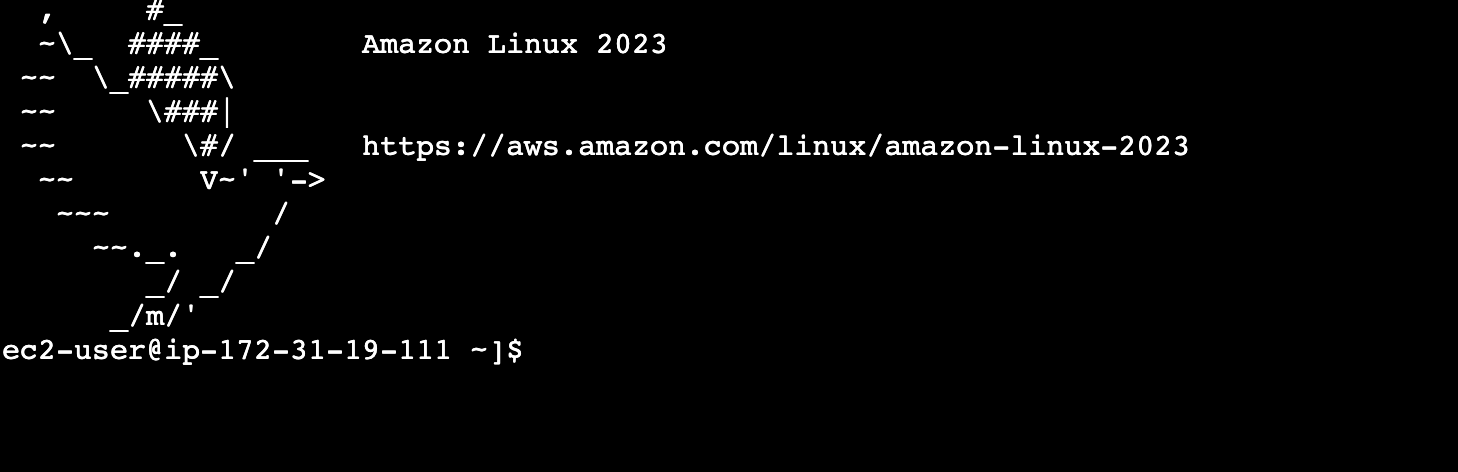
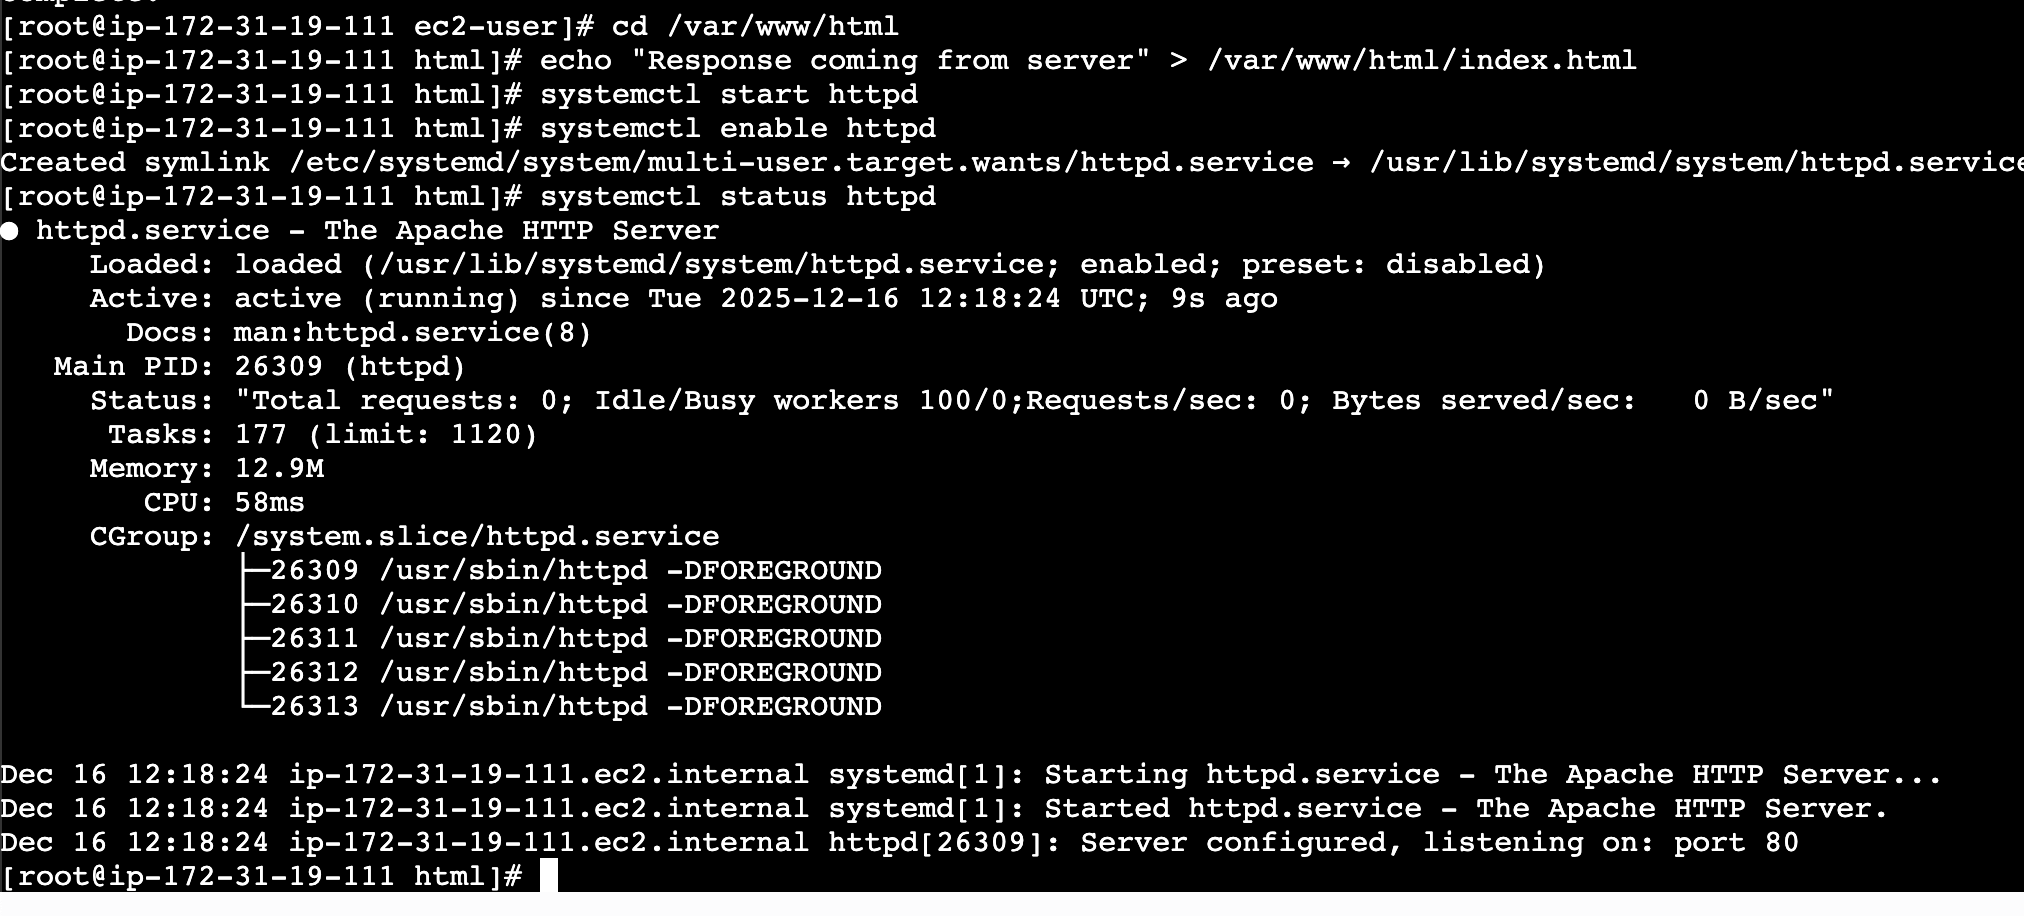
- Once you SSH into the instance, install an Apache Server. To install it, follow the below steps. Run these commands one by one.
-
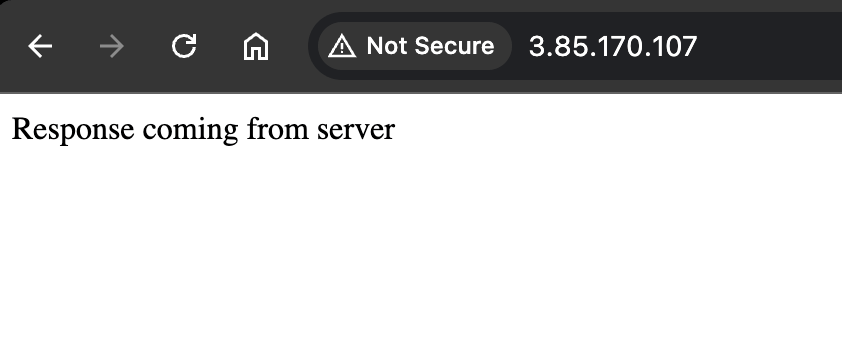
Copy your instance Public IP, open a new tab and paste it into the address bar, and hit enter. It should be shown as below:
Task 10: Check the logs in Cloudwatch Log groups
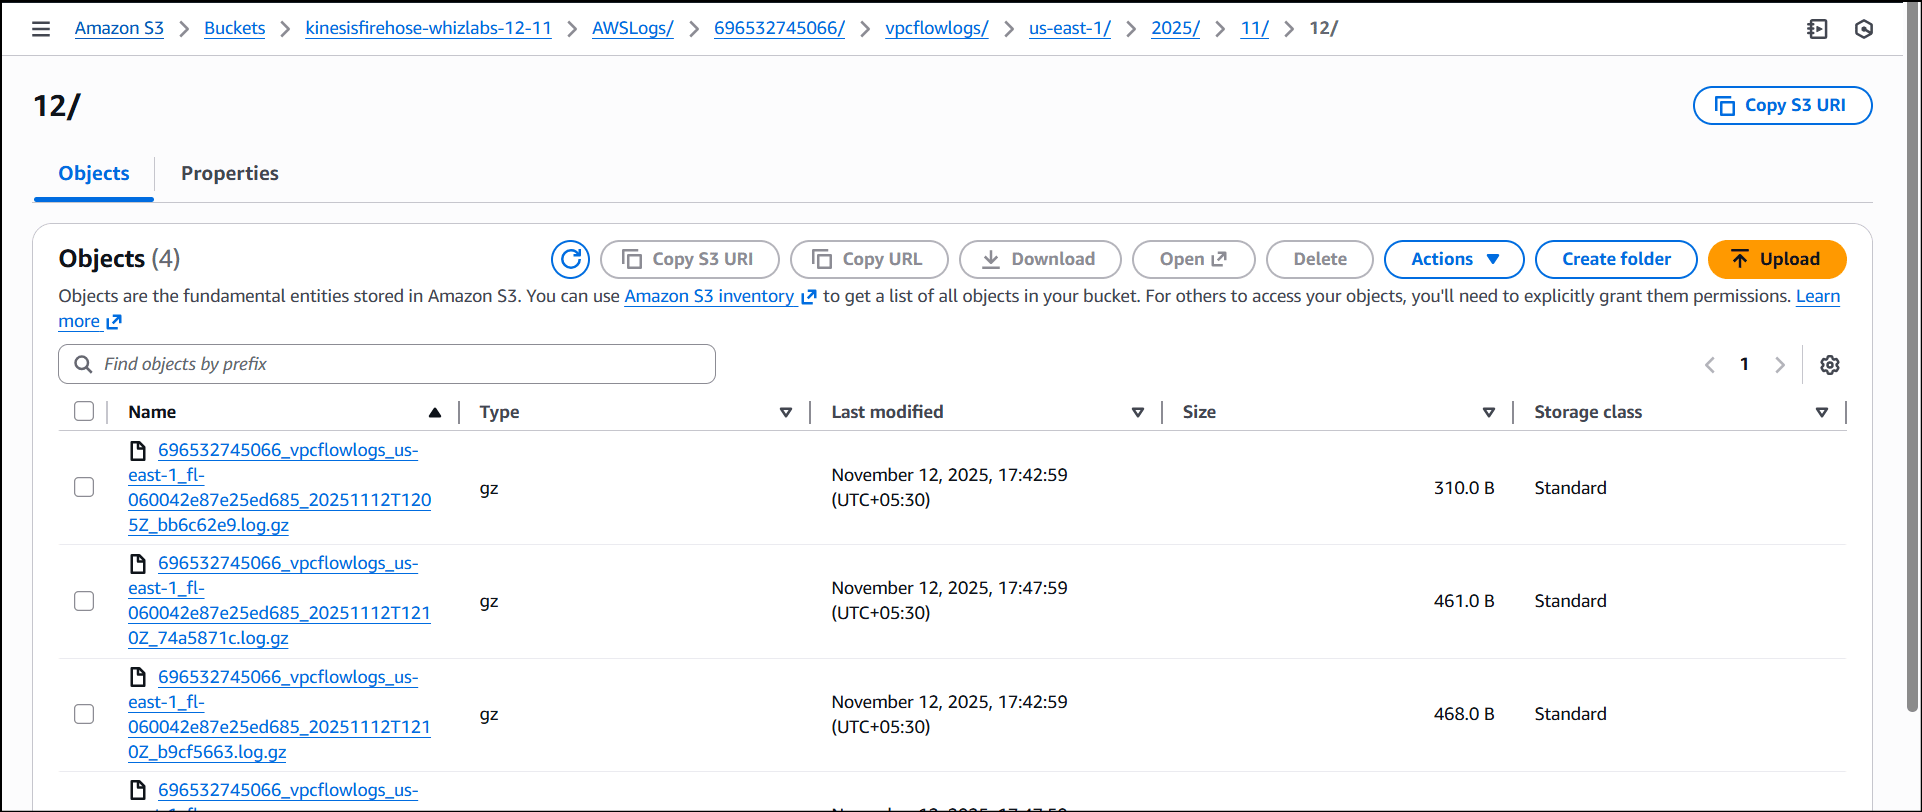
- Now Navigate to S3, Wait for few minutes and refresh the page, and click on Created bucket**.** You will see the AWSLogs appear under Objects.
- Click on AWSLogs -> Account ID -> vpcflowlogs -> us-east-1 -> Year -> Month -> Date.
-
You will be able to view all the details i.e. the traffic that is being directed to our EC2 Instance.
Do You Know ?
Amazon Kinesis Firehose is a fully managed service that makes it easy to capture, transform, and load streaming data into various AWS data stores, including Amazon S3. It provides a reliable and scalable solution for ingesting and processing large volumes of streaming data in real-time.
Completion and Conclusion
- You have successfully created an S3 bucket.
- You have successfully created a Kinesis firehose delivery stream.
- You have successfully transferred the sample data generated by the EC2 Instance, from VPC Flow Logs to Amazon S3 Bucket using Kinesis firehose delivery stream.
End Lab
- Sign out of AWS Account.
- You have completed the lab.
- Once you have completed the steps, click on End Lab from the IP Lab Portal dashboard.
What gets checked
When you press Check my work, the platform verifies each of these:- Create Public AWS S3 Bucket — Check whether a Public S3 Bucket created or not
- Create an Amazon Kinesis Data Firehouse Delivery stream — Check whether an Amazon Kinesis Firehouse Delivery Stream is created
- Create Amazon Custom VPC — Check whether a Custom VPC is created or not.
- Create Amazon Custom VPC Egress-Only Internet Gateway — Check whether a Custom VPC Egress-Only Internet Gateway is created or not.
- Create Amazon Custom VPC Subnet — Check whether a Subnet is created for the Custom VPC or not.
- Launch EC2 AMI type Amazon Linux — Check whether the EC2 instance is launched using an Amazon AMI.