

Overview
Lab Details
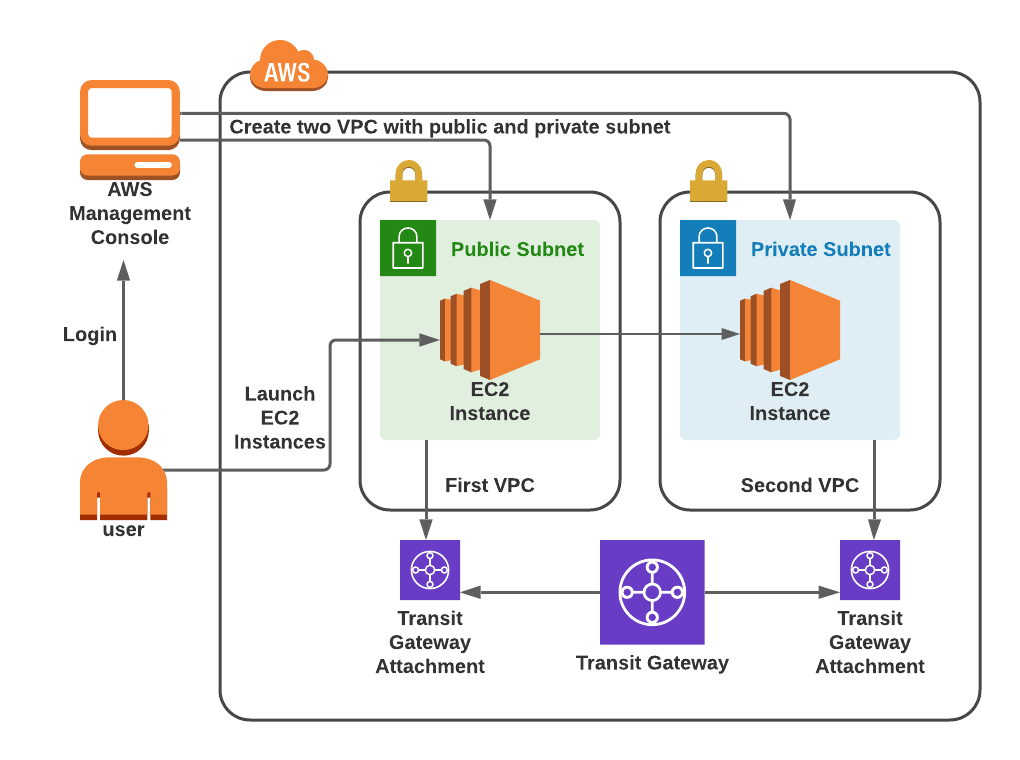
- This lab walks you through how to peer VPC with Transit Gateway. You will be creating 2 VPC with a public and private subnet. Launch EC2 Instances in both of the VPC and establish peering between them.
- You will be using the Transit gateway attachment to add VPC and add the entry in the route table. Then you will use SSH into the private EC2 from the public EC2 instance.
- Duration: 1 hour 15 minutes
- AWS Region: US East (N. Virginia) us-east-1.
Introduction
What is a Transit gateway?
- The AWS Transit Gateway helps you connect multiple VPCs and on-premises networks through a central hub. It simplifies your network with VPCs and on-premises connections and solves the problem of complex peering relationships.
- With VPC peering using the Transit gateway, your data is always encrypted and no longer uses the public internet for communication.
-
Benefits of using Transit gateway:
- Easy to connect
- Full control
- Greater security
- Multicast feature
-
Reasons to use Transit gateway over VPC peering:
- VPC peering does not support transitive peering, meaning you can only peer two VPC at a time.
- To peer your VPC with an on-premise network, you can not use VPC peering. Transit gateway supports connecting on-premise networks.
-
Transit gateway limits:
- Per transit gateway, you can have 20 transit gateway route tables.
- Per transit gateway, you can have 10000 routes.
- Per transit gateway, there can be 50 transit gateway attachments.
- Per VPC, you can have 5 unique transit gateways.
How Transit gateway can help you simplify your network?
-
Transit Gateway acts as a cloud router that supports connecting with the following resources:
- Amazon VPC
- VPN Connection having Customer Gateway
- AWS Direct Connect Gateway
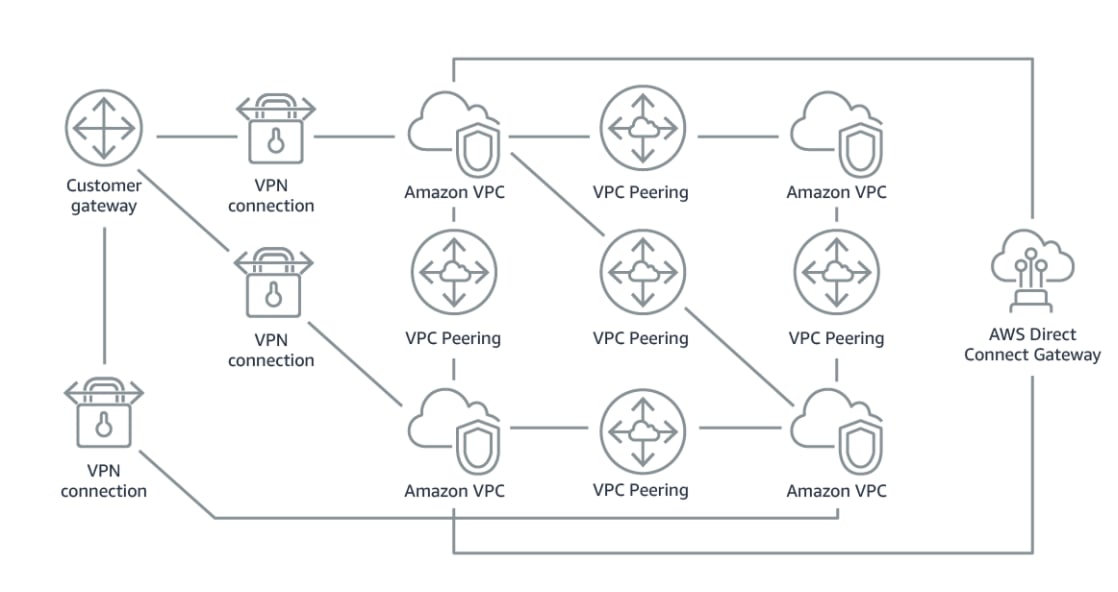
Without Transit Gateway:
- VPC peering can have only one-to-one relationship between two VPCs. The complexity increases as you scale the number of connections.
-
Maintenance of the route table is another big challenge when you are scaling, you must keep the route table having routes to VPC and connection with the on-premise network using a separate network gateway for each new connection.
With Transit Gateway:
- To interconnect Amazon VPC with an on-premise network, we can use Transit Gateway.
-
The network is standardized and easily scalable. With Transit Gateway, you have one place to manage and monitor the number of active connections for each network.
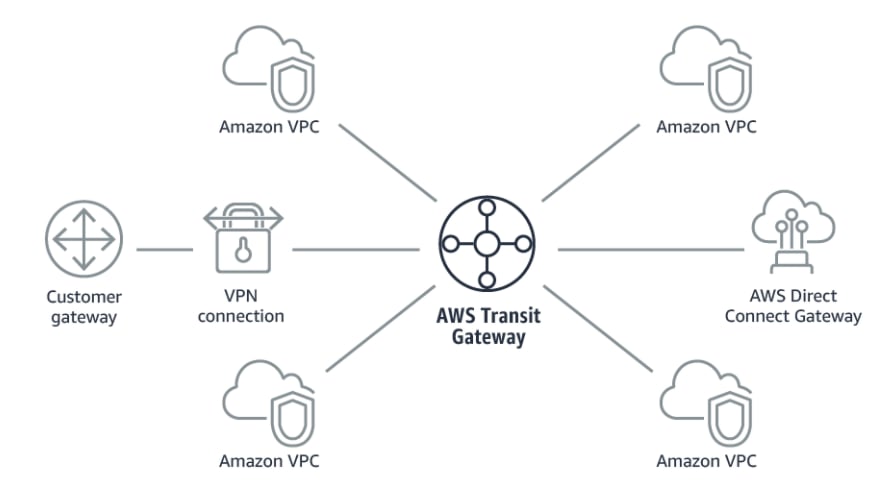
- Since connecting to an on-premise network is not possible virtually, In this lab, you will learn how to create a Transit gateway and use it to peer VPC.
Transit gateway use cases
- Applications can be delivered around the world.
- Move your network design from Multi-AZ to Multi-region.
- Scale quickly and respond to spikes in traffic smoothly.
- Connect to all types of networks in one place.
Architecture Diagram
Task Details
- Sign into the AWS Manangement Console.
- Create the first VPC
- Create a Public subnet in First VPC
- Create and attach an Internet Gateway
- Create a Public Route Table and associate it with the subnet
- Add public Route in the Route table
- Launch an EC2 instance in the First VPC
- Create a Second VPC
- Create a Private subnet in Second VPC
- Launch an EC2 instance in Second VPC
- Create a Transit gateway
- Create two Transit gateway attachment for the VPCs created
- Add the routes in the First VPC’s route table
- Add the routes in the Second VPC’s route table
- Test the connectivity between two VPCs
- Deleting AWS Resources
Launching Lab Environment
- To launch the lab environment, Click on the Start Lab button.
- Please wait until the cloud environment is provisioned. It will take less than a minute to provision.
- Once the Lab is started, you will be provided with IAM username, Password, Access Key, and Secret Access Key.
Note : You can only start one lab at any given time
Lab guide
Lab Steps
Task 1: Sign in to AWS Management Console
- Click on the Open Console button, and you will get redirected to AWS Console in a new browser tab.
-
On the AWS sign-in page,
- Leave the Account ID as default. Never edit/remove the 12-digit Account ID present in the AWS Console. Otherwise, you cannot proceed with the lab.
- Now copy your User Name and Password in the Lab Console to the IAM Username and Password in AWS Console and click on the Sign in button.
- Once Signed In to the AWS Management Console, make the default AWS Region as US East (N. Virginia) us-east-1.
Task 2: Create the first VPC
In this task, we are going to create the first VPC (Virtual Private Cloud) in the specified AWS region. This VPC will serve as one of the VPCs that will be peered using the Transit Gateway.- Make sure you are in the N.Virginia Region.
- Navigate to VPC by clicking on the Services menu in the top, then click on VPC in the Networking & Content Delivery section.
-
Navigate to Your VPCs on the left panel and click on the Create VPC button.
- Select VPC only
- Name tag : Enter First_VPC
-
IPv4 CIDR block : Enter 10.0.0.0/24
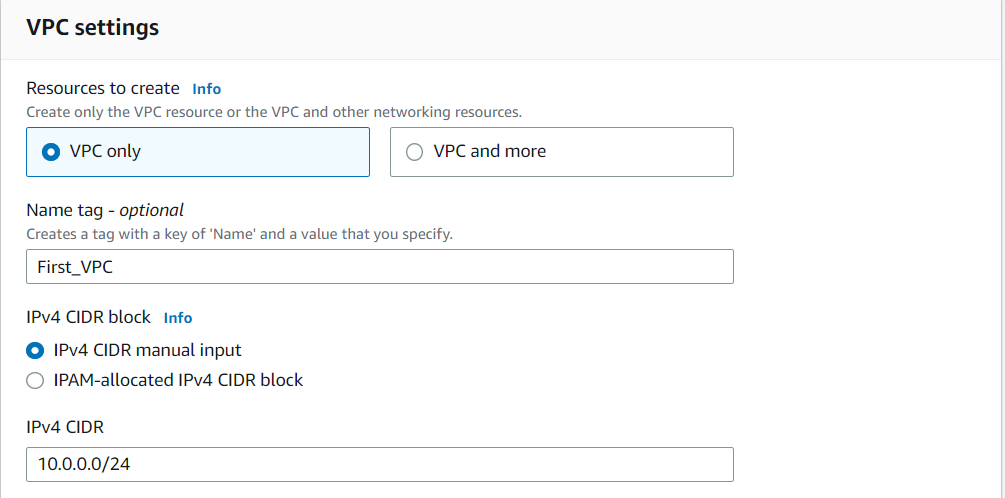
- Leave everything else as default and click on the Create VPC button.
- You have successfully created the VPC. Note the VPC ID for later use.
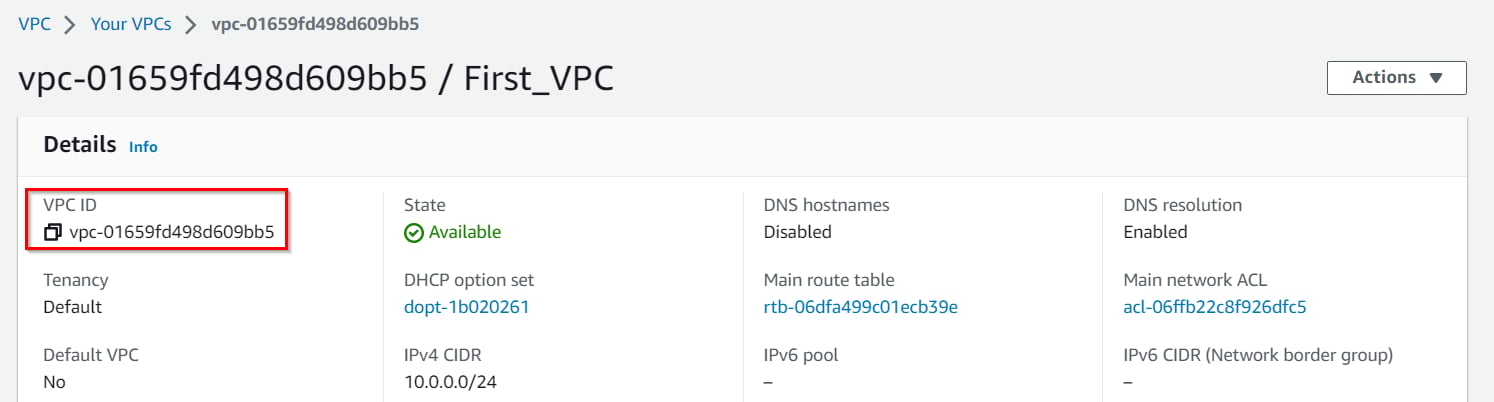
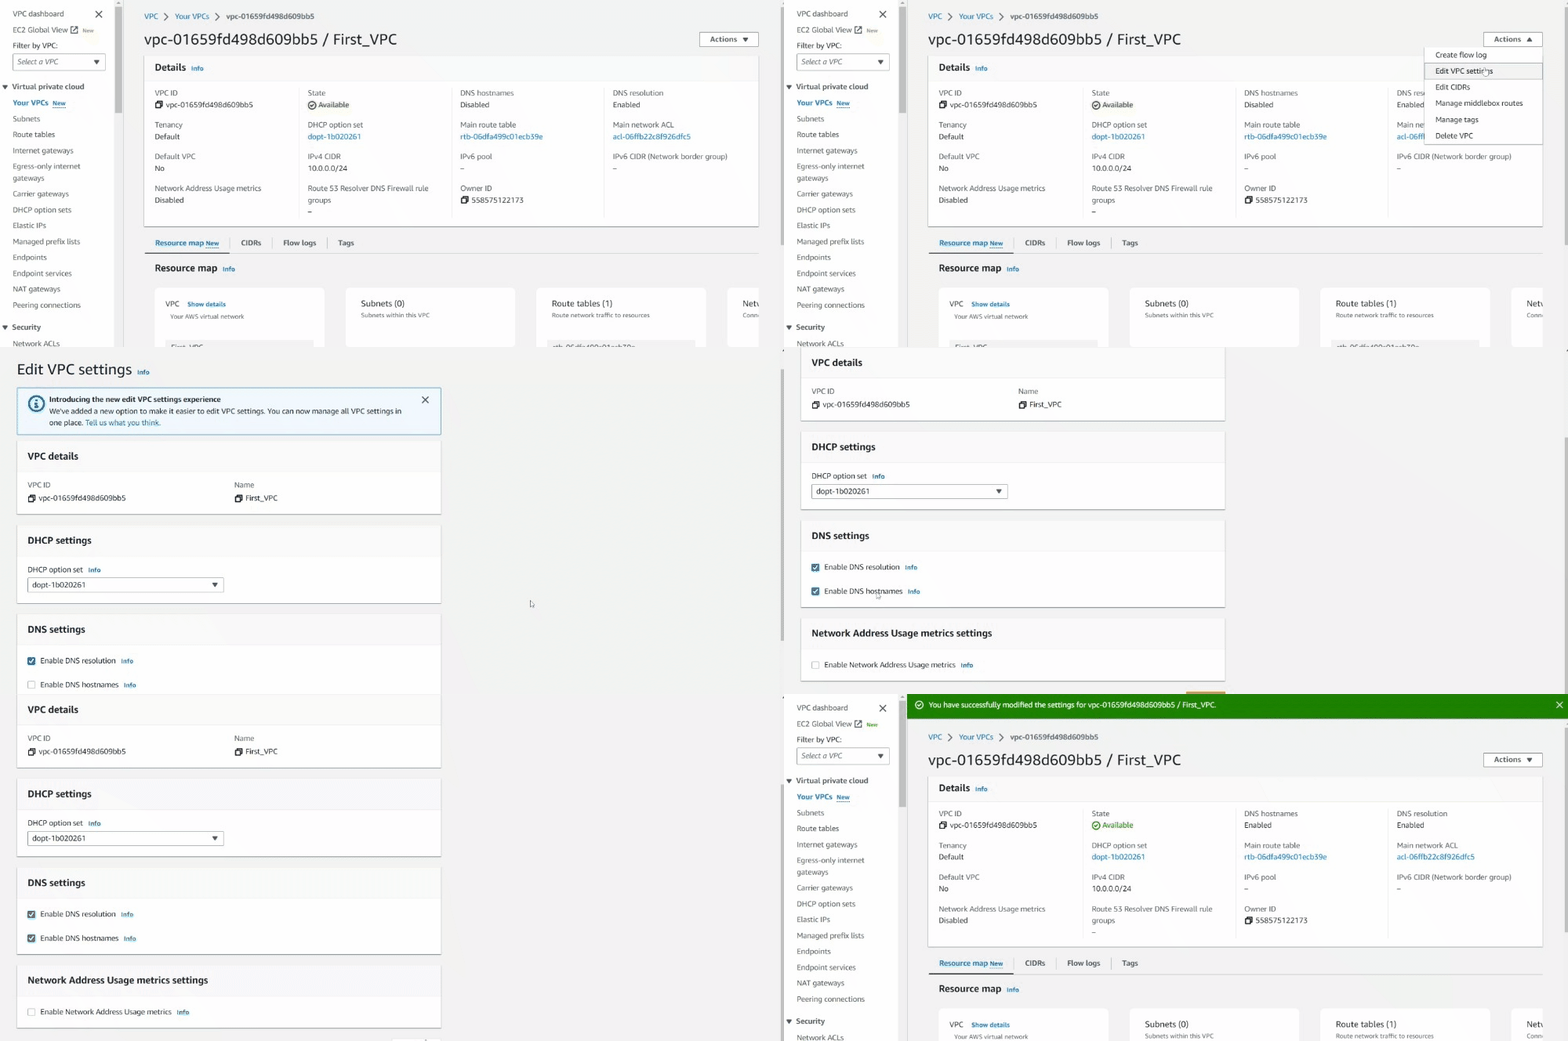
- Now select the First_VPC from the list and click on the Actions dropdown and select Edit VPC Settings
-
Check the Enable DNS resolution and Enable DNS hostnames checkbox under DNS settings, and then click on the Save button.
Task 3: Create a Public subnet in First VPC
In this task, we are going to create a public subnet within the first VPC. The public subnet will be used for launching an EC2 instance that will be accessible over the internet.-
Navigate to Subnet from the left side menu and click on Create subnet button.
- VPC ID : Select the First_VPC VPC from the list.
- Subnet name : Enter Public_subnet_first_VPC
- Availability Zone : Leave as No Preference
- IPv4 CIDR block : Enter 10.0.0.0/25
- Now click on the Create subnet button.
Task 4: Create and attach an Internet Gateway
In this task, we are going to create an internet gateway and attach it to the first VPC. The internet gateway allows the EC2 instance in the public subnet to communicate with the internet.-
Navigate to the Internet gateways from the left side menu and click on the Create Internet gateway button.
- Name tag : Enter IGW
- Click on the Create Internet gateway button
-
Now click on the Actions dropdown and select Attach to VPC.
- Available VPCs : select First_VPC from the list.
- Now click on the Attach Internet gateway.

Task 5: Create a Public Route Table and associate it with the subnet
In this task, we are going to create a public route table and associate it with the public subnet. The route table controls the traffic between the subnet and the internet gateway.-
Navigate to Route tables on the left side panel and click on the Create route table.
- Name : Enter PublicRT
- VPC* : Select the First_VPC from the list.
- Now click on the Create route table.
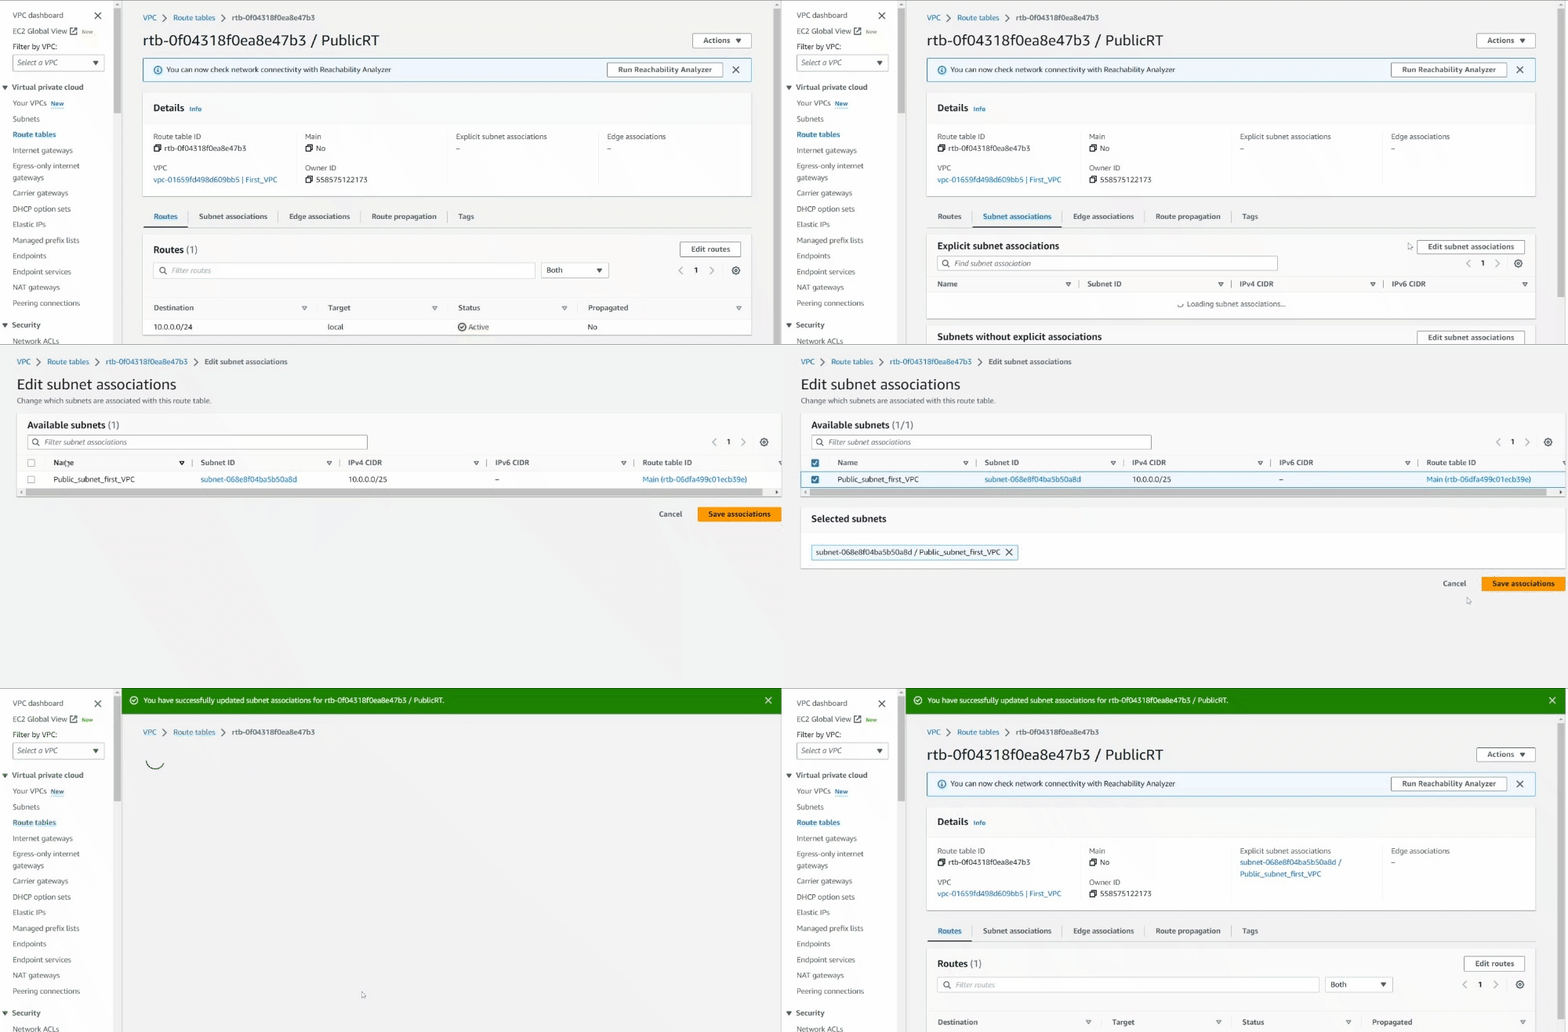
- Switch to the Subnet associations tab in below.
- Click on the Edit subnet associations.
- Now select the subnet with name Public_subnet_first_VPC and click on the Save associations button.
Task 6: Add public Route in the Route table
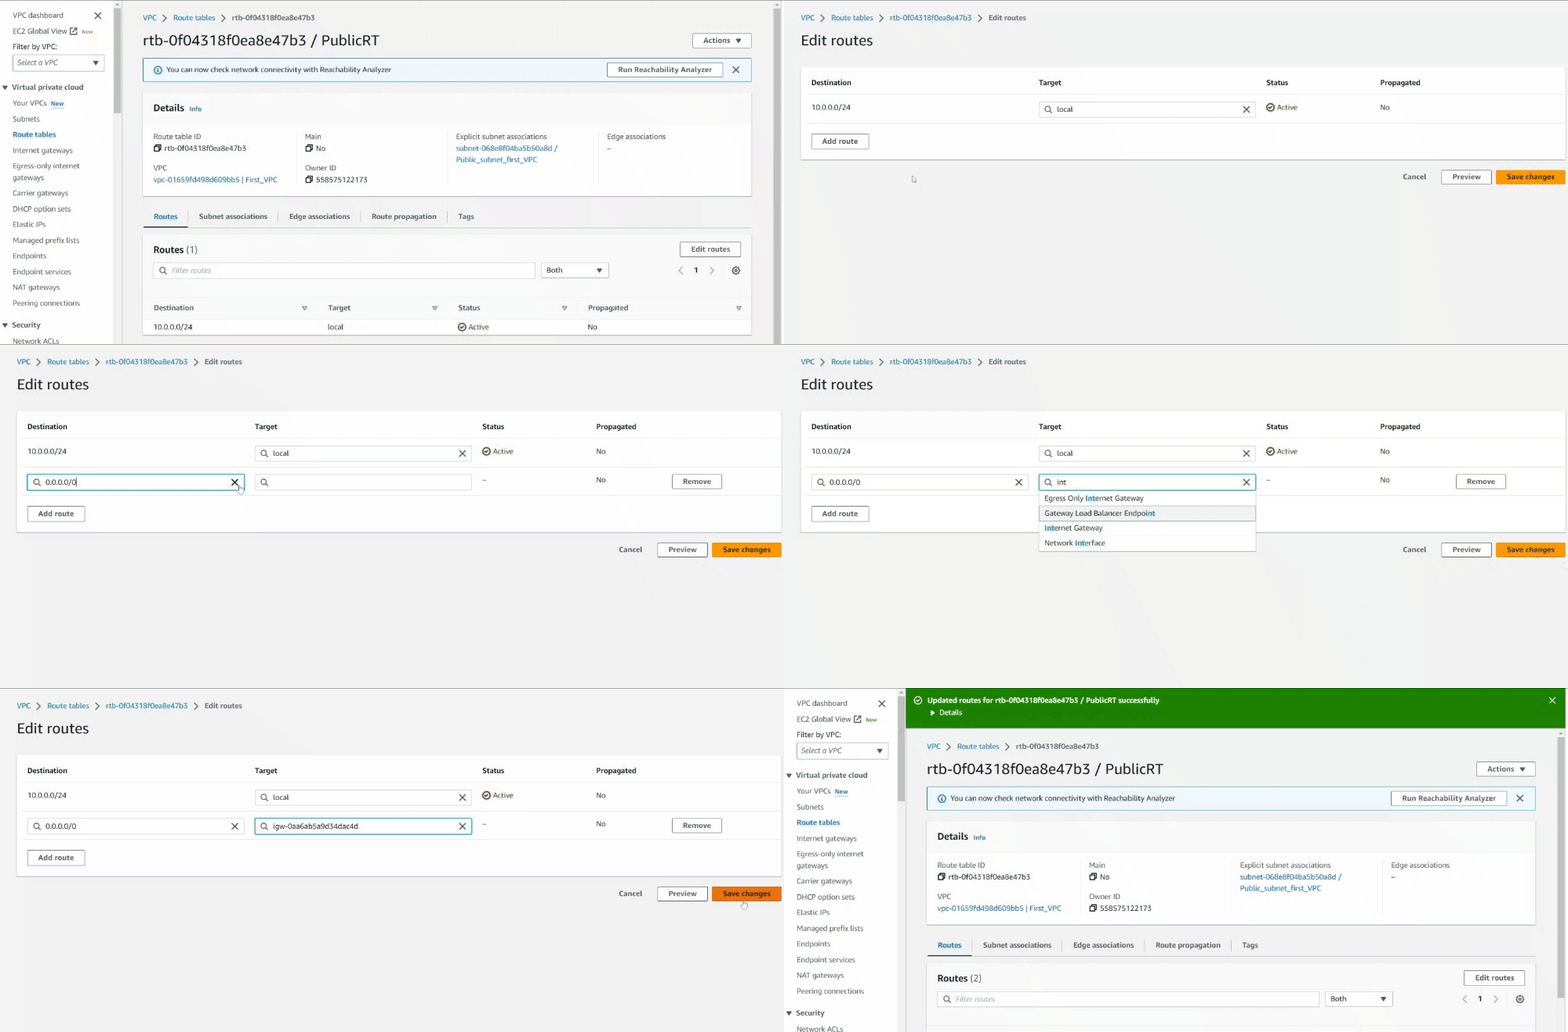
In this task, we are going to add a public route in the route table to allow traffic from the public subnet to the internet. This enables the EC2 instance in the public subnet to communicate with resources outside the VPC.- Navigate to Route tables on the left side panel and select the PublicRT from the list.
- Switch to the Routes tab in below and click on the Edit routes.
-
Now click on the Add route
- Destination : Enter 0.0.0.0/0
- Target : select Internet Gateway and then select the Internet Gateway id present.
- Click on the Save changes.
Task 7: Launch an EC2 instance in the First VPC
In this task, we are going to launch an EC2 instance in the first VPC’s public subnet. This EC2 instance will be used to test the connectivity between the VPCs after peering them using the Transit Gateway.- Make sure you are in the N. Virginia(us-east-1) Region.
- Navigate to EC2 by clicking on the Services menu in the top left, then click on EC2 in the Compute section.
- Navigate to Instances from the left side menu and click on Launch Instances button.

-
Under the Name and tags section :
- Name : First_VPCs_EC2
- Under the Application and OS Images (Amazon Machine Image) section :
-
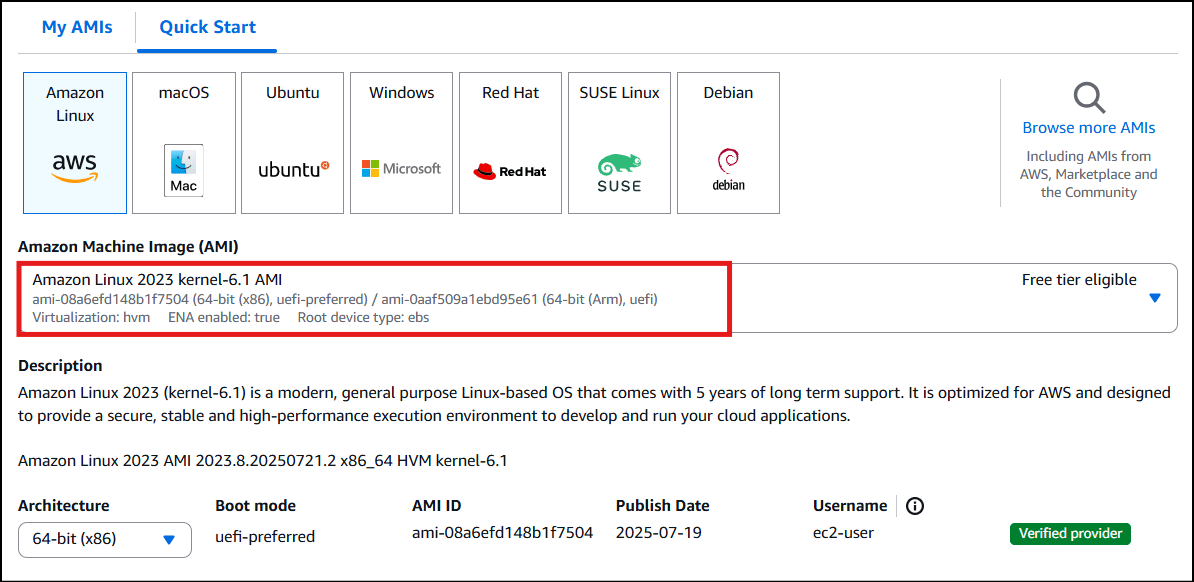
Select Quick Start tab and Amazon Linux 2023 kernel-6.1 AMI under it
- Under the Instance Type section :
-
Instance Type : Select t2.micro

- Under the Key Pair (login) section :
- Click on Create new key pair hyperlink
- Key pair name: ec2_ssh_key
- Key pair type: RSA
- Private key file format: .pem
- Click on Create key pair and select the created key pair
- Under the Network Settings section :
- Click on Edit button
- VPC : Select First_VPC
- Subnet : leave as default
- Auto-assign public IP: select Enable
- Firewall (security groups) : Select Create a new security group
- Security group name : Enter Public_EC2_SG
- Description : Enter Security group for public EC2
-
To add SSH:
- Choose Type: SSH
- Source: Anywhere (From ALL IP addresses accessible).
-
For HTTP, click on Add security group rule,
- Choose Type: HTTP
- Source: Anywhere (From ALL IP addresses accessible).
-
For HTTPS, click on Add security group rule,
- Choose Type: HTTPS
- Source: Anywhere (From ALL IP addresses accessible).
-
Under the Advanced details section :
- Under the IAM instance profile: Select task232_profile_… role.
- Under the User data: copy and paste the following script to create an HTML page served by an Apache httpd web server. Make sure you remove the extra space after pasting the comment.
- Keep everything else as default and click on the Launch instance button.
- Launch Status: Your instance is now launching, Navigate to Instances page from the left menu and wait until the status of the EC2 Instance changes to running.

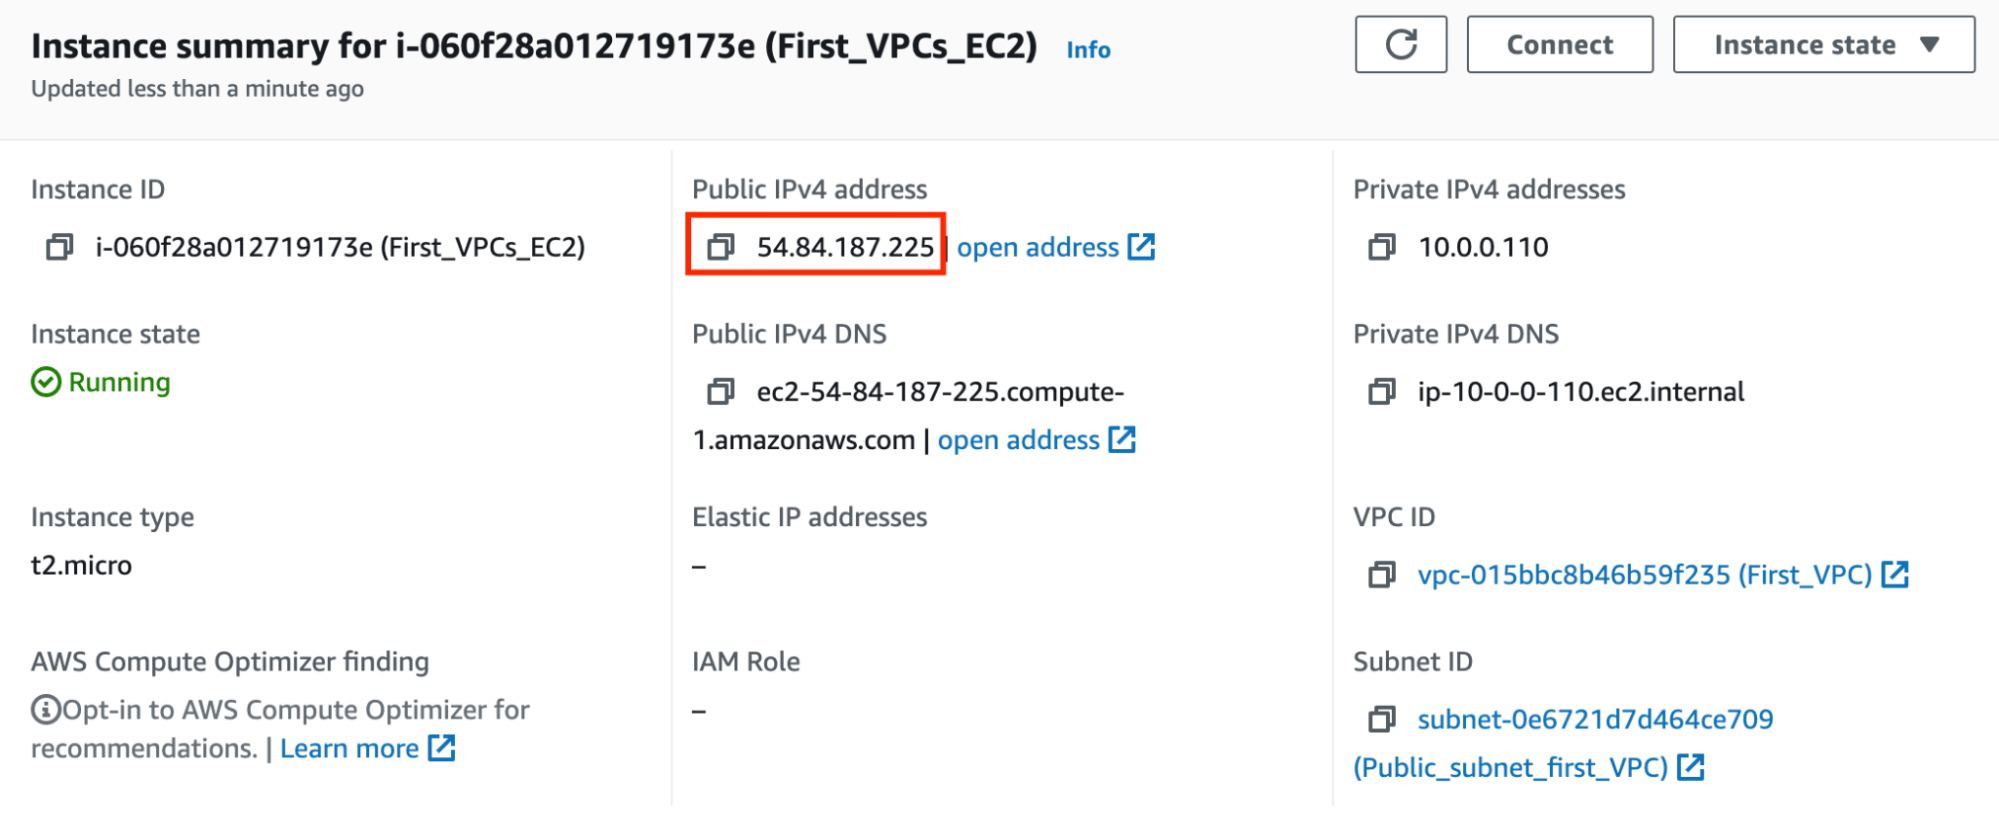
- Note down the sample IPv4 Public IP Address of the EC2 instance. A sample is shown in the screenshot below.
- If you paste the IPv4 Public IP in your browser and hit [enter]. You will be able to the below webpage.

Task 8: Create a Second VPC
In this task, we are going to create the second VPC, which will be the other VPC that is peered with the first VPC using the Transit Gateway.- Navigate to VPC by clicking on the Services menu at the top, then click on VPC in the Networking & Content Delivery section.
-
Navigate to Your VPCs on the left panel and click on the Create VPC button.
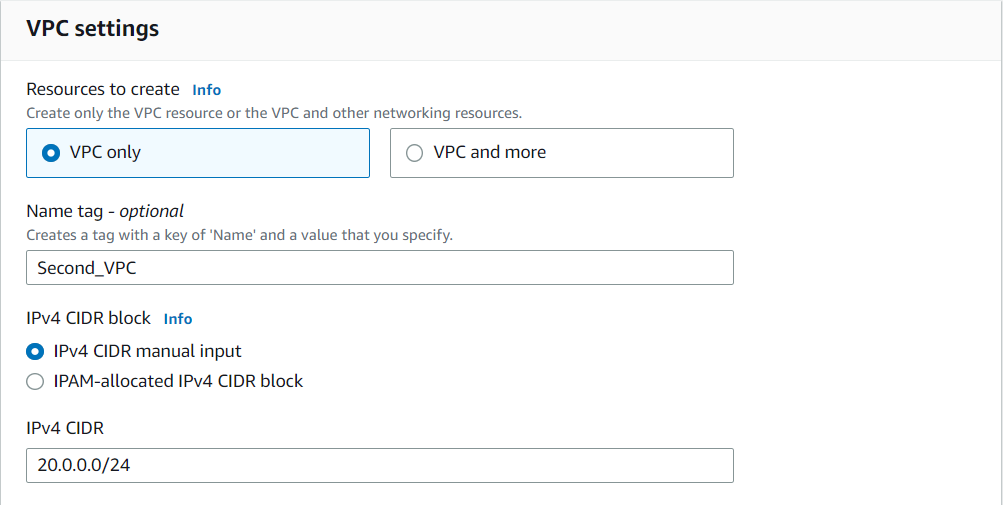
- Select VPC only
- Name tag : Enter Second_VPC
-
IPv4 CIDR block : Enter 20.0.0.0/24
- Leave everything else as default and click on the Create VPC button.
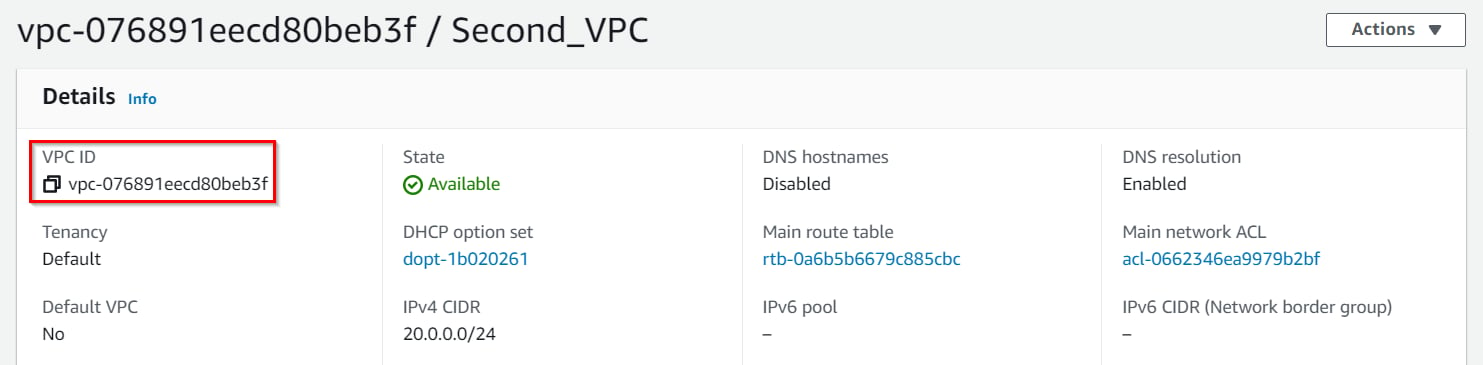
- You have successfully created the VPC. Note the VPC ID for later use.
- Now select the Second_VPC from the list and click on the Actions and select Edit VPC settings
- Check the Enable DNS resolution and Enable DNS hostnames checkbox under DNS settings and then click on the Save button
Task 9: Create a Private subnet in Second VPC
In this task, we are going to create a private subnet within the second VPC. The private subnet will be used for launching an EC2 instance that will not have direct internet connectivity.- Navigate to Subnets from the left side menu and click on Create Subnet button.
- VPC ID : Select the Second_VPC VPC from the list.
- Subnet name : Enter Private_subnet_second_VPC
- Availability Zone : Leave as No Preference
- IPv4 CIDR block : Enter 20.0.0.0/25
- Now click on the Create subnet button
Task 10: Launch an EC2 instance in Second VPC
In this task, we are going to launch an EC2 instance in the second VPC’s private subnet. This EC2 instance will be used to test the connectivity between the VPCs after peering them using the Transit Gateway.- Now again click on Launch Instances button.
- Under the Name and tags section :
- Name : Second_VPCs_EC2
- Under the Application and OS Images (Amazon Machine Image) section :
-
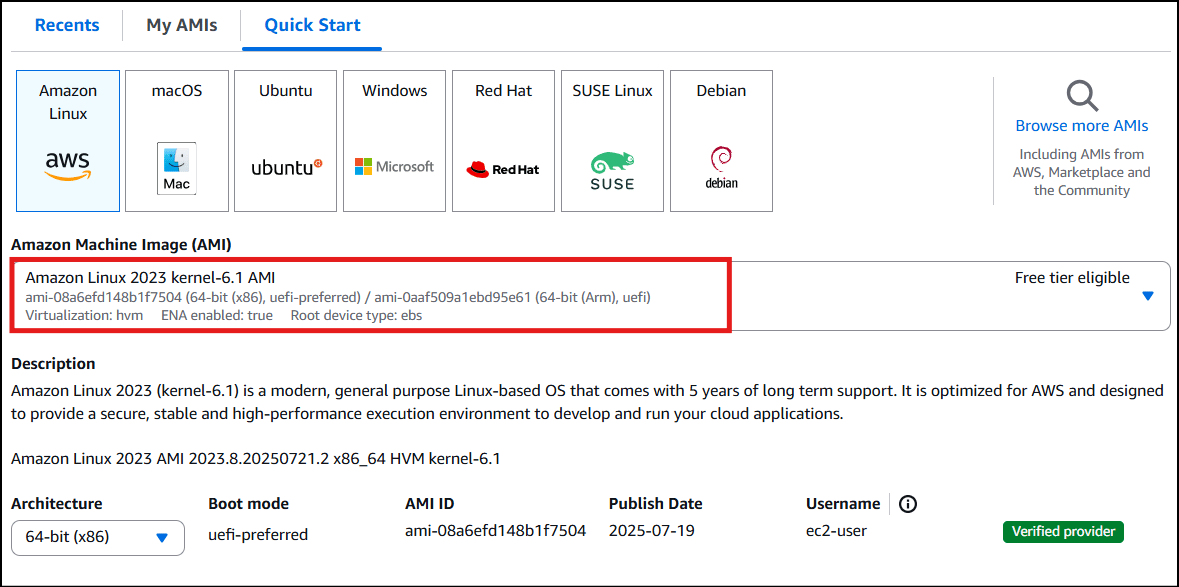
Select Quick Start tab and Amazon Linux 2023 kernel-6.1 AMI under it
-
Under the Instance Type section :
-
Instance Type : Select t2.micro

-
Instance Type : Select t2.micro
- Under the Key Pair (login) section :
- Select ec2_ssh_key from the list.
- Under the Network Settings section :
- Click on Edit button
- VPC : Select Second_VPC
- Subnet : leave as default
- Auto-assign public IP: select Disable
- Firewall (security groups) : Select Create a new security group
- Security group name : Enter Private_EC2_SG
- Description : Enter Security group for private EC2
-
To add SSH:
- Choose Type: SSH
- Source: Anywhere (From ALL IP addresses accessible).
- Keep everything else as default and then click on the Launch Instance button.
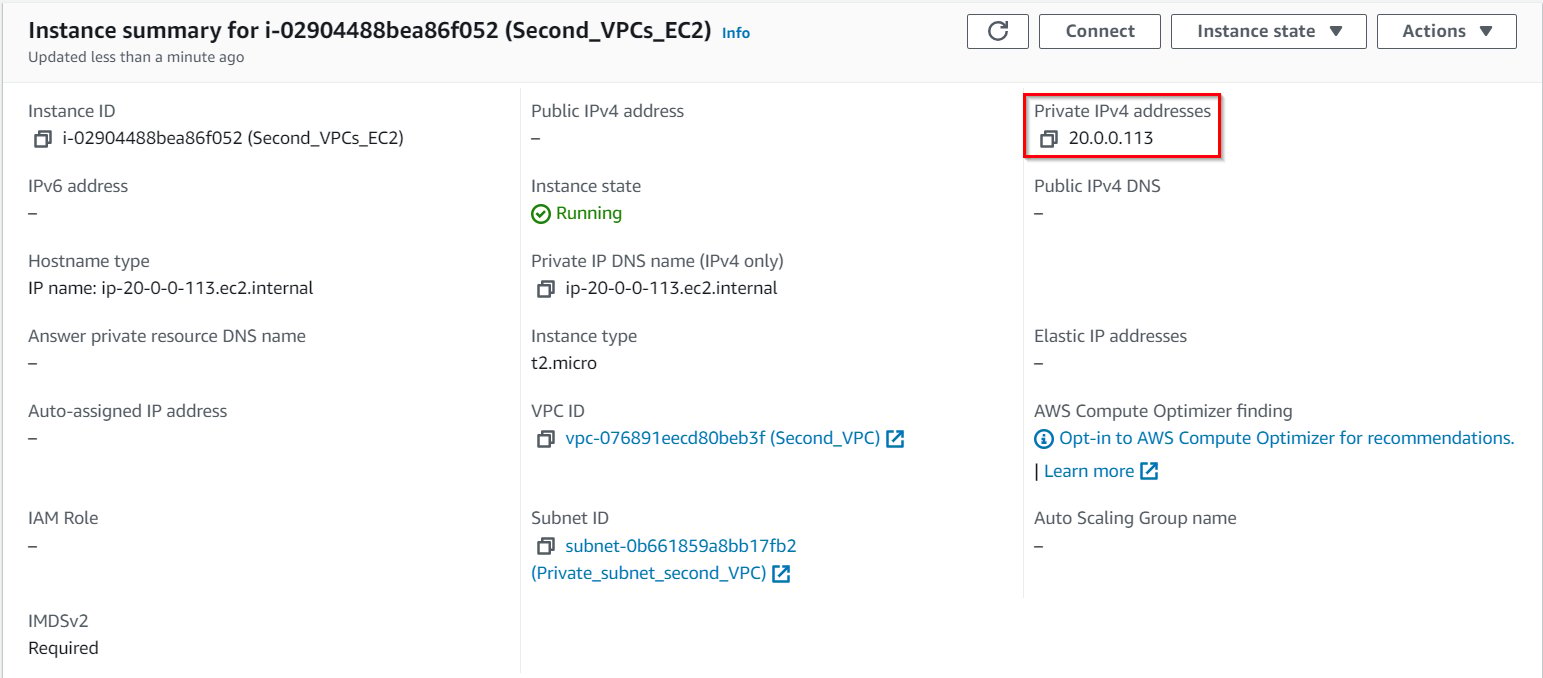
- Your instances are now launching. Navigate to the EC2 instance page and wait until the status changes to the Running. It will usually take 1-2 minutes.

Task 11: Create a Transit gateway
In this task, we are going to create a Transit Gateway, which acts as a central hub for connecting multiple VPCs and on-premises networks. The Transit Gateway simplifies the network architecture and facilitates the peering between VPCs.- Navigate to VPC by clicking on the Services menu at the top, then click on VPC in the Networking & Content Delivery section.
- Click on the Transit Gateways present under Transit Gateways section on the left sidebar.
- Click on the Create Transit gateway button to create a Transit gateway.

- Name tag: Enter DemoTG
- Description: Enter TG for peering two VPCs
- Keep all the options as default and click on Create transit gateway button.
-
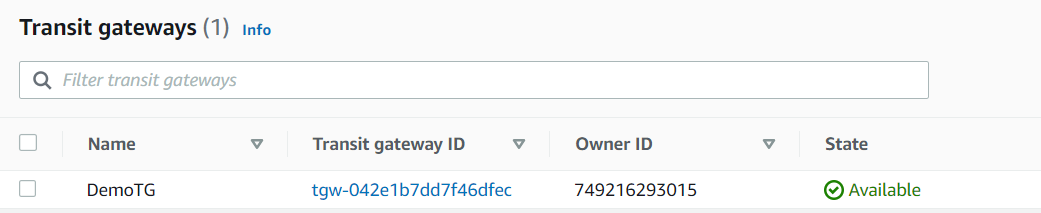
Currently, the status of the Transit gateway is in a pending state. It takes up to 5 minutes for it to become available.
Task 12: Create two Transit gateway attachment for the VPCs created
In this task, we are going to create two Transit Gateway attachments, one for each of the VPCs created. These attachments establish the peering between the VPCs and the Transit Gateway.- Navigate to the Transit gateways attachments present under Transit Gateways section on the left side bar.
-
Click on the Create transit gateway attachment button
- Name tag : First_VPC_TGA
- Transit Gateway ID: Select transit gateway present with Name tag DemoTG.
- Attachment type: Select VPC
- DNS support: Checked (default)
- IPv6 support: Unchecked
- VPC ID: Select VPC with the Name First_VPC
- Subnet IDs: Default
- Click on the Create transit gateway attachment.
- Creation will be in-progress for the Transit gateway attachment.
- It takes upto 5 minutes for it to come in available state.
-
To create the Transit gateway attachment for the second VPC, Click on the Create transit gateway attachment
- Name tag: Second_VPCs_TGA
- Transit Gateway ID: Select transit gateway present with Name tag DemoTG.
- Attachment type: Select VPC
- DNS support: Checked (default)
- IPv6 support: Unchecked
- VPC ID: Select VPC with the Name Second_VPC
- Subnet IDs: Default
- Creation will be in-progress for the Transit gateway attachment.
-
Once created both the Transit gateway attachment will be present.

Task 13: Add the routes in the First VPC’s route table
In this task, we are going to add a route in the first VPC’s route table that directs traffic destined for the second VPC’s CIDR range to the Transit Gateway. This enables communication between the VPCs through the Transit Gateway.- Navigate to Route tables on the left side panel.
- There will be 4 route tables present, and to avoid confusion put the entry in the correct route table. Let’s filter the route table present using the VPC filter.
- For the First VPC you created, you also have created a Route table with the name PublicRT which has a subnet association. Here the PublicRT route table is also called a custom or non-default route table.
- Click on the Route table ID to see the routes present.
- Click on the Routes tab below and click on the Edit routes.
- For this Route table, there are two entries present, First the local entry i.e. CIDR block of the First VPC, the second entry is about the route to the internet with Destination as 0.0.0.0/0 having target as the Internet gateway.
- Let’s add the third route which has destination as 20.0.0.0/24 i.e. CIDR range of second VPC and Target as Transit gateway.
-
To add the third route, Click on the Add route.
- Destination: Enter 20.0.0.0/24
- Target: Enter Transit Gateway
- Click on the Save changes button.
-
Make sure Routes have Destination as 20.0.0.0/24
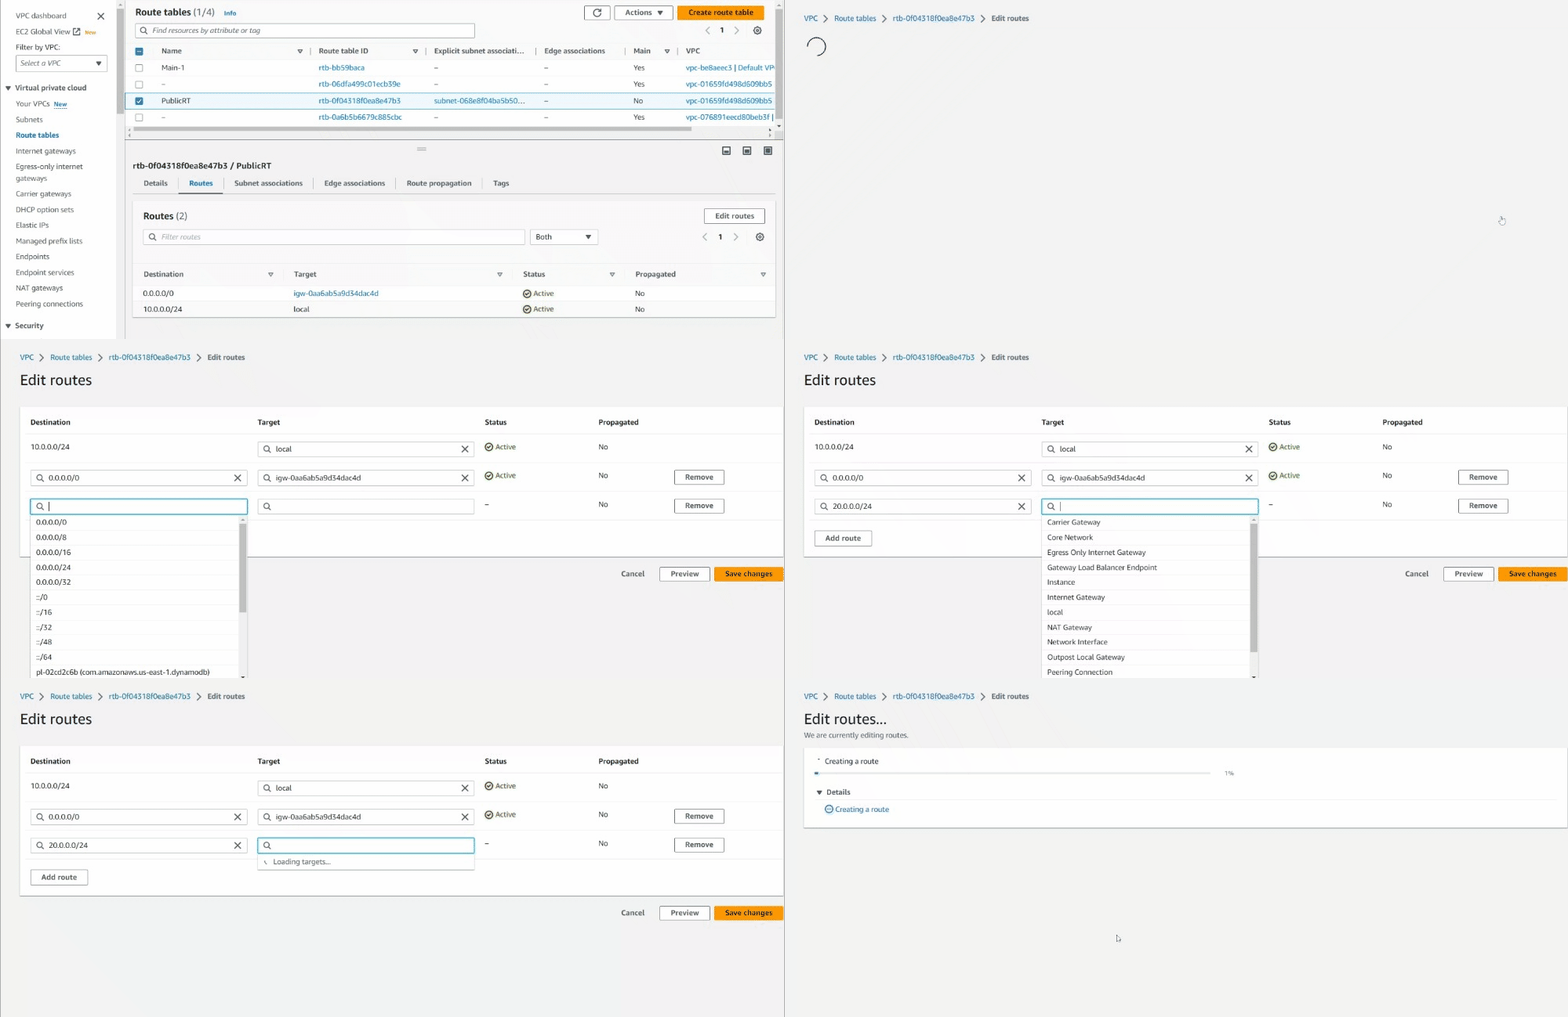
- Note: Sometimes it does not show the destination as 20.0.0.0/24, in that case, please add the following from Step 6 of this task.
Task 14: Add the routes in the Second VPC’s route table
In this task, we are going to add a route in the second VPC’s route table that directs traffic destined for the first VPC’s CIDR range to the Transit Gateway. This allows communication between the VPCs through the Transit Gateway.- Navigate to Route tables on the left side panel.
- Filter the VPC’s by using the ID of the second VPC.
- In the second VPC, we have not created any extra route table, so there will be only one route table present which was created during the creation of VPC itself and it’s called a default route table or main route table.
- Let’s filter the route table present using the VPC filter.
- To get the filter using the VPC option, simply click on the search bar and it will show the different options for the filter. Select VPC from that list and choose the ID of Second VPC.
- Click on the Route table ID to see the routes present.
- Click on the Routes tab in below and click on the Edit routes.
- There will be only one entry to local, as we have not created an internet gateway because this is a private route table.
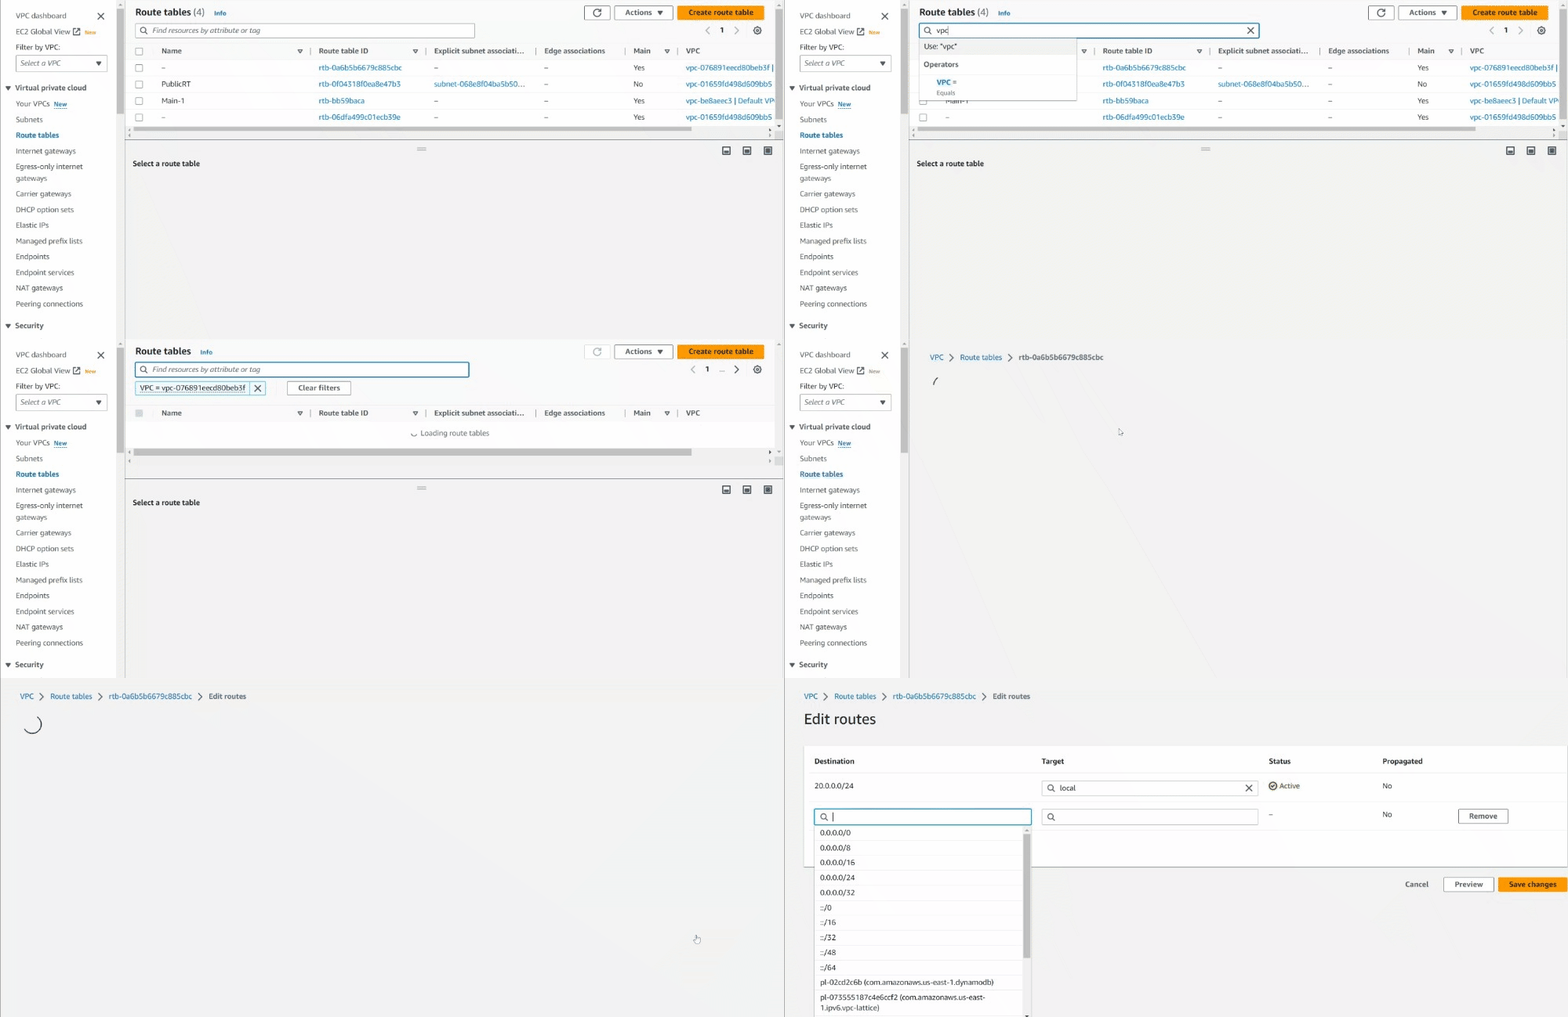
- Let’s add the entry to 10.0.0.0/24 i.e. CIDR of the first VPC as a destination and Transit gateway as a target.
-
To get the Transit gateway ID, click on the search button and select Transit Gateway from the list of options present.

- Click on the Save changes button.
-
Make sure Routes have Destination as 10.0.0.0/24
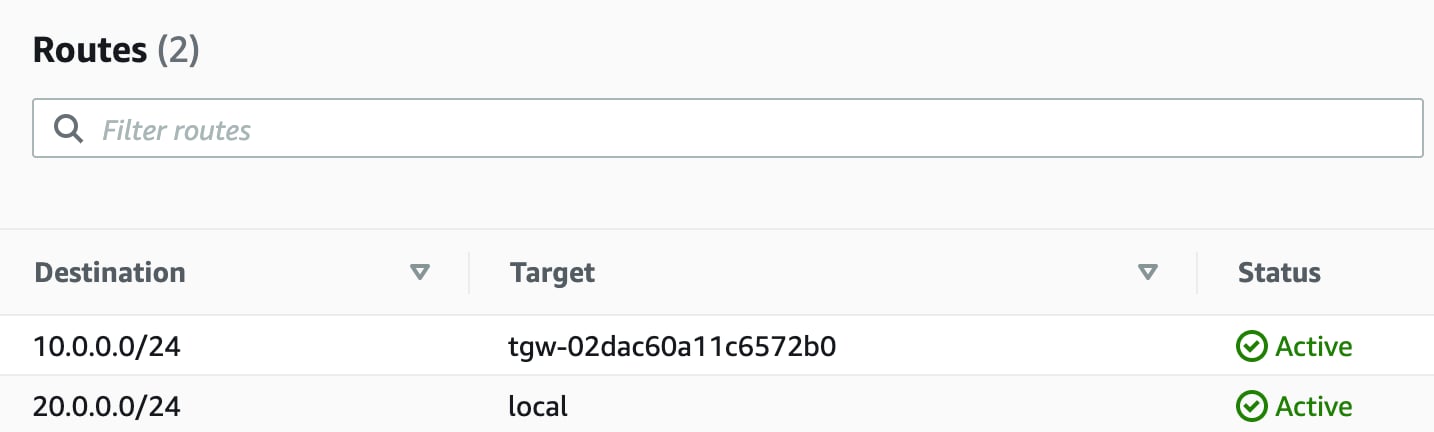
- Note: Sometimes it does not show the destination as 10.0.0.0/24, in that case, please add the following from Step 5 of this task.
Task 15: Test the connectivity between two VPCs
In this task, we are going to test the connectivity between the EC2 instances in both VPCs. This step confirms that the VPCs have been successfully peered using the Transit Gateway, and the EC2 instances can communicate with each other.- You have copied the IPv4 Public IP of the EC2 instance created in the First VPC.
-
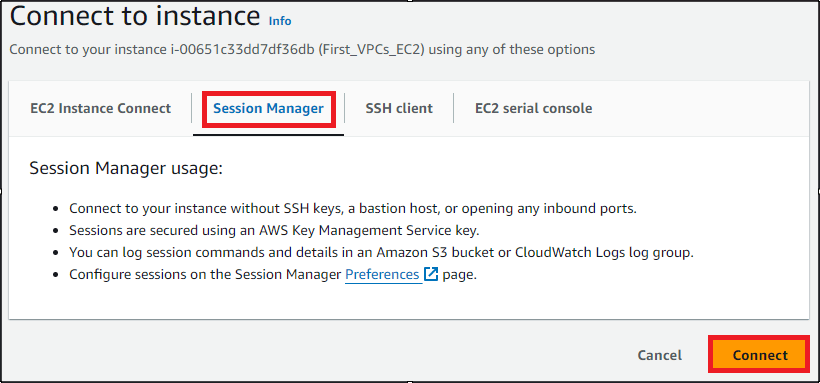
Please follow the steps for Session manager to connect into First_VPCs_EC2
-
Select First_VPCs_EC2 and click on Connect button.

-
Go to Session Manager and click Connect
-
Select First_VPCs_EC2 and click on Connect button.
- Once you have successfully connected in to EC2, run the following commands :
-
Switch to root user :
-
Update server repository :
- Now we need to copy the .pem key of the EC2 instance created.
-
Create a file :

-
Open the .pem key of EC2 ec2_ssh_key in your local editor and paste it in the terminal file.
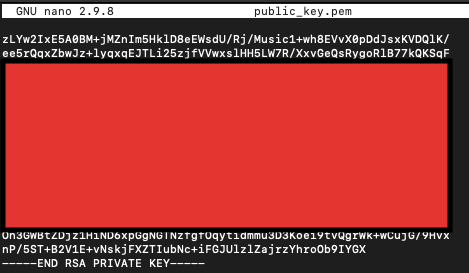
- Press [ctrl] + x / [control] + x
- Press y key in your keyboard.
- File Name : No changes, press [Enter] key in your keyboard
-
Change the .pem key permission
-
SSH into the Private EC2 ec2_ssh_key
- Copy the Private IP of Second_VPCs_EC2
- Example : ssh ec2-user@20.0.0.11 -i ec2_ssh_key.pem
- If the connection prompts a message to confirm connect enter yes

- As you can see the IP address is changed to private ec2 private IP 30.0.1.154
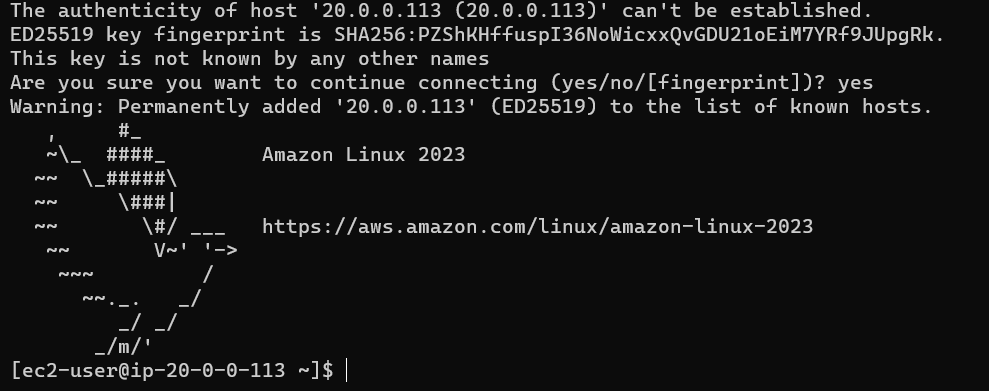
- Now you have connected two VPCs using the Transit gateway.
Do You Know?
With Transit Gateway, you can easily add or remove VPC connections as your network grows or changes, without impacting existing connections. It provides a flexible and scalable solution for interconnecting VPCs and simplifies network administration, routing, and security.
Task 16: Delete AWS Resources
Deleting EC2 Instances
- Make sure you are in the US East (N. Virginia) Region.
- Navigate to EC2 by clicking on the Services menu in the top left, then click on EC2 in the Compute section.
- Now select both the EC2 instances that you have created, click on Instance State and click on the Terminate instance option.
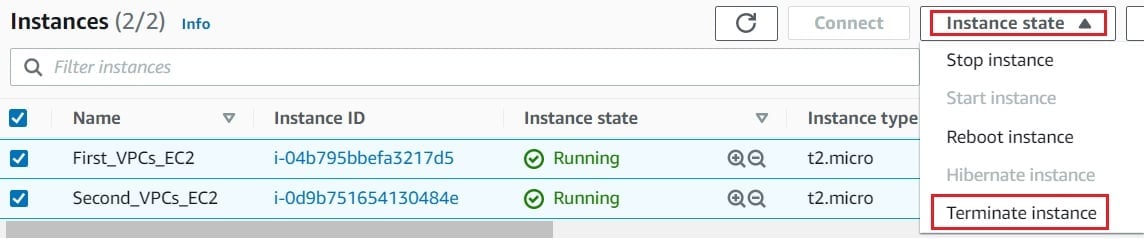
- Click on the Terminate button and your EC2 will start terminating.
Completion and Conclusion
- You have successfully created a VPC with a public subnet & internet gateway and Launched an EC2 instance.
- You have successfully created a VPC with a private subnet and Launched an EC2 instance.
- You have successfully created the Transit gateway.
- You have successfully created the Transit gateway attachments for both the VPC’s.
- You have successfully tested the connectivity of VPC after peering using the Transit gateway.
End Lab
- Sign out of AWS Account.
- You have successfully completed the lab.
- Once you have completed the steps, click on End Lab from the IP Lab Portal dashboard.
What gets checked
When you press Check my work, the platform verifies each of these:- Create Amazon Custom VPC — Check whether a Custom VPC is created or not.
- Install Apache Web Server — Check whether Apache Web Server is installed in EC2 Instance or not.
- Launch EC2 AMI type Amazon Linux — Check whether the EC2 instance is launched using an Amazon AMI.
- Create VPC Transit Gateway — Check whether a Transit Gateway is created with status Available or not.
- Create VPC Transit Gateway Attachment — Check whether a Transit Gateway Attachment is created with Resource Type VPC and status Available or not.